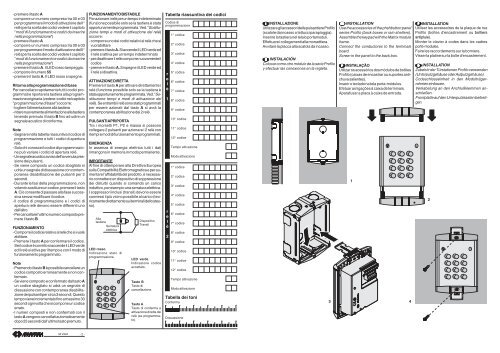
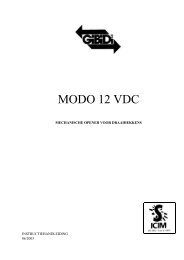
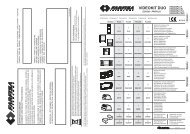
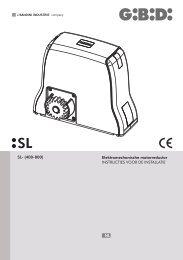
-premere il tasto A-comporre un numero compreso tra 00 e 03per programmare il modo di attivazione del I°relè (per la scelta dei codici vedere il capitolo"modi di funzionamento e codici da inserirenella programmazione")-premere il tasto A-comporre un numero compreso tra 00 e 03per programmare il modo di attivazione del II°relè (per la scelta dei codici vedere il capitolo"modi di funzionamento e codici da inserirenella programmazione")-premere il tasto A. Il LED rosso lampeggia.-comporre il numero 55-premere il tasto A. Il LED rosso si spegne.Ritorno alla programmazione di basePer cancellare rapidamente tutti i codici programmatie riportare la tastiera alla programmazioneoriginaria (vedere i codici nel capitolo"programmazione di base") occorre:-togliere l'alimentazione alla tastiera- ridare nuovamente alimentazione alla tastieratenendo premuto il tasto B fino ad udire unsegnale acustico di conferma.Note-Segnare nella tabella riassuntiva il codice diprogrammazione e tutti i codici di aperturarelè.-Solo chi conosce il codice di programmazionepuò variare i codici di apertura relè.- Un segnale acustico avvisa dell'avvenuta pressionedei pulsanti.-Se viene composto un codice sbagliato siudrà un segnale di dissuasione con contemporaneadisabilitazione dei pulsanti per 2secondi.-Durante le fasi della programmazione, nonvolendo sostituire un codice, premere il tastoA. Ciò consente di passare alla fase successivasenza modificare il codice.-Il codice di programmazione e i codici diapertura relè devono essere differenti unodall'altro.-Per cancellare l'ultimo numero composto premereil tasto B.FUNZIONAMENTO-Comporre il codice relativo al relè che si vuoleabilitare.-Premere il tasto A per confermare il codice.Se il codice è corretto si accende il LED verdeed il relè si attiva per il tempo e con il modo difunzionamento programmato.Note-Premendo il tasto B è possibile cancellare uncodice composto erroneamente e non confermato.-Se viene composto e confermato dal tasto Aun codice sbagliato si udrà un segnale didissuasione con contemporanea disabilitazionedei pulsanti per circa 3 secondi. Questotempo viene incrementato fino a massimo 30secondi ogni volta che si compone un codiceerrato.-I numeri composti e non confermati con iltasto A vengono cancellati automaticamentedopo 25 secondi dall'ultimo tasto premuto.FUNZIONAMENTO BISTABILEPer azionare i relè per un tempo indeterminato(funzione possibile solo se la tastiera è stataopportunamente programmata. Ved. "Sostituzionetempi e modi di attivazione dei relè)occorre:-comporre uno dei codici relativi al relè che sivuol abilitare-premere il tasto A. Si accende il LED verde edil relè si attiva per un tempo indeterminato-per disattivare il relè comporre nuovamente ilcodice-premere il tasto A. Si spegne il LED verde edil relè si disattiva.ATTIVAZIONE DIRETTAPremere il tasto A per attivare direttamente irelè (funzione possibile solo se la tastiera èstata opportunamente programmata. Ved. "Sostituzionetempi e modi di attivazione deirelè). Se entrambi i relè sono stati programmatiper essere azionati dal tasto A si avrà lacontemporanea abilitazione dei 2 relè.PULSANTI APRIPORTATra i morsetti P1, P2 e massa si possonocollegare 2 pulsanti per azionare i 2 relè coni tempi e modi di funzionamento programmati.EMERGENZAIn assenza di energia elettrica tutti i datirimangono in memoria in modo permanente.IMPORTANTEAl fine di ottemperare alla Direttiva Europeasulla Compatibilità Elettromagnetica e per aumentarel’affidabilità del prodotto, è necessarioconnettere un dispositivo di soppressionedei disturbi quando si comanda un caricoinduttivo, per esempio una serratura elettrica.I soppressori inclusi (transil) devono essereconnessi il più vicino possibile al carico (teoricamentedirettamente sui terminali dello stesso).LED rosso.Indicazione stato diprogrammazione.LED verde.Indicazione codiceaccettato.Tasto B.Tasto dicancellazione.Tasto A.Tasto di conferma eattivazione diretta deirelè (se programmato).Tabella riassuntiva dei codiciCodice diprogrammazione1° codice2° codice3° codice4° codice5° codicere6° codicelè7° codice1 8° codice9° codice10° codice11° codice12° codiceTempo attivazioneModo attivazione1° codice2° codice3° codice4° codice5° codicer6° codiceel 7° codiceè8° codice29° codice10° codice11° codice12° codiceTempo attivazioneModo attivazioneTabella dei toniConferma0 1 2 3 4 5Dissuasione0 1 2 3 4 5INSTALLAZIONEUtilizzare gli accessori delle pulsantiere Profilo(scatole da incasso o tettucci parapioggia).Inserire la tastiera nel telaio portamoduli.Effettuare i collegamenti alla morsettiera.Avvitare la placca alla scatola da incasso.INSTALACIÓNColocar como otro módulo de la serie Profiloy efectuar las conexiones en la regleta.INSTALLATIONUse the accessories of the phshbutton panelseries Profilo (back boxes or rain shelters).Assemble the keypad with the Matrix moduleframe.Connect the conductores to the terminalsboard.Screw-in the panel to the back box.INSTALAÇÃOUtilizar os acessórios dos módulos de botõesProfilo (caixas de encastrar ou suportes antichuvasalientes).Inserir o teclado na tela porta-módulos.Efetuar as ligações à caixa de terminais.Aparafusar a placa à caixa de entrada.13 4INSTALLATIONUtiliser les accessoires de la plaque de rueProfilo (boîtes d'encastrement ou boîtiersantipluie).Monter le clavier à codes dans les cadresporte-modules.Faire les raccordements sur la borniere.Visser la platine sur la boîte d'encastrement.INSTALLATIONZubehör der Türstationen Profilo verwenden(Unterputzgehäuse oder Aufputzgehäuse).Codeschlosseinheit in den Modulträgerrahmeneinbauen.Verkabelung an den Anchlußklemmen anschließen.Frontplatte auf den Unterputzkasten befestigen.2Mi 2346 - 2 -Mi 2346- 13 -
Rückkehr zur BasisprogrammierungUm alle programmierten Codes schnell zu löschenund die Tastatur wieder auf den ursprünglichenProgrammierstatus einzustellen (sieheCodes im Kapitel “Basisprogrammierung”), istwie folgt vorzugehen:- Stromversorgung der Tastatur unterbrechen- Stromversorgung der Tastatur erneut herstellen,indem die Taste B solange gedrückt gehaltenwird, bis ein Bestätigungston zu hörenist.Anmerkung- In der zusammenfassenden Tabelle sind derProgrammierungscode und alle Relais-Öffnungscodes einzutragen.- Die Relais-Öffnungscodes können nur vonPersonen geändert werden, die den Programmierungscodekennen.- Ein akustisches Signal weist den Benutzerdarauf hin, dass die Tasten gedrückt wurden.- Bei Eingabe eine falschen Codes ist ein abratenderTon zu hören und gleichzeitig sind dieTasten 2 Sekunden lang deaktiviert.- Falls während der Programmierung kein Codegeändert werden soll, ist die Taste A drücken.Auf diese Weise ist es möglich, zur nächstenPhase überzugehen, ohne den Code zu ändern.- Der Programmierungscode und die Relais-Öffnungscodes dürfen nicht gleich sein.- Zum Löschen der zuletzt eingegebenen Nummerist die Taste B zu drücken.FUNKTIONSWEISE- Code des Relais eingeben, das aktiviert werdensoll.- Taste A drücken. Daraufhin schaltet sich diegrüne LED ein und das Relais wird für dieprogrammierte Zeit und den programmiertenModus aktiviert.Anmerkung- Durch Drücken der Taste B kann ein falscheingegebener und noch nicht bestätigter Codegelöscht werden.- Wenn ein falscher Code eingegeben und mitder Taste A bestätigt wird, ist ein abratenderTon zu hören und gleichzeitig sind die Tasten3 Sek.lang deaktiviert. Die Deaktivierungszeitwird bei jeder Neueingabe einer falschenNummer bis zu einer Höchstzeit von 30 Sek.erhöht.- Die eingegebenen und nicht mit der Taste Abestätigten Nummern werden 25 Sek. nachdem letzten Tastendruck automatisch gelöscht.BISTABILE FUNKTIONSWEISEDie Funktion steht nur dann zur Verfügung,wenn die Tastatur entsprechend programmiertwurde. Siehe “Änderung der Aktivierungszeitenund -Modalitäten der Relais”.Zur Aktivierung der Relais für unbegrenzte Zeitist wie folgt vorzugehen:- Code der Relais eingeben, die aktiviert werdensollen- Taste A drücken. Daraufhin schaltet sich diegrüne LED ein und das Relais wird für unbegrenzteZeit aktiviert- Zur Deaktivierung des Relais ist erneut derCode einzugeben- Taste A drücken. Die grüne LED erlischt unddas Relais wird deaktiviert.DIREKTAKTIVIERUNGTaste A drücken, um die Relais direkt zu aktivieren(die Funktion steht nur dann zur Verfügung,wenn die Tastatur entsprechend programmiertwurde. Siehe “Änderung der Aktivierungszeitenund -Modalitäten der Relais”). Wenn beideRelais programmiert wurden, um mit derTaste A aktiviert zu werden, erfolgt die gleichzeitigeAktivierung der 2 Relais.TÜRÖFFNERTASTENAn die Klemmen P1, P2 und Masse können 2Tasten zur direkten Aktivierung der 2 Relais mitden programmierten Zeiten und Funktionsmodalitätenangeschlossen werden.NETZAUSFALLBei Netzausfall bleiben alle programmierteDaten auf unbestimmte Zeit gespeichert.WICHTIG!Gemäß den Europäischen Richtlinien zur elektromagnetischenKompatibilität und zur Erhöhungder Zuverlässigkeit des Produkts muß beiinduktiver Belastung, z. B. bei Betätigung einesTürschlosses, eine Entstörvorrichtung angeschlossenwerden.Die mitgelieferten Entstörer (Transil) müssenso nahe wie möglich an der Last (theoretischdirekt an den End-Verschlüssen derselben)angeschlossen werden.TontabelleBestätigung0 1 2 3 4 5Besetztton0 1 2 3 4 5Rote LED.AnzeigeProgrammierebene.Grüne LED.Anzeige positiveCodeeingabe.Taste B.Löchtaste.Taste A.Eingabetaste undAktivierungstasteohne Code für Relais(wenn programmiert)Übersichttabelle der CodesProgrammiercode1. Code2. Code3. Code4. Code5. CodeRe6. Codela7. Codeis 8. Code1 9. Code10. Code11. Code12. CodeAktivierungszeitAktivierungsmodus1. Code2. Code3. Code4. Code5. CodeR6. Codeel 7. Codeai 8. Codes9. Code210. Code11. Code12. CodeAktivierungszeitAktivierungsmodusThe keypad allows for the activation of 2relays with programmable codes.Technical dataPower supply 12Vac/dc ±10%Stand-by current 0.06AMaximum current consumption 0. 15AContact ratings12Vac - 2ANumber of codes for relay 1 12 (+ directactivation)Number of codes for relay 2 12 (+ directactivation)Activation time for each relay from 1 to 99 sec.(or bistable)Operating temperature 0° ÷ +40°CMaximum allowable humidity 85% RHTerminalsNC2 normally closed contact of relay 2NA2 normally open contact of relay 2C2 common contact of relay 2NC1 normally closed contact of relay 1NA1 normally open contact of relay 1C1 common contact of relay 1ground or alternate voltage inputpositive or alternate voltage inputP2P1ACCESS CONTROL KEYPADactivation of the relay 2; if momentarilyconnected to ground it allows the activationfor the programmed timeactivation of the relay 1; if momentarilyconnected to ground it allows the activationfor the programmed timeINSTALLATION DIAGRAMPROGRAMMINGDefault programmingThe article is supplied from the factory withthe following codes:Programming code: 11Activation code 1 of relay 1: 12345678Other activation codes of relay 1(from 2 to 12): noneActivation time code of relay 1: 01 (1 sec.)Operating mode of relay 1: 00 (monostable)Activation code 1 of relay 2: 90Other activation codes of relay 2(from 2 to 12): noneActivation time code of relay 2: 01 (1 sec.)Operating mode of relay 2: 00 (monostable)All codes are user-modifiable.Operating modes and programming codesMonostable 00Bistable 01Monostable and direct activat. by key A 02Bistable and direct activation by key A 03Changing the programming codeTo change the programming code:- enter the actual programming code- press key A (red LED flashes)- enter 00- press key A (red LED on)- enter the new programming code with 1 to 8digits (from 0 to 99999999)- press key A (red LED flashes)- enter 55- press key A (red LED off).Changing the activation codes of relay 1To change the activation codes of relay 1:- enter the programming code- press key A (red LED flashes)- enter 01 (identification code of relay 1)- press key A (red LED on)- enter a number with 1 to 8 digits to programmecode 1 (from 0 to 99999999)- press key A- enter a number with 1 to 8 digits to programmecode 2 (from 0 to 99999999)- press key A- enter a number with 1 to 8 digits to programmecode 3 (from 0 to 99999999)- press key A- repeat the operation to programme all codesas necessary (max.12). When programmingis completed press key A repeatedlyuntil the red LED starts flashing- enter 55- press A (red LED off).Changing the activation codes of relay 2To change the activation codes of relay 2follow the procedure described above, changingthe relay identification code (02 instead of01).Changing one relay activation codeTo change one relay activation code, withoutmodifying the others:- enter the programming code- press key A (red LED flashes)- enter 01 or 02 (for relay 1 or 2, respectively)- press key A (red LED on)- press key A repeatedly to reach the code tobe changed- enter a number with 1 to 8 digits (from 0 to99999999)- press key A repeatedly until the red LEDstarts flashing- enter 55- press key A (red LED off).ExampleTo change activation code 7 of relay 2:- enter the programming code- press key A (red LED flashes)- enter 02- press key A (red LED on)- press key A six times- enter a number with 1 to 8 digits- press key A six times (red LED flashes)- enter 55- press key A (red LED off).Deleting one relay activation codeTo delete one relay activation code, withoutmodifying the others:- enter the programming code- press key A (red LED flashes)- enter 90- press key A (red LED on)- enter a 3-digit number “nxx”; n indicates therelay associated with the code to be deleted(1 or 2); xx indicates the code to be deleted(from 01 to 12)- press key A (red LED flashes)- enter 55- press key A (red LED off).Changing the relay activation time and modeTo change the relay activation time and mode:- enter the programming code- press key A (red LED flashes)- enter 03- press key A (red LED on)- enter a number from 00 to 99 to programmeactivation time of relay 1 (enter 00 to deactivatethe relay)- press key A- enter a number from 00 to 99 to programmeactivation time of relay 2 (enter 00 to deactivatethe relay)- press key A- enter a number from 00 to 03 to programmeactivation mode of relay 1 (for code selectionrefer to “operating modes and programmingcodes”)- press key A- enter a number from 00 to 03 to programmeactivation mode of relay 2 (for code selectionrefer to “operating modes and programmingcodes”)- press key A (red LED flashes)- enter 55- press key A (red LED off)Mi 2346 - 12 -EnglishMi 2346 - 3 -