Barriera a catena per l'accesso carrabile fino a 16 m ... - Antriebe 24
Barriera a catena per l'accesso carrabile fino a 16 m ... - Antriebe 24
Barriera a catena per l'accesso carrabile fino a 16 m ... - Antriebe 24

You also want an ePaper? Increase the reach of your titles
YUMPU automatically turns print PDFs into web optimized ePapers that Google loves.
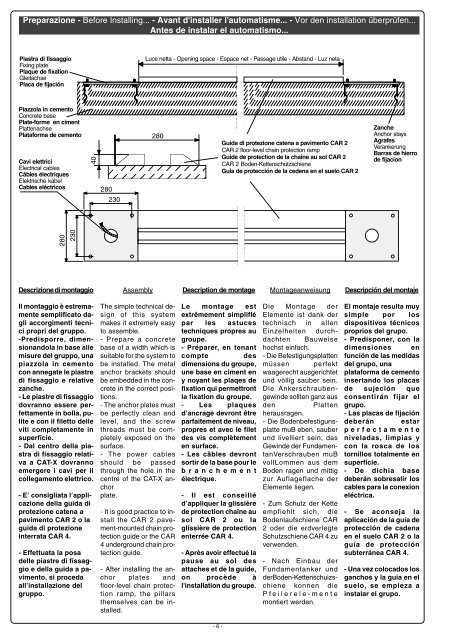
Preparazione - Before Installing... - Avant d'installer l'automatisme... - Vor den installation überprüfen...Antes de instalar el automatismo...Piastra di fissaggioFixing platePlaque de fixationGleitachsePlaca de fijaciónLuce netta - Opening space - Espace net - Passage utile - Abstand - Luz netaPiazzola in cementoConcrete basePlate-forme en cimentPlattenachsePlataforma de cemento 280Cavi elettriciElectrical cablesCâbles électriquesElektrische kabelCables eléctricos40280230Guida di protezione <strong>catena</strong> a pavimento CAR 2CAR 2 floor-level chain protection rampGuide de protection de la chaîne au sol CAR 2CAR 2 Boden-KettenschutzschieneGuia de protección de la cedena en el suelo CAR 2ZancheAnchor staysAgrafesVerankerungBarras de hierrode fijacion280230Descrizione di montaggioAssemblyDescription de montageMontageanweisungDescripción del montajeIl montaggio è estremamentesemplificato dagliaccorgimenti tecnicipropri del gruppo.-Predisporre, dimensionandolain base allemisure del gruppo, unapiazzola in cementocon annegate le piastredi fissaggio e relativezanche.- Le piastre di fissaggiodovranno essere <strong>per</strong>fettamentein bolla, pulitee con il filetto delleviti completamente insu<strong>per</strong>ficie.- Dal centro della piastradi fissaggio relativaa CAT-X dovrannoemergere i cavi <strong>per</strong> ilcollegamento elettrico.- E’ consigliata l’applicazionedella guida diprotezione <strong>catena</strong> apavimento CAR 2 o laguida di protezioneinterrata CAR 4.- Effettuata la posadelle piastre di fissaggioe della guida a pavimento,si procedaall’installazione delgruppo.The simple technical designof this systemmakes it extremely easyto assemble.- Prepare a concretebase of a width which issuitable for the system tobe installed. The metalanchor brackets shouldbe embedded in the concretein the correct positions.- The anchor plates mustbe <strong>per</strong>fectly clean andlevel, and the screwthreads must be completelyexposed on thesurface.- The power cablesshould be passedthrough the hole in thecentre of the CAT-X anchorplate.- It is good practice to installthe CAR 2 pavement-mountedchain protectionguide or the CAR4 underground chain protectionguide.- After installing the anchorplates andfloor-level chain protectionramp, the pillarsthemselves can be installed.Le montage estextrêmement simpliflépar les astucestechniques propres augroupe.- Préparer, en tenantcomptedesdimensions du groupe,une base en ciment eny noyant les plaqes defixation qui <strong>per</strong>mettrontla fixation du groupe.- Les plaquesd’ancrage devront êtreparfaitement de niveau,propres et avec le filetdes vis complètementen surface.- Les câbles devrontsortir de la base pour lebranchementélectrique.- Il est conseilléd’appliquer la glissièrede protection chaîne ausol CAR 2 ou laglissière de protectionenterrée CAR 4.- Après avoir effectué lapause au sol desattaches et de la guide,on procède àl'installation du groupe.Die Montage derElemente ist dank dertechnisch in allenEinzelheiten durchdachtenBauweisehochst einfach.- Die Befestigungsplattenmüssen <strong>per</strong>fektwaagerecht ausgerichtetund völlig sauber sein.Die Ankerschraubengewindesollten ganz ausdenPlattenherausragen.- Die BodenbefestigunsplattemuB eben, sauberund livelliert sein; dasGewinde der FundamentanVerschraubenmuBvollLommen aus demBoden ragen und mittigzur Auflageflache derElemente liegen.- Zum Schutz der Ketteempfiehlt sich, dieBodenlaufschiene CAR2 oder die erdverlegteSchutzschiene CAR 4 zuverwenden.- Nach Einbau derFundamentanker undderBoden-Kettenschuizschienekonnen diePfeilerele-mentemontiert werden.El montaje resulta muysimple por losdispositivos técnicosproprios del grupo.- Predisponer, con ladimensiones enfunción de las medidasdel grupo, unaplataforma de cementoinsertando los placasde sujeción queconsentirán fijar elgrupo.- Las placas de fijacióndeberán estar<strong>per</strong>fectamenteniveladas, limpias ycon la rosca de lostornillos totalmente ensu<strong>per</strong>ficie.- De dichia basedeberán sobresalir loscables para la conexioneléctrica.- Se aconseja laaplicación de la guía deprotección de cadenaen el suelo CAR 2 o laguía de protecciónsubterránea CAR 4.- Una vez colocados losganchos y la guia en elsuelo, se empieza ainstalar el grupo.- 6 -