FREEZER / CONGELADOR INSTRUCTION ... - Avanti Products
FREEZER / CONGELADOR INSTRUCTION ... - Avanti Products
FREEZER / CONGELADOR INSTRUCTION ... - Avanti Products
- No tags were found...

You also want an ePaper? Increase the reach of your titles
YUMPU automatically turns print PDFs into web optimized ePapers that Google loves.
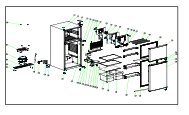
TABLE OF CONTENTSHelp Us Help You 3Parts and Features 4Chest Freezer Safety 5Important Safeguards 6Important Safety Instructions 7Installation Instructions 7Before Using Your Freezer 7Installation of Your Freezer 7Electrical Connection 8Operating Your Freezer 8Temperature Control 8Defrosting Your Freezer 9The Freezer Compartment 9Care and Maintenance 10Cleaning Your Freezer 10Vacation Time 10Moving Your Freezer 10Energy Saving Tips 10Troubleshooting Guide 11-12Service for Your Appliance 12Wiring Diagram 12Your <strong>Avanti</strong> <strong>Products</strong> Warranty 13Instrucciones en Español 14 – 18Registration Information and Registration Card 192
Electrical ConnectionWarningImproper use of the grounded plug can result in the risk of electrical shock. If the power cord isdamaged, have it replaced by an authorized <strong>Avanti</strong> <strong>Products</strong> service center.This freezer should be properly grounded for your safety. The power cord of this freezer is equippedwith a three-prong plug which mates with standard three prong wall outlets to minimize the possibilityof electrical shock.Do not under any circumstances cut or remove the third ground prong from the power cord supplied.This freezer requires a standard 115/120Volt~60Hz electrical outlet with three-prong ground.The cord should be secured behind the freezer and not left exposed or dangling to prevent accidentalinjury.Never unplug the freezer by pulling the power cord. Always grip the plug firmly and pull straight outfrom the receptacle.Do not use an extension cord with this appliance. If the power cord is too short, have a qualifiedelectrician or service technician install an outlet near the appliance.The light indicates that the freezer is properly connected to the electrical power. The light indicatespower supply, and will glow even if the temperature control dial is turned to “OFF”, or the compressorhas failed to work and the compartment is not being cooled.OPERATING YOUR <strong>FREEZER</strong>Temperature Control• Your freezer has one control for regulating the temperature. Thetemperature control is located on the lower right hand corner.• The first time you turn the unit on, switch the thermostat to the“MAX” setting and run for at least 2 hours before putting frozenfoods inside. This will ensure the cabinet is thoroughly chilledbefore food is put in.• The range of the temperature control is from position"MIN" thewarmest to "MAX" the coldest. Adjust the temperature control to thesetting that best suits your needs. The setting of “MID” should beappropriate for home or office freezer use.• To turn the freezer off, turn the temperature control to "OFF".NOTE:• Turning the temperature control to "OFF" position stops the cooling cycle but does not shut off thepower to the freezer.• If the unit is unplugged, lost power, or turned off; you must wait 3 to 5 minutes before restartingthe unit. If you attempt to restart before this time delay, the freezer will not start.• Large amounts of food will lower the cooling efficiency of the appliance.• If you choose to change the thermostat setting, adjust thermostat control by one numericalincrement at a time. Allow several hours for temperature to stabilize between adjustments.8
Defrosting Your Freezer• When? For the most efficient operation and minimum energy consumption, defrost the freezerwhen the frost on the freezer walls is excessive or ¼ to ½ inch thick.• Choose a time when the stock of frozen food is low.CAUTIONDo not use boiling water because it may damage the plastic parts. In addition, never use asharp or metallic instrument to remove frost as it may damage the cooling coils and will voidthe warranty. We recommend using the plastic scraper provided with your unit.• Remove the frozen food from the freezer and place it in a cooler to protect the food.• Turn the thermostat knob to “OFF”.• Unplug the freezer. The Power Supply light should be off (amber light out).• During defrosting, the ice melts into the cabinet.• Remove the drain plug on the inside floor of the freezer by pulling straight out.• Place a shallow pan outside drain outlet. The defrost water will drain out.• Check the pan occasionally so the water does not overflow.• Clean the interior of the freezer.• Replace the plug on the inside floor.• Reset the thermostat to desired setting.• Allow the cabinet to cool for one hour.• Return food to the freezer.HELPFUL HINT:Defrosting usually takes a few hours. Leaving the door open will help speed the process.Also, pouring warm water (not boiling) on the ice/frost will help speed melting. If you mustuse a scraper- please use caution - it is very easy to damage the freezer compartment andvoid your warranty.The Freezer Compartment• This compartment is designed for the long-term storage of frozen food. Storage time is up tothree months.• The storage life of frozen foods varies and the recommended storage time should not beexceeded. The instructions regarding the care of frozen foods should be followed whendefrosting the freezer.• Pre-packed commercially frozen food should be stored in accordance with the frozen foodsmanufacturer’s instructions for a three star frozen food storage compartment or home freezer.• Place frozen food into the freezer as quickly as possible after purchase. If there are instructionson the packet, carefully follow these instructions regarding storage times.• The freezer door is susceptible to breaking due to excessive ice build up. Be sure to defrostwhen the ice reaches ¼ to ½ inch thick.• A storage basket is provided for the organization of odd-shaped items. To reach other packagesin the freezer, just slide the basket to one side, or lift it out.9
CARE AND MAINTENANCECleaning Your Freezer• Upon installation of your new appliance, it is recommended that it be cleaned thoroughly.• Turn the temperature control to "OFF", unplug the freezer, remove the food and storage basket.• Wash the inside with a damp warm cloth containing a water and baking soda solution. Thesolution should be about 2 tablespoons of baking soda to a quart of water.• Wash the storage basket with a mild detergent solution.• Be sure to keep the door gasket (seal) clean to keep the unit running efficiently.• The outside of the freezer should be cleaned with mild detergent and warm water.• Dry the interior and exterior with a soft cloth.• The condenser coils should be vacuumed when they are dusty or dirty.• It is recommended that the unit be cleaned each time it is defrosted to help keep the unit odor freeand running efficiently.Vacation Time• Remove all the food.• Unplug the freezer.• Clean the freezer.• Leave the door open slightly to avoid possible formation of condensation, mold, or odors.• Use extreme caution in the case of children. The unit should not be accessible to child’s play.• Short vacations: Leave the freezer operating during vacations of less than three weeks.• Long vacations: If the appliance will not be used for several months, remove all food and unplugthe power cord. Clean and dry the interior thoroughly. To prevent odor and mold growth, leavethe door open slightly: blocking it open if necessary or have the door removed.Moving Your Freezer• Remove all the food.• Securely tape down all loose items inside your freezer.• Tape the doors shut.• Be sure the freezer stays in the upright position during transportation.Energy Saving Tips• The freezer should be located in the coolest area of the room, away from heat producingappliances or heating ducts, and out of the direct sunlight.• Let hot foods cool to room temperature before placing in the freezer. Overloading the freezerforces the compressor to run longer. Foods that freeze too slowly may lose quality, or spoil.• Be sure to wrap foods properly, and wipe containers dry before placing them in the freezer. Thiscuts down on frost build-up inside the freezer.• Freezer storage bin should not be lined with aluminum foil, wax paper, or paper toweling. Linersinterfere with cold air circulation, making the freezer less efficient.• Organize and label food to reduce door openings and extended searches. Remove as manyitems as needed at one time, and close the door as soon as possible.10
PROBLEMS WITH YOUR <strong>FREEZER</strong>You can solve many common freezer problems easily, saving you the cost of a possible service call.Try the suggestions below to see if you can solve the problem before calling the servicer.TROUBLESHOOTING GUIDEPROBLEMFreezer does not operate.Compressor turns on and off frequently.Temperature inside the freezer is too warm.Temperature inside the freezer is too cold.Temperature of external freezer surface is warm.Popping or cracking sound when compressorcomes on.Bubbling or gurgling sound, like water boiling.Vibrations.POSSIBLE CAUSENot plugged in.The circuit breaker tripped or a blown fuse.The freezer temperature control is set to "OFF".The room temperature is hotter than normal.A large amount of food has been added to thefreezer.The door is open too often.The door is not closed completely.The temperature control is not set correctly.The door gasket does not seal properly.The freezer does not have the correctclearances.The freezer has recently been disconnected for aperiod of time. Four hours are required for thefreezer to cool down completely.Temperature control is set to “MIN”. Turn thecontrol to a cooler setting and allow several hoursfor the temperature to stabilize.Door is kept open too long or is opened toofrequently. Warm air enters the freezer everytime the door is opened. Open the door lessoften.The door is not closed completely.The door gasket does not seal properly.A large amount of warm or hot food might havebeen stored recently. Wait until the freezer hashad a chance to reach its selected temperature.The freezer has recently been disconnected for aperiod of time. Four hours are required for thefreezer to cool down completely.Temperature control is set too cold. Turn thecontrol to a warmer setting and allow severalhours for the temperature to stabilize.The exterior freezer walls can be as much as30 ο F warmer than room temperature. This isnormal while the compressor works to transferheat from inside the freezer cabinet.Metal parts undergo expansion and contraction,as in hot water pipes. This is normal. Sound willlevel off or disappear as freezer continues to run.Refrigerant (used to cool freezer) is circulatingthroughout the system. This is normal.Check to assure that the freezer is on a levelsurface.Floor is uneven or weak. Freezer rocks on thefloor when it is moved slightly. Be sure floor canadequately support freezer. Level the freezer byputting wood or metal shims under part of thefreezer.The freezer is touching the wall. Re-level the11
Moisture forms on inside freezer walls.Moisture forms on outside of freezer.The door will not close properly.freezer and move it from the wall.See “Installation Instructions”.Weather is hot and humid, which increasesinternal rate of frost build-up. This is normal.Door is slightly open.Door is kept open too long, or is opened toofrequently. Open the door less often.The door is not sealed properly.Door is slightly open, causing cold air from insidethe freezer to meet warm moist air from outside.The freezer is not on a level surface.The gasket is dirty.The storage basket is out of position.SERVICE FOR YOUR <strong>FREEZER</strong>We are proud of our customer service organization and the network of professional servicetechnicians that provide service on your <strong>Avanti</strong> freezers. With the purchase of your <strong>Avanti</strong> freezer, youcan be confident that if you ever need additional information or assistance, the <strong>Avanti</strong> <strong>Products</strong>Customer Service Team will be here for you. Just call us toll-free.Product Information800-323-5029Part Orders800-220-5570In-Home Repair Service800-220-5570AVANTI PRODUCTS CUSTOMER SERVICESWhatever your questions are about our products,help is available.You may order parts and accessories that will bedelivered directly to your home, by personalcheck, money order, Master Card, or Visa.An <strong>Avanti</strong> <strong>Products</strong> authorized service center willprovide expert repair service, scheduled at a timethat is convenient for you. Our trained servicersknow your freezer inside and out.WIRING DIAGRAM12
YOUR <strong>Avanti</strong> <strong>Products</strong> WARRANTYWHAT IS COVEREDLIMITED ONE-YEARWARRANTYFor one year from the date ofpurchase by the original owner, <strong>Avanti</strong><strong>Products</strong> will, at its option, repair orreplace any part of the freezer, whichproves to be defective in material orworkmanship under normal use.During this period <strong>Avanti</strong> <strong>Products</strong> willprovide all parts and labor necessaryto correct such defects free of charge,so long as the freezer has beeninstalled and operated in accordancewith the written instructions in thismanual. In rental or commercial use,the warranty period is 90 days. All<strong>Avanti</strong> Appliances of 3.5 cubic footcapacity or less must be brought/sentto the appliance service shop forrepair. <strong>Avanti</strong> <strong>Products</strong> will provideyou with a reasonably similarreplacement product that is either newor factory refurbishedStaple your sales receipt here. Proof oforiginal purchase date is needed to obtainservice under warranty.LIMITED SECOND THROUGHFIFTH YEAR WARRANTYFor the second through the fifth year from dateof original purchase, <strong>Avanti</strong> <strong>Products</strong> willprovide a replacement compressor free ofcharge due to a failure. You are responsiblefor the service labor and freight charges. Inrental or commercial use, the limitedcompressor warranty is one year and ninemonths. Cost to move the freezer to theservicers’ shop and back to the users’ home,as may be required, are the users’responsibility.WHAT IS NOT COVERED• Content losses of food due to spoilage.• Incidental or consequential damages.• Parts and labor costs for the following willnot be considered as warranty:• Chest freezer lid liners.• Light bulbs and/or plastic housing.• Plastic cabinet liners.• Punctured evaporator that voids thewarranty on the complete sealed system.• Repairs performed by unauthorizedservicers.• Shipping and handling costs associatedwith the replacement of the unit.• Service calls that do not involve defects inmaterial or workmanship such ascustomer education, door reversal, orproper installation.• Surcharges including, but not limited to,any after hour, weekend, or holidayservice calls, tolls ferry trip charges, ormileage expense for service calls toremote areas including the state of Alaska.• Service calls that are related to externalproblems, such as abuse, misuse,inadequate electrical power, accidents,fire, floods, or acts of God.• Replacement of house fuses or resettingcircuit breakers.• Failure of the product if it is used for otherthan its intended purpose.• This warranty does not apply outside theContinental USA.13
INSTRUCCIONES EN ESPAÑOLPRECAUCIÓNPara reducir el riesgo de incendio, descargaeléctrica, o daño cuando use suelectrodoméstico, siga las siguientesprecauciones.• Lea todas las instrucciones antes de usar su electrodoméstico.• Peligro o Precaución: Existe el riesgo que los niños queden atrapados.• Niños atrapados o sofocamiento no son un problema del pasado. Los electrodomésticosson peligrosos aún si sólo los deja en el garaje por un par de días.• Antes de desechar su congelador o refrigerador usado: quítele las puertas. Deje lasrepisas en su lugar para evitar que los niños se queden atrapados.• No permita que los niños manejen, jueguen o entren dentro del electrodoméstico.• No limpie su electrodoméstico con líquidos inflamables. Los gases pueden ocasionarfuego o una explosión.• No guarde ni use gasolina u otros líquidos inflamables cerca de este o de cualquier otroelectrodoméstico. Los vapores pueden ocasionar fuego o explosión.- Guarde estas instrucciones.-INSTRUCCIONES PARA LA INSTALACIÓN‣ Antes de Usar su Artefacto• Retire la envoltura interna y externa.• Verifique que tenga las siguientes partes: 1 canasta de almacenaje, 1 manual de instrucciones, 1espátula de plástico.• Antes de conectar su electrodoméstico a la corriente eléctrica, ubíquelo en una superficie planapor lo menos por 2 horas. Esto reducirá la posibilidad de malfuncionamiento en el sistema deenfriamiento por la manipulación durante el transporte.• Limpie la superficie interior con agua tibia usando un paño suave.‣ Instalación de su Congelador• Ubique su congelador en un piso que sea lo suficientemente fuerte para soportar su peso cuandoeste totalmente lleno o cargado.• Deje aproximadamente 3 pulgadas de espacio entre la parte trasera y los costados de suelectrodoméstico, así permitirá la circulación de aire necesaria para enfriar el compresor.• Mantenga su congelador alejado del aire caliente, vapor o líquidos que puedan salpicarlo, ya quela unidad podría averiarse.• Los rayos solares directos pueden dañar la capa acrílica, y las fuentes de calor pueden ocasionarun aumento en el consumo eléctrico. Manténgalo lo más alejado posible del agua para preveniralgún choque eléctrico. Evite los sitios húmedos y los ambientes extremadamente fríos ya queesto puede afectar la eficiencia del enfriamiento de su congelador.• Evite ubicar su congelador en áreas mojadas o muy húmedas. Mucha humedad en el aire puedecausar la formación de escarcha rapidamente y necesitará descongelar su congelador másfrecuentemente.• Conecte el congelador a un enchufe de pared exclusivo e instale el cable de tierra. Bajo ningunarazón se debe retirar la tercera punta del enchufe. Cualquier consulta con respecto a la energíay/o cable de tierra debe ser dirigida a un electricista certificado o autorizado por el ServicioTécnico de <strong>Avanti</strong> <strong>Products</strong>.‣ Conexión eléctricaEste electrodoméstico debe ser conectado a tierra. En el caso que ocurra un corto circuito, laconexión a tierra reduce el riesgo de recibir un choque eléctrico ya que cuenta con un alambrepara el escape de la corriente eléctrica. Este electrodoméstico está equipado con un enchufeque consta de tres puntas, la tercera punta es la conexión a tierra. Este enchufe debe serinsertado a un enchufe de pared que este correctamente instalado con la conexión a tierra.14
ADVERTENCIA• El uso inapropiado del enchufe a tierra puede desencadenar un choque eléctrico. Consulte apersonal autorizado por <strong>Avanti</strong> Productos si tiene alguna duda sobre las instrucciones o si tienealguna consulta si el electrodoméstico está correctamente instalado a la corriente eléctrica y atierra. Si el cordón del enchufe del electrodoméstico se encuentra dañado, debe ser reemplazadopor el Servicio Técnico de <strong>Avanti</strong> <strong>Products</strong>.• El cordón del enchufe está equipado con tres puntas que encajan perfectamente en un enchufede pared standard para reducir el riesgo de un choque eléctrico.• Bajo ninguna circunstancia corte o saque la tercera punta del enchufe que le proveemos ya queéste es para que vaya conectado a tierra.• No use una extensión.• La corriente de este electrodoméstico es de 115/120 voltios, tiene una salida eléctrica de 60 hz. yconsta de un enchufe de tres puntas que va conectado al enchufe de pared.• El cordón del enchufe debe ser asegurado atrás del electrodoméstico y no dejarlo expuesto paraevitar accidentes.Si la luz ambar que indica “Power On” (Encendido) está encendida quiere decir que el congeladorestá apropiadamente conectado a la corriente eléctrica. La luz indica que está recibiendo energíaeléctrica, y se iluminará aún cuando Ud. cambie el control de temperatura a “OFF”, ó cuando pare detrabajar el compresor y el compartimiento no esté enfriando.USANDO SU <strong>CONGELADOR</strong>‣ Control de Temperatura• Su congelador tiene un control que regula la temperatura. El control de temperatura está ubicadoen la esquina inferior a mano derecha.• La primera vez que encienda el congelador, Gire el control de temperatura a “MAX”, déjeloencendido por lo menos 2 horas antes de colocar alimentos dentro de su congelador. Estoasegurará que la cabina esté completamente fría antes de colocar los alimentos.• El control de temperatura va desde lo más caliente “MIN” hasta lo más frío “MAX”, también tiene“OFF”. Ajuste el control de temperatura al nivel que usted necesite. El nivel “MID” es el másadecuado para uso en la casa u oficina.• Para detener el enfriamiento de su congelador, mueva el control de temperatura a la posición“OFF”NOTA:• Si gira la temperatura a la posición “OFF” detendrá el ciclo de enfriamiento, esto no significaque apagará el congelador.• Si la unidad se desconecta, pierde corriente o se apaga la llave principal, tendrá que esperar3 a 5 minutos para volver a reiniciar la unidad. Si usted intenta reiniciar antes de este tiemposu congelador no encenderá.‣ Descongelando• ¿Cuando descongelar? Para el mejor funcionamiento y consumo mínimo de energía de sucongelador, descongele cuando las paredes internas estén llenas de escarcha o tengan unespesor de ¼ a ½ pulgada.• Escoja un momento cuando no tenga muchos alimentos en el congelador.• Cómo descongelar? Siguiendo estas indicaciones:15
ADVERTENCIANo use agua hirviendo porque dañará las partes de plástico. Tampoco use puntas oinstrumentos metálicos para retirar la escarcha ya que dañará el espiral de enfriamiento ycancelará la garantía. Le recomendamos usar la espátula de plástico incluída con estaunidad.• Retire los alimentos del congelador y colóquelos en una caja térmica para conservarlos yprotegerlos.• Gire el termostato a la posición “OFF”.• Desconecte el congelador. La luz indicadora de suministro de energía se apagará (luz amarillaapagada).• Durante el descongelamiento, el hielo se derrite dentro de la cabina.• Para drenar el líquido retire la tapa de drenaje situada en el piso del congelador.• Retire la tapa de la pared frente.• Coloque una bandeja afuera de la pared frente para que drene.• Vigile la bandeja de vez en cuando para que no se desborde.• Limpie el interior de su congelador (vea la Pág. 18 Limpiando su congelador)• Coloque la tapa de drenaje dentro del congelador y fuera del gabinete.• Reconfigure el termostato según lo deseado.• Deje que la cabina se enfríe por una hora, luego coloque los alimentos..• Coloque los alimentos en el congelador.INFORMACION ADICIONAL:El descongelamiento toma pocas horas. Le ayudará, dejar abierta la puerta del congeladorpara apresurar el proceso de descongelamiento. Para acelerar el descongelamiento, echeagua caliente (no hirviendo), al hielo y la escarcha. Tenga mucho cuidado si usa la espátulapara raspar el hielo, si lo hace muy fuerte puede dañar el compartimiento de su congelador yanular la garantía.Compartimiento de su Congelador• Este compartimiento está diseñado para un período largo (3 meses) de almacenamiento dealimentos congelados.• El tiempo de almacenamiento de los alimentos congelados varía y se recomienda almacenar nomás del tiempo recomendado. Cuando descongele su congelador deberá seguircuidadosamente las instrucciones.• Alimentos congelados preenvasados comercialmente deben ser almacenados de acuerdo conlas indicaciones de su fabricante.• Coloque los alimentos congelados dentro de su congelador inmediatamente después decomprarlos. Si hay indicaciones en el envase, sígalas cuidadosamente considerando el tiempode almacenamiento.• La puerta del congelador puede quebrarse cuando hay mucho hielo. Asegúrese dedescongelarlo cuando el hielo haya excedido de ¼ a ½ pulgada de espesor.• La canasta de almacenaje está diseñada para organizar toda clase de alimentos. Para colocarotros paquetes en su congelador, mueva la canasta a un lado o sáquela.CUIDADO Y MANTENIMIENTO‣ Limpiando su Congelador• Después de instalar su congelador, se le recomienda que este sea limpiado a fondo.• Gire el control de temperatura a “OFF”, desconecte el congelador y retire los alimentos y lacanasta de almacenaje.• Lave el interior con agua tibia y un trapo suave remojado en una solución de Bicarbonato deSodio. La solución consiste en dos cucharadas de la referida sal en un litro de agua.• Lave la canasta de almacenaje con un detergente suave.• Asegúrese que la puerta quede herméticamente cerrada para que su congelador funcioneeficientemente.• Las partes externas de su congelador deben ser limpiadas con un detergente suave y agua tibia.• Seque el interior y el exterior con un paño suave.16
• Se recomienda que la unidad sea limpiada en el momento en que se descongela, con la finalidadde que quede libre de mal olor y operando eficientemente.‣ Si usted sale de Vacaciones• Retire todos los alimentos• Desconecte su congelador• Limpie su congelador• Deje la puerta de su congelador ligeramente abierta para evitar la formación de mal olor, moho.• Sea extremadamente cuidadoso si hay niños. El congelador no debe ser accesible a los niños.• En el caso de ser un largo tiempo de almacenamiento, la puerta deberá ser sellada con cintaadhesiva para que no se abra o se deberá retirar la puerta.‣ Para mover su Congelador• Retire los alimentos• Asegúrese de colocar cinta adhesiva a todo lo que se puede caer dentro de su congelador.• Selle las puertas con cinta adhesiva.• Asegúrese que el congelador se mantenga parado durante el traslado.GUIA PARA SOLUCIONAR PROBLEMASPROBLEMASOLUCIONSu electrodoméstico no funciona No está conectado a la corriente eléctrica.El interruptor saltó o se quemó un fusibleEl control de temperatura está en “OFF / APAGADO”El compresor se enciende y se apaga La temperatura de la habitación es más caliente de lo normal.frecuentementeColocó una cantidad muy grande de alimentos en elcongelador.La puerta permanece abierta mucho tiempo.La puerta no quedó completamente cerrada.El control de temperatura no está funcionando correctamente.La empaquetadura de la puerta no la está sellandoadecuadamente.El congelador no tiene el suficiente espacio libre.El congelador recientemente fue desconectado.Para que el congelador esté completamente frío necesitaráenfriarse por cuatro horas.La temperatura dentro del congeladorestá muy caliente.La temperatura dentro del congeladorestá muy fría.La temperatura de la superficie externaestá caliente.Ruido fuerte cuando el congeladorfunciona.La temperatura está programada muy caliente. Baje latemperatura con el control y espere unas horas hasta queestá se estabilice.Ha dejado la puerta abierta frecuentemente. El calor entra enel congelador cada vez que se abre la puerta. Abra la puertalo menos posible.La puerta no está cerrada completamente.La empaquetadura de la puerta la está sellandoadecuadamente.Probablemente colocó alimentos calientes recientementeEl congelador recientemente fue desconectado.Para que el congelador esté completamente frío necesitaráenfriarse por cuatro horas.El control de temperatura está programado muy frío. Suba latemperatura con el control y espere unas horas hasta que latemperatura se estabilice.La pared externa del congelador puede estar 30º Fahrenheitmás alta que la temperatura de la habitación.Esto es normal mientras el compresor funciona para transferircalor dentro de la cavidad del congelador.Los congeladores modernos tienen más capacidad dealmacenaje y la temperatura es más uniforme. Estos17
Ruido fuerte cuando comienza a trabajarel compresor.Sonidos similares a crujidos y estallidoscuando empieza a funcionar elcompresorBurbujeo o gorgoteo, como agua quehierve.Vibración.Formación de humedad dentro delcongelador.Formación de humedad fuera delcongelador.La puerta no cierra completamenterequieren compresores más eficientes. Ud. puede oír elcompresor cuando no hay ruido alrededor.Esto es normal. Cuando el congelador funciona conpresiones altas durante el ciclo de encendido. El sonido seacabará e irá desapareciendo de acuerdo a como vayaavanzando el congelamiento.Las partes metálicas, como los ductos de agua caliente, sedilatan y contraen. Esto es normal. El sonido desaparecerápaulatinamente.Esto es normal. Es el refrigerante (usado para enfriar elcongelador) que está circulando a través del sistema.Asegúrese que el congelador esté nivelado. El piso puedeestar desnivelado. El congelador se puede estar meciendo.Asegúrese que la superficie donde tiene el congeladoraguante el peso de este. Nivele el congelador colocando unpedazo de madera o de metal por debajo.Asegúrese que el electrodoméstico esté ubicado en un lugartotalmente plano.Esto es normal. Cuando el clima es húmedo y caliente, laacumulación de escarcha aumenta. Se ha dejado la puertafrecuentemente abierta. El calor entra en el congelador cadavez que se abre la puerta. Abra la puerta lo menos posible.La puerta no está cerrada completamente.La empaquetadura de la puerta no está sellandoadecuadamenteLa puerta no está cerrada completamente. El calor entra enel congelador cada vez que se abre la puerta.El congelador no está totalmente nivelado.El sellador de la puerta está sucio.La canasta de almacenaje está fuera de su sitio,obstaculizando el cierre de la puerta.SERVICIO TECNICO PARA SU ELECTRODOMESTICOEstamos orgullosos de nuestro servicio de atención al cliente y servicio que brindan nuestrostécnicos profesionales en sus electrodomésticos <strong>Avanti</strong>. Con la compra de sus electrodomésticos<strong>Avanti</strong>, usted puede confiar pues si usted necesita información adicional o asistencia, el equipo delDepartamento de Servicio al Cliente de <strong>Avanti</strong> <strong>Products</strong>, estará con usted para responder cualquierconsulta o inquietud que usted tenga. Sólo llámenos gratis a los siguientes números telefónicos.SERVICIO AL CLIENTE AVANTI PRODUCTSInformación del Producto800-323-5029Para solicitud de Partes800-220-5570Servicio de Reparación a domicilio800-220-5570Estamos dispuestos a ayudarlos si tiene dudaso preguntas acerca de nuestros productos.Usted debe solicitar las partes y accesoriosque necesite y nosotros se los enviaremosdirectamente a su domicilio.Usted puede solocotar lo que necesite y pagarcon cheques personales, efectivo, Master Cardo Visa.<strong>Avanti</strong> <strong>Products</strong> autoriza al Centro de Serviciopara brindarle un servicio experto dereparación, adecuándose al horario que ustedencuentre conveniente. Nuestros técnicosconocen perfectamente nuestros productostanto por dentro como por fuera.18
REGISTRATION INFORMATIONThank you for purchasing this fine <strong>Avanti</strong> product. Please fill out this card and return it within 100days of purchase and receive theseimportant benefits:‣ Protect your product:We will keep the model number and date of purchase of your new <strong>Avanti</strong> product on file tohelp you refer to this information in the event of an insurance claim such as fire or theft.‣ Promote better products:We value your input. Your responses will help us develop products designed to best meetyour future needs.-------------------------------------------------(detach here)----------------------------------------------------------<strong>Avanti</strong> Registration Card__________________________________ _____________________________________Name Model # Serial #__________________________________ _____________________________________Address Date Purchased Store/Dealer Name__________________________________ ______________________________________City State Zip Occupation__________________________________ As Your Primary Residence, Do You:Area Code Phone Number Own RentDid You Purchase An Additional Warranty: Your Age:Extended Food Loss None under 18 18-25 26-30Reason For Choosing This <strong>Avanti</strong> Product: 31-35 36-50 over 50Please indicate the most important factors Marital Status:that influenced your decision to purchase Married Singlethis product.Is This Product Used In The:Price Home BusinessProduct FeaturesHow Did You Learn About This Product:<strong>Avanti</strong> ReputationAdvertisingProduct Quality In Store Demo Personal DemoSalesperson RecommendationOther______________________________Friend/Relative RecommendationComments____________________________Warranty_____________________________________Other___________________________________________________________19
这 一 页 要 单 独 印 在 最 后 一 页 , 不 能 与 上 一 页 印 成 正 反 页PRINTED IN CHINA20