Campana de salida Fume extractor hood Hotte aspirante Exaustor ...
Campana de salida Fume extractor hood Hotte aspirante Exaustor ...
Campana de salida Fume extractor hood Hotte aspirante Exaustor ...

You also want an ePaper? Increase the reach of your titles
YUMPU automatically turns print PDFs into web optimized ePapers that Google loves.
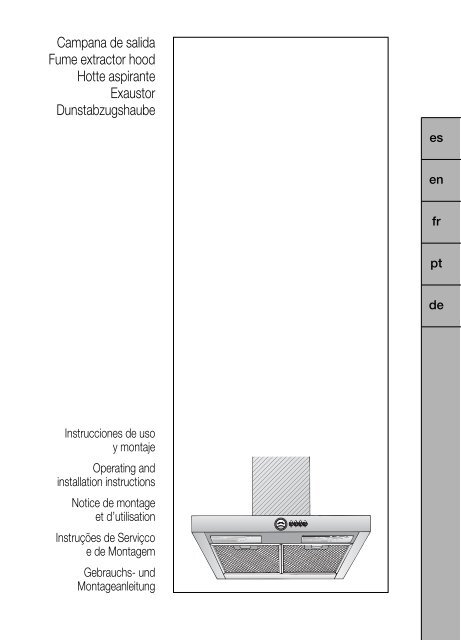
<strong>Campana</strong> <strong>de</strong> <strong>salida</strong><br />
<strong>Fume</strong> <strong>extractor</strong> <strong>hood</strong><br />
<strong>Hotte</strong> <strong>aspirante</strong><br />
<strong>Exaustor</strong><br />
Dunstabzugshaube<br />
Instrucciones <strong>de</strong> uso<br />
y montaje<br />
Operating and<br />
installation instructions<br />
Notice <strong>de</strong> montage<br />
et d’utilisation<br />
Instruções <strong>de</strong> Serviçco<br />
e <strong>de</strong> Montagem<br />
Gebrauchs- und<br />
Montageanleitung<br />
es<br />
en<br />
fr<br />
pt<br />
<strong>de</strong>
es página 03–13<br />
en page 14 – 24<br />
fr page 25 – 35<br />
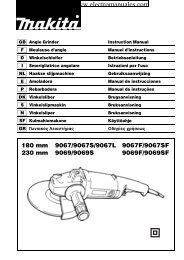
Abb. 1<br />
GAS<br />
GAZ<br />
KAASU<br />
GASS<br />
2<br />
Abb. 1<br />
ELEKTRO<br />
ELECTR.<br />
ELETT.<br />
EL.<br />
min. 650 min. 550<br />
pt página 36 – 46<br />
<strong>de</strong> Seite 47 – 57
Instrucciones <strong>de</strong> uso<br />
Descripción <strong>de</strong>l aparato<br />
Revestimiento<br />
en forma<br />
<strong>de</strong> chimenea<br />
Iluminación<br />
Interruptor<br />
Iluminación/<br />
Ventilador<br />
Rejilla <strong>de</strong>l filtro<br />
Modalida<strong>de</strong>s <strong>de</strong> funcionamiento<br />
Evacuación <strong>de</strong>l aire hacia el exterior:<br />
❑ El ventilador que incorpora la campana<br />
<strong>extractor</strong>a aspira los vahos <strong>de</strong> la cocina<br />
y los evacúa hacia el exterior,<br />
haciéndolos pasar previamente a través<br />
<strong>de</strong>l filtro antigrasa.<br />
❑ El filtro antigrasa absorbe las partículas<br />
sólidas contenidas en los vahos <strong>de</strong> la<br />
cocina.<br />
❑ La cocina queda así prácticamente libre<br />
<strong>de</strong> grasa y olores.<br />
D Si se utiliza la campana con<br />
evacuación <strong>de</strong>l aire al exterior simultáneamente<br />
con un hogar <strong>de</strong>pendiente <strong>de</strong><br />
una chimenea (por ejemplo calefacciones<br />
<strong>de</strong> gas, gas-oil o carbón, calentadores<br />
instantáneos, calentadores <strong>de</strong> agua), hay<br />
procurar que exista una suficiente<br />
alimentación <strong>de</strong> aire, necesario para el<br />
proceso <strong>de</strong> combustión <strong>de</strong>l hogar.<br />
Este funcionamiento es posible sin peligro<br />
si en el local <strong>de</strong> emplazamiento <strong>de</strong>l hogar<br />
no se sobrepasa la <strong>de</strong>presión admisible <strong>de</strong><br />
4 Pa (0,04 mbares).<br />
Modalida<strong>de</strong>s <strong>de</strong> funcionamiento<br />
Para ello, es necesario que existan<br />
aperturas no bloqueables por las que el aire<br />
<strong>de</strong> combustión pueda renovarse y<br />
ventilarse sin dificultad, por ejemplo por<br />
puertas, ventanas o cajas murales para la<br />
alimentación o evacuación <strong>de</strong>l aire o<br />
también pue<strong>de</strong>n tomarse otras otras<br />
medidas como por ejemplo instalando<br />
cerrojos invertidos o similares.<br />
Cerciorarse <strong>de</strong> que existe una alimentación<br />
suficiente <strong>de</strong>l aire. De lo contrario el<br />
aire evacuado se vuelve a utilizar para la<br />
admisión y se corre el peligro <strong>de</strong><br />
intoxicación.<br />
La sola presencia <strong>de</strong> una caja mural para alimentación<br />
o evacuación <strong>de</strong>l aire, sin embargo,<br />
no constituye una garantía para la observación<br />
<strong>de</strong> los límites <strong>de</strong> tolerancia válidos.<br />
Nota: En las consi<strong>de</strong>raciones y valoraciones<br />
a este respecto siempre habrá que tener en<br />
cuenta todo el conjunto <strong>de</strong>l sistema <strong>de</strong><br />
ventilación existente en la vivienda.<br />
Esta regla no es válida para las cocinas y<br />
placas <strong>de</strong> cocción <strong>de</strong> gas.<br />
Las campanas <strong>extractor</strong>as montadas con<br />
evacuación <strong>de</strong>l aire interior (sistema <strong>de</strong><br />
recirculación <strong>de</strong>l aire), dotadas <strong>de</strong> filtro <strong>de</strong><br />
carbón activo, pue<strong>de</strong>n funcionar sin ningún<br />
tipo <strong>de</strong> restricción.<br />
Evacuación <strong>de</strong>l aire hacia el interior<br />
(sistema <strong>de</strong> recirculación <strong>de</strong>l aire):<br />
❑ Para trabajar con esta modalidad hay que<br />
montar un filtro <strong>de</strong> carbón activo en la<br />
campana <strong>extractor</strong>a (véase el capítulo<br />
«Filtros y mantenimiento» <strong>de</strong> las<br />
presentes Instrucciones).<br />
� El kit <strong>de</strong> montaje completo, así<br />
como los filtros <strong>de</strong> repuesto, se pue<strong>de</strong>n<br />
adquirir en el comercio especializado.<br />
❑ El ventilador que incorpora la campana<br />
<strong>extractor</strong>a aspira los vahos <strong>de</strong> la cocina y<br />
los hace pasar a través <strong>de</strong> los filtros<br />
antigrasa y <strong>de</strong> carbón activo, <strong>de</strong>volviéndolos<br />
a continuación, una vez purificados, a la<br />
cocina.<br />
❑ El filtro antigrasa absorbe las partículas sólidas<br />
contenidas en los vahos <strong>de</strong> la cocina.<br />
❑ El filtro <strong>de</strong> carbón activo absorbe el olor.<br />
� En caso <strong>de</strong> no montar la campana un<br />
filtro <strong>de</strong> carbón activo, no se pue<strong>de</strong>n<br />
absorber los olores producidos durante la<br />
preparación <strong>de</strong> los alimentos.<br />
3
Antes <strong>de</strong> la primera utilización<br />
Antes <strong>de</strong> la puesta en marcha inicial<br />
<strong>de</strong>l aparato:<br />
❑ Las presentes instrucciones <strong>de</strong> servicio<br />
son válidas para diferentes mo<strong>de</strong>los <strong>de</strong><br />
aparato; por ello pue<strong>de</strong> ser posible que<br />
se <strong>de</strong>scriban <strong>de</strong>talles y características <strong>de</strong><br />
equipamiento que no concuer<strong>de</strong>n<br />
íntegramente con las <strong>de</strong> su aparato<br />
concreto.<br />
❑ Esta campana <strong>extractor</strong>a cumple las<br />
normas y disposiciones específicas en<br />
materia <strong>de</strong> seguridad.<br />
Las reparaciones que fuera necesario<br />
efectuar en el aparato sólo podrán ser<br />
ejecutadas por técnicos especializados<br />
<strong>de</strong>l ramo.<br />
Las reparaciones ejecutadas <strong>de</strong> modo<br />
erróneo o incorrecto pue<strong>de</strong>n dar lugar a<br />
situaciones <strong>de</strong> serio peligro para el<br />
usuario.<br />
� Si el aparato presentara daños o<br />
<strong>de</strong>sperfectos, no <strong>de</strong>berá ser utilizado.<br />
� La conexión y puesta en marcha <strong>de</strong>l<br />
aparato sólo podrán ser efectuadas por un<br />
técnico especialista <strong>de</strong>l ramo.<br />
� En caso <strong>de</strong> producirse daños en el<br />
cable <strong>de</strong> conexión <strong>de</strong>l aparato, éste sólo<br />
podrá ser sustituido por el fabricante, un<br />
técnico especializado <strong>de</strong>l Servicio <strong>de</strong><br />
Asistencia Técnica Oficial o un técnico<br />
especializado <strong>de</strong>l ramo, a fin <strong>de</strong> evitar<br />
situaciones <strong>de</strong> peligro.<br />
� Elimine los envases y el material <strong>de</strong><br />
embalaje <strong>de</strong> acuerdo a las normas<br />
correspondientes para la protección <strong>de</strong>l<br />
medio ambiente (véanse al respecto las<br />
instrucciones <strong>de</strong> montaje <strong>de</strong> la campana<br />
<strong>extractor</strong>a).<br />
� La presente campana <strong>extractor</strong>a sólo<br />
es a<strong>de</strong>cuada para uso doméstico.<br />
� Utilizar la campana <strong>extractor</strong>a sólo con<br />
las lámparas <strong>de</strong> iluminación montadas.<br />
� Sustituir inmediatamente las lámparas<br />
<strong>de</strong>fectuosas a fin <strong>de</strong> evitar la sobrecarga <strong>de</strong><br />
las lámparas restantes.<br />
� No usar nunca la campana <strong>extractor</strong>a<br />
sin incorporar el filtro antigrasa.<br />
4<br />
❑ Antes <strong>de</strong> emplear el aparato nuevo<br />
<strong>de</strong>berá leer <strong>de</strong>tenidamente las<br />
instrucciones <strong>de</strong> servicio <strong>de</strong> la cocina<br />
eléctrica.<br />
En ella se facilitan informaciones y<br />
consejos importantes para su seguridad<br />
personal, así como para el correcto<br />
manejo y cuidado <strong>de</strong> la cocina.<br />
❑ Guar<strong>de</strong> las instrucciones <strong>de</strong> servicio y <strong>de</strong><br />
montaje para un posible propietario<br />
posterior.<br />
� Las grasas y aceites calentados<br />
excesivamente pue<strong>de</strong>n inflamarse<br />
rápidamente. Por ello los alimentos o platos<br />
que requieran grasa o aceite caliente, como<br />
por ejemplo patatas fritas, etc., sólo<br />
<strong>de</strong>berán prepararse bajo vigilancia.<br />
� No preparar alimentos o platos<br />
flameados directamente <strong>de</strong>bajo <strong>de</strong> la<br />
campana <strong>extractor</strong>a.<br />
La grasa acumulada en el filtro antigrasa<br />
podría incendiarse por las llamas que<br />
! suben!<br />
� Las llamas <strong>de</strong> los quemadores <strong>de</strong> gas<br />
<strong>de</strong> las zonas <strong>de</strong> cocción <strong>de</strong>berán encontrarse<br />
siempre cubiertas con un recipiente.<br />
� El montaje <strong>de</strong> la campana <strong>extractor</strong>a<br />
por encima <strong>de</strong> hogares para combustibles<br />
sólidos (carbón, leña, etc.) sólo está<br />
permitido si ésta cumple una serie <strong>de</strong><br />
condiciones restrictivas (véanse al respecto<br />
las instrucciones <strong>de</strong> montaje <strong>de</strong> la campana<br />
<strong>extractor</strong>a).<br />
Placas <strong>de</strong> cocción <strong>de</strong> gas /<br />
Cocinas <strong>de</strong> gas<br />
� No trabajar simultáneamente con todas<br />
las zonas <strong>de</strong> cocción (quemadores) durante<br />
un tiempo prolongado (como máximo<br />
15 minutos) ajustadas a su máxima<br />
potencia, <strong>de</strong> lo contrario existe peligro <strong>de</strong><br />
quemadura en caso <strong>de</strong> tocar la campana o<br />
<strong>de</strong> ocasionar daños en la misma. En caso<br />
<strong>de</strong> instalar y trabajar la campana por<br />
encima <strong>de</strong> una placa <strong>de</strong> cocción <strong>de</strong> gas,<br />
hay que ajustar ésta a su máxima potencia<br />
en caso <strong>de</strong> trabajar simultáneamente con<br />
tres o más zonas <strong>de</strong> cocción (quemadores).
Manejo <strong>de</strong> la campana <strong>extractor</strong>a<br />
� La manera más eficaz <strong>de</strong> absorber los<br />
vahos producidos en la cocina durante la<br />
preparación <strong>de</strong> los alimentos es:<br />
❑ Conectando la campana <strong>extractor</strong>a<br />
al comenzar a trabajar.<br />
❑ Desconectando la campana <strong>extractor</strong>a<br />
al cabo <strong>de</strong> unos minutos <strong>de</strong>spués <strong>de</strong><br />
haber concluido los trabajos.<br />
Iluminación<br />
Escalones <strong>de</strong><br />
potencia <strong>de</strong>l<br />
ventilador<br />
Ajustar el escalón <strong>de</strong> potencia <strong>de</strong>l<br />
ventilador <strong>de</strong>seado:<br />
❑ Desplazar hacia abajo el mando<br />
correspondiente a la potencia <strong>de</strong><br />
funcionamiento <strong>de</strong>seada.<br />
❑ El ventilador siempre trabaja con el<br />
escalón <strong>de</strong> potencia más elevado<br />
ajustado.<br />
Iluminación:<br />
❑ La iluminación se pue<strong>de</strong> conectar en<br />
cualquier momento, con in<strong>de</strong>pen<strong>de</strong>ncia<br />
<strong>de</strong> que el ventilador funcione o no.<br />
Filtros y mantenimiento<br />
Filtro antigrasa:<br />
Para retener las partículas <strong>de</strong> grasa<br />
contenidas en el vaho <strong>de</strong> la cocina se<br />
montan filtros metálicos.<br />
Las esterillas <strong>de</strong> filtro son <strong>de</strong> metal<br />
antiinflamable.<br />
¡Atención! A medida que crece el grado <strong>de</strong><br />
saturación <strong>de</strong> la esterilla <strong>de</strong> filtro con partículas<br />
<strong>de</strong> grasa, aumenta su inflamabilidad,<br />
influyendo negativamente en el funcionamiento<br />
<strong>de</strong> la campana.<br />
¡Importante!: La limpieza a tiempo <strong>de</strong> los<br />
filtros metálicos, eliminando las partículas<br />
<strong>de</strong> grasa adheri-das en el mismo, pue<strong>de</strong><br />
prevenir el peligro <strong>de</strong> incendio a causa <strong>de</strong><br />
una acumulación <strong>de</strong> calor al freír o asar<br />
alimentos.<br />
Limpieza <strong>de</strong>l filtro antigrasa metálico:<br />
❑ En caso <strong>de</strong> un servicio normal (<strong>de</strong> 1 a 2<br />
horas diarias) <strong>de</strong>be cambiarse el filtro<br />
metálico <strong>de</strong> grasa <strong>de</strong>spués <strong>de</strong> 8 a 10<br />
semanas.<br />
❑ Los filtros antigrasa metálicos se pue<strong>de</strong>n<br />
limpiar en un lavavajillas. Ello pue<strong>de</strong> dar<br />
lugar a una ligera <strong>de</strong>coloración <strong>de</strong> los<br />
mismos.<br />
Importante: No mezclar con la vajilla<br />
normal los filtros antigrasa metálicos<br />
muy saturados <strong>de</strong> grasa.<br />
❑ En caso <strong>de</strong> limpiar los filtros metálicos a<br />
mano, colocar la caja <strong>de</strong>l filtro durante<br />
varias horas en una solución <strong>de</strong>tergente<br />
(para vajilla) muy caliente, para reblan<strong>de</strong>cer<br />
la grasa adherida. Limpiarlos a<br />
continuación con un cepillo, enjuagarlos<br />
bien y <strong>de</strong>jarlos escurrir.<br />
Averías y perturbaciones<br />
En caso <strong>de</strong> consultas o averías <strong>de</strong> la<br />
campana <strong>extractor</strong>a, no du<strong>de</strong> en llamar al<br />
Servicio <strong>de</strong> Asistencia Técnica.<br />
(Véase al respecto la lista con las<br />
<strong>de</strong>legaciones y distribuidores oficiales).<br />
Para cualquier consulta <strong>de</strong>berán indicarse<br />
los números <strong>de</strong> producto y <strong>de</strong> fabricación:<br />
N° E FD<br />
Anote las números correspondientes a su<br />
aparato en los espacios correspondientes.<br />
Los números figuran en la placa <strong>de</strong><br />
características, a la que se acce<strong>de</strong> tras<br />
<strong>de</strong>smontar la rejilla <strong>de</strong>l filtro <strong>de</strong>ntro <strong>de</strong> la<br />
campana <strong>extractor</strong>a. 5
Filtros y mantenimiento<br />
Desmontar y montar los filtros antigrasa<br />
metálicos:<br />
1. Presionar el enclavamiento <strong>de</strong> los filtros<br />
antigrasa en dirección a la flecha. Abatir<br />
los filtros antigrasa hacia abajo.<br />
2. Limpiar los filtros.<br />
3. Montar los filtros limpios en su sitio.<br />
Filtro <strong>de</strong> carbón activo:<br />
Para retener los olores durante el<br />
funcionamiento <strong>de</strong> la campana<br />
<strong>extractor</strong>a con evacuación <strong>de</strong>l aire al<br />
interior (recirculación <strong>de</strong>l aire).<br />
¡Atención!<br />
A medida que crece el grado <strong>de</strong> saturación<br />
<strong>de</strong> la esterilla <strong>de</strong> filtro con partículas <strong>de</strong><br />
grasa, aumenta su inflamabilidad,<br />
influyendo negativamente en el<br />
funcionamiento <strong>de</strong> la campana.<br />
¡Importante!:<br />
La limpieza a tiempo <strong>de</strong> los filtros metálicos,<br />
eliminando las partículas <strong>de</strong> grasa<br />
adheridas en el mismo, pue<strong>de</strong> prevenir el<br />
peligro <strong>de</strong> incendio a causa <strong>de</strong> una<br />
acumulación <strong>de</strong> calor al freír o asar<br />
alimentos.<br />
6<br />
Montar el filtro:<br />
1. Desmontar los filtros antigrasa (véase a<br />
este respecto el capítulo «Desmontar y<br />
montar los filtros antigrasa metálicos».<br />
2. Montar el filtro <strong>de</strong> carbón activo.<br />
3. Encajar la lengüeta.<br />
4. Montar los filtros antigrasa (véase al<br />
respecto el capítulo «Desmontar y<br />
montar los filtros antigrasa metálicos»).<br />
Desmontar el filtro <strong>de</strong> carbón activo:<br />
1. Desmontar los filtros antigrasa.<br />
2. Presionar la lengüeta y retirar el filtro <strong>de</strong><br />
carbón activo hacia abajo.<br />
3. Montar los filtros antigrasa.<br />
Sustituir el filtro <strong>de</strong> carbón activo:<br />
❑ Bajo unas condiciones <strong>de</strong> funcionamiento<br />
normal (1 ó 2 horas diarias), los<br />
filtros <strong>de</strong> carbón activo tienen que<br />
sustituirse una vez al año.<br />
❑ El filtro <strong>de</strong> carbón activo pue<strong>de</strong> adquirirse<br />
en el COMERCIO ESPECIALIZADO.<br />
❑ Utilizar sólo filtros originales <strong>de</strong>l<br />
Fabricante.<br />
De este modo se cumplen las normas y<br />
disposiciones <strong>de</strong> seguridad vigentes,<br />
asegurando un funcionamiento óptimo.<br />
Evacuación <strong>de</strong>l filtro <strong>de</strong> carbón activo<br />
usado:<br />
❑ Los filtros <strong>de</strong> carbón activo no<br />
incorporan ningún tipo <strong>de</strong> material o<br />
substancia tóxica o nociva. Por esta<br />
razón pue<strong>de</strong>n evacuarse conjuntamente<br />
con los <strong>de</strong>sechos domésticos (cubo <strong>de</strong><br />
basura).
Limpieza y cuidados<br />
Desconectar la campana <strong>extractor</strong>a <strong>de</strong> la<br />
red eléctrica extrayendo el cable <strong>de</strong><br />
conexión <strong>de</strong> la toma <strong>de</strong> corriente o a<br />
través <strong>de</strong>l fusible.<br />
❑ Al limpiar los filtros antigrasa, limpiar la<br />
grasa acumulada en los puntos<br />
accesibles <strong>de</strong>l cuerpo <strong>de</strong> la campana<br />
<strong>extractor</strong>a. De este modo se previene el<br />
peligro <strong>de</strong> que se inflamen los restos <strong>de</strong><br />
grasa antiguos y la campana conserva<br />
óptimo funcionamiento.<br />
❑ Utilizar una solución <strong>de</strong> agua y agente<br />
lavavajillas <strong>de</strong> uso corriente caliente para<br />
limpiar la campana <strong>extractor</strong>a.<br />
❑ En caso <strong>de</strong> suciedad más resistente y<br />
fuertemente acumulada, utilizar un agente<br />
limpiacristales suave.<br />
❑ No rascar la suciedad reseca acumulada.<br />
Reblandézcala primero aplicando sobre la<br />
misma un paño húmedo.<br />
No utilizar agentes o esponjas abrasivos.<br />
❑ Atención: No limpiar las superficies y<br />
elementos <strong>de</strong> plástico con alcohol <strong>de</strong><br />
quemar, dado que podrían producirse<br />
zonas o puntos <strong>de</strong> color mate.<br />
Atención: Procurar una buena ventilación <strong>de</strong><br />
la cocina. ¡No trabajar con llamas abiertas!<br />
� Limpiar el mando <strong>de</strong>splazable <strong>de</strong>l<br />
ventilador sólo con un paño suave y húmedo<br />
(usar una solución <strong>de</strong> agua y agente<br />
lavavajillas suave).<br />
¡No usar limpiadores <strong>de</strong> acero para limpiar el<br />
mando <strong>de</strong>splazable!<br />
Superficies <strong>de</strong> acero inoxidable:<br />
❑ Usar un limpiador para acero inoxidable<br />
suave, no abrasivo.<br />
❑ Limpiar el metal sólo en dirección al pulido.<br />
� ¡No limpiar las superficies <strong>de</strong> acero<br />
inoxidable con esponjas abrasivas!<br />
¡No emplear <strong>de</strong>tergentes que contengan<br />
arena, sosa, ácidos o cloruro!<br />
Superficies <strong>de</strong> aluminio y plástico:<br />
❑ Utilizar sólo paños suaves para limpieza <strong>de</strong><br />
ventanas, libres <strong>de</strong> pelusas o paños <strong>de</strong><br />
microfibra.<br />
❑ No utilizar paños secos.<br />
❑ Utilizar un agente limpiacristales suave.<br />
❑ No utilizar agentes limpiadores agresivos<br />
que contengan ácidos o álcalis.<br />
❑ No utilizar agentes frotadores.<br />
Sustituir las lámparas<br />
1. Desconectar la campana <strong>extractor</strong>a <strong>de</strong><br />
la red eléctrica,.extrayendo el cable <strong>de</strong><br />
conexión <strong>de</strong> la toma <strong>de</strong> corriente o a<br />
través <strong>de</strong>l fusible.<br />
2. Desmontar los filtros antigrasa (véase el<br />
capítulo «Filtros y mantenimiento»).<br />
3. Desencajar <strong>de</strong>s<strong>de</strong> arriba el recubrimiento<br />
protector <strong>de</strong> la lámpara <strong>de</strong>l listón <strong>de</strong> luz.<br />
4. Sustituir la lámpara (lámpara corriente,<br />
máx. 40 W, portalámparas E 14).<br />
5. Volver a colocar el recubrimiento en su<br />
sitio.<br />
6. Montar los filtros antigrasa en su<br />
emplazamiento.<br />
7. Restablecer la alimentación <strong>de</strong> corriente<br />
introduciendo el cable <strong>de</strong> conexión en la<br />
toma <strong>de</strong> corriente o a través <strong>de</strong>l fusible.<br />
7
Instrucciones <strong>de</strong> montaje: – Advertencias importantes<br />
� Los aparatos eléctricos usados<br />
incorporan materiales valiosos que se<br />
pue<strong>de</strong>n recuperar. Por ello <strong>de</strong>berán<br />
entregarse a dicho efecto en un centro<br />
oficial <strong>de</strong> recogida o recuperación <strong>de</strong><br />
materiales reciclables (por ejemplo Servicio o<br />
centro municipal <strong>de</strong> <strong>de</strong>sguace o<br />
instituciones semejantes).<br />
Su Ayuntamiento o Administración local le<br />
facilitarán gustosamente las señas <strong>de</strong>l<br />
Centro <strong>de</strong> recuperación <strong>de</strong> materiales más<br />
próximo.<br />
Antes <strong>de</strong> <strong>de</strong>shacerse <strong>de</strong> su aparato usado<br />
<strong>de</strong>berá inutilizarlo.<br />
� Su nuevo aparato está protegido<br />
durante el transporte hasta su hogar por<br />
un embalaje protector. Todos los materiales<br />
<strong>de</strong> embalaje utilizados son respetuosos<br />
con el medio ambiente y pue<strong>de</strong>n ser<br />
reciclados o reutilizados. Contribuya<br />
activamente a la protección <strong>de</strong>l medio<br />
ambiente insistiendo en unos métodos <strong>de</strong><br />
eliminación y recuperación <strong>de</strong> los<br />
materiales <strong>de</strong> embalaje respetuosos con el<br />
medio ambiente.<br />
Su Distribuidor o Administración local le<br />
informará gustosamente sobre las vías y<br />
posibilida<strong>de</strong>s más eficaces y actuales para<br />
la eliminación respetuosa con el medio<br />
ambiente <strong>de</strong> estos materiales.<br />
� La presente campana <strong>extractor</strong>a es<br />
apropiada para trabajar con evacuación <strong>de</strong>l<br />
aire al exterior o al interior (sistema <strong>de</strong><br />
recirculación <strong>de</strong>l aire).<br />
� Montar la campana <strong>extractor</strong>a siempre<br />
por encima <strong>de</strong>l centro <strong>de</strong> las zonas <strong>de</strong><br />
cocción o los quemadores (según el tipo<br />
<strong>de</strong> cocina que se utilice).<br />
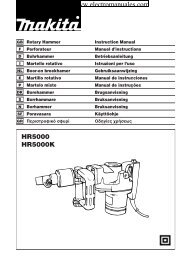
� La distancia mínima a observar entre<br />
las zonas <strong>de</strong> cocción (<strong>de</strong> una placa o<br />
cocina eléctrica) y el bor<strong>de</strong> inferior <strong>de</strong> la<br />
campana es <strong>de</strong> 550 mm (Fig. 1).<br />
8<br />
� La campana sólo se podrá montar por<br />
encima <strong>de</strong> hogares para combustibles<br />
sólidos con peligro <strong>de</strong> incendio (por<br />
ejemplo proyección <strong>de</strong> chispas) si el hogar<br />
está provisto <strong>de</strong> una protección cerrada<br />
no <strong>de</strong>smontable y se cumplen las normas<br />
y disposiciones nacionales vigentes. Esta<br />
restricción no es válida para cocinas y<br />
placas <strong>de</strong> gas.<br />
� Cuanto menor sea la distancia entre la<br />
campana <strong>extractor</strong>a y los quemadores,<br />
mayor posibilidad existe <strong>de</strong> que se formen<br />
gotas <strong>de</strong> agua en la parte inferior <strong>de</strong> la<br />
campana <strong>extractor</strong>a <strong>de</strong>bidas a la<br />
con<strong>de</strong>nsación <strong>de</strong>l vapor <strong>de</strong> agua.<br />
Advertencias adicionales relativas a las<br />
cocinas <strong>de</strong> gas:<br />
� Al proce<strong>de</strong>r al montaje <strong>de</strong> los quemadores<br />
<strong>de</strong> una placa <strong>de</strong> cocción o cocina <strong>de</strong><br />
gas <strong>de</strong>berán observarse estrictamente las<br />
normas y disposiciones legales vigentes en<br />
cada pa’s (en Alemania, por ejemplo, son<br />
las Normas Técnicas para Instalación <strong>de</strong><br />
Equipos <strong>de</strong> Gas TRGI).<br />
� Respetar las normas y disposiciones.<br />
así como las instrucciones y consejos <strong>de</strong><br />
montaje facilitadas por los fabricantes <strong>de</strong><br />
las cocinas y aparatos <strong>de</strong> gas.<br />
� Esta campana <strong>extractor</strong>a sólo <strong>de</strong>berá<br />
montarse con un lateral junto a un armario<br />
o pared alta. Distancia mínima a observar:<br />
50 mm.<br />
� La distancia mínima entre el bor<strong>de</strong><br />
inferior <strong>de</strong> la campana <strong>extractor</strong>a y el<br />
bor<strong>de</strong> superior <strong>de</strong> la parrilla para colocar<br />
recipientes <strong>de</strong> las zonas <strong>de</strong> cocción<br />
(quemadores) <strong>de</strong> una placa <strong>de</strong> cocción o<br />
cocina <strong>de</strong> gas: 650 mm, (Fig. 1).
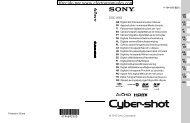
Antes <strong>de</strong>l montaje<br />
Funcionamiento con evacuación <strong>de</strong>l<br />
aire al exterior<br />
150 150<br />
El aire <strong>de</strong> evacuación pasa a través <strong>de</strong> un<br />
túnel <strong>de</strong> ventilación hacia arriba o<br />
directamente hacia el exterior, a través <strong>de</strong><br />
la correspondiente pared.<br />
D El aire <strong>de</strong> evacuación no <strong>de</strong>be pasar a<br />
ninguna chimenea <strong>de</strong> humos o gases <strong>de</strong><br />
escape en servicio, ni tampoco a túneles<br />
<strong>de</strong> ventilación <strong>de</strong> locales con hogares.<br />
Antes <strong>de</strong> proce<strong>de</strong>r a los trabajos <strong>de</strong><br />
evacuación <strong>de</strong>l aire al exterior, <strong>de</strong>berá<br />
observar las disposicones legales <strong>de</strong> su<br />
localiad (por ejemplo el reglamento local<br />
para el permiso <strong>de</strong> edificación).<br />
En caso <strong>de</strong> hacer pasar el aire <strong>de</strong><br />
evacuación <strong>de</strong> la campana a una chimenea<br />
<strong>de</strong> humos o gases <strong>de</strong> escape fuera <strong>de</strong><br />
servicio, <strong>de</strong>berá consultarse con el<br />
<strong>de</strong>shollinador <strong>de</strong>l distrito competente,<br />
observando asimismo las normas y<br />
disposiciones nacionales vigentes.<br />
D Si se utiliza la campana con<br />
evacuación <strong>de</strong>l aire al exterior simultáneamente<br />
con un hogar <strong>de</strong>pendiente <strong>de</strong><br />
una chimenea (por ejemplo calefacciones<br />
<strong>de</strong> gas, gas-oil o carbón, calentadores<br />
instantáneos, calentadores <strong>de</strong> agua), hay<br />
procurar que exista una suficiente<br />
alimentación <strong>de</strong> aire, necesario para el<br />
proceso <strong>de</strong> combustión <strong>de</strong>l hogar.<br />
Este funcionamiento es posible sin peligro<br />
si en el local <strong>de</strong> emplazamiento <strong>de</strong>l hogar<br />
no se sobrepasa la <strong>de</strong>presión admisible <strong>de</strong><br />
4 Pa (0,04 mbares).<br />
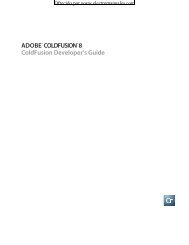
mind. 45<br />
684-1086 136<br />
500<br />
280<br />
260<br />
mind.60<br />
mind.<br />
400<br />
mind.<br />
460<br />
600 / 900<br />
Para ello, es necesario que existan<br />
aperturas no bloqueables por las que el<br />
aire <strong>de</strong> combustión pueda renovarse y<br />
ventilarse sin dificultad, por ejemplo por<br />
puertas, ventanas o cajas murales para la<br />
alimentación o evacuación <strong>de</strong>l aire o<br />
también pue<strong>de</strong>n tomarse otras otras<br />
medidas como por ejemplo instalando<br />
cerrojos invertidos o similares.<br />
Cerciorarse <strong>de</strong> que existe una alimentación<br />
suficiente <strong>de</strong>l aire. De lo contrario el<br />
aire evacuado se vuelve a utilizar para la<br />
admisión y se corre el peligro <strong>de</strong> intoxicación.<br />
La sola presencia <strong>de</strong> una caja mural para<br />
alimentación o evacuación <strong>de</strong>l aire, sin<br />
embargo, no constituye una garantía para<br />
la observación <strong>de</strong> los límites <strong>de</strong> tolerancia<br />
válidos.<br />
Nota: En las consi<strong>de</strong>raciones y<br />
valoraciones a este respecto siempre<br />
habrá que tener en cuenta todo el conjunto<br />
<strong>de</strong>l sistema <strong>de</strong> ventilación existente en la<br />
vivienda. Esta regla no es válida para las<br />
cocinas y placas <strong>de</strong> cocción <strong>de</strong> gas.<br />
Las campanas <strong>extractor</strong>as montadas con<br />
evacuación <strong>de</strong>l aire interior (sistema <strong>de</strong><br />
recirculación <strong>de</strong>l aire), dotadas <strong>de</strong> filtro <strong>de</strong><br />
carbón activo, pue<strong>de</strong>n funcionar sin ningún<br />
tipo <strong>de</strong> restricción.<br />
Si el aire es evacuado pasando a través<br />
<strong>de</strong> la pared exterior, <strong>de</strong>berá utilizarse una<br />
caja mural telescópica.<br />
9
Antes <strong>de</strong>l montaje<br />
Si la campana <strong>extractor</strong>a trabaja con<br />
sistema <strong>de</strong> evacuación <strong>de</strong>l aire exterior,<br />
<strong>de</strong>berá montarse una válvula antirretorno,<br />
en caso <strong>de</strong> no estar ésta ya incorporada<br />
en el tubo <strong>de</strong> evacuación <strong>de</strong>l aire o en la<br />
caja mural.<br />
En caso <strong>de</strong> no incorporar la presente<br />
campana <strong>extractor</strong>a dicha válvula<br />
antirretorno, la podrá adquirir en el<br />
comercio especializado.<br />
Montaje <strong>de</strong> la válvula antirretorno:<br />
❑ Hacer encajar los salientes <strong>de</strong> la válvula<br />
antirretorno en las perforaciones<br />
correspondiente que figuran en el<br />
empalme <strong>de</strong> evacuación (o <strong>salida</strong> <strong>de</strong><br />
aire) <strong>de</strong>l aire <strong>de</strong> la campana.<br />
� Cerciorarse antes <strong>de</strong>l montaje <strong>de</strong> la<br />
válvula que la cara rotulada o estampada<br />
esté hacia fuera.<br />
Si el aire es evacuado pasando a través<br />
<strong>de</strong> la pared exterior, <strong>de</strong>berá utilizarse una<br />
caja mural telescópica.<br />
Condiciones necesarias para lograr la<br />
óptima potencia y rendimiento <strong>de</strong> la<br />
campana <strong>extractor</strong>a:<br />
❑ Tubo <strong>de</strong> evacuación corto y liso.<br />
❑ Menor número <strong>de</strong> codos posible.<br />
❑ Usar en lo posible tubos <strong>de</strong> gran<br />
diámetro, así como codos <strong>de</strong> gran<br />
tamaño.<br />
Los tubos <strong>de</strong> evacuación largos y<br />
con <strong>de</strong>sigualda<strong>de</strong>s, y la utilización <strong>de</strong><br />
muchos tubos y codos <strong>de</strong> diámetro<br />
pequeño perjudica el rendimiento<br />
óptimo <strong>de</strong>l aparato y provoca un<br />
aumento <strong>de</strong> ruidos <strong>de</strong>sagradables<br />
durante su funcionamiento.<br />
❑ Tubos redondos:<br />
Se aconseja emplear tubos con un<br />
diámetro interior 150 mm.<br />
10<br />
❑ Los canales planos <strong>de</strong>berán poseer<br />
una sección interior equivalente a la <strong>de</strong><br />
los tubos redondos.<br />
No <strong>de</strong>ben presentar ángulos<br />
<strong>de</strong>masiado agudos.<br />
Diámetro 150 mm, approx. 177 cm 2<br />
❑ En caso <strong>de</strong> usar tubos con diferentes<br />
diámetros:<br />
Colocar una tira estanqueizante.<br />
❑ Al trabajar con sistema <strong>de</strong> evacuación<br />
<strong>de</strong>l aire al exterior: Procurar una<br />
suficiente alimentación <strong>de</strong> aire.<br />
Conexión <strong>de</strong> los tubos <strong>de</strong><br />
evacuación<br />
❑ Fijar el racor <strong>de</strong><br />
empalme<br />
suministrado por<br />
encima <strong>de</strong> la<br />
<strong>salida</strong> <strong>de</strong> aire<br />
Tubo <strong>de</strong> evacuación con 150 mm <strong>de</strong><br />
diámetro:<br />
❑ Fijar directamente el tubo <strong>de</strong> evacuación<br />
<strong>de</strong>l aire en la <strong>salida</strong> <strong>de</strong> aire.<br />
� En caso <strong>de</strong> incorporar el aparato una<br />
válvula antirretorno, verificar su<br />
funcionamiento.
Antes <strong>de</strong>l montaje<br />
Funcionamiento con evacuación <strong>de</strong>l<br />
aire hacia el interior (recirculación<br />
<strong>de</strong>l aire)<br />
❑ Filtro <strong>de</strong> carbón<br />
activo en caso <strong>de</strong><br />
no existir la<br />
posibilidad <strong>de</strong><br />
trabajar con<br />
evacuación <strong>de</strong>l<br />
aire hacia el<br />
exterior.<br />
Peso en kg:<br />
60 cm<br />
90 cm<br />
Evacuación<br />
<strong>de</strong>l aire al<br />
exterior<br />
600 / 900<br />
� El kit <strong>de</strong> montaje completo, así como<br />
los filtros <strong>de</strong> repuesto, se pue<strong>de</strong>n adquirir<br />
en el comercio especializado.<br />
Preparativos en la pared<br />
❑ La pared tiene que ser lisa y vertical.<br />
❑ Procurar un asiento firme <strong>de</strong> los tacos<br />
en la pared.<br />
Recirculación<br />
<strong>de</strong>l aire<br />
15,0 17,0<br />
17,5 19,5<br />
Nos reservamos el <strong>de</strong>recho <strong>de</strong> introducir modificaciones<br />
o cambios constructivos en los aparatos como<br />
consecuencia <strong>de</strong>l progreso técnico.<br />
Conexión eléctrica<br />
La campana <strong>extractor</strong>a sólo podrá<br />
conectarse a una toma (caja) <strong>de</strong> corriente<br />
provista <strong>de</strong> puesta a tierra. La toma <strong>de</strong><br />
corriente <strong>de</strong>berá encontrarse o montarse<br />
directamente <strong>de</strong>trás <strong>de</strong>l revestimiento<br />
<strong>de</strong>corativo <strong>de</strong> la campana.<br />
Características eléctricas:<br />
figuran en la placa <strong>de</strong> características que<br />
es accesible <strong>de</strong>spués <strong>de</strong> quitar los marcos<br />
<strong>de</strong> filtro, en la parte interior <strong>de</strong>l aparato.<br />
� En caso <strong>de</strong> reparación <strong>de</strong> la campana<br />
<strong>de</strong>berá <strong>de</strong>sconectarse siempre el aparato<br />
<strong>de</strong> la red eléctrica, antes <strong>de</strong> iniciar los<br />
trabajos correspondientes.<br />
Longitud <strong>de</strong>l cable <strong>de</strong> conexión a la red<br />
eléctrica: 1,30 m.<br />
En caso <strong>de</strong> necesitar una conexión fija a<br />
la red eléctrica:<br />
El aparato sólo <strong>de</strong>berá ser conectado a la<br />
red eléctrica por un instalador-electricista<br />
registrado como tal en la empresa <strong>de</strong><br />
abastecimiento <strong>de</strong> energía eléctrica <strong>de</strong> la<br />
zona. Como dispositivo <strong>de</strong> separación se<br />
admiten interruptores con una abertura <strong>de</strong><br />
contacto superior a 3 mm y <strong>de</strong>sconexión<br />
<strong>de</strong> todas las fases. Esto incluye<br />
interruptores LS y contactores.<br />
� En caso <strong>de</strong> producirse daños en el<br />
cable <strong>de</strong> conexión <strong>de</strong>l aparato, éste sólo<br />
podrá ser sustituido por el fabricante, un<br />
técnico especializado <strong>de</strong>l Servicio <strong>de</strong><br />
Asistencia Técnica Oficial o un técnico<br />
especializado <strong>de</strong>l ramo, a fin <strong>de</strong> evitar<br />
situaciones <strong>de</strong> peligro.<br />
La campana <strong>extractor</strong>a cumple las normas<br />
comunitarias en materia <strong>de</strong> radio<strong>de</strong>sparasitaje.<br />
11
Montaje<br />
Esta campana <strong>extractor</strong>a ha sido<br />
diseñada exclusivamente para su montaje<br />
en la pared.<br />
1. Retirar el filtro antigrasa (véanse al<br />
respecto las instrucciones <strong>de</strong> uso <strong>de</strong> la<br />
campana).<br />
2. Trazar en la pared una línea medial<br />
<strong>de</strong>s<strong>de</strong> el techo hasta el bor<strong>de</strong> inferior <strong>de</strong><br />
la campana <strong>extractor</strong>a.<br />
3. Marcar en la pared la posición <strong>de</strong> los<br />
tornillos con ayuda <strong>de</strong> la plantilla.<br />
� Entre la placa <strong>de</strong> cocción y el bor<strong>de</strong><br />
inferior <strong>de</strong> la campana <strong>extractor</strong>a <strong>de</strong>be<br />
observarse la siguiente distancia mínima <strong>de</strong><br />
seguridad: 550 mm, por encima <strong>de</strong> las<br />
placas <strong>de</strong> cocción eléctricas 650 mm por<br />
encima <strong>de</strong> las placas <strong>de</strong> cocción <strong>de</strong> gas. El<br />
bor<strong>de</strong> inferior <strong>de</strong> la plantilla <strong>de</strong> montaje<br />
correspon<strong>de</strong> al bor<strong>de</strong> inferior <strong>de</strong> la<br />
campana <strong>extractor</strong>a.<br />
4. Practicar 4 taladros para los tornillos <strong>de</strong><br />
sujeción <strong>de</strong>l cuerpo <strong>de</strong> la campana<br />
<strong>extractor</strong>a, y dos para fijar el<br />
revestimiento <strong>de</strong>corativo en forma <strong>de</strong><br />
chimenea, con diámetro 8 mm.<br />
Colocar en los mismos los tacos<br />
correspondientes, prestando atención a<br />
que los tacos que<strong>de</strong>n perfectamente a<br />
ras con la pared.<br />
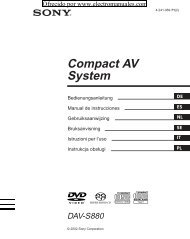
347<br />
12<br />
30<br />
36,5<br />
mind.550 Elektro<br />
mind.650 Gas<br />
216<br />
178<br />
400<br />
Atención: ¡Ténganse en cuenta los<br />
posibles accesorios opcionales que se<br />
vayan a montar con la campana <strong>extractor</strong>a!<br />
5. Encajar los 2 distanciadores adjuntos en<br />
la escuadra <strong>de</strong> soporte para el<br />
revestimiento <strong>de</strong> la chimenea.<br />
Montar y fijar la escuadra <strong>de</strong> soporte<br />
<strong>de</strong>l revestimiento con dos tornillos<br />
hexagonales.<br />
6. Enroscar los dos tornillos hexagonales<br />
superiores hasta unos 5 mm.<br />
7. Enganchar la campana <strong>extractor</strong>a en los<br />
tornillos.<br />
ca.5mm
Montaje<br />
08. Enroscar los dos tornillos hexagonales<br />
inferiores.<br />
� ¡Antes <strong>de</strong> apretar a tope los tornillos<br />
<strong>de</strong> sujeción <strong>de</strong> la campana, hay que<br />
alinear ésta!.<br />
09. Empalmar el tubo <strong>de</strong> evacuación <strong>de</strong>l<br />
aire en la campana <strong>extractor</strong>a.<br />
10. Conectar el aparato a la red eléctrica.<br />
11. Retirar la lámina protectora <strong>de</strong> los<br />
revestimientos laterales <strong>de</strong> la chimenea.<br />
� ¡Prestar atención a no dañar la<br />
superficie sensible <strong>de</strong> acero inoxidable<br />
<strong>de</strong> los revestimientos!<br />
12. Enganchar los dos elementos <strong>de</strong>l<br />
revestimiento <strong>de</strong> la chimenea<br />
<strong>de</strong>splazándolos uno respecto al otro -<br />
las ranuras <strong>de</strong> la parte telescópica<br />
superior <strong>de</strong>berá estar hacia abajo.<br />
Colocar el revestimiento en forma <strong>de</strong><br />
chimenea en la ranura <strong>de</strong> soporte <strong>de</strong> la<br />
campana <strong>extractor</strong>a.<br />
� ¡Evite los rasguños al montar los<br />
elementos <strong>de</strong> revestimiento en forma<br />
<strong>de</strong> chimenea, protegiendo con la<br />
plantilla <strong>de</strong> montaje el bor<strong>de</strong> <strong>de</strong>l<br />
elemento inferior <strong>de</strong>l revestimiento.<br />
1.<br />
3.<br />
2.<br />
13. Levantar ligeramente el elemento<br />
superior <strong>de</strong>l revestimiento <strong>de</strong> la<br />
chimenea y fijarlo lateralmente, con<br />
ayuda <strong>de</strong> dos tornillos, a la escuadra<br />
<strong>de</strong> soporte.<br />
14. Montar el filtro antigrasa (véanse al<br />
respecto las instrucciones <strong>de</strong> uso <strong>de</strong> la<br />
campana <strong>extractor</strong>a).<br />
13
Operating Instructions<br />
Appliance <strong>de</strong>scription<br />
Lighting<br />
Operating mo<strong>de</strong>s<br />
Exhaust-air mo<strong>de</strong>:<br />
❑ The <strong>extractor</strong>-<strong>hood</strong> fan extracts the kitchen<br />
vapours and conveys them through<br />
the grease filter into the atmosphere.<br />
❑ The grease filter absorbs the solid<br />
particles in the kitchen vapours.<br />
❑ The kitchen is kept almost free of grease<br />
and odours.<br />
D When the <strong>extractor</strong> <strong>hood</strong> is operated<br />
in exhaust-air mo<strong>de</strong> simultaneously with<br />
a different burner which also makes use<br />
of the same chimney (such as gas, oil or<br />
coal-fired heaters, continuous-flow heaters,<br />
hot-water boilers) care must be taken to<br />
ensure that there is an a<strong>de</strong>quate supply<br />
of fresh air which will be nee<strong>de</strong>d by the<br />
burner for combustion.<br />
Safe operation is possible provi<strong>de</strong>d that the<br />
un<strong>de</strong>rpressure in the room where the<br />
burner is installed does not exceed 4 Pa<br />
(0.04 mbar).<br />
14<br />
Chimney<br />
panelling<br />
Light / fan<br />
switches<br />
Filter grille<br />
Operating mo<strong>de</strong>s<br />
This can be achieved if combustion air can<br />
flow through non-lockable openings, e.g. in<br />
doors, windows and via the airintake/exhaust-air<br />
wall box or by other<br />
technical measures, such as reciprocal<br />
interlocking, etc.<br />
If the air intake is ina<strong>de</strong>quate, there is a<br />
risk of poisoning from combustion gases<br />
which are drawn back into the room.<br />
An air-intake/exhaust-air wall box by itself is<br />
no guarantee that the limiting value will not<br />
be excee<strong>de</strong>d.<br />
Note: When assessing the overall<br />
requirement, the combined ventilation<br />
system for the entire household must be<br />
taken into consi<strong>de</strong>ration. This rule does not<br />
apply to the use of cooking appliances,<br />
such as hobs and ovens.<br />
Unrestricted operation is possible if the<br />
<strong>extractor</strong> <strong>hood</strong> is used in recirculating mo<strong>de</strong><br />
– with activated carbon filter.<br />
Circulating-air mo<strong>de</strong>:<br />
❑ An activated carbon filter must be fitted<br />
for this operating mo<strong>de</strong> (see Filters and<br />
maintenance).<br />
� The complete installation set and<br />
replacement filters can be obtained from<br />
specialist outlets.<br />
❑ The <strong>extractor</strong>-<strong>hood</strong> fan extracts the<br />
kitchen vapours which are purified in the<br />
grease filter and activated carbon filter<br />
and then conveyed back into the<br />
kitchen.<br />
❑ The grease filter absorbs the grease<br />
particles in the kitchen vapours.<br />
❑ The activated carbon filter binds the<br />
odorous substances.<br />
� If no activated carbon filter is installed,<br />
it is not possible to bind the odorous<br />
substances in the cooking vapours.
Before using for the first time<br />
Important notes:<br />
❑ The Instructions for Use apply to several<br />
versions of this appliance. Accordingly,<br />
you may find <strong>de</strong>scriptions of individual<br />
features that do not apply to your<br />
specific appliance.<br />
❑ This <strong>extractor</strong> <strong>hood</strong> complies with all<br />
relevant safety regulations.<br />
Repairs should be carried out by<br />
qualified technicians only.<br />
Improper repairs may put the user at<br />
consi<strong>de</strong>rable risk.<br />
� Do not use the appliance if damaged.<br />
� The appliance may be connected to the<br />
mains by a qualified technician only.<br />
� The appliance is not inten<strong>de</strong>d for use by<br />
young children or infirmed persons<br />
without supervision.<br />
Young children should be supervised to<br />
ensure they do not play with the appliance.<br />
� If the connecting cable for this<br />
appliance is damaged, the cable must be<br />
replaced by the manufacturer or his customer<br />
service or a similarly qualified person in or<strong>de</strong>r<br />
to prevent serious injury to the user.<br />
� Dispose of packaging materials<br />
properly (see Installation instructions).<br />
� This <strong>extractor</strong> <strong>hood</strong> is <strong>de</strong>signed for<br />
domestic use only.<br />
� Light bulbs must always be fitted when<br />
the <strong>extractor</strong> <strong>hood</strong> is in use.<br />
� Defective bulbs should be replaced<br />
immediately to prevent the remaining bulbs<br />
from overloading.<br />
� Never operate the <strong>extractor</strong> <strong>hood</strong><br />
without a grease filter.<br />
� Overheated fat or oil can easily catch fire.<br />
If you are cooking with fat or oil, e.g. chips,<br />
etc., never leave the cooker unatten<strong>de</strong>d.<br />
� Do not flambé food directly un<strong>de</strong>r the<br />
<strong>extractor</strong> <strong>hood</strong>.<br />
Risk of grease filter catching fire due<br />
! to flames.<br />
❑ Before using your appliance for the first<br />
time, please read these Instructions for<br />
Use carefully. They contain important<br />
information concerning your personal<br />
safety as well as on use and care of the<br />
appliance.<br />
❑ Please retain the operating and<br />
installation instructions for a subsequent<br />
owner.<br />
� The hotplates must always be covered<br />
with a utensil.<br />
� Restrictions apply to the use of the<br />
<strong>extractor</strong> <strong>hood</strong> over a solid-fuel burner<br />
(coal, wood, etc.). (See Installation<br />
instructions).<br />
Gas hobs / Gas cookers<br />
� Do not use all the gas hotplates<br />
simultaneously for a prolonged period<br />
(max. 15 minutes) at maximum thermal<br />
load, otherwise there is a risk of burns if the<br />
housing surfaces are touched or a risk of<br />
damage to the <strong>extractor</strong> <strong>hood</strong>. If the<br />
<strong>extractor</strong> <strong>hood</strong> is situated over a gas hob,<br />
operate the <strong>hood</strong> at maximum setting if<br />
three or more gas hotplates are operated<br />
simultaneously.<br />
If you encounter a problem<br />
If you have any questions or if a fault<br />
occurs, please call Customer Service.<br />
(See list of Customer Service<br />
representatives).<br />
When you call, please quote the following:<br />
E-Nr. FD<br />
Enter the relevant numbers into the box<br />
above. The E-Nr. (product no.) and FD<br />
(production date) are shown on the<br />
nameplate which can be seen insi<strong>de</strong> the<br />
<strong>extractor</strong> <strong>hood</strong> after the filter frame has<br />
been <strong>de</strong>tached.<br />
15
Operating procedure<br />
� The most effective method of removing<br />
vapours produced during cooking is to:<br />
❑ Switch the ventilator ON<br />
as soon as you begin cooking.<br />
❑ Switch the ventilator OFF<br />
a few minutes after you have finished<br />
cooking.<br />
Selecting the required fan setting:<br />
❑ Depress the appropriate switch.<br />
❑ The fan always runs at the highest<br />
selected setting.<br />
Lighting:<br />
❑ The light can be switched on at any<br />
time, even though the fan is switched off.<br />
16<br />
Light<br />
Fan settings<br />
Filters and maintenance<br />
Grease filters:<br />
Metal filters are used to trap the greasy<br />
element of the vapours that <strong>de</strong>velop<br />
during cooking.<br />
The filter mats are ma<strong>de</strong> from noncombustible<br />
metal.<br />
Caution:<br />
As the filter becomes more and more<br />
saturated with grease, not only does the<br />
risk of it catching fire increase but the<br />
efficiency of the <strong>extractor</strong> <strong>hood</strong> can also be<br />
adversely affected.<br />
Important:<br />
By cleaning the metal grease filters at<br />
appropriate intervals, the possibility of them<br />
catching fire as a result of a build-up of heat<br />
such as occurs when <strong>de</strong>ep-fat frying or<br />
roasting is taking place, is reduced.<br />
Cleaning the metal grease filters:<br />
❑ In normal operation (1 to 2 hours daily),<br />
the metal grease filter must be cleaned<br />
after 8 to 10 weeks.<br />
❑ The filters can be cleaned in a dishwasher.<br />
It is however possible that they<br />
will become slightly discoloured.<br />
❑ The filter must be placed loosely, and<br />
NOT wedged, in the dishwasher.<br />
Important:<br />
Metal filters that are saturated with<br />
grease should not be washed together<br />
with other dishes etc.<br />
❑ When cleaning the filters by hand, soak<br />
them in hot soapy water first of all.<br />
Then brush the filters clean, rinse them<br />
thoroughly and leave the water to drain off.
Filters and maintenance<br />
Removing and inserting the metal grease<br />
filters:<br />
1. Press the catch on the grease filters<br />
inwards and fold the filters down.<br />
2. Clean the filters.<br />
3. Insert the clean filters back into the<br />
<strong>hood</strong>.<br />
Activated carbon filter:<br />
For neutralizing odours in recirculating<br />
mo<strong>de</strong>.<br />
Caution:<br />
As the filter becomes more and more<br />
saturated with grease, there is an increased<br />
risk of fire and the function of the <strong>extractor</strong><br />
<strong>hood</strong> may be impaired.<br />
Important:<br />
Change the activated carbon filter promptly<br />
to prevent the risk of fire from the<br />
accumulation of heat when <strong>de</strong>ep-fat frying<br />
or roasting.<br />
Inserting the filter:<br />
1. Remove the metal filters (see "Removing<br />
and inserting the metal grease filters").<br />
2. Insert the activated carbon filter.<br />
3. Engage the lug.<br />
4. Insert the metal grease filters (see<br />
"Removing and inserting the metal<br />
grease filters").<br />
Removing the filter:<br />
1. Remove the metal filters.<br />
2. Press in the lug and remove the<br />
activated carbon filter.<br />
3. Insert the metal grease filters.<br />
Replacing the activated carbon filter:<br />
❑ During normal operation (1 to 2 hours<br />
per day) the activated carbon filters<br />
should be replaced approximately 1 x<br />
year.<br />
❑ A replacement filter can be obtained<br />
from any authorized <strong>de</strong>aler.<br />
❑ Use original filters only.<br />
By doing so you will obtain maximum<br />
performance from your <strong>extractor</strong> <strong>hood</strong>.<br />
Disposing of the old activated carbon<br />
filter:<br />
❑ There are no pollutants in the activated<br />
carbon filters. They can therefore be<br />
disposed of as part of your normal<br />
domestic refuse.<br />
17
Cleaning and care<br />
Disconnect the <strong>extractor</strong> <strong>hood</strong> from the<br />
electricity supply by pulling out the<br />
mains plug or switching it off at the fuse<br />
box.<br />
❑ At the same time as you clean the<br />
grease filters, clean off any grease from<br />
all accessible parts of the housing. This<br />
significantly reduces the fire hazard and<br />
ensures that the <strong>extractor</strong> <strong>hood</strong><br />
performs as effectively as possible.<br />
❑ Use a hot <strong>de</strong>tergent solution or a mild<br />
window cleaner to clean the canopy of<br />
the <strong>extractor</strong> <strong>hood</strong>.<br />
❑ Do not scrape off any dirt that has dried<br />
on but loosen it up with a damp cloth.<br />
❑ Do not use abrasive cleaning agents or<br />
sponges that could cause scratches.<br />
❑ Note: Do not use alcohol (spirit) on<br />
plastic parts, otherwise the surface may<br />
become matt in appearance.<br />
Caution: Ensure that the kitchen is a<strong>de</strong>quately<br />
ventilated. Avoid naked flames!<br />
� Clean the operating buttons with a mild<br />
soapy solution and a soft, damp cloth only.<br />
Do not use stainless-steel cleaner to clean<br />
the operating buttons.<br />
Stainless steel surfaces:<br />
❑ Use a mild non-abrasive stainless steel<br />
cleaner.<br />
❑ Clean the surface in the same direction<br />
as it has been ground and polished.<br />
� Do not use any of the following to clean<br />
stainless steel surfaces: abrasive sponges,<br />
cleaning agents containing sand, soda, acid<br />
or chlori<strong>de</strong>!<br />
Aluminium and plastic surfaces:<br />
❑ Use a soft, non-linting window cloth or<br />
micro-fibre cloth.<br />
❑ Do not use dry cloths.<br />
❑ Use a mild window cleaning agent.<br />
❑ Do not use aggressive, acidic or caustic<br />
cleaners.<br />
❑ Do not use abrasive agents.<br />
18<br />
Replacing the light bulbs<br />
1. Switch off the <strong>extractor</strong> <strong>hood</strong> and pull<br />
out the mains plug or switch off the<br />
electricity supply at the fuse box.<br />
2. Remove the grease filters (see Filters and<br />
Maintenance).<br />
3. Press down the bulb cover and<br />
disconnect from the light strip.<br />
4. Replace the bulb (standard filament bulb,<br />
max 40 W, E14 bulb hol<strong>de</strong>r).<br />
5. Attach the lamp cover again.<br />
6. Re-insert the grease filters.<br />
7. Plug the appliance into the mains or<br />
switch it on at the fuse box.
Installation Instructions:<br />
Important information<br />
� Old appliances are not worthless<br />
rubbish. Valuable raw materials can be<br />
reclaimed by recycling old appliances.<br />
Before disposing of your old appliance,<br />
ren<strong>de</strong>r it unusable.<br />
� You received your new appliance in a<br />
protective shipping carton. All packaging<br />
materials are environmentally friendly and<br />
recyclable. Please contribute to a better<br />
environment by disposing of packaging<br />
materials in an environmentally-friendly<br />
manner.<br />
Please ask your <strong>de</strong>aler or inquire at your<br />
local authority about current means of<br />
disposal.<br />
� The <strong>extractor</strong> <strong>hood</strong> can be used in<br />
exhaust air or circulating air mo<strong>de</strong>.<br />
� Always mount the <strong>extractor</strong> <strong>hood</strong> over<br />
the centre of the hob.<br />
� Minimum distance between electric<br />
hob and bottom edge of <strong>extractor</strong> <strong>hood</strong>:<br />
550 mm, Fig. 1.<br />
�The <strong>extractor</strong> <strong>hood</strong> must not be<br />
installed over a solid fuel cooker – a<br />
potential fire hazard (e.g. flying sparks) –<br />
unless the cooker features a closed,<br />
non-removable cover and all national<br />
regulations are observed.<br />
� The smaller the gap between the<br />
<strong>extractor</strong> <strong>hood</strong> and hotplates, the greater<br />
the likeli<strong>hood</strong> that droplets will form on the<br />
un<strong>de</strong>rsi<strong>de</strong> of the <strong>extractor</strong> <strong>hood</strong>.<br />
Additional information concerning gas<br />
cookers:<br />
� When installing gas hotplates, comply<br />
with the relevant national statutory<br />
regulations (e.g. in Germany: Technische<br />
Regeln Gasinstallation TRGI).<br />
� Always comply with the currently valid<br />
regulations and installation instructions<br />
supplied by the gas appliance<br />
manufacturer.<br />
� Only one si<strong>de</strong> of the <strong>extractor</strong> <strong>hood</strong><br />
may be installed next to a high-si<strong>de</strong>d unit<br />
or high wall. Gap at least 50 mm.<br />
� Minimum distance on gas hotplates<br />
between the upper edge of the trivet<br />
and lower edge of the <strong>extractor</strong><br />
<strong>hood</strong>: 650 mm, Fig. 1.<br />
19
Prior to installation<br />
Exhaust-air mo<strong>de</strong><br />
The exhaust air is discharged upwards<br />
through a ventilation shaft or directly<br />
through the outsi<strong>de</strong> wall into the open.<br />
D Exhaust air should neither be directed<br />
into a smoke or exhaust flue that is<br />
currently used for other purposes, nor into<br />
a shaft that is used for ventilating rooms in<br />
which stoves or fireplaces are also located.<br />
Exhaust air may be discharged in<br />
accordance with official and statutory<br />
regulations only (e.g. national building<br />
regulations).<br />
Local authority regulations must be<br />
observed when discharging air into smoke<br />
or exhaust flues that are not otherwise in<br />
use.<br />
D When the <strong>extractor</strong> <strong>hood</strong> is operated<br />
in exhaust-air mo<strong>de</strong> simultaneously with<br />
a different burner which also makes use<br />
of the same chimney (such as gas, oil or<br />
coal-fired heaters, continuous-flow heaters,<br />
hot-water boilers) care must be taken to<br />
ensure that there is an a<strong>de</strong>quate supply<br />
of fresh air which will be nee<strong>de</strong>d by the<br />
burner for combustion.<br />
Safe operation is possible provi<strong>de</strong>d that the<br />
un<strong>de</strong>rpressure in the room where the<br />
burner is installed does not exceed 4 Pa<br />
(0.04 mbar).<br />
20<br />
150 150<br />
mind. 45<br />
684-1086 136<br />
500<br />
280<br />
260<br />
mind.60<br />
mind.<br />
400<br />
mind.<br />
460<br />
600 / 900<br />
This can be achieved if combustion air can<br />
flow through non-lockable openings, e.g. in<br />
doors, windows and via the airintake/exhaust-air<br />
wall box or by other<br />
technical measures, such as reciprocal<br />
interlocking, etc.<br />
If the air intake is ina<strong>de</strong>quate, there is a<br />
risk of poisoning from combustion gases<br />
which are drawn back into the room.<br />
An air-intake/exhaust-air wall box by itself<br />
is no guarantee that the limiting value will<br />
not be excee<strong>de</strong>d.<br />
Note: When assessing the overall<br />
requirement, the combined ventilation<br />
system for the entire household must be<br />
taken into consi<strong>de</strong>ration. This rule does not<br />
apply to the use of cooking appliances,<br />
such as hobs and ovens.<br />
Unrestricted operation is possible if the<br />
<strong>extractor</strong> <strong>hood</strong> is used in recirculating<br />
mo<strong>de</strong> – with activated carbon filter.<br />
If the exhaust air is going to be<br />
discharged into the open, a telescopic<br />
wall box should be fitted into the outsi<strong>de</strong><br />
wall.
Prior to installation<br />
For operating in exhaust-air mo<strong>de</strong>, a<br />
one-way flap should be mounted insi<strong>de</strong> the<br />
<strong>extractor</strong> <strong>hood</strong> unless there is already one<br />
fitted in the outlet duct or wall ventilation<br />
box.<br />
If no one-way flap was enclosed with the<br />
<strong>hood</strong>, it can be obtained from a specialist<br />
retailer.<br />
Attaching the one-way flap:<br />
❑ Insert the two lugs on the one-way flap<br />
into the holes on the air-pipe connector<br />
or air outlet and lock into position.<br />
� Before installing the one-way flap,<br />
ensure that the lettering or stamp is on the<br />
outsi<strong>de</strong>.<br />
If the exhaust air is going to be<br />
discharged into the open, a telescopic<br />
wall box should be fitted into the outsi<strong>de</strong><br />
wall.<br />
For optimum <strong>extractor</strong> <strong>hood</strong> efficiency:<br />
❑ Short, smooth air exhaust pipe.<br />
❑ As few bends in the pipe as possible.<br />
❑ Diameter of pipe to be as large as<br />
possible and no tight bends in pipe.<br />
If long, rough exhaust-air pipes,<br />
many pipe bends or smaller pipe<br />
diameters are used, the air extraction<br />
rate will no longer be at an optimum<br />
level and there will be an increase in<br />
noise.<br />
❑ Round pipes:<br />
We recommend<br />
Internal diameter: 150 mm.<br />
❑ Flat ducts must have an internal crosssection<br />
that equates to that of round<br />
pipes.<br />
There should be no sharp bends.<br />
l 150 mm approx. 177 cm 2<br />
❑ If pipes have different diameters:<br />
Insert sealing strip.<br />
❑ For exhaust-air mo<strong>de</strong>, ensure that<br />
there is an a<strong>de</strong>quate supply of fresh air.<br />
Pipe connection<br />
❑ Screw the<br />
enclosed air-pipe<br />
connector over<br />
the air outlet.<br />
150 mm l extraction pipe:<br />
❑ Attach the exhaust-air pipe directly to<br />
the air outlet.<br />
� If a one-way flap has been fitted,<br />
conduct a performance test.<br />
21
Prior to installation<br />
Circulating-air mo<strong>de</strong><br />
❑ With activated carbon filter if exhaust-air<br />
mo<strong>de</strong> is not possible.<br />
� The complete installation set can be<br />
obtained from specialist outlets.<br />
Weight in kg:<br />
Electrical connection<br />
WARNING: THIS APPLIANCE MUST BE<br />
EARTHED<br />
IMPORTANT: Fitting a Different Plug:<br />
The wires in the mains lead are coloured in<br />
accordance with the following co<strong>de</strong>:<br />
Green and Yellow – Earth<br />
Blue – Neutral<br />
Brown – Live<br />
If you fit your own plug, the colours of<br />
these wires may not correspond with the<br />
i<strong>de</strong>ntifying marks on the plug terminals.<br />
22<br />
Exhaust air Recirculating air<br />
60 cm 15,0<br />
17,0<br />
90 cm 17,5<br />
19,5<br />
600 / 900<br />
Preparing the wall<br />
❑ The wall must be flat and perpendicular.<br />
❑ Ensure that the wall is capable of<br />
providing a firm hold for mounting<br />
screws and plugs.<br />
We reserve the right to construction changes within the<br />
context of technical <strong>de</strong>velopment.<br />
Electrical connection<br />
This is what you have to do:<br />
1.Connect the green and yellow (Earth)<br />
wire to the terminal in the plug marked<br />
‘E’ or with the symbol ( ), or<br />
coloured green or green and yellow.<br />
2.Connect the blue (Neutral) wire to the<br />
terminal in the plug marked ‘N’ or<br />
coloured black.<br />
3.Connect the brown (Live) wire to the<br />
terminal marked ‘L’, or coloured red.<br />
The <strong>extractor</strong> <strong>hood</strong> should only be<br />
connected to an earthed socket that has<br />
been installed according to relevant<br />
regulations.<br />
If possible, site the earthed socket directly<br />
behind the chimney panelling.<br />
Electrical data:<br />
Are to be found on the name plate insi<strong>de</strong><br />
the appliance after removal of the filter<br />
frame.<br />
� Before un<strong>de</strong>rtaking any repairs,<br />
always disconnect the <strong>extractor</strong> <strong>hood</strong> from<br />
the electricity supply.<br />
Length of the connecting cable: 1.30 m.<br />
If it is necessary to wire the <strong>extractor</strong><br />
<strong>hood</strong> directly into the mains:<br />
The <strong>extractor</strong> <strong>hood</strong> should only be<br />
connected to the electricity supply by a<br />
properly qualified electrician.<br />
A separator must be installed in the<br />
household circuit. A suitable separator is a<br />
switch that has a contact gap of more than<br />
3 mm and interrupts all poles. Such<br />
<strong>de</strong>vices inclu<strong>de</strong> circuit breakers and<br />
contactors.<br />
� If the connecting cable for this<br />
appliance is damaged, the cable must be<br />
replaced by the manufacturer or his<br />
customer service or a similarly qualified<br />
person in or<strong>de</strong>r to prevent serious injury to<br />
the user.<br />
This <strong>extractor</strong> <strong>hood</strong> corresponds to EC<br />
regulations concerning RF interference<br />
suppression.
Installation<br />
This <strong>extractor</strong> <strong>hood</strong> is inten<strong>de</strong>d to be<br />
mounted onto the kitchen wall.<br />
1. Remove the grease filter (refer to<br />
Operating Instructions).<br />
2. Draw a line on the wall from the ceiling<br />
to the lower edge of the <strong>hood</strong> at the<br />
centre of the location where the <strong>hood</strong> is<br />
going to be mounted.<br />
3. Using the template, mark positions on<br />
the wall for the screws.<br />
� Ensure that the minimum distance between<br />
the hob and the <strong>extractor</strong> <strong>hood</strong> is<br />
maintained – 550 mm for an electric hob<br />
and 650 mm for a gas hob. The bottom<br />
edge of the template equates to the lower<br />
edge of the <strong>extractor</strong> <strong>hood</strong>.<br />
4. Drill 4 x l 8 mm holes for the <strong>extractor</strong><br />
<strong>hood</strong> and 2 x l 8 mm holes for the<br />
chimney panelling. Insert plugs into the<br />
holes so that they are flush with the wall.<br />
347<br />
30<br />
36,5<br />
mind.550 Elektro<br />
mind.650 Gas<br />
216<br />
178<br />
400<br />
Note: Take into account any special<br />
accessories that are going to be fitted.<br />
5. Attach the 2 enclosed spacers to the<br />
fixing bracket for the flue duct panelling.<br />
Attach the fixing bracket for the<br />
chimney panelling using two hexagon<br />
head cap screws.<br />
6. Screw in the two upper hexagon head<br />
cap screws leaving them exten<strong>de</strong>d by<br />
approx. 5 mm.<br />
7. Attach the <strong>extractor</strong> <strong>hood</strong> to the<br />
screws.<br />
ca.5mm<br />
23
Installation<br />
08. Screw in the two lower hexagon head<br />
cap screws.<br />
� Before the 4 screws are tightened<br />
down, align the <strong>extractor</strong> <strong>hood</strong> properly.<br />
09. Connect up the air outlet pipe.<br />
10. Connect the <strong>hood</strong> to the electricity<br />
supply.<br />
24<br />
11. Remove the protective film from the<br />
two flue ducts.<br />
� Take care not to damage the<br />
stainless steel surfaces which are<br />
susceptible to scratches etc.<br />
12. Push both sections of the flue panelling<br />
together (slots in the upper section<br />
must be pointing downwards) and<br />
insert into the opening in the <strong>extractor</strong><br />
<strong>hood</strong>.<br />
� Protect the cover panels from<br />
scratches, for example by laying the<br />
template used for marking the wall over<br />
the top edge of the lower section.<br />
1.<br />
3.<br />
2.<br />
13. Sli<strong>de</strong> out the upper section and attach<br />
it to the mounting brackets at the si<strong>de</strong>s<br />
with two screws.<br />
14. Insert the grease filter (refer to<br />
Operating Instructions).
Mo<strong>de</strong> d’emploi<br />
Description <strong>de</strong> l'appareil Mo<strong>de</strong>s <strong>de</strong> fonctionnement<br />
Capot <strong>de</strong><br />
cheminée<br />
Eclairage<br />
Mo<strong>de</strong>s <strong>de</strong> fonctionnement<br />
Commutateur<br />
Lumière/<br />
Ventilateur<br />
Grille du filtre<br />
Air évacué à l'extérieur:<br />
❑ Le ventilateur <strong>de</strong> la hotte aspire les<br />
buées <strong>de</strong> cuisson qui traversent un filtre<br />
à graisse avant <strong>de</strong> regagner<br />
l'atmosphère extérieure.<br />
❑ Ce filtre retient les particules grasses<br />
soli<strong>de</strong>s en suspension dans les buées <strong>de</strong><br />
cuisson.<br />
❑ Les particules grasses ne se déposent<br />
plus dans la cuisine, les o<strong>de</strong>urs <strong>de</strong> cuisson<br />
disparaissent.<br />
D Si la hotte évacue l'air à l'extérieur et<br />
si le logement comporte <strong>de</strong>s moyens <strong>de</strong><br />
chauffage (tels par ex. <strong>de</strong>s appareils <strong>de</strong><br />
chauffage au gaz, au fuel ou au charbon,<br />
chauffe-eau instantanés ou à accumulation)<br />
raccordés à une cheminée, veiller<br />
impérativement à ce que l'apport d'air<br />
soit suffisant pour assurer la marche du<br />
chauffage à combustion.<br />
Un fonctionnement sans risque est possible<br />
si la dépression dans le local où le foyer <strong>de</strong><br />
chauffage est implanté ne dépasse pas 4<br />
Pascals (0,04 mbars).<br />
On y parvient en présence d'ouvertures non<br />
obturables ménagées par ex. dans les<br />
portes, fenêtres et en association avec <strong>de</strong>s<br />
ventouses télescopiques d'admission/<br />
évacuation <strong>de</strong> l'air à travers la maçonnerie<br />
ou par d'autres mesures techniques telles<br />
qu'un verrouillage réciproque ou assimilé<br />
permettant à l'air d'affluer pour assurer la<br />
combustion.<br />
En cas d'afflux d'air insuffisant, risque<br />
d'intoxication par réaspiration <strong>de</strong>s gaz<br />
<strong>de</strong> combustion.<br />
La présence d'une ventouse télescopique<br />
d'apport et d'évacuation d'air ne suffit pas<br />
à assurer le respect <strong>de</strong> la valeur limite.<br />
Remarque: lors <strong>de</strong> l'évaluation <strong>de</strong> la<br />
situation, toujours tenir compte <strong>de</strong><br />
l'ensemble <strong>de</strong>s moyens d'aération du<br />
logement. Cette règle ne vaut généralement<br />
pas si vous utilisez <strong>de</strong>s appareils <strong>de</strong> cuisson<br />
(table <strong>de</strong> cuisson et cuisinière à gaz).<br />
Si la hotte recycle l'air aspiré au moyen<br />
d'un filtre au charbon actif, son<br />
fonctionnement ne s'assortit d'aucune<br />
restriction.<br />
Air recyclé:<br />
❑ La hotte doit, dans ce cas, être équipée<br />
d'un filtre au charbon actif (voir le filtre et<br />
son entretien).<br />
� Vous pouvez vous procurer le kit <strong>de</strong><br />
montage complet ainsi que les filtres <strong>de</strong><br />
rechange auprès <strong>de</strong> votre reven<strong>de</strong>ur<br />
spécialisé.<br />
❑ Le ventilateur <strong>de</strong> la hotte <strong>aspirante</strong> aspire<br />
les buées qui traversent le filtre à graisse<br />
et celui à charbon actif avant <strong>de</strong> revenir<br />
dans la cuisine.<br />
❑ Le filtre à graisse retient les particules<br />
soli<strong>de</strong>s en suspension dans les buées <strong>de</strong><br />
cuisson.<br />
❑ Le filtre à charbon actif retient les<br />
substances odoriférantes.<br />
� Si vous n'incorporez aucun filtre au<br />
charbon actif, impossible <strong>de</strong> retenir les<br />
o<strong>de</strong>urs présentes dans les buées <strong>de</strong><br />
cuisson.<br />
25
Avant la première utilisation<br />
Remarques importantes:<br />
❑ La présente notice d'emploi vaut pour<br />
plusieurs versions <strong>de</strong> l'appareil.<br />
Elle peut contenir <strong>de</strong>s <strong>de</strong>scriptions<br />
d'accessoires ne figurant pas dans votre<br />
appareil.<br />
❑ Cette hotte <strong>aspirante</strong> est conforme aux<br />
dispositions <strong>de</strong> sécurité applicables.<br />
Les réparations ne doivent être<br />
effectuées que par un spécialiste.<br />
Des réparations inexpertes<br />
s'assortissent <strong>de</strong> risques<br />
considérables pour l'utilisateur.<br />
� Si l'appareil est endommagé, sa mise en<br />
service est proscrite.<br />
� Le branchement et la mise en service ne<br />
doivent être effectués que par un spécialiste.<br />
� Si le cordon d'alimentation <strong>de</strong> cet<br />
appareil a été endommagé, il faut confier son<br />
remplacement au fabricant ou à son service<br />
après-vente, ou encore à une personne<br />
possédant <strong>de</strong>s qualifications i<strong>de</strong>ntiques, pour<br />
éviter <strong>de</strong> créer <strong>de</strong>s risques.<br />
� Eliminez les matériaux d'emballage<br />
conformément à la réglementation (voir la<br />
notice <strong>de</strong> montage).<br />
� Cette hotte <strong>aspirante</strong> n'est <strong>de</strong>stinée à servir<br />
que pour couvrir les besoins d'un ménage.<br />
� Ne faites marcher la hotte <strong>aspirante</strong><br />
qu'ampoules montées sur leur douille.<br />
� Remplacez immédiatement les<br />
ampoules défectueuses pour empêcher une<br />
surcharge <strong>de</strong>s ampoules restantes.<br />
� N'utilisez jamais la hotte <strong>aspirante</strong> sans<br />
filtre à graisse.<br />
� Les graisses ou huiles surchauffées peuvent<br />
s'enflammer facilement.<br />
Par conséquent, surveillez toujours les plats<br />
(frites par ex.) qui se préparent à l'ai<strong>de</strong> <strong>de</strong><br />
matières grasses ou d'huiles.<br />
� Ne flambez aucun mets sous la hotte.<br />
Les flammes risqueraient d'atteindre le<br />
! filtre à graisse et d'y mettre le feu.<br />
26<br />
❑ Lisez attentivement la présente notice<br />
d'emploi avant d'utiliser votre appareil<br />
pour la première fois. Elle contient <strong>de</strong>s<br />
informations importantes non seulement<br />
pour votre sécurité mais aussi pour<br />
l'utilisation et l'entretien <strong>de</strong> l'appareil.<br />
❑ Rangez la présente notice <strong>de</strong> montage<br />
et d'emploi soigneusement pour pouvoir<br />
la remettre à un futur propriétaire <strong>de</strong><br />
l'appareil.<br />
� Lorsque les foyers sont allumés, <strong>de</strong>s<br />
ustensiles <strong>de</strong> cuisson doivent toujours se<br />
trouver <strong>de</strong>ssus.<br />
� L'utilisation d'une hotte <strong>aspirante</strong><br />
au-<strong>de</strong>ssus d'un foyer à combustible soli<strong>de</strong><br />
(charbon, bois, etc.) n'est autorisée qu'à<br />
certaines conditions (voir la notice <strong>de</strong><br />
montage).<br />
Tables <strong>de</strong> cuisson au gaz /<br />
Cuisinières à gaz<br />
� Ne faites jamais marcher tous les foyers<br />
au gaz en même temps et à pleine<br />
puissance pendant assez longtemps<br />
(15 minutes max.), sinon vous risquez <strong>de</strong><br />
vous brûler en touchant la surface du corps<br />
<strong>de</strong> la hotte, ou d'endommager carrément<br />
cette <strong>de</strong>rnière. Si la hotte doit marcher<br />
au-<strong>de</strong>ssus d'une table <strong>de</strong> cuisson au gaz,<br />
faites simultanément marcher la hotte à la<br />
puissance d'aspiration maximale si vous<br />
avez allumé trois foyers ou plus.<br />
Dérangements<br />
Si vous avez <strong>de</strong>s questions à poser ou en<br />
cas <strong>de</strong> dérangement, appelez s.v.p. le<br />
service après-vente.<br />
(Voir la liste <strong>de</strong>s agences du service aprèsvente).<br />
Lors <strong>de</strong> votre appel, veuillez mentionner les<br />
numéros suivants:<br />
N° E FD<br />
Inscrivez les numéros correspondants <strong>de</strong><br />
votre hotte dans le cadre ci-<strong>de</strong>ssus. Ces<br />
numéros se trouvent à l'intérieur <strong>de</strong><br />
l'appareil, sur la plaque signalétique<br />
accessible une fois la grille <strong>de</strong> filtre retirée.
Utilisation <strong>de</strong> la hotte <strong>aspirante</strong><br />
� La métho<strong>de</strong> la plus efficace pour<br />
supprimer les buées <strong>de</strong> cuisson consiste à:<br />
❑ Enclencher la hotte <strong>aspirante</strong><br />
en début <strong>de</strong> cuisson.<br />
❑ Eteindre la hotte <strong>aspirante</strong><br />
quelques seulement minutes après la fin<br />
<strong>de</strong> la cuisson.<br />
Lumière<br />
Puissance<br />
d’aspiaration<br />
Réglage <strong>de</strong> la puissance voulue du<br />
ventilateur:<br />
❑ Abaissez la manette du commutateur<br />
voulu.<br />
❑ Le ventilateur tourne toujours avec la<br />
plus forte puissance réglée.<br />
Eclairage:<br />
❑ Vous pouvez utiliser l'éclairage à tout<br />
moment, même quand le ventilateur est<br />
éteint.<br />
Filtre et entretien<br />
Filtres à graisse:<br />
Vous pouvez utiliser divers filtres pour<br />
retenir les particules grasses en<br />
suspension dans les buées <strong>de</strong> cuisson.<br />
Ces nattes filtrantes sont en métal<br />
incombustible.<br />
Attention:<br />
Plus elles se saturent en particules grasses<br />
et plus elles risquent <strong>de</strong> s'enflammer.<br />
D'autre part, leur saturation risque <strong>de</strong> gêner<br />
le bon fonctionnement <strong>de</strong> la hotte.<br />
Important:<br />
Prévenez tout risque d'incendie en<br />
nettoyant à temps les filtres à graisse en<br />
métal. Ce risque est dû à l'accumulation <strong>de</strong><br />
chaleur pendant la friture ou le rôtissage.<br />
Nettoyage <strong>de</strong>s filtres à graisse en métal:<br />
❑ En fonctionnement normal (1 à 2 heures<br />
par jour), le filtre doit être nettoyé au bout<br />
<strong>de</strong> 8 à 10 semaines.<br />
❑ Ces filtres sont nettoyables au lavevaisselle.<br />
Ils peuvent changer légèrement<br />
<strong>de</strong> couleur au lavage.<br />
❑ Le filtre doit reposer non serré dans le<br />
lave-vaisselle.<br />
Il ne doit pas être coincé.<br />
Important:<br />
Ne lavez pas en même temps la vaisselle<br />
et les filtres métalliques fortement<br />
saturés en matière grasse.<br />
❑ Si vous les nettoyez à la main, mettez les<br />
filtres à tremper pendant plusieurs heures<br />
dans <strong>de</strong> l'eau très chau<strong>de</strong> additionnée <strong>de</strong><br />
produit à vaisselle.<br />
Ensuite, brossez les filtres, rincez-les bien<br />
puis laissez-les goutter.<br />
27
Filtre et entretien<br />
Retrait et mise en place <strong>de</strong>s filtres à<br />
graisse en métal:<br />
1. Poussez dans le sens <strong>de</strong> la flèche le<br />
cran situé contre chaque filtre à graisse<br />
puis abaissez les filtres.<br />
2. Nettoyer les filtres à graisse.<br />
3. Une fois nettoyés, remettez les filtres à<br />
graisse en place.<br />
Filtre à charbon actif:<br />
Ce filtre sert à retenir les substances<br />
odoriférantes lorsque la hotte recycle l'air.<br />
Attention:<br />
Plus elles se saturent en particules grasses<br />
et plus elles risquent <strong>de</strong> s'enflammer.<br />
D'autre part, leur saturation risque <strong>de</strong> gêner<br />
le bon fonctionnement <strong>de</strong> la hotte.<br />
Important:<br />
Un changement à temps <strong>de</strong>s filtres à<br />
charbon actif prévient le risque d'incendie.<br />
Ce risque est dû à l'accumulation <strong>de</strong><br />
chaleur qui se produit pendant une friture<br />
ou la cuisson d'un rôti.<br />
28<br />
Mise en place du filtre:<br />
1. Retirez d'abord les filtres à graisse (voir<br />
la section intitulée "Retrait et mise en<br />
place <strong>de</strong>s filtres à graisse en métal).<br />
2. Mettez en place le filtre à charbon actif.<br />
3. Faites encranter la patte.<br />
4. Remontez les filtres à graisse en métal<br />
(voir la section intitulée "Retrait et mise<br />
en place <strong>de</strong>s filtres à graisse en métal).<br />
Retrait du filtre:<br />
1. Retirez les filtres à graisse en métal.<br />
2. Enfoncez la patte puis retirez le<br />
filtre à charbon actif par le bas.<br />
3. Remontez les filtres à graisse.<br />
Changement du filtre à charbon actif:<br />
❑ <strong>Hotte</strong> fonctionnant normalement<br />
(1 à 2 heures par jour), il faudra changer<br />
les filtres à charbon actif environ 1 fois<br />
par an.<br />
❑ Vous pouvez vous procurer un filtre à<br />
charbon actif <strong>de</strong> rechange dans le<br />
commerce spécialisé.<br />
❑ N'utilisez qu'un filtre d'origine.<br />
Vous garantirez ainsi un fonctionnement<br />
optimal <strong>de</strong> la hotte.<br />
Mise au rebut du filtre à charbon actif<br />
usagé:<br />
❑ Les filtres à charbon actif ne contiennent<br />
aucune substance nocive. Vous pouvez<br />
les mettre à la poubelles <strong>de</strong> déchets<br />
résiduels.
Nettoyage et entretien<br />
Avant tout nettoyage et entretien, mettez<br />
d'abord la hotte hors tension en débranchant<br />
la fiche mâle <strong>de</strong> la prise <strong>de</strong> courant<br />
ou en coupant le disjoncteur/fusible.<br />
❑ Lors du nettoyage <strong>de</strong>s filtres à graisse,<br />
nettoyez la graisse qui s'est déposée<br />
dans les endroits accessibles du corps <strong>de</strong><br />
hotte. Vous prévenez ainsi les risques<br />
d'incendie et garantissez ainsi un<br />
fonctionnement optimal <strong>de</strong> la hotte.<br />
❑ Pour la nettoyer, utilisez <strong>de</strong> l'eau chau<strong>de</strong><br />
additionnée <strong>de</strong> produit à vaisselle ou un<br />
liqui<strong>de</strong> non agressif à laver les fenêtres.<br />
❑ Ne tentez pas <strong>de</strong> gratter les salissures.<br />
Ramollissez-les avec un essuie-tout<br />
humi<strong>de</strong>.<br />
❑ N'utilisez pas <strong>de</strong> produits récurants ni<br />
d'éponges à dos abrasif.<br />
❑ Remarque: ne nettoyez pas les surfaces<br />
en plastique avec <strong>de</strong> l'alcool (à brûler) car<br />
<strong>de</strong>s taches mates pourraient<br />
apparaître.<br />
Pru<strong>de</strong>nce: ventilez suffisamment la<br />
cuisine, n'utilisez jamais <strong>de</strong> flamme nue.<br />
� Ne nettoyez les touches <strong>de</strong> comman<strong>de</strong><br />
qu'avec <strong>de</strong> l'eau additionnée d'un peu <strong>de</strong><br />
produit à vaisselle. Utilisez un chiffon doux et<br />
humi<strong>de</strong>.<br />
N'utilisez jamais <strong>de</strong> détergent pour acier pour<br />
nettoyer les touches <strong>de</strong> comman<strong>de</strong>.<br />
Surfaces en acier inox:<br />
❑ Veuillez utiliser un produit pour l'acier inox<br />
qui le nettoie sans le rayer.<br />
❑ Frottez toujours l'acier inox dans le sens<br />
<strong>de</strong> son polissage.<br />
� Ne nettoyez jamais les surfaces en acier<br />
inox avec <strong>de</strong>s éponges à dos<br />
récurant, et pas non plus avec <strong>de</strong>s détergents<br />
à base <strong>de</strong> sable, sou<strong>de</strong> caustique, aci<strong>de</strong><br />
ou chlore.<br />
Surfaces en aluminium et en plastique:<br />
❑ Utilisez un chiffon doux, ne peluchant pas,<br />
du genre employé pour nettoyer les vitres,<br />
ou un chiffon à microfibres.<br />
❑ N'utilisez pas <strong>de</strong> chiffons secs.<br />
❑ Utilisez un produit pour vitres mais non<br />
aggressif.<br />
❑ N'utilisez pas <strong>de</strong> détergents aggressifs,<br />
contenant un aci<strong>de</strong> ou une base.<br />
❑ N'utilisez pas <strong>de</strong> produits récurants.<br />
Changement du tube au néon<br />
1. Avant tout nettoyage et entretien, mettez<br />
d'abord la hotte hors tension en<br />
débranchant la fiche mâle <strong>de</strong> la prise <strong>de</strong><br />
courant ou en coupant le<br />
disjoncteur/fusible.<br />
2. Démontez les filtres à graisse (voir la<br />
section intitulée "Filtre et entretien").<br />
3. Par le haut, décrantez le cache<br />
d'éclairage hors du ban<strong>de</strong>au lumineux.<br />
4. Remplacez l'ampoule défectueuse<br />
(utilisez <strong>de</strong>s ampoules <strong>de</strong> 40 watts max.<br />
en vente habituelle dans le commerce,<br />
douille E14).<br />
5. Remettez le cache <strong>de</strong> l'éclairage en<br />
place.<br />
6. Remontez les filtres à graisse.<br />
7. Pour remettre la hotte sous tension,<br />
rebranchez la fiche mâle dans la prise <strong>de</strong><br />
courant ou remontez le fusible/réarmez<br />
le disjoncteur.<br />
29
Notice <strong>de</strong> montage:<br />
Remarques importantes<br />
� Les anciens appareils ne sont pas <strong>de</strong>s<br />
déchets sans valeur.<br />
Leur élimination respectueuse <strong>de</strong><br />
l'environnement permet <strong>de</strong> récupérer <strong>de</strong><br />
précieuses matières premières.<br />
Avant <strong>de</strong> vous débarrasser <strong>de</strong> l'appareil,<br />
ren<strong>de</strong>z-le inutilisable.<br />
� Pour vous parvenir en parfait état, votre<br />
nouvel appareil a été conditionné dans un<br />
emballage qui le protège efficacement.<br />
Tous les matériaux d'emballage utilisés<br />
sont compatibles avec l'environnement et<br />
recyclables. Ai<strong>de</strong>z-nous à éliminer<br />
l'emballage en respectant l'environnement.<br />
Deman<strong>de</strong>z à votre reven<strong>de</strong>ur ou à votre<br />
mairie quelles sont les formes <strong>de</strong> recyclage<br />
actuellement possibles.<br />
� Cette hotte peut évacuer l'air à<br />
l'extérieur ou le recycler.<br />
� Fixez toujours la hotte bien centrée<br />
au-<strong>de</strong>ssus <strong>de</strong>s foyers <strong>de</strong> la table <strong>de</strong><br />
cuisson.<br />
� L'écart minimum entre les foyers<br />
électriques et le bord inférieur <strong>de</strong> la hotte<br />
doit être <strong>de</strong> 550 mm, voir fig. 1.<br />
� Au-<strong>de</strong>ssus d'un foyer à combustible<br />
soli<strong>de</strong> générateur d'un risque d'incendie (par<br />
projection d'étincelles par ex.), le<br />
montage <strong>de</strong> la hotte ne sera admis que si ce<br />
foyer est équipé d'un couvercle fermé et<br />
inamovible et si le montage ne<br />
contrevient pas à la réglementation<br />
nationale. Cette restriction ne vaut pas pour<br />
les cuisinières à gaz et les foyers aux gaz.<br />
� Plus l'écart est faible entre la hotte<br />
<strong>aspirante</strong> et les foyers et plus il se pourra<br />
que la vapeur montant <strong>de</strong>s casseroles se<br />
con<strong>de</strong>nse et forme <strong>de</strong>s gouttes sur la face<br />
inférieure <strong>de</strong> la hotte.<br />
30<br />
Remarques supplémentaires<br />
concernant les cuisinières à gaz:<br />
� Lors du montage <strong>de</strong> foyers gaz, veuillez<br />
respecter les dispositions légales en<br />
vigueur dans votre pays (En Allemagne par<br />
ex: les Règles technique TRGI régissant<br />
l'installation du gaz).<br />
� Respectez les prescriptions et<br />
consignes d'encastrement en leur version<br />
applicable publiées par les fabricants<br />
d'appareils au gaz.<br />
� La hotte <strong>aspirante</strong> ne pourra cotoyer<br />
que sur un côté un meuble haut ou une<br />
paroi haute. Ecart minimum: 50 mm.<br />
� Ecart minimum, en présence <strong>de</strong><br />
foyers au gaz, entre le bord supérieur<br />
<strong>de</strong> la grille support et le bord inférieur <strong>de</strong> la<br />
hotte: 650 mm, fig. 1.
Avant le montage<br />
Evacuation <strong>de</strong> l'air à l'extérieur<br />
150 150<br />
L'air vicié est évacué vers le haut par un<br />
conduit d'aération ou directement à l'air<br />
libre par traversée du mur extérieur.<br />
D L'air vicié ne doit jamais être évacué<br />
vers une cheminée en service, rejetant <strong>de</strong>s<br />
fumées ou <strong>de</strong>s gaz <strong>de</strong> combustion, ni vers<br />
un conduit servant à l'aération <strong>de</strong> locaux<br />
dans lesquels se trouvent <strong>de</strong>s foyers à<br />
combustibles soli<strong>de</strong>s, liqui<strong>de</strong>s et gazeux.<br />
Le mo<strong>de</strong> d'évacuation <strong>de</strong> l'air vicié<br />
<strong>de</strong>vra être conforme aux arrêtés<br />
municipaux, préfectoraux, et aux<br />
prescriptions légales (par ex. aux<br />
ordonnances publiques applicables au<br />
bâtiment).<br />
Si l'air vicié doit être évacué par <strong>de</strong>s<br />
cheminées d'évacuation <strong>de</strong>s fumées et gaz<br />
<strong>de</strong> combustion qui ne sont pas en service,<br />
veuillez respecter la réglementation locale<br />
et nationale applicable.<br />
D Si la hotte évacue l'air à l'extérieur et<br />
si le logement comporte <strong>de</strong>s moyens <strong>de</strong><br />
chauffage (tels par ex. <strong>de</strong>s appareils <strong>de</strong><br />
chauffage au gaz, au fuel ou au charbon,<br />
chauffe-eau instantanés ou à accumulation)<br />
raccordés à une cheminée, veiller<br />
impérativement à ce que l'apport d'air<br />
soit suffisant pour assurer la marche du<br />
chauffage à combustion.<br />
Un fonctionnement sans risque est<br />
possible si la dépression dans le local où le<br />
foyer <strong>de</strong> chauffage est implanté ne<br />
dépasse pas 4 Pascals (0,04 mbars).<br />
mind. 45<br />
684-1086 136<br />
500<br />
280<br />
260<br />
mind.60<br />
mind.<br />
400<br />
mind.<br />
460<br />
600 / 900<br />
On y parvient en présence d'ouvertures<br />
non obturables ménagées par ex. dans les<br />
portes, fenêtres et en association avec <strong>de</strong>s<br />
ventouses télescopiques d'admission/<br />
évacuation <strong>de</strong> l'air à travers la maçonnerie<br />
ou par d'autres mesures techniques telles<br />
qu'un verrouillage réciproque ou assimilé<br />
permettant à l'air d'affluer pour assurer la<br />
combustion.<br />
En cas d'afflux d'air insuffisant, risque<br />
d'intoxication par réaspiration <strong>de</strong>s gaz<br />
<strong>de</strong> combustion.<br />
La présence d'une ventouse télescopique<br />
d'apport et d'évacuation d'air ne suffit pas<br />
à assurer le respect <strong>de</strong> la valeur limite.<br />
Remarque: lors <strong>de</strong> l'évaluation <strong>de</strong> la<br />
situation, toujours tenir compte <strong>de</strong><br />
l'ensemble <strong>de</strong>s moyens d'aération du<br />
logement. Cette règle ne vaut généralement<br />
pas si vous utilisez <strong>de</strong>s appareils <strong>de</strong><br />
cuisson (table <strong>de</strong> cuisson et cuisinière à<br />
gaz).<br />
Si la hotte recycle l'air aspiré au moyen<br />
d'un filtre au charbon actif, son<br />
fonctionnement ne s'assortit d'aucune<br />
restriction.<br />
Si l'air vicié traverse le mur extérieur,<br />
utilisez une ventouse télescopique.<br />
31
Avant le montage<br />
Si la hotte évacue l’air à l’extérieur,<br />
incorporer un volet anti-refoulement s’il n’y<br />
en a pas déjà un dans le conduit d’évacuation<br />
ou dans le conduit d’évacuation ou<br />
dans la ventouse télescopique.<br />
Si l’appareil a été fourni sans volet antirefoulement,<br />
vous pouvez vous le procurer<br />
dans le commerce spécialisé.<br />
Montage du clapet anti-retour:<br />
❑ Introduisez les <strong>de</strong>ux pivots du clapet<br />
anti-retour dans les trous ménagés<br />
contre le manchon à air et contre la<br />
sortie d’air.<br />
� Avant <strong>de</strong> monter le clapet, veillez à ce<br />
que la mention écrite et/ou le gaufrage se<br />
trouvent à l’extérieur.<br />
Si l'air vicié traverse le mur extérieur,<br />
utilisez une ventouse télescopique.<br />
Pour que la hotte <strong>aspirante</strong> ait le<br />
meilleur ren<strong>de</strong>ment, veillez à ce que:<br />
❑ Le conduit d'évacuation soit court et<br />
lisse.<br />
❑ Il ait le moins possible <strong>de</strong> cou<strong>de</strong>s.<br />
❑ Il ait le plus fort diamètre et que les<br />
cou<strong>de</strong>s soient les plus arrondis<br />
possibles.<br />
L'emploi <strong>de</strong> conduits d'air vicié<br />
longs, rugueux, formant <strong>de</strong> nombreux<br />
cou<strong>de</strong>s ou d'un trop petit diamètre<br />
fait <strong>de</strong>scendre le débit d'air en<br />
<strong>de</strong>ssous du débit optimal, tout en<br />
accroissant le bruit d'aspiration.<br />
❑ Conduits <strong>de</strong> section ron<strong>de</strong>:<br />
Nous recommandons<br />
recommandons <strong>de</strong>s conduits au<br />
diamètre intérieur <strong>de</strong> 150 mm.<br />
32<br />
❑ Les conduits plats doivent avoir une<br />
section intérieure équivalente au<br />
diamètre intérieur <strong>de</strong>s conduits ronds.<br />
Les conduits ne doivent comporter<br />
aucun cou<strong>de</strong> prononcé.<br />
150 mm l = 177 cm 2 <strong>de</strong> section.<br />
❑ Si les conduits ont <strong>de</strong>s diamètres<br />
différents: utilisez du ruban adhésif à<br />
étancher.<br />
❑ Si la hotte évacue l'air à l'extérieur,<br />
veillez à ce que l'apport d'air soit<br />
suffisant.<br />
Branchement du tuyau<br />
❑ Vissez le manchon<br />
à air ci-joint<br />
au-<strong>de</strong>ssus <strong>de</strong> la<br />
sortie d’air.<br />
Tuyau d’évacuation l 150 mm:<br />
❑ Fixez le tuyau d’évacuation directement<br />
contre la sortie d’air.<br />
� Si un clapet antiretour a été monté.<br />
vérifiez son bon fonctionnement.
Avant le montage<br />
Mo<strong>de</strong> Air recyclé<br />
❑ Avec filtre à<br />
charbon actif,<br />
lorsqu'il n'est<br />
pas possible<br />
d'évacuer l'air<br />
aspiré par la hotte.<br />
Poids en kg:<br />
600 / 900<br />
� Vous pouvez vous procurer le kit <strong>de</strong><br />
montage complet auprès <strong>de</strong> votre<br />
reven<strong>de</strong>ur spécialisé.<br />
Préparation du mur<br />
❑ Le mur doit être bien plat et vertical.<br />
❑ Utilisez <strong>de</strong>s chevilles pour assurer une<br />
retenue ferme.<br />
Air évacue Air recyclé<br />
60 cm 15,0<br />
17,0<br />
90 cm 17,5<br />
19,5<br />
Sous réserve <strong>de</strong> modifications constructives dans<br />
l’intérêt du progrès technique.<br />
Branchement électrique<br />
La fiche mâle <strong>de</strong> la hotte <strong>aspirante</strong> ne<br />
pourra être branchée que dans une prise<br />
secteur à contacts <strong>de</strong> terre réglementairement<br />
posée. Installer cette prise autant que<br />
possible directement <strong>de</strong>rrière le capotage<br />
<strong>de</strong> la hotte.<br />
Caractéristiques électriques:<br />
Vous les trouverez après avoir retiré le<br />
cadre pour filtre, sur la plaque signalétique,<br />
à l’intérieur <strong>de</strong> l’appareil.<br />
� Toujours mettre l'appareil hors tension<br />
avant d'effectuer <strong>de</strong>s réparations.<br />
Longueur du cordon <strong>de</strong> branchement:<br />
1,30 m.<br />
Si le cordon doit être raccordé<br />
définitivement au secteur:<br />
Dans ce cas, le branchement <strong>de</strong> la hotte<br />
ne pourra être effectué que par un<br />
électricien-installateur agréé auprès <strong>de</strong> la<br />
compagnie locale/nationale distributrice<br />
d'électricité.<br />
Prévoir un dispositif <strong>de</strong> coupure côté<br />
secteur. Valent comme tel les<br />
commutateurs dont l'ouverture entre<br />
contacts dépasse 3 mm et qui sectionnent<br />
tous les pôles. Figurent parmi eux<br />
également les disjoncteurs et contacteurs.<br />
� Si le cordon d'alimentation <strong>de</strong> cet<br />
appareil a été endommagé, il faut confier<br />
son remplacement au fabricant ou à son<br />
service après-vente, ou encore à une<br />
personne possédant <strong>de</strong>s qualifications<br />
i<strong>de</strong>ntiques, pour éviter <strong>de</strong> créer <strong>de</strong>s<br />
risques.<br />
Cette hotte <strong>aspirante</strong> est conforme aux<br />
dispositions CE sur l'antiparasitage <strong>de</strong>s<br />
appareils électriques.<br />
33
Encastrement<br />
Cette hotte <strong>aspirante</strong> est prévue pour le<br />
montage contre le mur <strong>de</strong> la cuisine.<br />
1. Retirer le filtre à graisse (voir la notice<br />
d'utilisation).<br />
2. Sur le mur, tracez une ligne médiane<br />
allant du plafond jusqu'au bord inférieur<br />
<strong>de</strong> la hotte <strong>aspirante</strong>.<br />
3. Posez le gabarit contre le mur et<br />
marquez grâce à lui l'emplacement <strong>de</strong>s<br />
vis sur le mur.<br />
� Respecter l'écart minimum entre les<br />
foyers et la hotte <strong>aspirante</strong>: 550 mm pour<br />
les foyers électriques et 650 mm pour les<br />
foyers au gaz. Le bord inférieur du gabarit<br />
représente le bord inférieur <strong>de</strong> la hotte<br />
<strong>aspirante</strong>.<br />
4. Percer 4 trous pour la hotte <strong>aspirante</strong> et<br />
2 trous pour le capotage-cheminée. Ces<br />
trous doivent faire 8 mm <strong>de</strong> diamètre.<br />
Enfoncer les chevilles jusqu'à ras du<br />
mur.<br />
347<br />
34<br />
30<br />
36,5<br />
mind.550 Elektro<br />
mind.650 Gas<br />
216<br />
178<br />
400<br />
Remarque: rappellez-vous que vous aurez<br />
peut-être <strong>de</strong>s accessoires spéciaux à<br />
monter.<br />
5. Faites encranter les 2 écarteurs ci-joints<br />
dans la cornière retenant le capotage <strong>de</strong><br />
cheminée.<br />
Au moyen <strong>de</strong> 2 vis hexagonales, visser<br />
les cornières servant à retenir le<br />
capotage <strong>de</strong> cheminée.<br />
6. Vissez les <strong>de</strong>ux vis hexagonales du haut<br />
jusqu'à ce qu'elles ne dépassent plus<br />
que <strong>de</strong> 5 mm env.<br />
7. Accrochez la hotte <strong>aspirante</strong> aux vis.<br />
ca.5mm
Encastrement<br />
08. Vissez les vis hexagonales du bas.<br />
� Avant <strong>de</strong> visser ces 4 vis à fond,<br />
ajuster la hotte <strong>aspirante</strong> en position.<br />
09. Raccor<strong>de</strong>r la hotte aux tuyaux.<br />
10. Effectuer le branchement électrique <strong>de</strong><br />
la hotte.<br />
11. Retirez la pellicule <strong>de</strong> plastique<br />
protégeant les <strong>de</strong>ux capots en inox.<br />
� Evitez d'endommager les surfaces<br />
lisses en acier inox.<br />
12. Insérer l'un dans l'autre les <strong>de</strong>ux<br />
éléments du capotage-cheminée (les<br />
fentes <strong>de</strong> l'élément télescopique<br />
supérieur doivent être tournées vers le<br />
bas) puis les introduire dans la découpe<br />
ménagée à cet effet dans la hotte<br />
<strong>aspirante</strong>.<br />
� Evitez <strong>de</strong> rayer les éléments du<br />
capotage-cheminée au moment <strong>de</strong> les<br />
introduire l'un dans l'autre. Dans ce<br />
but, placez par exemple le gabarit sur<br />
les arêtes <strong>de</strong> l'élément inférieur.<br />
1.<br />
3.<br />
2.<br />
13. Soulever l'élément supérieur puis le<br />
visser au moyen <strong>de</strong> <strong>de</strong>ux vis contre la<br />
cornière <strong>de</strong> retenue.<br />
14. Remettre le filtre à graisse en place (voir<br />
la notice d'utilisation).<br />
35
Instruções <strong>de</strong> serviço<br />
Descrição do aparelho Tipos <strong>de</strong> funcionamento<br />
Revestimento<br />
da<br />
chaminé<br />
Iluminação<br />
Tipos <strong>de</strong> funcionamento<br />
Funcionamento com exaustão:<br />
❑ O ventilador do exaustor aspira os<br />
vapores da cozinha e, através do filtro<br />
<strong>de</strong> gordura, encaminha-os para o ar<br />
livre.<br />
❑ O filtro <strong>de</strong> gordura retém as partículas<br />
gordurosos dos vapores da cozinha.<br />
❑ A cozinha mantém-se livre <strong>de</strong> gorduras e<br />
cheiros.<br />
D Se o exaustor funcionar com<br />
exaustão, o funcionamento simultâneo<br />
<strong>de</strong> aparelhos <strong>de</strong>pen<strong>de</strong>ntes <strong>de</strong> uma<br />
chaminé (como por ex. aquecedores a<br />
gás, óleo ou carvão, esquentadores e<br />
acumuladores) tem que ser garantida a<br />
renovação do ar necessário, para a<br />
combustão perfeita dos aparelhos antes<br />
referidos.<br />
É possível um funcionamento sem<br />
qualquer perigo, se não for ultrapassada a<br />
<strong>de</strong>pressão <strong>de</strong> 4 Pa (0,04 mbar) no local <strong>de</strong><br />
instalação dos aparelhos <strong>de</strong> queima.<br />
36<br />
Interruptor<br />
Luz/<br />
Ventilador<br />
Grelha do filtro<br />
Isto po<strong>de</strong> ser conseguido se o ar<br />
necessário à combustão pu<strong>de</strong>r ser<br />
reposto, através <strong>de</strong> aberturas não<br />
fecháveis, p. ex. em portas, janelas e em<br />
ligação com caixas murais <strong>de</strong> alimentação<br />
ou <strong>de</strong> saída <strong>de</strong> ar, ou ainda através doutras<br />
medidas técnicas, como trancagem<br />
recíproca ou semelhantes.<br />
Se a renovação <strong>de</strong> ar fresco não for<br />
suficiente, existe o perigo <strong>de</strong> envenenamento,<br />
provocado pelo retorno dos<br />
gases provenientes da combustão.<br />
Uma caixa mural <strong>de</strong> entrada/saída <strong>de</strong> ar<br />
não garante, por si só, o cumprimento do<br />
valor limite.<br />
Nota: Na avaliação tem que ser<br />
consi<strong>de</strong>rada sempre a necessida<strong>de</strong> global<br />
<strong>de</strong> ventilação da habitação.<br />
No funcionamento <strong>de</strong> aparelhos <strong>de</strong><br />
cozinhar, como por ex. placas e fogões a<br />
gás, esta regra não se aplica.<br />
Se o exaustor funcionar com circulação <strong>de</strong><br />
ar – com filtro <strong>de</strong> carvão activo – não há<br />
qualquer tipo <strong>de</strong> limitação.<br />
Funcionamento com circulação <strong>de</strong> ar:<br />
❑ Neste caso, tem que ser montado um<br />
filtro <strong>de</strong> carvão activo (ver Filtro e<br />
Manutenção).<br />
� O jogo completo <strong>de</strong> montagem,<br />
bem como os filtros <strong>de</strong> substituição,<br />
po<strong>de</strong>m ser adquiridos nos nossos<br />
Serviços Técnicos.<br />
❑ O ventilador do exaustor aspira os<br />
fumos da cozinha e reencaminha o ar<br />
para a cozinha, <strong>de</strong>pois <strong>de</strong> limpo pelo<br />
filtro <strong>de</strong> gordura e <strong>de</strong> carvão activo.<br />
❑ O filtro <strong>de</strong> gordura retém os<br />
componentes gordurosos dos vapores<br />
da cozinha.<br />
❑ O filtro <strong>de</strong> carvão activo retém as<br />
substâncias com cheiro.<br />
� Se não for instalado o filtro <strong>de</strong> carvão<br />
activo, não po<strong>de</strong>m ser eliminidas as<br />
partículas <strong>de</strong> cheiro existentes nos vapores<br />
da cozinha.
Antes da primeira utilização<br />
Indicações importantes:<br />
❑ Estas instruções <strong>de</strong> serviço aplicam-se a<br />
vários mo<strong>de</strong>los <strong>de</strong> aparelhos.<br />
É. por isso, possível que se encontrem<br />
<strong>de</strong>scritas várias características <strong>de</strong><br />
equipamento que não dizem respeito ao<br />
seu aparelho.<br />
❑ Este exaustor correspon<strong>de</strong> às normas<br />
<strong>de</strong> segurança para este tipo <strong>de</strong><br />
aparelhos.<br />
As reparações só <strong>de</strong>vem ser<br />
efectuadas por pessoal especializado.<br />
Reparações ina<strong>de</strong>quadas po<strong>de</strong>m a<br />
carretar perigos vários para o<br />
utilizador.<br />
� Se o aparelho apresentar qualquer<br />
dano, não o <strong>de</strong>verá pôr em funcionamento.<br />
� A ligação e a colocação em<br />
funcionamento só <strong>de</strong>vem ser efectuadas<br />
por um técnico.<br />
� Se o cabo <strong>de</strong> ligação <strong>de</strong>ste aparelho<br />
estiver danificado, ele terá que ser<br />
substituido pelo fabricante, pelos seus<br />
Serviços Técnicos ou, ainda, por uma<br />
pessoa qualificada, a fim <strong>de</strong> se evitarem<br />
situações <strong>de</strong> perigo para o utilizador.<br />
� Provi<strong>de</strong>nciar a reciclagem a<strong>de</strong>quada do<br />
material da embalagem (ver Instruções <strong>de</strong><br />
Montagem).<br />
� Este exaustor só <strong>de</strong>ve ser aplicado<br />
para fins domésticos.<br />
� O exaustor só <strong>de</strong>ve funcionar com as<br />
lâmpadas colocadas.<br />
� As lâmpadas fundidas <strong>de</strong>vem ser<br />
imediatamente substituidas, para evitar a<br />
sobrecarga das outras lâmpadas.<br />
� O exaustor não <strong>de</strong>ve funcionar sem o<br />
filtro <strong>de</strong> gordura.<br />
� Gordura ou óleo sobreaquecidos po<strong>de</strong>m<br />
incendiar-se facilmente.<br />
Sempre que preparar alimentos com gordura<br />
ou óleo, por ex. batatas fritas, <strong>de</strong>verá, por<br />
isso, manter-se vigilante.<br />
❑ Antes <strong>de</strong> utilizar o novo aparelho, <strong>de</strong>verá<br />
ler com atenção estas instruções <strong>de</strong><br />
serviço.<br />
Delas constam informações importantes<br />
para a sua segurança, bem como sobre<br />
a utilização e manutenção do aparelho.<br />
❑ Guar<strong>de</strong> as instruções <strong>de</strong> serviço e <strong>de</strong><br />
montagem em lugar seguro, para a<br />
eventualida<strong>de</strong> <strong>de</strong> o aparelho ter um outro<br />
dono.<br />
� Não flamejar alimentos por baixo do<br />
exaustor.<br />
Perigo <strong>de</strong> incêndio do filtro <strong>de</strong> gordura,<br />
! <strong>de</strong>vido à subida da chama.<br />
� Os queimadores têm que estar sempre<br />
cobertos com os recipientes <strong>de</strong> cozinhar.<br />
� O funcionamento do exaustor por cima<br />
<strong>de</strong> um aparelho <strong>de</strong> queima para<br />
combustíveis sólidos (carvão, ma<strong>de</strong>ira e<br />
similares) só é possível com limitações (ver<br />
Instruções <strong>de</strong> montagem).<br />
Placas a gás / fogões a gás<br />
� Não utilize, simultaneamente, todos os<br />
queimadores a gás durante um longo<br />
período <strong>de</strong> tempo (máx. 15 minutos) com a<br />
potência máxima, pois, existe o perigo <strong>de</strong><br />
queimaduras ao tocar na superfície do<br />
aparelho ou o perigo <strong>de</strong> serem causados<br />
danos no exaustor.<br />
Caso o exaustor funcione sobre uma placa<br />
a gás, o mesmo tem que estar ligado na<br />
potência máxima, se estiverem a funcionar<br />
três ou mais queimadores.<br />
Anomalias<br />
Em caso <strong>de</strong> eventuais dúvidas ou anomalias,<br />
<strong>de</strong>verá contactar os nossos Serviços<br />
Técnicos.<br />
(Ver Índice <strong>de</strong> Postos <strong>de</strong> Assistência).<br />
Sempre que contactar os Serviços<br />
Técnicos, agra<strong>de</strong>cemos que indique os<br />
seguintes dados:<br />
E-NR. FD<br />
Registe nestes campos os dados do seu<br />
aparelho. Estes elementos constam da<br />
chapa <strong>de</strong> características, que se encontra<br />
no interior do exaustor, <strong>de</strong>pois <strong>de</strong> retirar o<br />
filtro <strong>de</strong> gordura.<br />
37
Comando do exaustor<br />
� Os vapores são eliminados <strong>de</strong> forma<br />
mais eficaz, se:<br />
❑ Ligar o ventilador<br />
no início dos cozinhados.<br />
❑ Desligar o ventilador só alguns minutos<br />
<strong>de</strong>pois <strong>de</strong> terminados os cozinhados.<br />
Regulação da fase <strong>de</strong> ventilação<br />
<strong>de</strong>sejada:<br />
❑ Deslocar o interruptor correspon<strong>de</strong>nte<br />
para baixo.<br />
❑ O ventilador continua, ainda, a funcionar<br />
na fase máxima regulada.<br />
Iluminação:<br />
❑ A iluminação po<strong>de</strong> ser utilizada em<br />
qualquer altura, mesmo com o ventilador<br />
<strong>de</strong>sligado.<br />
38<br />
Iluminação<br />
Fases <strong>de</strong><br />
ventilação<br />
Filtros e Manutenção<br />
Filtro <strong>de</strong> gordura:<br />
Para retenção das partículas <strong>de</strong> gordura<br />
existentes nos vapores da cozinha, são<br />
utilizados filtros metálicos<br />
A malha do filtro é <strong>de</strong> metal não inflamável.<br />
Atenção:<br />
Em caso <strong>de</strong> saturação do filtro com<br />
resíduos gordurosos, aumentam as<br />
possibilida<strong>de</strong>s <strong>de</strong> inflamação do mesmo e a<br />
função do aparelho po<strong>de</strong> ser prejudicada.<br />
Importante:<br />
A limpeza atempada do filtro evita o perigo<br />
<strong>de</strong> incêndio, que se po<strong>de</strong> verificar com a<br />
concentração <strong>de</strong> calor proveniente <strong>de</strong> fritos<br />
ou assados.<br />
Limpeza dos filtros metálicos:<br />
❑ Com um uso normal (<strong>de</strong> 1 a 2 horas<br />
diárias) ter-se-á que limpar o filtro <strong>de</strong><br />
metal após 8 a 10 semanas.<br />
❑ A limpeza <strong>de</strong>stes filtros po<strong>de</strong> ser feita na<br />
máquina <strong>de</strong> lavar loiça. Com este<br />
processo, po<strong>de</strong> verificar-se uma ligeira<br />
alteração na cor dos filtros.<br />
Importante:<br />
Os filtros <strong>de</strong> metal muito saturados não<br />
<strong>de</strong>vem ser lavados juntamente com<br />
a outra loiça.<br />
❑ Se a limpeza for feita manualmente,<br />
colocar primeiro os filtros numa solução<br />
<strong>de</strong> água quente com <strong>de</strong>tergente.<br />
Passado algum tempo, escovar os filtros<br />
com uma escova própria e, <strong>de</strong>pois,<br />
enxaguá-los e secá-los bem.
Filtros e Manutenção<br />
Desmontar e montar os filtros metálicos:<br />
1. Pressionar os encaixes dos filtros no<br />
sentido da seta e, <strong>de</strong>pois, retirar os<br />
filtros.<br />
2. Limpar os filtros metálicos.<br />
3. Recolocar os filtros.<br />
Filtro <strong>de</strong> carvão activo:<br />
Para reter os cheiros no funcionamento<br />
com circulação <strong>de</strong> ar.<br />
Atenção:<br />
Em caso <strong>de</strong> saturação do filtro com<br />
resíduos gordurosos, aumentam as<br />
possibilida<strong>de</strong>s <strong>de</strong> inflamação do mesmo e a<br />
função do aparelho po<strong>de</strong> ser prejudicada.<br />
Importante:<br />
Através da substituição atempada do filtro<br />
<strong>de</strong> carvão activo, é evitado o perigo <strong>de</strong><br />
incêndio provocado pela concentração <strong>de</strong><br />
calor na confecção <strong>de</strong> fritos ou <strong>de</strong> assados.<br />
Montagem:<br />
1. Desmontar os filtros <strong>de</strong> gordura<br />
(ver Desmontar e montar os filtros <strong>de</strong><br />
gordura).<br />
2. Aplicar o filtro <strong>de</strong> carvão activo.<br />
3. Encaixar as patilhas.<br />
4. Montar os filtros <strong>de</strong> gordura<br />
(ver Desmontar e montar os filtros <strong>de</strong><br />
gordura).<br />
Desmontar:<br />
1. Desmontar os filtros <strong>de</strong> gordura.<br />
2. Pressionar as patilhas e retirar o filtro <strong>de</strong><br />
carvão activo para baixo.<br />
3. Montar os filtros <strong>de</strong> gordura.<br />
Substituição do filtro <strong>de</strong> carvão activo:<br />
❑ No caso <strong>de</strong> funcionamento normal (1 a 2<br />
horas diárias), os filtros <strong>de</strong> carvão activo<br />
<strong>de</strong>vem ser substituidos uma vez no ano.<br />
❑ O filtro <strong>de</strong> carvão activo po<strong>de</strong> ser<br />
adquirido nos Serviços Técnicos.<br />
❑ Devem ser utilizados apenas filtros<br />
originais.<br />
Só assim é garantido o funcionamento<br />
optimizado do exaustor.<br />
Reciclagem do filtro <strong>de</strong> carvão activo<br />
usado:<br />
❑ O filtro <strong>de</strong> carvão activo não contém<br />
substâncias prejudiciais. Ele po<strong>de</strong> ser<br />
reciclado como lixo normal.<br />
39
Limpeza e manutenção<br />
Desligar o exaustor da corrente,<br />
<strong>de</strong>sligando a ficha da tomada, o fusível<br />
ou o disjuntor.<br />
❑ Quando limpar os filtros <strong>de</strong> gordura,<br />
<strong>de</strong>verá também limpar as zonas<br />
acessíveis do aparelho, on<strong>de</strong> existirem<br />
<strong>de</strong>pósitos <strong>de</strong> gordura. Evita-se assim, o<br />
perigo <strong>de</strong> incêndios e o mau funcionamento<br />
do aparelho.<br />
❑ Para limpar o exaustor, utilizar uma<br />
solução <strong>de</strong> água quente e <strong>de</strong>tergente ou<br />
um <strong>de</strong>tergente suave para janelas.<br />
❑ Não raspar sujida<strong>de</strong>s secas acumuladas,<br />
<strong>de</strong>vendo, sim, amolecê-las com um<br />
pano húmido.<br />
❑ Não utilizar produtos ácidos ou escovas<br />
rijas.<br />
❑ Nota: Não aplicar álcool sobre as<br />
superfícies sintéticas pois isto po<strong>de</strong><br />
provocar manchas.<br />
Atenção: Arejar suficientemente a<br />
cozinha e não fazer chamas livres.<br />
� As teclas <strong>de</strong> comando <strong>de</strong>vem ser limpas<br />
com uma solução <strong>de</strong> água com um<br />
<strong>de</strong>tergente suave e um pano macio e<br />
húmido.<br />
Não aplicar, nas teclas <strong>de</strong> comando,<br />
produtos para limpeza <strong>de</strong> inox.<br />
Superfícies <strong>de</strong> aço inox:<br />
❑ Utilizar um produto para inox suave e<br />
não abrasivo.<br />
❑ Limpar apenas no sentido do polimento.<br />
� As superfícies <strong>de</strong> inox não <strong>de</strong>vem ser<br />
limpas com produtos abrasivos ou com<br />
teor <strong>de</strong> soda, ácidos ou cloretos.<br />
Superfícies <strong>de</strong> alumínio e material<br />
sintético:<br />
❑ Utilizar um pano macio, que não largue<br />
fios, próprio para janelas ou um pano<br />
com micro fibras.<br />
❑ Não utilizar panos secos.<br />
❑ Utilizar um produto suave para limpar<br />
janelas.<br />
❑ Não utilizar produtos <strong>de</strong> limpeza<br />
agressivos, que contenham ácido ou<br />
lixívia.<br />
❑ Não utilizar produtos abrasivos.<br />
40<br />
Substituição das Lâmpadas<br />
1. Desligar o exaustor da corrente,<br />
retirando a ficha da tomada ou<br />
<strong>de</strong>sligando o fusível ou o disjuntor.<br />
2. Desmontar os filtros <strong>de</strong> gordura<br />
(ver Filtros e Manutenção).<br />
3. Remover a cobertura da lâmpada, pela<br />
parte superior da sanca <strong>de</strong> luz.<br />
4. Substituir a lâmpada (lâmpadas <strong>de</strong><br />
incan<strong>de</strong>scência correntes no mercado,<br />
máx. 40 Watt, casquilho E 14).<br />
5. Voltar a colocar a cobertura da lâmpada.<br />
6. Voltar a montar os filtros <strong>de</strong> gordura.<br />
7. Voltar a ligar o exaustor à corrente,<br />
ligando a ficha à tomada, o fusível ou o<br />
disjuntor.
Instruções <strong>de</strong> Montagem:<br />
Indicações Importantes<br />
� Aparelhos velhos não são, <strong>de</strong> forma<br />
alguma, lixo.<br />
Através <strong>de</strong> reciclagem compatível com o<br />
meio ambiente, é possível recuperar<br />
matérias primas valiosas.<br />
Antes <strong>de</strong> enviar o aparelho para reciclagem,<br />
inutilize-o.<br />
� O seu novo aparelho esteve protegido<br />
pela embalagem até chegar a sua casa.<br />
Todos os materiais aplicados na<br />
embalagem são compatíveis com o meio<br />
ambiente e reutilizáveis. Por favor<br />
contribua também para a preservação do<br />
meio ambiente, reciclando a embalagem<br />
em conformida<strong>de</strong>.<br />
Junto do Agente Especializado ou na<br />
Câmara Municipal da sua área <strong>de</strong><br />
residência informe-se sobre os processos<br />
<strong>de</strong> reciclagem disponíveis.<br />
� O exaustor po<strong>de</strong> funcionar com<br />
exaustão ou circulação <strong>de</strong> ar.<br />
� Instalar o exaustor sempre centrado<br />
com a placa <strong>de</strong> cozinha.<br />
� Respeitar a distância mínima entre a<br />
placa eléctrica <strong>de</strong> cozinha e o canto inferior<br />
do exaustor: 550 mm, Fig. 1.<br />
� A montagem do exaustor só é possível<br />
sobre uma zona <strong>de</strong> chama alimentada por<br />
combustíveis sólidos, da qual po<strong>de</strong> resultar<br />
perigo <strong>de</strong> incêndio (por ex. o saltar <strong>de</strong> uma<br />
faúlha), se essa zona estiver protegida<br />
com uma cobertura fechada inamovível e<br />
se forem respeitadas as normas<br />
específicas do país. Esta limitação não se<br />
aplica a fogões ou placas a gás.<br />
� Quanto menor for a distância entre o<br />
exaustor e a placa <strong>de</strong> cozinha, maior é a<br />
possibilida<strong>de</strong> <strong>de</strong> se formarem bolhas <strong>de</strong><br />
água na zona inferior do exaustor,<br />
resultantes da subida do vapor <strong>de</strong> água.<br />
Instruções adicionais para placas a gás:<br />
� Na montagem <strong>de</strong> aparelhos <strong>de</strong><br />
cozinhar a gás (= fogões e placas), têm<br />
que ser respeitadas as respectivas normas<br />
nacionais em vigor (p. ex. na Alemanha:<br />
Regulamentações Técnicas sobre<br />
Instalações <strong>de</strong> Gás TRGI).<br />
� Têm que ser respeitadas as instruções<br />
e as normas <strong>de</strong> instalação do fabricante.<br />
� O exaustor só po<strong>de</strong> ser instalado junto<br />
<strong>de</strong> um armário superior ou <strong>de</strong> uma pare<strong>de</strong><br />
alta. Distância mínima: 50 mm.<br />
� A distância mínima, no caso <strong>de</strong><br />
queimadores a gás, entre a aresta superior<br />
dos recipientes e a aresta inferior do<br />
exaustor: 650 mm, Fig. 1.<br />
41
Antes da Montagem<br />
Funcionamento com exaustão<br />
Os vapores são encaminhados para o<br />
exterior através <strong>de</strong> um canal <strong>de</strong> ventilação<br />
ou directamente através <strong>de</strong> furo na pare<strong>de</strong>,<br />
para o exterior.<br />
D Os vapores não po<strong>de</strong>m ser<br />
encaminhados para uma chaminé nem<br />
para um canal, que sirvam para ventilação<br />
ou evacuação <strong>de</strong> zonas <strong>de</strong> chama.<br />
Na <strong>de</strong>rivação do ar evacuado, têm que<br />
ser respeitadas as prescrições<br />
municipais e as normas legais ( p. ex.<br />
Departamento Regulador da<br />
Construção Civil).<br />
Para se po<strong>de</strong>r encaminhar o ar <strong>de</strong><br />
exaustão do aparelho para uma chaminé<br />
fora <strong>de</strong> serviço, é necessário obter uma<br />
autorização expressa do limpa-chaminés<br />
responsável pela zona.<br />
D No caso <strong>de</strong> funcionamento por<br />
exaustão e funcionamento simultâneo<br />
<strong>de</strong> zonas <strong>de</strong> chama <strong>de</strong>pen<strong>de</strong>ntes <strong>de</strong><br />
ligação a uma chaminé (por ex.<br />
aquecedores a gás, a óleo ou a carvão;<br />
esquentadores, aquecedores <strong>de</strong> água),<br />
tem que ser garantida a ventilação<br />
necessária para a combustão perfeita <strong>de</strong>sses<br />
aparelhos.<br />
É possível o funcionamento não perigoso,<br />
se a subpressão no local <strong>de</strong> instalação do<br />
aparelho, com funcionamento por<br />
combustão, não for superior a 4 Pa<br />
(0.04 mbar).<br />
42<br />
150 150<br />
mind. 45<br />
684-1086 136<br />
500<br />
280<br />
260<br />
mind.60<br />
mind.<br />
400<br />
mind.<br />
460<br />
600 / 900<br />
Isto po<strong>de</strong> ser conseguido se o ar<br />
necessário à combustão pu<strong>de</strong>r ser<br />
reposto, através <strong>de</strong> aberturas não<br />
fecháveis, p. ex. em portas, janelas e em<br />
ligação com caixas murais <strong>de</strong> alimentação<br />
ou <strong>de</strong> saída <strong>de</strong> ar, ou ainda através doutras<br />
medidas técnicas, como trancagem<br />
recíproca ou semelhantes.<br />
Se a renovação <strong>de</strong> ar fresco não for<br />
suficiente, existe o perigo <strong>de</strong> envenenamento,<br />
provocado pelo retorno dos<br />
gases provenientes da combustão.<br />
Uma caixa mural <strong>de</strong> entrada/saída <strong>de</strong> ar<br />
não garante, por si só, o cumprimento do<br />
valor limite.<br />
Nota: Na apreciação, tem sempre que ser<br />
consi<strong>de</strong>rada a ventilação global da<br />
habitação. No funcionamento <strong>de</strong> aparelhos<br />
para cozinhar, por ex. placas e fogões,<br />
esta regra não é aplicada.<br />
Se o exaustor estiver a funcionar com<br />
circulação <strong>de</strong> ar - com filtro <strong>de</strong> carvão<br />
activo - o funcionamento não sofre<br />
qualquer limitação.<br />
Se o ar da exaustão for conduzido<br />
através da pare<strong>de</strong> exterior, <strong>de</strong>ve ser<br />
utilizada uma caixa mural telescópica.
Antes da Montagem<br />
No caso <strong>de</strong> funcionamento por<br />
exaustão, <strong>de</strong>verá montar-se no exaustor<br />
uma válvula anti-retorno, se a mesma não<br />
estiver já integrada no tubo <strong>de</strong> exaustão ou<br />
na caixa mural.<br />
Se o aparelho não estiver equipado com a<br />
válvula anti-retorno, esta po<strong>de</strong> ser<br />
adquirida no comércio da especialida<strong>de</strong>.<br />
Montagem da válvula anti-retorno:<br />
❑ Engatar os dois pivots da válvula antiretorno<br />
nos furos do bocal <strong>de</strong> exaustão,<br />
respectivamente, à saída do ar.<br />
� Antes da montagem ter em atenção<br />
qua a legenda, respectivamente, a<br />
estampagem fica no exterior.<br />
Se o ar da exaustão for encaminhado<br />
através da pare<strong>de</strong> exterior, <strong>de</strong>verá<br />
utilizar-se uma caixa mural telescópica.<br />
Eficiência optimizada do exaustor:<br />
❑ Tubo <strong>de</strong> exaustão curto e com interior<br />
liso.<br />
❑ Fazer número mínimo <strong>de</strong> curvas.<br />
❑ Utilizar o diâmetro máximo possível do<br />
tubo e fazer as curvas tão abertas<br />
quanto possível.<br />
A utilização <strong>de</strong> tubos <strong>de</strong> aspiração<br />
longos e rugosos no seu interior,<br />
muitas curvas, ou diâmetros<br />
reduzidos, provoca uma alteração<br />
nas condições optimizadas <strong>de</strong><br />
ventilação e, simultaneamente, um<br />
aumento do nível <strong>de</strong> ruídos.<br />
❑ Tubos circulares:<br />
Recomendamos<br />
diâmetro interior 125 mm, mínimo<br />
100 mm.<br />
❑ Canais planos têm que possuir uma<br />
secção interior com valor equivalente<br />
aos tubos circulares.<br />
Eles não <strong>de</strong>vem ter nenhum <strong>de</strong>svio<br />
muito pronunciado.<br />
l 150 mm ca. 177 cm 2<br />
❑ No caso <strong>de</strong> tubos com diâmetros<br />
diferentes, utilizar tiras <strong>de</strong> vedação.<br />
❑ No caso <strong>de</strong> funcionamento por<br />
exaustão, garantir uma boa<br />
alimentação <strong>de</strong> ar fresco.<br />
Ligação do tubo<br />
❑ Aparafusar o<br />
bocal <strong>de</strong> saída<br />
sobre a saída <strong>de</strong><br />
ar do aparelho<br />
Tubo <strong>de</strong> exaustão <strong>de</strong> l 150 mm:<br />
❑ Fixar o tubo <strong>de</strong> exaustão directamente<br />
no bocal <strong>de</strong> ligação.<br />
� Se tiver sido montada uma válvula antiretorno,<br />
controlar o funcionamento.<br />
43
Antes da Montagem<br />
Função <strong>de</strong> circulação <strong>de</strong> ar<br />
❑ Com filtro <strong>de</strong><br />
carvão activo, se<br />
não existirem<br />
condições para<br />
funcionamento <strong>de</strong><br />
exaustão.<br />
Peso em kg:<br />
44<br />
600 / 900<br />
� O jogo completo <strong>de</strong> montagem po<strong>de</strong> ser<br />
adquirido nos nossos Serviços Técnicos.<br />
Preparação da pare<strong>de</strong><br />
❑ A pare<strong>de</strong> tem que ser plana e vertical.<br />
❑ Deve ser assegurada uma fixação<br />
perfeita das buchas.<br />
Saída <strong>de</strong> ar Circulação<br />
<strong>de</strong> ar<br />
60 cm 15,0<br />
17,0<br />
90 cm 17,5<br />
19,5<br />
Reservamo-nos o direito a alterações <strong>de</strong> construção no<br />
âmbito do <strong>de</strong>senvolvimento técnico.<br />
Ligação eléctrica<br />
O exaustor só <strong>de</strong>ve ligado a uma tomada<br />
com protecção <strong>de</strong> terra e instalada <strong>de</strong><br />
acordo com as normas em vigor.<br />
Se possível, instalar a tomada directamente<br />
por baixo da cobertura da chaminé.<br />
Características eléctricas:<br />
Encontram-se na chapa <strong>de</strong> características<br />
no interior do aparelho – que está à vista<br />
<strong>de</strong>pois <strong>de</strong> retirar os caixilhos do filtro.<br />
� Para reparações, <strong>de</strong>sligar o exaustor<br />
da corrente eléctrica.<br />
Comprimento do cabo <strong>de</strong> ligação: 1,30 m.<br />
No caso <strong>de</strong> ser necessário uma ligação<br />
fixa:<br />
O exaustor só po<strong>de</strong> ser ligado à corrente<br />
por um instalador eléctrico cre<strong>de</strong>nciado<br />
pela empresa distribuidora <strong>de</strong><br />
electricida<strong>de</strong>.<br />
Relativamente à instalação, <strong>de</strong>ve ser<br />
previsto um dispositivo <strong>de</strong> corte. Como<br />
dispositivo <strong>de</strong> corte, são válidos<br />
interruptores com uma abertura <strong>de</strong><br />
contactos superior a 3mm e corte<br />
multipolar. Daqui fazem parte os interruptores<br />
LS e protecções.<br />
� Se o cabo <strong>de</strong> ligação <strong>de</strong>ste aparelho<br />
estiver danificado, ele terá que ser<br />
substituido pelo fabricante, pelos seus Serviços<br />
Técnicos ou, ainda, por uma<br />
pessoa qualificada, a fim <strong>de</strong> se evitarem<br />
situações <strong>de</strong> perigo para o utilizador.<br />
Este exaustor correspon<strong>de</strong> às normas UE<br />
sobre protecção antiparasitária.
Montagem<br />
O exaustor foi previsto para montagem<br />
numa pare<strong>de</strong> da cozinha.<br />
1. Retirar o filtro <strong>de</strong> gordura (ver instruções<br />
<strong>de</strong> serviço).<br />
2. Marcar uma linha central na pare<strong>de</strong><br />
<strong>de</strong>s<strong>de</strong> o tecto até ao canto inferior do<br />
exaustor.<br />
3. Com o auxílio do mol<strong>de</strong> marcar as<br />
posições dos parafusos na pare<strong>de</strong>.<br />
� Ter em atenção a distância mínima da<br />
placa <strong>de</strong> cozinhar até ao exaustor, <strong>de</strong> 550<br />
mm, para discos eléctricos, ou <strong>de</strong> 650 mm<br />
para queimadores a gás. O canto inferior<br />
do gabarito correspon<strong>de</strong> ao bordo inferior<br />
do exaustor.<br />
4. Fazer 4 furos para o exaustor e 2 furos<br />
para o revestimento da chaminé<br />
l 8 mm e introduzir as buchas até à<br />
face com a pare<strong>de</strong>.<br />
347<br />
30<br />
36,5<br />
mind.550 Elektro<br />
mind.650 Gas<br />
216<br />
178<br />
400<br />
Nota: Tome em atenção a eventual<br />
montagem <strong>de</strong> acessórios especiais.<br />
5. Encaixar os 2 distanciadores, incluidos,<br />
no ângulo <strong>de</strong> apoio do revestimento da<br />
chaminé.<br />
Aparafusar o ângulo <strong>de</strong> retenção do<br />
revestimento da chaminé com dois<br />
parafusos sextavados.<br />
6. Aparafusar os dois parafusos<br />
sextavados superiores até ca. <strong>de</strong> 5 mm<br />
<strong>de</strong> profundida<strong>de</strong>.<br />
7. Pendurar o exaustor nos parafusos.<br />
ca.5mm<br />
45
Montagem<br />
08. Apertar ambos os parafusos<br />
sextavados inferiores.<br />
� Antes do aperto final dos 4<br />
parafusos <strong>de</strong>verá alinhar-se o exaustor.<br />
09. Fazer a ligação dos tubos.<br />
10. Fazer a ligação eléctrica.<br />
46<br />
11. Retirar a película <strong>de</strong> protecção aplicada<br />
nos revestimentos da chaminé.<br />
� Procure evitar provocar danos nas<br />
superfícies <strong>de</strong>licadas <strong>de</strong> aço inox.<br />
12. Encaixar as duas partes do<br />
revestimento da chaminé (ranhura na<br />
parte telescópica superior e introduzi-la<br />
na ranhura do exaustor.<br />
� Procure evitar riscos durante a<br />
introdução das duas partes do<br />
revestimento, uma na outra, colocando<br />
por ex., o gabarito <strong>de</strong> montagem como<br />
protecção sobre o canto do<br />
revestimento inferior.<br />
1.<br />
3.<br />
2.<br />
13. Levantar ligeiramente a parte superior e<br />
aparafusá-la lateralmente com dois<br />
parafusos no ângulo <strong>de</strong> retenção.<br />
14. Voltar a montar o filtro <strong>de</strong> gordura<br />
(ver instruções <strong>de</strong> serviço).
Gebrauchsanleitung<br />
Gerätebeschreibung<br />
Kaminverblendung<br />
Beleuchtung<br />
Betriebsarten<br />
Schalter<br />
Licht/Lüfter<br />
Filtergitter<br />
Abluftbetrieb:<br />
❑ Der Lüfter <strong>de</strong>r Dunstabzugshaube saugt<br />
<strong>de</strong>n Küchendunst an und<br />
leitet ihn durch <strong>de</strong>n Fettfilter ins Freie.<br />
❑ Der Fettfilter nimmt die fettigen<br />
Bestandteile <strong>de</strong>s Küchendunstes auf.<br />
❑ Die Küche bleibt weitgehend frei von<br />
Fett und Geruch.<br />
D Bei Abluftbetrieb <strong>de</strong>r Dunstabzugshaube<br />
und gleichzeitigem Betrieb<br />
schornsteinabhängiger Feuerungen (wie<br />
z. B. Gas-, Öl- o<strong>de</strong>r Kohleheizgeräte,<br />
Durchlauferhitzer, Warmwasserbereiter)<br />
muss für ausreichend Zuluft gesorgt<br />
wer<strong>de</strong>n, die von <strong>de</strong>r Feuerstätte zur<br />
Verbrennung benötigt wird.<br />
Ein gefahrloser Betrieb ist möglich, wenn<br />
<strong>de</strong>r Unterdruck im Aufstellraum <strong>de</strong>r<br />
Feuerstätte von 4 Pa (0,04 mbar) nicht<br />
überschritten wird.<br />
Betriebsarten<br />
Dies kann erreicht wer<strong>de</strong>n, wenn durch<br />
nicht verschließbare Öffnungen, z. B. in<br />
Türen, Fenstern und in Verbindung mit<br />
Zuluft-/Abluftmauerkasten o<strong>de</strong>r durch<br />
an<strong>de</strong>re techn. Maßnahmen, wie<br />
gegenseitige Verriegelung o. ä., die<br />
Verbrennungsluft nachströmen kann.<br />
Bei nicht ausreichen<strong>de</strong>r Zuluft besteht<br />
Vergiftungsgefahr durch zurückgesaugte<br />
Verbrennungsgase.<br />
Ein Zuluft-/Abluftmauerkasten allein stellt<br />
die Einhaltung <strong>de</strong>s Grenzwertes nicht<br />
sicher.<br />
Anmerkung: Bei <strong>de</strong>r Beurteilung muss<br />
immer <strong>de</strong>r gesamte Lüftungsverbund <strong>de</strong>r<br />
Wohnung beachtet wer<strong>de</strong>n. Bei Betrieb von<br />
Kochgeräten, z. B. Kochmul<strong>de</strong> und Gasherd<br />
wird diese Regel nicht angewen<strong>de</strong>t.<br />
Wenn die Dunstabzugshaube im Umluftbetrieb<br />
– mit Aktivkohlefilter – verwen<strong>de</strong>t wird,<br />
ist <strong>de</strong>r Betrieb ohne Einschränkung<br />
möglich.<br />
Umluftbetrieb:<br />
❑ Hierzu muss ein Aktivkohlefilter<br />
einge baut wer<strong>de</strong>n (siehe Filter und<br />
Wartung).<br />
� Das komplette Montage-Set sowie<br />
die Ersatzfilter können Sie beim<br />
Fachhan<strong>de</strong>l erwerben.<br />
❑ Der Lüfter <strong>de</strong>r Dunstabzugshaube saugt<br />
<strong>de</strong>n Küchendunst an und leitet ihn durch<br />
<strong>de</strong>n Fett- und Aktivkohlefilter gereinigt in<br />
die Küche zurück.<br />
❑ Der Fettfilter nimmt die fettigen<br />
Bestandteile <strong>de</strong>s Küchendunstes auf.<br />
❑ Der Aktivkohlefilter bin<strong>de</strong>t die<br />
Geruchsstoffe.<br />
� Wird kein Aktivkohlefilter eingebaut,<br />
können keine Geruchsstoffe <strong>de</strong>s<br />
Küchendunstes gebun<strong>de</strong>n wer<strong>de</strong>n.<br />
47
Vor <strong>de</strong>m ersten Benutzen<br />
Wichtige Hinweise:<br />
❑ Diese Gebrauchsanleitung gilt für<br />
mehrere Geräte-Ausführungen.<br />
Es ist möglich, dass einzelne<br />
Ausstattungsmerkmale beschrieben<br />
sind, die nicht auf Ihr Gerät zutreffen.<br />
❑ Diese Dunstabzugshaube entspricht <strong>de</strong>n<br />
einschlägigen Sicherheitsbestimmungen.<br />
Reparaturen dürfen nur von Fachkräften<br />
durchgeführt wer<strong>de</strong>n.<br />
Durch unsachgemäße Reparaturen<br />
können erhebliche Gefahren für <strong>de</strong>n<br />
Benutzer entstehen.<br />
� Ist das Gerät beschädigt, dürfen Sie es<br />
nicht in Betrieb nehmen.<br />
� Anschluss und Inbetriebnahme dürfen<br />
nur von einem Fachmann durchgeführt<br />
wer<strong>de</strong>n.<br />
� Wenn die Anschlussleitung dieses<br />
Gerätes beschädigt wird, muss sie durch<br />
<strong>de</strong>n Hersteller o<strong>de</strong>r seinen Kun<strong>de</strong>ndienst<br />
o<strong>de</strong>r eine ähnlich qualifizierte Person ersetzt<br />
wer<strong>de</strong>n, um Gefährdung zu vermei<strong>de</strong>n.<br />
� Verpackungsmaterial ordnungsgemäß<br />
entsorgen (siehe Montageanleitung).<br />
� Diese Dunstabzugshaube ist nur für<br />
<strong>de</strong>n Betrieb in Haushalten bestimmt.<br />
� Dunstabzugshaube nur mit<br />
eingesetzten Lampen betreiben.<br />
� Defekte Lampen sollten sofort ersetzt<br />
wer<strong>de</strong>n, um Überlastung <strong>de</strong>r restlichen<br />
Lampen zu vermei<strong>de</strong>n.<br />
� Dunstabzugshaube nie ohne Fettfilter<br />
betreiben.<br />
� Überhitzte Fette o<strong>de</strong>r Öle können sich<br />
leicht entzün<strong>de</strong>n.<br />
Darum Speisen mit Fetten o<strong>de</strong>r Ölen,<br />
z. B. Pommes frites, nur unter Aufsicht<br />
zubereiten.<br />
� Unter <strong>de</strong>r Dunstabzugshaube nicht<br />
flambieren.<br />
Brandgefahr am Fettfilter durch<br />
! aufsteigen<strong>de</strong> Flammen.<br />
48<br />
❑ Bevor Sie das neue Gerät benutzen,<br />
lesen Sie bitte sorgfältig die<br />
Gebrauchsanleitung.<br />
Sie enthält wichtige Informationen für Ihre<br />
Sicherheit sowie zum Gebrauch und zur<br />
Pflege <strong>de</strong>s Gerätes.<br />
❑ Bewahren Sie die Gebrauchs- und<br />
Montageanleitung ggf. für einen<br />
Nachbesitzer gut auf.<br />
� Die Kochstellen müssen immer mit<br />
Kochgeschirr abge<strong>de</strong>ckt sein.<br />
� Über einer Feuerstätte für feste<br />
Brennstoffe (Kohle, Holz und dgl.) ist <strong>de</strong>r<br />
Betrieb <strong>de</strong>r Dunstabzugshaube nur bedingt<br />
gestattet (siehe Montageanleitung).<br />
Gas-Kochmul<strong>de</strong>n / Gas-Her<strong>de</strong><br />
� Betreiben Sie nicht alle Gas-<br />
Kochstellen gleichzeitig über längere Zeit<br />
(max. 15 Minuten) bei höchster<br />
Wärmebelastung, sonst besteht<br />
Verbrennungsgefahr bei Berührung <strong>de</strong>r<br />
Gehäuseoberflächen bzw. Gefahr <strong>de</strong>r<br />
Beschädigung <strong>de</strong>r Dunstabzugshaube.<br />
Beim Betrieb <strong>de</strong>r Dunstabzugshaube über<br />
einem Gas-Kochfeld muss bei gleichzeitigem<br />
Betreiben von drei o<strong>de</strong>r mehr<br />
Gas-Kochstellen die Haube in <strong>de</strong>r<br />
Maximalstufe betrieben wer<strong>de</strong>n.<br />
Störungen<br />
Bei eventuellen Rückfragen o<strong>de</strong>r<br />
Störungen, Kun<strong>de</strong>ndienst anrufen.<br />
(Siehe Kun<strong>de</strong>ndienststellenverzeichnis).<br />
Bei Anruf bitte angeben:<br />
E-Nr. FD<br />
Tragen Sie die Nummern in obige Fel<strong>de</strong>r<br />
ein. Die Nummern sind auf <strong>de</strong>m<br />
Typenschild, nach Abnahme <strong>de</strong>r Fettfilter,<br />
im Innenraum <strong>de</strong>r Dunstabzugshaube zu<br />
fin<strong>de</strong>n.
Bedienen <strong>de</strong>r Dunstabzugshaube<br />
� Der Küchendunst wird am<br />
wirkungsvollsten beseitigt durch:<br />
❑ Einschalten <strong>de</strong>r Dunstabzugshaube<br />
bei Kochbeginn.<br />
❑ Ausschalten <strong>de</strong>r Dunstabzugshaube<br />
erst einige Minuten nach Kochen<strong>de</strong>.<br />
Licht<br />
Lüfterstufen<br />
Einstellen <strong>de</strong>r gewünschten Lüfterstufe:<br />
❑ Kippen Sie <strong>de</strong>n entsprechen<strong>de</strong>n Schalter<br />
nach unten.<br />
❑ Der Lüfter läuft immer in <strong>de</strong>r am<br />
höchsten eingestellten Stufe.<br />
Beleuchtung:<br />
❑ Die Beleuchtung kann zu je<strong>de</strong>r Zeit<br />
verwen<strong>de</strong>t wer<strong>de</strong>n, auch wenn <strong>de</strong>r<br />
Lüfter ausgeschaltet ist.<br />
Filter und Wartung<br />
Fettfilter:<br />
Zur Aufnahme <strong>de</strong>r fettigen Bestandteile<br />
<strong>de</strong>s Küchendunstes sind Metall-<br />
Fettfilter eingesetzt.<br />
Die Filtermatten bestehen aus unbrennbarem<br />
Metall.<br />
Achtung:<br />
Bei zunehmen<strong>de</strong>r Sättigung mit fetthaltigen<br />
Rückstän<strong>de</strong>n erhöht sich die<br />
Entflammbarkeit und die Funktion <strong>de</strong>r<br />
Dunstabzugshaube kann beeinträchtigt<br />
wer<strong>de</strong>n.<br />
Wichtig:<br />
Durch rechtzeitiges Reinigen <strong>de</strong>r Metall-<br />
Fettfilter wird <strong>de</strong>r Brandgefahr vorgebeugt,<br />
die durch Hitzestau beim Frittieren o<strong>de</strong>r<br />
Braten entstehen kann.<br />
Reinigen <strong>de</strong>r Metall-Fettfilter:<br />
❑ Bei normalem Betrieb (täglich 1 bis 2<br />
Stun<strong>de</strong>n) müssen die Metall-Fettfilter<br />
nach 8 bis 10 Wochen gereinigt wer<strong>de</strong>n.<br />
❑ Das Reinigen kann in <strong>de</strong>r Geschirrspülmaschine<br />
erfolgen. Dabei ist eine leichte<br />
Verfärbung möglich.<br />
❑ Der Filter muss locker in <strong>de</strong>r Geschirrspülmaschine<br />
liegen.<br />
Er darf nicht eingeklemmt sein.<br />
Wichtig:<br />
Stark gesättigte Metall-Fettfilter nicht<br />
zusammen mit Geschirr reinigen.<br />
❑ Beim Reinigen von Hand, die Fettfilter in<br />
heißer Spüllauge einweichen.<br />
Danach abbürsten, gut ausspülen und<br />
abtropfen lassen.<br />
49
Filter und Wartung<br />
Aus- und Einbauen <strong>de</strong>r Metall-Fettfilter:<br />
1. Drücken Sie die Raste an <strong>de</strong>n Fettfiltern<br />
in Pfeilrichtung ein und klappen Sie die<br />
Fettfilter ab.<br />
2. Reinigen Sie die Fettfilter.<br />
3. Setzen Sie die gereinigten Fettfilter<br />
wie<strong>de</strong>r ein.<br />
Aktivkohlefilter:<br />
Zum Bin<strong>de</strong>n <strong>de</strong>r Geruchsstoffe beim<br />
Umluftbetrieb.<br />
Achtung:<br />
Bei zunehmen<strong>de</strong>r Sättigung mit fetthaltigen<br />
Rückstän<strong>de</strong>n erhöht sich die<br />
Entflammbarkeit und die Funktion <strong>de</strong>r<br />
Dunstabzugshaube kann beeinträchtigt<br />
wer<strong>de</strong>n.<br />
Wichtig:<br />
Durch rechtzeitigen Wechsel <strong>de</strong>s<br />
Aktivekohlefilters wird <strong>de</strong>r Brandgefahr<br />
vorgebeugt, die durch Hitzestau beim<br />
Frittieren o<strong>de</strong>r Braten entstehen kann.<br />
50<br />
Einbauen:<br />
1. Bauen Sie die Fettfilter aus (siehe Ausund<br />
Einbauen <strong>de</strong>r Metall-Fettfilter).<br />
2. Setzen Sie <strong>de</strong>n Aktivkohlefilter ein.<br />
3. Rasten Sie die Lasche ein.<br />
4. Bauen Sie die Fettfilter ein (siehe Ausund<br />
Einbauen <strong>de</strong>r Metall-Fettfilter).<br />
Ausbauen:<br />
1. Bauen Sie die Fettfilter aus.<br />
2. Drücken Sie die Lasche ein und nehmen<br />
Sie <strong>de</strong>n Aktivkohlefilter nach unten ab.<br />
3. Bauen Sie die Fettfilter ein.<br />
Wechsel <strong>de</strong>s Aktivkohlefilters:<br />
❑ Bei normalem Betrieb (täglich 1 bis 2<br />
Stun<strong>de</strong>n) müssen die Aktivkohlefilter<br />
ungefähr 1 x im Jahr ausgetauscht<br />
wer<strong>de</strong>n.<br />
❑ Der Aktivkohlefilter ist im Fachhan<strong>de</strong>l<br />
erhältlich.<br />
❑ Nur Originalfilter verwen<strong>de</strong>n.<br />
Dadurch wird die optimale Funktion<br />
gewährleistet.<br />
Entsorgung <strong>de</strong>s alten Aktivkohlefilters:<br />
❑ Aktivkohlefilter enthalten keine<br />
Schadstoffe. Sie können z. B. als<br />
Restmüll entsorgt wer<strong>de</strong>n.
Reinigen und Pflegen<br />
Dunstabzugshaube durch Ziehen <strong>de</strong>s<br />
Netzsteckers bzw. Ausschalten <strong>de</strong>r<br />
Sicherung stromlos machen.<br />
❑ Beim Reinigen <strong>de</strong>r Fettfilter die<br />
zugänglichen Gehäuseteile von<br />
abgelagertem Fett reinigen.<br />
Dadurch wird <strong>de</strong>r Brandgefahr<br />
vorgebeugt und die optimale Funktion<br />
bleibt erhalten.<br />
❑ Zum Reinigen <strong>de</strong>r Dunstabzugshaube<br />
heiße Spüllauge o<strong>de</strong>r mil<strong>de</strong>s Fensterputzmittel<br />
verwen<strong>de</strong>n.<br />
❑ Kratzen Sie angetrocknete Verschmutzung<br />
nicht ab, son<strong>de</strong>rn weichen<br />
Sie diese mit einem feuchten Tuch auf.<br />
❑ Keine scheuern<strong>de</strong>n Mittel o<strong>de</strong>r<br />
kratzen<strong>de</strong> Schwämme verwen<strong>de</strong>n.<br />
❑ Hinweis: Alkohol (Spiritus) nicht auf<br />
Kunststoffflächen anwen<strong>de</strong>n, es<br />
könnten matte Stellen entstehen.<br />
Vorsicht! Küche ausreichend<br />
belüften, keine offene Flamme.<br />
� Die Bedientasten nur mit mil<strong>de</strong>r<br />
Spüllauge und einem weichen, feuchten<br />
Tuch reinigen.<br />
Keinen E<strong>de</strong>lstahlreiniger für die<br />
Bedientasten verwen<strong>de</strong>n.<br />
E<strong>de</strong>lstahloberflächen:<br />
❑ Verwen<strong>de</strong>n Sie einen mil<strong>de</strong>n nicht<br />
scheuern<strong>de</strong>n E<strong>de</strong>lstahlreiniger.<br />
❑ Reinigen Sie nur in Schliffrichtung.<br />
� E<strong>de</strong>lstahloberflächen nicht mit<br />
kratzen<strong>de</strong>n Schwämmen und nicht mit<br />
sand-, soda-, säure- o<strong>de</strong>r chloridhaltigen<br />
Putzmitteln reinigen!<br />
Aluminium-, Lack- und Kunststoffoberflächen:<br />
❑ Verwen<strong>de</strong>n Sie ein weiches, fusselfreies<br />
Fenster- o<strong>de</strong>r Microfasertuch.<br />
❑ Keine trockenen Tücher verwen<strong>de</strong>n.<br />
❑ Verwen<strong>de</strong>n Sie ein mil<strong>de</strong>s Fensterreinigungsmittel.<br />
❑ Keine aggressiven, säure- o<strong>de</strong>r laugenhaltigen<br />
Reiniger verwen<strong>de</strong>n.<br />
❑ Keine Scheuermittel verwen<strong>de</strong>n.<br />
Auswechseln <strong>de</strong>r Lampen<br />
1. Schalten Sie die Dunstabzugshaube aus<br />
und machen Sie durch Ziehen <strong>de</strong>s<br />
Netzsteckers o<strong>de</strong>r Ausschalten <strong>de</strong>r<br />
Sicherung die Dunstabzugshaube<br />
stromlos.<br />
2. Bauen Sie die Fettfilter aus<br />
(siehe Filter und Wartung).<br />
3. Rasten Sie die Lampenab<strong>de</strong>ckung von<br />
oben aus <strong>de</strong>r Lichtleiste aus.<br />
4. Tauschen Sie die Lampe aus<br />
(han<strong>de</strong>lsübliche Glühlampen<br />
max. 40 Watt, Sockel E 14).<br />
5. Setzen Sie die Lampenab<strong>de</strong>ckung<br />
wie<strong>de</strong>r ein.<br />
6. Bauen Sie die Fettfilter wie<strong>de</strong>r ein.<br />
7. Stellen Sie durch Einstecken <strong>de</strong>s<br />
Netzsteckers o<strong>de</strong>r durch Einschalten <strong>de</strong>r<br />
Sicherung die Stromversorgung wie<strong>de</strong>r<br />
her.<br />
51
Montageanleitung:<br />
Wichtige Hinweise<br />
� Altgeräte sind kein wertloser Abfall.<br />
Durch umweltgerechte Entsorgung können<br />
wertvolle Rohstoffe wie<strong>de</strong>rgewonnen<br />
wer<strong>de</strong>n.<br />
Bevor Sie das Altgerät entsorgen, machen<br />
Sie es unbrauchbar.<br />
� Ihr neues Gerät wur<strong>de</strong> auf <strong>de</strong>m Weg zu<br />
Ihnen durch die Verpackung geschützt. Alle<br />
eingesetzten Materialien sind umweltverträglich<br />
und wie<strong>de</strong>r verwertbar. Bitte helfen<br />
Sie mit und entsorgen Sie die Verpackung<br />
umweltgerecht.<br />
Über aktuelle Entsorgungswege informieren<br />
Sie sich bitte bei Ihrem Fachhändler o<strong>de</strong>r<br />
bei Ihrer Gemein<strong>de</strong>verwaltung.<br />
� Die Dunstabzugshaube ist für Abluftund<br />
Umluftbetrieb verwendbar.<br />
� Die Dunstabzugshaube immer über <strong>de</strong>r<br />
Mitte <strong>de</strong>r Kochstellen anbringen.<br />
� Min<strong>de</strong>stabstand zwischen<br />
Elektrokochstellen und Unterkante <strong>de</strong>r<br />
Dunstabzugshaube: 550 mm, Abb. 1.<br />
� Über einer Feuerstätte für feste<br />
Brennstoffe, von <strong>de</strong>r eine Brandgefahr<br />
(z. B. Funkenflug) ausgehen kann, ist die<br />
Montage <strong>de</strong>r Dunstabzugshaube nur dann<br />
zulässig, wenn die Feuerstätte eine<br />
geschlossene nicht abnehmbare<br />
Ab<strong>de</strong>ckung hat und die län<strong>de</strong>rspezifischen<br />
Vorschriften eingehalten wer<strong>de</strong>n.<br />
Diese Einschränkung gilt nicht für Gas-<br />
Her<strong>de</strong> und Gas-Mul<strong>de</strong>n.<br />
� Je kleiner <strong>de</strong>r Abstand zwischen<br />
Dunstabzugshaube und Kochstellen <strong>de</strong>sto<br />
größer ist die Möglichkeit, dass sich durch<br />
aufsteigen<strong>de</strong>n Wasserdampf unten an <strong>de</strong>r<br />
Dunstabzugshaube Tropfen bil<strong>de</strong>n können.<br />
52<br />
Zusätzliche Hinweise bei Gas-Kochgeräten:<br />
� Bei <strong>de</strong>r Montage von Gaskochstellen<br />
sind die national einschlägigen gesetzlichen<br />
Bestimmungen (z. B. in Deutschland:<br />
Technische Regeln Gasinstallation TRGI) zu<br />
beachten.<br />
� Es müssen die jeweils gültigen Einbauvorschriften<br />
und die Einbauhinweise <strong>de</strong>r<br />
Gas-Gerätehersteller beachtet wer<strong>de</strong>n.<br />
� Die Dunstabzugshaube darf nur an<br />
einer Seite neben einem Hochschrank o<strong>de</strong>r<br />
einer hohen Wand eingebaut wer<strong>de</strong>n.<br />
Abstand mind. 50 mm.<br />
� Min<strong>de</strong>stabstand bei Gas-Kochstellen<br />
zwischen Oberkante Topfträger und<br />
Unterkante <strong>de</strong>r Dunstabzugshaube:<br />
650 mm, Abb. 1.
Vor <strong>de</strong>r Montage<br />
Abluftbetrieb<br />
150 150<br />
Die Abluft wird über einen Lüftungsschacht<br />
nach oben, o<strong>de</strong>r direkt durch die Außenwand<br />
ins Freie geleitet.<br />
D Die Abluft darf we<strong>de</strong>r in einen in Betrieb<br />
befindlichen Rauch- o<strong>de</strong>r Abgaskamin<br />
noch in einen Schacht, welcher <strong>de</strong>r Entlüftung<br />
von Aufstellungsräumen von Feuerstätten<br />
dient, abgegeben wer<strong>de</strong>n.<br />
Bei <strong>de</strong>r Ableitung von Abluft sind die<br />
behördlichen und gesetzlichen Vorschriften<br />
(z. B. Lan<strong>de</strong>sbauordnungen) zu<br />
beachten.<br />
Bei Abführung <strong>de</strong>r Luft in nicht in Betrieb<br />
befindliche Rauch- o<strong>de</strong>r Abgaskamine ist<br />
die Zustimmung <strong>de</strong>s zuständigen<br />
Schornsteinfegermeisters einzuholen.<br />
D Bei Abluftbetrieb <strong>de</strong>r Dunstabzugshaube<br />
und gleichzeitigem Betrieb<br />
schornsteinabhängiger Feuerungen (wie<br />
z. B. Gas-, Öl- o<strong>de</strong>r Kohleheizgeräte,<br />
Durchlauferhitzer, Warmwasserbereiter)<br />
muss für ausreichend Zuluft gesorgt<br />
wer<strong>de</strong>n, die von <strong>de</strong>r Feuerstätte zur Verbrennung<br />
benötigt wird.<br />
Ein gefahrloser Betrieb ist möglich, wenn<br />
<strong>de</strong>r Unterdruck im Aufstellraum <strong>de</strong>r<br />
Feuerstätte von 4 Pa (0,04 mbar) nicht<br />
überschritten wird.<br />
mind. 45<br />
684-1086 136<br />
500<br />
280<br />
260<br />
mind.60<br />
mind.<br />
400<br />
mind.<br />
460<br />
600 / 900<br />
Dies kann erreicht wer<strong>de</strong>n, wenn durch<br />
nicht verschließbare Öffnungen, z. B. in<br />
Türen, Fenstern und in Verbindung mit<br />
Zuluft-/Abluftmauerkasten o<strong>de</strong>r durch<br />
an<strong>de</strong>re techn. Maßnahmen, wie gegenseitige<br />
Verriegelung o. ä., die Verbrennungsluft<br />
nachströmen kann.<br />
Bei nicht ausreichen<strong>de</strong>r Zuluft besteht<br />
Vergiftungsgefahr durch zurückgesaugte<br />
Verbrennungsgase.<br />
Ein Zuluft-/Abluftmauerkasten allein stellt<br />
die Einhaltung <strong>de</strong>s Grenzwertes nicht<br />
sicher.<br />
Anmerkung: Bei <strong>de</strong>r Beurteilung muss<br />
immer <strong>de</strong>r gesamte Lüftungsverbund <strong>de</strong>r<br />
Wohnung beachtet wer<strong>de</strong>n. Bei Betrieb<br />
von Kochgeräten, z. B. Kochmul<strong>de</strong> und<br />
Gasherd wird diese Regel nicht<br />
angewen<strong>de</strong>t.<br />
Wenn die Dunstabzugshaube im Umluftbetrieb<br />
– mit Aktivkohlefilter – verwen<strong>de</strong>t wird,<br />
ist <strong>de</strong>r Betrieb ohne Einschränkung<br />
möglich.<br />
Wird die Abluft durch die Außenwand<br />
geleitet, sollte ein Teleskop-Mauerkasten<br />
verwen<strong>de</strong>t wer<strong>de</strong>n.<br />
53
Vor <strong>de</strong>r Montage<br />
Bei Abluftbetrieb sollte in <strong>de</strong>r Dunstabzugshaube<br />
eine Rückstauklappe eingebaut<br />
wer<strong>de</strong>n, wenn sie nicht im Abluftrohr o<strong>de</strong>r<br />
Mauerkasten vorhan<strong>de</strong>n ist.<br />
Ist <strong>de</strong>m Gerät keine Rückstauklappe<br />
beigelegt, kann sie über <strong>de</strong>n Fachhan<strong>de</strong>l<br />
bezogen wer<strong>de</strong>n.<br />
Montieren <strong>de</strong>r Rückstauklappe:<br />
❑ Die bei<strong>de</strong>n Zapfen <strong>de</strong>r Rückstauklappe<br />
in die Löcher am Luftstutzen bzw. am<br />
Luftaustritt einrasten.<br />
� Vor <strong>de</strong>m Montieren beachten, dass die<br />
Beschriftung bzw. Prägung aussen ist.<br />
Wird die Abluft durch die Außenwand<br />
geleitet, sollte ein Teleskop-Mauerkasten<br />
verwen<strong>de</strong>t wer<strong>de</strong>n.<br />
Optimale Leistung <strong>de</strong>r Dunstabzugshaube:<br />
❑ Kurzes, glattes Abluftrohr.<br />
❑ Möglichst wenig Rohrbögen.<br />
❑ Möglichst große Rohrdurchmesser und<br />
große Rohrbögen.<br />
Der Einsatz von langen, rauhen<br />
Abluftrohren, vielen Rohrbögen o<strong>de</strong>r<br />
kleineren Rohrdurchmessern führt zu<br />
einer Abweichung von <strong>de</strong>r optimalen<br />
Luftleistung und gleichzeitig zu einer<br />
Geräuscherhöhung.<br />
❑ Rundrohre:<br />
Wir empfehlen<br />
Innendurchmesser mind. 150 mm.<br />
54<br />
❑ Flachkanäle müssen einen gleichwertigen<br />
Innenquerschnitt wie Rundrohre<br />
haben.<br />
Sie sollten keine scharfen Umlenkungen<br />
haben.<br />
l 150 mm ca. 177 cm 2<br />
❑ Bei abweichen<strong>de</strong>n Rohrdurchmessern:<br />
Dichtstreifen einsetzen.<br />
❑ Bei Abluftbetrieb für ausreichend Zuluft<br />
sorgen.<br />
Rohranschluss<br />
❑ Den beiliegen<strong>de</strong>n<br />
Luftstutzen über<br />
<strong>de</strong>m Luftaustritt<br />
festschrauben.<br />
Abzugsrohr l 150 mm:<br />
❑ Abluftrohr direkt am Luftaustritt<br />
befestigen.<br />
� Ist eine Rückstauklappe montiert, die<br />
Funktion überprüfen.
Vor <strong>de</strong>r Montage<br />
Umluftbetrieb<br />
❑ Mit Aktivkohlefilter,<br />
wenn keine<br />
Möglichkeit für<br />
Abluftbetrieb vorhan<strong>de</strong>n<br />
ist.<br />
Gewicht in kg:<br />
600 / 900<br />
� Das komplette Montage-Set können<br />
Sie beim Fachhan<strong>de</strong>l erwerben.<br />
Vorbereiten <strong>de</strong>r Wand<br />
❑ Die Wand muss eben und senkrecht<br />
sein.<br />
❑ Für festen Halt <strong>de</strong>r Dübel ist zu sorgen.<br />
Abluft Umluft<br />
60 cm 15,0<br />
17,0<br />
90 cm 17,5<br />
19,5<br />
Konstruktionsän<strong>de</strong>rungen im Rahmen <strong>de</strong>r technischen<br />
Entwicklung bleiben vorenthalten.<br />
Elektrischer Anschluss<br />
Die Dunstabzugshaube darf nur an eine<br />
vorschriftsmäßig installierte Schutzkontaktsteckdose<br />
angeschlossen wer<strong>de</strong>n.<br />
Die Schutzkontaktsteckdose möglichst<br />
direkt hinter <strong>de</strong>r Kaminverblendung<br />
anbringen.<br />
Elektrische Daten:<br />
Sie sind auf <strong>de</strong>m Typenschild nach<br />
Abnahme <strong>de</strong>r Filterrahmen – im Innenraum<br />
<strong>de</strong>s Gerätes – zu fin<strong>de</strong>n.<br />
� Bei Reparaturen die Dunstabzugshaube<br />
generell stromlos machen.<br />
Länge <strong>de</strong>r Anschlussleitung: 1,30 m.<br />
Bei erfor<strong>de</strong>rlichem Festanschluss:<br />
Die Dunstabzugshaube darf in je<strong>de</strong>m Fall<br />
nur durch einen beim zuständigen<br />
Elektrizitäts-Versorgungsunternehmen<br />
eingetragenen Elektro-Installateur<br />
angeschlossen wer<strong>de</strong>n.<br />
Installationsseitig ist eine Trennvorrichtung<br />
vorzusehen. Als Trennvorrichtung gelten<br />
Schalter mit einer Kontaktöffnung von mehr<br />
als 3 mm und allpoliger Abschaltung. Dazu<br />
gehören LS-Schalter und Schütze.<br />
� Wenn die Anschlussleitung dieses<br />
Gerätes beschädigt wird, muss sie durch<br />
<strong>de</strong>n Hersteller o<strong>de</strong>r seinen Kun<strong>de</strong>ndienst<br />
o<strong>de</strong>r eine ähnlich qualifizierte Person<br />
ersetzt wer<strong>de</strong>n, um Gefährdung zu<br />
vermei<strong>de</strong>n.<br />
Diese Dunstabzugshaube entspricht <strong>de</strong>n<br />
EG-Funkentstörbestimmungen.<br />
55
Einbauen<br />
Die Dunstabzugshaube ist für die<br />
Montage an die Küchenwand vorgesehen.<br />
1. Fettfilter abnehmen (siehe Gebrauchsanleitung).<br />
2. Von <strong>de</strong>r Decke bis zur Unterkante <strong>de</strong>r<br />
Dunstabzugshaube eine Mittellinie an<br />
die Wand anzeichnen.<br />
3. Mit Hilfe <strong>de</strong>r Schablone Positionen für<br />
die Schrauben an <strong>de</strong>r Wand anreißen.<br />
� Auf Min<strong>de</strong>stabstand Kochstelle –<br />
Dunstabzugshaube von 550 mm bei<br />
Elektro-Kochstellen bzw. 650 mm bei Gas-<br />
Kochstellen achten. Der untere Rand <strong>de</strong>r<br />
Schablone entspricht <strong>de</strong>m unteren Rand<br />
<strong>de</strong>r Dunstabzugshaube.<br />
4. 4 Löcher für die Dunstabzugshaube und<br />
2 Löcher für die Kaminverblendung<br />
l 8 mm bohren und Dübel wandbündig<br />
eindrücken.<br />
347<br />
56<br />
30<br />
36,5<br />
mind.550 Elektro<br />
mind.650 Gas<br />
216<br />
178<br />
400<br />
Hinweis: Achten Sie auf eventuell zu<br />
montieren<strong>de</strong> Son<strong>de</strong>rzubehörteile.<br />
5. Die 2 beiliegen<strong>de</strong>n Abstandshalter in<br />
<strong>de</strong>n Haltewinkel für Kaminverblendung<br />
einrasten.<br />
Haltewinkel für Kaminverblendung mit<br />
2 Sechskantschrauben anschrauben.<br />
6. Die bei<strong>de</strong>n oberen Sechskantschrauben<br />
bis auf ca. 5 mm eindrehen.<br />
7. Dunstabzugshaube an <strong>de</strong>n Schrauben<br />
einhängen.<br />
ca.5mm
Einbauen<br />
08. Die bei<strong>de</strong>n unteren Sechskantschrauben<br />
eindrehen.<br />
� Vor <strong>de</strong>m Festdrehen <strong>de</strong>r 4 Schrauben<br />
ist die Dunstabzugshaube auszurichten.<br />
09. Rohrverbindung herstellen.<br />
10. Elektrische Verbindung herstellen.<br />
11. Schutzfolie an <strong>de</strong>n bei<strong>de</strong>n<br />
Kaminverblendungen abziehen.<br />
� Vermei<strong>de</strong>n Sie Beschädigungen <strong>de</strong>r<br />
empfindlichen E<strong>de</strong>lstahloberflächen.<br />
12. Die bei<strong>de</strong>n Teile <strong>de</strong>r Kaminverblendung<br />
ineinan<strong>de</strong>r schieben (Schlitze am oberen<br />
Teleskopteil nach unten) und in <strong>de</strong>n<br />
Ausschnitt an <strong>de</strong>r Dunstabzugshaube<br />
einsetzen.<br />
� Vermei<strong>de</strong>n Sie Kratzer beim<br />
Ineinan<strong>de</strong>rschieben, in <strong>de</strong>m Sie z. B.<br />
die Montageschablone als Schutz über<br />
die Kante <strong>de</strong>r unteren Kaminverblendung<br />
legen.<br />
1.<br />
3.<br />
2.<br />
13. Den oberen Teil anheben und mit 2<br />
Schrauben seitlich an <strong>de</strong>n Haltewinkel<br />
schrauben.<br />
14. Fettfilter wie<strong>de</strong>r einsetzen (siehe<br />
Gebrauchsanleitung).<br />
57
Notizen<br />
58 089 336
9000 089 336<br />
Printed in Germany 0805 Es.