Owner's Guide Guía de usario Notice d'utilitsation - Bose
Owner's Guide Guía de usario Notice d'utilitsation - Bose
Owner's Guide Guía de usario Notice d'utilitsation - Bose

You also want an ePaper? Increase the reach of your titles
YUMPU automatically turns print PDFs into web optimized ePapers that Google loves.
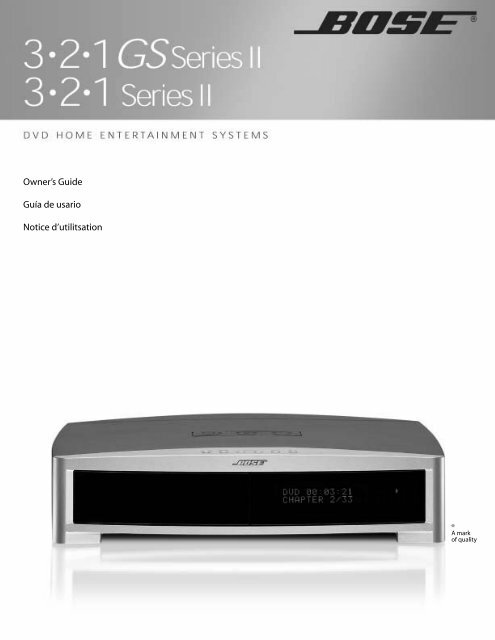
Owner’s <strong>Gui<strong>de</strong></strong><br />
<strong>Guía</strong> <strong>de</strong> <strong>usario</strong><br />
<strong>Notice</strong> d’utilitsation<br />
®<br />
A mark<br />
of quality
English<br />
2<br />
Safety Information<br />
WARNING: To reduce the risk of fire or electric shock, do not expose the system to rain or moisture.<br />
WARNING: This apparatus shall not be exposed to dripping or splashing, and objects filled with liquids,<br />
such as vases, shall not be placed on the apparatus. As with any electronic products, use care not to spill<br />
liquids in any part of the system. Liquids can cause a failure and/or a fire hazard.<br />
The CAUTION marks shown here are located on the bottom of your 3•2•1 Series II home entertainment<br />
system media center and the rear panel of the Acoustimass module:<br />
The lightning flash with arrowhead symbol, within an equilateral triangle, alerts the user to the<br />
presence of uninsulated dangerous voltage within the system enclosure that may be of sufficient<br />
magnitu<strong>de</strong> to constitute a risk of electric shock.<br />
The exclamation point within an equilateral triangle alerts the user to the presence of important<br />
operating and maintenance instructions in this owner’s gui<strong>de</strong>.<br />
CAUTION: To prevent electric shock, match wi<strong>de</strong> bla<strong>de</strong> of plug to wi<strong>de</strong> slot, insert fully.<br />
CAUTION: No naked flame sources, such as lighted candles, should be placed on the apparatus.<br />
Class 1 laser product<br />
The DVD player contained within the media center is classified as a CLASS 1<br />
LASER PRODUCT according to EN60825-1:1994 + A11. The CLASS 1<br />
LASER PRODUCT label is located on the bottom of the media center.<br />
CAUTION: Use of controls or adjustments or performance of procedures other than those specified<br />
herein may result in hazardous radiation exposure. The DVD player should not be adjusted or<br />
repaired by anyone except properly qualified service personnel.<br />
Class B emissions limits<br />
This Class B digital apparatus meets all requirements of the Canadian Interference-Causing Equipment<br />
Regulations.<br />
Batteries<br />
CAUTION<br />
RISK OF ELECTRICAL SHOCK<br />
DO NOT OPEN<br />
CAUTION: TO REDUCE THE RISK OF ELECTRIC SHOCK,<br />
DO NOT REMOVE COVER (OR BACK).<br />
NO USER-SERVICABLE PARTS INSIDE.<br />
REFER SERVICING TO QUALIFIED PERSONNEL.<br />
Please dispose of used batteries properly, following any local regulations. Do not incinerate.<br />
Additional safety information<br />
See the additional instructions on the Important Safety Information sheet enclosed in the shipping carton.<br />
Please read this owner’s gui<strong>de</strong><br />
AVIS VIS<br />
RISQUE DE CHOC ÉLECTRIQUE<br />
NE PAS OUVRIR<br />
ATTENTION : POUR RÉDUIRE LE RISQUE DE DÉCHARGE<br />
ÉLECTRIQUE, NE RETIREZ PAS LE COUVERCLE (OU<br />
L’ARRIÈRE). IL NE SE TROUVE ÀL’INTÉRIEURAUCUNE<br />
PIÈCE POUVANT ÊTRE RÉPARÉE PAR L’USAGER.<br />
S’ADRESSER À UN RÉPARATEUR COMPÉTENT.<br />
CLASS 1 LASER PRODUCT<br />
KLASSE 1 LASER PRODUKT<br />
LUOKAN 1 LASER LAITE<br />
KLASS 1 LASER APPARAT<br />
Please take the time to follow this owner’s gui<strong>de</strong> carefully. It will help you set up and operate your system<br />
properly, and enjoy all of its advanced features. Save your owner’s gui<strong>de</strong> for future reference.
Where to find…<br />
Contents<br />
Introduction . . . . . . . . . . . . . . . . . . . . . . . . . . . . . . . . . . . . . . . . . . . . . . . . . . . . . . . . . . . . . . . . . . . 5<br />
Before you begin . . . . . . . . . . . . . . . . . . . . . . . . . . . . . . . . . . . . . . . . . . . . . . . . . . . . . . . . . . . 5<br />
Selecting compatible discs . . . . . . . . . . . . . . . . . . . . . . . . . . . . . . . . . . . . . . . . . . . . . . . . 5<br />
Check for region co<strong>de</strong> compatibility . . . . . . . . . . . . . . . . . . . . . . . . . . . . . . . . . . . . . . . . . 5<br />
MP3 compatibility . . . . . . . . . . . . . . . . . . . . . . . . . . . . . . . . . . . . . . . . . . . . . . . . . . . . . . . 5<br />
Glossary of terms . . . . . . . . . . . . . . . . . . . . . . . . . . . . . . . . . . . . . . . . . . . . . . . . . . . . . . . . . . . 6<br />
Limited warranty . . . . . . . . . . . . . . . . . . . . . . . . . . . . . . . . . . . . . . . . . . . . . . . . . . . . . . . . . . . . 7<br />
For your records . . . . . . . . . . . . . . . . . . . . . . . . . . . . . . . . . . . . . . . . . . . . . . . . . . . . . . . . . . . . 7<br />
System Setup . . . . . . . . . . . . . . . . . . . . . . . . . . . . . . . . . . . . . . . . . . . . . . . . . . . . . . . . . . . . . . . . . 8<br />
Unpacking . . . . . . . . . . . . . . . . . . . . . . . . . . . . . . . . . . . . . . . . . . . . . . . . . . . . . . . . . . . . . . . . 8<br />
Selecting locations for your 3•2•1 Series II system components . . . . . . . . . . . . . . . . . . . . . . 9<br />
Placing the media center . . . . . . . . . . . . . . . . . . . . . . . . . . . . . . . . . . . . . . . . . . . . . . . . . . 9<br />
Placing the speakers . . . . . . . . . . . . . . . . . . . . . . . . . . . . . . . . . . . . . . . . . . . . . . . . . . . . . 10<br />
Placing the Acoustimass ® module . . . . . . . . . . . . . . . . . . . . . . . . . . . . . . . . . . . . . . . . . . . 11<br />
Making system connections . . . . . . . . . . . . . . . . . . . . . . . . . . . . . . . . . . . . . . . . . . . . . . . . . . . 12<br />
Connecting the Acoustimass module to the media center . . . . . . . . . . . . . . . . . . . . . . . . 12<br />
Connecting the speakers to the Acoustimass module . . . . . . . . . . . . . . . . . . . . . . . . . . . 12<br />
Connecting the supplied antennas . . . . . . . . . . . . . . . . . . . . . . . . . . . . . . . . . . . . . . . . . . 14<br />
Connecting cable FM radio . . . . . . . . . . . . . . . . . . . . . . . . . . . . . . . . . . . . . . . . . . . . . . . . 14<br />
Connecting your TV to the media center . . . . . . . . . . . . . . . . . . . . . . . . . . . . . . . . . . . . . . . . . 15<br />
Making audio connections . . . . . . . . . . . . . . . . . . . . . . . . . . . . . . . . . . . . . . . . . . . . . . . . . 15<br />
Making composite vi<strong>de</strong>o connections . . . . . . . . . . . . . . . . . . . . . . . . . . . . . . . . . . . . . . . . 15<br />
Connecting your TV and VCR to the media center . . . . . . . . . . . . . . . . . . . . . . . . . . . . . . . . . 16<br />
If your TV has audio output jacks . . . . . . . . . . . . . . . . . . . . . . . . . . . . . . . . . . . . . . . . . . . 16<br />
If your TV does not have audio output jacks . . . . . . . . . . . . . . . . . . . . . . . . . . . . . . . . . . . 17<br />
VCR consi<strong>de</strong>rations . . . . . . . . . . . . . . . . . . . . . . . . . . . . . . . . . . . . . . . . . . . . . . . . . . . . . . 18<br />
Advanced setup options . . . . . . . . . . . . . . . . . . . . . . . . . . . . . . . . . . . . . . . . . . . . . . . . . . . . . 18<br />
Making S-vi<strong>de</strong>o connections (higher quality vi<strong>de</strong>o) . . . . . . . . . . . . . . . . . . . . . . . . . . . . . . 18<br />
Making component vi<strong>de</strong>o connections (highest quality vi<strong>de</strong>o) . . . . . . . . . . . . . . . . . . . . . 19<br />
Connecting digital audio <strong>de</strong>vices . . . . . . . . . . . . . . . . . . . . . . . . . . . . . . . . . . . . . . . . . . . . 20<br />
Connecting your cable/satellite box, TV, and VCR to the media center . . . . . . . . . . . . . . 20<br />
Connecting a game console . . . . . . . . . . . . . . . . . . . . . . . . . . . . . . . . . . . . . . . . . . . . . . . 22<br />
Installing the remote control batteries . . . . . . . . . . . . . . . . . . . . . . . . . . . . . . . . . . . . . . . . . . . 23<br />
Connecting the power cord . . . . . . . . . . . . . . . . . . . . . . . . . . . . . . . . . . . . . . . . . . . . . . . . . . . 24<br />
Checking your system setup . . . . . . . . . . . . . . . . . . . . . . . . . . . . . . . . . . . . . . . . . . . . . . . . . . 25<br />
System Controls and Indicators . . . . . . . . . . . . . . . . . . . . . . . . . . . . . . . . . . . . . . . . . . . . . . . . . . . 26<br />
Remote control . . . . . . . . . . . . . . . . . . . . . . . . . . . . . . . . . . . . . . . . . . . . . . . . . . . . . . . . . . . . . 26<br />
The media center . . . . . . . . . . . . . . . . . . . . . . . . . . . . . . . . . . . . . . . . . . . . . . . . . . . . . . . . . . . 29<br />
Control panel . . . . . . . . . . . . . . . . . . . . . . . . . . . . . . . . . . . . . . . . . . . . . . . . . . . . . . . . . . . 29<br />
Display indicators . . . . . . . . . . . . . . . . . . . . . . . . . . . . . . . . . . . . . . . . . . . . . . . . . . . . . . . . 29<br />
Operation . . . . . . . . . . . . . . . . . . . . . . . . . . . . . . . . . . . . . . . . . . . . . . . . . . . . . . . . . . . . . . . . . . . . 30<br />
Turning your system on and off . . . . . . . . . . . . . . . . . . . . . . . . . . . . . . . . . . . . . . . . . . . . . . . . 30<br />
Playing vi<strong>de</strong>o DVDs . . . . . . . . . . . . . . . . . . . . . . . . . . . . . . . . . . . . . . . . . . . . . . . . . . . . . . . . . 30<br />
Basic DVD operations . . . . . . . . . . . . . . . . . . . . . . . . . . . . . . . . . . . . . . . . . . . . . . . . . . . . 31<br />
Restricting access to vi<strong>de</strong>o DVDs . . . . . . . . . . . . . . . . . . . . . . . . . . . . . . . . . . . . . . . . . . . 31<br />
Playing audio CDs . . . . . . . . . . . . . . . . . . . . . . . . . . . . . . . . . . . . . . . . . . . . . . . . . . . . . . . . . . 32<br />
Basic CD operations . . . . . . . . . . . . . . . . . . . . . . . . . . . . . . . . . . . . . . . . . . . . . . . . . . . . . 32<br />
Listening to FM/AM radio . . . . . . . . . . . . . . . . . . . . . . . . . . . . . . . . . . . . . . . . . . . . . . . . . . . . . 33<br />
Tuning to a station . . . . . . . . . . . . . . . . . . . . . . . . . . . . . . . . . . . . . . . . . . . . . . . . . . . . . . . 33<br />
Storing stations as presets . . . . . . . . . . . . . . . . . . . . . . . . . . . . . . . . . . . . . . . . . . . . . . . . 33<br />
Erasing a preset . . . . . . . . . . . . . . . . . . . . . . . . . . . . . . . . . . . . . . . . . . . . . . . . . . . . . . . . . 34<br />
Playing other sources . . . . . . . . . . . . . . . . . . . . . . . . . . . . . . . . . . . . . . . . . . . . . . . . . . . . . . . . 34<br />
Using the sleep timer . . . . . . . . . . . . . . . . . . . . . . . . . . . . . . . . . . . . . . . . . . . . . . . . . . . . . . . . 34<br />
3<br />
English Español Français
English<br />
Français Español<br />
4<br />
Contents<br />
Controlling Other Audio Devices . . . . . . . . . . . . . . . . . . . . . . . . . . . . . . . . . . . . . . . . . . . . . . . . . . . 35<br />
Setting up your remote to control other audio/vi<strong>de</strong>o <strong>de</strong>vices . . . . . . . . . . . . . . . . . . . . . . . . . 35<br />
Direct entry of a <strong>de</strong>vice co<strong>de</strong> . . . . . . . . . . . . . . . . . . . . . . . . . . . . . . . . . . . . . . . . . . . . . . . 35<br />
Searching for a <strong>de</strong>vice co<strong>de</strong> . . . . . . . . . . . . . . . . . . . . . . . . . . . . . . . . . . . . . . . . . . . . . . . 36<br />
Verifying an entered <strong>de</strong>vice co<strong>de</strong> . . . . . . . . . . . . . . . . . . . . . . . . . . . . . . . . . . . . . . . . . . . . 38<br />
Changing channel selection control . . . . . . . . . . . . . . . . . . . . . . . . . . . . . . . . . . . . . . . . . . . . . 38<br />
Changing Source Settings . . . . . . . . . . . . . . . . . . . . . . . . . . . . . . . . . . . . . . . . . . . . . . . . . . . . . . . 39<br />
Using the settings menus . . . . . . . . . . . . . . . . . . . . . . . . . . . . . . . . . . . . . . . . . . . . . . . . . . . . . 39<br />
To view the settings menus . . . . . . . . . . . . . . . . . . . . . . . . . . . . . . . . . . . . . . . . . . . . . . . . 39<br />
To make changes in the settings menus . . . . . . . . . . . . . . . . . . . . . . . . . . . . . . . . . . . . . . 40<br />
FM-AM settings menu . . . . . . . . . . . . . . . . . . . . . . . . . . . . . . . . . . . . . . . . . . . . . . . . . . . . . . . 41<br />
CD settings menu . . . . . . . . . . . . . . . . . . . . . . . . . . . . . . . . . . . . . . . . . . . . . . . . . . . . . . . . . . . 41<br />
DVD settings menu . . . . . . . . . . . . . . . . . . . . . . . . . . . . . . . . . . . . . . . . . . . . . . . . . . . . . . . . . . 42<br />
TV, CBL-SAT, and AUX settings menu . . . . . . . . . . . . . . . . . . . . . . . . . . . . . . . . . . . . . . . . . . 43<br />
Changing System Options . . . . . . . . . . . . . . . . . . . . . . . . . . . . . . . . . . . . . . . . . . . . . . . . . . . . . . . 44<br />
Using the System menu . . . . . . . . . . . . . . . . . . . . . . . . . . . . . . . . . . . . . . . . . . . . . . . . . . . . . . 44<br />
To view the System menu . . . . . . . . . . . . . . . . . . . . . . . . . . . . . . . . . . . . . . . . . . . . . . . . . 44<br />
To change system options . . . . . . . . . . . . . . . . . . . . . . . . . . . . . . . . . . . . . . . . . . . . . . . . . 45<br />
Audio options . . . . . . . . . . . . . . . . . . . . . . . . . . . . . . . . . . . . . . . . . . . . . . . . . . . . . . . . . . . . . . 46<br />
Vi<strong>de</strong>o options . . . . . . . . . . . . . . . . . . . . . . . . . . . . . . . . . . . . . . . . . . . . . . . . . . . . . . . . . . . . . . 47<br />
Media center options . . . . . . . . . . . . . . . . . . . . . . . . . . . . . . . . . . . . . . . . . . . . . . . . . . . . . . . . 48<br />
Remote control options . . . . . . . . . . . . . . . . . . . . . . . . . . . . . . . . . . . . . . . . . . . . . . . . . . . . . . 49<br />
DVD Lock options . . . . . . . . . . . . . . . . . . . . . . . . . . . . . . . . . . . . . . . . . . . . . . . . . . . . . . . . . . . 50<br />
Setting a password and restriction level . . . . . . . . . . . . . . . . . . . . . . . . . . . . . . . . . . . . . . 50<br />
Motion Picture Association of America (MPAA) rating system . . . . . . . . . . . . . . . . . . . . . 51<br />
Maintaining Your System . . . . . . . . . . . . . . . . . . . . . . . . . . . . . . . . . . . . . . . . . . . . . . . . . . . . . . . . 52<br />
Cleaning . . . . . . . . . . . . . . . . . . . . . . . . . . . . . . . . . . . . . . . . . . . . . . . . . . . . . . . . . . . . . . . . . . 52<br />
Cleaning the media center . . . . . . . . . . . . . . . . . . . . . . . . . . . . . . . . . . . . . . . . . . . . . . . . . 52<br />
Cleaning the speakers . . . . . . . . . . . . . . . . . . . . . . . . . . . . . . . . . . . . . . . . . . . . . . . . . . . . 52<br />
Cleaning discs . . . . . . . . . . . . . . . . . . . . . . . . . . . . . . . . . . . . . . . . . . . . . . . . . . . . . . . . . . 52<br />
Replacing the remote control batteries . . . . . . . . . . . . . . . . . . . . . . . . . . . . . . . . . . . . . . . . . . 53<br />
Accessories . . . . . . . . . . . . . . . . . . . . . . . . . . . . . . . . . . . . . . . . . . . . . . . . . . . . . . . . . . . . . . . 53<br />
Troubleshooting . . . . . . . . . . . . . . . . . . . . . . . . . . . . . . . . . . . . . . . . . . . . . . . . . . . . . . . . . . . . . . . 54<br />
Troubleshooting table . . . . . . . . . . . . . . . . . . . . . . . . . . . . . . . . . . . . . . . . . . . . . . . . . . . . . . . . 54<br />
Customer service . . . . . . . . . . . . . . . . . . . . . . . . . . . . . . . . . . . . . . . . . . . . . . . . . . . . . . . . . . . 55<br />
Technical Information . . . . . . . . . . . . . . . . . . . . . . . . . . . . . . . . . . . . . . . . . . . . . . . . . . . . . . . . . . . 57<br />
Device Co<strong>de</strong>s . . . . . . . . . . . . . . . . . . . . . . . . . . . . . . . . . . . . . . . . . . . . . . . . . . . . . . . . . . . . . . . . . A-1<br />
Cable box <strong>de</strong>vice co<strong>de</strong>s . . . . . . . . . . . . . . . . . . . . . . . . . . . . . . . . . . . . . . . . . . . . . . . . . . . . . . A-1<br />
Satellite box <strong>de</strong>vice co<strong>de</strong>s . . . . . . . . . . . . . . . . . . . . . . . . . . . . . . . . . . . . . . . . . . . . . . . . . . . . A-2<br />
TV <strong>de</strong>vice co<strong>de</strong>s . . . . . . . . . . . . . . . . . . . . . . . . . . . . . . . . . . . . . . . . . . . . . . . . . . . . . . . . . . . . A-4<br />
VCR <strong>de</strong>vice co<strong>de</strong>s . . . . . . . . . . . . . . . . . . . . . . . . . . . . . . . . . . . . . . . . . . . . . . . . . . . . . . . . . . A-9<br />
Digital vi<strong>de</strong>o recor<strong>de</strong>r <strong>de</strong>vice co<strong>de</strong>s . . . . . . . . . . . . . . . . . . . . . . . . . . . . . . . . . . . . . . . . . . . . A-12<br />
©2004 <strong>Bose</strong> Corporation. No part of this work may be reproduced, modified, distributed or otherwise used without prior written permission.<br />
Dolby and the double-D symbol are tra<strong>de</strong>marks of Dolby Laboratories. Manufactured un<strong>de</strong>r license from Dolby Laboratories. Confi<strong>de</strong>ntial unpublished works.<br />
1992-1997 Dolby Laboratories. All rights reserved.<br />
This product incorporates copyright protection technology that is protected by method claims of certain U.S. patents and other intellectual property rights<br />
owned by Macrovision Corporation and other rights owners. Use of this copyright protection technology must be authorized by Macrovision Corporation, and<br />
is inten<strong>de</strong>d for home and other limited viewing uses only unless otherwise authorized by Macrovision Corporation. Reverse engineering or disassembly is<br />
prohibited.<br />
“DTS” and “DTS Digital Surround” are registered tra<strong>de</strong>marks of Digital Theater Systems, Inc.<br />
MPEG Layer-3 audio compression technology licensed by Fraunhofer IIS and THOMSON multimedia.<br />
This product incorporates copyright protected technology and other intellectual property rights owned by Cirrus Logic, Inc. and subject to the copyright<br />
protection of the U.S. as well as other licensing restrictions and protections. Use of this copyright protected technology is limited solely to use with the Cirrus<br />
Logic integrated circuits incorporated in this product. Reverse engineering or disassembly is prohibited.
Before you begin<br />
Introduction<br />
Thank you for purchasing the <strong>Bose</strong> ® 3•2•1 Series II or 3•2•1 GS Series II DVD home<br />
entertainment system, which offers superb sound, elegance, and simplicity in an advanced<br />
home audio setup. Using <strong>Bose</strong> proprietary signal processing technology, the 3•2•1 Series II<br />
systems provi<strong>de</strong> improved spaciousness from stereo recordings, and bold movie effects from<br />
surround-enco<strong>de</strong>d materials. Yet its few parts require little effort to set up, so you can enjoy<br />
your new system’s performance right away.<br />
Your system inclu<strong>de</strong>s:<br />
• Integrated AM/FM tuner and DVD/CD player in a small console<br />
• Small, easy-to-place shelf speakers and an attractive hi<strong>de</strong>away Acoustimass ® module<br />
• Easy-to-use infrared remote control<br />
• Console input jacks for connecting other audio <strong>de</strong>vices (such as a VCR, cable or<br />
satellite box)<br />
Selecting compatible discs<br />
The DVD/CD player built into the 3•2•1 series II media center can play the following types of<br />
discs i<strong>de</strong>ntified by their corresponding logos:<br />
•Vi<strong>de</strong>o DVDs •Audio CDs<br />
•Vi<strong>de</strong>o CDs<br />
•CD-R and CD-R/Ws<br />
•DVD-R, DVD+R •MP3 CDs<br />
Check for region co<strong>de</strong> compatibility<br />
For a DVD player and DVD disc to be compatible, their region co<strong>de</strong> numbers must match.<br />
These numbers are allocated according to where the player and disc are sold. The 3•2•1<br />
Series II DVD home entertainment systems have a region co<strong>de</strong> which must also match the<br />
DVD discs.<br />
Check the region co<strong>de</strong> number on the carton of the 3•2•1 Series II DVD home entertainment<br />
system or on the bottom of the media center that comes in the carton. Then be sure to<br />
choose only DVD discs that show the same region number on the disc label or front cover.<br />
For example, a Region 1 DVD disc should display the following mark:<br />
MP3 compatibility<br />
To be compatible with the 3•2•1 Series II or 3•2•1 GS Series II home entertainment systems,<br />
MP3s must meet the following criteria:<br />
• All tracks must be burned in a single closed session<br />
• The disc format must be ISO9660<br />
• Each file must have a “.mp3” extension and have no other periods in the filename<br />
5<br />
English
English<br />
6<br />
Introduction<br />
Glossary of terms<br />
Aspect Ratio – The shape of the rectangular picture in a TV set. It is the width of the picture<br />
relative to the height. Our standard TV picture, in terminology used by that industry, is 4 units<br />
wi<strong>de</strong> by 3 units high, or 4:3 (read as 4 by 3) in aspect ratio. There are currently two standard<br />
TV aspect ratios, 4:3 and 16:9.<br />
Chapter – In DVD-Vi<strong>de</strong>o, a division of a title. Technically called a part of title (PTT).<br />
Component Vi<strong>de</strong>o – A vi<strong>de</strong>o signal split into three parts: luminance and two color signals<br />
(marked as YPbPr). It provi<strong>de</strong>s the highest resolution vi<strong>de</strong>o, but cannot be processed by all<br />
television sets.<br />
Composite Vi<strong>de</strong>o – A single vi<strong>de</strong>o signal that contains luminance, color, and synchronization<br />
information. NTSC and PAL are examples of composite vi<strong>de</strong>o systems.<br />
Dolby Laboratories – Developer of a perceptual coding system for audio.<br />
Dolby Digital – a type of multi-channel surround sound format used on discs.<br />
– the logo representing Dolby ® Digital.<br />
DTS – a type of multi-channel surround sound format used on discs.<br />
– the logo representing DTS.<br />
DVD – An acronym that is most commonly known to mean Digital Vi<strong>de</strong>o Disc or Digital<br />
Versatile Disc. The audio/vi<strong>de</strong>o/data storage system based on 12- and 8-cm optical discs.<br />
DVD Vi<strong>de</strong>o – A standard for storing and reproducing audio and vi<strong>de</strong>o on DVD-ROM discs,<br />
based on MPEG vi<strong>de</strong>o, Dolby Digital and MPEG audio, and other proprietary data formats.<br />
IR – An acronym for infrared. Pertains to the type of remote that sends/receives commands<br />
on an infrared light beam.<br />
Letterbox – The projected aspect ratio of feature films is often 16:9 rather than the 4:3 aspect<br />
ratio of most TVs. Therefore, it is becoming common practice to transfer films to vi<strong>de</strong>o with<br />
black bor<strong>de</strong>rs at the top and bottom of the picture. The film picture becomes a “letterbox”<br />
within the vi<strong>de</strong>o.<br />
MPEG – a type of data compression used for audio or vi<strong>de</strong>o storage on disc.<br />
MP3 – MPEG-1 Layer III audio. This is a compressed audio format that allows you to record<br />
many hours of music on a single CD.<br />
NTSC – An acronym for National Television System Committee. The organization that <strong>de</strong>veloped<br />
both the American Black & White and Color television systems.<br />
PAL – An acronym for Phase Alternate Line. A television format used extensively in Western<br />
Europe.
Limited warranty<br />
For your records<br />
Introduction<br />
PCM – An uncompressed, digitally co<strong>de</strong>d representation of an analog signal. This is the form<br />
of the digital audio signal used for both CD and laserdisc. It is a serial data stream that is<br />
co<strong>de</strong>d for transmission or recording. PCM is also used for many other types of serial data<br />
communications.<br />
S-vi<strong>de</strong>o – A vi<strong>de</strong>o interface standard that carries separate luminance and chrominance<br />
signals, usually on a four-pin mini-DIN connector. Also called Y/C. The quality of S-vi<strong>de</strong>o is<br />
significantly better than composite vi<strong>de</strong>o since it does not require a comb filter to separate<br />
the signals. Most high-end televisions have S-vi<strong>de</strong>o inputs.<br />
Title – numbered elements of the DVD contents, which may inclu<strong>de</strong> more than the movie<br />
alone.<br />
Track – Individual selections recor<strong>de</strong>d on an audio tape or disc.<br />
The 3•2•1 Series II and 3•2•1 GS Series II home entertainment systems are covered by a<br />
limited transferable warranty. Details of the limited warranty are provi<strong>de</strong>d on the product<br />
registration card that came with your system. Please fill out the information section on the<br />
card and mail it to <strong>Bose</strong>. Failure to do so will not affect your limited warranty rights.<br />
Serial numbers are located on the bottom of the media center and the rear of the<br />
Acoustimass ® module. Please have your serial number ready before contacting <strong>Bose</strong> ®<br />
Customer Service.<br />
Mo<strong>de</strong>l: 3•2•1 Series II 3•2•1 GS Series II Check one<br />
Media center serial number: _________________________________________________________<br />
Acoustimass module serial number: __________________________________________________<br />
Dealer name: ______________________________________________________________________<br />
Dealer phone: __________________________ Purchase date: _____________________________<br />
We suggest you keep your sales receipt and product registration together with this owner’s gui<strong>de</strong>.<br />
7<br />
English
English<br />
8<br />
System Setup<br />
Unpacking<br />
Figure 1<br />
Contents of the shipping<br />
carton<br />
Your system inclu<strong>de</strong>s<br />
one of the following<br />
cords:<br />
120 VAC power cord<br />
(US/Canada)<br />
115/230 VAC power<br />
cord with adapter<br />
(US/Europe)<br />
230 VAC power cord<br />
(Europe)<br />
230 VAC power cord<br />
(UK/Singapore)<br />
240 VAC power cord<br />
(Australia)<br />
Carefully unpack your system. Save all packing materials, which provi<strong>de</strong> the safest way to<br />
transport your system. Check to be sure your system inclu<strong>de</strong>s the parts shown in Figure 1.<br />
If any part of the system appears damaged, do not attempt to use it. Notify <strong>Bose</strong> or your<br />
authorized <strong>Bose</strong> ® <strong>de</strong>aler immediately. For <strong>Bose</strong> contact information, refer to the address<br />
sheet inclu<strong>de</strong>d in the carton.<br />
WARNING: To avoid danger of suffocation, keep the plastic bags out of the reach of children.<br />
Media center<br />
Remote<br />
control<br />
Acoustimass<br />
module<br />
Batteries<br />
FM antenna<br />
Speaker cable<br />
Note: If you purchased a 3•2•1<br />
GS Series II system, the left and<br />
right speaker cable connectors<br />
will be marked with a “GS”.<br />
Rubber feet for<br />
Acoustimass<br />
module<br />
Antenna stand<br />
Acoustimass ® module<br />
cable<br />
Stereo cable<br />
AM antenna<br />
Your system inclu<strong>de</strong>s one the<br />
following speaker types:<br />
3•2•1 speakers<br />
3•2•1 GS speakers<br />
Rubber feet for<br />
speakers<br />
Setup and<br />
<strong>de</strong>mo disc<br />
Note: Now is a good time to find the serial numbers on the bottom of the media center and<br />
Acoustimass module. Copy these numbers onto your product registration card and in the space<br />
provi<strong>de</strong>d on page 7.<br />
or<br />
Vi<strong>de</strong>o cable
Selecting locations for your 3•2•1 Series II system components<br />
Figure 2<br />
Sample media center and<br />
speaker placement<br />
System Setup<br />
Use the following gui<strong>de</strong>lines and Figure 2 to choose locations and positions for the components<br />
of your 3•2•1 home entertainment system.<br />
Note: While these gui<strong>de</strong>lines are offered to help provi<strong>de</strong> great system performance, you may find<br />
other placement choices that are more convenient and provi<strong>de</strong> the sound you enjoy.<br />
Placing the media center<br />
CAUTION: Do not block any ventilation openings. For reliable operation of the product and to<br />
protect it from overheating, put the product in a position and location that will not interfere with its<br />
proper ventilation. For example, do not place the product on a bed, sofa, or similar surface that<br />
may block the ventilation openings. Do not put it in a built-in system, such as a bookcase or cabinet<br />
that may keep air from flowing through its ventilation openings.<br />
• Place the media center where nothing obstructs opening the disc tray on its front panel.<br />
• Make sure the media center will be placed close enough to the Acoustimass ® module and<br />
the speakers so that all the cables will reach.<br />
• Make sure the media center will be placed close enough to additional source <strong>de</strong>vices (TV,<br />
VCR or cable box) so that all the cables will reach.<br />
Note: Make sure that the front of the media center is unobstructed so that it may receive<br />
IR (infrared) commands from the remote control.<br />
Left<br />
speaker<br />
3 ft (1 m)<br />
maximum<br />
3 ft (1 m)<br />
minimum<br />
3 ft (1 m)<br />
maximum<br />
Media center<br />
Note: The speakers are magnetically shiel<strong>de</strong>d to prevent interference with the TV screen.<br />
Right<br />
speaker<br />
9<br />
English
English<br />
10<br />
System Setup<br />
Figure 3<br />
Recommen<strong>de</strong>d speaker<br />
placement<br />
Placing the speakers<br />
Choosing a good location for the speakers will allow you to experience the audio surround<br />
effects that your 3•2•1 home entertainment system is <strong>de</strong>signed to <strong>de</strong>liver.<br />
• Place the two speakers either on top of the TV or at equal distance from the left and right of<br />
the TV screen (Figure 2). Keep both speakers at approximately the same height.<br />
• Place each speaker within 3 feet (1 meter) of the edge of the TV screen. Placing the<br />
speakers more than 3 feet away from the TV can cause the sound to become separated<br />
from the picture.<br />
• If you are using a bookshelf or a home entertainment unit, place each speaker at the<br />
front edge of its shelf. Positioning the speakers too far back in an enclosed space can<br />
change the overall quality of sound and alter the movie sound effects.<br />
• Place the speakers at least 3 feet (1 meter) apart from each other to optimize the<br />
surround sound experience.<br />
CAUTION: Choose a stable and level surface for both speakers. Vibration can cause the speakers<br />
to move, particularly on smooth surfaces like marble, glass, or highly polished wood. If you<br />
are placing the speakers on a flat surface, be sure to attach the smaller of the two sets of supplied<br />
rubber feet to the bottom surface. You may obtain additional rubber feet (part number<br />
178321) from <strong>Bose</strong> ® Customer Service. To contact <strong>Bose</strong>, refer to the list of offices inclu<strong>de</strong>d in the<br />
product carton.<br />
Note: The speakers can be mounted on <strong>Bose</strong> brackets, table stands, or floor stands. For or<strong>de</strong>ring<br />
information, refer to “Accessories” on page 53. Additional or longer cables may also be<br />
or<strong>de</strong>red.<br />
• Place the speakers only on their bottom surfaces, with the <strong>Bose</strong> logo right-si<strong>de</strong> up.<br />
• Aim the speakers straight ahead toward the listening area. Do not place the speakers at an<br />
angle. Angling one or both speakers into or away from the listening area significantly<br />
alters system performance.
Figure 4<br />
Recommen<strong>de</strong>d<br />
Acoustimass module<br />
placement<br />
Figure 5<br />
Recommen<strong>de</strong>d orientation<br />
of the module<br />
Placing the Acoustimass ® module<br />
System Setup<br />
• Place the Acoustimass ® module within reach of the cable from the music center and an AC<br />
(mains) power outlet.<br />
• Place the module at the same end of the room as the TV and the speakers (Figure 4).<br />
• Keep the module at least 3 feet (1 meter) away from the TV to prevent the module from<br />
interfering with the TV screen.<br />
3 ft (1 m)<br />
minimum<br />
• Attach the medium-sized rubber feet to the bottom of each foot on the module. The rubber<br />
feet provi<strong>de</strong> increased stability and protection from scratches.<br />
• Choose a convenient location such as un<strong>de</strong>r a table, behind a sofa or chair, or behind<br />
drapes, but do not block the port opening.<br />
• Aim the port of the module into the room or along the wall. This prevents a blocked port or<br />
over-powering bass.<br />
• Stand the Acoustimass module on its feet. Do not lay it on its si<strong>de</strong> or stand it on either end<br />
(Figure 5).<br />
CAUTION: Do not block the openings on the back of the module, which provi<strong>de</strong> ventilation for<br />
the built-in circuitry.<br />
CAUTION: The Acoustimass module generates a magnetic field. Although this is not an immediate<br />
risk to your vi<strong>de</strong>o tapes, audio tapes, and other magnetic media, you should not store any of<br />
these items directly on or near the module.<br />
ACINPUT<br />
MUSICCENTER<br />
11<br />
English
English<br />
12<br />
System Setup<br />
Making system connections<br />
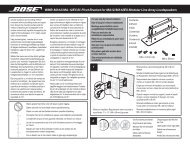
Figure 6<br />
Acoustimass module-tomedia<br />
center connection<br />
Figure 7<br />
Speaker cable-to-<br />
Acoustimass module<br />
connection<br />
CAUTION: Do not plug the Acoustimass ® module into an AC power (mains) outlet until all the<br />
components are connected.<br />
Note: If additional audio cables or longer cables are nee<strong>de</strong>d to make these connections, contact<br />
<strong>Bose</strong> Customer Service. Refer to the list of offices inclu<strong>de</strong>d in the product carton.<br />
Connecting the Acoustimass module to the media center<br />
Plug one end of the Acoustimass module cable into the Acoustimass Module jack on the rear<br />
of the media center (Figure 6). Plug the other end of the cable into the input ( ) jack on the<br />
rear of the Acoustimass module.<br />
Note: The jacks for the Acoustimass module cable are keyed so that the cable connectors only plug<br />
in one way. Make sure that the arrow on the connector body faces up when plugging in the cable.<br />
Media center<br />
rear panel<br />
Acoustimass<br />
module cable<br />
Acoustimass<br />
module input<br />
jack<br />
Connecting the speakers to the Acoustimass module<br />
1. Insert the single-plug end of the speaker cable into the SPEAKERS jack on the rear<br />
panel of the Acoustimass module (Figure 7). Tighten both screws on the plug.<br />
Acoustimass<br />
module cable<br />
Acoustimass<br />
module input<br />
jack<br />
Speaker<br />
cable
Figure 8<br />
Separating left and right<br />
speaker cords<br />
Figure 9<br />
Left and right speaker<br />
connections<br />
System Setup<br />
2. At the other end of the speaker cable, separate the left and right speaker cords as much<br />
as necessary to reach each speaker (Figure 8).<br />
3. Plug the LEFT speaker cable into the rear jack of the left speaker (Figure 9). Plug the<br />
RIGHT speaker cable into the rear jack on the right speaker.<br />
RIGHT<br />
speaker<br />
cable<br />
RIGHT<br />
Note: If you purchased a 3•2•1<br />
GS Series II system, the left and<br />
right speaker cable connectors<br />
will be marked with a “GS”.<br />
Note: Make sure cable connectors are fully inserted and seated firmly in the speaker jacks.<br />
LEFT<br />
LEFT<br />
speaker<br />
cable<br />
13<br />
English
English<br />
14<br />
System Setup<br />
Figure 10<br />
Antenna connections<br />
FM dipole<br />
antenna<br />
AM loop antenna<br />
Connecting the supplied antennas<br />
The rear panel of the media center provi<strong>de</strong>s jacks for the AM and FM antennas inclu<strong>de</strong>d with<br />
your system (Figure 10). Unwind the wires for each antenna to provi<strong>de</strong> the best reception.<br />
Note: An outdoor antenna may be<br />
used in place of the supplied indoor<br />
antennas. To add an outdoor<br />
antenna, consult a qualified installer.<br />
Follow all safety instructions supplied<br />
with the antenna.<br />
Media center<br />
FM antenna<br />
Plug the FM antenna into the FM jack on the media center rear panel. Spread out the antenna<br />
arms and move them around to establish optimum FM reception. Extend the antenna as far<br />
from the media center and other equipment as possible.<br />
AM antenna<br />
Plug the AM loop antenna into the AM jack on the media center rear panel. Place the antenna<br />
loop at least 20 inches (50 centimeters) away from the media center and at least 4 feet (1.2<br />
meters) away from the Acoustimass ® module. Experiment with positioning the loop for optimum<br />
AM reception. Follow the instructions enclosed with the AM loop antenna to stand it on<br />
the supplied base, or mount it to a wall.<br />
Connecting cable FM radio<br />
Some cable TV provi<strong>de</strong>rs make FM radio signals available through the cable service to your<br />
home. This connection is ma<strong>de</strong> to the external FM jack on the back panel of the media center.<br />
To connect to this service, contact your cable TV provi<strong>de</strong>r for assistance.<br />
Note: Make sure that the cable radio installation inclu<strong>de</strong>s a TV/FM splitter so that only the<br />
FM radio band, not the cable TV band, is received by the media center. If necessary, contact your<br />
cable company.
Connecting your TV to the media center<br />
Figure 11<br />
TV (composite vi<strong>de</strong>o)-tomedia<br />
center connections<br />
Stereo cable<br />
(red and white connectors)<br />
System Setup<br />
Note: If you will be using the 3•2•1 system with both a TV and a VCR, skip this section and go<br />
to “Connecting your TV and VCR to the media center” on page 16.<br />
Making audio connections<br />
Note: If your TV does not have audio output jacks, see “If your TV does not have audio output<br />
jacks” on page 17. Otherwise, continue.<br />
1. Connect one end of the supplied stereo cable to the TV Audio IN jacks on the rear panel<br />
of the media center (Figure 11). Insert the white RCA plug into the TV white L jack. Insert<br />
the red RCA plug into the TV red R jack.<br />
2. Connect the other end of the stereo cable to the audio output jacks on your TV. Insert the<br />
white RCA plug into the white AUDIO OUT L jack. Insert the red RCA plug into the red<br />
AUDIO OUT R jack.<br />
Making composite vi<strong>de</strong>o connections<br />
Note: Some ol<strong>de</strong>r TVs with standard TV cable connectors do not have a composite vi<strong>de</strong>o or an<br />
S-vi<strong>de</strong>o input. Such TVs are not compatible with any DVD players and require use of an RF modulator<br />
for this connection. RF modulators are available at your local electronics store.<br />
1. Insert one end of the supplied vi<strong>de</strong>o cable (yellow) to the Vi<strong>de</strong>o OUT C (composite) jack<br />
on the back of the media center (Figure 11).<br />
2. Insert the other end of the vi<strong>de</strong>o cable into one of the vi<strong>de</strong>o input jacks on your TV.<br />
Remember the name of the TV vi<strong>de</strong>o input you plugged the vi<strong>de</strong>o cable into (for<br />
example: Vi<strong>de</strong>o 1, Input 1, or Aux). Later, you will need to select the corresponding<br />
vi<strong>de</strong>o input on your TV in or<strong>de</strong>r to view the 3•2•1 system vi<strong>de</strong>o output.<br />
Vi<strong>de</strong>o cable<br />
(yellow connectors)<br />
Media center rear panel<br />
*<br />
TV connector panel<br />
TV<br />
*Could be labelled “FIXED”, “MONITOR”, or “HiFi”.<br />
15<br />
English
English<br />
16<br />
System Setup<br />
Connecting your TV and VCR to the media center<br />
Figure 12<br />
TV and VCR connections<br />
with media center<br />
Stereo cable<br />
(red and white connectors)<br />
Note: There are two options for connecting your TV and VCR to the media center. Before you<br />
proceed, you must <strong>de</strong>termine if your TV has audio output jacks. Consult your TV owner’s gui<strong>de</strong> if<br />
you need assistance.<br />
If your TV has audio output jacks<br />
If your TV has audio output jacks, you can directly route the TV audio to the 3•2•1 home<br />
entertainment system (Figure 12).<br />
1. Connect one end of the supplied stereo cable to the TV Audio IN jacks on the rear panel<br />
of the media center. Insert the white RCA plug into the TV white L jack. Insert the red<br />
RCA plug into the TV red R jack.<br />
2. Connect the other end of the stereo cable to the audio output jacks on your TV. Insert the<br />
white RCA plug into the white AUDIO OUT L jack. Insert the red RCA plug into the red<br />
AUDIO OUT R jack.<br />
3. Insert one end of the supplied vi<strong>de</strong>o cable (yellow) to the Vi<strong>de</strong>o OUT C (composite) jack<br />
on the back of the media center. Insert the other end of the vi<strong>de</strong>o cable into one of the<br />
vi<strong>de</strong>o input jacks on your TV.<br />
Remember the name of the TV vi<strong>de</strong>o input you plugged the vi<strong>de</strong>o cable into (for<br />
example: Vi<strong>de</strong>o 1, Input 1, or Aux). Later, you will need to select the corresponding<br />
vi<strong>de</strong>o input on your TV in or<strong>de</strong>r to view the 3•2•1 system vi<strong>de</strong>o output.<br />
Vi<strong>de</strong>o cable<br />
(yellow connectors)<br />
*<br />
TV connector<br />
panel<br />
Cable/satellite box<br />
(if applicable)<br />
Existing<br />
cable<br />
Existing<br />
cable<br />
*Could be labelled “FIXED”, “MONITOR”, or “HiFi”.<br />
VCR<br />
TV
Figure 13<br />
System setup when TV has<br />
no audio output jacks<br />
Media center rear panel<br />
Stereo cable<br />
(red and white connectors)<br />
IMPORTANT<br />
If you connected your TV and VCR this way, you<br />
will need to turn on your VCR and select the<br />
AUX source on the 3•2•1 remote to hear sound<br />
from TV programs.<br />
System Setup<br />
If your TV does not have audio output jacks<br />
If your TV does not have audio output jacks, you will need to feed audio to the 3•2•1 home<br />
entertainment system through a secondary source, such as a VCR. To do this, you will need<br />
one additional vi<strong>de</strong>o cable, which can be purchased at your local electronics store.<br />
1. Connect one end of the supplied stereo cable to the AUX Audio IN jacks on the rear<br />
panel of the media center (Figure 13). Insert the white RCA plug into the AUX white L<br />
jack. Insert the red RCA plug into the AUX red R jack.<br />
2. Connect the other end of the stereo cable to the AUDIO OUT jacks on your VCR. Insert<br />
the white RCA plug into the white AUDIO OUT L jack. Insert the red RCA plug into the<br />
red AUDIO OUT R jack.<br />
3. Insert one end of the supplied vi<strong>de</strong>o cable (yellow) into the VIDEO OUT jack on the<br />
back of your VCR. Insert the other end of the supplied vi<strong>de</strong>o cable into the Vi<strong>de</strong>o IN C<br />
(composite) jack on the back of the media center.<br />
4. Insert one end of the second vi<strong>de</strong>o cable (yellow) into the Vi<strong>de</strong>o OUT C (composite) jack<br />
on the back of the media center. Insert the other end of the second vi<strong>de</strong>o cable into one<br />
of the vi<strong>de</strong>o input jacks on your TV.<br />
Remember the name of the TV vi<strong>de</strong>o input you plugged the vi<strong>de</strong>o cable into (for<br />
example: Vi<strong>de</strong>o 1, Input 1, or Aux). Later, you will need to select the corresponding<br />
vi<strong>de</strong>o input on your TV in or<strong>de</strong>r to view the 3•2•1 system vi<strong>de</strong>o output.<br />
Vi<strong>de</strong>o cables<br />
(yellow connector)<br />
TV connection panel<br />
VCR<br />
Cable/satellite box<br />
TV<br />
Existing<br />
cable<br />
VCR<br />
connection<br />
panel<br />
Existing<br />
cable<br />
17<br />
English
English<br />
18<br />
System Setup<br />
Advanced setup options<br />
Figure 14<br />
TV (S-vi<strong>de</strong>o)-to-media<br />
center connections<br />
IMPORTANT<br />
If you use S-vi<strong>de</strong>o to<br />
connect your TV to the<br />
media center, you<br />
must also use S-vi<strong>de</strong>o<br />
to connect all other<br />
<strong>de</strong>vices (such as a<br />
cable box and VCR) to<br />
the media center.<br />
VCR consi<strong>de</strong>rations<br />
• Some combination TV/VCR units may not work with 3•2•1 Series II home entertainment<br />
systems. Please refer to your TV/VCR owner’s manual for information.<br />
• A stereo VCR is required for optimal sound performance. If your VCR has only one audio<br />
output and is not labeled Stereo or Hi-fi, you have a mono VCR. You will need a<br />
Y-adapter cable (available at electronics stores) to connect audio to the media center. For<br />
this setup, you will need to select “Mono <strong>de</strong>coding” (see “TV, CBL-SAT, and AUX settings<br />
menu” on page 43) so your 3•2•1 system will simulate surround sound effects from a mono<br />
source. Otherwise, you will hear mono sound from both speakers.<br />
Making S-vi<strong>de</strong>o connections (higher quality vi<strong>de</strong>o)<br />
An S-vi<strong>de</strong>o input jack, provi<strong>de</strong>d on many TVs, <strong>de</strong>livers a higher quality TV picture than the<br />
composite vi<strong>de</strong>o output connection shown in Figure 11. For this connection you will need an<br />
S-vi<strong>de</strong>o cable which can be purchased from your <strong>Bose</strong> <strong>de</strong>aler or a local electronics retailer.<br />
• Insert one end of the S-vi<strong>de</strong>o cable into the S-Vi<strong>de</strong>o OUT jack on the media<br />
center (Figure 14).<br />
• Insert the other end of the S-vi<strong>de</strong>o cable into the S-VIDEO IN jack on your TV.<br />
S-vi<strong>de</strong>o cable<br />
Stereo cable<br />
(red and white connectors)<br />
Media center rear panel<br />
TV connector panel<br />
TV
Figure 15<br />
TV (component vi<strong>de</strong>o)-tomedia<br />
center connections<br />
System Setup<br />
Making component vi<strong>de</strong>o connections (highest quality vi<strong>de</strong>o)<br />
Note: Component vi<strong>de</strong>o connections are required in or<strong>de</strong>r to use the progressive scan feature of<br />
your 3•2•1 system. Your TV must also support this feature. To turn on the progressive scan feature,<br />
see “Vi<strong>de</strong>o options” on page 47.<br />
For the highest quality vi<strong>de</strong>o from DVDs, you may want to use a component vi<strong>de</strong>o connection<br />
between the media center and the TV. To do so, your TV must provi<strong>de</strong> component vi<strong>de</strong>o jacks<br />
(typically labelled Y, Pb, and Pr). Refer to your TV owner’s gui<strong>de</strong> for more information.<br />
To make component vi<strong>de</strong>o connections you will need three vi<strong>de</strong>o gra<strong>de</strong> cables that are long<br />
enough to reach from the rear of the media center to your TV (Figure 15). If the cables are not<br />
supplied with your TV, you can purchase them separately.<br />
1. On the media center rear panel, plug one vi<strong>de</strong>o cable into the Component Y, Pb, and Pr<br />
vi<strong>de</strong>o output jacks (Figure 15).<br />
2. Plug the other end of each vi<strong>de</strong>o cable into the corresponding (color or letter co<strong>de</strong>) component<br />
vi<strong>de</strong>o jack on the back of your TV.<br />
Media center rear panel<br />
Stereo cable<br />
(red and white connectors)<br />
TV connector panel<br />
Color-co<strong>de</strong>d component vi<strong>de</strong>o<br />
jacks (Y, Pb, and Pr)<br />
Component<br />
vi<strong>de</strong>o cable<br />
IMPORTANT FOR COMPONENT VIDEO USERS<br />
Input signals received by the C (Composite) or S-Vi<strong>de</strong>o IN jacks are not passed through to<br />
the Component vi<strong>de</strong>o OUT jacks. If you connect an external vi<strong>de</strong>o <strong>de</strong>vice to the C or<br />
S-Vi<strong>de</strong>o IN jack, you must also connect the C or S-Vi<strong>de</strong>o OUT jack on the media center to<br />
the respective vi<strong>de</strong>o input jack on your TV. To view the external vi<strong>de</strong>o input on your TV, you<br />
will need to select the TV vi<strong>de</strong>o input used for that <strong>de</strong>vice. To view the onscreen menus of<br />
the 3•2•1 system, you will need to switch back to the TV’s component vi<strong>de</strong>o input.<br />
Note: For more information, or to purchase the vi<strong>de</strong>o cables, contact your local electronics store<br />
or authorized <strong>Bose</strong> <strong>de</strong>aler.<br />
19<br />
English
English<br />
20<br />
System Setup<br />
Figure 16<br />
Media center digital audio<br />
input jacks<br />
Connecting digital audio <strong>de</strong>vices<br />
Some audio <strong>de</strong>vices may feature a digital audio output for optimum sound performance. Use<br />
an optical digital cable or a coaxial digital cable, as appropriate, to connect this output to the<br />
digital input on the media center. You can purchase the required cables at a local electronics<br />
store.<br />
On the media center rear panel, an optical digital cable connects to the OPTICAL jack. A<br />
coaxial cable connects to the audio input jacks labeled D.<br />
Note: The digital audio inputs of the 3•2•1 system are not able to <strong>de</strong>co<strong>de</strong> a DTS bitstream from<br />
an external audio <strong>de</strong>vice. Only a DTS bitstream from the internal DVD player can be <strong>de</strong>co<strong>de</strong>d.<br />
Note: Before you can benefit from the optical connection, you will need to assign the optical<br />
connector to the audio source in the system settings menu. See “Media center options” on<br />
page 48.<br />
Optical digital<br />
audio input<br />
Coaxial digital<br />
audio inputs<br />
Connecting your cable/satellite box, TV, and VCR to the media center<br />
The 3•2•1 home entertainment system provi<strong>de</strong>s flexibility for you to add up to three external<br />
audio <strong>de</strong>vices, including your TV, directly to the media center.<br />
Figure 17 shows you an advanced setup using a TV, VCR and cable/satellite box. In this<br />
setup, please notice the following:<br />
• S-vi<strong>de</strong>o connections are used to <strong>de</strong>liver the cable/satellite signal to the media center.<br />
Therefore, the media center output vi<strong>de</strong>o is sent to the TV also through an S-vi<strong>de</strong>o<br />
connection.<br />
• Analog and digital coax audio connections are shown for the cable/satellite box. As an<br />
option, you may use an optical digital connection. However, before you can benefit from the<br />
optical connection, you will need to assign the optical connector to the cable/satellite box<br />
audio source in the system settings menu. See “Media center options” on page 48.<br />
• When connecting an audio <strong>de</strong>vice to the media center jacks, remember to match the red<br />
jack to the right channel (R) and the white (or black) jack to the left channel (L).<br />
• For further <strong>de</strong>tails on making the vi<strong>de</strong>o connections between your VCR and TV, refer to the<br />
manuals for these vi<strong>de</strong>o <strong>de</strong>vices.<br />
Note: The recommendations contained in this owner’s gui<strong>de</strong> are basic suggestions for connecting<br />
external <strong>de</strong>vices to the 3•2•1 Series II system. Instructions and terminology pertinent to these<br />
external <strong>de</strong>vices may vary, <strong>de</strong>pending on the manufacturer. Consult the owner’s gui<strong>de</strong> that came<br />
with the <strong>de</strong>vice for clarification on setup and usage before making any connections.
Figure 17<br />
Advanced setup: TV, VCR<br />
and cable/satellite box<br />
CBL-SAT<br />
S-vi<strong>de</strong>o<br />
output<br />
VCR analog audio<br />
Cable/satellite<br />
Media center’s<br />
S-vi<strong>de</strong>o output<br />
to TV<br />
Media center<br />
CBL-SAT analog<br />
audio CBL-SAT<br />
digital audio<br />
VCR<br />
CBL-SAT<br />
signal to<br />
VCR<br />
CBL-SAT<br />
signal to<br />
TV<br />
Cable/satellite<br />
(CBL-SAT)<br />
service<br />
System Setup<br />
Note: For more information on advanced connections, refer to the DVD setup disc that came<br />
with your 3•2•1 Series II home entertainment system.<br />
TV<br />
21<br />
English
English<br />
22<br />
System Setup<br />
Figure 18<br />
Game console connections<br />
Game console<br />
connection panel<br />
Connecting a game console<br />
Connect the audio output of a game console to the AUX Left and Right input jacks. Connect<br />
the vi<strong>de</strong>o output of the game console to the C (composite) Vi<strong>de</strong>o IN jack.<br />
TV connection panel<br />
Media center<br />
IMPORTANT<br />
If you connected your game console this way, you will<br />
need to select the AUX source on the 3•2•1 remote in<br />
or<strong>de</strong>r to hear sound from the game console.
Installing the remote control batteries<br />
Figure 19<br />
Installing the batteries<br />
System Setup<br />
1. On the back of the remote, sli<strong>de</strong> open the battery compartment (Figure 19).<br />
2. Insert the two supplied AA (IEC-R6) 1.5V batteries, or their equivalent, as shown. Match<br />
the plus (+) and minus (–) marked on the batteries with the plus (+) and minus (–) insi<strong>de</strong><br />
the battery compartment.<br />
3. Sli<strong>de</strong> the battery compartment cover back into place.<br />
Note: Replace the batteries when the remote control stops operating or its range seems reduced.<br />
(2) AA batteries (IEC R6)<br />
Battery<br />
compartment<br />
door<br />
+<br />
+<br />
23<br />
English
English<br />
24<br />
System Setup<br />
Connecting the power cord<br />
Figure 20<br />
Connecting to power<br />
CAUTION: For dual voltage mo<strong>de</strong>ls only, be sure to set the dual voltage switch on the back of<br />
the Acoustimass ® module to the appropriate voltage for your area (115V or 230V) before connecting<br />
to power. If you are not sure about the proper voltage for your area, consult your local<br />
electrical authorities.<br />
1. Insert the small connector end of the power cord into the AC INPUT connector on the<br />
Acoustimass module (Figure 20).<br />
2. Insert the large end of the cord into an AC power (mains) outlet.<br />
Note: On 220-240V mo<strong>de</strong>ls only, turn the Acoustimass module POWER switch to on (l).<br />
AC input<br />
jack<br />
AC power<br />
switch<br />
Note: Provi<strong>de</strong>d only on 220-240V<br />
rated systems<br />
115/230V<br />
selection<br />
switch<br />
115V<br />
Note: Provi<strong>de</strong>d only on 115/230V<br />
dual voltage rated systems
Checking your system setup<br />
System Setup<br />
1. Check the following before you continue:<br />
• All cables are connected for the setup you chose.<br />
• The batteries were installed in the remote control.<br />
• The power cord was installed and plugged into a live AC receptacle.<br />
2. Turn on your TV. Use the remote control that came with your TV.<br />
3. Select the right vi<strong>de</strong>o input on your TV to view the 3•2•1 system vi<strong>de</strong>o output.<br />
• Refer to the name of the TV vi<strong>de</strong>o input you used during setup.<br />
• Use the remote for your TV to select the vi<strong>de</strong>o input for your 3•2•1 system. The vi<strong>de</strong>o<br />
input button might be labelled “TV Input”, “TV/VCR”, or “AV”. Refer to your TV’s<br />
owner’s gui<strong>de</strong> for help.<br />
4. Turn off the speakers on your TV.<br />
• Refer to your TV’s owner’s gui<strong>de</strong> for help.<br />
• If your TV does not have an option to turn off the internal speakers, you may need to<br />
adjust both the 3•2•1 system volume and your TV volume until you find a level that<br />
produces the <strong>de</strong>sired sound.<br />
• In some TVs, when the internal speakers are turned off, you may need to raise the TV’s<br />
volume level by 75% to 100% in or<strong>de</strong>r to hear audio from the 3•2•1 home entertainment<br />
system. See your TV owner’s gui<strong>de</strong> for help.<br />
5. Turn on your 3•2•1 system.<br />
• Point the 3•2•1 remote control at the media center and press On-Off.<br />
6. Play the 3•2•1 setup DVD.<br />
•Press Eject on the media center control panel.<br />
• Insert the DVD setup disc into the disc tray.<br />
•Press Eject again to close the tray. The DVD will automatically begin to play. If it does<br />
not, press the play button ( ).<br />
Note: Be sure to play the Setup DVD, inclu<strong>de</strong>d in the carton with your system, as soon as all the<br />
connections are completed. This will help you verify the connections you have ma<strong>de</strong> and confirm<br />
proper sound performance.<br />
25<br />
English
English<br />
26<br />
System Controls and Indicators<br />
Remote control<br />
Remote<br />
status<br />
LED<br />
On<br />
Off<br />
AUX<br />
Turns the system on or off.<br />
Status LED:<br />
• Remains off (unlit) during normal operation.<br />
• Remains on during setup mo<strong>de</strong>. Turns off briefly with each key press.<br />
• Blinks rapidly eight times if the wrong key is pressed during setup or if an<br />
unavailable <strong>de</strong>vice co<strong>de</strong> is entered.<br />
• After ten seconds of no key presses, blinks rapidly eight times and the remote<br />
exits the setup mo<strong>de</strong>.<br />
Silences or restores the sound from the current source.<br />
Selects the built-in CD/DVD player and turns the system on.<br />
• Selects the built-in tuner and turns the system on to the previously selected<br />
FM/AM station.<br />
• Switches between FM and AM when the tuner is selected.<br />
TV: Turns your system on and selects the TV input as the sound source.<br />
Input: Changes the external input to your TV. For example, your TV<br />
might have two external inputs where one is connected to your cable<br />
box and the other to your VCR. Pressing this button alternates between<br />
the cable box and the VCR.*<br />
On/Off: Turns your TV on and off.*<br />
CBL-SAT: Turns your system on and selects the CBL-SAT input as the sound<br />
source.<br />
On/Off: Turns your cable/satellite box on or off.*<br />
AUX: Turns your system on and selects the AUX input as the sound source.<br />
On/Off: Turns a VCR or DVR that is connected to the AUX jack on or off.*<br />
* Requires special remote settings. See “Setting up your remote to control other audio/vi<strong>de</strong>o <strong>de</strong>vices”<br />
on page 35.
Remote control – cont.<br />
System Controls and Indicators<br />
Puts the Settings menu for the current source on your TV screen or media<br />
center display.<br />
Puts the System menu on your TV screen.<br />
• Puts the DVD menu of the currently loa<strong>de</strong>d DVD disc on your TV screen.<br />
• Puts the main menu of a cable/satellite box, VCR, or DVR on your TV<br />
screen (if supported).*<br />
Puts the TV program gui<strong>de</strong> (if supported) on your TV screen.<br />
Dismisses the Settings menu, System menu, or TV program gui<strong>de</strong> (if supported)<br />
from your TV screen or media center display.<br />
• Tunes the FM or AM radio to the next higher or lower frequency.<br />
• Selects the next item, up or down, in menus.<br />
Confirms a menu selection or introduces the next level of menu options.<br />
Moves up, down, left, or right in onscreen menus and media center<br />
displays.<br />
*Requires special remote settings. See “Setting up your remote to control other audio/vi<strong>de</strong>o <strong>de</strong>vices” on<br />
page 35.<br />
27<br />
English
English<br />
28<br />
System Controls and Indicators<br />
Remote control – cont.<br />
1 2<br />
0<br />
3<br />
4 5 6<br />
7 8 9<br />
• Raises or lowers the volume of the current source.<br />
• Pressing + restores muted sound from the current source.<br />
• Pressing – lowers the volume of the current source, but does not restore<br />
muted sound.<br />
Skips to the next or previous CD track, DVD chapter, radio station preset,<br />
or TV channel (if the remote is set up to control your TV).<br />
• Stops the disc player.<br />
• For DVDs only, the disc stops and the system saves the DVD play position.<br />
Pressing continues the DVD from the saved play position.<br />
Pressing twice for a disc in play returns to the beginning of the disc.<br />
• Pauses a currently playing disc.<br />
• Pressing again (or pressing ) resumes play of a paused disc.<br />
• After 20 minutes of no user interaction, the disc player stops and returns<br />
to the beginning of the disc to wait for the next command.<br />
Starts the disc player.<br />
• Skips backward or forward through CD tracks.<br />
• Skips backward or forward through DVD chapters.<br />
• Seeks backward or forward to the next strongest radio station.<br />
Plays audio CD tracks in random or<strong>de</strong>r. Press again to cancel this mo<strong>de</strong>.<br />
Repeats a CD, CD track, DVD chapter, or DVD title. Press again to change<br />
the repeat mo<strong>de</strong>.<br />
• Provi<strong>de</strong>s a means for selecting a CD track, DVD chapter, radio station<br />
preset, or TV channel.<br />
• Allows you to change numerical values for some menu options.<br />
• Displays or dismisses a cable/satellite information window, if supported.<br />
• If playing an MP3 CD, displays or dismisses artist and title information<br />
on the media center display panel.<br />
Skips to the previous TV channel (if supported by your TV).
The media center<br />
Figure 21<br />
Media center controls<br />
Figure 22<br />
Sample media center<br />
display<br />
®<br />
System Controls and Indicators<br />
The media center has a control panel on the top, a display area to show the current status of<br />
the system, and a disc tray that opens on the front of the console.<br />
Control panel<br />
The media center has six buttons located on the top control panel. Their functions are also<br />
available through use of the remote control.<br />
On-Off Source – Volume + Enter Eject<br />
Turns system<br />
power on or<br />
off.<br />
Steps through<br />
the available<br />
source<br />
selections.<br />
Note: If you selected another source by pressing the Source button, you cannot control the<br />
new source with the remote until you press the button for that new source on the remote.<br />
Display indicators<br />
With the system turned on, the music center display lights up to show the state of the<br />
system. Not all possible choices, shown below, light up at once (Figure 22). The display<br />
changes with each adjustment or selection you make.<br />
DVD 0:06:11<br />
CHAPTER 1/12<br />
Lights to indicate<br />
shuffle mo<strong>de</strong> is<br />
selected for the<br />
current disc.<br />
Lowers or raises<br />
the volume level.<br />
SHUFFLE REPEAT DISC TRACK<br />
Lights to indicate<br />
repeat mo<strong>de</strong> is<br />
selected for current<br />
track or disc.<br />
Lights to indicate<br />
“Repeat Disc” or<br />
“Shuffle Repeat<br />
Disc” mo<strong>de</strong> is<br />
selected.<br />
•Used to navigate<br />
through menus.<br />
• Selects the next<br />
available FM/AM<br />
preset.<br />
Opens or<br />
closes the<br />
disc tray.<br />
Lights to indicate<br />
disc is in play.<br />
Lights briefly when a<br />
remote control command<br />
is received.<br />
Lights to indicate<br />
“Repeat Track”<br />
mo<strong>de</strong> is selected.<br />
29<br />
English
English<br />
30<br />
Operation<br />
Turning your system on and off<br />
Playing vi<strong>de</strong>o DVDs<br />
To turn power on or off:<br />
• Point the 3•2•1 remote at the media center and press On/Off.<br />
OR<br />
•Press On-Off on top of the media center.<br />
To turn the system on to a source:<br />
•Press CD-DVD, FM-AM, TV, CBL-SAT, or AUX on the 3•2•1 remote.<br />
Note: Your 3•2•1 remote control can be set up to control other audio <strong>de</strong>vices such as your TV,<br />
VCR, or cable/satellite receiver. For instructions, see “Setting up your remote to control other<br />
audio/vi<strong>de</strong>o <strong>de</strong>vices” on page 35.<br />
Before you play your first DVD:<br />
• Familiarize yourself with the 3•2•1 remote control. See “Remote control” on page 26.<br />
• Be sure you un<strong>de</strong>rstand how to switch between the available vi<strong>de</strong>o inputs on your TV. To<br />
view a vi<strong>de</strong>o DVD, you will need to select the vi<strong>de</strong>o input on your TV that is connected to<br />
vi<strong>de</strong>o output of the 3•2•1 media center (see “Connecting your TV to the media center”<br />
on page 15).<br />
• If you are unable to select the correct vi<strong>de</strong>o input on your TV, please consult your TV’s<br />
owner’s gui<strong>de</strong>.<br />
• Be sure that you play the 3•2•1 system setup DVD first. This will help you verify the connections<br />
you have ma<strong>de</strong> and confirm proper sound performance.<br />
1. Turn on your TV.<br />
2. On the 3•2•1 remote, press CD/DVD to turn the 3•2•1 system on to the CD/DVD source.<br />
3. On the media center control panel, press Eject to open the disc tray.<br />
4. Place the DVD disc in the disc tray.<br />
5. Press Eject again to close the tray.<br />
The DVD should begin to play automatically. If not, press Play on the 3•2•1 remote.<br />
Note: Not all DVDs offer the same features. For example, you can choose to display subtitles<br />
while watching a movie only if that particular disc provi<strong>de</strong>s subtitle information.
Figure 23<br />
Sample display for<br />
a DVD vi<strong>de</strong>o<br />
OR<br />
Eject<br />
Operation<br />
While a DVD vi<strong>de</strong>o is playing, elapsed play time and chapter number are displayed on the<br />
media center front panel.<br />
DVD 0:06:11<br />
CHAPTER 1/12<br />
Basic DVD operations<br />
•Press Pause to pause a movie.<br />
•Press Pause again, or press Play to resume playing a paused CD.<br />
• Use the stop button ( ) to interrupt a movie in play.<br />
• Press once to interrupt a playing movie. The system holds the movie at the point of<br />
interruption. Press Play to resume play from the point of interruption.<br />
OR<br />
• Press twice. Play is interrupted and the system returns to the beginning of the disc.<br />
Press Play to restart the vi<strong>de</strong>o.<br />
•Press Chapter to skip to the next chapter on the current DVD. Press Chapter to skip<br />
to the previous chapter.<br />
•Press Repeat while a chapter is playing to make it repeat.<br />
• Press to scan backward through the current DVD. Press to scan forward.<br />
•Press Eject on the media center to stop a disc and open the disc tray.<br />
Note: For information on changing DVD-related source settings, see “DVD settings menu” on<br />
page 42.<br />
Restricting access to vi<strong>de</strong>o DVDs<br />
The DVD Lock menu allows you to restrict access to vi<strong>de</strong>o DVDs which may contain inappropriate<br />
material for certain members of your family. You can get to the DVD Lock menu by<br />
pressing the System button on the remote control. This feature allows you to set up password<br />
access for movies which have a certain rating. For instructions on using the DVD Lock<br />
menu, see “DVD Lock options” on page 50.<br />
31<br />
English
English<br />
32<br />
Operation<br />
Playing audio CDs<br />
OR<br />
Eject<br />
Eject<br />
1. On the 3•2•1 remote, press CD/DVD to turn the 3•2•1 system on to the CD/DVD source.<br />
2. On the media center control panel, press Eject to open the disc tray.<br />
3. Place the DVD disc in the disc tray.<br />
4. Press Eject again to close the tray.<br />
5. The audio CD should begin to play automatically. If not, press Play on the 3•2•1 remote.<br />
Basic CD operations<br />
•Press Pause to pause an audio CD.<br />
•Press Pause again, or press Play to resume playing a paused CD.<br />
• Press to stop an audio CD.<br />
•Press Track to skip to the next track on the current CD. Press Track to skip to the<br />
previous track.<br />
• Press and hold to scan backward through the current CD. Press and hold to scan<br />
forward.<br />
• Press once to advance to the next song.<br />
•Press Repeat once for REPEAT TRACK mo<strong>de</strong>. Press Repeat again for REPEAT DISC<br />
mo<strong>de</strong>. Press Repeat again to turn the repeat functions off (REPEAT OFF).<br />
•Press Shuffle once for SHUFFLE DISC mo<strong>de</strong>. Press Shuffle again to turn off the shuffle<br />
mo<strong>de</strong> (SHUFFLE OFF).<br />
Note: For information on changing CD-related source settings, see “CD settings menu” on<br />
page 41.<br />
Note: If playing an MP3 CD, the Info button displays or clears artist and title information on the<br />
media center display panel.
Listening to FM/AM radio<br />
1 2<br />
0<br />
3<br />
4 5 6<br />
7 8 9<br />
Operation<br />
On the 3•2•1 remote, press FM-AM. If the system is off, the radio will turn on to the most<br />
recently selected station.<br />
Tuning to a station<br />
You can tune to a radio station in any of the following ways:<br />
•Press FM-AM to switch between the FM and AM bands.<br />
•Press Tune to tune up the band. Press Tune to tune down the band.<br />
•Press Seek to go to the previous station. Press Seek to go to the next available<br />
station. Press and hold for rapid tuning. Release to stop at the next available station. To<br />
stop anytime, briefly press Seek or Seek . To begin seeking again without holding<br />
down the Seek button, briefly press Seek or Seek as soon as the first seek operation<br />
stops.<br />
•Press Preset to select the next stored station. Press Preset to select the previous<br />
stored station.<br />
OR<br />
• Press the number of a stored station on the keypad.<br />
Note: For information on changing FM/AM-related source settings, see “FM/AM settings menu”<br />
on page 41.<br />
Storing stations as presets<br />
Using your 3•2•1 remote control you can store up to 20 AM and 20 FM station presets. This<br />
enables you to tune to a favorite station quickly.<br />
1. Tune to the preferred station.<br />
2. Store the station with an assigned preset number.<br />
• For numbers 1-9, press the single number button and hold it. For numbers 10-20, press<br />
the first number. Immediately after, press the second number and hold it.<br />
•OR, press Enter on the media center to store the selected station at the next available<br />
preset number.<br />
The newly assigned preset number appears briefly on the media center display.<br />
Note: Assigning a preset number to a station will replace any previous assignment of that preset.<br />
33<br />
English
English<br />
34<br />
Operation<br />
Playing other sources<br />
Using the sleep timer<br />
Erasing a preset<br />
1. Tune to the preset station.<br />
2. Press and hold the 0 button on the remote until the media center display tells you that<br />
the preset is erased.<br />
Turn on any component connected to the media center by using the remote for that component<br />
or controls on the component front panel. Use the 3•2•1 Series II or 3•2•1 GS Series II<br />
system remote to get started:<br />
•Pressing TV, CBL-SAT, or AUX on the 3•2•1 or 3•2•1 GS system remote turns on the<br />
system and selects the audio for that component. Be sure a tape or disc is loa<strong>de</strong>d, as<br />
nee<strong>de</strong>d.<br />
•Use the Volume up or down arrows on the system remote or on the media center to raise<br />
or lower the volume of the system.<br />
Your system inclu<strong>de</strong>s a sleep timer which can be set to turn your system off automatically<br />
after 1 to 90 minutes of listening to any source. This timer can be accessed through the<br />
Settings menu for any source. See “Changing Source Settings” on page 39.<br />
Note: The sleep timer will not turn off the TV or other audio <strong>de</strong>vice.
Controlling Other Audio Devices<br />
Setting up your remote to control other audio/vi<strong>de</strong>o <strong>de</strong>vices<br />
Your remote can be set up to control other audio <strong>de</strong>vices such as a TV, VCR, PVR or<br />
cable/satellite box by entering a <strong>de</strong>vice co<strong>de</strong> while in the setup mo<strong>de</strong>.<br />
• If you know the <strong>de</strong>vice co<strong>de</strong>, follow the instructions un<strong>de</strong>r the heading, “Direct<br />
entry of a <strong>de</strong>vice co<strong>de</strong>” below. Device co<strong>de</strong>s are listed in the back section of this<br />
owner’s gui<strong>de</strong> and in the System menus un<strong>de</strong>r Remote Control options.<br />
• If you can’t find the <strong>de</strong>vice co<strong>de</strong> and want to search the system for it, see<br />
“Searching for a <strong>de</strong>vice co<strong>de</strong>” on page 36.<br />
• If you want to verify the <strong>de</strong>vice co<strong>de</strong> you have entered for an audio <strong>de</strong>vice, see<br />
“Verifying an entered <strong>de</strong>vice co<strong>de</strong>” on page 38.<br />
Note: More than one co<strong>de</strong> may work with your particular brand of product. If you notice a lack of<br />
response or limited functionality after setting up the remote, try a different co<strong>de</strong>.<br />
Note: The remote status LED flashes rapidly eight times if you press an invalid key, or enter an<br />
unavailable <strong>de</strong>vice co<strong>de</strong>. Wait seven seconds for the error to clear and start again.<br />
Direct entry of a <strong>de</strong>vice co<strong>de</strong><br />
Device co<strong>de</strong>s can be found at the back of this owner’s gui<strong>de</strong> or in the System menu un<strong>de</strong>r<br />
Remote Control options. If you know the <strong>de</strong>vice co<strong>de</strong>, you can do the following:<br />
To set up the remote to control your TV<br />
1. Turn on both the 3•2•1 system and your TV.<br />
2. Press and hold the TV button until the remote LED is lit (about five seconds).<br />
3. On the remote keypad, enter the four-digit <strong>de</strong>vice co<strong>de</strong> for your TV. The LED will turn off<br />
temporarily as you press each key.<br />
4. Check that the LED turns off after the co<strong>de</strong> is entered. If the LED blinks, the co<strong>de</strong> is<br />
invalid. Try again.<br />
5. Point the remote at your TV and press the TV On-Off button. If your TV does not<br />
respond, go back to step 2 and try other co<strong>de</strong>s. If you are still unsuccessful, see<br />
“Searching for a <strong>de</strong>vice co<strong>de</strong>” on page 36.<br />
To set up the remote to control your cable/satellite box<br />
1. Turn on both the 3•2•1 system and your cable/satellite box.<br />
2. Press and hold the CBL-SAT button until the remote LED is lit (about five seconds).<br />
3. On the remote keypad, enter the four-digit <strong>de</strong>vice co<strong>de</strong> for your cable/satellite box. The<br />
LED will turn off temporarily as you press each key.<br />
4. Check that the LED turns off after the co<strong>de</strong> is entered. If the LED blinks, the co<strong>de</strong> is<br />
invalid. Try again.<br />
5. Point the remote at your cable/satellite box and press the CBL-SAT On-Off button. If<br />
your cable/satellite box does not respond, go back to step 2 and try other co<strong>de</strong>s. If you<br />
are still unsuccessful, see “Searching for a <strong>de</strong>vice co<strong>de</strong>” on page 36.<br />
35<br />
English
English<br />
36<br />
Controlling Other Audio Devices<br />
AUX<br />
AUX<br />
To set up the remote to control your VCR or PVR (such as Tivo or Replay TV)<br />
1. Turn on both the 3•2•1 system and your VCR or PVR.<br />
2. Press and hold the AUX button until the remote LED is lit (about five seconds).<br />
3. On the remote keypad, enter the four-digit <strong>de</strong>vice co<strong>de</strong> for your VCR/PVR. The LED will<br />
turn off temporarily as you press each key.<br />
4. Check that the LED turns off after the co<strong>de</strong> is entered. If the LED blinks, the co<strong>de</strong> is<br />
invalid. Try again.<br />
5. Point the remote at your VCR or PVR and press the AUX On-Off button. If your VCR or<br />
PVR does not respond, go back to step 2 and try other co<strong>de</strong>s. If you are still unsuccessful,<br />
see “Searching for a <strong>de</strong>vice co<strong>de</strong>” on page 36.<br />
Searching for a <strong>de</strong>vice co<strong>de</strong><br />
Use this method if you do not know the <strong>de</strong>vice co<strong>de</strong> for a <strong>de</strong>vice.<br />
Note: This is a very time-consuming process. Use it as a last resort.<br />
To set up the remote to control your TV<br />
1. Turn on both the 3•2•1 system and your TV.<br />
2. Press and hold TV until the remote LED is lit (about five seconds).<br />
3. Alternately press Channel and TV On-Off until your TV turns off.<br />
4. Press Enter. Check that the remote LED turns off.<br />
5. Point the remote at your TV and press TV On-Off. If your TV does not respond, go back<br />
to step 2 and try again.
AUX<br />
AUX<br />
AUX<br />
To set up the remote to control your cable/satellite box<br />
1. Turn on both the 3•2•1 system and your cable/satellite box.<br />
Controlling Other Audio Devices<br />
2. Press and hold CBL-SAT until the remote LED is lit (about five seconds).<br />
3. Alternately press Channel and CBL-SAT On-Off until your cable/satellite box<br />
turns off.<br />
4. Press Enter. Check that the remote LED turns off.<br />
5. Point the remote at your cable/satellite box and press CBL-SAT On-Off. If your cable/<br />
satellite box does not respond, go back to step 2 and try again.<br />
To set up the remote to control your VCR or PVR (for example, TiVo or Replay TV)<br />
1. Turn on both the 3•2•1 system and your VCR/PVR.<br />
2. Press and hold AUX until the remote LED is lit (about five seconds).<br />
3. Alternately press Channel and AUX On-Off until your VCR/PVR turns off.<br />
4. Press Enter. Check that the remote LED turns off.<br />
5. Point the remote at your VCR/PVR and press AUX On-Off. If your VCR/PVR does not<br />
respond, go back to step 2 and try again.<br />
37<br />
English
English<br />
38<br />
Controlling Other Audio Devices<br />
Verifying an entered <strong>de</strong>vice co<strong>de</strong><br />
In case you need to check to see what co<strong>de</strong> the remote is using for a particular audio <strong>de</strong>vice,<br />
do the following:<br />
1. Press and hold a source key (TV, CBL-SAT, or AUX) until the remote LED lights (about<br />
five seconds)<br />
2. Press the Info button.<br />
3. Press 1 on the remote and count the number of times the LED blinks (zero is indicated by<br />
a long blink). This is the first digit.<br />
4. Press 2 on the remote and count the number of times the LED blinks (zero is indicated by<br />
a long blink). This is the second digit.<br />
5. Press 3 on the remote and count the number of times the LED blinks (zero is indicated by<br />
a long blink). This is the third digit.<br />
6. Press 4 on the remote and count the number of times the LED blinks (zero is indicated by<br />
a long blink). This is the fourth digit.<br />
7. Press Exit.<br />
Changing channel selection control<br />
If you are using your 3•2•1 home entertainment system with other audio <strong>de</strong>vices, such as a<br />
VCR and cable/satellite box, you may wish to change channels using one of these other<br />
audio <strong>de</strong>vices rather than your TV.<br />
You can easily switch your 3•2•1 remote to change channels on another audio <strong>de</strong>vice:<br />
1. Press and hold Last on the 3•2•1 remote. The remote status LED will illuminate and blink<br />
the number of times corresponding to the <strong>de</strong>vice controlling channel selection.<br />
1 blink = TV<br />
2 blinks = CBL-SAT<br />
3 blinks = AUX<br />
2. After the blinking stops, press the source button (TV, CBL-SAT, or AUX) that corresponds<br />
to the <strong>de</strong>vice you want to use for channel selection.<br />
3. Press Exit on the 3•2•1 remote.<br />
To confirm, press and hold Last on the 3•2•1 remote and count the number of blinks. If the<br />
change was ma<strong>de</strong>, press Exit. If not, repeat steps 2 and 3.
Using the settings menus<br />
Figure 24<br />
Sample Settings menu on<br />
your TV screen<br />
Figure 25<br />
Sample Settings menu on<br />
the media center display<br />
Changing Source Settings<br />
While watching a vi<strong>de</strong>o or listening to music on your system, you can make quick adjustments<br />
that will increase your enjoyment of the program. For that purpose, each source you<br />
use with this system has its own Settings menu with features appropriate to that source.<br />
To view the settings menus<br />
You can see the Settings menu for each source on your TV screen (Figure 24) and on the display<br />
panel of your media center (Figure 25).<br />
1. Turn on your TV and select the correct TV input to view your 3•2•1 system.<br />
2. Press a source button on your 3•2•1 remote control.<br />
3. Press Settings to display the Settings menu for the selected source.<br />
If the list of menu items is too long for the screen, a small down or up arrow indicates that<br />
you need to scroll down or up to see other items.<br />
4. Press Exit to dismiss the Settings menu.<br />
Source name<br />
Menu items<br />
Tuner<br />
Menu item name<br />
Output Mo<strong>de</strong>: Auto<br />
Selection box<br />
Note: Any changes ma<strong>de</strong> in the settings menu on your TV screen will also appear in the media<br />
center display panel.<br />
On the media center display panel, menu items will scroll in and out of view as you press the<br />
up ( ) and down ( ) arrow buttons on the remote.<br />
>Output Mo<strong>de</strong>: Auto<br />
Sleep Timer: Off<br />
SETTINGS<br />
Setting<br />
Navigation help - which buttons to use<br />
39<br />
English
English<br />
40<br />
Changing Source Settings<br />
Figure 26<br />
Changing the FM output<br />
mo<strong>de</strong> setting<br />
Tuner<br />
Output Mo<strong>de</strong>: Auto<br />
The down arrow<br />
button was pressed<br />
to select the Output<br />
Mo<strong>de</strong> menu item.<br />
To make changes in the settings menus<br />
Whether you use your TV screen or the media center display to change settings, the same<br />
instructions apply.<br />
You can use the actions above to change back to the original (<strong>de</strong>fault) settings, too. Do that if<br />
you do not like the effect of a change you have ma<strong>de</strong>, or acci<strong>de</strong>ntally ma<strong>de</strong> a change you did<br />
not intend. The <strong>de</strong>fault settings for each source are shown in the menu tables on the following<br />
pages.<br />
1. Turn on your TV and select the correct TV input to view your 3•2•1 system.<br />
2. Press a source button on your 3•2•1 remote control.<br />
3. Press Settings to display the Settings menu for the selected source.<br />
4. Using the down ( ) and up ( ) arrow buttons, select the menu item you want to change.<br />
5. Press the right arrow ( ) button to select the menu item setting.<br />
6. Press the up ( ) or down ( ) arrow button to change the setting.<br />
7. Press Enter or the left arrow ( ) button to save the setting.<br />
8. Press Exit to dismiss the Settings menu.<br />
The progression in Figure 26 shows output mo<strong>de</strong> for the FM tuner being changed from Auto<br />
to Stereo.<br />
Tuner<br />
Output Mo<strong>de</strong>: Auto<br />
The right arrow<br />
button was<br />
pressed to select<br />
the setting.<br />
Tuner<br />
Output Mo<strong>de</strong>: Stereo<br />
The up or down<br />
arrow button<br />
was pressed to<br />
change setting<br />
from Auto to<br />
Stereo.<br />
Note: You can restore all <strong>de</strong>fault settings by choosing Restore Settings in the Systems menu,<br />
un<strong>de</strong>r Media Center options. This reverts all source settings back to the factory <strong>de</strong>fault settings.<br />
It also changes the Audio Processing setting back to Automatic (found in the Systems<br />
menu un<strong>de</strong>r Audio options).
FM/AM settings menu<br />
CD settings menu<br />
Changing Source Settings<br />
To see the FM/AM Settings menu, press FM-AM on the remote. Then press Settings. Press<br />
Exit to remove the menu from the screen.<br />
Item Name Settings Default Description<br />
Output Mo<strong>de</strong><br />
(FM only)<br />
RDS Info<br />
(FM only, and<br />
only on some<br />
systems)<br />
Auto, Stereo,<br />
Mono<br />
Sleep Timer Off, 10-90<br />
minutes<br />
Auto Allows you to listen to stereo broadcasts<br />
in either stereo or mono output.<br />
Off, On Off Displays station and program information<br />
(as available from Radio Data<br />
System).<br />
To see the CD Settings menu, press CD-DVD on the remote while playing an audio CD. Then<br />
press Settings. Press Exit to remove the menu from the screen.<br />
Item Name Settings Default Description<br />
Off Turns the system off after the set time<br />
expires. Choose off to <strong>de</strong>activate the<br />
timer.<br />
Track __ of __ Allows you to select a track on the<br />
current disc.<br />
Sleep Timer Off, 10-90<br />
minutes<br />
Off Turns the system off after the set time<br />
expires. Choose off to <strong>de</strong>activate the<br />
timer.<br />
41<br />
English
English<br />
42<br />
Changing Source Settings<br />
DVD settings menu<br />
To see the DVD Settings menu, press CD-DVD on the remote while playing a DVD vi<strong>de</strong>o disc.<br />
Then press Settings. Press Exit to remove the menu from the screen.<br />
Item Name Settings Default Description<br />
Movie EQ* On, Off On Optimizes the tonal balance for movies.<br />
Range Compression* On, Off On Adjusts volume to maintain dialogue intelligibility. Keeps<br />
some sounds from overwhelming others.<br />
Mono Decoding* On, Off On Engages Vi<strong>de</strong>ostage ® 5 mono <strong>de</strong>coding circuitry to process<br />
mono sound (one-channel audio) for your system.<br />
Time _:_ _ 0:00 Displays the elapsed time of the current DVD. Also,<br />
allows you to move to a new location in the movie by<br />
entering a new time.<br />
Title __ of __ Selects a DVD title from the current disc, according to<br />
the number set. Some DVDs do not allow direct access<br />
to titles.<br />
Chapter _____ Selects a DVD chapter from the current DVD movie,<br />
according to the number entered. Some DVDs do not<br />
allow direct access to chapters.<br />
Audio Track Depen<strong>de</strong>nt on<br />
disc<br />
Subtitle language Depen<strong>de</strong>nt on<br />
disc<br />
Allows you to choose one of the available audio tracks<br />
on the current disc.<br />
Allows you to choose one of the available subtitle languages<br />
(only if inclu<strong>de</strong>d on disc).<br />
Camera Angle 1 of ____ Allows you to select one of the available camera angles<br />
(only if inclu<strong>de</strong>d on disc).<br />
A-B Repeat A, B Repeats a segment of the DVD after the start and end<br />
points are <strong>de</strong>fined. To begin:<br />
1. Move backward or forward to the point in the DVD<br />
where you want the segment to start.<br />
2. Press Enter.<br />
3. Move to the point where you want it to end.<br />
4. Press Enter.<br />
Repeats until you press the Exit or Settings button.<br />
Sleep Timer Off, 10-90<br />
minutes<br />
Off Turns the system off after the set time expires. Choose<br />
off to <strong>de</strong>activate the timer.<br />
*Available only when Audio Processing is set to User Adjustable. See “Audio options” on<br />
page 46 for more information.
TV, CBL-SAT, and AUX settings menu<br />
Changing Source Settings<br />
The settings below affect programs on the TV, even when the source of the program is VCR,<br />
CBL/SAT or AUX. There are no separate setting menus for these sources.<br />
Movie EQ, Range Compression and Mono Decoding appear in the menu only if Audio<br />
Processing is set to User Adjustable. Audio Processing can be found in the System<br />
menu un<strong>de</strong>r Audio options.<br />
Item Name Settings Default Description<br />
Movie EQ* On, Off On Optimizes the tonal balance for<br />
movies.<br />
Range<br />
Compression*<br />
On, Off On Adjusts volume to maintain dialogue<br />
intelligibility. Keeps some sounds from<br />
overwhelming others.<br />
Mono Decoding* On, Off On Engages Vi<strong>de</strong>ostage ® 5 mono <strong>de</strong>coding<br />
circuitry to process mono sound<br />
(one-channel audio) for your system.<br />
Dolby Digital<br />
1+1**<br />
Sleep Timer Off, 10-90<br />
minutes<br />
1, 2, Both 1 Plays audio content of selected<br />
soundtrack(s).<br />
The content of the second soundtrack<br />
may be a second language, for<br />
example.<br />
Off Turns the system off after the set time<br />
expires. Choose off to <strong>de</strong>activate the<br />
timer.<br />
*Available only when Audio Processing is set to User Adjustable. See “Audio options” on<br />
page 46 for more information.<br />
** Available only when a Dolby Digital 1+1 signal is <strong>de</strong>tected.<br />
43<br />
English
English<br />
44<br />
Changing System Options<br />
Using the System menu<br />
Figure 27<br />
Sample system menu<br />
showing audio options<br />
Changes to system options are typically ma<strong>de</strong> only once. If your system operates as you<br />
want it to, there may be no need for any changes. In some cases, however, changes are<br />
required to make the system fully compatible with the installation options you have chosen.<br />
To view the System menu<br />
Unlike the source settings menus, the System menu only appears on your TV screen.<br />
1. Turn on your TV and select the correct TV input to view your 3•2•1 system.<br />
2. Press the System button on your 3•2•1 remote control. The System menu appears with<br />
Audio options selected, showing a list of the Audio options that can be changed.<br />
3. Press System again, or press Exit to dismiss the System menu.<br />
Note: Entering the System menu causes any DVD or VCD that is playing to pause.<br />
List of system options for<br />
the selected category<br />
Navigation help – Which remote<br />
control buttons to use<br />
Categories of options<br />
Audio<br />
Vi<strong>de</strong>o<br />
Bass Compensation<br />
Treble Compensation<br />
Audio Processing<br />
Input Levels<br />
select<br />
Media<br />
Center<br />
Remote<br />
Control<br />
DVD<br />
Lock<br />
Select Audio to adjust these system options:<br />
navigate
To change system options<br />
Changing System Options<br />
Changing system options in this menu is similar to changing the settings for a source.<br />
1. Turn on your TV and select the correct TV input to view your 3•2•1 system.<br />
2. Press the System button on your 3•2•1 remote control.<br />
3. Using the right ( ) and left ( ) arrow buttons, highlight one of the option categories<br />
(Audio, Vi<strong>de</strong>o, Media Center, Remote Control, or DVD Lock).<br />
4. Press Enter or the down ( ) arrow to select the option category.<br />
5. Using the down ( ) and up ( ) arrow buttons, select the system option to change.<br />
6. Press the right arrow ( ) button to see the system option settings.<br />
7. Press the up ( ) or down ( ) arrow button to change the setting.<br />
8. Press Enter or the left arrow ( ) button to save the setting.<br />
9. Press System again, or press Exit to dismiss the System menu.<br />
45<br />
English
English<br />
46<br />
Changing System Options<br />
Audio options<br />
Figure 28<br />
Audio system options Audio Vi<strong>de</strong>o Media<br />
Center<br />
The audio options affect the way the system sounds in your home.<br />
Note: Listening to an audio source while you change audio options can be helpful. Some<br />
changes will be immediately noticeable and therefore useful in fine tuning your selections.<br />
navigate<br />
select<br />
Remote<br />
Control<br />
Select Audio to adjust these system options:<br />
Bass Compensation<br />
Treble Compensation<br />
Audio Processing<br />
Input Levels<br />
DVD<br />
Lock<br />
System Option Settings Description<br />
Bass Compensation 0 [<strong>de</strong>fault]<br />
–14 to +14<br />
Treble Compensation 0 [<strong>de</strong>fault]<br />
–14 to +14<br />
Audio Processing Automatic [<strong>de</strong>fault]<br />
User Adjustable<br />
Input Levels:<br />
TV Analog Input Level<br />
TV Digital Input Level<br />
CBL/SAT Analog Input Level<br />
CBL/SAT Digital Input Level<br />
AUX Analog Input Level<br />
AUX Digital Input Level<br />
Normal [<strong>de</strong>fault]<br />
–6, –3, +3, +6<br />
Normal low-frequency reproduction.<br />
Decreased (–) or increased (+) low-frequency reproduction.<br />
Normal high-frequency reproduction.<br />
Decreased (–) or increased (+) high-frequency reproduction.<br />
Standard <strong>Bose</strong> ® processing applied.<br />
Processing options (Movie EQ, Range Compression, Mono<br />
Decoding) available in Source Settings menus.<br />
Standard signal level (loudness).<br />
Decreases or increases signal level (adjustable to match the<br />
levels of other audio <strong>de</strong>vices).<br />
Note: You may want to adjust the input levels of external audio<br />
<strong>de</strong>vices so they match the system’s internal FM and CD levels.
Vi<strong>de</strong>o options<br />
Figure 29<br />
Vi<strong>de</strong>o system options<br />
The vi<strong>de</strong>o options affect the way the picture looks on your TV.<br />
Audio<br />
Vi<strong>de</strong>o<br />
TV Aspect Ratio<br />
Wi<strong>de</strong>screen DVDs<br />
Vi<strong>de</strong>o Connector<br />
Vi<strong>de</strong>o Black Level<br />
Vi<strong>de</strong>o Format<br />
Progressive Scan<br />
navigate<br />
navigate<br />
Media<br />
Center<br />
select<br />
select<br />
Remote<br />
Control<br />
Select Vi<strong>de</strong>o to adjust these system options:<br />
System Option Settings Description<br />
TV Aspect Ratio Normal [<strong>de</strong>fault]<br />
Wi<strong>de</strong>screen<br />
Wi<strong>de</strong>screen DVDs Modified [<strong>de</strong>fault]<br />
Unmodified<br />
Vi<strong>de</strong>o Connector* Composite + S-Vi<strong>de</strong>o [<strong>de</strong>fault]<br />
Component<br />
Vi<strong>de</strong>o Black Level Normal [<strong>de</strong>fault]<br />
Exten<strong>de</strong>d<br />
Vi<strong>de</strong>o Format NTSC [<strong>de</strong>fault]<br />
PAL<br />
Progressive Scan** Off [<strong>de</strong>fault]<br />
On<br />
DVD<br />
Lock<br />
4:3 ratio screen display.<br />
16:9 ratio wi<strong>de</strong>screen display.<br />
Modified [<strong>de</strong>fault].<br />
Unmodified.<br />
Changing System Options<br />
I<strong>de</strong>ntifies the type of vi<strong>de</strong>o connection ma<strong>de</strong> on the back panel<br />
of the media center.<br />
Screen black level generally appropriate for TVs.<br />
Increases screen black level, appropriate for certain TVs.<br />
Correct for NTSC (US standard) monitors.<br />
Correct for PAL (European standard) monitors.<br />
Screen image repaints in standard style.<br />
Screen image repaints in advanced style (if available on the TV).<br />
* A read-only item that indicates the connection <strong>de</strong>tected automatically by the system.<br />
** Appears only when Vi<strong>de</strong>o Connector is Component.<br />
47<br />
English
English<br />
48<br />
Changing System Options<br />
Media center options<br />
Figure 30<br />
Media Center system<br />
options<br />
The media center options affect the general operation of the system.<br />
Audio<br />
navigate<br />
Vi<strong>de</strong>o Media Remote<br />
Center Control<br />
select<br />
DVD<br />
Lock<br />
Select Media Center to adjust these system options:<br />
Display Brightness<br />
Display Language<br />
Optical Source<br />
Tuner Spacing<br />
<strong>Bose</strong> Link Room Co<strong>de</strong><br />
Restore Factory Defaults<br />
System Option Settings Description<br />
Display Brightness 4 [<strong>de</strong>fault]<br />
1 (darkest) to 4 (brightest)<br />
Display Language English [<strong>de</strong>fault]<br />
Dansk, Deutsch, Espanol, Francais,<br />
Italiano, Ne<strong>de</strong>rlands, Svenska<br />
Optical Source None [<strong>de</strong>fault]<br />
TV, CBL/SAT, AUX<br />
Tuner Spacing US [<strong>de</strong>fault]<br />
European<br />
<strong>Bose</strong> link Room<br />
Co<strong>de</strong>*<br />
Restore Factory<br />
Defaults<br />
B [<strong>de</strong>fault], C, D, E, F, G, H, I, J, K,<br />
L, M, N, or O<br />
No<br />
Yes<br />
** Appears only when a <strong>Bose</strong> ® link source is connected.<br />
Media center display lights with a mid-range brightness.<br />
Darkens or lightens the media center display.<br />
On-screen display menus appear in the selected language.<br />
No digital signal received via optical cable.<br />
Digital signal received via optical cable for selected source.<br />
Channel spacing for AM/FM radio stations set to selected<br />
region standard.<br />
Assigns a room co<strong>de</strong> to your 3•2•1 Series II system when<br />
it is connected to a <strong>Bose</strong> ® link source.<br />
Maintains current system settings.<br />
Reverts system settings back to factory <strong>de</strong>faults.
Remote control options<br />
Figure 31<br />
Remote Control system<br />
options<br />
Changing System Options<br />
The Remote Control options help you set up your remote to control other audio <strong>de</strong>vices that<br />
are connected to your system.<br />
Audio<br />
navigate<br />
Vi<strong>de</strong>o Media<br />
Center<br />
select<br />
Remote<br />
Control<br />
DVD<br />
Lock<br />
Select Remote Control to adjust these system<br />
options:<br />
TV Brand<br />
TV Device Co<strong>de</strong><br />
CBL/SAT Device<br />
CBL/SAT Brand<br />
CBL/SAT Device Co<strong>de</strong><br />
AUX Device<br />
AUX Brand<br />
AUX Device Co<strong>de</strong><br />
System Option Settings Description<br />
TV Brand Brand name Provi<strong>de</strong>s a list of TV brands for the 3•2•1 remote control to operate.<br />
TV Device Co<strong>de</strong> Co<strong>de</strong> number Provi<strong>de</strong>s a list of available <strong>de</strong>vice co<strong>de</strong>s for the selected TV brand.<br />
CBL/SAT Device Cable, Satellite I<strong>de</strong>ntifies which of two <strong>de</strong>vices is connected to the CBL-SAT input.<br />
CBL/SAT Brand Brand name Provi<strong>de</strong>s a list of cable/satellite box brands for the 3•2•1 remote<br />
control to operate.<br />
CBL/SAT Device Co<strong>de</strong> Co<strong>de</strong> number Provi<strong>de</strong>s a list of available <strong>de</strong>vice co<strong>de</strong>s for the selected cable/satellite<br />
box brand.<br />
AUX Device VCR, DVR I<strong>de</strong>ntifies which of two <strong>de</strong>vices is connected to the AUX input.<br />
AUX Brand Brand name Provi<strong>de</strong>s a list of VCR/DVR brands for the 3•2•1 remote control to<br />
operate.<br />
AUX Device Co<strong>de</strong> Co<strong>de</strong> number Provi<strong>de</strong>s a list of available <strong>de</strong>vice co<strong>de</strong>s for the selected VCR/DVR<br />
brand.<br />
Note: To find the brand and <strong>de</strong>vice co<strong>de</strong>s for each component that can be connected to, and<br />
controlled by the 3•2•1 system, see “Device Co<strong>de</strong>s” on page 57.<br />
49<br />
English
English<br />
50<br />
Changing System Options<br />
DVD Lock options<br />
Figure 32<br />
DVD Lock system options<br />
The DVD Lock options allow you to restrict viewing of DVD vi<strong>de</strong>os with certain ratings. To<br />
activate this feature, you need to set a level of restriction and establish a password in the<br />
DVD Lock section of the System menu.<br />
Audio<br />
Vi<strong>de</strong>o Media<br />
Center<br />
Remote<br />
Control<br />
DVD<br />
Lock<br />
Select DVD Lock to adjust these system options:<br />
Lock Unrated Discs<br />
Lock Discs Rated Above<br />
Change Password<br />
navigate<br />
select<br />
System Option Settings Description<br />
Lock Unrated Discs Off<br />
On<br />
Setting a password and restriction level<br />
Your password will help prevent unauthorized viewing of DVD vi<strong>de</strong>os that have a higher rating<br />
than your restriction level. There are 8 levels to choose from, matched to movie ratings set by<br />
the Motion Picture Association of America (MPAA). See “Motion Picture Association of America<br />
(MPAA) rating system” on page 51.<br />
1. Turn on your TV and select the correct TV input to view your 3•2•1 system.<br />
2. Press the System button on your 3•2•1 remote control.<br />
3. Using the right ( ) and left ( ) arrow buttons, highlight the DVD Lock option.<br />
4. Press Enter or the down ( ) arrow key.<br />
No restriction applies to unrated DVD movies.<br />
Restricts viewing access to unrated titles when password is set.<br />
Lock Discs Rated Above 1 to 8 Helps prevent viewing discs above the selected number when a<br />
password is created.<br />
Change Password _ _ _ _ Establishes a new four-number co<strong>de</strong> to restrict access to movies<br />
with certain ratings.<br />
Note: If you are using the DVD Lock option for the first time, enter a four-digit password. Then<br />
enter it again to confirm.
5. Enter your four-digit password.<br />
Changing System Options<br />
6. Using the down ( ) button, scroll down to Lock Discs Rated Above.<br />
7. Press the right arrow ( ) button to see the available settings.<br />
8. Press the up ( ) or down ( ) arrow button to find the rating you want.<br />
9. Press Enter or the left arrow ( ) button to save the setting.<br />
10. Press Exit to dismiss the System menu.<br />
Motion Picture Association of America (MPAA) rating system<br />
Parental<br />
Control<br />
Setting<br />
MPAA<br />
Rating<br />
Audience<br />
Restriction<br />
8 None<br />
7 NC-17 Adult audiences<br />
6 R Mature audiences<br />
5 Mature teenage audiences<br />
4 PG-13 Teenage audiences<br />
3 PG Mature young audiences<br />
2 Most audiences<br />
1 G General<br />
Example: Choosing a Parental Control Setting of 4, restricts access to vi<strong>de</strong>os<br />
rated above PG-13. Vi<strong>de</strong>os with ratings above that may be viewed only after entering<br />
the password.<br />
Your password also helps prevent others from changing the restriction level setting without<br />
permission.<br />
51<br />
English
English<br />
52<br />
Maintaining Your System<br />
Cleaning<br />
Figure 33<br />
Disc care<br />
Cleaning the media center<br />
• Use only a soft, dry cloth to clean the outsi<strong>de</strong> surfaces of the media center.<br />
• Do not use any sprays near the system. Do not use any solvents, chemicals, or cleaning<br />
solutions containing alcohol, ammonia, or abrasives.<br />
• Do not allow liquids to spill into any openings.<br />
Cleaning the speakers<br />
• Clean the surface of your speakers with a soft, damp cloth. You can use an ammonia-free<br />
window cleaner on a soft cloth to maintain the finish.<br />
• Do not use any sprays near the speakers. Do not use any solvents, chemicals, or cleaning<br />
solutions containing alcohol, ammonia, or abrasives.<br />
• Do not allow liquids to spill into any openings.<br />
• The speaker grilles require no special care, although you may vacuum them carefully<br />
if necessary.<br />
Cleaning discs<br />
• Handle discs by their edges to prevent fingerprints and scratches (Figure 33a).<br />
• To remove stains or fingerprints from the surface of a disc, use a soft and dry lint-free,<br />
cloth. Wipe in straight movements from the center of the disc to the outsi<strong>de</strong> (Figure 33b).<br />
Do not use any chemical products; they can damage the disc.<br />
• Do not use a circular motion to clean (Figure 33c).<br />
• Do not write on or attach labels to the surface of a disc.<br />
• To minimize exposure to dust and dirt, return discs to their cases after use. Store each disc<br />
in its case, away from direct sunlight, high temperatures, and humidity.<br />
a. b. c.
Replacing the remote control batteries<br />
Figure 34<br />
Putting in the batteries<br />
Accessories<br />
Figure 35<br />
Speaker accessories<br />
Maintaining Your System<br />
CAUTION: Please dispose of used batteries properly, following any local regulations.<br />
Do not incinerate.<br />
• Sli<strong>de</strong> open the battery compartment (Figure 34).<br />
• <strong>Notice</strong> the polarity markings (+ and –) insi<strong>de</strong> the compartment and install the batteries<br />
accordingly. Be sure to replace both batteries.<br />
• Sli<strong>de</strong> the battery compartment cover back into place.<br />
AA batteries (IEC R6)<br />
The <strong>Bose</strong> ® 3•2•1 Series II and 3•2•1 GS Series II system shelf speakers are compatible with<br />
<strong>Bose</strong> mounting accessories, including the UB-20 wall brackets, UFS-20 floor stands and<br />
UTS-20 table stands (Figure 35). <strong>Bose</strong> also offers cable adapters for use in running speaker<br />
cable through walls.<br />
For further information or to or<strong>de</strong>r the mounting brackets, stands, or cable adapters, contact<br />
your <strong>Bose</strong> <strong>de</strong>aler or <strong>Bose</strong> Corporation directly. Refer to the address sheet inclu<strong>de</strong>d in the<br />
shipping carton.<br />
UB-20<br />
Wall Bracket<br />
Battery compartment cover<br />
US-T20<br />
Table Stand<br />
UFS-20<br />
Floor Stand<br />
53<br />
English
English<br />
54<br />
Troubleshooting<br />
Troubleshooting table<br />
Problem What to do<br />
System doesn’t do<br />
anything<br />
• Make sure the unit is turned on. Try pressing the remote On-Off button and the media<br />
center On-Off button.<br />
• Make sure the power cord is inserted securely into the Acoustimass ® module and plugged<br />
firmly into an operating AC wall outlet.<br />
• Be sure to select a source (CD/DVD, AM/FM, etc.).<br />
• Unplug the Acoustimass module power cord from the outlet for one minute, then reconnect<br />
it. This allows the unit to reset itself. After reconnecting the power cord, wait for the<br />
message, “BOSE 3•2•1” to appear on the media center display.<br />
Disc won’t eject • Turn off the unit.<br />
• Unplug the Acoustimass module power cord from the outlet for one minute, then reconnect<br />
it. This allows the unit to reset itself.<br />
• Before powering on, press and hold Eject on the media center.<br />
No sound • Increase the volume.<br />
• Check to see if MUTE is lit on the display. If it is, press the Mute button on the remote control<br />
to unmute the sound.<br />
• Make sure the Acoustimass module cable and speaker cable are firmly seated in their<br />
respective jacks and the multi-pin connector on the other end is firmly seated in the<br />
Acoustimass module jack.<br />
• Check speaker connections.<br />
• Turn the media center off for 10 seconds, then on again, to restore communication<br />
between the media center and the speakers.<br />
• Check the connections for any external audio <strong>de</strong>vices. Be sure to select the correct source<br />
for the <strong>de</strong>sired input.<br />
• Be sure the disc is placed correctly, label-si<strong>de</strong> up, in the CD tray.<br />
• Connect the FM and AM antennas.<br />
• Unplug the Acoustimass module power cord from the outlet for a minute, then reconnect it.<br />
This allows the unit to reset itself.<br />
• If you are using an optical digital audio connection, make sure that the optical jack is correctly<br />
assigned in the System menu.<br />
• Make sure the volume is turned up on the TV.<br />
• Check input level settings for each connected <strong>de</strong>vice in the System menu.
Problem What to do<br />
Troubleshooting<br />
Sound, but no picture • Make sure the TV is on.<br />
• When playing a DVD or other vi<strong>de</strong>o source, make sure the TV is set to the correct vi<strong>de</strong>o<br />
input.<br />
Remote control is<br />
inconsistent or does not<br />
work<br />
Radio does not work<br />
or has poor reception<br />
DVD or CD does not<br />
play<br />
Customer service<br />
• Check batteries and their polarity (+ and –). See “Replacing the remote control batteries”<br />
on page 53.<br />
• Point the remote control at the media center.<br />
• Make sure antennas are connected properly.<br />
• Move AM antenna at least 20 inches (50 cm) from the media center.<br />
• Adjust antenna position to improve reception.<br />
• AM antenna must be upright.<br />
• Move antennas farther from TV or other electronic equipment.<br />
• You may be in an area of weak signal coverage.<br />
• Check to see if the Play symbol in the display is lit.<br />
• After pressing the CD/DVD button, wait a few seconds before pressing Play.<br />
• Make sure the disc is properly inserted (label-si<strong>de</strong> up).<br />
• Eject the disc and try loading it again.<br />
• There may be dirt or dust on the disc. Clean the disc. See “Cleaning discs” on page 52.<br />
• The disc may be <strong>de</strong>fective. Try another disc.<br />
• Make sure region co<strong>de</strong>s for both the DVD and player match. See “Check for region co<strong>de</strong><br />
compatibility” page 5.<br />
FM sound is distorted • Adjust antenna position to reduce interference.<br />
Sound is distorted • Make sure speaker cables are not damaged and the connections are secure.<br />
• Reduce the output level from any external audio <strong>de</strong>vices connected to the music center.<br />
• Reduce the input level setting for the connected <strong>de</strong>vice in the system menu.<br />
Picture is black and<br />
white or rolling<br />
You forgot your<br />
password<br />
• Check the vi<strong>de</strong>o cable connections.<br />
• Check the Vi<strong>de</strong>o Format setting and change to appropriate setting (NTSC or PAL).<br />
See “Vi<strong>de</strong>o options” on page 47.<br />
• Enter the password 2673 to access the parental controls and create a new password.<br />
For additional help in solving problems, contact <strong>Bose</strong> ® Customer Service. Refer to the<br />
address list inclu<strong>de</strong>d in the carton.<br />
55<br />
English
English<br />
56
Power rating<br />
57<br />
USA/Canada: 120V 50/60Hz 300W<br />
International: 220-240V 50/60Hz 300W<br />
Dual voltage: 115/230V 50/60Hz 300W<br />
Audio inputs<br />
AUX – Left, Right (analog); D (digital)<br />
CBL-SAT – L, R (analog); D (digital)<br />
TV – L, R (analog); D (digital)<br />
Optical – SPDIF digital, mapped to input<br />
Audio outputs<br />
Acoustimass ® Module – SPDIF<br />
Vi<strong>de</strong>o inputs<br />
C (composite) – NTSC or PAL format<br />
S-Vi<strong>de</strong>o<br />
Vi<strong>de</strong>o outputs<br />
C (composite) – NTSC or PAL format<br />
S-Vi<strong>de</strong>o<br />
Component Y, Pb, Pr<br />
Antennas<br />
FM 75Ω – external FM antenna<br />
AM – external AM antenna<br />
Technical Information<br />
Maximum ambient temperature<br />
104°F (45°C)<br />
Dimensions<br />
Media center: 3¼"H x 13¾"W x 10"D<br />
(8.3 cm x 34.9 cm x 25.4 cm)<br />
Remote control: 11 / 8"H x 21 / 2"W x 9"D<br />
(3.0 cm x 6.5 cm x 22.9 cm)<br />
3•2•1 speakers: 31 / 2"H x 77 / 8"W x 51 / 4"D<br />
(8.7 cm x 19.9 cm x 13.6 cm)<br />
3•2•1 GS speakers: 4"H x 51 / 2"W x 21 / 2"D<br />
(10.5 cm x 14 cm x 6.4 cm)<br />
Acoustimass module: 141 / 2"H x 83 / 4"W x 191 / 8"D<br />
(36.7 cm x 22.2 cm x 48.5 cm)<br />
Weights<br />
Media center: 6.7 lb (3.0 kg)<br />
3•2•1 speakers: 2.7 lb (1.2 kg) each<br />
GS speakers: 1 lb (.45 kg) each<br />
Acoustimass module: 23.3 lb (10.6 kg)<br />
Finish<br />
Media center: polymer<br />
Speakers: polymer<br />
Acoustimass module: polymer<br />
English
Español<br />
2<br />
Información <strong>de</strong> seguridad<br />
ADVERTENCIA: Con el fin <strong>de</strong> reducir el riesgo <strong>de</strong> <strong>de</strong>scargas eléctricas, no exponga el sistema a la lluvia<br />
o la humedad.<br />
ADVERTENCIA: Este aparato no <strong>de</strong>be recibir salpicaduras ni mojarse, por lo que no <strong>de</strong>ben colocarse<br />
sobre él objetos que contengan líquidos, como jarrones y similares. Al igual que con cualquier producto<br />
electrónico, tenga cuidado para no <strong>de</strong>rramar líquidos en ningún componente <strong>de</strong>l sistema. Los líquidos<br />
pue<strong>de</strong>n provocar averías o riesgo <strong>de</strong> incendio.<br />
Estas marcas <strong>de</strong> PRECAUCIÓN se encuentran ubicadas en la base <strong>de</strong>l centro multimedia <strong>de</strong>l sistema<br />
<strong>de</strong> entretenimiento para el hogar 3•2•1 Series II y en el panel posterior <strong>de</strong>l módulo Acoustimass:<br />
El símbolo <strong>de</strong> un relámpago con una flecha <strong>de</strong>ntro <strong>de</strong> un triángulo equilátero avisa al usuario<br />
<strong>de</strong> que <strong>de</strong>ntro <strong>de</strong> la carcasa <strong>de</strong>l sistema pue<strong>de</strong> haber voltaje sin aislar <strong>de</strong> una magnitud<br />
suficiente para constituir un riesgo <strong>de</strong> <strong>de</strong>scarga eléctrica.<br />
El punto <strong>de</strong> exclamación <strong>de</strong>ntro <strong>de</strong> un triangulo equilátero avisa al usuario <strong>de</strong> la existencia<br />
<strong>de</strong> instrucciones <strong>de</strong> funcionamiento y <strong>de</strong> mantenimiento importantes en esta guía <strong>de</strong>l usuario.<br />
PRECAUCIÓN: Para evitar <strong>de</strong>scargas eléctricas, haga coincidir la patilla ancha <strong>de</strong>l enchufe con<br />
la ranura ancha e insértela completamente.<br />
PRECAUCIÓN: No coloque sobre el aparato ninguna llama viva, como, por ejemplo, una vela.<br />
Producto láser clase 1<br />
El reproductor <strong>de</strong> DVD contenido en el centro multimedia está clasificado<br />
como un PRODUCTO LÁSER DE CLASE 1 según la norma EN60825-1:1994<br />
+ A11. La etiqueta PRODUCTO LÁSER DE CLASE 1 está situada en la parte<br />
inferior <strong>de</strong>l centro multimedia.<br />
PRECAUCIÓN: El uso <strong>de</strong> controles o ajustes o la realización <strong>de</strong> procedimientos distintos <strong>de</strong><br />
los especificados en este documento pue<strong>de</strong>n ocasionar la exposición a radiaciones peligrosas.<br />
Únicamente el personal técnico cualificado <strong>de</strong>be ajustar y reparar el reproductor <strong>de</strong> DVD.<br />
Límites para las emisiones <strong>de</strong> clase B<br />
Este aparato digital <strong>de</strong> clase B cumple todos los requisitos <strong>de</strong> las leyes <strong>de</strong> Canadá sobre equipos que<br />
causan interferencias.<br />
Pilas<br />
CAUTION<br />
RISK OF ELECTRICAL SHOCK<br />
DO NOT OPEN<br />
CAUTION: TO REDUCE THE RISK OF ELECTRIC SHOCK,<br />
DO NOT REMOVE COVER (OR BACK).<br />
NO USER-SERVICABLE PARTS INSIDE.<br />
REFER SERVICING TO QUALIFIED PERSONNEL.<br />
Deseche correctamente las pilas usadas, siguiendo las disposiciones locales. No las queme.<br />
Información <strong>de</strong> seguridad adicional<br />
Consulte las instrucciones adicionales <strong>de</strong> la hoja Información <strong>de</strong> seguridad importante que se incluyen en<br />
el embalaje <strong>de</strong> envío.<br />
Por favor, lea esta guía <strong>de</strong>l usuario<br />
PRECAUCIÓN<br />
RIESGO DE DESCARGA ELÉCTRICA<br />
ABSTÉNGASE DE ABRIR<br />
PRECAUCIÓN: PARA REDUCIR EL RIESGO DE SUFRIR<br />
DESCARGAS ELÉCTRICAS, ABSTÉNGASE DE ABRIR<br />
LA TAPA (O LA PARTE POSTERIOR). EL INTERIOR NO<br />
CONTIENE PIEZAS DE UTILIDAD PARA EL USUARIO.<br />
ENCARGUE TODO SERVICIO AL PERSONAL CUALIFICADO.<br />
CLASS 1 LASER PRODUCT<br />
KLASSE 1 LASER PRODUKT<br />
LUOKAN 1 LASER LAITE<br />
KLASS 1 LASER APPARAT<br />
Dedique el tiempo que sea necesario para seguir el contenido <strong>de</strong> esta guía <strong>de</strong>l usuario<br />
cuidadosamente. Le ayudará a configurar y utilizar correctamente el sistema y a disfrutar <strong>de</strong> todas sus<br />
funciones avanzadas. Guar<strong>de</strong> la guía <strong>de</strong>l usuario para utilizarla como material <strong>de</strong> referencia en el futuro.
Dón<strong>de</strong> encontrar…<br />
Contenido<br />
Introducción . . . . . . . . . . . . . . . . . . . . . . . . . . . . . . . . . . . . . . . . . . . . . . . . . . . . . . . . . . . . . . . . . . 5<br />
Antes <strong>de</strong> comenzar . . . . . . . . . . . . . . . . . . . . . . . . . . . . . . . . . . . . . . . . . . . . . . . . . . . . . . . . . . 5<br />
Selección <strong>de</strong> discos compatibles . . . . . . . . . . . . . . . . . . . . . . . . . . . . . . . . . . . . . . . . . . . 5<br />
Compruebe la compatibilidad <strong>de</strong>l código <strong>de</strong> la región . . . . . . . . . . . . . . . . . . . . . . . . . . . 5<br />
Compatibilidad MP3 . . . . . . . . . . . . . . . . . . . . . . . . . . . . . . . . . . . . . . . . . . . . . . . . . . . . . 5<br />
Glosario <strong>de</strong> términos . . . . . . . . . . . . . . . . . . . . . . . . . . . . . . . . . . . . . . . . . . . . . . . . . . . . . . . . 6<br />
Garantía limitada . . . . . . . . . . . . . . . . . . . . . . . . . . . . . . . . . . . . . . . . . . . . . . . . . . . . . . . . . . . 7<br />
Para conservar como referencia . . . . . . . . . . . . . . . . . . . . . . . . . . . . . . . . . . . . . . . . . . . . . . . 7<br />
Configuración <strong>de</strong>l sistema . . . . . . . . . . . . . . . . . . . . . . . . . . . . . . . . . . . . . . . . . . . . . . . . . . . . . . . 8<br />
Desembalaje . . . . . . . . . . . . . . . . . . . . . . . . . . . . . . . . . . . . . . . . . . . . . . . . . . . . . . . . . . . . . . . 8<br />
Selección <strong>de</strong> ubicaciones para los componentes <strong>de</strong>l sistema 3•2•1 Series II . . . . . . . . . . . . 9<br />
Ubicación <strong>de</strong>l centro multimedia . . . . . . . . . . . . . . . . . . . . . . . . . . . . . . . . . . . . . . . . . . . . 9<br />
Colocación <strong>de</strong> los altavoces . . . . . . . . . . . . . . . . . . . . . . . . . . . . . . . . . . . . . . . . . . . . . . . 10<br />
Colocación <strong>de</strong>l módulo Acoustimass ® . . . . . . . . . . . . . . . . . . . . . . . . . . . . . . . . . . . . . . . . 11<br />
Conexiones . . . . . . . . . . . . . . . . . . . . . . . . . . . . . . . . . . . . . . . . . . . . . . . . . . . . . . . . . . . . . . . . 12<br />
Conexión <strong>de</strong>l módulo Acoustimass ® al centro multimedia . . . . . . . . . . . . . . . . . . . . . . . . 12<br />
Conexión <strong>de</strong> los altavoces al módulo Acoustimass . . . . . . . . . . . . . . . . . . . . . . . . . . . . . 12<br />
Conexión <strong>de</strong> las antenas suministradas . . . . . . . . . . . . . . . . . . . . . . . . . . . . . . . . . . . . . . 14<br />
Conexión <strong>de</strong> radio FM por cable . . . . . . . . . . . . . . . . . . . . . . . . . . . . . . . . . . . . . . . . . . . . 14<br />
Conexión <strong>de</strong>l TV al centro multimedia . . . . . . . . . . . . . . . . . . . . . . . . . . . . . . . . . . . . . . . . . . . 15<br />
Conexiones <strong>de</strong> audio . . . . . . . . . . . . . . . . . . . . . . . . . . . . . . . . . . . . . . . . . . . . . . . . . . . . . 15<br />
Conexiones <strong>de</strong> ví<strong>de</strong>o compuesto . . . . . . . . . . . . . . . . . . . . . . . . . . . . . . . . . . . . . . . . . . . 15<br />
Conexión <strong>de</strong>l TV y <strong>de</strong>l ví<strong>de</strong>o al centro multimedia . . . . . . . . . . . . . . . . . . . . . . . . . . . . . . . . . . 16<br />
Si el TV tiene tomas <strong>de</strong> salida <strong>de</strong> audio . . . . . . . . . . . . . . . . . . . . . . . . . . . . . . . . . . . . . . . 16<br />
Si el TV no tiene ninguna toma <strong>de</strong> salida <strong>de</strong> audio . . . . . . . . . . . . . . . . . . . . . . . . . . . . . . 17<br />
Consi<strong>de</strong>raciones <strong>de</strong>l ví<strong>de</strong>o . . . . . . . . . . . . . . . . . . . . . . . . . . . . . . . . . . . . . . . . . . . . . . . . . 18<br />
Opciones <strong>de</strong> configuración avanzada . . . . . . . . . . . . . . . . . . . . . . . . . . . . . . . . . . . . . . . . . . . 18<br />
Conexiones <strong>de</strong> S ví<strong>de</strong>o (ví<strong>de</strong>o <strong>de</strong> alta calidad) . . . . . . . . . . . . . . . . . . . . . . . . . . . . . . . . . 18<br />
Conexiones <strong>de</strong> ví<strong>de</strong>o componente (ví<strong>de</strong>o <strong>de</strong> alta calidad) . . . . . . . . . . . . . . . . . . . . . . . . 19<br />
Conexión <strong>de</strong> dispositivos <strong>de</strong> sonido digital . . . . . . . . . . . . . . . . . . . . . . . . . . . . . . . . . . . . 20<br />
Conexión <strong>de</strong>l receptor <strong>de</strong> cable/satélite, <strong>de</strong>l TV y <strong>de</strong>l ví<strong>de</strong>o al centro multimedia . . . . . . 20<br />
Conexión <strong>de</strong> una consola <strong>de</strong> vi<strong>de</strong>ojuegos . . . . . . . . . . . . . . . . . . . . . . . . . . . . . . . . . . . . . 22<br />
Instalación <strong>de</strong> las pilas <strong>de</strong>l control remoto . . . . . . . . . . . . . . . . . . . . . . . . . . . . . . . . . . . . . . . . 23<br />
Conexión <strong>de</strong>l cable <strong>de</strong> alimentación . . . . . . . . . . . . . . . . . . . . . . . . . . . . . . . . . . . . . . . . . . . . 24<br />
Comprobación <strong>de</strong> la configuración <strong>de</strong>l sistema . . . . . . . . . . . . . . . . . . . . . . . . . . . . . . . . . . . . 25<br />
Controles e indicadores <strong>de</strong>l sistema . . . . . . . . . . . . . . . . . . . . . . . . . . . . . . . . . . . . . . . . . . . . . . . . 26<br />
Control remoto . . . . . . . . . . . . . . . . . . . . . . . . . . . . . . . . . . . . . . . . . . . . . . . . . . . . . . . . . . . . . 26<br />
Centro multimedia . . . . . . . . . . . . . . . . . . . . . . . . . . . . . . . . . . . . . . . . . . . . . . . . . . . . . . . . . . 29<br />
Panel <strong>de</strong> control . . . . . . . . . . . . . . . . . . . . . . . . . . . . . . . . . . . . . . . . . . . . . . . . . . . . . . . . . 29<br />
Indicadores <strong>de</strong> pantalla . . . . . . . . . . . . . . . . . . . . . . . . . . . . . . . . . . . . . . . . . . . . . . . . . . . 29<br />
Funcionamiento . . . . . . . . . . . . . . . . . . . . . . . . . . . . . . . . . . . . . . . . . . . . . . . . . . . . . . . . . . . . . . . 30<br />
Encendido y apagado <strong>de</strong>l sistema . . . . . . . . . . . . . . . . . . . . . . . . . . . . . . . . . . . . . . . . . . . . . . 30<br />
Reproducción <strong>de</strong> DVD . . . . . . . . . . . . . . . . . . . . . . . . . . . . . . . . . . . . . . . . . . . . . . . . . . . . . . . 30<br />
Operaciones básicas <strong>de</strong>l DVD . . . . . . . . . . . . . . . . . . . . . . . . . . . . . . . . . . . . . . . . . . . . . . 31<br />
Acceso restringido a DVD . . . . . . . . . . . . . . . . . . . . . . . . . . . . . . . . . . . . . . . . . . . . . . . . . 31<br />
Reproducción <strong>de</strong> CD <strong>de</strong> audio . . . . . . . . . . . . . . . . . . . . . . . . . . . . . . . . . . . . . . . . . . . . . . . . . 32<br />
Operaciones básicas <strong>de</strong> CD . . . . . . . . . . . . . . . . . . . . . . . . . . . . . . . . . . . . . . . . . . . . . . . 32<br />
Radio AM/FM . . . . . . . . . . . . . . . . . . . . . . . . . . . . . . . . . . . . . . . . . . . . . . . . . . . . . . . . . . . . . . 33<br />
Sintonización <strong>de</strong> una emisora . . . . . . . . . . . . . . . . . . . . . . . . . . . . . . . . . . . . . . . . . . . . . . 33<br />
Almacenamiento <strong>de</strong> emisoras y sintonías . . . . . . . . . . . . . . . . . . . . . . . . . . . . . . . . . . . . . 33<br />
Eliminación <strong>de</strong> una presintonía . . . . . . . . . . . . . . . . . . . . . . . . . . . . . . . . . . . . . . . . . . . . . 34<br />
Reproducción <strong>de</strong> otras fuentes . . . . . . . . . . . . . . . . . . . . . . . . . . . . . . . . . . . . . . . . . . . . . . . . 34<br />
Utilización <strong>de</strong>l temporizador <strong>de</strong> suspensión . . . . . . . . . . . . . . . . . . . . . . . . . . . . . . . . . . . . . . 34<br />
3<br />
Español
Español<br />
4<br />
Contenido<br />
Control <strong>de</strong> otros dispositivos <strong>de</strong> audio . . . . . . . . . . . . . . . . . . . . . . . . . . . . . . . . . . . . . . . . . . . . . . 35<br />
Configuración <strong>de</strong>l control remoto para otros dispositivos <strong>de</strong> audio/ví<strong>de</strong>o . . . . . . . . . . . . . . . 35<br />
Introducción directa <strong>de</strong> un código <strong>de</strong> dispositivo . . . . . . . . . . . . . . . . . . . . . . . . . . . . . . . 35<br />
Búsqueda <strong>de</strong> códigos <strong>de</strong> dispositivo . . . . . . . . . . . . . . . . . . . . . . . . . . . . . . . . . . . . . . . . 36<br />
Comprobación e introducción <strong>de</strong>l código <strong>de</strong> dispositivo . . . . . . . . . . . . . . . . . . . . . . . . . 38<br />
Cambio <strong>de</strong>l control <strong>de</strong> selección <strong>de</strong> canal . . . . . . . . . . . . . . . . . . . . . . . . . . . . . . . . . . . . . . . . 38<br />
Utilización <strong>de</strong> los menús <strong>de</strong> configuración . . . . . . . . . . . . . . . . . . . . . . . . . . . . . . . . . . . . . . . . 39<br />
Para visualizar los menús <strong>de</strong> configuración . . . . . . . . . . . . . . . . . . . . . . . . . . . . . . . . . . . . 39<br />
Realizar cambios en los menús <strong>de</strong> configuración . . . . . . . . . . . . . . . . . . . . . . . . . . . . . . . 40<br />
Menú <strong>de</strong> configuración FM-AM . . . . . . . . . . . . . . . . . . . . . . . . . . . . . . . . . . . . . . . . . . . . . . . . 41<br />
Menú Configuración <strong>de</strong> CD . . . . . . . . . . . . . . . . . . . . . . . . . . . . . . . . . . . . . . . . . . . . . . . . . . . 41<br />
Menú <strong>de</strong> configuración <strong>de</strong> DVD . . . . . . . . . . . . . . . . . . . . . . . . . . . . . . . . . . . . . . . . . . . . . . . . 42<br />
Menú configuración <strong>de</strong> TV, CBL-SAT y AUX . . . . . . . . . . . . . . . . . . . . . . . . . . . . . . . . . . . . . . 43<br />
Cambio <strong>de</strong> las opciones <strong>de</strong>l sistema . . . . . . . . . . . . . . . . . . . . . . . . . . . . . . . . . . . . . . . . . . . . . . . 44<br />
Utilización <strong>de</strong> los menús <strong>de</strong> sistema . . . . . . . . . . . . . . . . . . . . . . . . . . . . . . . . . . . . . . . . . . . . 44<br />
Visualización <strong>de</strong>l menú Sistema . . . . . . . . . . . . . . . . . . . . . . . . . . . . . . . . . . . . . . . . . . . . . 44<br />
Para cambiar las opciones <strong>de</strong>l sistema . . . . . . . . . . . . . . . . . . . . . . . . . . . . . . . . . . . . . . . 45<br />
Opciones <strong>de</strong> audio . . . . . . . . . . . . . . . . . . . . . . . . . . . . . . . . . . . . . . . . . . . . . . . . . . . . . . . . . . 46<br />
Opciones <strong>de</strong> ví<strong>de</strong>o . . . . . . . . . . . . . . . . . . . . . . . . . . . . . . . . . . . . . . . . . . . . . . . . . . . . . . . . . . 47<br />
Opciones <strong>de</strong>l centro multimedia . . . . . . . . . . . . . . . . . . . . . . . . . . . . . . . . . . . . . . . . . . . . . . . 48<br />
Opciones <strong>de</strong>l control remoto . . . . . . . . . . . . . . . . . . . . . . . . . . . . . . . . . . . . . . . . . . . . . . . . . . 49<br />
Opciones <strong>de</strong> Bloqueo DVD . . . . . . . . . . . . . . . . . . . . . . . . . . . . . . . . . . . . . . . . . . . . . . . . . . . 50<br />
Configuración <strong>de</strong> una contraseña y <strong>de</strong> un nivel <strong>de</strong> restricción . . . . . . . . . . . . . . . . . . . . . 50<br />
Sistema <strong>de</strong> clasificación <strong>de</strong> la Motion Picture Association of America (MPAA) . . . . . . . . 51<br />
Mantenimiento <strong>de</strong>l sistema . . . . . . . . . . . . . . . . . . . . . . . . . . . . . . . . . . . . . . . . . . . . . . . . . . . . . . . 52<br />
Limpieza . . . . . . . . . . . . . . . . . . . . . . . . . . . . . . . . . . . . . . . . . . . . . . . . . . . . . . . . . . . . . . . . . . 52<br />
Limpieza <strong>de</strong>l centro multimedia . . . . . . . . . . . . . . . . . . . . . . . . . . . . . . . . . . . . . . . . . . . . . 52<br />
Cómo limpiar los altavoces . . . . . . . . . . . . . . . . . . . . . . . . . . . . . . . . . . . . . . . . . . . . . . . . 52<br />
Limpieza <strong>de</strong> discos . . . . . . . . . . . . . . . . . . . . . . . . . . . . . . . . . . . . . . . . . . . . . . . . . . . . . . 52<br />
Cambio <strong>de</strong> las pilas <strong>de</strong>l control remoto . . . . . . . . . . . . . . . . . . . . . . . . . . . . . . . . . . . . . . . . . . 53<br />
Accesorios . . . . . . . . . . . . . . . . . . . . . . . . . . . . . . . . . . . . . . . . . . . . . . . . . . . . . . . . . . . . . . . . 53<br />
Resolución <strong>de</strong> problemas . . . . . . . . . . . . . . . . . . . . . . . . . . . . . . . . . . . . . . . . . . . . . . . . . . . . . . . . 54<br />
Tabla <strong>de</strong> resolución <strong>de</strong> problemas . . . . . . . . . . . . . . . . . . . . . . . . . . . . . . . . . . . . . . . . . . . . . . 54<br />
Servicio al cliente . . . . . . . . . . . . . . . . . . . . . . . . . . . . . . . . . . . . . . . . . . . . . . . . . . . . . . . . . . . 55<br />
Información técnica . . . . . . . . . . . . . . . . . . . . . . . . . . . . . . . . . . . . . . . . . . . . . . . . . . . . . . . . . . . . 57<br />
Device Co<strong>de</strong>s . . . . . . . . . . . . . . . . . . . . . . . . . . . . . . . . . . . . . . . . . . . . . . . . . . . . . . . . . . . . . . . . . A-1<br />
Códigos <strong>de</strong> instalación para cable . . . . . . . . . . . . . . . . . . . . . . . . . . . . . . . . . . . . . . . . . . . . . . A-1<br />
Códigos <strong>de</strong> instalación para satelite . . . . . . . . . . . . . . . . . . . . . . . . . . . . . . . . . . . . . . . . . . . . . A-2<br />
Códigos <strong>de</strong> instalación para TV . . . . . . . . . . . . . . . . . . . . . . . . . . . . . . . . . . . . . . . . . . . . . . . . A-4<br />
Códigos <strong>de</strong> instalación para VCR . . . . . . . . . . . . . . . . . . . . . . . . . . . . . . . . . . . . . . . . . . . . . . A-9<br />
Códigos <strong>de</strong> dispositivo <strong>de</strong> grabador <strong>de</strong> ví<strong>de</strong>o digital . . . . . . . . . . . . . . . . . . . . . . . . . . . . . . . A-12<br />
©2004 <strong>Bose</strong> Corporation. Ninguna parte <strong>de</strong> esta obra pue<strong>de</strong> reproducirse, modificarse, distribuirse o usarse <strong>de</strong> ninguna otra manera sin consentimiento<br />
previo por escrito.<br />
Dolby y el símbolo <strong>de</strong> las dos D son marcas registradas <strong>de</strong> Dolby Laboratories. Fabricado con licencia <strong>de</strong> Dolby Laboratories. Trabajos confi<strong>de</strong>nciales no<br />
publicados. 1992-1997 Dolby Laboratories. Reservados todos los <strong>de</strong>rechos.<br />
Este producto incorpora tecnología <strong>de</strong> protección <strong>de</strong> copyright protegida por los aspectos metodológicos <strong>de</strong> <strong>de</strong>terminadas patentes <strong>de</strong> los EE.UU. y por otros<br />
<strong>de</strong>rechos <strong>de</strong> propiedad intelectual que son propiedad <strong>de</strong> Macrovision Corporation y otras empresas. Esta tecnología <strong>de</strong> protección <strong>de</strong> copyright sólo pue<strong>de</strong><br />
utilizarse con autorización <strong>de</strong> Macrovision Corporation y está dirigida al uso doméstico y otros usos <strong>de</strong> visualización limitada, salvo autorización <strong>de</strong> Macrovision<br />
Corporation en otro sentido. Se prohíben la ingeniería inversa y el <strong>de</strong>sensamblaje.<br />
“DTS” y “DTS Digital Surround” son marcas registradas <strong>de</strong> Digital Theater Systems, Inc.<br />
La licencia <strong>de</strong> la tecnología <strong>de</strong> compresión <strong>de</strong> audio MPEG Layer-3 la otorgan Fraunhofer IIS y THOMSON multimedia.<br />
Este producto incorpora tecnología protegida por copyright y otros <strong>de</strong>rechos <strong>de</strong> propiedad intelectual que son propiedad <strong>de</strong> Cirrus Logic, Inc. y están sujetos<br />
a la protección <strong>de</strong> copyright <strong>de</strong> EE.UU., así como otras restricciones y protecciones <strong>de</strong> licencias. Esta tecnología <strong>de</strong> protección <strong>de</strong> copyright sólo pue<strong>de</strong><br />
utilizarse con los circuitos integrados <strong>de</strong> Cirrus Logic incorporados en este producto. Se prohíben la ingeniería inversa y el <strong>de</strong>sensamblaje.
Antes <strong>de</strong> comenzar<br />
Introducción<br />
Gracias por adquirir el sistema <strong>de</strong> entretenimiento <strong>de</strong> DVD para el hogar <strong>Bose</strong> ® 3•2•1<br />
Series II o 3•2•1GS Series II que brinda un sonido excepcional, a la vez que elegancia y<br />
simplicidad en una configuración avanzada <strong>de</strong> audio para el hogar. Gracias a la tecnología<br />
<strong>de</strong> proceso <strong>de</strong> señales propiedad <strong>de</strong> <strong>Bose</strong>, los sistemas 3•2•1 Series II ofrecen una mayor<br />
amplitud en las grabaciones en estéreo y llamativos efectos en las películas con materiales<br />
codificados para efecto envolvente. Sin embargo, está formado por pocos elementos y<br />
requiere poco trabajo <strong>de</strong> instalación, para que pueda disfrutar enseguida <strong>de</strong>l rendimiento<br />
<strong>de</strong> su nuevo sistema.<br />
El sistema incluye lo siguiente:<br />
• Sintonizador <strong>de</strong> AM/FM y reproductor <strong>de</strong> DVD/CD integrados en una pequeña consola<br />
• Altavoces para estantes pequeños y fáciles <strong>de</strong> colocar, y el atractivo módulo oculto<br />
Acoustimass ®<br />
• Control remoto por infrarrojos fácil <strong>de</strong> utilizar<br />
• Tomas <strong>de</strong> entrada para conectar a la consola otros dispositivos <strong>de</strong> audio (como aparatos<br />
<strong>de</strong> ví<strong>de</strong>o o el receptor <strong>de</strong> cable o satélite)<br />
Selección <strong>de</strong> discos compatibles<br />
El reproductor <strong>de</strong> DVD/CD incorporado en el centro multimedia 3•2•1 serie II pue<strong>de</strong><br />
reproducir los siguientes tipos <strong>de</strong> discos i<strong>de</strong>ntificados por sus logotipos correspondientes:<br />
•DVD <strong>de</strong> ví<strong>de</strong>o •CD <strong>de</strong> audio<br />
•CD <strong>de</strong> ví<strong>de</strong>o<br />
•CD-R y CD-R/W<br />
• DVD-R, DVD+R • CD MP3<br />
Compruebe la compatibilidad <strong>de</strong>l código <strong>de</strong> la región<br />
Para que el reproductor <strong>de</strong> DVD y el disco DVD sean compatibles, sus números <strong>de</strong> código<br />
<strong>de</strong> región <strong>de</strong>ben coincidir. Estos números se asignan según la zona geográfica en la que se<br />
ven<strong>de</strong>n los reproductores y los discos. El sistema <strong>de</strong> entretenimiento <strong>de</strong> DVD para el hogar<br />
3•2•1 Series II tiene un código <strong>de</strong> región que <strong>de</strong>be coincidir con los DVD.<br />
Compruebe el número <strong>de</strong> código <strong>de</strong> región en el embalaje <strong>de</strong>l sistema <strong>de</strong> entretenimiento<br />
<strong>de</strong> DVD para el hogar 3•2•1 Series II o en la parte inferior <strong>de</strong>l centro multimedia que se<br />
suministra en el embalaje. Después, asegúrese <strong>de</strong> elegir únicamente discos DVD en los que<br />
aparezca el mismo número <strong>de</strong> región en la etiqueta o en la tapa frontal. Por ejemplo, un DVD<br />
<strong>de</strong> la región 1 <strong>de</strong>be contener la marca siguiente:<br />
Compatibilidad MP3<br />
Para ser compatibles con los sistemas <strong>de</strong> entretenimiento para el hogar 3•2•1 Series II<br />
o 3•2•1 GS, los MP3 <strong>de</strong>ben satisfacer los siguientes criterios:<br />
• Todas las pistas <strong>de</strong>ben grabarse en una única sesión cerrada<br />
• El formato <strong>de</strong>l disco <strong>de</strong>be ser ISO9660<br />
• Cada archivo <strong>de</strong>be llevar la extensión “.mp3” y no incluir ningún otro punto en el nombre<br />
<strong>de</strong> archivo<br />
5<br />
Español
Español<br />
6<br />
Introducción<br />
Glosario <strong>de</strong> términos<br />
Capítulo: en ví<strong>de</strong>o DVD, la división <strong>de</strong> un título. Técnicamente <strong>de</strong>nominado parte <strong>de</strong> título<br />
(PTT).<br />
Dolby Digital: un tipo <strong>de</strong> formato <strong>de</strong> sonido envolvente <strong>de</strong> múltiples canales utilizado en<br />
discos.<br />
: el logotipo que representa Dolby ® Digital.<br />
Dolby Laboratories : creadores <strong>de</strong> un sistema <strong>de</strong> codificación perceptiva <strong>de</strong> audio.<br />
DTS: tipo <strong>de</strong> formato <strong>de</strong> sonido envolvente <strong>de</strong> múltiples canales utilizado en discos.<br />
: logotipo que representa DTS.<br />
DVD: sigla que se utiliza normalmente con el significado “Digital Vi<strong>de</strong>o Disc” (disco <strong>de</strong> ví<strong>de</strong>o<br />
digital) o “Digital Versatile Disc” (disco versátil digital). El sistema <strong>de</strong> audio/ví<strong>de</strong>o/<br />
almacenamiento <strong>de</strong> datos se basa en discos ópticos <strong>de</strong> 12 y 8 cm.<br />
Formato <strong>de</strong> imagen: forma <strong>de</strong> la imagen rectangular en un televisor. Se expresa como la<br />
anchura <strong>de</strong> la imagen en relación con su altura. La imagen <strong>de</strong> TV estándar, en la terminología<br />
utilizada por el sector, tiene un formato <strong>de</strong> imagen <strong>de</strong> 4 unida<strong>de</strong>s <strong>de</strong> anchura por 3 unida<strong>de</strong>s<br />
<strong>de</strong> altura o 4:3 (4 por 3). Actualmente, existen dos formatos <strong>de</strong> imagen estándar <strong>de</strong> TV:<br />
4:3 y 16:9.<br />
IR: sigla que refiere a los rayos infrarrojos. Pertenece al tipo <strong>de</strong> control remoto que envía y<br />
recibe instrucciones mediante un rayo <strong>de</strong> luz infrarroja.<br />
MP3: audio MPEG-1 Layer III. Se trata <strong>de</strong> un formato <strong>de</strong> audio comprimido que permite<br />
grabar muchas horas <strong>de</strong> música en un solo CD.<br />
MPEG: tipo <strong>de</strong> compresión <strong>de</strong> datos utilizado para el almacenamiento <strong>de</strong> audio o ví<strong>de</strong>o en<br />
disco.<br />
NTSC: sigla <strong>de</strong> National Television System Committee. La organización que ha <strong>de</strong>sarrollado<br />
los sistemas <strong>de</strong> televisión americanos en blanco y negro, y en color.<br />
PAL: sigla <strong>de</strong> Phase Alternate Line. Formato <strong>de</strong> televisión muy utilizado en Europa<br />
Occi<strong>de</strong>ntal.<br />
Panorámico: el formato <strong>de</strong> la imagen proyectada <strong>de</strong> las películas es habitualmente 16:9,<br />
a diferencia <strong>de</strong>l formato 4:3 <strong>de</strong> la mayoría <strong>de</strong> los televisores. Por ello, se está convirtiendo en<br />
algo normal transferir películas a ví<strong>de</strong>o con bor<strong>de</strong>s negros en la parte superior e inferior <strong>de</strong> la<br />
imagen. La imagen <strong>de</strong> la película se convierte en “panorámica” en el ví<strong>de</strong>o.<br />
PCM: representación sin comprimir con codificación digital <strong>de</strong> una señal analógica. Es el<br />
formato <strong>de</strong> la señal <strong>de</strong> audio digital utilizado para CD y discos láser. Se trata <strong>de</strong> un flujo <strong>de</strong><br />
datos serie que se codifica para su transmisión o grabación. PCM también se utiliza para<br />
muchos otros tipos <strong>de</strong> comunicaciones <strong>de</strong> datos serie.<br />
Pista: selecciones individuales grabadas en una cinta o disco <strong>de</strong> audio.<br />
S-ví<strong>de</strong>o: estándar <strong>de</strong> interfaz <strong>de</strong> ví<strong>de</strong>o que transporta señales separadas <strong>de</strong> luminancia y<br />
crominancia, normalmente en un conector mini-DIN <strong>de</strong> cuatro patillas. También <strong>de</strong>nominado<br />
Y/C. La calidad <strong>de</strong> S-ví<strong>de</strong>o es sensiblemente mejor que la <strong>de</strong>l ví<strong>de</strong>o compuesto, ya que no<br />
requiere ningún filtro <strong>de</strong> peine para separar las señales. La mayoría <strong>de</strong> televisores <strong>de</strong> la gama<br />
alta disponen <strong>de</strong> entradas <strong>de</strong> S-ví<strong>de</strong>o.<br />
Título: elementos numerados <strong>de</strong>l contenido <strong>de</strong>l DVD, que pue<strong>de</strong> incluir más <strong>de</strong> una película.<br />
Ví<strong>de</strong>o compuesto: una sola señal <strong>de</strong> ví<strong>de</strong>o que contiene información <strong>de</strong> la luminancia, el<br />
color y la sincronización. NTSC y PAL son ejemplos <strong>de</strong> sistemas <strong>de</strong> ví<strong>de</strong>o compuestos.<br />
Ví<strong>de</strong>o <strong>de</strong> componente: una señal <strong>de</strong> ví<strong>de</strong>o dividida en tres partes: luminancia y dos señales<br />
<strong>de</strong> color (marcadas como “YPbPr”). Proporciona una resolución <strong>de</strong> ví<strong>de</strong>o máxima, pero no<br />
todos los televisores pue<strong>de</strong>n procesarla.
Garantía limitada<br />
Para conservar como referencia<br />
Introducción<br />
Ví<strong>de</strong>o DVD: estándar para almacenar y reproducir audio y ví<strong>de</strong>o en discos DVD-ROM,<br />
basado en ví<strong>de</strong>o MPEG, Dolby Digital y audio MPEG y otros formatos <strong>de</strong> datos <strong>de</strong> propiedad<br />
registrada.<br />
Los sistemas <strong>de</strong> entretenimiento para el hogar 3•2•1 Series II y 3•2•1 GS Series II están<br />
cubiertos por una garantía limitada transferible. Los <strong>de</strong>talles sobre la garantía constan en la<br />
tarjeta <strong>de</strong> registro <strong>de</strong>l producto que se incluye con el sistema. Rellene la sección <strong>de</strong><br />
información <strong>de</strong> la tarjeta y remítala a <strong>Bose</strong>. En caso <strong>de</strong> no hacerlo, la garantía limitada no se<br />
vería afectada.<br />
Los números <strong>de</strong> serie aparecen indicados en la parte inferior <strong>de</strong>l centro multimedia y en el<br />
panel posterior <strong>de</strong>l módulo Acoustimass ® . Busque el número <strong>de</strong> serie antes <strong>de</strong> ponerse en<br />
contacto con el servicio <strong>de</strong> atención al cliente <strong>de</strong> <strong>Bose</strong> ® .<br />
Mo<strong>de</strong>lo: 3•2•1 Series II 3•2•1 GS Series II Marque uno<br />
Número <strong>de</strong> serie <strong>de</strong>l centro multimedia: ______________________________________________<br />
Número <strong>de</strong> serie <strong>de</strong>l módulo Acoustimass: ___________________________________________<br />
Nombre <strong>de</strong>l distribuidor: __________________________________________________________<br />
Teléfono <strong>de</strong>l distribuidor: ____________________ Fecha <strong>de</strong> compra: ______________________<br />
Se recomienda conservar el recibo <strong>de</strong> compra y la tarjeta <strong>de</strong> registro <strong>de</strong>l producto junto con esta<br />
guía <strong>de</strong>l usuario.<br />
7<br />
Español
Español<br />
8<br />
Configuración <strong>de</strong>l sistema<br />
Desembalaje<br />
Figura 1<br />
Contenido <strong>de</strong> la caja<br />
<strong>de</strong> envío<br />
El sistema incluye<br />
lo siguiente<br />
cables:<br />
Cable <strong>de</strong> alimentación<br />
<strong>de</strong> 120 VCA<br />
(Estados Unidos/Canadá)<br />
Cables <strong>de</strong> alimentación<br />
115/230 VCA<br />
con adaptador<br />
(Estados Unidos/Europa)<br />
Cable <strong>de</strong><br />
alimentación <strong>de</strong><br />
230 VCA (Europa)<br />
Cable <strong>de</strong> alimentación<br />
<strong>de</strong> 230 VCA (Reino<br />
Unido/Singapur)<br />
Cable <strong>de</strong><br />
alimentación <strong>de</strong><br />
240 VCA (Australia)<br />
Desembale el sistema cuidadosamente. Conserve todo el material <strong>de</strong> embalaje, ya que<br />
permite transportar el sistema <strong>de</strong> la forma más segura cuando sea necesario. Compruebe<br />
que el sistema incluye los componentes indicados en la Figura 1.<br />
Si alguna pieza <strong>de</strong>l sistema parece estar dañada, no la utilice. Comuníqueselo <strong>de</strong> inmediato a<br />
<strong>Bose</strong> ® o a un distribuidor <strong>Bose</strong> autorizado. Para conocer la información <strong>de</strong> contacto <strong>de</strong> <strong>Bose</strong>,<br />
consulte la página <strong>de</strong> direcciones que viene con la caja.<br />
ADVERTENCIA: Mantenga las bolsas <strong>de</strong> plástico fuera <strong>de</strong>l alcance <strong>de</strong> los niños, para evitar el<br />
peligro <strong>de</strong> asfixia.<br />
Centro multimedia<br />
Control<br />
remoto<br />
Módulo<br />
Acoustimass<br />
Pilas<br />
Antena FM<br />
Cable <strong>de</strong>l altavoz<br />
Nota: Si compra el sistema<br />
3•2•1 GS Series II, los<br />
conectores <strong>de</strong> los cables <strong>de</strong> los<br />
altavoces <strong>de</strong>recho e izquierdo<br />
tendrán la marca “GS”.<br />
Almohadillas <strong>de</strong><br />
goma para el<br />
módulo<br />
Acoustimass<br />
Base <strong>de</strong> antena<br />
Cable <strong>de</strong>l módulo <strong>de</strong><br />
Acoustimass ®<br />
Cable estéreo<br />
Antena AM<br />
El sistema incluye los siguientes<br />
tipos <strong>de</strong> altavoces:<br />
Altavoces 3•2•1<br />
3•2•1 Altavoces GS :<br />
Almohadillas <strong>de</strong><br />
goma para los<br />
altavoces<br />
Disco <strong>de</strong><br />
configuración y <strong>de</strong><br />
<strong>de</strong>mostración<br />
Nota: Éste es un buen momento para buscar los números <strong>de</strong> serie <strong>de</strong> la base <strong>de</strong>l centro<br />
multimedia y <strong>de</strong>l módulo <strong>de</strong> Acoustimass Copie estos números en la tarjeta <strong>de</strong> registro <strong>de</strong>l<br />
producto y en el espacio provisto página 6.<br />
o<br />
Cable para ví<strong>de</strong>o
Configuración <strong>de</strong>l sistema<br />
Selección <strong>de</strong> ubicaciones para los componentes <strong>de</strong>l sistema 3•2•1 Series II<br />
Figura 2<br />
Ejemplo <strong>de</strong> colocación <strong>de</strong>l<br />
centro multimedia y <strong>de</strong> los<br />
altavoces<br />
Siga estas indicaciones y la Figura 2 para elegir ubicaciones y posiciones para los<br />
componentes <strong>de</strong>l sistema <strong>de</strong> entretenimiento para el hogar 3•2•1.<br />
Nota: Estas indicaciones se ofrecen para proporcionar el mejor funcionamiento <strong>de</strong>l sistema,<br />
pero usted pue<strong>de</strong> elegir otras ubicaciones que resulten más cómodas y en las que consiga el<br />
sonido <strong>de</strong>seado.<br />
Ubicación <strong>de</strong>l centro multimedia<br />
PRECAUCIÓN: No bloquee las aberturas <strong>de</strong> ventilación. Para el buen funcionamiento <strong>de</strong>l<br />
producto y para protegerlo <strong>de</strong>l sobrecalentamiento, colóquelo en una posición y una ubicación<br />
que no interfiera con una ventilación a<strong>de</strong>cuada. Por ejemplo, no coloque el producto sobre una<br />
cama, sofá o superficie similar que pueda bloquear las aberturas <strong>de</strong> ventilación. No lo coloque en<br />
estructuras cerradas, como estanterías o armarios, que puedan impedir que el aire pase por las<br />
aberturas <strong>de</strong> ventilación.<br />
• Coloque el centro multimedia en un sitio don<strong>de</strong> nada obstruya la apertura <strong>de</strong> la ban<strong>de</strong>ja <strong>de</strong><br />
discos <strong>de</strong>l panel frontal.<br />
• Asegúrese <strong>de</strong> que el centro multimedia esté lo bastante cerca <strong>de</strong>l módulo Acoustimass ® y<br />
<strong>de</strong> los altavoces, para que los cables puedan conectarse correctamente.<br />
• Compruebe que esté lo suficientemente cerca <strong>de</strong> otros componentes <strong>de</strong> emisión (televisor,<br />
VCR o receptor <strong>de</strong> cable) como para que la longitud <strong>de</strong> los cables sea suficiente.<br />
Nota: Asegúrese <strong>de</strong> que la parte <strong>de</strong>lantera <strong>de</strong>l centro multimedia no esté obstruida y pueda<br />
recibir comandos infrarrojos (IR) <strong>de</strong>l control remoto.<br />
Altavoz<br />
izquierdo<br />
3 ft (1 m)<br />
máximo<br />
3 ft (1 m)<br />
mínimo<br />
3 ft (1 m)<br />
máximo<br />
Centro multimedia<br />
Altavoz<br />
<strong>de</strong>recho<br />
Nota: Los altavoces están protegidos magnéticamente para evitar interferencias con la pantalla<br />
<strong>de</strong>l TV.<br />
9<br />
Español
Español<br />
10<br />
Configuración <strong>de</strong>l sistema<br />
Figura 3<br />
Colocación recomendada<br />
<strong>de</strong>l sistema<br />
Colocación <strong>de</strong> los altavoces<br />
La elección <strong>de</strong> una buena ubicación para los altavoces permite experimentar los efectos <strong>de</strong>l<br />
sonido envolvente que el sistema <strong>de</strong> entretenimiento para el hogar 3•2•1 proporciona.<br />
• Coloque los dos altavoces encima <strong>de</strong>l TV o a una misma distancia a izquierda y <strong>de</strong>recha <strong>de</strong><br />
la pantalla (Figura 2). Mantenga ambos altavoces aproximadamente a la misma altura.<br />
• Coloque cada altavoz a un máximo <strong>de</strong> 1 metro <strong>de</strong>l bor<strong>de</strong> <strong>de</strong> la pantalla <strong>de</strong>l TV. Si se<br />
colocan los altavoces a más <strong>de</strong> un metro <strong>de</strong>l TV, el sonido pue<strong>de</strong> separarse <strong>de</strong> la imagen.<br />
• Si utiliza una repisa o una unidad <strong>de</strong> entretenimiento en el hogar, coloque los altavoces en<br />
el bor<strong>de</strong> <strong>de</strong>lantero <strong>de</strong>l estante. Si coloca los altavoces en la parte interior <strong>de</strong> un espacio<br />
cerrado pue<strong>de</strong> alterar la calidad general <strong>de</strong> sonido y los efectos sonoros <strong>de</strong> la película.<br />
• Coloque los altavoces por lo menos a 3 pies (1 metro) uno <strong>de</strong>l otro para optimizar los<br />
efectos <strong>de</strong> sonido envolvente.<br />
PRECAUCIÓN: Seleccione una superficie estable y nivelada para los altavoces. La vibración<br />
pue<strong>de</strong> provocar que los altavoces se muevan, sobre todo en superficies suaves como el mármol,<br />
el cristal o la ma<strong>de</strong>ra muy pulida. Si los coloca sobre una superficie plana, coloque en la<br />
superficie inferior el juego más pequeño <strong>de</strong> patas <strong>de</strong> goma que se incluye. Pue<strong>de</strong> conseguir más<br />
patas <strong>de</strong> goma (número <strong>de</strong> artículo 178321) a través <strong>de</strong>l <strong>de</strong>partamento <strong>de</strong> atención al cliente <strong>de</strong><br />
<strong>Bose</strong> ® . Para comunicarse con <strong>Bose</strong>, consulte la lista <strong>de</strong> oficinas que se incluye en la caja <strong>de</strong>l<br />
producto.<br />
Nota: Se pue<strong>de</strong>n montar los altavoces en los soportes <strong>Bose</strong>, en los soportes para mesa, o en<br />
los soportes para suelo. Para obtener información sobre pedidos, consulte “Accesorios” en la<br />
página 52. También se pue<strong>de</strong>n pedir más cables o cables más largos.<br />
• Coloque los altavoces <strong>de</strong> pie, con el logotipo <strong>de</strong> <strong>Bose</strong> hacia arriba.<br />
• Oriente los altavoces directamente hacia el área <strong>de</strong> escucha. No coloque los altavoces en<br />
ángulo. Si coloca en ángulo uno o los dos altavoces hacia el área <strong>de</strong> audición o en<br />
sentido contrario, alterará <strong>de</strong> forma significativa el funcionamiento <strong>de</strong>l sistema.
Figura 4<br />
Colocación recomendada<br />
<strong>de</strong>l módulo Acoustimass<br />
Figura 5<br />
Orientación recomendada<br />
para el módulo<br />
Colocación <strong>de</strong>l módulo Acoustimass ®<br />
Configuración <strong>de</strong>l sistema<br />
• Coloque el módulo Acoustimass ® al alcance <strong>de</strong>l cable <strong>de</strong> entrada <strong>de</strong> audio, <strong>de</strong> los cables<br />
<strong>de</strong> los altavoces y <strong>de</strong> una toma <strong>de</strong> corriente alterna <strong>de</strong> la red eléctrica.<br />
• Coloque el módulo en el mismo punto <strong>de</strong> la habitación que el televisor y los altavoces<br />
(Figura 4).<br />
• Coloque el módulo, por lo menos a 3 pies (1 metro) <strong>de</strong>l TV para evitar interferencias en la<br />
pantalla.<br />
3 ft (1 m)<br />
mínimo<br />
• Coloque las patas <strong>de</strong> goma <strong>de</strong> tamaño medio en la base <strong>de</strong> las patas <strong>de</strong>l módulo.<br />
Las almohadillas <strong>de</strong> goma proporcionan una mayor estabilidad y protección contra<br />
arañazos.<br />
• Elija un lugar a<strong>de</strong>cuado, por ejemplo bajo la mesa, <strong>de</strong>trás <strong>de</strong>l sofá o <strong>de</strong> una silla, o <strong>de</strong>trás<br />
<strong>de</strong> las cortinas siempre y cuando no se bloquee la abertura <strong>de</strong>l puerto.<br />
• Dirija el puerto <strong>de</strong>l módulo hacia la habitación o por la pared. De este modo, se impi<strong>de</strong> el<br />
bloqueo <strong>de</strong>l puerto o el exceso <strong>de</strong> graves.<br />
• Coloque el módulo Acoustimass sobre las patas. No lo apoye <strong>de</strong> lado ni sobre los<br />
extremos (Figura 5).<br />
PRECAUCIÓN: vNo bloquee las aberturas <strong>de</strong> la parte trasera <strong>de</strong>l módulo, pues proporcionan<br />
ventilación para los circuitos incorporados.<br />
PRECAUCIÓN: El módulo Acoustimass genera un campo magnético. Si bien no constituye un<br />
riesgo inmediato para las cintas <strong>de</strong> ví<strong>de</strong>o, audio, ni para otros medios magnéticos, no se <strong>de</strong>ben<br />
guardar estos elementos en el módulo ni cerca <strong>de</strong> él.<br />
ACINPUT<br />
MUSICCENTER<br />
11<br />
Español
Español<br />
12<br />
Configuración <strong>de</strong>l sistema<br />
Conexiones<br />
Figura 6<br />
Conexión <strong>de</strong>l centro<br />
multimedia <strong>de</strong>l módulo<br />
Acoustimass<br />
Figura 7<br />
Conexión <strong>de</strong>l cable <strong>de</strong><br />
los altavoces al módulo<br />
Acoustimass<br />
PRECAUCIÓN: No enchufe el módulo Acoustimass en una toma <strong>de</strong> corriente alterna (CA) <strong>de</strong> la<br />
red eléctrica hasta no haber conectado todos los componentes.<br />
Nota: Si se necesitan cables adicionales <strong>de</strong> audio o cables más largos para hacer estas<br />
conexiones, póngase en contacto con <strong>Bose</strong>. Consulte la lista <strong>de</strong> direcciones incluida en la caja.<br />
Conexión <strong>de</strong>l módulo Acoustimass ® al centro multimedia<br />
Conecte uno <strong>de</strong> los extremos <strong>de</strong>l cable <strong>de</strong>l módulo Acoustimass a la toma posterior <strong>de</strong>l<br />
centro multimedia (Figura 6). Enchufe el otro extremo <strong>de</strong>l cable <strong>de</strong>l módulo Acoustimass a la<br />
toma <strong>de</strong> entrada ( ) <strong>de</strong> la parte posterior <strong>de</strong>l módulo Acoustimass.<br />
Nota: Los conectores <strong>de</strong>l cable <strong>de</strong>l módulo Acoustimass tienen una forma única, <strong>de</strong> modo que las<br />
conexiones <strong>de</strong>l cable únicamente encajen en un sentido. Asegúrese <strong>de</strong> que la flecha <strong>de</strong>l conector<br />
apunta hacia arriba al conectar el cable.<br />
Panel posterior<br />
<strong>de</strong>l centro<br />
multimedia<br />
Cable <strong>de</strong>l módulo<br />
<strong>de</strong> Acoustimass<br />
Conector <strong>de</strong> entrada<br />
<strong>de</strong>l módulo<br />
Acoustimass<br />
Conexión <strong>de</strong> los altavoces al módulo Acoustimass<br />
1. Inserte el extremo <strong>de</strong>l cable <strong>de</strong>l altavoz que sólo tiene un conector en la clavija<br />
SPEAKERS situada en el panel posterior <strong>de</strong>l módulo Acoustimass (Figura 7).<br />
Apriete los tornillos <strong>de</strong>l enchufe.<br />
Cable <strong>de</strong>l<br />
módulo<br />
Acoustimass<br />
Toma <strong>de</strong><br />
entrada <strong>de</strong>l<br />
módulo<br />
Acoustimass<br />
Cable <strong>de</strong>l<br />
altavoz
Figura 8<br />
Separación <strong>de</strong> los cables<br />
<strong>de</strong> los altavoces <strong>de</strong>recho<br />
eizquierdo<br />
Figura 9<br />
Colocación <strong>de</strong> los altavoces<br />
izquierdo y <strong>de</strong>recho<br />
Configuración <strong>de</strong>l sistema<br />
2. En el otro extremo <strong>de</strong>l cable <strong>de</strong>l altavoz, separe los cables <strong>de</strong> los altavoces <strong>de</strong>recho e<br />
izquierdo lo suficiente para que alcance a ambos altavoces (Figura 8).<br />
3. Conecte el cable <strong>de</strong>l altavoz LEFT (izquierdo) en la toma posterior <strong>de</strong>l altavoz izquierdo<br />
(Figura 9). Conecte el cable <strong>de</strong>l altavoz RIGHT (<strong>de</strong>recho) en la toma posterior <strong>de</strong>l altavoz<br />
<strong>de</strong>recho.<br />
DERECHO<br />
cable<br />
altavoz<br />
RIGHT<br />
Nota: Si compra el sistema<br />
3•2•1 GS Series II, los<br />
conectores <strong>de</strong> los cables <strong>de</strong> los<br />
altavoces <strong>de</strong>recho e izquierdo<br />
tendrán la marca “GS”.<br />
Nota: Asegúrese <strong>de</strong> que los conectores <strong>de</strong> los cables están correctamente introducidos en las<br />
tomas <strong>de</strong> los altavoces.<br />
LEFT<br />
IZQUIERDO<br />
cable<br />
altavoz<br />
13<br />
Español
Español<br />
14<br />
Configuración <strong>de</strong>l sistema<br />
Figura 10<br />
Conexiones <strong>de</strong> antena<br />
Antena<br />
FM dipolo<br />
Conexión <strong>de</strong> las antenas suministradas<br />
El panel posterior <strong>de</strong>l centro multimedia aloja las tomas para antenas AM y FM (Figura 10).<br />
Desenrolle los cables <strong>de</strong> cada antena para garantizar la mejor recepción.<br />
Antena <strong>de</strong> cuadro <strong>de</strong> AM<br />
Nota: Es posible utilizar una antena<br />
exterior en vez <strong>de</strong> las dos antenas<br />
suministradas. Para agregar una<br />
antena exterior, consulte con un<br />
instalador cualificado. Siga todas las<br />
instrucciones <strong>de</strong> seguridad que se<br />
incluyen con la antena.<br />
Centro multimedia<br />
Antena FM<br />
Conecte la antena FM al panel posterior <strong>de</strong>l centro multimedia. Extienda los brazos <strong>de</strong> la<br />
antena y muévalos para establecer una recepción óptima en FM. Extienda la antena lo más<br />
lejos posible <strong>de</strong>l centro multimedia y <strong>de</strong> cualquier otro equipo externo.<br />
Antena AM<br />
Conecte la antena <strong>de</strong> cuadro AM al panel posterior <strong>de</strong>l centro multimedia. Coloque el cuadro<br />
<strong>de</strong> antena por lo menos a 20 pulgadas (50 centímetros) <strong>de</strong>l centro multimedia y a 4 pies<br />
(1,2 metros) <strong>de</strong>l módulo Acoustimass ® . Experimente con la posición <strong>de</strong>l cuadro para lograr la<br />
mejor recepción <strong>de</strong> AM. Siga las instrucciones suministradas con la antena <strong>de</strong> cuadro AM<br />
para colocarla sobre la base suministrada, o instálela en una pared.<br />
Conexión <strong>de</strong> radio FM por cable<br />
Algunos proveedores <strong>de</strong> televisión por cable ofrecen señales <strong>de</strong> radio FM por medio <strong>de</strong>l<br />
servicio <strong>de</strong> cable hasta su casa. Esta conexión se realiza a la toma <strong>de</strong> FM externa situada en<br />
el panel posterior <strong>de</strong>l centro multimedia. Para conectarse a este servicio, solicite ayuda a su<br />
proveedor <strong>de</strong> televisión por cable.<br />
Nota: Verifique que la instalación <strong>de</strong> radio por cable incluye un divisor <strong>de</strong> señales para que el<br />
centro multimedia reciba únicamente la banda <strong>de</strong> radio <strong>de</strong> FM y no la banda <strong>de</strong> televisión por<br />
cable. Si fuese necesario, póngase en contacto con su empresa <strong>de</strong> cable.
Conexión <strong>de</strong>l TV al centro multimedia<br />
Figura 11<br />
Conexiones <strong>de</strong>l TV<br />
(ví<strong>de</strong>o compuesto) al centro<br />
multimedia<br />
Configuración <strong>de</strong>l sistema<br />
Nota: Si <strong>de</strong>sea usar el sistema 3•2•1 con un TV y un VCR, sáltese esta sección y consulte<br />
“Conexión <strong>de</strong>l TV y <strong>de</strong>l ví<strong>de</strong>o al centro multimedia” en la página 16.<br />
Conexiones <strong>de</strong> audio<br />
Nota: Si el TV no tiene ninguna toma <strong>de</strong> salida <strong>de</strong> audio, consulte “Si el TV no tiene ninguna<br />
toma <strong>de</strong> salida <strong>de</strong> audio” en la página 17. Si no es así, continúe.<br />
1. Conecte un extremo <strong>de</strong>l cable estéreo suministrado a la toma TV Audio IN situada en el<br />
panel posterior <strong>de</strong>l centro multimedia (Figura 11). Introduzca el conector blanco RCA en<br />
la toma blanca <strong>de</strong>l TVL. Introduzca el conector rojo RCA en la toma roja <strong>de</strong>l TVR.<br />
2. Conecte el otro extremo <strong>de</strong>l cable estéreo a los conectores <strong>de</strong> salida <strong>de</strong> audio <strong>de</strong> su TV.<br />
Introduzca el conector blanco RCA en la toma blanca AUDIO OUT L. Introduzca el<br />
conector rojo RCA en la toma roja AUDIO OUT R.<br />
Conexiones <strong>de</strong> ví<strong>de</strong>o compuesto<br />
Nota: Algunos TV viejos, con conectores <strong>de</strong> cable <strong>de</strong> TV estándar no disponen <strong>de</strong> una entrada<br />
ví<strong>de</strong>o compuesto ni <strong>de</strong> S-vi<strong>de</strong>o. Estos TV no son compatibles con ningún reproductor DVD y<br />
necesitan un modulador RF para esta conexión. Pue<strong>de</strong> adquirir moduladores RF en cualquier<br />
tienda especializada en electrónica.<br />
1. Conecte el extremo <strong>de</strong>l cable <strong>de</strong> ví<strong>de</strong>o suministrado (amarillo) a la toma Vi<strong>de</strong>o OUT C<br />
(compuesto) situada en la parte posterior <strong>de</strong>l centro multimedia (Figura 11).<br />
2. Inserte el otro extremo <strong>de</strong>l cable <strong>de</strong> ví<strong>de</strong>o en una <strong>de</strong> las tomas <strong>de</strong> entrada <strong>de</strong> ví<strong>de</strong>o<br />
<strong>de</strong>l TV.<br />
Recuer<strong>de</strong> el nombre <strong>de</strong> la entrada <strong>de</strong> ví<strong>de</strong>o <strong>de</strong> su TV a la que ha conectado el<br />
cable <strong>de</strong>l ví<strong>de</strong>o (por ejemplo: Ví<strong>de</strong>o 1, Entrada 1, o Aux). Más a<strong>de</strong>lante, necesitará<br />
seleccionar la entrada <strong>de</strong> ví<strong>de</strong>o correspondiente en su TV para po<strong>de</strong>r ver la salida<br />
<strong>de</strong> ví<strong>de</strong>o <strong>de</strong>l sistema 3•2•1.<br />
Cable <strong>de</strong> ví<strong>de</strong>o<br />
(conectores<br />
amarillos)<br />
Cable estéreo<br />
(conectores rojos y blancos)<br />
Panel posterior <strong>de</strong>l centro multimedia<br />
*<br />
Panel conector <strong>de</strong>l TV<br />
Televisor<br />
* Pue<strong>de</strong>n llevar la etiqueta “FIXED”, “MONITOR”, o “HiFi”.<br />
15<br />
Español
Español<br />
16<br />
Configuración <strong>de</strong>l sistema<br />
Conexión <strong>de</strong>l TV y <strong>de</strong>l ví<strong>de</strong>o al centro multimedia<br />
Figura 12<br />
Conexiones <strong>de</strong> TV y ví<strong>de</strong>o<br />
al centro multimedia<br />
Cable estéreo<br />
(conectores rojos y blancos)<br />
Nota: Hay dos opciones para conectar el TV y el ví<strong>de</strong>o al centro multimedia. En primer lugar,<br />
<strong>de</strong>be comprobar si el TV tiene tomas <strong>de</strong> salida <strong>de</strong> audio. Consulte la guía <strong>de</strong> usuario <strong>de</strong>l TV si<br />
necesita más información.<br />
Si el TV tiene tomas <strong>de</strong> salida <strong>de</strong> audio<br />
Si el TV tiene tomas <strong>de</strong> salida <strong>de</strong> audio, canalice directamente el audio <strong>de</strong>l TV al sistema <strong>de</strong><br />
entretenimiento para el hogar 3•2•1 (Figura 12).<br />
1. Conecte un extremo <strong>de</strong>l cable estéreo suministrado a la toma TV Audio IN <strong>de</strong>l panel<br />
posterior <strong>de</strong>l centro multimedia. Introduzca el conector blanco RCA en la toma blanca<br />
<strong>de</strong>l TVL. Introduzca el conector rojo RCA en la toma roja <strong>de</strong>l TVR.<br />
2. Conecte el otro extremo <strong>de</strong>l cable estéreo a los conectores <strong>de</strong> salida <strong>de</strong> audio <strong>de</strong> su TV.<br />
Introduzca el conector blanco RCA en la toma blanca AUDIO OUT L. Introduzca el<br />
conector rojo RCA en la toma roja AUDIO OUT R.<br />
3. Introduzca un extremo <strong>de</strong>l cable <strong>de</strong> ví<strong>de</strong>o suministrado (amarillo) en la toma Vi<strong>de</strong>o OUT<br />
C (compuesto) situada en la parte posterior <strong>de</strong>l centro multimedia. Inserte el otro<br />
extremo <strong>de</strong>l cable <strong>de</strong> ví<strong>de</strong>o en una <strong>de</strong> las tomas <strong>de</strong> entrada <strong>de</strong> ví<strong>de</strong>o <strong>de</strong>l TV.<br />
Recuer<strong>de</strong> el nombre <strong>de</strong> la entrada <strong>de</strong> ví<strong>de</strong>o <strong>de</strong>l TV a la que ha conectado el cable<br />
<strong>de</strong> ví<strong>de</strong>o (por ejemplo: Ví<strong>de</strong>o 1, Entrada 1, o Aux). Más a<strong>de</strong>lante, necesitará<br />
seleccionar la entrada <strong>de</strong> ví<strong>de</strong>o correspondiente en su TV para po<strong>de</strong>r ver la salida<br />
<strong>de</strong> ví<strong>de</strong>o <strong>de</strong>l sistema 3•2•1.<br />
Cable <strong>de</strong> ví<strong>de</strong>o<br />
(conectores<br />
amarillos)<br />
*<br />
Panel conector<br />
<strong>de</strong>l TV<br />
Receptor <strong>de</strong> cable/satélite<br />
(cuando corresponda)<br />
Cable<br />
existente<br />
Cable<br />
existente<br />
VCR<br />
Televisor<br />
* Pue<strong>de</strong>n llevar la etiqueta “FIXED”, “MONITOR”, o “HiFi”.
Figura 13<br />
Configuración <strong>de</strong>l sistema<br />
cuando el TV no tiene<br />
salidas <strong>de</strong> audio<br />
Panel posterior <strong>de</strong>l centro multimedia<br />
Cable estéreo<br />
(conectores rojos y blancos)<br />
IMPORTANTE<br />
Si conecta el TV y el ví<strong>de</strong>o <strong>de</strong> este modo,<br />
necesitará encen<strong>de</strong>r el ví<strong>de</strong>o y seleccionar la<br />
fuente AUX en el control remoto <strong>de</strong>l sistema<br />
3•2•1 para po<strong>de</strong>r oír el sonido <strong>de</strong> los<br />
programas <strong>de</strong> TV.<br />
Configuración <strong>de</strong>l sistema<br />
Si el TV no tiene ninguna toma <strong>de</strong> salida <strong>de</strong> audio<br />
Si el TV no tiene ninguna toma <strong>de</strong> salida <strong>de</strong> audio, tendrá que canalizar el sonido al sistema<br />
<strong>de</strong> entretenimiento para el hogar 3•2•1 a través <strong>de</strong> una fuente secundaria, como por<br />
ejemplo, un VCR. Para ello, necesitará un cable <strong>de</strong> ví<strong>de</strong>o adicional, que pue<strong>de</strong> adquirir en<br />
cualquier tienda especializada en electrónica.<br />
1. Introduzca uno <strong>de</strong> los extremos <strong>de</strong>l cable estéreo suministrado en la toma AUX Audio<br />
IN <strong>de</strong>l panel posterior <strong>de</strong>l centro multimedia (Figura 13). Introduzca el conector blanco<br />
RCA en la toma blanca AUXL. Introduzca el conector rojo RCA en la toma roja AUXR.<br />
2. Enchufe el otro extremo <strong>de</strong>l cable estéreo a la toma AUDIO OUT <strong>de</strong>l ví<strong>de</strong>o. Introduzca el<br />
conector blanco RCA en la toma blanca AUDIO OUT L. Introduzca el conector rojo RCA<br />
en la toma roja AUDIO OUT R.<br />
3. Inserte un extremo <strong>de</strong>l cable <strong>de</strong> ví<strong>de</strong>o suministrado (amarillo) en la toma VIDEO<br />
OUTPUT<strong>de</strong> la parte posterior <strong>de</strong>l VCR. Introduzca el otro extremo <strong>de</strong>l cable <strong>de</strong> ví<strong>de</strong>o<br />
suministrado en la toma Vi<strong>de</strong>o IN C (compuesto) <strong>de</strong> la parte posterior <strong>de</strong>l centro<br />
multimedia.<br />
4. Introduzca el otro extremo <strong>de</strong>l cable <strong>de</strong> ví<strong>de</strong>o suministrado (amarillo) en la toma VIDEO<br />
OUTPUT C (compuesto) <strong>de</strong> la parte posterior <strong>de</strong>l centro multimedia. Introduzca el otro<br />
extremo <strong>de</strong>l cable <strong>de</strong> ví<strong>de</strong>o en una <strong>de</strong> las tomas <strong>de</strong> entrada <strong>de</strong> ví<strong>de</strong>o <strong>de</strong>l TV.<br />
Recuer<strong>de</strong> el nombre <strong>de</strong> la entrada <strong>de</strong> ví<strong>de</strong>o <strong>de</strong>l TV a la que ha conectado el cable<br />
<strong>de</strong> ví<strong>de</strong>o (por ejemplo: Ví<strong>de</strong>o 1, Entrada 1, o Aux). Más a<strong>de</strong>lante, necesitará<br />
seleccionar la entrada <strong>de</strong> ví<strong>de</strong>o correspondiente en su TV para po<strong>de</strong>r ver la salida<br />
<strong>de</strong> ví<strong>de</strong>o <strong>de</strong>l sistema 3•2•1.<br />
Cables <strong>de</strong> ví<strong>de</strong>o<br />
(conector amarillo)<br />
Panel <strong>de</strong> conexión <strong>de</strong>l TV<br />
VCR<br />
Antena <strong>de</strong> cable/<br />
satélite<br />
Televisor<br />
Cable<br />
existente<br />
VCR<br />
panel <strong>de</strong><br />
conexión<br />
Cable<br />
existente<br />
17<br />
Español
Español<br />
18<br />
Configuración <strong>de</strong>l sistema<br />
Consi<strong>de</strong>raciones <strong>de</strong>l ví<strong>de</strong>o<br />
• Algunas unida<strong>de</strong>s combinadas <strong>de</strong> TV/ví<strong>de</strong>o pue<strong>de</strong>n no ser compatibles con el sistema <strong>de</strong><br />
entretenimiento para el hogar 3•2•1 Series II. Consulte el manual <strong>de</strong>l usuario <strong>de</strong>l TV/ví<strong>de</strong>o<br />
para obtener más información.<br />
• Necesita un ví<strong>de</strong>o estéreo para una correcta recepción <strong>de</strong>l sonido. Si su ví<strong>de</strong>o sólo tiene<br />
una salida <strong>de</strong> audio y no está marcada Stereo o Hi-fi, tiene un ví<strong>de</strong>o mono. Necesitará:<br />
cable adaptador en Y (disponible en tiendas <strong>de</strong> electrónica) para conectar el sonido al<br />
centro multimedia. Para esta configuración, necesitará seleccionar “Descodificación<br />
mono” (consulte “Menú configuración <strong>de</strong> TV, CBL-SAT y AUX” en la página 42) para que el<br />
sistema 3•2•1 pueda simular los efectos <strong>de</strong> sonido envolvente <strong>de</strong>s<strong>de</strong> una fuente mono.<br />
De lo contrario, oirá sonido mono en ambos altavoces.<br />
Opciones <strong>de</strong> configuración avanzada<br />
Figura 14<br />
Conexiones <strong>de</strong>l centro<br />
TV (S ví<strong>de</strong>o) a centro<br />
multimedia<br />
IMPORTANTE<br />
Si utiliza S ví<strong>de</strong>o para<br />
conectar el TV al<br />
centro multimedia,<br />
<strong>de</strong>be utilizar S ví<strong>de</strong>o<br />
para conectar el resto<br />
<strong>de</strong> dispositivos (como<br />
receptor <strong>de</strong> cable y<br />
ví<strong>de</strong>o) al centro<br />
multimedia.<br />
Conexiones <strong>de</strong> S ví<strong>de</strong>o (ví<strong>de</strong>o <strong>de</strong> alta calidad)<br />
Una toma <strong>de</strong> entrada S-vi<strong>de</strong>o, que incluyen muchos televisores, proporciona una imagen<br />
televisiva <strong>de</strong> mayor calidad que la conexión <strong>de</strong> salida <strong>de</strong> ví<strong>de</strong>o compuesto que se muestra en<br />
la Figura 11. Para esta conexión necesitará un cable <strong>de</strong> S ví<strong>de</strong>o que podrá comprar en su<br />
distribuidor <strong>Bose</strong> ® o en una tienda especializada en electrónica.<br />
• Introduzca uno <strong>de</strong> los extremos <strong>de</strong>l cable <strong>de</strong> S ví<strong>de</strong>o en la toma S-Vi<strong>de</strong>o OUT <strong>de</strong>l centro<br />
multimedia (Figura 14).<br />
• Introduzca el otro extremo <strong>de</strong>l cable <strong>de</strong> S ví<strong>de</strong>o en la toma S-VIDEO IN <strong>de</strong>l TV.<br />
Cable <strong>de</strong><br />
S ví<strong>de</strong>o<br />
Cable estéreo<br />
(conectores rojos y blancos)<br />
Panel posterior <strong>de</strong>l centro multimedia<br />
Panel conector <strong>de</strong>l TV<br />
Televisor
Figura 15<br />
Conexiones <strong>de</strong>l TV (ví<strong>de</strong>o<br />
componente) al centro<br />
multimedia<br />
Configuración <strong>de</strong>l sistema<br />
Conexiones <strong>de</strong> ví<strong>de</strong>o componente (ví<strong>de</strong>o <strong>de</strong> alta calidad)<br />
Nota: Será necesario llevar a cabo conexiones <strong>de</strong> ví<strong>de</strong>o componente para utilizar la función <strong>de</strong><br />
exploración progresiva <strong>de</strong>l sistema 3•2•1. El TV también <strong>de</strong>be admitir esta función. Para utilizar<br />
la función <strong>de</strong> exploración progresiva, consulte “Opciones <strong>de</strong> ví<strong>de</strong>o” en la página 46.<br />
Para obtener la máxima calidad <strong>de</strong> ví<strong>de</strong>o a partir <strong>de</strong> los DVD, <strong>de</strong>berá utilizar una conexión <strong>de</strong><br />
ví<strong>de</strong>o componente entre el centro multimedia y el TV. Para ello, el TV <strong>de</strong>be tener tomas para<br />
ví<strong>de</strong>o componente (generalmente con la etiqueta Y, Pb, y Pr). Consulte la guía <strong>de</strong> usuario <strong>de</strong>l<br />
televisor para obtener más información.<br />
Para realizar las conexiones <strong>de</strong> ví<strong>de</strong>o componente necesitará tres cables para ví<strong>de</strong>o lo<br />
suficientemente largos como para conectarlos <strong>de</strong>s<strong>de</strong> el panel posterior <strong>de</strong>l centro multimedia<br />
al TV (Figura 15). Si los cables no se suministran con el TV, pue<strong>de</strong> comprarlos aparte.<br />
1. En el panel posterior <strong>de</strong>l centro multimedia, conecte el cable <strong>de</strong>l ví<strong>de</strong>o a las tomas <strong>de</strong><br />
salida <strong>de</strong>l ví<strong>de</strong>o componente Y, Pb, y Pr (Figura 15).<br />
2. Conecte el otro extremo <strong>de</strong>l cable <strong>de</strong> ví<strong>de</strong>o a la toma <strong>de</strong> ví<strong>de</strong>o componente<br />
correspondiente (color o código alfabético) en la parte posterior <strong>de</strong>l TV.<br />
Panel posterior <strong>de</strong>l centro multimedia<br />
Cable estéreo<br />
(conectores rojos y blancos)<br />
Panel conector <strong>de</strong>l TV<br />
Tomas <strong>de</strong> ví<strong>de</strong>o componente con<br />
código <strong>de</strong> color (Y, Pb, y Pr)<br />
Cable <strong>de</strong> ví<strong>de</strong>o<br />
componente<br />
IMPORTANTE PARA LOS USUARIOS DE VÍDEO COMPONENTE<br />
Las señales <strong>de</strong> entrada recibidas por las tomas C (compuesto) o S Ví<strong>de</strong>o IN no se han<br />
conectado a las tomas <strong>de</strong> Ví<strong>de</strong>o componente OUT. Si conecta un dispositivo externo <strong>de</strong><br />
ví<strong>de</strong>o a la toma C o S-Vi<strong>de</strong>o IN <strong>de</strong>berá también conectar la toma C o S-Vi<strong>de</strong>o OUT <strong>de</strong>l<br />
centro multimedia a la toma <strong>de</strong> entrada respectiva <strong>de</strong>l TV. Para visualizar la entrada externa<br />
<strong>de</strong> ví<strong>de</strong>o en su TV, <strong>de</strong>berá seleccionar la entrada <strong>de</strong> TV ví<strong>de</strong>o utilizada para ese dispositivo.<br />
Para visualizar los menús <strong>de</strong> pantalla <strong>de</strong>l sistema 3-2-1, <strong>de</strong>be volver a cambiar la entrada<br />
<strong>de</strong> ví<strong>de</strong>o <strong>de</strong>l TV.<br />
Nota: Si <strong>de</strong>sea obtener más información, o si quiere comprar los cables <strong>de</strong> ví<strong>de</strong>o, póngase en<br />
contacto con una tienda especializada en electrónica o con un proveedor <strong>de</strong> <strong>Bose</strong> ® autorizado.<br />
19<br />
Español
Español<br />
20<br />
Configuración <strong>de</strong>l sistema<br />
Figura 16<br />
Tomas <strong>de</strong> entrada <strong>de</strong> audio<br />
digital <strong>de</strong>l centro multimedia<br />
Conexión <strong>de</strong> dispositivos <strong>de</strong> sonido digital<br />
Algunos dispositivos pue<strong>de</strong>n tener una salida <strong>de</strong> sonido digital para obtener un rendimiento<br />
óptimo <strong>de</strong> sonido. Utilice un cable digital o coaxial, según sea necesario, para conectar dicha<br />
salida a la entrada digital <strong>de</strong>l centro multimedia. Pue<strong>de</strong> adquirir los cables en una tienda<br />
especializada en electrónica.<br />
En el panel posterior <strong>de</strong>l centro multimedia, el cable digital óptico se conecta a la toma<br />
OPTICAL. Un cable coaxial conecta la entrada <strong>de</strong> audio con la etiqueta D.<br />
Nota: Las entradas <strong>de</strong> audio digital <strong>de</strong>l sistema 3•2•1 no pue<strong>de</strong>n <strong>de</strong>codificar un flujo <strong>de</strong> bits<br />
DTS <strong>de</strong> un componente externo. Únicamente se pue<strong>de</strong> <strong>de</strong>scodificar el flujo <strong>de</strong> bits DTS <strong>de</strong>l<br />
reproductor interno <strong>de</strong> DVD.<br />
Nota: Antes <strong>de</strong> aprovechar las ventajas <strong>de</strong> la conexión óptica, <strong>de</strong>be <strong>de</strong>signar el conector óptico<br />
a la fuente <strong>de</strong> audio en el menú <strong>de</strong> configuración <strong>de</strong>l sistema. Consulte “Opciones <strong>de</strong>l centro<br />
multimedia” en la página 47.<br />
Entrada <strong>de</strong> audio digital óptica Entrada <strong>de</strong> audio digital coaxial<br />
Conexión <strong>de</strong>l receptor <strong>de</strong> cable/satélite, <strong>de</strong>l TV y <strong>de</strong>l ví<strong>de</strong>o al centro<br />
multimedia<br />
El sistema <strong>de</strong> entretenimiento para el hogar 3•2•1 le proporciona flexibilidad para añadir<br />
hasta tres dispositivos <strong>de</strong> audio externos, incluido el TV, directamente al centro multimedia.<br />
Figura 17 muestra una configuración avanzada que utiliza el TV, el ví<strong>de</strong>o y el receptor <strong>de</strong><br />
cable/satélite. En esta configuración, tenga en cuenta lo siguiente:<br />
• las conexiones <strong>de</strong> S ví<strong>de</strong>o se usan para enviar la señal <strong>de</strong>l cable/satélite al centro<br />
multimedia. Por lo tanto, la salida <strong>de</strong> ví<strong>de</strong>o <strong>de</strong>l centro multimedia se envía al TV también<br />
a través una conexión <strong>de</strong> S ví<strong>de</strong>o.<br />
• Existen conexiones coaxiales <strong>de</strong> audio analógicas y digitales para el receptor <strong>de</strong> cable/<br />
satélite. Pue<strong>de</strong> utilizar una conexión digital óptica. Sin embargo, antes <strong>de</strong> aprovechar las<br />
ventajas <strong>de</strong> la conexión optica, <strong>de</strong>be asignar el conector óptico a la fuente <strong>de</strong> audio <strong>de</strong>l<br />
receptor <strong>de</strong> cable/satélite <strong>de</strong>l menú <strong>de</strong> configuración <strong>de</strong>l sistema. Consulte “Opciones <strong>de</strong>l<br />
centro multimedia” en la página 47.<br />
• Al conectar un dispositivo <strong>de</strong> audio a las tomas <strong>de</strong>l centro multimedia, recuer<strong>de</strong> que la<br />
toma roja correspon<strong>de</strong> con la toma roja <strong>de</strong>l canal <strong>de</strong>recho (R) y la toma blanca (o negra)<br />
con la toma <strong>de</strong>l canal izquierdo (L).<br />
• Para conocer más <strong>de</strong>talles sobre las conexiones <strong>de</strong> ví<strong>de</strong>o entre el VCR y el televisor,<br />
consulte los manuales correspondientes.<br />
Nota: Las recomendaciones contenidas en esta guía <strong>de</strong> usuario son sugerencias básicas para<br />
conectar dispositivos externos al sistema 3•2•1 Series II. Las instrucciones y la terminología<br />
correspondientes a estos dispositivos externos pue<strong>de</strong>n variar, <strong>de</strong>pendiendo <strong>de</strong>l fabricante.<br />
Consulte la guía <strong>de</strong>l usuario que se suministra con el dispositivo para obtener más información<br />
sobre la configuración antes <strong>de</strong> realizar ninguna conexión.
Figura 17<br />
Configuración avanzada:<br />
TV, ví<strong>de</strong>o y receptor <strong>de</strong><br />
cable/satélite<br />
Salida<br />
S-ví<strong>de</strong>o<br />
CBL-SAT<br />
Salida analógica <strong>de</strong><br />
audio CBL-SAT<br />
Cable/satélite<br />
Salida analógica <strong>de</strong> audio <strong>de</strong> ví<strong>de</strong>o<br />
Salida <strong>de</strong> S-vi<strong>de</strong>o<br />
<strong>de</strong>l centro<br />
multimedia al TV<br />
Centro multimedia<br />
Salida digital<br />
<strong>de</strong> audio<br />
CBL-SAT<br />
VCR<br />
Señal<br />
CBL-SAT<br />
para ví<strong>de</strong>o<br />
Señal<br />
CBL-SAT<br />
para TV<br />
Configuración <strong>de</strong>l sistema<br />
Servicio <strong>de</strong><br />
Cable/satélite<br />
(CBL-SAT)<br />
Televisor<br />
Nota: Para obtener más información sobre las conexiones avanzadas, consulte el disco <strong>de</strong><br />
configuración <strong>de</strong>l DVD incluido en el sistema <strong>de</strong> entretenimiento para el hogar 3•2•1 Series II.<br />
21<br />
Español
Español<br />
22<br />
Configuración <strong>de</strong>l sistema<br />
Figura 18<br />
Conexiones <strong>de</strong> la consola<br />
<strong>de</strong> vi<strong>de</strong>ojuegos<br />
Panel <strong>de</strong> conexión <strong>de</strong> la<br />
consola <strong>de</strong> vi<strong>de</strong>ojuegos<br />
Conexión <strong>de</strong> una consola <strong>de</strong> vi<strong>de</strong>ojuegos<br />
Conecte la salida <strong>de</strong> audio <strong>de</strong> la consola <strong>de</strong> vi<strong>de</strong>ojuegos a la toma <strong>de</strong> entrada AUX Left y<br />
Right. Conecte la salida <strong>de</strong> ví<strong>de</strong>o <strong>de</strong> la consola <strong>de</strong> vi<strong>de</strong>ojuegos a la toma C (compuesto)<br />
Vi<strong>de</strong>o IN.<br />
Centro multimedia<br />
Panel <strong>de</strong> conexión <strong>de</strong>l TV<br />
IMPORTANTE<br />
Si conecta la consola <strong>de</strong> vi<strong>de</strong>ojuegos <strong>de</strong> esta manera, <strong>de</strong>berá<br />
seleccionar la fuente AUX en el control remoto <strong>de</strong>l sistema 3•2•1<br />
para po<strong>de</strong>r oír el sonido <strong>de</strong> la consola <strong>de</strong> vi<strong>de</strong>ojuegos.
Instalación <strong>de</strong> las pilas <strong>de</strong>l control remoto<br />
Figura 19<br />
Instalación <strong>de</strong> las pilas<br />
Configuración <strong>de</strong>l sistema<br />
1. Deslice la tapa <strong>de</strong>l compartimento <strong>de</strong> pilas situado en la parte posterior <strong>de</strong>l control<br />
remoto (Figura 19).<br />
2. Inserte las dos pilas AA (IEC-R6) incluidas <strong>de</strong> 1,5 V, o su equivalente, como se indica.<br />
Haga coincidir los polos positivo (+) y negativo (–) <strong>de</strong> las pilas con los <strong>de</strong>l interior <strong>de</strong>l<br />
compartimento <strong>de</strong> pilas.<br />
3. Vuelva a colocar la tapa <strong>de</strong>l compartimento <strong>de</strong> pilas.<br />
Nota: Cambie las pilas cuando el control remoto <strong>de</strong>je <strong>de</strong> funcionar o el alcance parezca haberse<br />
reducido.<br />
Puerta <strong>de</strong>l<br />
compartimento<br />
<strong>de</strong> las pilas<br />
Pilas AA (IEC R6)<br />
+<br />
+<br />
23<br />
Español
Español<br />
24<br />
Configuración <strong>de</strong>l sistema<br />
Conexión <strong>de</strong>l cable <strong>de</strong> alimentación<br />
Figura 20<br />
Conexión a la alimentación<br />
Toma <strong>de</strong><br />
entrada <strong>de</strong> CA<br />
PRECAUCIÓN: Únicamente en los mo<strong>de</strong>los <strong>de</strong> doble voltaje, coloque el interruptor <strong>de</strong> doble<br />
voltaje en la parte posterior <strong>de</strong>l módulo Acoustimass ® en el voltaje correspondiente a su zona<br />
(115 V o 230 V) antes <strong>de</strong> conectarlo a la alimentación. Si no está seguro <strong>de</strong>l voltaje a<strong>de</strong>cuado<br />
para su zona, consulte con las autorida<strong>de</strong>s locales <strong>de</strong> servicios eléctricos.<br />
1. Introduzca el extremo pequeño <strong>de</strong>l conector <strong>de</strong>l cable <strong>de</strong> alimentación al conector AC<br />
INPUT <strong>de</strong>l módulo Acoustimass (Figura 20).<br />
2. Inserte el extremo gran<strong>de</strong> <strong>de</strong>l cable en la toma <strong>de</strong> red <strong>de</strong> CA (red eléctrica principal).<br />
Nota: En los mo<strong>de</strong>los <strong>de</strong> 220-240 V, active el interruptor POWER <strong>de</strong>l módulo Acoustimass (l).<br />
Cable <strong>de</strong> alimentación<br />
<strong>de</strong> CA<br />
Nota: Suministrado únicamente<br />
en sistemas <strong>de</strong> 220-240 V<br />
Interruptor <strong>de</strong><br />
selección 115/230 V<br />
115V<br />
Nota: Suministrado únicamente<br />
en sistemas <strong>de</strong> voltaje dual <strong>de</strong><br />
115/230 V
Comprobación <strong>de</strong> la configuración <strong>de</strong>l sistema<br />
Configuración <strong>de</strong>l sistema<br />
1. Compruebe lo siguiente antes <strong>de</strong> continuar:<br />
• Todos los cables están conectados <strong>de</strong> acuerdo con la configuración elegida.<br />
• Las pilas están colocadas en el control remoto.<br />
• El cable está conectado al receptáculo <strong>de</strong> CA.<br />
2. Encienda el TV. Utilice el control remoto <strong>de</strong>l TV.<br />
3. Seleccione la entrada <strong>de</strong> ví<strong>de</strong>o correspondiente en el TV para la salida <strong>de</strong><br />
ví<strong>de</strong>o <strong>de</strong>l sistema 3•2•1.<br />
• Consulte el nombre <strong>de</strong> la entrada <strong>de</strong> ví<strong>de</strong>o establecida para su TV durante el proceso<br />
<strong>de</strong> configuración.<br />
• Utilice el control remoto <strong>de</strong> su TV para seleccionar la entrada <strong>de</strong> ví<strong>de</strong>o para el<br />
sistema 3•2•1. El botón <strong>de</strong> la entrada <strong>de</strong> ví<strong>de</strong>o llevará la etiqueta “entrada TV”,<br />
“TV/ví<strong>de</strong>o”, o “AV”. Si necesita ayuda, consulte la guía <strong>de</strong>l usuario <strong>de</strong>l TV.<br />
4. Apague los altavoces <strong>de</strong>l TV<br />
• Si necesita ayuda, consulte la guía <strong>de</strong>l usuario <strong>de</strong>l TV.<br />
• Si el TV no tiene la opción <strong>de</strong> apagar los altavoces internos, tal vez tenga que ajustar el<br />
volumen <strong>de</strong>l sistema 3•2•1 y el <strong>de</strong>l TV hasta conseguir un nivel que produzca el sonido<br />
<strong>de</strong>seado.<br />
• En algunos TV, cuando se apagan los altavoces internos <strong>de</strong>l TV, tal vez necesite subir<br />
el volumen <strong>de</strong>l TV entre un 75% y un 100% para oír el audio <strong>de</strong>l sistema <strong>de</strong><br />
entretenimiento para el hogar 3•2•1. Si necesita ayuda, consulte la guía <strong>de</strong>l usuario<br />
<strong>de</strong>l TV.<br />
5. Encienda el sistema 3•2•1.<br />
• Dirija el control remoto al centro multimedia y pulse On-Off (Activado/Desactivado).<br />
6. Reproduzca el DVD <strong>de</strong> configuración 3•2•1.<br />
•Pulse Eject (Expulsar) en el panel <strong>de</strong> control <strong>de</strong>l centro multimedia<br />
• Introduzca el DVD <strong>de</strong> configuración en la ban<strong>de</strong>ja <strong>de</strong>l disco.<br />
•Pulse Eject (Expulsar) <strong>de</strong> nuevo para cerrar la ban<strong>de</strong>ja <strong>de</strong>l disco. El DVD comienza a<br />
reproducirse automáticamente. Si no lo hace, pulse el botón <strong>de</strong> reproducción ( ).<br />
Nota: Una vez realizadas todas las conexiones, asegúrese <strong>de</strong> reproducir el DVD <strong>de</strong><br />
configuración que va incluido en la caja con el sistema. Esto le ayudará a comprobar que las<br />
conexiones realizadas funcionan correctamente y le asegurará una correcta emisión <strong>de</strong>l sonido.<br />
25<br />
Español
Español<br />
26<br />
Controles e indicadores <strong>de</strong>l sistema<br />
Control remoto<br />
Indicador LED<br />
<strong>de</strong>l control<br />
remoto<br />
On<br />
Off<br />
AUX<br />
Encien<strong>de</strong> y apaga el sistema.<br />
Indicador LED <strong>de</strong> estado:<br />
• Permanece apagado durante el funcionamiento normal.<br />
• Permanece encendido durante el proceso <strong>de</strong> instalación. Se apaga brevemente<br />
cada vez que se pulsa alguna tecla.<br />
• Parpa<strong>de</strong>a ocho veces si, durante la instalación, se pulsa el botón equivocado<br />
durante la instalación o se introduce un código <strong>de</strong> un dispositivo no disponible.<br />
• Si al cabo <strong>de</strong> 10 segundos no se ha pulsado ningún botón, parpa<strong>de</strong>ará 8 veces y<br />
saldrá <strong>de</strong>l modo <strong>de</strong> instalación.<br />
Silencia o restablece el sonido <strong>de</strong> la fuente en uso.<br />
Selecciona el reproductor <strong>de</strong> CD/DVD incorporado y encien<strong>de</strong> el sistema.<br />
• Selecciona el sintonizador incorporado y encien<strong>de</strong> el sistema en la estación <strong>de</strong><br />
FM/AM seleccionada previamente.<br />
• Cambia <strong>de</strong> FM a AM cuando se selecciona el sintonizador.<br />
TV: Encien<strong>de</strong> el sistema y selecciona la entrada <strong>de</strong> TV como fuente <strong>de</strong><br />
sonido.<br />
Entrada: Cambia la entrada externa para el TV. Por ejemplo, el TV<br />
pue<strong>de</strong> tener dos entradas externas, una <strong>de</strong> las cuales se conecta al<br />
receptor <strong>de</strong>l cable y otra al VCR. Al pulsar este botón, se alterna entre<br />
el receptor <strong>de</strong>l cable y el <strong>de</strong>l satélite.<br />
Encendido/Apagado: Encien<strong>de</strong> y apaga el TV.*<br />
CBL-SAT: Encien<strong>de</strong> el sistema y selecciona la entrada <strong>de</strong> CBL-SAT como fuente<br />
<strong>de</strong> sonido.<br />
Encendido/Apagado: Encien<strong>de</strong> o apaga el receptor <strong>de</strong>l cable/satélite.*<br />
AUX: Encien<strong>de</strong> el sistema y selecciona la entrada AUX como fuente <strong>de</strong> sonido.<br />
Encendido/Apagado: Encien<strong>de</strong> o apaga el VCR o DVR enchufado al dispositivo<br />
AUX.*<br />
* Necesita ajustes especiales para el control remoto. Consulte “Configuración <strong>de</strong>l control remoto para<br />
otros dispositivos <strong>de</strong> audio/ví<strong>de</strong>o” en la página 35.
Control remoto – cont.<br />
Controles e indicadores <strong>de</strong>l sistema<br />
Muestra el menú Configuración para la fuente en uso en la pantalla <strong>de</strong>l TV o<br />
<strong>de</strong>l centro multimedia.<br />
Muestra el menú Sistema en la pantalla <strong>de</strong>l TV.<br />
• Muestra el menú DVD en la pantalla <strong>de</strong>l TV.<br />
• Muestra el menú principal <strong>de</strong> la caja <strong>de</strong>l cable/satélite o <strong>de</strong>l VCR o DVR<br />
en la pantalla <strong>de</strong>l TV (si los hubiera)*.<br />
Muestra la programación en la pantalla <strong>de</strong>l TV (si es compatible).<br />
Oculta el menú Configuración, el menú Sistema, o la programación (si la<br />
hubiera) <strong>de</strong> la pantalla <strong>de</strong>l TV o <strong>de</strong>l centro multimedia.<br />
• Sintoniza la radio AM/FM hacia arriba o hacia abajo en la siguiente<br />
frecuencia.<br />
• Selecciona el siguiente elemento, hacia arriba o hacia abajo, en los<br />
menús.<br />
Confirma la selección <strong>de</strong> menú o introduce el siguiente nivel en las<br />
opciones <strong>de</strong>l menú.<br />
Mueve hacia arriba, abajo, a la izquierda o a la <strong>de</strong>recha en los menús <strong>de</strong><br />
pantalla y en las pantallas <strong>de</strong>l centro multimedia.<br />
* Necesita ajustes especiales para el control remoto. Consulte “Configuración <strong>de</strong>l control remoto para otros<br />
dispositivos <strong>de</strong> audio/ví<strong>de</strong>o” en la página 35.<br />
27<br />
Español
Español<br />
28<br />
Controles e indicadores <strong>de</strong>l sistema<br />
Control remoto – cont.<br />
1 2<br />
0<br />
3<br />
4 5 6<br />
7 8 9<br />
• Sube o baja el volumen <strong>de</strong> la fuente actual.<br />
• Al pulsar + se restablece la opción sin sonido <strong>de</strong> la fuente actual.<br />
• Al pulsar – se baja el volumen <strong>de</strong> la fuente actual, pero no se restablece<br />
el sonido silenciado.<br />
Salta a la siguiente o anterior pista <strong>de</strong>l CD, capítulo <strong>de</strong>l DVD, presintonía <strong>de</strong><br />
la emisora <strong>de</strong> radio o canal <strong>de</strong>l TV (si el control remoto está configurado<br />
para sintonizar el TV).<br />
• Detiene el reproductor <strong>de</strong> discos.<br />
• Sólo para DVD, <strong>de</strong>tiene la reproducción <strong>de</strong>l disco y el sistema guarda la<br />
posición <strong>de</strong> reproducción <strong>de</strong>l DVD. Al pulsar el DVD continúa <strong>de</strong>s<strong>de</strong><br />
la posición <strong>de</strong> reproducción guardada. Al pulsar dos veces, el disco<br />
que se esté reproduciendo en ese momento vuelve al principio.<br />
• Detiene la reproducción <strong>de</strong>l disco en curso.<br />
• Al pulsar <strong>de</strong> nuevo (o al pulsar ) se reanuda la reproducción <strong>de</strong><br />
un disco en pausa.<br />
• Tras 20 minutos sin interacción por parte <strong>de</strong>l usuario, el reproductor <strong>de</strong><br />
discos se <strong>de</strong>tiene, vuelve al principio y permanece a la espera <strong>de</strong> la<br />
siguiente or<strong>de</strong>n.<br />
Inicia el reproductor <strong>de</strong> discos.<br />
• Salta hacia <strong>de</strong>lante o hacia atrás las pistas <strong>de</strong>l CD.<br />
• Salta hacia <strong>de</strong>lante o hacia atrás los capítulos <strong>de</strong>l DVD.<br />
• Busca hacia a<strong>de</strong>lante o hacia atrás la siguiente emisora <strong>de</strong> radio más<br />
potente.<br />
Reproduce las pistas <strong>de</strong>l CD en or<strong>de</strong>n aleatorio. Pulse <strong>de</strong> nuevo para<br />
cancelar este modo.<br />
Repite un CD, una pista <strong>de</strong> CD, un capítulo <strong>de</strong> DVD o un título <strong>de</strong> DVD.<br />
Pulse Repetición <strong>de</strong> nuevo para cambiar el modo <strong>de</strong> repetición.<br />
• Proporciona medios para seleccionar una pista <strong>de</strong> CD, un capítulo <strong>de</strong><br />
DVD, una presintonía <strong>de</strong> emisora <strong>de</strong> radio o un canal <strong>de</strong>l TV.<br />
• Permite cambiar los valores numéricos <strong>de</strong> algunas <strong>de</strong> las opciones <strong>de</strong>l<br />
menú.<br />
• Muestra u oculta la pantalla <strong>de</strong> información <strong>de</strong> cable o satélite (si es<br />
compatible).<br />
• Si se reproduce un CD en formato MP3, muestra u oculta la información<br />
sobre el título y el artista en la pantalla <strong>de</strong>l centro multimedia.<br />
Pasa al canal <strong>de</strong> TV anterior (si el TV admite esta función).
Centro multimedia<br />
Figura 21<br />
Controles <strong>de</strong>l centro<br />
multimedia<br />
®<br />
Figura 22<br />
Muestra <strong>de</strong> la pantalla<br />
<strong>de</strong>l centro multimedia<br />
Controles e indicadores <strong>de</strong>l sistema<br />
El centro multimedia dispone <strong>de</strong> un panel <strong>de</strong> control en la parte superior, un área <strong>de</strong> pantalla<br />
en la parte frontal que indica el estado actual <strong>de</strong>l sistema y una ban<strong>de</strong>ja <strong>de</strong> DVD/CD que se<br />
abre por la parte frontal <strong>de</strong> la consola.<br />
Panel <strong>de</strong> control<br />
El centro multimedia dispone <strong>de</strong> seis botones situados en la parte superior <strong>de</strong>l panel <strong>de</strong><br />
control. El control remoto también ofrece las funciones <strong>de</strong> estos botones.<br />
Activado-<br />
Desactivado Fuente – Volumen + Enter (Intro) Expulsar<br />
Encien<strong>de</strong> y<br />
apaga el<br />
sistema.<br />
Recorre las<br />
selecciones<br />
<strong>de</strong> fuentes<br />
disponibles.<br />
Nota: Si selecciona otra fuente pulsando el botón Fuente, no podrá utilizar el control remoto la<br />
nueva fuente hasta que no pulse el botón correspondiente a dicha fuente en el control remoto.<br />
Indicadores <strong>de</strong> pantalla<br />
Con el sistema encendido, se encien<strong>de</strong> la pantalla <strong>de</strong>l centro <strong>de</strong> música para mostrar el<br />
estado actual <strong>de</strong>l sistema. No todas las opciones posibles que se muestran abajo se<br />
encen<strong>de</strong>rán a la vez (Figura 22). La pantalla cambia con cada ajuste o selección que realice.<br />
DVD 00:06:11<br />
CAPÍTULO 1/12<br />
Luces que indican<br />
que se ha<br />
seleccionado el<br />
modo aleatorio para<br />
el disco en uso.<br />
Sube o baja el<br />
volumen.<br />
ALEAT REPETIR DISCO PISTA<br />
Luces que indican<br />
que se ha<br />
seleccionado el<br />
modo repetir para<br />
la pista o disco en<br />
uso.<br />
Luces que<br />
indican que se ha<br />
seleccionado el<br />
modo “Repetir<br />
Disco” o “Repetir<br />
Aleatorio Disco”.<br />
• Se utiliza para<br />
<strong>de</strong>splazarse por<br />
los menús.<br />
• Selecciona la<br />
siguiente<br />
presintonía<br />
FM/AM disponible.<br />
Abre o<br />
cierra la<br />
ban<strong>de</strong>ja <strong>de</strong><br />
discos.<br />
Luces que indican que<br />
el disco está<br />
reproduciéndose.<br />
Se encien<strong>de</strong><br />
brevemente cuando<br />
se recibe una or<strong>de</strong>n<br />
<strong>de</strong>l control remoto.<br />
Luces que indican<br />
que se ha<br />
seleccionado el<br />
modo “Repetir<br />
Pista”.<br />
29<br />
Español
Español<br />
30<br />
Funcionamiento<br />
Encendido y apagado <strong>de</strong>l sistema<br />
Reproducción <strong>de</strong> DVD<br />
Encendido o apagado:<br />
• Oriente el control remoto 3•2•1 al centro multimedia y pulse On/Off.<br />
O<br />
•Pulse On-Off en la parte superior <strong>de</strong>l centro multimedia.<br />
Para activar una fuente <strong>de</strong>l sistema:<br />
•Pulse CD-DVD, FM-AM, TV, CBL-SAT o AUX en el control remoto 3•2•1.<br />
Nota: El control remoto 3•2•1 pue<strong>de</strong> configurarse para otros dispositivos <strong>de</strong> audio como, por<br />
ejemplo, el TV, el VCR, o el receptor <strong>de</strong> cable/satelite. Para obtener instrucciones, consulte<br />
“Configuración <strong>de</strong>l control remoto para otros dispositivos <strong>de</strong> audio/ví<strong>de</strong>o” en la página 34.<br />
Antes <strong>de</strong> reproducir el primer DVD<br />
• Familiarícese con el control remoto 3•2•1. Consulte “Control remoto” en la página 25.<br />
• Asegúrese <strong>de</strong> que sabe cómo conectar las entradas <strong>de</strong> ví<strong>de</strong>o disponibles <strong>de</strong> su TV.<br />
Para ver un DVD, <strong>de</strong>be seleccionar la entrada <strong>de</strong> ví<strong>de</strong>o <strong>de</strong> su TV que esté conectada<br />
a la salida <strong>de</strong>l centro multimedia 3•2•1 (consulte “Conexión <strong>de</strong>l TV al centro<br />
multimedia” en la página 14).<br />
• Si no pue<strong>de</strong> seleccionar la entrada <strong>de</strong> ví<strong>de</strong>o correcta en su TV, consulte el manual <strong>de</strong><br />
usuario <strong>de</strong> su TV.<br />
• Asegúrese primero <strong>de</strong> que reproduce el DVD <strong>de</strong> configuración <strong>de</strong>l sistema 3•2•1.<br />
Esto le ayudará a comprobar las conexiones realizadas y le permitirá confirmar que la<br />
reproducción <strong>de</strong> sonido es óptima.<br />
1. Encienda su TV.<br />
2. En el control remoto, pulse CD/DVD para conectar el sistema 3•2•1 al reproductor <strong>de</strong><br />
CD/DVD.<br />
3. En la pantalla <strong>de</strong>l centro multimedia, pulse Eject (Expulsar) para abrir la ban<strong>de</strong>ja <strong>de</strong>l<br />
disco.<br />
4. Coloque el DVD en la ban<strong>de</strong>ja.<br />
5. Pulse Eject (Expulsar) para cerrar la ban<strong>de</strong>ja <strong>de</strong>l disco.<br />
Empieza automáticamente la reproducción <strong>de</strong>l DVD. En caso contrario, pulse Play<br />
(Reproducción) en el control remoto.<br />
Nota: No todos los DVD ofrecen las mismas características. Por ejemplo, podrá elegir <strong>de</strong>cidir si<br />
<strong>de</strong>sea ver subtítulos durante una película sólo si el disco en cuestión dispone <strong>de</strong> esa información.
Figura 23<br />
Muestra <strong>de</strong> la pantalla<br />
<strong>de</strong> un DVD<br />
O<br />
Eject (Expulsar)<br />
Funcionamiento<br />
Durante la reproducción <strong>de</strong> un DVD, el tiempo <strong>de</strong> reproducción y el número <strong>de</strong>l capítulo<br />
aparecen en la pantalla <strong>de</strong>l centro multimedia.<br />
DVD 0:06:11<br />
CHAPTER 1/12<br />
Operaciones básicas <strong>de</strong>l DVD<br />
•Pulse Pause (Pausa) para <strong>de</strong>tener la película.<br />
•Pulse Pause (Pausa) otra vez o pulse Play (Reproducción) para reanudar la<br />
reproducción <strong>de</strong> un CD en pausa.<br />
• Utilice el botón Stop ( ) para interrumpir la reproducción <strong>de</strong> la película.<br />
• Pulse una vez para interrumpir la reproducción <strong>de</strong> la película. El sistema <strong>de</strong>tiene la<br />
película en el punto <strong>de</strong> interrupción. Pulse Play (Reproducción) para reanudar la<br />
reproducción <strong>de</strong>s<strong>de</strong> el punto <strong>de</strong> interrupción.<br />
•O<br />
• Pulse dos veces. La reproducción se interrumpe y el sistema vuelve al principio <strong>de</strong>l<br />
disco. Pulse Play (Reproducción) para reproducir el ví<strong>de</strong>o <strong>de</strong>s<strong>de</strong> el principio.<br />
•Pulse Chapter (Capítulo siguiente) para pasar al siguiente capítulo <strong>de</strong>l DVD en uso.<br />
Pulse Chapter (Capítulo anterior) para pasar al capítulo anterior.<br />
•Pulse Repeat (Repetir) para repetir un capítulo que está en reproducción.<br />
• Pulse para explorar el DVD en uso hacia atrás. Pulse para explorarlo hacia<br />
a<strong>de</strong>lante.<br />
•Pulse Eject (Expulsar) en el centro multimedia para <strong>de</strong>tener la reproducción <strong>de</strong> un disco y<br />
abrir la ban<strong>de</strong>ja.<br />
Nota: Para obtener información sobre cómo cambiar la configuración <strong>de</strong> la fuente <strong>de</strong>l DVD,<br />
consulte “Menú <strong>de</strong> configuración <strong>de</strong> DVD” en la página 41.<br />
Acceso restringido a DVD<br />
El menú <strong>de</strong> bloqueo permite restringir el acceso a los DVD que puedan contener material<br />
ina<strong>de</strong>cuado para <strong>de</strong>terminados miembros <strong>de</strong> la familia. Pue<strong>de</strong> acce<strong>de</strong>r al menú Bloqueo DVD<br />
pulsando el botón System (Sistema) en el control remoto. Esta opción permite configurar<br />
una contraseña <strong>de</strong> acceso para películas clasificadas. Si <strong>de</strong>sea instrucciones sobre el uso<br />
<strong>de</strong>l menú <strong>de</strong> Bloqueo DVD, consulte “Opciones <strong>de</strong> Bloqueo DVD” en la página 49.<br />
31<br />
Español
Español<br />
32<br />
Funcionamiento<br />
Reproducción <strong>de</strong> CD <strong>de</strong> audio<br />
Eject (Expulsar)<br />
1. En el control remoto, pulse CD/DVD para conectar el sistema 3•2•1 a la fuente<br />
<strong>de</strong>l CD/DVD.<br />
2. En la pantalla <strong>de</strong>l centro multimedia, pulse Eject (Expulsar) para abrir la ban<strong>de</strong>ja <strong>de</strong>l<br />
disco.<br />
3. Coloque el DVD en la ban<strong>de</strong>ja.<br />
Eject (Expulsar)<br />
4. Pulse Explusar para cerrar la ban<strong>de</strong>ja <strong>de</strong>l disco.<br />
O<br />
5. La reproducción <strong>de</strong>l DVD empieza automáticamente. En caso contrario, pulse Play<br />
(Reproducción) en el control remoto.<br />
Operaciones básicas <strong>de</strong> CD<br />
•Pulse Pause (Pausa) para <strong>de</strong>tener la reproducción <strong>de</strong> un CD <strong>de</strong> audio.<br />
•Pulse Pause (Pausa) otra vez o Play (Reproducción) para reanudar la reproducción <strong>de</strong>l<br />
CD en pausa.<br />
• Pulse para <strong>de</strong>tener la reproducción <strong>de</strong> un CD <strong>de</strong> audio.<br />
•Pulse Track (Pista siguiente) para pasar a la siguiente pista <strong>de</strong>l CD en uso. Pulse<br />
Track (Pista anterior) para pasar a la pista anterior.<br />
• Mantenga pulsado para explorar las pistas <strong>de</strong>l CD hacia atrás. Mantenga pulsado<br />
para explorar las pistas hacia <strong>de</strong>lante.<br />
• Pulse una vez para pasar a la siguiente canción.<br />
•Pulse Repeat (Repetir) una vez para activar el modo REPETIR PISTA. Pulse Repeat<br />
(Repetir) otra vez para activar el modo REPETIR DISCO. Pulse Repeat (Repetir) otra vez<br />
para <strong>de</strong>sactivar las funciones <strong>de</strong> repetición (REPETIR DESACT).<br />
•Pulse Shuffle (Aleatorio) una vez para activar el modo COMB ALEAT DISCO. Pulse<br />
Shuffle (Aleatorio) otra vez para <strong>de</strong>sactivar el modo <strong>de</strong> reproducción aleatoria (COMB<br />
ALEAT DESACT).<br />
Nota: Para obtener información sobre cómo cambiar la configuración <strong>de</strong>l reproductor <strong>de</strong> CD,<br />
consulte “Menú Configuración <strong>de</strong> CD” en la página 40.<br />
Nota: Al reproducir un CD que contenga archivos MP3, el botón Info (Información) muestra<br />
u oculta el nombre <strong>de</strong>l artista y la información <strong>de</strong>l título <strong>de</strong> la canción en la pantalla <strong>de</strong>l centro<br />
multimedia.
Radio AM/FM<br />
1 2<br />
0<br />
3<br />
4 5 6<br />
7 8 9<br />
Funcionamiento<br />
En el control remoto 3•2•1, pulse FM-AM. Si el sistema está apagado, cuando conecte la<br />
radio, se sintonizará la última emisora que se haya seleccionado en esa banda.<br />
Sintonización <strong>de</strong> una emisora<br />
Pue<strong>de</strong> sintonizar una emisora <strong>de</strong> radio <strong>de</strong> las maneras siguientes:<br />
•Pulse FM-AM para cambiar entre las frecuencias FM y AM.<br />
•Pulse Tune (Sintonizar siguiente) para sintonizar siguiente emisora <strong>de</strong> la banda. Pulse<br />
Tune (Sintonizar anterior) para sintonizar la emisora anterior <strong>de</strong> la banda.<br />
•Pulse Seek (Buscar anterior) para sintonizar la emisora anterior. Pulse Seek<br />
(Buscar siguiente) para sintonizar la siguiente emisora disponible. Mantenga pulsado este<br />
botón para una rápida sintonización. Suéltelo para que se <strong>de</strong>tenga en la siguiente emisora<br />
disponible. Para <strong>de</strong>tenerse antes, pulse brevemente el botón Seek (Buscar anterior)<br />
o Seek (Buscar siguiente). Para empezar la búsqueda <strong>de</strong> nuevo sin mantener pulsado<br />
el botón Seek (Buscar), pulse brevemente Seek (Buscar anterior) o Seek (Buscar<br />
siguiente) <strong>de</strong> nuevo en cuanto se <strong>de</strong>tenga la primera operación <strong>de</strong> búsqueda.<br />
•Pulse Preset (Presintonía siguiente) para sintonizar la siguiente emisora almacenada.<br />
Pulse Preset (Presintonía anterior) para sintonizar la emisora anterior almacenada.<br />
O<br />
• Pulse en el teclado el número <strong>de</strong> una emisora almacenada.<br />
Nota: Para obtener información sobre cómo cambiar la configuración <strong>de</strong> la fuente FM/AM,<br />
consulte “Menú <strong>de</strong> configuración FM-AM” en la página 40.<br />
Almacenamiento <strong>de</strong> emisoras y sintonías<br />
Utilizando el control remoto 3•2•1 pue<strong>de</strong> almacenar la 20 emisoras presintonizadas <strong>de</strong> AM y<br />
FM. Esto le permite sintonizar con rapi<strong>de</strong>z sus emisoras preferidas.<br />
1. Sintonice la emisora que le interesa.<br />
2. Almacene la emisora con un número <strong>de</strong> presintonía asignado.<br />
• Para los números <strong>de</strong>l 1 al 9, basta mantener pulsado un solo número. Para los números<br />
<strong>de</strong>l 10 al 20, pulse el primer número. Inmediatamente <strong>de</strong>spués, mantenga pulsado el<br />
segundo número.<br />
•O, pulse Enter (Intro) en el centro multimedia para almacenar la emisora seleccionada<br />
en el siguiente número <strong>de</strong> presintonía disponible.<br />
El nuevo número preseleccionado aparece brevemente en la pantalla <strong>de</strong>l centro multimedia.<br />
Nota: La asignación <strong>de</strong> un número preseleccionado a una emisora cambiará cualquier<br />
asignación previa <strong>de</strong> ese número.<br />
33<br />
Español
Español<br />
34<br />
Funcionamiento<br />
Reproducción <strong>de</strong> otras fuentes<br />
Eliminación <strong>de</strong> una presintonía<br />
1. Sintonice la emisora presintonizada.<br />
2. Mantenga pulsado el botón 0 en el control remoto hasta que la pantalla <strong>de</strong>l centro<br />
multimedia indique que la presintonía se ha borrado.<br />
Encienda cualquier componente conectado al centro multimedia utilizando el control remoto<br />
<strong>de</strong> ese componente o los controles <strong>de</strong>l panel frontal <strong>de</strong>l componente. Utilice el control<br />
remoto <strong>de</strong>l sistema 3•2•1 Series II o 3•2•1 GS Series II o 3•2•1 para comenzar:<br />
• Si pulsa el botón TV, CBL-SAT, o AUX en el control remoto <strong>de</strong>l sistema 3•2•1 o 3•2•1 GS,<br />
se conectará el sistema y se seleccionará el reproductor <strong>de</strong> sonido <strong>de</strong> dicho componente.<br />
Asegúrese <strong>de</strong> haber insertado una cinta o disco, según sea necesario.<br />
• Utilice las flechas para subir o bajar el Volumen <strong>de</strong>l control remoto o <strong>de</strong>l centro multimedia<br />
para subir o bajar el volumen <strong>de</strong>l sistema.<br />
Utilización <strong>de</strong>l temporizador <strong>de</strong> suspensión<br />
El sistema dispone <strong>de</strong> un temporizador <strong>de</strong> suspensión, que pue<strong>de</strong> establecerse para que<br />
apague el sistema automáticamente <strong>de</strong>spués <strong>de</strong> un período <strong>de</strong> 1 a 90 minutos <strong>de</strong><br />
reproducción <strong>de</strong> una fuente. Pue<strong>de</strong> acce<strong>de</strong>r a este temporizador <strong>de</strong>s<strong>de</strong> el menú <strong>de</strong><br />
configuración <strong>de</strong> cualquier fuente. Consulte “Cambio <strong>de</strong> la configuración <strong>de</strong> la fuente” en la<br />
página 38.<br />
Nota: El temporizador <strong>de</strong> suspensión no apagará el TV o cualquier otro dispositivo <strong>de</strong> audio.
Control <strong>de</strong> otros dispositivos <strong>de</strong> audio<br />
Configuración <strong>de</strong>l control remoto para otros dispositivos <strong>de</strong> audio/ví<strong>de</strong>o<br />
El control remoto pue<strong>de</strong> configurarse para controlar otros dispositivos <strong>de</strong> audio como el TV,<br />
el VCR, el DVR o la caja <strong>de</strong> cable/satélite mediante la introducción <strong>de</strong> un código <strong>de</strong><br />
dispositivo en el modo <strong>de</strong> configuración.<br />
• Si conoce el código <strong>de</strong> dispositivo, siga las instrucciones que se indican <strong>de</strong>bajo<br />
<strong>de</strong>l título “Introducción directa <strong>de</strong> un código <strong>de</strong> dispositivo”. La lista <strong>de</strong> los códigos<br />
<strong>de</strong> dispositivos se encuentra en la última sección <strong>de</strong> esta guía <strong>de</strong>l usuario y en los menús<br />
Sistema, en las opciones Control remoto.<br />
• Si no encuentra el código <strong>de</strong> dispositivo y <strong>de</strong>sea que el sistema lo busque,<br />
consulte “Búsqueda <strong>de</strong> códigos <strong>de</strong> dispositivo” en la página 36.<br />
• Si quiere comprobar el código <strong>de</strong> dispositivo que ha introducido para un<br />
dispositivo <strong>de</strong> audio, consulte “Comprobación e introducción <strong>de</strong>l código <strong>de</strong><br />
dispositivo” en la página 38.<br />
Nota: Más <strong>de</strong> un código pue<strong>de</strong> ser válido para un producto en particular. Si, tras configurar el<br />
control remoto, éste no funciona correctamente, inténtelo con un código diferente.<br />
Nota: Si pulsa una tecla no válida o introduce un código <strong>de</strong> dispositivo no disponible, el<br />
indicador LED <strong>de</strong>l control remoto parpa<strong>de</strong>ará ocho veces. Espere siete segundos a que se<br />
solucione el error e inténtelo <strong>de</strong> nuevo.<br />
Introducción directa <strong>de</strong> un código <strong>de</strong> dispositivo<br />
Los códigos <strong>de</strong> dispositivo se pue<strong>de</strong>n encontrar en la última sección <strong>de</strong> la guía <strong>de</strong> usuario o<br />
en el menú Sistema en las opciones Control remoto. Si conoce el código <strong>de</strong> dispositivo, haga<br />
lo siguiente.<br />
Configuración <strong>de</strong>l control remoto para el TV<br />
1. Encienda el sistema 3•2•1 y el TV.<br />
2. Mantenga pulsado el botón TV hasta que se encienda el indicador LED <strong>de</strong>l control<br />
remoto (alre<strong>de</strong>dor <strong>de</strong> 5 segundos).<br />
3. Introduzca en el teclado <strong>de</strong>l control remoto el código <strong>de</strong> cuatro dígitos para el TV.<br />
El indicador LED se apagará temporalmente cada vez que pulse un botón.<br />
4. Compruebe que el indicador LED se apaga <strong>de</strong>spués <strong>de</strong> introducir el código. Si el<br />
indicador LED parpa<strong>de</strong>a, el código no es válido. Inténtelo otra vez.<br />
5. Dirija el control remoto a su TV y pulse el botón TV On-Off (Encendido/Apagado <strong>de</strong>l TV).<br />
Si el TV no respon<strong>de</strong>, vuelva al paso 2 e inténtelo con otros códigos. Si sigue sin dar<br />
resultado, consulte “Búsqueda <strong>de</strong> códigos <strong>de</strong> dispositivo” en la página 36.<br />
Configuración <strong>de</strong>l control remoto <strong>de</strong>l receptor <strong>de</strong> cable/satelite<br />
1. Encienda el sistema 3•2•1 y el receptor <strong>de</strong> cable/satélite.<br />
2. Mantenga pulsado el botón CBL-SAT hasta que se encienda el indicador LED <strong>de</strong>l control<br />
remoto (alre<strong>de</strong>dor <strong>de</strong> 5 segundos).<br />
3. Introduzca el código <strong>de</strong> cuatro dígitos para el receptor <strong>de</strong> cable/satélite en el control<br />
remoto. El indicador LED se apagará temporalmente cada vez que pulse un botón.<br />
4. Compruebe que el indicador LED se apaga <strong>de</strong>spués <strong>de</strong> introducir el código. Si el<br />
indicador LED parpa<strong>de</strong>a, el código no es válido. Inténtelo otra vez.<br />
35<br />
Español
Español<br />
36<br />
Controlador <strong>de</strong> otros dispositivos <strong>de</strong> audio<br />
AUX<br />
AUX<br />
5. Dirija el control remoto a su receptor <strong>de</strong> cable/satélite y pulse el botón CBL-SAT On-Off<br />
(Encendido/Apagado <strong>de</strong> CBL-SAT). Si el receptor <strong>de</strong> cable/satélite no respon<strong>de</strong>, vuelva<br />
al paso 2 e inténtelo introduciendo otros códigos. Si sigue sin dar resultado, consulte<br />
“Búsqueda <strong>de</strong> códigos <strong>de</strong> dispositivo” en la página 36.<br />
Configuración <strong>de</strong>l control remoto <strong>de</strong>l VCR o DVR (como Tivo o Replay TV)<br />
1. Encienda el sistema 3•2•1 y el VCR o DVR.<br />
2. Mantenga pulsado el botón AUX hasta que se encienda el indicador LED <strong>de</strong>l control<br />
remoto (alre<strong>de</strong>dor <strong>de</strong> 5 segundos).<br />
3. Introduzca el código <strong>de</strong> dispositivo <strong>de</strong> cuatro dígitos para el VCR/DVR en el teclado <strong>de</strong>l<br />
control remoto. El indicador LED se apagará temporalmente cada vez que pulse un<br />
botón.<br />
4. Compruebe que el indicador LED se apaga <strong>de</strong>spués <strong>de</strong> introducir el código. Si el<br />
indicador LED parpa<strong>de</strong>a, el código no es válido. Inténtelo otra vez.<br />
5. Dirija el control remoto hacia el VCR o DVR y pulse el botón AUX On-Off (Encedido-<br />
Apagado <strong>de</strong> AUX). Si el VCR o DVR no respon<strong>de</strong>, vuelva al paso 2 e inténtelo con otros<br />
códigos. Si sigue sin dar resultado, consulte “Búsqueda <strong>de</strong> códigos <strong>de</strong> dispositivo” en la<br />
página 36.<br />
Búsqueda <strong>de</strong> códigos <strong>de</strong> dispositivo<br />
Utilice este método si no conoce el código <strong>de</strong> alguno <strong>de</strong> los dispositivos.<br />
Nota: Este proceso le llevará tiempo. Utilícelo como último recurso.<br />
Configuración <strong>de</strong>l control remoto para el TV<br />
1. Encienda el sistema 3•2•1 y el TV.<br />
2. Mantenga pulsado el botón TV hasta que se encienda el indicador LED <strong>de</strong>l control<br />
remoto (alre<strong>de</strong>dor <strong>de</strong> 5 segundos).<br />
3. Pulse alternativamente los botones Channel (Canal) y TV On-Off (Encendido/<br />
Apagado <strong>de</strong> TV) hasta que se apague el TV.<br />
4. Pulse Enter (Intro). Compruebe que se apaga el indicador LED <strong>de</strong>l control remoto.<br />
5. Dirija el control remoto hacia su TV y pulse TV On-Off (Encendido-Apagado <strong>de</strong> TV). Si el<br />
TV no respon<strong>de</strong>, vuelva al paso 2 e inténtelo otra vez.
AUX<br />
AUX<br />
AUX<br />
Controlador <strong>de</strong> otros dispositivos <strong>de</strong> audio<br />
Configuración <strong>de</strong>l control remoto <strong>de</strong>l receptor <strong>de</strong> cable/satélite<br />
1. Encienda el sistema 3•2•1 y el receptor <strong>de</strong> cable/satélite.<br />
2. Mantenga pulsado el botón CBL-SAT hasta que se apague el indicador LED <strong>de</strong>l control<br />
remoto (alre<strong>de</strong>dor <strong>de</strong> 5 segundos).<br />
3. Pulse <strong>de</strong> forma alternativa los botones Channel (Canal) y CBL-SAT On-Off<br />
(Encendido-Apagado <strong>de</strong> CBL-SAT) hasta que el receptor <strong>de</strong> cable/satélite se apague.<br />
4. Pulse Enter (Intro). Compruebe que se apaga el indicador LED <strong>de</strong>l control remoto.<br />
5. Dirija el control remoto hacia su receptor <strong>de</strong> cable/satélite y pulse CBL-SAT On-Off<br />
(Encendido-Apagado <strong>de</strong> CBL-SAT). Si el receptor <strong>de</strong> cable/satélite no respon<strong>de</strong>, vuelva<br />
al paso 2 e inténtelo otra vez.<br />
Configuración <strong>de</strong>l control remoto <strong>de</strong>l VCR o DVR (por ejemplo, TiVo o Replay TV)<br />
1. Encienda el sistema 3•2•1 y el VCR/DVR.<br />
2. Mantenga pulsado el botón AUX hasta que se apague el indicador LED <strong>de</strong>l control<br />
remoto (alre<strong>de</strong>dor <strong>de</strong> 5 segundos).<br />
3. Pulse alternativamente los botones Channel (Canal) y AUX On-Off (Encendido-<br />
Apagado <strong>de</strong> AUX) hasta que el VCR/DVR se apague.<br />
4. Pulse Enter (Intro). Compruebe que se apaga el indicador LED <strong>de</strong>l control remoto.<br />
5. Dirija el control remoto hacia el VCR/DVR y pulse AUX On-Off (Encendido-Apagado <strong>de</strong><br />
AUX). Si el VCR/DVR no respon<strong>de</strong>, vuelva al paso 2 e inténtelo otra vez.<br />
37<br />
Español
Español<br />
38<br />
Controlador <strong>de</strong> otros dispositivos <strong>de</strong> audio<br />
Comprobación e introducción <strong>de</strong>l código <strong>de</strong> dispositivo<br />
En caso <strong>de</strong> que necesite comprobar qué código está utilizando el control remoto para un<br />
dispositivo <strong>de</strong> audio en particular, haga lo siguiente.<br />
1. Mantenga pulsado el botón (TV, CBL-SAT, o AUX) hasta que se apague el indicador LED<br />
<strong>de</strong>l control remoto (alre<strong>de</strong>dor <strong>de</strong> 5 segundos)<br />
2. Pulse el botón Info.<br />
3. Pulse 1 en el control remoto y cuente los parpa<strong>de</strong>os <strong>de</strong>l dispositivo LED (un largo<br />
parpa<strong>de</strong>o indica cero). Este es el primer dígito.<br />
4. Pulse 2 en el control remoto y cuente los parpa<strong>de</strong>os <strong>de</strong>l indicador LED (un largo<br />
parpa<strong>de</strong>o indica cero). Este es el segundo dígito.<br />
5. Pulse 3 en el control remoto y cuente los parpa<strong>de</strong>os <strong>de</strong>l indicador LED (un largo<br />
parpa<strong>de</strong>o indica cero). Este es el tercer dígito.<br />
6. Pulse 4 en el control remoto y cuente los parpa<strong>de</strong>os <strong>de</strong>l indicador LED (un largo<br />
parpa<strong>de</strong>o indica cero). Este es el cuarto dígito.<br />
7. Pulse Exit (Salir).<br />
Cambio <strong>de</strong>l control <strong>de</strong> selección <strong>de</strong> canal<br />
Si está usando el sistema <strong>de</strong> entretenimiento para el hogar 3•2•1 con otros dispositivos <strong>de</strong><br />
audio, como el aparato <strong>de</strong> ví<strong>de</strong>o o el receptor <strong>de</strong> cable/satélite, pue<strong>de</strong> que <strong>de</strong>see cambiar los<br />
canales mediante uno <strong>de</strong> éstos dispositivos <strong>de</strong> audio y no mediante su TV.<br />
Pue<strong>de</strong> configurar <strong>de</strong> un modo sencillo el control remoto 3•2•1 para cambiar los canales en<br />
otro dispositivo <strong>de</strong> audio:<br />
1. Mantenga pulsado el botón Last (Último) en el control remoto 3•2•1. El indicador LED<br />
<strong>de</strong>l control remoto se encen<strong>de</strong>rá y parpa<strong>de</strong>ará el número <strong>de</strong> veces que corresponda al<br />
dispositivo que controla la selección <strong>de</strong> canal.<br />
1 parpa<strong>de</strong>o = Televisor<br />
2 parpa<strong>de</strong>os = CBL-SAT:<br />
3 parpa<strong>de</strong>os = AUX<br />
2. Cuando terminan los parpa<strong>de</strong>os, pulse el botón (TV, CBL-SAT, o AUX) correspondientes<br />
al dispositivo que se quiera utilizar para la selección <strong>de</strong> canal.<br />
3. Pulse Exit (Salir) en el control remoto 3•2•1.<br />
Para confirmar el cambio, mantenga pulsado Last (Último) en el control remoto 3•2•1 y<br />
cuente el número <strong>de</strong> parpa<strong>de</strong>os. Si se ha realizado el cambio, pulse Exit (Salir). Si no, repita<br />
los pasos 2 y 3.
Utilización <strong>de</strong> los menús <strong>de</strong> configuración<br />
Figura 24<br />
Ejemplo <strong>de</strong> menú <strong>de</strong><br />
configuración en la pantalla<br />
<strong>de</strong>l tv<br />
Figura 25<br />
Muestra <strong>de</strong>l menú <strong>de</strong><br />
configuración en la pantalla<br />
<strong>de</strong>l centro multimedia<br />
Cambio <strong>de</strong> la configuración <strong>de</strong> la fuente<br />
Mientras esté viendo un ví<strong>de</strong>o o escuchando música en el sistema, se pue<strong>de</strong>n realizar ajustes<br />
rápidos para mejorar la experiencia. Con ese fin, cada fuente <strong>de</strong>l sistema tiene su propio<br />
menú <strong>de</strong> configuración, con las funciones correspondientes.<br />
Para visualizar los menús <strong>de</strong> configuración<br />
Pue<strong>de</strong> visualizar el menú <strong>de</strong> configuración para cada fuente en la pantalla <strong>de</strong> su TV<br />
(Figura 24) o <strong>de</strong>l centro multimedia (Figura 25).<br />
1. Encienda el TV y seleccione la entrada correcta <strong>de</strong>l TV para visualizar el sistema 3•2•1.<br />
2. Pulse el botón fuente <strong>de</strong>l control remoto 3•2•1.<br />
3. Pulse Settings para visualizar el menú <strong>de</strong> Configuración para la fuente seleccionada.<br />
Si la lista <strong>de</strong> elementos <strong>de</strong>l menú es <strong>de</strong>masiado larga para la pantalla, una flecha hacia<br />
arriba o hacia abajo indica que necesita avanzar o retroce<strong>de</strong>r el texto en pantalla para<br />
visualizar otros elementos.<br />
4. Pulse Exit para salir <strong>de</strong>l menú Configuración.<br />
Nombre fuente<br />
Elementos<br />
<strong>de</strong> menú<br />
Sintonizador<br />
Nombre <strong>de</strong> elemento <strong>de</strong> menú<br />
Modo <strong>de</strong> salida: Auto<br />
Casilla <strong>de</strong> selección<br />
Configuración<br />
Ayuda <strong>de</strong> navegación: qué botones usar<br />
Nota: Cualquier cambio que se lleve a cabo en el menú <strong>de</strong> configuración <strong>de</strong> la pantalla <strong>de</strong>l TV<br />
también aparecerá en la pantalla <strong>de</strong>l centro multimedia.<br />
Los elementos <strong>de</strong> menú avanzarán o retroce<strong>de</strong>rán en la pantalla <strong>de</strong>l centro multimedia al<br />
pulsar las flechas hacia arriba ( ) o hacia abajo ( ) <strong>de</strong>l control remoto.<br />
>Modo <strong>de</strong> salida: Auto<br />
Temporiz susp: Desactivar<br />
SETTINGS<br />
39<br />
Español
Español<br />
40<br />
Cambio <strong>de</strong> configuración <strong>de</strong> la fuente<br />
Figura 26<br />
Cambio <strong>de</strong> la configuración<br />
<strong>de</strong>l modo <strong>de</strong> salida FM<br />
Sintonizador<br />
Modo <strong>de</strong> salida: Auto<br />
Se pulsó la flecha<br />
hacia abajo para<br />
seleccionar el<br />
elemento <strong>de</strong> menú<br />
en modo <strong>de</strong> salida.<br />
Realizar cambios en los menús <strong>de</strong> configuración<br />
Se aplican las mismas instrucciones para cambiar la configuración <strong>de</strong>s<strong>de</strong> la pantalla <strong>de</strong>l TV<br />
o <strong>de</strong>s<strong>de</strong> la <strong>de</strong>l centro multimedia.<br />
También pue<strong>de</strong> realizar las acciones anteriores para volver a la configuración inicial. Hágalo<br />
cuando no esté satisfecho con el resultado <strong>de</strong> algún cambio que haya realizado o si realiza<br />
uno acci<strong>de</strong>ntalmente. Las configuraciones pre<strong>de</strong>terminadas para cada fuente se muestran<br />
en las tablas <strong>de</strong> menú en las páginas siguientes.<br />
1. Encienda el TV y seleccione la entrada correcta para visualizar el sistema 3•2•1.<br />
2. Pulse un botón fuente <strong>de</strong>l control remoto 3•2•1.<br />
3. Pulse Settings para visualizar el menú Configuración para la fuente seleccionada.<br />
4. Utilizando las flechas hacia abajo ( ) y hacia arriba ( ), seleccione el elemento <strong>de</strong> menú<br />
que <strong>de</strong>sea cambiar.<br />
5. Pulse el botón <strong>de</strong> flecha hacia la <strong>de</strong>recha ( ) para seleccionar la configuración <strong>de</strong>l<br />
elemento <strong>de</strong> menú.<br />
6. Pulse la flecha hacia arriba ( ) o hacia abajo ( ) para cambiar la configuración.<br />
7. Pulse Enter (Intro) o la flecha hacia la izquierda ( ) para guardar la configuración.<br />
8. Pulse Exit para salir <strong>de</strong>l menú Configuración.<br />
La evolución <strong>de</strong> la Figura 26 muestra el cambio <strong>de</strong> Auto a Estéreo <strong>de</strong>l modo <strong>de</strong> salida para el<br />
sintonizador FM.<br />
Sintonizador<br />
Modo <strong>de</strong> salida: Auto<br />
Se pulsó la flecha<br />
hacia la <strong>de</strong>recha<br />
para seleccionar<br />
la configuración.<br />
Sintonizador<br />
Modo <strong>de</strong> salida: Estéreo<br />
Se pulsó la flecha<br />
hacia arriba o hacia<br />
abajo para cambiar la<br />
configuración <strong>de</strong><br />
Auto a Estéreo.<br />
Nota: Pue<strong>de</strong> restaurar todos los valores pre<strong>de</strong>terminados si selecciona la opción Restaurar<br />
configuración <strong>de</strong>l menú Sistemas, en el Centro multimedia. Esto hace que todas las<br />
configuraciones vuelvan a la configuración pre<strong>de</strong>terminada. También cambia el Audio<br />
Processing a modo Automático (opciones <strong>de</strong> Audio <strong>de</strong>l menú Sistemas).
Menú <strong>de</strong> configuración FM-AM<br />
Cambio <strong>de</strong> configuración <strong>de</strong> la fuente<br />
Para visualizar el menú Configuración FM-AM, pulse FM-AM en el control remoto. Pulse el<br />
botón Settings. Pulse Exit para quitar el menú <strong>de</strong> la pantalla.<br />
Elemento<br />
Nombre:<br />
Menú Configuración <strong>de</strong> CD<br />
Modo <strong>de</strong> salida<br />
(solo FM)<br />
Info RDS<br />
(solo FM, y<br />
únicamente<br />
en algunos<br />
sistemas)<br />
Temporizador <strong>de</strong><br />
<strong>de</strong>sconexión<br />
Configuración<br />
Auto, Estéreo,<br />
Mono<br />
Pre<strong>de</strong>terminado<br />
Descripción<br />
Auto Le permite escuchar emisiones<br />
estéreo con salida estéreo o mono.<br />
Para visualizar el menú Configuración <strong>de</strong> CD, pulse CD-DVD en el control remoto mientras<br />
se reproduce un CD. Pulse el botón Settings. Pulse Exit para quitar el menú <strong>de</strong> la pantalla.<br />
Elemento<br />
Nombre:<br />
Activar,<br />
<strong>de</strong>sactivar<br />
Desactivar,<br />
<strong>de</strong> 10 a<br />
90 minutos<br />
Configuración<br />
Desactivar<br />
Desactivar<br />
Muestra la emisora y la información<br />
<strong>de</strong> programa (disponible <strong>de</strong>s<strong>de</strong> el<br />
Sistema <strong>de</strong> datos <strong>de</strong> radio.)<br />
Desactiva el sistema una vez agotado<br />
el tiempo establecido. Escoja<br />
“Desactivar” para <strong>de</strong>sactivar el<br />
temporizador.<br />
Pre<strong>de</strong>terminado<br />
Descripción<br />
Pista __ <strong>de</strong> __ Permite seleccionar una pista <strong>de</strong>l<br />
disco actual.<br />
Temporizador <strong>de</strong><br />
<strong>de</strong>sconexión<br />
Desactivar,<br />
<strong>de</strong> 10 a<br />
90 minutos<br />
Desactivar<br />
Desactiva el sistema una vez agotado<br />
el tiempo establecido. Escoja<br />
“Desactivar” para <strong>de</strong>sactivar el<br />
temporizador.<br />
41<br />
Español
Español<br />
42<br />
Cambio <strong>de</strong> configuración <strong>de</strong> la fuente<br />
Menú <strong>de</strong> configuración <strong>de</strong> DVD<br />
Elemento Nombre:<br />
Para visualizar el menú <strong>de</strong> configuración <strong>de</strong> DVD, pulse CD-DVD en el control remoto<br />
mientras se reproduce un disco DVD. A continuación pulse Settings. Pulse Exit para quitar<br />
el menú <strong>de</strong> la pantalla.<br />
Configuración<br />
EQ película Activar,<br />
<strong>de</strong>sactivar<br />
Compresión<br />
<strong>de</strong> rango<br />
Descodificación<br />
mono<br />
Activar,<br />
<strong>de</strong>sactivar<br />
Activar,<br />
<strong>de</strong>sactivar<br />
Pre<strong>de</strong>terminado<br />
Descripción<br />
Activar Optimiza el balance acústico <strong>de</strong> las películas.<br />
Activar Ajusta el volumen para mantener la inteligibilidad <strong>de</strong> los<br />
diálogos. Protege algunos sonidos <strong>de</strong> otros ruidos más<br />
potentes.<br />
Activar Activa el circuito <strong>de</strong> <strong>de</strong>scodificación mono Vi<strong>de</strong>ostage ® 5<br />
para procesar los programas con sonido mono (un solo<br />
canal <strong>de</strong> audio) en el sistema.<br />
Tiempo _:_ _ 0:00 Muestra el tiempo transcurrido en el DVD en uso.<br />
También permite <strong>de</strong>splazarse hasta otra ubicación en la<br />
película introduciendo otra hora.<br />
Título _ <strong>de</strong> __ Selecciona el título <strong>de</strong>l disco <strong>de</strong> DVD en uso, <strong>de</strong> acuerdo<br />
con el número introducido. Algunos DVD no permiten el<br />
acceso directo a los títulos.<br />
Capítulo _____ Selecciona un capítulo <strong>de</strong> la película <strong>de</strong>l DVD en uso,<br />
<strong>de</strong> acuerdo con el número introducido. Algunos DVD no<br />
permiten el acceso directo a los capítulos.<br />
Pista <strong>de</strong> audio Depen<strong>de</strong> <strong>de</strong>l<br />
disco<br />
Idioma <strong>de</strong> subtítulo Depen<strong>de</strong> <strong>de</strong>l<br />
disco<br />
Permite elegir las pistas <strong>de</strong> audio disponibles en el disco<br />
en uso.<br />
Permite seleccionar los idiomas <strong>de</strong> subtítulo disponibles<br />
(solo si están incluidos en el disco).<br />
Ángulo <strong>de</strong> cámara 1 <strong>de</strong> ____ Permite seleccionar los ángulos <strong>de</strong> cámara disponibles<br />
(solo si están incluidos en el disco).<br />
Repetición <strong>de</strong> A a B A, B Repite un segmento <strong>de</strong>l DVD, una vez <strong>de</strong>finidos los<br />
puntos <strong>de</strong> inicio y fin. Para empezar:<br />
1. Muévase hacia a<strong>de</strong>lante o hacia atrás, hasta el<br />
punto <strong>de</strong>l DVD en que <strong>de</strong>sea que comience el<br />
segmento.<br />
2. Pulse Enter (Intro).<br />
3. Muévase hasta el punto don<strong>de</strong> quiera que termine.<br />
4. Pulse Enter (Intro).<br />
El fragmento se repite hasta que se pulsa el botón Exit o<br />
Settings.<br />
Temporizador <strong>de</strong><br />
<strong>de</strong>sconexión<br />
Desactivar,<br />
<strong>de</strong> 10 a 90<br />
minutos<br />
Desactivar Desactiva el sistema una vez agotado el tiempo<br />
establecido. Escoja “Desactivar” para <strong>de</strong>sactivar el<br />
temporizador.<br />
*Disponible solo cuando el procesador <strong>de</strong> Audio está configurado para Usuario regulable.<br />
Consulte “Opciones <strong>de</strong> audio” en la página 45 para más información.
Menú configuración <strong>de</strong> TV, CBL-SAT y AUX<br />
Cambio <strong>de</strong> configuración <strong>de</strong> la fuente<br />
La configuración siguiente afecta a los programas <strong>de</strong>l tv aunque la fuente <strong>de</strong>l programa sea<br />
un VCR, CBL/SAT o AUX. No hay menús <strong>de</strong> configuración diferentes para estas fuentes.<br />
EQ película, compresión <strong>de</strong> rango y <strong>de</strong>scodificador mono solo aparecen en el menú si se<br />
establece Procesador <strong>de</strong> audio como Usuario regulable. El Procesador <strong>de</strong> audio se<br />
encuentra en las opciones <strong>de</strong> Audio en el menú Sistema.<br />
Elemento<br />
Nombre:<br />
Configuración<br />
EQ película Activar,<br />
<strong>de</strong>sactivar<br />
Compresión<br />
<strong>de</strong> rango<br />
Descodificación<br />
mono<br />
Dolby Digital<br />
1+1<br />
Temporizador <strong>de</strong><br />
<strong>de</strong>sconexión<br />
Activar,<br />
<strong>de</strong>sactivar<br />
Activar,<br />
<strong>de</strong>sactivar<br />
Pre<strong>de</strong>terminado<br />
Descripción<br />
Activar Optimiza el balance acústico <strong>de</strong> las<br />
películas.<br />
Activar Ajusta el volumen para mantener la<br />
inteligibilidad <strong>de</strong> los diálogos. Protege<br />
algunos sonidos <strong>de</strong> otros ruidos más<br />
potentes.<br />
Activar Activa el circuito <strong>de</strong> <strong>de</strong>scodificación<br />
mono Vi<strong>de</strong>ostage ® 5 para procesar los<br />
programas con sonido mono (un solo<br />
canal <strong>de</strong> audio) en el sistema.<br />
1, 2, Ambos 1 Reproduce el contenido <strong>de</strong> audio <strong>de</strong><br />
pistas <strong>de</strong> sonido seleccionadas.<br />
El contenido <strong>de</strong> la segunda pista<br />
pue<strong>de</strong> ser, por ejemplo, un segundo<br />
idioma.<br />
Desactivar,<br />
<strong>de</strong> 10 a<br />
90 minutos<br />
Desactivar<br />
Desactiva el sistema una vez agotado<br />
el tiempo establecido. Escoja<br />
“Desactivar” para <strong>de</strong>sactivar el<br />
temporizador.<br />
*Disponible solo cuando el procesador <strong>de</strong> Audio se ha establecido como Usuario regulable.<br />
Consulte “Opciones <strong>de</strong> audio” en la página 45 para obtener más información.<br />
** Disponible solo cuanto se <strong>de</strong>tecta la señal Dolby Digital 1+1.<br />
43<br />
Español
Español<br />
44<br />
Cambio <strong>de</strong> las opciones <strong>de</strong>l sistema<br />
Utilización <strong>de</strong> los menús <strong>de</strong> sistema<br />
Figura 27<br />
Ejemplo <strong>de</strong>l menú <strong>de</strong>l<br />
sistema que muestra las<br />
opciones <strong>de</strong> audio<br />
Los cambios <strong>de</strong> las opciones <strong>de</strong>l sistema suelen realizarse una única vez. Si su sistema<br />
funciona como usted <strong>de</strong>sea, es posible que no tenga que volver a hacer ningún cambio. Sin<br />
embargo, en algunos casos, se requieren ciertos cambios para que el sistema sea totalmente<br />
compatible con las opciones <strong>de</strong> instalación seleccionadas.<br />
Visualización <strong>de</strong>l menú Sistema<br />
Al contrario que los menús <strong>de</strong> configuración <strong>de</strong> la fuente, el menú Sistema sólo aparece en la<br />
pantalla <strong>de</strong>l TV.<br />
1. Encienda el TV y seleccione la entrada correcta <strong>de</strong>l TV para visualizar el sistema 3•2•1.<br />
2. Pulse el botón System (Sistema) <strong>de</strong>l control remoto 3•2•1. El menú Sistema aparecerá<br />
con las opciones <strong>de</strong> audio seleccionadas y muestra una lista <strong>de</strong> opciones <strong>de</strong> audio que<br />
se pue<strong>de</strong>n cambiar.<br />
3. Pulse System (Sistema) o Exit (Salir) para salir <strong>de</strong>l menú Sistema.<br />
Nota: Al acce<strong>de</strong>r al menú Sistema, el DVD o ví<strong>de</strong>o que se está reproduciendo entra en pausa.<br />
Lista <strong>de</strong> las opciones <strong>de</strong>l<br />
sistema para la categoría<br />
seleccionada<br />
Ayuda <strong>de</strong> navegación – Qué botones<br />
<strong>de</strong>l control remoto <strong>de</strong>ben utilizarse<br />
Categorías <strong>de</strong> opciones<br />
Audio<br />
Ví<strong>de</strong>o<br />
Compensación bajos<br />
Compensación agudos<br />
Procesamiento <strong>de</strong> audio<br />
Niveles <strong>de</strong> entrada<br />
seleccionar<br />
Centro<br />
multimedia<br />
Control<br />
remoto<br />
Bloqueo<br />
DVD<br />
Seleccione Audio para ajustar estas opciones<br />
<strong>de</strong>l sistema:<br />
navegar
Para cambiar las opciones <strong>de</strong>l sistema<br />
Cambio <strong>de</strong> las opciones <strong>de</strong>l sistema<br />
Cambiar las opciones <strong>de</strong>l sistema en este menú es similar a cambiar los ajustes <strong>de</strong> una<br />
fuente.<br />
1. Encienda el TV y seleccione la entrada correcta para visualizar el sistema 3•2•1.<br />
2. Pulse el botón System (Sistema) <strong>de</strong>l control remoto 3•2•1.<br />
3. Mediante los botones <strong>de</strong> las flechas <strong>de</strong>recha ( ) e izquierda ( ), se iluminará una <strong>de</strong> las<br />
opciones <strong>de</strong> las categorías (Audio, ví<strong>de</strong>o, centro multimedia, control remoto o bloqueo<br />
<strong>de</strong>l DVD).<br />
4. Pulse el botón Enter (Intro) o la flecha hacia abajo ( ) para seleccionar la categoría <strong>de</strong> la<br />
opción.<br />
5. Mediante los botones <strong>de</strong> las flechas abajo ( ) y arriba ( ), seleccione la opción <strong>de</strong>l<br />
sistema que <strong>de</strong>sea cambiar.<br />
6. Pulse el botón <strong>de</strong> la flecha <strong>de</strong>recha ( ) para visualizar los ajustes <strong>de</strong> las opciones <strong>de</strong>l<br />
sistema.<br />
7. Pulse la flecha hacia arriba ( ) o hacia abajo ( ) para cambiar la configuración.<br />
8. Pulse Enter (Intro) o la flecha hacia la izquierda ( ) para guardar la configuración.<br />
9. Pulse System (Sistema) o Exit (Salir) para salir <strong>de</strong>l menú Sistema.<br />
45<br />
Español
Español<br />
46<br />
Cambio <strong>de</strong> las opciones <strong>de</strong>l sistema<br />
Opciones <strong>de</strong> audio<br />
Figura 28<br />
Opciones <strong>de</strong>l sistema<br />
<strong>de</strong> audio<br />
Las opciones <strong>de</strong> audio pue<strong>de</strong>n afectar al modo en que el sistema suena en su casa.<br />
Nota: Escuchar una fuente <strong>de</strong> audio mientras cambia las opciones pue<strong>de</strong> resultar útil. Algunos<br />
cambios se percibirán inmediatamente, por lo que le serán útiles para realizar una sintonía fina <strong>de</strong><br />
las selecciones.<br />
Audio<br />
navegar<br />
Ví<strong>de</strong>o Centro<br />
multimedia<br />
seleccionar<br />
Control<br />
remoto<br />
Bloqueo<br />
DVD<br />
Seleccione Audio para ajustar estas opciones <strong>de</strong><br />
sistema:<br />
Compensación bajos<br />
Compensación agudos<br />
Procesamiento <strong>de</strong> audio<br />
Niveles <strong>de</strong> entrada<br />
Opción <strong>de</strong>l sistema Configuración Descripción<br />
Compensación bajos 0 [pre<strong>de</strong>terminado]<br />
De –14 a +14<br />
Compensación agudos 0 [pre<strong>de</strong>terminado]<br />
De –14 a +14<br />
Procesamiento <strong>de</strong> audio Automático<br />
[pre<strong>de</strong>terminado]<br />
Manual<br />
Niveles <strong>de</strong> entrada:<br />
Nivel <strong>de</strong> entrada analógica<br />
<strong>de</strong> TV<br />
Nivel <strong>de</strong> entrada digital<br />
<strong>de</strong> TV<br />
Nivel <strong>de</strong> entrada analógico<br />
<strong>de</strong> CBL/SAT<br />
Nivel <strong>de</strong> entrada digital<br />
<strong>de</strong> CBL/SAT<br />
Nivel <strong>de</strong> entrada analógico<br />
<strong>de</strong> AUX<br />
Nivel <strong>de</strong> entrada digital<br />
<strong>de</strong> AUX<br />
Normal<br />
[pre<strong>de</strong>terminado]<br />
–6, –3, +3, +6<br />
Reproducción <strong>de</strong> baja frecuencia normal.<br />
Reproducción <strong>de</strong> las bajas frecuencias reducida (–)<br />
oaumentada (+).<br />
Reproducción <strong>de</strong> alta frecuencia normal.<br />
Reproducción <strong>de</strong> las altas frecuencias reducida (–)<br />
oaumentada (+).<br />
Se aplica el procesamiento Standard <strong>Bose</strong> ® .<br />
Opciones <strong>de</strong> procesamiento (Movie EQ, Range Compression,<br />
Mono Decoding) disponibles en los menús <strong>de</strong> configuración <strong>de</strong><br />
la fuente.<br />
Nivel <strong>de</strong> señal estándar (volumen <strong>de</strong> sonido).<br />
Disminuye o aumenta la señal <strong>de</strong> nivel (se pue<strong>de</strong> ajustar para<br />
igualar los niveles <strong>de</strong> otros dispositivos <strong>de</strong> audio).<br />
Nota: Es posible ajustar los niveles <strong>de</strong> las entradas <strong>de</strong><br />
dispositivos <strong>de</strong> audio externos para que coincidan con los niveles<br />
<strong>de</strong> FM y CD internos <strong>de</strong>l sistema.
Opciones <strong>de</strong> ví<strong>de</strong>o<br />
Figura 29<br />
Opciones <strong>de</strong>l sistema<br />
<strong>de</strong> ví<strong>de</strong>o<br />
Cambio <strong>de</strong> las opciones <strong>de</strong>l sistema<br />
Las opciones <strong>de</strong> ví<strong>de</strong>o pue<strong>de</strong>n afectar al modo <strong>de</strong> ver la imagen en el TV.<br />
Audio Ví<strong>de</strong>o<br />
Centro<br />
multimedia<br />
Control<br />
remoto<br />
Bloqueo<br />
DVD<br />
Seleccione Ví<strong>de</strong>o para ajustar estas opciones <strong>de</strong> sistema:<br />
Formato <strong>de</strong> imagen <strong>de</strong> TV<br />
DVD <strong>de</strong> pantalla amplia<br />
Conector <strong>de</strong> ví<strong>de</strong>o<br />
Nivel bor<strong>de</strong> ví<strong>de</strong>o<br />
Formato <strong>de</strong> ví<strong>de</strong>o<br />
Progressive Scan<br />
navegar<br />
seleccionar<br />
Opción <strong>de</strong>l sistema Configuración Descripción<br />
Formato <strong>de</strong> imagen<br />
<strong>de</strong> TV<br />
DVD <strong>de</strong> pantalla<br />
amplia<br />
Normal [pre<strong>de</strong>treminado]<br />
Pantalla amplia<br />
Modificado [pre<strong>de</strong>terminado]<br />
No modificado<br />
Conector <strong>de</strong> ví<strong>de</strong>o* Compuesto + S-Ví<strong>de</strong>o<br />
[pre<strong>de</strong>terminado]<br />
Componente<br />
Nivel bor<strong>de</strong> ví<strong>de</strong>o Normal [pre<strong>de</strong>terminado]<br />
Extendido<br />
Formato <strong>de</strong> ví<strong>de</strong>o NTSC [pre<strong>de</strong>terminado]<br />
PAL<br />
Progressive Scan** Desact. [pre<strong>de</strong>terminado]<br />
Activar<br />
Visualización en formato 4:3.<br />
Visualización en formato 16:9.<br />
Modificado [pre<strong>de</strong>terminado]<br />
No modificado<br />
I<strong>de</strong>ntifica el tipo <strong>de</strong> conexión <strong>de</strong> ví<strong>de</strong>o realizada en el panel<br />
posterior <strong>de</strong>l centro multimedia<br />
Nivel bor<strong>de</strong> pantalla normalmente a<strong>de</strong>cuado para los<br />
televisores.<br />
Aumenta el nivel bor<strong>de</strong> <strong>de</strong> pantalla, apropiado para algunos<br />
televisores.<br />
Correcto para monitores NTSC (estándar en EE.UU.).<br />
Correcto para monitores PAL (estándar <strong>de</strong> Europa).<br />
La imagen en pantalla se vuelve a actualizar con estilo estándar.<br />
La imagen en pantalla se vuelve a actualizar en estilo avanzado<br />
(si está disponible en el televisor).<br />
* Un elemento <strong>de</strong> sólo lectura señala la conexión <strong>de</strong>tectada automáticamente por el sistema.<br />
** Aparece sólo cuando el conector <strong>de</strong>l ví<strong>de</strong>o es un Componente.<br />
47<br />
Español
Español<br />
48<br />
Cambio <strong>de</strong> las opciones <strong>de</strong>l sistema<br />
Opciones <strong>de</strong>l centro multimedia<br />
Figura 30<br />
Opciones <strong>de</strong>l sistema <strong>de</strong>l<br />
centro multimedia<br />
Las opciones <strong>de</strong>l centro multimedia modifican el funcionamiento general <strong>de</strong>l sistema.<br />
Audio<br />
navegar<br />
Ví<strong>de</strong>o Centro Control<br />
multimedia remoto<br />
Seleccione Centro multimedia para ajustar estas<br />
opciones <strong>de</strong> sistema:<br />
seleccionar<br />
Bloqueo<br />
DVD<br />
Brillo pantalla<br />
Idioma <strong>de</strong> la pantalla<br />
Fuente óptica<br />
Espaciado sintonizador<br />
Código <strong>de</strong> enlace <strong>Bose</strong><br />
Restablecer valores pre<strong>de</strong>terminados<br />
Opciones <strong>de</strong>l sistema Configuración Descripción<br />
Brillo pantalla 4 [pre<strong>de</strong>terminado]<br />
1 (oscuro) a 4 (brillante)<br />
Idioma <strong>de</strong> la pantalla English [pre<strong>de</strong>terminado]<br />
Dansk, Deutsch, Español, Francais,<br />
Italiano, Ne<strong>de</strong>rlands, Svenska<br />
Fuente óptica Ninguno [pre<strong>de</strong>terminado]<br />
Espaciado<br />
sintonizador<br />
Código <strong>de</strong> enlace<br />
<strong>Bose</strong>*<br />
Restablecer valores<br />
pre<strong>de</strong>terminados<br />
TV, CBL/SAT, AUX<br />
US [pre<strong>de</strong>terminado],<br />
Europeo<br />
B [pre<strong>de</strong>terminado], C, D, E, F, G, H,<br />
I, J, K, L, M, N u O<br />
No<br />
Sí<br />
La pantalla <strong>de</strong>l centro multimedia se encien<strong>de</strong> con un brillo<br />
intermedio.<br />
Oscurece o aclara la pantalla <strong>de</strong>l centro multimedia.<br />
Los menús <strong>de</strong> pantalla aparecen en el idioma<br />
seleccionado.<br />
No se recibe ninguna señal digital a través <strong>de</strong>l cable<br />
óptico.<br />
Señal digital recibida a través <strong>de</strong>l cable óptico <strong>de</strong> la fuente<br />
seleccionada.<br />
Espaciado <strong>de</strong> canal para las estaciones <strong>de</strong> radio AM/FM<br />
con el estándar <strong>de</strong> región seleccionado.<br />
Asigna un código <strong>de</strong> sala al sistema 3-2-1 Series II si está<br />
conectado al enlace <strong>de</strong> fuente <strong>Bose</strong>.<br />
Conserva la configuración actual <strong>de</strong>l sistema.<br />
Restablece la configuración <strong>de</strong>l sistema a los valores<br />
pre<strong>de</strong>terminados <strong>de</strong> fábrica.<br />
** Aparece sólo cuando la fuente <strong>de</strong> enlace <strong>Bose</strong> está conectada.
Opciones <strong>de</strong>l control remoto<br />
Figura 31<br />
Opciones <strong>de</strong>l sistema<br />
<strong>de</strong>l control remoto<br />
Cambio <strong>de</strong> las opciones <strong>de</strong>l sistema<br />
Las opciones <strong>de</strong>l control remoto le ayudarán a configurar el control remoto para otros<br />
dispositivos <strong>de</strong> audio conectados al sistema.<br />
Audio<br />
navegar<br />
Ví<strong>de</strong>o Centro<br />
multimedia<br />
seleccionar<br />
Control<br />
remoto<br />
Elija Control remoto para ajustar estas opciones<br />
<strong>de</strong> sistema:<br />
Marca <strong>de</strong> TV<br />
Código disposit TV<br />
Dispositivo CBL/SAT<br />
Marca <strong>de</strong> CBL/SAT<br />
Código disposit CBL/SAT<br />
Opciones <strong>de</strong>l sistema Configuración Descripción<br />
Bloqueo<br />
DVD<br />
Disposit AUX<br />
Marca AUX<br />
Código disposit AUX<br />
Marca <strong>de</strong> TV Nombre <strong>de</strong> marca Proporciona una lista <strong>de</strong> marcas <strong>de</strong> TV compatibles con el control<br />
remoto 3•2•1.<br />
Código disposit TV Número <strong>de</strong> código Proporciona una lista <strong>de</strong> códigos <strong>de</strong> dispositivos disponibles para la<br />
marca <strong>de</strong> TV seleccionada.<br />
Dispositivo CBL/SAT Cable, Satélite I<strong>de</strong>ntifica cuál <strong>de</strong> los dos dispositivos está conectado a la entrada<br />
CBL-SAT.<br />
Marca <strong>de</strong> CBL/SAT Nombre <strong>de</strong> marca Proporciona una lista <strong>de</strong> marcas <strong>de</strong> receptores <strong>de</strong> cable/satélite<br />
compatibles con el control remoto 3•2•1.<br />
Código disposit<br />
CBL/SAT<br />
Número <strong>de</strong> código Proporciona una lista <strong>de</strong> códigos <strong>de</strong> dispositivo disponibles para la<br />
marca <strong>de</strong> receptor <strong>de</strong> cable/satélite seleccionada.<br />
Disposit AUX VCR, DVR I<strong>de</strong>ntifica cuál <strong>de</strong> los dos dispositivos está conectado a la entrada<br />
AUX.<br />
Marca AUX Nombre <strong>de</strong> marca Proporciona una lista <strong>de</strong> marcas <strong>de</strong> VCR/DVR compatibles con el<br />
control remoto 3•2•1.<br />
Código disposit AUX Número <strong>de</strong> código Proporciona una lista <strong>de</strong> códigos <strong>de</strong> dispositivo disponibles para la<br />
marca <strong>de</strong> ví<strong>de</strong>o seleccionada.<br />
Nota: Para encontrar la marca y los códigos <strong>de</strong> dispositivo <strong>de</strong> cada componente que pue<strong>de</strong>n<br />
conectarse y controlarse a través <strong>de</strong>l sistema, consulte “Códigos <strong>de</strong> dispositivos” en la página 1.<br />
49<br />
Español
Español<br />
50<br />
Cambio <strong>de</strong> las opciones <strong>de</strong>l sistema<br />
Opciones <strong>de</strong> Bloqueo DVD<br />
Figura 32<br />
Opciones <strong>de</strong> sistema<br />
<strong>de</strong> bloqueo DVD<br />
Las opciones <strong>de</strong> bloqueo <strong>de</strong> DVD le permiten restringir la visualización <strong>de</strong> DVD con cierta<br />
calificación. Para activar esta función es necesario fijar un nivel <strong>de</strong> restricción y establecer<br />
una contraseña en la sección <strong>de</strong> Bloqueo DVD <strong>de</strong>l menú Sistema.<br />
Ví<strong>de</strong>o Centro<br />
multimedia Control<br />
remoto Bloqueo<br />
Audio<br />
DVD<br />
Elija Bloqueo DVD para ajustar estas opciones<br />
<strong>de</strong> sistema:<br />
navegar<br />
Opciones <strong>de</strong> sistema<br />
Bloquear discos no<br />
clasificados<br />
Bloquear discos<br />
clasificados por<br />
encima <strong>de</strong><br />
Bloquear discos no clasificados<br />
Bloquear discos clasificados por encima <strong>de</strong><br />
Cambiar contraseña<br />
seleccionar<br />
Configuración<br />
Descripción<br />
Desactivar<br />
Activar<br />
No se aplica ninguna restricción a las películas <strong>de</strong> DVD sin<br />
clasificar.<br />
Impi<strong>de</strong> ver títulos no clasificados cuando se establece la<br />
contraseña.<br />
De 1 a 8 Ayuda a prevenir la visualización <strong>de</strong> discos con una clasificación<br />
superior a la indicada, una vez creada la contraseña.<br />
Cambiar contraseña _ _ _ _ Establece un nuevo código <strong>de</strong> cuatro dígitos para limitar el<br />
acceso a las películas con una clasificación <strong>de</strong>terminada.<br />
Configuración <strong>de</strong> una contraseña y <strong>de</strong> un nivel <strong>de</strong> restricción<br />
Su contraseña impedirá que se vean ví<strong>de</strong>os <strong>de</strong> DVD no autorizados, con una clasificación<br />
que supere el nivel <strong>de</strong> restricción. Se pue<strong>de</strong>n elegir ocho niveles que se correspon<strong>de</strong>n con<br />
las clasificaciones establecidas por la Motion Picture Association of America (MPAA).<br />
Consulte “Sistema <strong>de</strong> clasificación <strong>de</strong> la Motion Picture Association of America (MPAA)” en la<br />
página 51.<br />
1. Encienda el TV y seleccione la entrada correcta para visualizar el sistema 3•2•1.<br />
2. Pulse el botón System (Sistema) <strong>de</strong>l control remoto.<br />
3. Mediante los botones <strong>de</strong> las flechas <strong>de</strong>recha ( ) e izquierda ( ) seleccione la opción <strong>de</strong><br />
bloqueo <strong>de</strong>l DVD.<br />
4. Pulse Enter (Intro) o el botón <strong>de</strong> la flecha hacia abajo ( ).<br />
Nota: Si utiliza la opción <strong>de</strong> bloqueo <strong>de</strong>l DVD por primera vez, introduzca una contraseña <strong>de</strong><br />
cuatro dígitos. Vuelva a introducir la contraseña para su confirmación.
5. Introduzca la contraseña <strong>de</strong> cuatro dígitos.<br />
Cambio <strong>de</strong> las opciones <strong>de</strong>l sistema<br />
6. Mediante el botón <strong>de</strong> la flecha hacia abajo ( ) retroceda para bloquear los discos<br />
clasificados en la parte superior.<br />
7. Pulse el botón <strong>de</strong> la flecha <strong>de</strong> la <strong>de</strong>recha ( ) para visualizar las configuraciones<br />
disponibles.<br />
8. Pulse el botón <strong>de</strong> la flecha hacia arriba ( ) o hacia abajo ( ) para encontrar la<br />
clasificación <strong>de</strong>seada.<br />
9. Pulse Enter (Intro) o la flecha hacia la izquierda ( ) para guardar la configuración.<br />
10. Pulse Exit (Salir) para salir <strong>de</strong>l menú Sistemas.<br />
Sistema <strong>de</strong> clasificación <strong>de</strong> la Motion Picture Association<br />
of America (MPAA)<br />
Configuración<br />
<strong>de</strong>l<br />
control<br />
parental<br />
Calificación<br />
<strong>de</strong><br />
MPAA Restricción <strong>de</strong> público<br />
8 Ninguna<br />
7 NC-17 Adultos<br />
6 R Mayores <strong>de</strong> 18<br />
5 Mayores <strong>de</strong> 16<br />
4 PG-13 Mayores <strong>de</strong> 13<br />
3 PG No apto para menores <strong>de</strong> 13<br />
2 Apta para todos los públicos<br />
1 G Apta para todos los públicos<br />
Ejemplo: Al elegir una configuración <strong>de</strong> control parental 4, restringirá el acceso a los ví<strong>de</strong>os<br />
clasificados para mayores <strong>de</strong> 13. Se podrán ver los ví<strong>de</strong>os clasificados por encima<br />
introduciendo una contraseña.<br />
La contraseña también ayuda a prevenir que otros cambien la configuración <strong>de</strong>l nivel <strong>de</strong><br />
restricción sin autorización.<br />
51<br />
Español
Español<br />
52<br />
Mantenimiento <strong>de</strong>l sistema<br />
Limpieza<br />
Figura 33<br />
Cuidado <strong>de</strong> los discos<br />
Limpieza <strong>de</strong>l centro multimedia<br />
• Utilice únicamente un paño suave y seco para limpiar las superficies externas <strong>de</strong>l centro<br />
multimedia.<br />
• No use aerosoles cerca <strong>de</strong>l sistema. No use disolventes, sustancias químicas ni soluciones<br />
<strong>de</strong>tergentes que contengan alcohol, amoníaco o abrasivos.<br />
• No permita la entrada <strong>de</strong> ningún líquido por ninguna apertura.<br />
Cómo limpiar los altavoces<br />
• Limpie la superficie <strong>de</strong> los altavoces con un paño suave y húmedo. Pue<strong>de</strong> utilizar un paño<br />
suave hume<strong>de</strong>cido con limpia cristales sin amoníaco para conservar el acabado.<br />
• No use aerosoles cerca <strong>de</strong> los altavoces. No use disolventes, sustancias químicas ni<br />
soluciones <strong>de</strong>tergentes que contengan alcohol, amoníaco o abrasivos.<br />
• No permita la entrada <strong>de</strong> ningún líquido por ninguna apertura.<br />
• Los paneles <strong>de</strong> la rejilla <strong>de</strong> los altavoces no requieren cuidados especiales; no obstante,<br />
pue<strong>de</strong> pasarles el aspirador con cuidado, si es necesario.<br />
Limpieza <strong>de</strong> discos<br />
• Coja los discos por los bor<strong>de</strong>s para no <strong>de</strong>jar marcas <strong>de</strong> huellas ni rayarlos (Figura 33a).<br />
• Para eliminar manchas o huellas digitales <strong>de</strong> la superficie <strong>de</strong> un disco, utilice un paño<br />
suave, seco y sin pelusas. Limpie con movimientos rectos, <strong>de</strong>s<strong>de</strong> el centro <strong>de</strong>l disco hacia<br />
el exterior (Figura 33b). No utilice productos químicos puesto que pue<strong>de</strong>n dañar el disco.<br />
• No efectúe movimientos circulares al limpiar (Figura 33c).<br />
• No escriba sobre la superficie <strong>de</strong>l disco ni adhiera etiquetas.<br />
• Para minimizar la exposición al polvo y a la suciedad, coloque los discos en sus cajas<br />
<strong>de</strong>spués <strong>de</strong> usarlos. Guar<strong>de</strong> los discos en las cajas, alejados <strong>de</strong> la luz solar directa, las<br />
altas temperaturas y la humedad.<br />
a. b. c.
Cambio <strong>de</strong> las pilas <strong>de</strong>l control remoto<br />
Figura 34<br />
Colocación <strong>de</strong> las pilas<br />
Accesorios<br />
Figura 35<br />
Accesorios <strong>de</strong> altavoz<br />
Mantenimiento <strong>de</strong>l sistema<br />
PRECAUCIÓN: Deseche correctamente las pilas usadas, siguiendo las disposiciones locales.<br />
No las queme.<br />
• Deslice el compartimento <strong>de</strong> la pila para abrirlo (Figura 34).<br />
• Observe las marcas <strong>de</strong> polaridad (+ y –) en el interior <strong>de</strong>l compartimento e instale las pilas<br />
como correspon<strong>de</strong>. Asegúrese <strong>de</strong> cambiar ambas pilas.<br />
• Vuelva a colocar la tapa <strong>de</strong>l compartimento <strong>de</strong> pilas.<br />
Pilas AA (IEC R6)<br />
Los altavoces para estante <strong>de</strong>l sistema <strong>Bose</strong> ® 3•2•1 Series II y 3•2•1 GS Series II son<br />
compatibles con los accesorios <strong>de</strong> montaje <strong>de</strong> <strong>Bose</strong>, incluidas las piezas <strong>de</strong> sujeción a la<br />
pared UB-20, los pe<strong>de</strong>stales <strong>de</strong> suelo UFS-20 y los pe<strong>de</strong>stales <strong>de</strong> mesa UTS-20 (Figura 35).<br />
<strong>Bose</strong> ofrece también adaptadores <strong>de</strong> cable para el tendido <strong>de</strong>l cable <strong>de</strong>l altavoz por las<br />
pare<strong>de</strong>s.<br />
Para obtener más información o pedir piezas <strong>de</strong> sujeción <strong>de</strong> montaje, pe<strong>de</strong>stales o<br />
adaptadores <strong>de</strong> cable póngase en contacto con el proveedor <strong>de</strong> <strong>Bose</strong> o directamente con la<br />
compañía. Consulte la lista <strong>de</strong> direcciones incluida en la caja.<br />
UB-20<br />
Soporte<br />
para pared<br />
UT-S20<br />
Pe<strong>de</strong>stal<br />
<strong>de</strong> mesa<br />
Tapa <strong>de</strong>l compartimento <strong>de</strong> las pilas<br />
UFS-20<br />
Pe<strong>de</strong>stal<br />
<strong>de</strong> suelo<br />
53<br />
Español
Español<br />
54<br />
Resolución <strong>de</strong> problemas<br />
Tabla <strong>de</strong> resolución <strong>de</strong> problemas<br />
Problema Acción<br />
El sistema no respon<strong>de</strong> • Asegúrese <strong>de</strong> que la unidad está encendida. Inténtelo pulsando el botón On-Off <strong>de</strong>l<br />
control remoto y el botón On-Off <strong>de</strong>l centro multimedia.<br />
• Asegúrese <strong>de</strong> que el cable <strong>de</strong> alimentación esté bien insertado en el módulo Acoustimass ®<br />
y firmemente enchufado en una toma eléctrica <strong>de</strong> CA que funcione.<br />
• No olvi<strong>de</strong> seleccionar una fuente (CD/DVD, AM/FM, etc.).<br />
• Desenchufe el cable <strong>de</strong> alimentación <strong>de</strong>l módulo Acoustimass <strong>de</strong> la toma eléctrica durante<br />
un minuto y, a continuación, vuelva a conectarlo. Esto permite que la unidad se<br />
restablezca por sí misma. Tras volver a conectar el cable <strong>de</strong> alimentación, espere a que el<br />
mensaje “BOSE 3•2•1” aparezca en la pantalla <strong>de</strong>l centro multimedia.<br />
El disco no se pue<strong>de</strong><br />
expulsar<br />
• Apague la unidad.<br />
• Desenchufe el cable <strong>de</strong> alimentación <strong>de</strong>l módulo Acoustimass <strong>de</strong> la toma eléctrica durante<br />
un minuto y, a continuación, vuelva a conectarlo. Esto permite que la unidad se<br />
restablezca por sí misma.<br />
• Antes <strong>de</strong> encen<strong>de</strong>r, mantenga pulsado Eject en el centro multimedia.<br />
No llega sonido • Suba el volumen.<br />
• Compruebe si MUTE aparece iluminado en la pantalla. Si es así, pulse el botón Mute <strong>de</strong>l<br />
control remoto para <strong>de</strong>sactivar el silencio <strong>de</strong>l sonido.<br />
• Asegúrese <strong>de</strong> que el cable <strong>de</strong>l módulo y el cable <strong>de</strong>l altavoz estén bien insertados en las<br />
tomas <strong>de</strong>l centro multimedia y <strong>de</strong> que el conector múltiple <strong>de</strong>l otro extremo esté bien<br />
enchufado en la toma <strong>de</strong>l módulo Acoustimass.<br />
• Verifique las conexiones <strong>de</strong>l altavoz.<br />
• Apague el centro multimedia 10 segundos y vuelva a encen<strong>de</strong>rlo, para restaurar la<br />
comunicación entre el centro y los altavoces.<br />
• Verifique las conexiones <strong>de</strong> los componentes <strong>de</strong> audio externos. No olvi<strong>de</strong> seleccionar la<br />
fuente correcta para la entrada <strong>de</strong>seada.<br />
• Verifique que el disco esté bien colocado en la ban<strong>de</strong>ja <strong>de</strong> CD, con la etiqueta hacia arriba.<br />
• Conecte las antenas <strong>de</strong> FM y AM.<br />
• Desenchufe el cable <strong>de</strong> alimentación <strong>de</strong>l módulo Acoustimass <strong>de</strong> la toma eléctrica durante<br />
un minuto y, a continuación, vuelva a conectarlo. Esto permite que la unidad se<br />
restablezca por sí misma.<br />
• Si utiliza una conexión <strong>de</strong> audio digital y óptica, asegúrese <strong>de</strong> que el enchufe óptico tiene<br />
una asignación correcta en el menú Sistema.<br />
• Asegúrese <strong>de</strong> que hay volumen en el TV.<br />
• Compruebe la configuración <strong>de</strong>l nivel <strong>de</strong> entrada para cada dispositivo conectado en el<br />
menú Sistema.
Problema Acción<br />
Emite sonido pero no<br />
imágenes<br />
El mano a distancia no<br />
funciona bien o no<br />
funciona<br />
No funciona la radio<br />
o la recepción es mala<br />
El DVD o CD no se<br />
reproduce<br />
El sonido FM está<br />
distorsionado<br />
El sonido está<br />
distorsionado<br />
La imagen está en<br />
blanco y negro o con<br />
distorsiones<br />
No se acuerda <strong>de</strong> la<br />
contraseña<br />
Servicio al cliente<br />
Resolución <strong>de</strong> problemas<br />
• Asegúrese <strong>de</strong> que el TV esté encendido.<br />
• Al reproducir un DVD u otra fuente <strong>de</strong> ví<strong>de</strong>o, asegúrese <strong>de</strong> que el TV esté correctamente<br />
configurado para la entrada <strong>de</strong> ví<strong>de</strong>o.<br />
• Compruebe las pilas y la polaridad (+ y –). Consulte “Cambio <strong>de</strong> las pilas <strong>de</strong>l control<br />
remoto” en la página 53.<br />
• Dirija el control remoto hacia el centro multimedia.<br />
• Compruebe que las antenas estén bien conectadas.<br />
• Separe la antena <strong>de</strong> AM un mínimo <strong>de</strong> 50 cm <strong>de</strong>l centro multimedia.<br />
• Regule la posición <strong>de</strong> la antena para mejorar la recepción.<br />
• La antena AM <strong>de</strong>be estar en posición vertical.<br />
• Aleje más las antenas <strong>de</strong>l TV u otro equipo electrónico.<br />
• Quizá se encuentre en un área <strong>de</strong> cobertura débil <strong>de</strong> señal.<br />
• Compruebe si el símbolo <strong>de</strong> reproducción <strong>de</strong> la pantalla está encendido.<br />
• Después <strong>de</strong> pulsar el botón CD/DVD, espere unos segundos antes <strong>de</strong> pulsar Play.<br />
• Compruebe que el disco esté bien insertado (con la etiqueta hacia arriba).<br />
• Expulse el disco y trate <strong>de</strong> volver a cargarlo.<br />
• Pue<strong>de</strong> haber suciedad o polvo en el disco. Limpie el disco. Consulte la sección “Limpieza<br />
<strong>de</strong> discos” en la página 52.<br />
• Quizá el CD sea <strong>de</strong>fectuoso. Pruebe otro disco.<br />
• Asegúrese <strong>de</strong> que coinci<strong>de</strong>n los códigos <strong>de</strong> región para el DVD y el reproductor. Consulte<br />
la sección “Compruebe la compatibilidad <strong>de</strong>l código <strong>de</strong> la región” en la página 5.<br />
• Regule la posición <strong>de</strong> la antena para reducir las interferencias.<br />
• Compruebe que los cables <strong>de</strong>l altavoz no estén dañados y las conexiones sean correctas.<br />
• Reduzca el nivel <strong>de</strong> salida <strong>de</strong> los dispositivos <strong>de</strong> audio externos conectados al centro<br />
musical.<br />
• Reduzca el nivel <strong>de</strong> entrada configurado para el dispositivo conectado en el menú<br />
Sistema.<br />
• Compruebe las conexiones <strong>de</strong>l cable <strong>de</strong> ví<strong>de</strong>o.<br />
• Compruebe el ajuste <strong>de</strong> formato <strong>de</strong> ví<strong>de</strong>o y establezca los apropiados (NTSC o PAL).<br />
Consulte “Opciones <strong>de</strong> ví<strong>de</strong>o” en la página 47.<br />
• Introduzca la contraseña 2673 para acce<strong>de</strong>r a los controles parentales y crear una nueva<br />
contraseña.<br />
Para obtener ayuda adicional para la resolución <strong>de</strong> problemas, diríjase al <strong>de</strong>partamento <strong>de</strong><br />
Atención al cliente <strong>de</strong> <strong>Bose</strong> ® . Consulte la lista <strong>de</strong> direcciones incluida en la caja.<br />
55<br />
Español
Español<br />
56
Voltaje<br />
EE.UU./Canadá: 120 V 50/60 Hz 300 W<br />
Mo<strong>de</strong>los internacionales: 220-240 V 50/60 Hz 300 W<br />
Voltaje doble: 115/230 V 50/60 Hz 300 W<br />
Entradas <strong>de</strong> audio<br />
AUX – Izq., Dcha. (analógico); D (digital)<br />
CBL-SAT – L, R (analógico); D (digital)<br />
TV – L, R (analógico); D (digital)<br />
Óptico – SPDIF digital, con correspon<strong>de</strong>ncia a la<br />
entrada<br />
Salidas <strong>de</strong> audio<br />
Módulo Acoustimass – SPDIF<br />
Entradas <strong>de</strong> ví<strong>de</strong>o<br />
C (compuesto) – formato NTSC o PAL<br />
S-Ví<strong>de</strong>o<br />
Salidas <strong>de</strong> ví<strong>de</strong>o<br />
C (compuesto) – formato NTSC o PAL<br />
S-Ví<strong>de</strong>o<br />
Componente Y, Pb, Pr<br />
Antenas<br />
FM 75 Ω – antena FM externa<br />
AM - antena AM externa<br />
Información técnica<br />
Temperatura ambiente máxima<br />
104 °F (45 °C)<br />
Dimensiones<br />
Centro multimedia: 3¼" alto x 13¾" ancho x 10" largo<br />
(8,3 cm x 34,9 cm x 25,4 cm)<br />
Control remoto: 11 / 8" alto x 21 / 2" ancho x 9" largo<br />
(3,0 cm x 6,5 cm x 22,9 cm)<br />
Altavoces 3•2•1: 31 / 2" alto. x 77 / 8" ancho x 51 / 4" largo<br />
(8,7 cm x 19,9 cm x 13,6 cm)<br />
3•2•1 Altavoces GS: 4" alto x 51 / 2" ancho x 21 / 2" largo<br />
(10,5 cm x 14 cm x 6,4 cm)<br />
Módulo Acoustimass ® : 141 / 2" alto x 83 / 4" ancho x 191 / 8"<br />
profundidad (36,7 cm x 22,2 cm x 48,5 cm)<br />
Pesos<br />
Centro multimedia: 6,7 lb (3,0 kg)<br />
Altavoces 3•2•1: 2,7 lb (1,2 kg) cada uno<br />
Altavoces GS: 1 lb (0,45 kg) cada uno<br />
Módulo Acoustimass: 23,3 lb (10,6 kg)<br />
Acabado<br />
Centro multimedia: polímero<br />
Altavoces: polímero<br />
Módulo Acoustimass: polímero<br />
57<br />
Español
Français<br />
2<br />
Informations <strong>de</strong> sécurité<br />
AVERTISSEMENT : Afin <strong>de</strong> limiter les risques d’incendie ou d’électrocution, n’exposez pas l’appareil<br />
à la pluie ou à l’humidité.<br />
AVERTISSEMENT : Protégez-le <strong>de</strong> tout risque <strong>de</strong> ruissellement ou d’éclaboussure. Ne placez<br />
pas d’objets contenant <strong>de</strong>s liqui<strong>de</strong>s, tels que <strong>de</strong>s vases, sur l’appareil. Comme avec tout appareil<br />
électronique, veillez à ne pas renverser <strong>de</strong> liqui<strong>de</strong>s sur aucune partie <strong>de</strong> l’appareil. Les liqui<strong>de</strong>s peuvent<br />
provoquer <strong>de</strong>s pannes et/ou un risque d’incendie.<br />
Ces marquages <strong>de</strong> SÉCURITÉ sont situés au-<strong>de</strong>ssous du media center <strong>de</strong> votre système home cinéma<br />
3•2•1 série II et sur le panneau arrière du module Acoustimass.<br />
Le symbole représentant un éclair avec une flèche à l’intérieur d’un triangle équilatéral est<br />
utilisé pour prévenir l’utilisateur <strong>de</strong> la présence d’une tension électrique dangereuse non isolée<br />
à l’intérieur <strong>de</strong> l’appareil. Cette tension est d’un niveau suffisamment élevé pour représenter un<br />
risque d’électrocution.<br />
Le symbole représentant un point d’exclamation à l’intérieur d’un triangle équilatéral signale à<br />
l’utilisateur la présence d’instructions importantes relatives au fonctionnement et à l’entretien<br />
<strong>de</strong> l’appareil dans cette notice d’utilisation.<br />
ATTENTION : Afin d’éviter tout risque d’électrocution, insérez bien la fiche du cordon<br />
d’alimentation dans la fente correspondante <strong>de</strong> la prise d’alimentation.<br />
ATTENTION : Ne placez jamais d’objets enflammés, tels que <strong>de</strong>s bougies allumées, sur l’appareil.<br />
Produit laser <strong>de</strong> classe 1<br />
Le lecteur DVD inclus dans le media center est classé CLASS 1 LASER<br />
PRODUCT selon la norme EN60825-1:1994 + A11. L’étiquette CLASS 1<br />
LASER PRODUCT est située au-<strong>de</strong>ssous du media center.<br />
ATTENTION : L’utilisation <strong>de</strong> comman<strong>de</strong>s, réglages ou procédures autres que ceux spécifiés<br />
dans le présent document peuvent provoquer une exposition dangereuse aux rayonnements.<br />
Le lecteur DVD ne doit être réglé ou réparé que par une personne qualifiée.<br />
Limites d’émission <strong>de</strong> classe B<br />
Cet appareil numérique <strong>de</strong> classe B est entièrement conforme aux normes « Canadian Interference-<br />
Causing Equipment Regulations » (Réglementation canadienne sur les équipements pouvant causer<br />
<strong>de</strong>s interférences).<br />
Piles<br />
CAUTION<br />
RISK OF ELECTRICAL SHOCK<br />
DO NOT OPEN<br />
CAUTION: TO REDUCE THE RISK OF ELECTRIC SHOCK,<br />
DO NOT REMOVE COVER (OR BACK).<br />
NO USER-SERVICABLE PARTS INSIDE.<br />
REFER SERVICING TO QUALIFIED PERSONNEL.<br />
Veillez à vous débarrasser <strong>de</strong> vos piles usagées conformément aux réglementations locales. Ne les<br />
incinérez pas.<br />
Informations <strong>de</strong> sécurité complémentaires<br />
Vous trouverez <strong>de</strong>s instructions complémentaires dans le document intitulé Informations <strong>de</strong> sécurité<br />
importantes joint au carton d’expédition.<br />
Veuillez lire cette notice d’utilisation<br />
AVIS VIS<br />
RISQUE DE CHOC ÉLECTRIQUE<br />
NE PAS OUVRIR<br />
ATTENTION : POUR RÉDUIRE LE RISQUE DE DÉCHARGE<br />
ÉLECTRIQUE, NE RETIREZ PAS LE COUVERCLE (OU<br />
L’ARRIÈRE). IL NE SE TROUVE ÀL’INTÉRIEURAUCUNE<br />
PIÈCE POUVANT ÊTRE RÉPARÉE PAR L’USAGER.<br />
S’ADRESSER À UN RÉPARATEUR COMPÉTENT.<br />
CLASS 1 LASER PRODUCT<br />
KLASSE 1 LASER PRODUKT<br />
LUOKAN 1 LASER LAITE<br />
KLASS 1 LASER APPARAT<br />
Prenez le temps <strong>de</strong> lire attentivement les instructions <strong>de</strong> cette notice d’utilisation. Elles vous seront<br />
précieuses pour installer et utiliser correctement votre système et vous ai<strong>de</strong>ront à tirer le meilleur parti<br />
<strong>de</strong> sa technologie. Conservez cette notice d’utilisation pour référence ultérieure.
Pour trouver …<br />
Table <strong>de</strong>s matières<br />
Introduction . . . . . . . . . . . . . . . . . . . . . . . . . . . . . . . . . . . . . . . . . . . . . . . . . . . . . . . . . . . . . . . . . . . 5<br />
Avant <strong>de</strong> commencer . . . . . . . . . . . . . . . . . . . . . . . . . . . . . . . . . . . . . . . . . . . . . . . . . . . . . . . . 5<br />
Disques compatibles . . . . . . . . . . . . . . . . . . . . . . . . . . . . . . . . . . . . . . . . . . . . . . . . . . . . . 5<br />
Vérification <strong>de</strong> la compatibilité <strong>de</strong>s disques avec votre zone . . . . . . . . . . . . . . . . . . . . . . 5<br />
Compatibilité avec le format MP3 . . . . . . . . . . . . . . . . . . . . . . . . . . . . . . . . . . . . . . . . . . . 5<br />
Glossaire . . . . . . . . . . . . . . . . . . . . . . . . . . . . . . . . . . . . . . . . . . . . . . . . . . . . . . . . . . . . . . . . . . 6<br />
Garantie limitée . . . . . . . . . . . . . . . . . . . . . . . . . . . . . . . . . . . . . . . . . . . . . . . . . . . . . . . . . . . . . 7<br />
Renseignements à conserver . . . . . . . . . . . . . . . . . . . . . . . . . . . . . . . . . . . . . . . . . . . . . . . . . . 7<br />
Installation du système . . . . . . . . . . . . . . . . . . . . . . . . . . . . . . . . . . . . . . . . . . . . . . . . . . . . . . . . . . 8<br />
Déballage . . . . . . . . . . . . . . . . . . . . . . . . . . . . . . . . . . . . . . . . . . . . . . . . . . . . . . . . . . . . . . . . . 8<br />
Choix d’un emplacement pour les éléments du système home cinéma 3•2•1 série II . . . . . . 9<br />
Positionnement du media center . . . . . . . . . . . . . . . . . . . . . . . . . . . . . . . . . . . . . . . . . . . . 9<br />
Positionnement <strong>de</strong>s enceintes . . . . . . . . . . . . . . . . . . . . . . . . . . . . . . . . . . . . . . . . . . . . . . 10<br />
Positionnement du module Acoustimass® . . . . . . . . . . . . . . . . . . . . . . . . . . . . . . . . . . . . 11<br />
Branchement du système . . . . . . . . . . . . . . . . . . . . . . . . . . . . . . . . . . . . . . . . . . . . . . . . . . . .<br />
Connexion du module Acoustimass<br />
12<br />
® au media center . . . . . . . . . . . . . . . . . . . . . . . . . . . 12<br />
Connexion <strong>de</strong>s enceintes au module Acoustimass . . . . . . . . . . . . . . . . . . . . . . . . . . . . . . 12<br />
Connexion <strong>de</strong>s antennes . . . . . . . . . . . . . . . . . . . . . . . . . . . . . . . . . . . . . . . . . . . . . . . . . . 14<br />
Connexion <strong>de</strong> la radio FM par câble . . . . . . . . . . . . . . . . . . . . . . . . . . . . . . . . . . . . . . . . . 14<br />
Connexion du téléviseur au media center . . . . . . . . . . . . . . . . . . . . . . . . . . . . . . . . . . . . . . . . 15<br />
Réalisation <strong>de</strong>s connexions audio . . . . . . . . . . . . . . . . . . . . . . . . . . . . . . . . . . . . . . . . . . . 15<br />
Réalisation <strong>de</strong>s connexions vidéo composite . . . . . . . . . . . . . . . . . . . . . . . . . . . . . . . . . . 15<br />
Connexion du téléviseur et du magnétoscope au media center . . . . . . . . . . . . . . . . . . . . . . . 16<br />
Si votre téléviseur est équipé <strong>de</strong> sorties audio . . . . . . . . . . . . . . . . . . . . . . . . . . . . . . . . . 16<br />
Si votre téléviseur n’est pas équipé <strong>de</strong> sorties audio . . . . . . . . . . . . . . . . . . . . . . . . . . . . 17<br />
Remarques concernant les magnétoscopes . . . . . . . . . . . . . . . . . . . . . . . . . . . . . . . . . . . 18<br />
Options d’installation avancée . . . . . . . . . . . . . . . . . . . . . . . . . . . . . . . . . . . . . . . . . . . . . . . . . 18<br />
Réalisation <strong>de</strong> connexion S-vidéo (qualité vidéo supérieure) . . . . . . . . . . . . . . . . . . . . . . 18<br />
Réalisation <strong>de</strong> connexion par vidéo composante (meilleure qualité vidéo) . . . . . . . . . . . . 19<br />
Connexion d’appareils audio numériques . . . . . . . . . . . . . . . . . . . . . . . . . . . . . . . . . . . . .<br />
Connexion d’un récepteur câble/satellite, d’un téléviseur et d’un magnétoscope au media<br />
20<br />
center . . . . . . . . . . . . . . . . . . . . . . . . . . . . . . . . . . . . . . . . . . . . . . . . . . . . . . . . . . 20<br />
Connexion d’une console <strong>de</strong> jeux . . . . . . . . . . . . . . . . . . . . . . . . . . . . . . . . . . . . . . . . . . . 22<br />
Mise en place <strong>de</strong>s piles <strong>de</strong> la télécomman<strong>de</strong> . . . . . . . . . . . . . . . . . . . . . . . . . . . . . . . . . . . . . 23<br />
Branchement du cordon d’alimentation . . . . . . . . . . . . . . . . . . . . . . . . . . . . . . . . . . . . . . . . . . 24<br />
Vérification <strong>de</strong> l’installation <strong>de</strong> votre système . . . . . . . . . . . . . . . . . . . . . . . . . . . . . . . . . . . . . 25<br />
Comman<strong>de</strong>s et indicateurs du système . . . . . . . . . . . . . . . . . . . . . . . . . . . . . . . . . . . . . . . . . . . . . 26<br />
Télécomman<strong>de</strong> . . . . . . . . . . . . . . . . . . . . . . . . . . . . . . . . . . . . . . . . . . . . . . . . . . . . . . . . . . . . . 26<br />
Media center . . . . . . . . . . . . . . . . . . . . . . . . . . . . . . . . . . . . . . . . . . . . . . . . . . . . . . . . . . . . . . . 29<br />
Panneau <strong>de</strong> comman<strong>de</strong>s . . . . . . . . . . . . . . . . . . . . . . . . . . . . . . . . . . . . . . . . . . . . . . . . . . 29<br />
Indicateurs <strong>de</strong> l’écran . . . . . . . . . . . . . . . . . . . . . . . . . . . . . . . . . . . . . . . . . . . . . . . . . . . . . 29<br />
Fonctionnement . . . . . . . . . . . . . . . . . . . . . . . . . . . . . . . . . . . . . . . . . . . . . . . . . . . . . . . . . . . . . . . 30<br />
Activation et désactivation du système . . . . . . . . . . . . . . . . . . . . . . . . . . . . . . . . . . . . . . . . . . 30<br />
Lecture <strong>de</strong> DVD vidéo . . . . . . . . . . . . . . . . . . . . . . . . . . . . . . . . . . . . . . . . . . . . . . . . . . . . . . . 30<br />
Fonctionnement <strong>de</strong> base du lecteur DVD . . . . . . . . . . . . . . . . . . . . . . . . . . . . . . . . . . . . . 31<br />
Restrictions d’accès aux DVD vidéo . . . . . . . . . . . . . . . . . . . . . . . . . . . . . . . . . . . . . . . . . 31<br />
Lecture <strong>de</strong> CD audio . . . . . . . . . . . . . . . . . . . . . . . . . . . . . . . . . . . . . . . . . . . . . . . . . . . . . . . . 32<br />
Fonctionnement <strong>de</strong> base du lecteur CD . . . . . . . . . . . . . . . . . . . . . . . . . . . . . . . . . . . . . . 32<br />
Écouter une station radio FM/AM . . . . . . . . . . . . . . . . . . . . . . . . . . . . . . . . . . . . . . . . . . . . . . 33<br />
Sélection d’une station . . . . . . . . . . . . . . . . . . . . . . . . . . . . . . . . . . . . . . . . . . . . . . . . . . . 33<br />
Mémorisation <strong>de</strong> stations préréglées . . . . . . . . . . . . . . . . . . . . . . . . . . . . . . . . . . . . . . . . . 33<br />
Suppression d’un préréglage . . . . . . . . . . . . . . . . . . . . . . . . . . . . . . . . . . . . . . . . . . . . . . . 34<br />
Lecture d’autres sources . . . . . . . . . . . . . . . . . . . . . . . . . . . . . . . . . . . . . . . . . . . . . . . . . . . . . 34<br />
Utilisation <strong>de</strong> la minuterie . . . . . . . . . . . . . . . . . . . . . . . . . . . . . . . . . . . . . . . . . . . . . . . . . . . . . 34<br />
3<br />
Français
Français<br />
4<br />
Table <strong>de</strong>s matières<br />
Contrôle d’autres appareils audio . . . . . . . . . . . . . . . . . . . . . . . . . . . . . . . . . . . . . . . . . . . . . . . . . . 35<br />
Programmation <strong>de</strong> la télécomman<strong>de</strong> pour contrôler d’autres appareils audio/vidéo . . . . . . . 35<br />
Saisie directe d’un co<strong>de</strong> d’appareil . . . . . . . . . . . . . . . . . . . . . . . . . . . . . . . . . . . . . . . . . . 35<br />
Recherche d’un co<strong>de</strong> d’appareil . . . . . . . . . . . . . . . . . . . . . . . . . . . . . . . . . . . . . . . . . . . . 36<br />
Vérification du co<strong>de</strong> d’un appareil . . . . . . . . . . . . . . . . . . . . . . . . . . . . . . . . . . . . . . . . . . . 38<br />
Modification <strong>de</strong>s comman<strong>de</strong>s <strong>de</strong> sélection <strong>de</strong> chaînes . . . . . . . . . . . . . . . . . . . . . . . . . . . . . . 38<br />
Modification <strong>de</strong> la configuration <strong>de</strong>s sources . . . . . . . . . . . . . . . . . . . . . . . . . . . . . . . . . . . . . . . . . 39<br />
Utilisation <strong>de</strong>s menus <strong>de</strong> configuration . . . . . . . . . . . . . . . . . . . . . . . . . . . . . . . . . . . . . . . . . . 39<br />
Pour afficher les menus <strong>de</strong> configuration . . . . . . . . . . . . . . . . . . . . . . . . . . . . . . . . . . . . . 39<br />
Pour effectuer <strong>de</strong>s modifications dans les menus <strong>de</strong> configuration . . . . . . . . . . . . . . . . . 40<br />
Menu <strong>de</strong> configuration du tuner FM-AM . . . . . . . . . . . . . . . . . . . . . . . . . . . . . . . . . . . . . . . . . 41<br />
Menu <strong>de</strong> configuration CD . . . . . . . . . . . . . . . . . . . . . . . . . . . . . . . . . . . . . . . . . . . . . . . . . . . . 41<br />
Menu <strong>de</strong> configuration DVD . . . . . . . . . . . . . . . . . . . . . . . . . . . . . . . . . . . . . . . . . . . . . . . . . . . 42<br />
Menu <strong>de</strong> configuration TV, CBL-SAT et AUX . . . . . . . . . . . . . . . . . . . . . . . . . . . . . . . . . . . . . . 43<br />
Modification <strong>de</strong>s options du système . . . . . . . . . . . . . . . . . . . . . . . . . . . . . . . . . . . . . . . . . . . . . . . 44<br />
Utilisation du menu Système . . . . . . . . . . . . . . . . . . . . . . . . . . . . . . . . . . . . . . . . . . . . . . . . . . 44<br />
Pour afficher le menu Système . . . . . . . . . . . . . . . . . . . . . . . . . . . . . . . . . . . . . . . . . . . . . 44<br />
Pour modifier <strong>de</strong>s options système . . . . . . . . . . . . . . . . . . . . . . . . . . . . . . . . . . . . . . . . . . 45<br />
Options audio . . . . . . . . . . . . . . . . . . . . . . . . . . . . . . . . . . . . . . . . . . . . . . . . . . . . . . . . . . . . . . 46<br />
Options vidéo . . . . . . . . . . . . . . . . . . . . . . . . . . . . . . . . . . . . . . . . . . . . . . . . . . . . . . . . . . . . . . 47<br />
Options du media center . . . . . . . . . . . . . . . . . . . . . . . . . . . . . . . . . . . . . . . . . . . . . . . . . . . . . 48<br />
Options <strong>de</strong> la télécomman<strong>de</strong> . . . . . . . . . . . . . . . . . . . . . . . . . . . . . . . . . . . . . . . . . . . . . . . . . . 49<br />
Options <strong>de</strong> verrouillage DVD . . . . . . . . . . . . . . . . . . . . . . . . . . . . . . . . . . . . . . . . . . . . . . . . . . 50<br />
Définition d’un mot <strong>de</strong> passe et d’un niveau <strong>de</strong> restriction . . . . . . . . . . . . . . . . . . . . . . . . 50<br />
Système <strong>de</strong> classification <strong>de</strong> la Motion Picture Association of America (MPAA) . . . . . . . 51<br />
Entretien du système . . . . . . . . . . . . . . . . . . . . . . . . . . . . . . . . . . . . . . . . . . . . . . . . . . . . . . . . . . . 52<br />
Nettoyage . . . . . . . . . . . . . . . . . . . . . . . . . . . . . . . . . . . . . . . . . . . . . . . . . . . . . . . . . . . . . . . . . 52<br />
Nettoyage du media center . . . . . . . . . . . . . . . . . . . . . . . . . . . . . . . . . . . . . . . . . . . . . . . . 52<br />
Nettoyage <strong>de</strong>s enceintes . . . . . . . . . . . . . . . . . . . . . . . . . . . . . . . . . . . . . . . . . . . . . . . . . . 52<br />
Nettoyage <strong>de</strong>s disques . . . . . . . . . . . . . . . . . . . . . . . . . . . . . . . . . . . . . . . . . . . . . . . . . . . 52<br />
Remplacement <strong>de</strong>s piles <strong>de</strong> la télécomman<strong>de</strong> . . . . . . . . . . . . . . . . . . . . . . . . . . . . . . . . . . . . 53<br />
Accessoires . . . . . . . . . . . . . . . . . . . . . . . . . . . . . . . . . . . . . . . . . . . . . . . . . . . . . . . . . . . . . . . 53<br />
Dépannage . . . . . . . . . . . . . . . . . . . . . . . . . . . . . . . . . . . . . . . . . . . . . . . . . . . . . . . . . . . . . . . . . . . 54<br />
Tableau <strong>de</strong> dépannage . . . . . . . . . . . . . . . . . . . . . . . . . . . . . . . . . . . . . . . . . . . . . . . . . . . . . . . 54<br />
Service client . . . . . . . . . . . . . . . . . . . . . . . . . . . . . . . . . . . . . . . . . . . . . . . . . . . . . . . . . . . . . . 55<br />
Informations techniques . . . . . . . . . . . . . . . . . . . . . . . . . . . . . . . . . . . . . . . . . . . . . . . . . . . . . . . . . 56<br />
Device Co<strong>de</strong>s . . . . . . . . . . . . . . . . . . . . . . . . . . . . . . . . . . . . . . . . . . . . . . . . . . . . . . . . . . . . . . . . . A-1<br />
Co<strong>de</strong>s <strong>de</strong> configuration pour le câble . . . . . . . . . . . . . . . . . . . . . . . . . . . . . . . . . . . . . . . . . . . A-1<br />
Co<strong>de</strong>s <strong>de</strong> configuration pour le satellite . . . . . . . . . . . . . . . . . . . . . . . . . . . . . . . . . . . . . . . . . . A-2<br />
Co<strong>de</strong>s <strong>de</strong> configuration pour le téléviseur . . . . . . . . . . . . . . . . . . . . . . . . . . . . . . . . . . . . . . . . A-4<br />
Co<strong>de</strong>s <strong>de</strong> configuration pour le magnétoscope . . . . . . . . . . . . . . . . . . . . . . . . . . . . . . . . . . . . A-9<br />
Co<strong>de</strong>s <strong>de</strong> configuration pour l’enregistreur vidéo numérique . . . . . . . . . . . . . . . . . . . . . . . . A-11<br />
©2004 <strong>Bose</strong> Corporation. Toute reproduction, modification, distribution ou autre utilisation, même partielle, <strong>de</strong> ce document est interdite sans autorisation<br />
écrite préalable.<br />
Dolby et le symbole du double D sont <strong>de</strong>s marques <strong>de</strong> commerce <strong>de</strong> Dolby Laboratories. Fabriqué sous licence <strong>de</strong> Dolby Laboratories. Ouvrage non publié à<br />
caractère confi<strong>de</strong>ntiel. 1992-1997 Dolby Laboratories. Tous droits réservés.<br />
Ce produit intègre une technologie <strong>de</strong> défense <strong>de</strong>s droits d’auteurs protégée par les revendications <strong>de</strong> procédés <strong>de</strong> certains brevets américains et autres<br />
droits <strong>de</strong> propriété intellectuelle détenus par Macrovision Corporation et autres titulaires <strong>de</strong> ces droits. L’utilisation <strong>de</strong> ladite technologie doit être autorisée par<br />
Macrovision Corporation. Elle est consentie pour le seul usage domestique et certains autres usages limités <strong>de</strong> visionnage, sauf autorisation contraire <strong>de</strong><br />
Macrovision Corporation. Tout désassemblage ou démontage est interdit.<br />
« DTS » et « DTS Digital Surround » sont <strong>de</strong>s marques déposées <strong>de</strong> Digital Theater Systems, Inc.<br />
La technologie <strong>de</strong> compression audio MPEG Layer 3 est sous licence <strong>de</strong> Fraunhofer IIS et THOMSON Multimedia.<br />
Ce produit intègre une technologie <strong>de</strong> défense <strong>de</strong>s droits d’auteurs et d’autres droits <strong>de</strong> propriété intellectuelle détenus par Cirrus Logic, Inc. Il est soumis aux<br />
lois <strong>de</strong> protection <strong>de</strong>s droits d’auteurs <strong>de</strong>s États-Unis ainsi qu’à d’autres restrictions et protections d’octroi <strong>de</strong> licence. L’utilisation <strong>de</strong> ladite technologie se<br />
limite uniquement à l’utilisation <strong>de</strong>s circuits intégrés Cirrus Logic intégrés à ce produit. Tout désassemblage ou démontage est interdit.
Avant <strong>de</strong> commencer<br />
Introduction<br />
Nous vous remercions d’avoir acheté le système home cinéma <strong>Bose</strong> ® 3•2•1 série II ou 3•2•1<br />
GS série II, qui allie élégance et simplicité et vous offre un son incroyable grâce à une<br />
configuration audio très perfectionnée. Grâce à la technologie <strong>de</strong> traitement <strong>de</strong>s signaux<br />
déposée <strong>de</strong> <strong>Bose</strong>, les systèmes 3•2•1 série II élargissent le champ stéréo <strong>de</strong>s<br />
enregistrements et restituent les effets sonores <strong>de</strong>s films codés en mo<strong>de</strong> surround. Vous<br />
pouvez immédiatement apprécier les performances du système, car l’installation <strong>de</strong> ses<br />
éléments est très facile.<br />
Ce système se compose <strong>de</strong>s éléments suivants :<br />
• tuner AM/FM et lecteur DVD/CD intégrés dans une petite console,<br />
• enceintes <strong>de</strong> petite taille faciles à installer sur une étagère et module Acoustimass ®<br />
esthétique et facile à dissimuler,<br />
• télécomman<strong>de</strong> à infrarouge simple d’utilisation,<br />
• prises d’entrée sur la console pour connecter d’autres appareils audio (tels qu’un<br />
magnétoscope ou un récepteur câble ou satellite).<br />
Disques compatibles<br />
Le lecteur DVD/CD intégré au media center 3•2•1 série II peut lire les types <strong>de</strong> disques<br />
suivants (i<strong>de</strong>ntifiés par les logos correspondants) :<br />
•DVD vidéo •CD audio<br />
•CD vidéo<br />
•CD-R et CD-R/W<br />
• DVD-R, DVD+R • CD MP3<br />
Vérification <strong>de</strong> la compatibilité <strong>de</strong>s disques avec votre zone<br />
Pour qu’un disque et un lecteur DVD soient compatibles, ils doivent avoir le même numéro<br />
<strong>de</strong> zone. Le numéro <strong>de</strong> zone est attribué en fonction <strong>de</strong> l’endroit où le lecteur et le disque<br />
sont vendus. Les systèmes home cinéma 3•2•1 série II comportent un numéro <strong>de</strong> zone qui<br />
doit également correspondre à celui <strong>de</strong>s DVD lus.<br />
Vérifiez le numéro <strong>de</strong> zone figurant sur l’emballage du système home cinéma 3•2•1 série II<br />
ou sous le media center fourni avec le système. Assurez-vous ensuite <strong>de</strong> vous procurer<br />
uniquement <strong>de</strong>s DVD dont l’étiquette ou l’emballage indique le même numéro <strong>de</strong> zone.<br />
Par exemple, un lecteur DVD <strong>de</strong> la zone 1 doit présenter le logo suivant :<br />
Compatibilité avec le format MP3<br />
Pour être compatibles avec les systèmes home cinéma 3•2•1 série II ou 3•2•1 GS série II,<br />
les CD MP3 doivent répondre aux critères suivants :<br />
• Toutes les pistes doivent être gravées en une session unique et finalisée.<br />
• Le format <strong>de</strong> disque doit respecter la norme ISO9660.<br />
• Chaque fichier doit porter l’extension « .mp3 » et son nom ne doit comporter aucun autre<br />
point.<br />
5<br />
Français
Français<br />
6<br />
Introduction<br />
Glossaire<br />
Chapitre : En matière <strong>de</strong> DVD vidéo, division d’un titre. Le terme technique est PTT (part of<br />
title, partie <strong>de</strong> titre).<br />
Cinémascope : Le rapport d’écran le plus largement utilisé pour les longs métrages est 16:9,<br />
alors que le rapport d’écran <strong>de</strong> la plupart <strong>de</strong>s téléviseurs est 4:3. Il est désormais courant <strong>de</strong><br />
transférer les films sur vidéo avec <strong>de</strong>s ban<strong>de</strong>s noires dans la partie supérieure et la partie<br />
inférieure <strong>de</strong> l’image. L’image du film apparaît au format cinémascope sur la vidéo.<br />
Dolby Digital : Type <strong>de</strong> format <strong>de</strong> son surround multicanaux utilisé pour les disques.<br />
: Logo du format Dolby ® Digital.<br />
Dolby Laboratories : Développeur d’un système <strong>de</strong> codage perceptuel utilisé pour le<br />
son.<br />
DTS : Type <strong>de</strong> format <strong>de</strong> son surround multicanaux utilisé pour les disques.<br />
: Logo du format DTS.<br />
DVD : Acronyme signifiant le plus souvent Digital Vi<strong>de</strong>o Disc (disque vidéo numérique) ou<br />
Digital Versatile Disc (disque numérique polyvalent). Le stockage <strong>de</strong> son/images/données se<br />
fait sur <strong>de</strong>s disques optiques <strong>de</strong> 12 ou 8 cm.<br />
DVD vidéo : Norme <strong>de</strong> stockage et <strong>de</strong> reproduction du son et <strong>de</strong>s images sur <strong>de</strong>s DVD ROM,<br />
basée sur le format vidéo MPEG, les formats audio Dolby Digital et MPEG, ainsi que sur<br />
d’autres formats <strong>de</strong> données déposés.<br />
IR : Abréviation du terme « infrarouge ». Utilisé par les télécomman<strong>de</strong>s qui envoient/reçoivent<br />
<strong>de</strong>s instructions à l’ai<strong>de</strong> d’un rayon infrarouge.<br />
MP3 : Son MPEG-1 Layer III. Il s’agit d’un format <strong>de</strong> son compressé qui permet d’enregistrer<br />
plusieurs heures <strong>de</strong> musique sur un seul CD.<br />
MPEG : Type <strong>de</strong> compression <strong>de</strong> données utilisé pour le stockage audio ou vidéo sur disque.<br />
NTSC : Acronyme <strong>de</strong> National Television System Committee. Organisation qui a développé<br />
les systèmes <strong>de</strong> télévision en noir et blanc, puis en couleur aux États-Unis.<br />
PAL : Acronyme <strong>de</strong> Phase Alternate Line. Norme vidéo couramment utilisée en Europe<br />
occi<strong>de</strong>ntale.<br />
PCM : Format <strong>de</strong> codage numérique non compressé d’un signal analogique. Il s’agit du<br />
format du signal audio numérique utilisé pour les CD et les Laserdisc. C’est un flux <strong>de</strong><br />
données série codé pour la transmission ou l’enregistrement. Le format PCM est également<br />
utilisé pour <strong>de</strong> nombreux autres types <strong>de</strong> communications <strong>de</strong> données série.<br />
Piste : Morceau sonore enregistré individuellement sur un disque ou une cassette audio.<br />
Rapport d’écran : Forme <strong>de</strong> l’image rectangulaire d’un écran <strong>de</strong> télévision. Il représente la<br />
largeur <strong>de</strong> l’image par rapport à sa hauteur. L’image d’un téléviseur standard, selon la<br />
terminologie utilisée par ce secteur, est <strong>de</strong> 4 unités <strong>de</strong> largeur sur 3 unités <strong>de</strong> hauteur, soit 4:3<br />
(4 sur 3). 4:3 et 16:9 sont les <strong>de</strong>ux rapports d’écran standard pour les téléviseurs.<br />
S-vidéo : Norme d’interface vidéo qui transporte séparément les signaux <strong>de</strong> luminance et <strong>de</strong><br />
chrominance. Cette norme, également appelée Y/C, est généralement utilisée pour les<br />
connecteurs mini-DIN à quatre broches. La qualité <strong>de</strong> la norme S-vidéo est nettement<br />
supérieure à celle <strong>de</strong> la vidéo composite, car elle ne requiert pas <strong>de</strong> filtre en peigne pour<br />
séparer les signaux. La plupart <strong>de</strong>s télévisions haut <strong>de</strong> gamme possè<strong>de</strong>nt <strong>de</strong>s entrées<br />
S-vidéo.<br />
Titre : Contenu d’un DVD, qui peut inclure d’autres éléments que le film en lui-même.<br />
Vidéo composante : Signal vidéo divisé en trois parties : un signal <strong>de</strong> luminance et <strong>de</strong>ux<br />
signaux <strong>de</strong> couleurs (désignés par YPbPr). Il permet d’obtenir la meilleure qualité d’image en<br />
termes <strong>de</strong> résolution, mais ne peut pas être traité par tous les téléviseurs.
Garantie limitée<br />
Renseignements à conserver<br />
Introduction<br />
Vidéo composite : Signal vidéo unique comprenant <strong>de</strong>s informations <strong>de</strong> luminance, <strong>de</strong><br />
couleur et <strong>de</strong> synchronisation. Les systèmes NTSC et PAL sont <strong>de</strong>s exemples <strong>de</strong> systèmes<br />
vidéo composite.<br />
Les systèmes home cinéma 3•2•1 série II et 3•2•1 GS série II sont couverts par une garantie<br />
limitée transférable. Les conditions détaillées <strong>de</strong> la garantie limitée sont notées sur la carte<br />
d’enregistrement qui accompagne votre système. Veuillez remplir la section « Informations »<br />
<strong>de</strong> la carte et renvoyez-la par courrier à <strong>Bose</strong>. En cas d’oubli, les droits que vous confère<br />
cette garantie limitée ne s’en trouveront pas affectés.<br />
Les numéros <strong>de</strong> série se situent au-<strong>de</strong>ssous du media center et à l’arrière du module<br />
Acoustimass ® . Munissez-vous toujours <strong>de</strong> vos numéros <strong>de</strong> série avant <strong>de</strong> contacter le<br />
Service client <strong>de</strong> <strong>Bose</strong> ® .<br />
Modèle : 3•2•1 série II 3•2•1 GS série II Cochez la case appropriée.<br />
Numéro <strong>de</strong> série du media center : ___________________________________________________<br />
Numéro <strong>de</strong> série du module Acoustimass : ____________________________________________<br />
Nom du reven<strong>de</strong>ur : ________________________________________________________________<br />
Numéro <strong>de</strong> téléphone du reven<strong>de</strong>ur : _________________ Date d’achat : ___________________<br />
Nous vous conseillons <strong>de</strong> conserver votre reçu et votre carte d’enregistrement avec cette notice<br />
d’utilisation.<br />
7<br />
Français
Français<br />
8<br />
Installation du système<br />
Déballage<br />
Figure 1<br />
Contenu du carton<br />
d’emballage<br />
Votre système comporte<br />
l’un <strong>de</strong> cordons<br />
d’alimentation suivants :<br />
Cordon<br />
d’alimentation 120 V<br />
(États-Unis/Canada)<br />
Cordon d’alimentation<br />
15/230 V avec adaptateur<br />
(États-Unis/Europe)<br />
Cordon<br />
d’alimentation 230 V<br />
(Europe)<br />
Cordon<br />
d’alimentation 230 V<br />
(Royaume-Uni/<br />
Singapour)<br />
Cordon<br />
d’alimentation 240 V<br />
(Australie)<br />
Déballez le système avec précaution. Conservez tous les emballages, car ils constituent, en<br />
cas <strong>de</strong> besoin, la façon la plus sûre <strong>de</strong> transporter le système. Assurez-vous que toutes les<br />
pièces illustrées sur la Figure 1 figurent dans le carton.<br />
Si vous remarquez que l’un <strong>de</strong>s composants du système semble endommagé, n’essayez pas<br />
<strong>de</strong> l’utiliser. Avertissez immédiatement <strong>Bose</strong> ou un reven<strong>de</strong>ur <strong>Bose</strong> ® agréé. Pour contacter<br />
<strong>Bose</strong>, consultez la liste d’adresses incluse dans le carton d’emballage.<br />
AVERTISSEMENT : Pour éviter tout risque d’étouffement, gar<strong>de</strong>z les sacs plastiques hors <strong>de</strong><br />
portée <strong>de</strong>s enfants.<br />
Media center<br />
Télécomman<strong>de</strong><br />
Module<br />
Acoustimass<br />
Piles<br />
Antenne FM<br />
Câble du module<br />
Acoustimass ®<br />
Câble d’enceintes<br />
Remarque : Si vous avez fait<br />
l’acquisition d’un système 3•2•1<br />
GS série II, les connecteurs<br />
gauche et droit du câble<br />
d’enceintes porteront la mention<br />
«GS».<br />
Pieds en caoutchouc pour<br />
le module Acoustimass<br />
Câble stéréo<br />
Support d’antenne<br />
Antenne AM<br />
Votre système comporte l’un<br />
<strong>de</strong>s types d’enceintes suivants :<br />
Enceintes 3•2•1<br />
Enceintes 3•2•1 GS<br />
Pieds en caoutchouc<br />
pour enceintes<br />
Disque d’installation<br />
et <strong>de</strong> démonstration<br />
Remarque : C’est le moment <strong>de</strong> relever les numéros <strong>de</strong> série situés sous le media center et sur<br />
le module Acoustimass. Notez ces numéros sur la carte d’enregistrement <strong>de</strong> votre produit et<br />
dans l’espace prévu à cet effet page 7.<br />
ou<br />
Câble vidéo
Installation du système<br />
Choix d’un emplacement pour les éléments du système home cinéma 3•2•1<br />
série II<br />
Figure 2<br />
Exemple <strong>de</strong> positionnement<br />
pour le media center et les<br />
enceintes<br />
Les instructions suivantes et la Figure 2 vous permettent <strong>de</strong> choisir le meilleur emplacement,<br />
ainsi que la position la mieux appropriée pour les éléments <strong>de</strong> votre système home<br />
cinéma 3•2•1.<br />
Remarque : Ces recommandations sont fournies dans le but <strong>de</strong> vous offrir les meilleures<br />
performances possibles avec votre système. Cependant, d’autres emplacements peuvent<br />
s’avérer plus pratiques et vous fournir le son que vous souhaitez.<br />
Positionnement du media center<br />
ATTENTION : Ne bloquez jamais les orifices d’aération. Pour garantir un fonctionnement fiable<br />
du produit et le protéger contre tout risque <strong>de</strong> surchauffe, installez-le à un emplacement et dans<br />
une position permettant d’assurer une ventilation correcte. Par exemple, ne placez pas le produit<br />
sur un lit, un canapé ou toute autre surface semblable qui risquerait d’obstruer les ouvertures. Ne<br />
le placez pas dans un système intégré, tel qu’une bibliothèque ou une armoire, qui empêche une<br />
libre circulation <strong>de</strong> l’air à travers les orifices d’aération.<br />
• Placez le media center <strong>de</strong> sorte à ce que rien n’entrave l’ouverture du chargeur <strong>de</strong> disque<br />
du panneau avant.<br />
• Assurez-vous <strong>de</strong> placer le media center suffisamment près du module Acoustimass ® et <strong>de</strong>s<br />
enceintes pour que la longueur <strong>de</strong>s câbles soit suffisante.<br />
• De même, assurez-vous <strong>de</strong> le placer à proximité <strong>de</strong> tout autre appareil source<br />
supplémentaire (téléviseur, magnétoscope, récepteur câble) que vous envisagez <strong>de</strong><br />
raccor<strong>de</strong>r au système.<br />
Remarque : Assurez-vous que la partie avant du media center est bien dégagée, <strong>de</strong> façon à<br />
recevoir les comman<strong>de</strong>s IR (infrarouges) <strong>de</strong> la télécomman<strong>de</strong>.<br />
Enceinte<br />
gauche<br />
1m<br />
maximum<br />
1m<br />
minimum<br />
1m<br />
maximum<br />
Media center<br />
Enceinte<br />
droite<br />
Remarque : Les enceintes sont blindées magnétiquement afin d’éviter toute perturbation <strong>de</strong><br />
l’image du téléviseur.<br />
9<br />
Français
Français<br />
10<br />
Installation du système<br />
Figure 3<br />
Positionnement<br />
recommandé <strong>de</strong>s enceintes<br />
Positionnement <strong>de</strong>s enceintes<br />
Le choix d’un emplacement approprié pour les enceintes vous permettra <strong>de</strong> profiter<br />
pleinement <strong>de</strong>s effets sonores surround délivrés par votre système home cinéma 3•2•1.<br />
• Placez les <strong>de</strong>ux enceintes au-<strong>de</strong>ssus <strong>de</strong> la télévision ou à distance égale <strong>de</strong> celle-ci, à<br />
droite et à gauche (Figure 2). Placez les <strong>de</strong>ux enceintes à la même hauteur<br />
approximativement.<br />
• Placez chaque enceinte à une distance maximale <strong>de</strong> 1 mètre du téléviseur. Si vous<br />
placez les enceintes à une distance supérieure, le son peut sembler trop distant <strong>de</strong> l’image.<br />
• Si vous utilisez une étagère ou un meuble audio/vidéo, placez chaque enceinte à l’avant <strong>de</strong><br />
l’étagère. Si vous placez les enceintes au fond d’un espace fermé, vous risquez <strong>de</strong> modifier<br />
la qualité acoustique générale et <strong>de</strong> diminuer les effets sonores <strong>de</strong>s films.<br />
• Placez les enceintes à une distance minimale d’un mètre l’une <strong>de</strong> l’autre afin d’optimiser<br />
les performances du son surround.<br />
ATTENTION : La surface sur laquelle reposent les enceintes doit être stable et plane. Les<br />
enceintes risquent <strong>de</strong> bouger sous l’effet <strong>de</strong>s vibrations, en particulier si elles sont positionnées<br />
sur <strong>de</strong>s surfaces lisses, telles que le marbre, le verre ou le bois bien ciré. Si vous placez les<br />
enceintes sur une surface plane, veillez à fixer le plus petit <strong>de</strong>s <strong>de</strong>ux jeux <strong>de</strong> pieds en caoutchouc<br />
sous celles-ci. Si nécessaire, <strong>de</strong>s pieds supplémentaires (référence 178321) sont disponibles sur<br />
simple <strong>de</strong>man<strong>de</strong> auprès du service client <strong>de</strong> <strong>Bose</strong> ® . Pour contacter <strong>Bose</strong>, consultez la liste <strong>de</strong>s<br />
bureaux incluse dans le carton d’emballage.<br />
Remarque : Les enceintes peuvent être installées sur <strong>de</strong>s supports <strong>de</strong> fixation, <strong>de</strong>s pieds <strong>de</strong><br />
table ou <strong>de</strong>s pieds <strong>de</strong> sol <strong>Bose</strong>. Pour obtenir <strong>de</strong>s informations concernant les comman<strong>de</strong>s,<br />
reportez-vous à la section « Accessoires », page 53. Il est également possible <strong>de</strong> comman<strong>de</strong>r<br />
<strong>de</strong>s câbles supplémentaires ou plus longs.<br />
• Placez les enceintes sur leur base uniquement, avec le logo <strong>de</strong> <strong>Bose</strong> à l’endroit.<br />
• Orientez les enceintes directement vers la zone d’écoute. Ne les placez pas dans un angle.<br />
Si vous orientez l’une <strong>de</strong>s enceintes ou les <strong>de</strong>ux vers l’intérieur ou l’extérieur <strong>de</strong><br />
la zone d’écoute, vous risquez <strong>de</strong> modifier <strong>de</strong> façon significative les<br />
performances du système.
Figure 4<br />
Positionnement<br />
recommandé du module<br />
Acoustimass<br />
Figure 5<br />
Orientation recommandée<br />
pour le module<br />
Positionnement du module Acoustimass ®<br />
Installation du système<br />
• Positionnez le module Acoustimass ® à portée du câble <strong>de</strong> connexion au media center et<br />
d’une prise secteur.<br />
• Placez le module du même côté <strong>de</strong> la pièce que le téléviseur et les enceintes (Figure 4).<br />
• Placez le module à une distance minimale d’un mètre du téléviseur afin d’éviter toute<br />
perturbation <strong>de</strong> l’image.<br />
1m<br />
minimum<br />
• Fixez les pieds en caoutchouc <strong>de</strong> taille moyenne sous chaque pied du module. Les pieds<br />
en caoutchouc améliorent la stabilité du module et limitent les risques <strong>de</strong> rayures.<br />
• Choisissez un emplacement pratique (sous une table, <strong>de</strong>rrière un canapé, un fauteuil ou<br />
<strong>de</strong>s ri<strong>de</strong>aux), mais veillez à ne pas obstruer les orifices d’aération du module.<br />
• Dirigez le port du module vers la pièce ou le long du mur. Vous éviterez ainsi d’obstruer<br />
l’évent ou <strong>de</strong> produire une suramplification <strong>de</strong>s basses.<br />
• Positionnez le module Acoustimass verticalement sur ses pieds. Ne le faites pas reposer<br />
sur un côté ou sur toute autre extrémité (Figure 5).<br />
ATTENTION : N’obstruez pas les ouvertures situées à l’arrière du module, car elles assurent la<br />
ventilation du circuit intégré.<br />
ATTENTION : Le module Acoustimass génère un champ magnétique. Bien que celui-ci ne<br />
représente pas un danger immédiat pour vos cassettes vidéo, vos cassettes audio ou tout autre<br />
support magnétique, vous <strong>de</strong>vez éviter <strong>de</strong> ranger ce type <strong>de</strong> support sur ou à proximité du<br />
module.<br />
ACINPUT<br />
MUSICCENTER<br />
11<br />
Français
Français<br />
12<br />
Installation du système<br />
Branchement du système<br />
Figure 6<br />
Connexion du module<br />
Acoustimass au media<br />
center<br />
Figure 7<br />
Connexion du câble<br />
d’enceintes au module<br />
Acoustimass<br />
ATTENTION : Ne branchez pas le module Acoustimass ® à une prise secteur avant d’avoir<br />
connecté tous les composants.<br />
Remarque : Si vous avez besoin <strong>de</strong> câbles audio supplémentaires ou plus longs pour effectuer<br />
ces branchements, contactez le service client <strong>de</strong> <strong>Bose</strong>. Reportez-vous à la liste <strong>de</strong>s bureaux<br />
incluse dans le carton d’emballage.<br />
Connexion du module Acoustimass ® au media center<br />
Connectez l’une <strong>de</strong>s extrémités du câble du module Acoustimass à la prise Acoustimass<br />
Module située sur le panneau arrière du media center (Figure 6). Connectez l’autre extrémité<br />
du câble du module Acoustimass à la prise d’entrée ( ) située à l’arrière du module<br />
Acoustimass.<br />
Remarque : Les prises <strong>de</strong>stinées au câble du module Acoustimass sont conçues <strong>de</strong> façon à ce<br />
que les connecteurs du câble ne puissent s’insérer que dans un seul sens. Veillez à ce que la flèche<br />
figurant sur chaque connecteur soit orientée vers le haut lorsque vous connectez le câble.<br />
Panneau arrière du<br />
media center<br />
Câble du module<br />
Acoustimass<br />
Prise d’entrée<br />
du module<br />
Acoustimass<br />
Connexion <strong>de</strong>s enceintes au module Acoustimass<br />
1. Insérez la fiche simple du câble d’enceintes dans la prise SPEAKERS située sur le<br />
panneau arrière du module Acoustimass (Figure 7). Serrez les <strong>de</strong>ux vis <strong>de</strong> la fiche.<br />
Câble du module<br />
Acoustimass<br />
Prise d’entrée<br />
du module<br />
Acoustimass<br />
Câble d’enceintes
Figure 8<br />
Séparation <strong>de</strong>s cordons<br />
<strong>de</strong>s enceintes gauche et<br />
droite<br />
Figure 9<br />
Connexion <strong>de</strong>s enceintes<br />
droite et gauche<br />
Installation du système<br />
2. À l’autre extrémité du câble d’enceintes, séparez autant que nécessaire les cordons<br />
<strong>de</strong>s enceintes gauche et droite, <strong>de</strong> façon à ce qu’ils puissent atteindre chaque enceinte<br />
(Figure 8).<br />
3. Insérez le connecteur LEFT (gauche) du câble d’enceintes dans la prise située à l’arrière<br />
<strong>de</strong> l’enceinte gauche (Figure 9). Insérez le connecteur RIGHT (droite) du câble<br />
d’enceintes dans la prise située à l’arrière <strong>de</strong> l’enceinte droite.<br />
Cordon<br />
d’enceinte<br />
RIGHT<br />
(droite)<br />
RIGHT<br />
Remarque : Si vous avez fait l’acquisition d’un<br />
système 3•2•1 GS série II, les connecteurs<br />
gauche et droit du câble d’enceintes porteront<br />
la mention « GS ».<br />
Remarque : Vérifiez que les connecteurs du câble sont correctement insérés dans les prises<br />
<strong>de</strong>s enceintes.<br />
LEFT<br />
Cordon<br />
d’enceinte<br />
LEFT<br />
(gauche)<br />
13<br />
Français
Français<br />
14<br />
Installation du système<br />
Figure 10<br />
Connexion <strong>de</strong>s antennes<br />
Antenne dipôle FM<br />
Antenne cadre AM<br />
Connexion <strong>de</strong>s antennes<br />
Le panneau arrière du media center comporte <strong>de</strong>s prises pour les antennes AM et FM fournies<br />
avec votre système (Figure 10). Déroulez les fils <strong>de</strong>s antennes pour obtenir la meilleure<br />
réception possible.<br />
Remarque : Il est possible<br />
d’utiliser une antenne extérieure au<br />
lieu <strong>de</strong>s antennes intérieures<br />
fournies. Pour ajouter une antenne<br />
extérieure, consultez un installateur<br />
qualifié. Suivez les consignes <strong>de</strong><br />
sécurité fournies avec l’antenne.<br />
Media center<br />
Antenne FM<br />
Connectez l’antenne FM à la prise FM située sur le panneau arrière du media center.<br />
Dépliez les branches <strong>de</strong> l’antenne et déplacez-les jusqu’à obtenir une réception FM optimale.<br />
Positionnez l’antenne aussi loin que possible du media center et <strong>de</strong>s autres appareils.<br />
Antenne AM<br />
Connectez l’antenne AM à la prise AM située sur le panneau arrière du media center. Placez<br />
l’antenne cadre à une distance d’au moins 50 cm du media center et d’au moins 1,20 m du<br />
module Acoustimass ® . Orientez l’antenne cadre dans différentes directions afin d’obtenir une<br />
réception AM optimale. Suivez les instructions fournies avec l’antenne cadre AM pour la<br />
placer sur sa base ou la fixer au mur.<br />
Connexion <strong>de</strong> la radio FM par câble<br />
Certains opérateurs <strong>de</strong> télévision par câble peuvent également transmettre <strong>de</strong>s signaux radio<br />
FM jusque chez vous par l’intermédiaire du câble. La connexion s’effectue sur la fiche FM<br />
externe, située sur le panneau arrière du media center. Pour vous connecter à ce service,<br />
contactez votre opérateur <strong>de</strong> télévision par câble.<br />
Remarque : Assurez-vous que l’installation <strong>de</strong> radio câblée dispose d’un aiguilleur <strong>de</strong> signaux<br />
TV/FM <strong>de</strong> façon à ce que seule la ban<strong>de</strong> FM, et non la ban<strong>de</strong> <strong>de</strong> la TV câblée, soit reçue par le<br />
media center. En cas <strong>de</strong> besoin, contactez votre opérateur <strong>de</strong> télévision par câble.
Connexion du téléviseur au media center<br />
Figure 11<br />
Connexion du téléviseur au<br />
media center par vidéo<br />
composite<br />
Installation du système<br />
Remarque : Si vous envisagez d’utiliser votre système 3•2•1 avec un téléviseur et un<br />
magnétoscope, ignorez ce chapitre et passez directement à la section « Connexion du téléviseur<br />
et du magnétoscope au media center », page 16.<br />
Réalisation <strong>de</strong>s connexions audio<br />
Remarque : Si votre téléviseur n’est pas équipé <strong>de</strong> prise <strong>de</strong> sortie audio, reportez-vous à la section<br />
« Si votre téléviseur n’est pas équipé <strong>de</strong> sorties audio », page 17. Dans le cas contraire, continuez.<br />
1. Connectez l’une <strong>de</strong>s extrémités du câble stéréo fourni aux prises d’entrée TV Audio IN<br />
situées sur le panneau arrière du media center (Figure 11). Insérez la fiche RCA blanche<br />
dans la prise blanche TV L. Insérez la fiche RCA rouge dans la prise rouge TV R.<br />
2. Connectez l’autre extrémité du câble stéréo aux prises <strong>de</strong> sortie audio <strong>de</strong> votre<br />
téléviseur. Insérez la fiche RCA blanche dans la prise blanche AUDIO OUT L. Insérez<br />
la fiche RCA rouge dans la prise rouge AUDIO OUT R.<br />
Réalisation <strong>de</strong>s connexions vidéo composite<br />
Remarque : Certains modèles <strong>de</strong> téléviseurs plus anciens comportent <strong>de</strong>s connecteurs <strong>de</strong><br />
câbles TV standard, mais pas d’entrée S-vidéo ou vidéo composite. De telles télévisions ne sont<br />
pas compatibles avec les lecteurs DVD et nécessitent l’utilisation d’un modulateur <strong>de</strong> fréquences<br />
radio pour réaliser cette connexion. Vous pouvez vous procurer un modulateur <strong>de</strong> fréquences<br />
radio auprès d’un reven<strong>de</strong>ur <strong>de</strong> matériel électronique.<br />
1. Insérez l’une <strong>de</strong>s extrémités du câble vidéo fourni (jaune) dans la prise Vi<strong>de</strong>o OUT C<br />
(composite) située à l’arrière du media center (Figure 11).<br />
2. Insérez l’autre extrémité du câble vidéo dans l’une <strong>de</strong>s prises d’entrée vidéo <strong>de</strong> votre<br />
téléviseur.<br />
Notez le nom <strong>de</strong> l’entrée vidéo du téléviseur à laquelle vous avez connecté le<br />
câble vidéo (par exemple : Vi<strong>de</strong>o 1, Input 1 ou Aux). Vous <strong>de</strong>vrez sélectionner<br />
l’entrée vidéo correspondante sur votre téléviseur pour visionner le signal vidéo<br />
transmis par le système 3•2•1.<br />
Câble vidéo<br />
(connecteurs jaunes)<br />
Câble stéréo<br />
(connecteurs rouges et blancs)<br />
Panneau arrière du media center<br />
*<br />
Panneau <strong>de</strong> connexion du téléviseur<br />
* Ces connecteurs peuvent être nommés « FIXED », « MONITOR » ou « HiFi ».<br />
TV<br />
15<br />
Français
Français<br />
16<br />
Installation du système<br />
Connexion du téléviseur et du magnétoscope au media center<br />
Figure 12<br />
Connexion d’un téléviseur<br />
et d’un magnétoscope au<br />
media center<br />
Câble stéréo<br />
(connecteurs rouges et<br />
blancs)<br />
Remarque : Vous avez <strong>de</strong>ux possibilités pour connecter votre téléviseur et votre magnétoscope<br />
au media center. Avant <strong>de</strong> commencer, vous <strong>de</strong>vez déterminer si votre téléviseur dispose <strong>de</strong><br />
prises <strong>de</strong> sortie audio. Reportez-vous à la notice d’utilisation <strong>de</strong> votre téléviseur pour plus<br />
d’informations.<br />
Si votre téléviseur est équipé <strong>de</strong> sorties audio<br />
Si votre téléviseur est équipé <strong>de</strong> prises <strong>de</strong> sortie audio, vous pouvez acheminer directement<br />
le son <strong>de</strong> celui-ci vers le système home cinéma 3•2•1 (Figure 12).<br />
1. Connectez l’une <strong>de</strong>s extrémités du câble stéréo fourni aux prises d’entrée TV Audio IN<br />
situées sur le panneau arrière du media center. Insérez la fiche RCA blanche dans la prise<br />
blanche TV L. Insérez la fiche RCA rouge dans la prise rouge TV R.<br />
2. Connectez l’autre extrémité du câble stéréo aux prises <strong>de</strong> sortie audio <strong>de</strong> votre<br />
téléviseur. Insérez la fiche RCA blanche dans la prise blanche AUDIO OUT L. Insérez la<br />
fiche RCA rouge dans la prise rouge AUDIO OUT R.<br />
3. Insérez l’une <strong>de</strong>s extrémités du câble vidéo fourni (jaune) dans la prise Vi<strong>de</strong>o OUT C<br />
(composite) située à l’arrière du media center. Insérez l’autre extrémité du câble vidéo<br />
dans l’une <strong>de</strong>s prises d’entrée vidéo <strong>de</strong> votre téléviseur.<br />
Notez le nom <strong>de</strong> l’entrée vidéo du téléviseur à laquelle vous avez connecté le<br />
câble vidéo (par exemple : Vi<strong>de</strong>o 1, Input 1 ou Aux). Vous <strong>de</strong>vrez sélectionner<br />
l’entrée vidéo correspondante sur votre téléviseur pour visionner le signal vidéo<br />
transmis par le système 3•2•1.<br />
Câble vidéo<br />
(connecteurs jaunes)<br />
*<br />
Panneau <strong>de</strong><br />
connexion du<br />
téléviseur<br />
Récepteur câble/satellite<br />
(le cas échéant)<br />
Câble<br />
existant<br />
Câble<br />
existant<br />
* Ces connecteurs peuvent être nommés « FIXED »,<br />
« MONITOR » ou « HiFi ».<br />
Magnétoscope<br />
TV
Figure 13<br />
Installation du système<br />
lorsque le téléviseur ne<br />
comporte pas <strong>de</strong> prises<br />
<strong>de</strong> sortie audio<br />
Panneau arrière du media center<br />
Câble stéréo<br />
(connecteurs rouges et blancs)<br />
IMPORTANT :<br />
Si vous connectez votre téléviseur et votre<br />
magnétoscope <strong>de</strong> cette façon, vous <strong>de</strong>vrez<br />
mettre votre magnétoscope sous tension et<br />
sélectionner la source AUX sur la<br />
télécomman<strong>de</strong> 3•2•1 afin d’écouter le son<br />
<strong>de</strong>s programmes télévisés.<br />
Installation du système<br />
Si votre téléviseur n’est pas équipé <strong>de</strong> sorties audio<br />
Si votre téléviseur n’est pas équipé <strong>de</strong> prises <strong>de</strong> sortie audio, vous <strong>de</strong>vrez acheminer le son<br />
vers le système home cinéma 3•2•1 via une source secondaire, telle qu’un magnétoscope.<br />
Pour ce faire, vous aurez besoin d’un câble vidéo supplémentaire, disponible auprès d’un<br />
reven<strong>de</strong>ur <strong>de</strong> matériel électronique.<br />
1. Connectez l’une <strong>de</strong>s extrémités du câble stéréo fourni aux prises d’entrée AUX Audio<br />
IN situées sur le panneau arrière du media center (Figure 13). Insérez la fiche RCA<br />
blanche dans la prise blanche AUX L. Insérez la fiche RCA rouge dans la prise rouge<br />
AUX R.<br />
2. Connectez l’autre extrémité du câble stéréo aux prises <strong>de</strong> sortie AUDIO OUT <strong>de</strong> votre<br />
magnétoscope. Insérez la fiche RCA blanche dans la prise blanche AUDIO OUT L.<br />
Insérez la fiche RCA rouge dans la prise rouge AUDIO OUT R.<br />
3. Insérez l’une <strong>de</strong>s extrémités du câble vidéo fourni (jaune) dans la prise VIDEO OUT<br />
située à l’arrière <strong>de</strong> votre magnétoscope. Insérez l’autre extrémité du câble vidéo fourni<br />
dans la prise Vi<strong>de</strong>o IN C (composite) située à l’arrière du media center.<br />
4. Insérez l’une <strong>de</strong>s extrémités du second câble vidéo (jaune) dans la prise Vi<strong>de</strong>o OUT C<br />
(composite) située à l’arrière du media center. Insérez l’autre extrémité du second câble<br />
vidéo dans l’une <strong>de</strong>s prises d’entrée vidéo <strong>de</strong> votre téléviseur.<br />
Notez le nom <strong>de</strong> l’entrée vidéo du téléviseur à laquelle vous avez connecté le<br />
câble vidéo (par exemple : Vi<strong>de</strong>o 1, Input 1 ou Aux). Vous <strong>de</strong>vrez sélectionner<br />
l’entrée vidéo correspondante sur votre téléviseur pour visionner le signal vidéo<br />
transmis par le système 3•2•1.<br />
Câbles vidéo<br />
(connecteurs jaunes)<br />
Panneau <strong>de</strong> connexion<br />
du téléviseur<br />
Récepteur câble/satellite<br />
Magnétoscope<br />
TV<br />
Câble<br />
existant<br />
Panneau <strong>de</strong><br />
connexion du<br />
magnétoscope<br />
Câble<br />
existant<br />
17<br />
Français
Français<br />
18<br />
Installation du système<br />
Options d’installation avancée<br />
Figure 14<br />
Connexion du téléviseur au<br />
media center par S-vidéo<br />
IMPORTANT :<br />
Si vous connectez<br />
votre téléviseur au<br />
media center par<br />
connexion S-vidéo,<br />
vous <strong>de</strong>vez également<br />
utiliser une connexion<br />
S-vidéo pour<br />
connecter tous les<br />
autres appareils (tels<br />
qu’un récepteur câble<br />
ou un magnétoscope)<br />
au media center.<br />
Remarques concernant les magnétoscopes<br />
• Il est possible que certains combinés téléviseur/magnétoscope ne fonctionnent pas avec<br />
les systèmes home cinéma 3•2•1 série II. Reportez-vous à la notice d’utilisation <strong>de</strong> votre<br />
combiné téléviseur/magnétoscope pour plus d’informations.<br />
• Un magnétoscope stéréo est nécessaire pour obtenir <strong>de</strong>s performances acoustiques<br />
optimales. Si votre magnétoscope dispose d’une seule sortie audio et ne comporte pas la<br />
mention Stéréo ou Hi-fi, il s’agit d’un magnétoscope mono. Vous <strong>de</strong>vrez alors utiliser un<br />
câble adaptateur Y (disponible dans les magasins d’électronique) pour connecter la source<br />
audio au media center. Dans ce cas, vous <strong>de</strong>vrez sélectionner « Décodage mono » (voir<br />
« Menu <strong>de</strong> configuration TV, CBL-SAT et AUX », page 43) pour que votre système 3•2•1<br />
simule les effets sonores surround à partir <strong>de</strong> cette source mono. Dans le cas contraire,<br />
les <strong>de</strong>ux enceintes diffuseront un son mono.<br />
Réalisation <strong>de</strong> connexion S-vidéo (qualité vidéo supérieure)<br />
La prise d’entrée S-vidéo, figurant sur <strong>de</strong> nombreux téléviseurs, permet d’obtenir une image<br />
<strong>de</strong> meilleure qualité que la connexion par sortie vidéo composite, illustrée Figure 11. Cette<br />
connexion requiert l’utilisation d’un câble S-vidéo, que vous pouvez vous procurer auprès <strong>de</strong><br />
votre reven<strong>de</strong>ur <strong>Bose</strong> ® ou d’un reven<strong>de</strong>ur local <strong>de</strong> matériel électronique.<br />
• Insérez l’une <strong>de</strong>s extrémités du câble S-vidéo dans la prise <strong>de</strong> sortie S-Vi<strong>de</strong>o OUT située<br />
sur le media center (Figure 14).<br />
• Insérez l’autre extrémité du câble S-vidéo dans la prise d’entrée S-VIDEO IN <strong>de</strong> votre<br />
téléviseur.<br />
Câble stéréo<br />
(connecteurs rouges et<br />
blancs)<br />
Câble S-vidéo<br />
Panneau arrière du media center<br />
Panneau <strong>de</strong> connexion du téléviseur<br />
TV
Figure 15<br />
Connexion du téléviseur<br />
au media center par vidéo<br />
composante<br />
Installation du système<br />
Réalisation <strong>de</strong> connexion par vidéo composante (meilleure qualité vidéo)<br />
Remarque : La connexion par vidéo composante est nécessaire pour utiliser la fonction <strong>de</strong><br />
balayage progressif <strong>de</strong> votre système 3•2•1. Votre téléviseur doit également être compatible<br />
avec cette fonction. Pour activer la fonction <strong>de</strong> balayage progressif, reportez-vous à la section<br />
« Options vidéo », page 47.<br />
Pour obtenir la meilleure qualité vidéo lors <strong>de</strong> la lecture d’un DVD, vous <strong>de</strong>vez connecter le<br />
media center au téléviseur par l’intermédiaire d’une connexion vidéo composante. Pour ce<br />
faire, votre téléviseur doit comporter <strong>de</strong>s prises vidéo composante (généralement nommées<br />
Y, Pb et Pr). Reportez-vous à la notice d’utilisation <strong>de</strong> votre téléviseur pour plus<br />
d’informations.<br />
Pour réaliser cette connexion par vidéo composante, vous <strong>de</strong>vez utiliser trois câbles vidéo<br />
suffisamment longs pour relier le media center à votre téléviseur. (Figure 15). Si ces câbles ne<br />
sont pas fournis avec votre téléviseur, vous pouvez les acheter séparément.<br />
1. Sur le panneau arrière du media center, connectez un câble vidéo aux prises <strong>de</strong> sortie<br />
vidéo Component Y, Pb et Pr (Figure 15).<br />
2. Connectez l’autre extrémité <strong>de</strong> chaque câble à la prise vidéo composante<br />
correspondante (i<strong>de</strong>ntifiée par un co<strong>de</strong> <strong>de</strong> couleur ou une lettre) à l’arrière <strong>de</strong> votre<br />
téléviseur.<br />
Panneau arrière du media center<br />
Câble stéréo<br />
(connecteurs rouges<br />
et blancs)<br />
Panneau <strong>de</strong> connexion du téléviseur<br />
Prises vidéo composante i<strong>de</strong>ntifiées par<br />
<strong>de</strong>s co<strong>de</strong>s <strong>de</strong> couleur (Y, Pb et Pr)<br />
Câble vidéo<br />
composante<br />
REMARQUE IMPOTANTE POUR LES UTILISATEURS DE VIDÉO COMPOSANTE<br />
Les signaux d’entrée reçus par les prises C (Composite) ou S-Vi<strong>de</strong>o IN ne sont pas<br />
transmis aux prises <strong>de</strong> sortie vidéo composante Component vi<strong>de</strong>o OUT. Si vous<br />
connectez un appareil vidéo externe aux prises d’entrée vidéo C ou S-Vi<strong>de</strong>o IN, vous<br />
<strong>de</strong>vez également relier les prises <strong>de</strong> sortie vidéo C ou S-Vi<strong>de</strong>o OUT du media center aux<br />
prises d’entrée vidéo respectives <strong>de</strong> votre téléviseur. Pour visionner l’entrée vidéo externe<br />
sur votre téléviseur, vous <strong>de</strong>vrez sélectionner l’entrée vidéo utilisée pour cet appareil sur<br />
votre téléviseur. Pour afficher les menus à l’écran du système 3-2-1, vous <strong>de</strong>vrez à nouveau<br />
sélectionner l’entrée vidéo composante sur votre téléviseur.<br />
Remarque : Pour obtenir plus d’informations ou comman<strong>de</strong>r <strong>de</strong>s câbles vidéo, adressez-vous<br />
à un magasin <strong>de</strong> matériel électronique ou à un reven<strong>de</strong>ur <strong>Bose</strong> ® agréé.<br />
19<br />
Français
Français<br />
20<br />
Installation du système<br />
Figure 16<br />
Prises d’entrée audio<br />
numérique du media center<br />
Connexion d’appareils audio numériques<br />
Certains appareils audio comportent une sortie audio numérique afin d’offrir <strong>de</strong>s<br />
performances acoustiques optimales. Utilisez un câble numérique optique ou un câble<br />
numérique coaxial pour connecter cette sortie à une entrée numérique du media center. Vous<br />
pouvez vous procurer les câbles nécessaires auprès d’un reven<strong>de</strong>ur <strong>de</strong> matériel électronique.<br />
Sur le panneau arrière du media center, connectez un câble numérique optique à la prise<br />
OPTICAL. Connectez un câble coaxial à l’une <strong>de</strong>s prises d’entrée audio i<strong>de</strong>ntifiées par la<br />
lettre D.<br />
Remarque : Les entrées audio numériques du système 3•2•1 ne peuvent pas déco<strong>de</strong>r un flux<br />
<strong>de</strong> données binaires DTS provenant d’un appareil audio externe. Seul le flux <strong>de</strong> données binaires<br />
DTS provenant du lecteur DVD interne peut être décodé.<br />
Remarque : Avant <strong>de</strong> pouvoir utiliser la connexion optique, vous <strong>de</strong>vrez affecter le connecteur<br />
optique à la source audio appropriée dans le menu <strong>de</strong> configuration du système. Reportez-vous<br />
à la section « Options du media center », page 48.<br />
Prise d’entrée audio<br />
numérique optique<br />
Prises d’entrée audio<br />
numérique coaxiales<br />
Connexion d’un récepteur câble/satellite, d’un téléviseur et d’un<br />
magnétoscope au media center<br />
Le système home cinéma 3•2•1 vous offre la possibilité <strong>de</strong> connecter directement jusqu’à<br />
trois appareils audio externes, y compris votre téléviseur, au media center.<br />
La Figure 17 vous présente une installation avancée comportant un téléviseur, un<br />
magnétoscope et un récepteur câble/satellite. Dans cette installation, notez les points<br />
suivants :<br />
• Les connexions S-vidéo sont utilisées pour transmettre le signal provenant du récepteur<br />
câble/satellite au media center. Par conséquent, le signal <strong>de</strong> sortie vidéo du media center<br />
doit également être transmis au téléviseur par l’intermédiaire d’une connexion S-vidéo.<br />
• Les connexions audio illustrées pour le récepteur câble/satellite sont <strong>de</strong> type analogique et<br />
coaxiale numérique. Vous pouvez éventuellement utiliser une connexion numérique<br />
optique. Cependant, avant <strong>de</strong> pouvoir utiliser la connexion optique, vous <strong>de</strong>vrez affecter<br />
le connecteur optique à la source audio que constitue le récepteur câble/satellite dans le<br />
menu <strong>de</strong> configuration du système. Reportez-vous à la section « Options du media<br />
center », page 48.<br />
• Lorsque vous connectez un appareil audio aux prises du media center, veillez à faire<br />
correspondre le connecteur rouge au canal <strong>de</strong> droite (R) et le connecteur blanc (ou noir) au<br />
canal <strong>de</strong> gauche (L).<br />
• Pour plus d’informations concernant le branchement du magnétoscope à la télévision,<br />
reportez vous aux manuels d’utilisation <strong>de</strong> ces appareils vidéo.<br />
Remarque : Les recommandations incluses dans cette notice d’utilisation constituent <strong>de</strong>s<br />
suggestions élémentaires pour la connexion d’appareils externes au système 3•2•1 série II.<br />
Les instructions et la terminologie relatives à ces appareils externes peuvent varier en fonction<br />
<strong>de</strong>s fabricants. Reportez-vous à la notice d’utilisation <strong>de</strong> ces appareils pour plus d’informations<br />
sur leur installation et leur utilisation avant <strong>de</strong> réaliser toute connexion.
Figure 17<br />
Installation avancée :<br />
téléviseur, magnétoscope et<br />
récepteur câble/satellite<br />
Sortie<br />
S-vidéo<br />
CBL-SAT<br />
Connexion audio<br />
analogique CBL-SAT<br />
Câble/satellite<br />
Magnétoscope<br />
Connexion audio analogique<br />
du magnétoscope<br />
Connexion S-vidéo<br />
du media center au<br />
téléviseur<br />
Media center<br />
Connexion<br />
audio<br />
numérique<br />
CBL-SAT<br />
Signal CBL-SAT<br />
transmis au<br />
magnétoscope<br />
Signal CBL-SAT<br />
transmis au<br />
téléviseur<br />
Installation du système<br />
Service câble/<br />
satellite<br />
(CBL-SAT)<br />
Remarque : Pour plus d’informations sur les connexions avancées, reportez-vous au DVD<br />
d’installation fourni avec votre système home cinéma 3•2•1 série II.<br />
TV<br />
21<br />
Français
Français<br />
22<br />
Installation du système<br />
Figure 18<br />
Connexion d’une console<br />
<strong>de</strong> jeux<br />
Panneau <strong>de</strong> connexion<br />
<strong>de</strong> la console <strong>de</strong> jeux<br />
Connexion d’une console <strong>de</strong> jeux<br />
Connectez la sortie audio <strong>de</strong> la console <strong>de</strong> jeux aux prises d’entrée AUX Left (gauche) et<br />
Right (droite). Connectez la sortie vidéo <strong>de</strong> la console <strong>de</strong> jeux à la prise d’entrée vidéo C<br />
(composite) Vi<strong>de</strong>o IN.<br />
Media center<br />
Panneau <strong>de</strong> connexion du téléviseur<br />
IMPORTANT :<br />
Si vous connectez votre console <strong>de</strong> jeux <strong>de</strong> cette façon, vous<br />
<strong>de</strong>vrez sélectionner la source AUX sur la télécomman<strong>de</strong> du<br />
système 3•2•1 afin d’entendre le son <strong>de</strong> la console.
Mise en place <strong>de</strong>s piles <strong>de</strong> la télécomman<strong>de</strong><br />
Figure 19<br />
Mise en place <strong>de</strong>s piles<br />
Installation du système<br />
1. Faites glisser le compartiment <strong>de</strong>s piles situé à l’arrière <strong>de</strong> la télécomman<strong>de</strong> pour l’ouvrir<br />
(Figure 19).<br />
2. Insérez les <strong>de</strong>ux piles AA (IEC-R6) 1,5 V fournies ou <strong>de</strong>s piles équivalentes, comme<br />
illustré. Faites correspondre les symboles plus (+) et moins (–) <strong>de</strong>s piles à ceux <strong>de</strong> la<br />
télécomman<strong>de</strong>.<br />
3. Remettez le couvercle en place.<br />
Remarque : Remplacez les piles dès que la télécomman<strong>de</strong> cesse <strong>de</strong> fonctionner ou que sa<br />
portée semble avoir diminué.<br />
Couvercle du<br />
compartiment<br />
à piles<br />
(2) piles AA (IEC R6)<br />
+<br />
+<br />
23<br />
Français
Français<br />
24<br />
Installation du système<br />
Branchement du cordon d’alimentation<br />
Figure 20<br />
Connexion au secteur<br />
Prise du cordon<br />
d’alimentation<br />
ATTENTION : Pour les modèles bi-tension, assurez-vous que le commutateur bi-tension à<br />
l’arrière du module Acoustimass ® est réglé sur la tension appropriée (115 V ou 230 V) avant <strong>de</strong><br />
le brancher au secteur. En cas <strong>de</strong> doute, renseignez-vous auprès <strong>de</strong>s autorités locales<br />
compétentes.<br />
1. Insérez le petit connecteur du cordon d’alimentation dans la prise AC INPUT du module<br />
Acoustimass (Figure 20).<br />
2. Branchez l’autre extrémité du cordon sur une prise secteur.<br />
Remarque : Pour les modèles 220-240 V, positionnez le commutateur POWER du module<br />
Acoustimass sur ( l ) (marche).<br />
Interrupteur marche/arrêt<br />
Remarque : Figure uniquement<br />
sur les systèmes 220-240 V.<br />
Commutateur <strong>de</strong><br />
sélection 115/230 V<br />
115V<br />
Remarque : Figure uniquement sur<br />
les systèmes bi-tension 115/230 V.
Vérification <strong>de</strong> l’installation <strong>de</strong> votre système<br />
Installation du système<br />
1. Vérifiez les points suivants avant <strong>de</strong> continuer :<br />
• Tous les câbles sont connectés pour la configuration que vous avez choisie.<br />
• Les piles ont été installées dans la télécomman<strong>de</strong>.<br />
• Le cordon d’alimentation a été installé et branché dans une prise secteur en état <strong>de</strong><br />
fonctionnement.<br />
2. Mettez votre téléviseur sous tension. Utilisez la télécomman<strong>de</strong> fournie avec votre<br />
téléviseur.<br />
3. Sélectionnez l’entrée vidéo appropriée sur votre téléviseur pour visionner le<br />
signal vidéo transmis par le système 3•2•1.<br />
• Reportez-vous au nom <strong>de</strong> l’entrée vidéo choisie sur votre téléviseur lors <strong>de</strong><br />
l’installation.<br />
• Utilisez la télécomman<strong>de</strong> <strong>de</strong> votre téléviseur pour sélectionner l’entrée vidéo<br />
correspondant à votre système 3•2•1. La touche <strong>de</strong> sélection <strong>de</strong> l’entrée vidéo peut<br />
être nommé « TV Input », « TV/VCR ou « AV ». Reportez-vous à la notice d’utilisation<br />
<strong>de</strong> votre téléviseur pour obtenir <strong>de</strong> l’ai<strong>de</strong>.<br />
4. Désactivez les enceintes <strong>de</strong> votre téléviseur.<br />
• Reportez-vous à la notice d’utilisation <strong>de</strong> votre téléviseur pour obtenir <strong>de</strong> l’ai<strong>de</strong>.<br />
• Si votre téléviseur ne comporte pas d’option permettant <strong>de</strong> désactiver les enceintes<br />
internes, vous <strong>de</strong>vrez peut-être ajuster le volume du système 3•2•1 et celui <strong>de</strong> votre<br />
téléviseur jusqu’à obtenir le son souhaité.<br />
• Sur certains modèles <strong>de</strong> téléviseurs, lorsque les enceintes internes sont désactivées,<br />
il peut être nécessaire d’augmenter le volume <strong>de</strong> 75 à 100 % afin <strong>de</strong> pouvoir entendre<br />
le son du système home cinéma 3•2•1. Reportez-vous à la notice d’utilisation <strong>de</strong> votre<br />
téléviseur pour obtenir <strong>de</strong> l’ai<strong>de</strong>.<br />
5. Mettez le système 3•2•1 sous tension.<br />
• Dirigez la télécomman<strong>de</strong> 3•2•1 vers le media center et appuyez sur On-Off.<br />
6. Visionnez le DVD d’installation du système 3•2•1.<br />
•Appuyez sur Eject sur le panneau <strong>de</strong> comman<strong>de</strong>s du media center.<br />
• Insérez le DVD d’installation dans le tiroir disque.<br />
• Appuyez <strong>de</strong> nouveau sur Eject pour fermer le tiroir disque. La lecture du DVD démarre<br />
automatiquement. Dans le cas contraire, appuyez sur la touche <strong>de</strong> lecture ( ).<br />
Remarque : Veillez à visionner le DVD d’installation fourni avec votre système dès que toutes<br />
les connexions ont été réalisées, afin <strong>de</strong> vérifier les connexions et <strong>de</strong> vous assurer que les<br />
performances acoustiques sont optimales.<br />
25<br />
Français
Français<br />
Télécomman<strong>de</strong><br />
26<br />
LED d’état <strong>de</strong> la<br />
télécomman<strong>de</strong><br />
On<br />
Off<br />
AUX<br />
Active et désactive le système.<br />
Comman<strong>de</strong>s et indicateurs du système<br />
LED d’état :<br />
• Reste éteinte lors du fonctionnement normal.<br />
• Reste allumée en mo<strong>de</strong> <strong>de</strong> configuration. S’éteint brièvement chaque fois que<br />
vous appuyez sur une touche.<br />
• Clignote rapi<strong>de</strong>ment huit fois si vous appuyez sur une touche inappropriée lors<br />
<strong>de</strong> la configuration ou si le co<strong>de</strong> d’un appareil indisponible a été saisi.<br />
• Clignote rapi<strong>de</strong>ment huit fois si vous n’appuyez sur aucune touche durant<br />
10 secon<strong>de</strong>s, puis la télécomman<strong>de</strong> quitte le mo<strong>de</strong> <strong>de</strong> configuration.<br />
Coupe ou restaure le son <strong>de</strong> la source active.<br />
Sélectionne le lecteur <strong>de</strong> CD/DVD intégré et active le système.<br />
• Sélectionne le tuner intégré et active le système sur la <strong>de</strong>rnière station FM/AM<br />
sélectionnée.<br />
• Permet <strong>de</strong> passer <strong>de</strong> la ban<strong>de</strong> FM à la ban<strong>de</strong> AM (et inversement) lorsque le<br />
tuner est sélectionné.<br />
TV : Active le système et sélectionne l’entrée TV comme source audio.<br />
Input : Permet <strong>de</strong> modifier l’entrée externe du téléviseur. Par exemple,<br />
votre téléviseur peut disposer <strong>de</strong> <strong>de</strong>ux entrées externes, l’une étant<br />
connectée au récepteur câble et l’autre au magnétoscope. Cette touche<br />
permet <strong>de</strong> passer du récepteur câble au magnétoscope et inversement.<br />
On/Off : Active et désactive votre téléviseur.*<br />
CBL-SAT : Active le système et sélectionne l’entrée CBL-SAT comme source<br />
audio.<br />
On/Off : Active ou désactive votre récepteur câble/satellite.*<br />
AUX : Active le système et sélectionne l’entrée AUX comme source audio.<br />
On/Off : Active ou désactive un magnétoscope ou un enregistreur vidéo<br />
numérique connecté à l’entrée AUX.*<br />
* Requiert une configuration particulière <strong>de</strong> la télécomman<strong>de</strong>. Reportez-vous à la section<br />
« Programmation <strong>de</strong> la télécomman<strong>de</strong> pour contrôler d’autres appareils audio/vidéo », page 35.
Télécomman<strong>de</strong> (suite)<br />
Comman<strong>de</strong>s et indicateurs du système<br />
Affiche sur l’écran <strong>de</strong> votre téléviseur ou du media center le menu<br />
Configuration correspondant à la source active.<br />
Affiche le menu Système sur l’écran <strong>de</strong> votre téléviseur.<br />
• Affiche sur l’écran <strong>de</strong> votre téléviseur le menu du DVD actuellement<br />
inséré.<br />
• Affiche sur l’écran <strong>de</strong> votre téléviseur le menu du récepteur câble/<br />
satellite, du magnétoscope ou <strong>de</strong> l’enregistreur vidéo numérique<br />
(si cette fonction est prise en charge)*.<br />
Affiche sur l’écran <strong>de</strong> votre téléviseur le gui<strong>de</strong> <strong>de</strong>s programmes <strong>de</strong><br />
télévision (si cette fonction est prise en charge).<br />
Efface les menus Configuration et Système, ou encore le gui<strong>de</strong> <strong>de</strong>s<br />
programmes <strong>de</strong> télévision (si cette fonction est prise en charge), <strong>de</strong> l’écran<br />
<strong>de</strong> votre téléviseur ou du media center.<br />
• Sélectionne la fréquence radio suivante/précé<strong>de</strong>nte sur la ban<strong>de</strong> AM<br />
ou FM.<br />
• Sélectionne l’élément suivant, vers le haut ou vers le bas, dans les<br />
menus.<br />
Confirme la sélection d’un menu ou affiche le niveau suivant d’options <strong>de</strong><br />
menu.<br />
Déplace le curseur vers le haut, le bas, la gauche ou la droite dans les<br />
menus affichés sur l’écran <strong>de</strong> votre téléviseur ou du media center.<br />
* Requiert une configuration particulière <strong>de</strong> la télécomman<strong>de</strong>. Reportez-vous à la section « Programmation<br />
<strong>de</strong> la télécomman<strong>de</strong> pour contrôler d’autres appareils audio/vidéo », page 35.<br />
27<br />
Français
Français<br />
28<br />
Comman<strong>de</strong>s et indicateurs du système<br />
Télécomman<strong>de</strong> (suite)<br />
1 2<br />
0<br />
3<br />
4 5 6<br />
7 8 9<br />
• Augmente ou diminue le volume <strong>de</strong> la source active.<br />
• La touche + permet <strong>de</strong> restaurer le son <strong>de</strong> la source active lorsque<br />
celui-ci a été coupé.<br />
• La touche – permet <strong>de</strong> diminuer le volume <strong>de</strong> la source active, mais ne<br />
restaure pas le son lorsqu’il a été coupé.<br />
Passe à la piste du CD, à la station radio préréglée, à la chaîne <strong>de</strong> télévision<br />
(si la télécomman<strong>de</strong> est configurée <strong>de</strong> façon à contrôler votre téléviseur) ou<br />
au chapitre du DVD suivant ou précé<strong>de</strong>nt.<br />
• Arrête le lecteur <strong>de</strong> disque.<br />
• Pour les DVD uniquement, le disque s’arrête et le système mémorise la<br />
position <strong>de</strong> lecture du DVD. Si vous appuyez sur , la lecture du DVD<br />
reprend à la position mémorisée. Si vous appuyez <strong>de</strong>ux fois sur lors<br />
<strong>de</strong> la lecture d’un disque, le lecteur revient au début du disque.<br />
• Met le disque en cours <strong>de</strong> lecture sur pause.<br />
• Si vous appuyez <strong>de</strong> nouveau sur (ou si vous appuyez sur )<br />
permet <strong>de</strong> reprendre la lecture d’un disque mis sur pause.<br />
• Lorsque l’utilisateur n’utilise aucune comman<strong>de</strong> durant 20 minutes, le<br />
lecteur <strong>de</strong> disque s’arrête et retourne au début du disque afin d’attendre<br />
la comman<strong>de</strong> suivante.<br />
Démarre le lecteur <strong>de</strong> disque.<br />
• Passe à la piste précé<strong>de</strong>nte ou suivante du CD.<br />
• Passe au chapitre précé<strong>de</strong>nt ou suivant du DVD.<br />
• Passe à la station radio « stable » suivante ou précé<strong>de</strong>nte.<br />
Lit les pistes du CD dans un ordre aléatoire. Appuyez à nouveau sur cette<br />
touche pour annuler ce mo<strong>de</strong>.<br />
Lit en boucle un CD, une piste <strong>de</strong> CD, un chapitre <strong>de</strong> DVD ou un titre DVD.<br />
Appuyez à nouveau sur cette touche pour modifier le mo<strong>de</strong> <strong>de</strong> répétition.<br />
• Permet <strong>de</strong> sélectionner une piste du CD, un chapitre du DVD, une<br />
station radio préréglée ou une chaîne <strong>de</strong> télévision.<br />
• Permet <strong>de</strong> modifier les valeurs numériques <strong>de</strong> certaines options <strong>de</strong><br />
menu.<br />
• Affiche ou ferme la fenêtre d’informations câble ou satellite, si cette<br />
fonction est prise en charge.<br />
• Lors <strong>de</strong> la lecture d’un CD MP3, affiche ou efface les informations sur<br />
l’artiste et le titre apparaissant sur l’écran d’affichage du media center.<br />
Passe à la chaîne <strong>de</strong> télévision précé<strong>de</strong>nte (si votre téléviseur prend cette<br />
fonction en charge).
Media center<br />
Figure 21<br />
Comman<strong>de</strong>s du media<br />
center<br />
®<br />
Figure 22<br />
Exemple d’affichage <strong>de</strong><br />
l’écran du media center<br />
Comman<strong>de</strong>s et indicateurs du système<br />
Le media center comporte un panneau <strong>de</strong> comman<strong>de</strong>s sur le <strong>de</strong>ssus, un écran d’affichage<br />
qui indique l’état du système et un tiroir disque qui s’ouvre à l’avant <strong>de</strong> la console.<br />
Panneau <strong>de</strong> comman<strong>de</strong>s<br />
Le media center comporte six touches sur le panneau <strong>de</strong> comman<strong>de</strong>s situé sur le <strong>de</strong>ssus.<br />
Les fonctions proposées sont les mêmes que celles <strong>de</strong> la télécomman<strong>de</strong>.<br />
On-Off Source – Volume + Enter Eject<br />
Active et<br />
désactive le<br />
système.<br />
Sélectionne<br />
alternativement<br />
les différentes<br />
sources<br />
disponibles.<br />
Remarque : Si vous sélectionnez une autre source en appuyant sur la touche Source, vous<br />
<strong>de</strong>vez appuyer sur la touche correspondant à cette nouvelle source sur la télécomman<strong>de</strong> afin <strong>de</strong><br />
pouvoir la contrôler à l’ai<strong>de</strong> <strong>de</strong> la télécomman<strong>de</strong>.<br />
Indicateurs <strong>de</strong> l’écran<br />
Lorsque le système est sous tension, l’écran du media center s’allume pour indiquer l’état du<br />
système. Tous les éléments ci-<strong>de</strong>ssous ne s’affichent pas en même temps (Figure 22).<br />
L’affichage <strong>de</strong> l’écran change en fonction <strong>de</strong>s réglages et <strong>de</strong>s sélections que vous effectuez.<br />
DVD 0:06:11<br />
CHAPITRE 1/12<br />
S’allume pour<br />
indiquer que le<br />
mo<strong>de</strong> <strong>de</strong> lecture<br />
aléatoire est<br />
sélectionné pour<br />
le disque en cours<br />
<strong>de</strong> lecture.<br />
Augmente ou<br />
diminue le niveau<br />
du volume.<br />
ACCÈS ALÉAT RÉPÉTER DISQUE PISTE<br />
S’allume pour<br />
indiquer que le mo<strong>de</strong><br />
<strong>de</strong> répétition est<br />
sélectionné pour la<br />
piste ou le disque en<br />
cours <strong>de</strong> lecture.<br />
S’allume pour<br />
indiquer que le<br />
mo<strong>de</strong> <strong>de</strong> répétition<br />
du disque ou le<br />
mo<strong>de</strong> <strong>de</strong> répétition<br />
en accès aléatoire<br />
du disque est<br />
sélectionné.<br />
• Permet <strong>de</strong> naviguer<br />
dans les menus.<br />
•Sélectionne la<br />
prochaine station<br />
FM/AM préréglée<br />
disponible.<br />
Ouvre ou<br />
ferme le tiroir<br />
disque.<br />
S’allume pour indiquer<br />
qu’un disque est en<br />
cours <strong>de</strong> lecture.<br />
S’allume brièvement<br />
à la réception d’un<br />
signal <strong>de</strong> la<br />
télécomman<strong>de</strong>.<br />
S’allume pour<br />
indiquer que le<br />
mo<strong>de</strong> <strong>de</strong> répétition<br />
<strong>de</strong> la piste est<br />
sélectionné.<br />
29<br />
Français
Français<br />
30<br />
Fonctionnement<br />
Activation et désactivation du système<br />
Lecture <strong>de</strong> DVD vidéo<br />
Pour activer ou désactiver le système :<br />
• Dirigez la télécomman<strong>de</strong> 3•2•1 vers le media center et appuyez sur On/Off.<br />
OU<br />
• Appuyez sur la touche On-Off située au-<strong>de</strong>ssus du media center.<br />
Pour activer ou désactiver le système en sélectionnant une source :<br />
• Appuyez sur la touche CD-DVD, FM-AM, TV, CBL-SAT ou AUX <strong>de</strong> la<br />
télécomman<strong>de</strong> 3•2•1.<br />
Remarque : Votre télécomman<strong>de</strong> 3•2•1 peut être configurée <strong>de</strong> façon à contrôler d’autres<br />
appareils audio, tels qu’un téléviseur, un magnétoscope ou un récepteur câble/satellite. Pour<br />
obtenir <strong>de</strong>s instructions, reportez-vous à la section « Programmation <strong>de</strong> la télécomman<strong>de</strong> pour<br />
contrôler d’autres appareils audio/vidéo », page 35.<br />
Avant <strong>de</strong> lire un DVD pour la première fois :<br />
• Familiarisez-vous avec la télécomman<strong>de</strong> 3•2•1. Reportez-vous à la section<br />
« Télécomman<strong>de</strong> », page 26.<br />
• Assurez-vous <strong>de</strong> bien savoir comment sélectionner les différentes entrées vidéo<br />
disponibles sur votre téléviseur. Pour visionner un DVD vidéo, vous <strong>de</strong>vrez sélectionner<br />
sur votre téléviseur l’entrée vidéo connectée à la sortie vidéo correspondante du media<br />
center 3•2•1 (reportez-vous à la section « Connexion du téléviseur au media center »,<br />
page 15).<br />
• Si vous ne parvenez pas à sélectionner l’entrée vidéo appropriée sur votre téléviseur,<br />
consultez la notice d’utilisation <strong>de</strong> votre poste <strong>de</strong> télévision.<br />
• Veillez à visionner au préalable le DVD <strong>de</strong> configuration du système 3•2•1 afin <strong>de</strong> vérifier<br />
les connexions réalisées et <strong>de</strong> vous assurer que les performances acoustiques sont<br />
optimales.<br />
1. Mettez votre téléviseur sous tension.<br />
2. Sur la télécomman<strong>de</strong> 3•2•1, appuyez sur CD/DVD afin d’activer le système 3•2•1 en<br />
sélectionnant la source CD/DVD.<br />
3. Sur le panneau <strong>de</strong> comman<strong>de</strong>s du media center, appuyez sur Eject pour ouvrir le tiroir<br />
disque.<br />
4. Placez le DVD dans le tiroir disque.<br />
5. Appuyez <strong>de</strong> nouveau sur Eject pour fermer le tiroir disque.<br />
La lecture du DVD démarre automatiquement. Dans le cas contraire, appuyez sur la touche<br />
Play <strong>de</strong> la télécomman<strong>de</strong> 3•2•1.<br />
Remarque : Les DVD ne présentent pas tous les mêmes caractéristiques. Vous pouvez par<br />
exemple choisir d’afficher les sous-titres d’un film uniquement si le DVD en propose.
Figure 23<br />
Exemple d’affichage pour<br />
un DVD vidéo<br />
OU<br />
Eject<br />
Fonctionnement<br />
Lors <strong>de</strong> la lecture d’un DVD vidéo, le temps <strong>de</strong> lecture écoulé et le numéro du chapitre<br />
s’affichent sur l’écran d’affichage du media center.<br />
DVD 0:06:11<br />
CHAPITRE 1/12<br />
Fonctionnement <strong>de</strong> base du lecteur DVD<br />
•Appuyez sur Pause pour mettre un film sur pause.<br />
• Appuyez <strong>de</strong> nouveau sur Pause ou appuyez sur Play pour reprendre la lecture d’un DVD<br />
mis sur pause.<br />
• Utilisez la touche Stop ( ) pour interrompre la lecture d’un film.<br />
• Appuyez une fois sur pour interrompre la lecture du film. Le système mémorise<br />
l’emplacement auquel la lecture du film a été interrompue. Appuyez sur Play pour<br />
reprendre la lecture à partir <strong>de</strong> l’emplacement auquel elle a été interrompue.<br />
•OU<br />
• Appuyez <strong>de</strong>ux fois sur . La lecture est interrompue et le système retourne au début<br />
du disque. Appuyez sur Play pour redémarrer la lecture.<br />
•Appuyez sur Chapter pour passer au chapitre suivant du DVD en cours <strong>de</strong> lecture.<br />
Appuyez sur Chapter pour passer au chapitre précé<strong>de</strong>nt.<br />
•Appuyez sur Repeat lors <strong>de</strong> la lecture d’un chapitre afin <strong>de</strong> répéter sa lecture.<br />
• Appuyez sur pour parcourir le DVD en cours <strong>de</strong> lecture en mo<strong>de</strong> retour rapi<strong>de</strong>. Appuyez<br />
sur pour parcourir le DVD en mo<strong>de</strong> avance rapi<strong>de</strong>.<br />
• Appuyez sur la touche Eject du media center afin <strong>de</strong> stopper la lecture d’un disque et<br />
d’ouvrir le tiroir disque.<br />
Remarque : Pour plus d’informations sur la modification <strong>de</strong>s paramètres <strong>de</strong> la source DVD,<br />
reportez-vous à la section « Menu <strong>de</strong> configuration DVD », page 42.<br />
Restrictions d’accès aux DVD vidéo<br />
Le menu Verrouillage DVD vous permet <strong>de</strong> restreindre l’accès aux DVD vidéo susceptibles<br />
d’être inappropriés pour certains membres <strong>de</strong> votre famille. Pour accé<strong>de</strong>r au menu<br />
Verrouillage DVD, appuyez sur la touche System <strong>de</strong> la télécomman<strong>de</strong>. Cette fonction vous<br />
permet <strong>de</strong> définir <strong>de</strong>s mots <strong>de</strong> passe pour accé<strong>de</strong>r aux films ayant une classification<br />
particulière. Pour obtenir <strong>de</strong>s informations sur l’utilisation du menu Verrouillage DVD,<br />
reportez-vous à la section « Options <strong>de</strong> verrouillage DVD », page 50.<br />
31<br />
Français
Français<br />
32<br />
Fonctionnement<br />
Lecture <strong>de</strong> CD audio<br />
OU<br />
Eject<br />
Eject<br />
1. Sur la télécomman<strong>de</strong> 3•2•1, appuyez sur CD/DVD afin d’activer le système 3•2•1 en<br />
sélectionnant la source CD/DVD.<br />
2. Sur le panneau <strong>de</strong> comman<strong>de</strong>s du media center, appuyez sur Eject pour ouvrir le tiroir<br />
disque.<br />
3. Placez le CD dans le tiroir disque.<br />
4. Appuyez <strong>de</strong> nouveau sur Eject pour fermer le tiroir disque.<br />
5. La lecture du CD audio démarre automatiquement. Dans le cas contraire, appuyez sur la<br />
touche Play <strong>de</strong> la télécomman<strong>de</strong> 3•2•1.<br />
Fonctionnement <strong>de</strong> base du lecteur CD<br />
•Appuyez sur Pause pour mettre un CD audio sur pause.<br />
• Appuyez <strong>de</strong> nouveau sur Pause ou appuyez sur Play pour reprendre la lecture d’un CD<br />
mis sur pause.<br />
• Appuyez sur pour arrêter la lecture d’un CD audio.<br />
•Appuyez sur Track pour passer à la piste suivante du CD en cours <strong>de</strong> lecture. Appuyez<br />
sur Track pour passer à la piste précé<strong>de</strong>nte.<br />
• Appuyez sur la touche et maintenez-la enfoncée pour parcourir le CD en cours <strong>de</strong><br />
lecture en mo<strong>de</strong> retour rapi<strong>de</strong>. Appuyez sur pour parcourir le CD en mo<strong>de</strong> avance<br />
rapi<strong>de</strong>.<br />
• Appuyez une fois sur pour accé<strong>de</strong>r à la chanson suivante.<br />
• Appuyez une fois sur Repeat pour accé<strong>de</strong>r au mo<strong>de</strong> RÉPÉTER PISTE. Appuyez <strong>de</strong><br />
nouveau sur Repeat pour accé<strong>de</strong>r au mo<strong>de</strong> RÉPÉTER DISQUE. Appuyez <strong>de</strong> nouveau sur<br />
Repeat pour désactiver les fonctions <strong>de</strong> répétition (RÉPÉTER INACTIF).<br />
• Appuyez une fois sur Shuffle pour accé<strong>de</strong>r au mo<strong>de</strong> ACCÈS ALÉAT DISQUE. Appuyez <strong>de</strong><br />
nouveau sur Shuffle pour désactiver le mo<strong>de</strong> <strong>de</strong> lecture aléatoire (ACCÈS ALÉAT<br />
INACTIF).<br />
Remarque : Pour plus d’informations sur la modification <strong>de</strong>s paramètres <strong>de</strong> la source CD,<br />
reportez-vous à la section « Menu <strong>de</strong> configuration CD », page 41.<br />
Remarque : Lors <strong>de</strong> la lecture d’un CD MP3, la touche Info permet d’afficher ou d’effacer les<br />
informations sur l’artiste et le titre apparaissant sur l’écran d’affichage du media center.
Écouter une station radio FM/AM<br />
1 2<br />
0<br />
3<br />
4 5 6<br />
7 8 9<br />
Fonctionnement<br />
Sur la télécomman<strong>de</strong> 3•2•1, appuyez sur la touche FM-AM. Si le système était éteint,<br />
il s’active et sélectionne la <strong>de</strong>rnière station radio écoutée.<br />
Sélection d’une station<br />
Pour sélectionner une station radio, procé<strong>de</strong>z <strong>de</strong> l’une <strong>de</strong>s manières indiquées ci-<strong>de</strong>ssous :<br />
•Appuyez sur FM-AM pour passer <strong>de</strong> la ban<strong>de</strong> FM à la ban<strong>de</strong> AM et inversement.<br />
•Appuyez sur Tune pour accé<strong>de</strong>r aux fréquences supérieures <strong>de</strong> la ban<strong>de</strong> sélectionnée.<br />
Appuyez sur Tune pour accé<strong>de</strong>r aux fréquences inférieures <strong>de</strong> la ban<strong>de</strong> sélectionnée.<br />
•Appuyez sur Seek pour accé<strong>de</strong>r à la station précé<strong>de</strong>nte. Appuyez sur Seek pour<br />
accé<strong>de</strong>r à la station suivante disponible. Appuyez sur cette touche et maintenez-la<br />
enfoncée pour parcourir rapi<strong>de</strong>ment la ban<strong>de</strong> sélectionnée. Relâchez votre pression pour<br />
arrêter la recherche à la prochaine station disponible. Pour arrêter la recherche à tout<br />
moment, appuyez brièvement sur la touche Seek ou Seek . Pour relancer la<br />
recherche sans maintenir la touche Seek enfoncée, appuyez à nouveau brièvement sur la<br />
touche Seek ou Seek dès la fin <strong>de</strong> la première opération <strong>de</strong> recherche.<br />
•Appuyez sur Preset pour sélectionner la station préréglée suivante. Appuyez sur<br />
Preset pour sélectionner la station préréglée précé<strong>de</strong>nte.<br />
OU<br />
• Appuyez sur le numéro correspondant à une station préréglée sur le pavé numérique.<br />
Remarque : Pour plus d’informations sur la modification <strong>de</strong>s paramètres <strong>de</strong> la source FM/AM,<br />
reportez-vous à la section « Menu <strong>de</strong> configuration du tuner FM-AM », page 41.<br />
Mémorisation <strong>de</strong> stations préréglées<br />
Vous pouvez mémoriser jusqu’à 20 stations AM et 20 stations FM à l’ai<strong>de</strong> <strong>de</strong> votre<br />
télécomman<strong>de</strong> 3•2•1. Vous pouvez ainsi sélectionner rapi<strong>de</strong>ment vos stations favorites.<br />
1. Sélectionnez l’une <strong>de</strong> vos stations favorites.<br />
2. Mémorisez la station en lui affectant un numéro <strong>de</strong> préréglage.<br />
• Pour les numéros compris entre 1 et 9, appuyez sur la touche appropriée du pavé<br />
numérique et maintenez-la enfoncée. Pour les numéros compris entre 10 et 20,<br />
appuyez sur le premier chiffre, puis appuyez immédiatement sur le second chiffre et<br />
maintenez la touche enfoncée.<br />
• Vous pouvez également appuyer sur la touche Enter du media center pour enregistrer<br />
la station sélectionnée sur le premier numéro <strong>de</strong> préréglage disponible.<br />
Le nouveau numéro <strong>de</strong> préréglage s’affiche brièvement à l’écran du media center.<br />
Remarque : L’attribution d’un numéro <strong>de</strong> préréglage à une station remplace automatiquement<br />
tout préréglage précé<strong>de</strong>mment affecté à ce numéro.<br />
33<br />
Français
Français<br />
34<br />
Fonctionnement<br />
Lecture d’autres sources<br />
Utilisation <strong>de</strong> la minuterie<br />
Suppression d’un préréglage<br />
1. Activez la station préréglée.<br />
2. Appuyez sur la touche 0 <strong>de</strong> la télécomman<strong>de</strong> et maintenez-la enfoncée jusqu’à ce que le<br />
media center affiche un message indiquant que le préréglage a été effacé.<br />
Activez l’un <strong>de</strong>s appareils connectés au media center à l’ai<strong>de</strong> <strong>de</strong> la télécomman<strong>de</strong> <strong>de</strong><br />
cet élément ou <strong>de</strong>s touches situées sur son panneau avant. Sur la télécomman<strong>de</strong> du<br />
système 3•2•1 série II ou 3•2•1 GS :<br />
• Appuyez sur la touche TV, CBL-SAT ou AUX afin d’activer le système et <strong>de</strong> sélectionner la<br />
source audio correspondant à cet appareil. Assurez-vous qu’une cassette ou un disque est<br />
bien inséré dans le lecteur, le cas échéant.<br />
• Utilisez les flèches <strong>de</strong> Volume <strong>de</strong> la télécomman<strong>de</strong> ou du media center pour augmenter ou<br />
diminuer le volume du système.<br />
Le système comporte une minuterie qui peut être configurée afin que le système s’éteigne<br />
automatiquement après 1 à 90 minutes d’écoute <strong>de</strong> l’une <strong>de</strong>s sources. Vous pouvez accé<strong>de</strong>r<br />
à cette minuterie à l’ai<strong>de</strong> du menu Configuration. Reportez-vous à la section « Modification<br />
<strong>de</strong> la configuration <strong>de</strong>s sources », page 39.<br />
Remarque : La minuterie ne permet pas <strong>de</strong> mettre le téléviseur ou tout autre appareil audio<br />
hors tension.
Contrôle d’autres appareils audio<br />
Programmation <strong>de</strong> la télécomman<strong>de</strong> pour contrôler d’autres appareils<br />
audio/vidéo<br />
Votre télécomman<strong>de</strong> peut être programmée <strong>de</strong> façon à contrôler d’autres appareils audio,<br />
tels qu’un téléviseur, un magnétoscope, un enregistreur vidéo numérique ou un récepteur<br />
câble/satellite, en saisissant un co<strong>de</strong> d’appareil lors du mo<strong>de</strong> <strong>de</strong> configuration.<br />
• Si vous connaissez le co<strong>de</strong> <strong>de</strong> l’appareil, suivez les instructions <strong>de</strong> la section<br />
« Saisie directe d’un co<strong>de</strong> d’appareil ». Les co<strong>de</strong>s d’appareils sont répertoriés dans<br />
la <strong>de</strong>rnière section <strong>de</strong> cette notice d’utilisation et dans les options du sous-menu<br />
Télécomman<strong>de</strong> du menu Système.<br />
• Si vous ne trouvez pas le co<strong>de</strong> d’un appareil et souhaitez que le système le<br />
recherche, reportez-vous à la section « Recherche d’un co<strong>de</strong> d’appareil »,<br />
page 36.<br />
• Si vous souhaitez vérifier le co<strong>de</strong> saisi pour un appareil audio, reportez-vous à la<br />
section « Vérification du co<strong>de</strong> d’un appareil », page 38.<br />
Remarque : Plusieurs co<strong>de</strong>s peuvent fonctionner avec un produit particulier. Si vous remarquez<br />
un mauvais fonctionnement (pas <strong>de</strong> réponse ou fonctions limitées) après avoir programmé la<br />
télécomman<strong>de</strong>, essayez un autre co<strong>de</strong>.<br />
Remarque : La LED d’état <strong>de</strong> la télécomman<strong>de</strong> clignote rapi<strong>de</strong>ment huit fois si vous appuyez<br />
sur une touche non vali<strong>de</strong> ou si vous saisissez un co<strong>de</strong> d’appareil indisponible. Atten<strong>de</strong>z sept<br />
secon<strong>de</strong>s pour que l’erreur soit effacée, puis recommencez.<br />
Saisie directe d’un co<strong>de</strong> d’appareil<br />
Les co<strong>de</strong>s d’appareils sont répertoriés à la fin <strong>de</strong> cette notice d’utilisation et dans les options<br />
du sous-menu Télécomman<strong>de</strong> du menu Système. Si vous connaissez le co<strong>de</strong> <strong>de</strong> l’appareil,<br />
procé<strong>de</strong>z comme suit.<br />
Pour programmer votre télécomman<strong>de</strong> afin <strong>de</strong> contrôler votre téléviseur<br />
1. Activez le système 3•2•1 et votre téléviseur.<br />
2. Appuyez sur la touche TV et maintenez-la enfoncée jusqu’à ce que la LED d’état s’allume<br />
(environ 5 secon<strong>de</strong>s).<br />
3. Sur le pavé numérique <strong>de</strong> la télécomman<strong>de</strong>, saisissez le co<strong>de</strong> à quatre chiffres<br />
correspondant à votre téléviseur. La LED s’éteint temporairement lorsque vous appuyez<br />
sur chaque touche.<br />
4. Vérifiez que la LED s’éteint une fois le co<strong>de</strong> saisi. Si la LED clignote, le co<strong>de</strong> n’est pas<br />
vali<strong>de</strong>. Réessayez.<br />
5. Dirigez la télécomman<strong>de</strong> vers votre téléviseur et appuyez sur la touche TV On-Off.<br />
Si votre téléviseur ne répond pas, recommencez à partir <strong>de</strong> l’étape 2 et essayez d’autres<br />
co<strong>de</strong>s. En cas <strong>de</strong> nouvel échec, reportez-vous à la section « Recherche d’un co<strong>de</strong><br />
d’appareil », page 36.<br />
Pour programmer votre télécomman<strong>de</strong> afin <strong>de</strong> contrôler votre récepteur<br />
câble/satellite<br />
1. Activez le système 3•2•1 et le récepteur câble/satellite.<br />
2. Appuyez sur la touche CBL-SAT et maintenez-la enfoncée jusqu’à ce que la LED d’état<br />
s’allume (environ 5 secon<strong>de</strong>s).<br />
3. Sur le pavé numérique <strong>de</strong> la télécomman<strong>de</strong>, saisissez le co<strong>de</strong> à quatre chiffres<br />
correspondant à votre récepteur câble/satellite. La LED s’éteint temporairement lorsque<br />
vous appuyez sur chaque touche.<br />
35<br />
Français
Français<br />
36<br />
Contrôle d’autres appareils audio<br />
AUX<br />
AUX<br />
4. Vérifiez que la LED s’éteint une fois le co<strong>de</strong> saisi. Si la LED clignote, le co<strong>de</strong> n’est pas<br />
vali<strong>de</strong>. Réessayez.<br />
5. Dirigez la télécomman<strong>de</strong> vers votre récepteur câble/satellite et appuyez sur la touche<br />
CBL-SAT On-Off. Si votre récepteur câble/satellite ne répond pas, recommencez à<br />
partir <strong>de</strong> l’étape 2 et essayez d’autres co<strong>de</strong>s. En cas <strong>de</strong> nouvel échec, reportez-vous<br />
à la section « Recherche d’un co<strong>de</strong> d’appareil », page 36.<br />
Pour programmer la télécomman<strong>de</strong> afin <strong>de</strong> contrôler votre magnétoscope ou votre<br />
enregistreur vidéo numérique (tel qu’un modèle Tivo ou Replay TV)<br />
1. Activez le système 3•2•1 et votre magnétoscope (ou votre enregistreur vidéo<br />
numérique).<br />
2. Appuyez sur la touche AUX et maintenez-la enfoncée jusqu’à ce que la LED d’état<br />
s’allume (environ 5 secon<strong>de</strong>s).<br />
3. Sur le pavé numérique <strong>de</strong> la télécomman<strong>de</strong>, saisissez le co<strong>de</strong> à quatre chiffres<br />
correspondant à votre magnétoscope ou à votre enregistreur vidéo numérique.<br />
La LED s’éteint temporairement lorsque vous appuyez sur chaque touche.<br />
4. Vérifiez que la LED s’éteint une fois le co<strong>de</strong> saisi. Si la LED clignote, le co<strong>de</strong> n’est pas<br />
vali<strong>de</strong>. Réessayez.<br />
5. Dirigez la télécomman<strong>de</strong> vers votre magnétoscope ou votre enregistreur vidéo<br />
numérique et appuyez sur la touche AUX On-Off. Si votre magnétoscope ou votre<br />
enregistreur vidéo numérique ne répond pas, recommencez à partir <strong>de</strong> l’étape 2 et<br />
essayez d’autres co<strong>de</strong>s. En cas <strong>de</strong> nouvel échec, reportez-vous à la section « Recherche<br />
d’un co<strong>de</strong> d’appareil », page 36.<br />
Recherche d’un co<strong>de</strong> d’appareil<br />
Utilisez cette métho<strong>de</strong> si vous ne connaissez pas le co<strong>de</strong> d’un appareil particulier.<br />
Remarque : Cette procédure est très longue. Utilisez-la en <strong>de</strong>rnier recours.<br />
Pour programmer votre télécomman<strong>de</strong> afin <strong>de</strong> contrôler votre téléviseur<br />
1. Activez le système 3•2•1 et votre téléviseur.<br />
2. Appuyez sur la touche TV et maintenez-la enfoncée jusqu’à ce que la LED d’état s’allume<br />
(environ 5 secon<strong>de</strong>s).<br />
3. Vous pouvez également appuyer sur les touches Channel et TV On-Off jusqu’à ce<br />
que le téléviseur soit désactivé.<br />
4. Appuyez sur Enter. Vérifiez que la LED <strong>de</strong> la télécomman<strong>de</strong> s’éteint.
AUX<br />
AUX<br />
AUX<br />
Contrôle d’autres appareils audio<br />
5. Dirigez la télécomman<strong>de</strong> vers votre téléviseur et appuyez sur la touche TV On-Off.<br />
Si votre téléviseur ne répond pas, recommencez à partir <strong>de</strong> l’étape 2 et essayez <strong>de</strong><br />
nouveau.<br />
Pour programmer votre télécomman<strong>de</strong> afin <strong>de</strong> contrôler votre récepteur<br />
câble/satellite<br />
1. Activez le système 3•2•1 et le récepteur câble/satellite.<br />
2. Appuyez sur la touche CBL-SAT et maintenez-la enfoncée jusqu’à ce que la LED d’état<br />
s’allume (environ 5 secon<strong>de</strong>s).<br />
3. Vous pouvez également appuyer sur les touches Channel et CBL-SAT On-Off<br />
jusqu’à ce que le récepteur câble/satellite soit désactivé.<br />
4. Appuyez sur Enter. Vérifiez que la LED <strong>de</strong> la télécomman<strong>de</strong> s’éteint.<br />
5. Dirigez la télécomman<strong>de</strong> vers votre récepteur câble/satellite et appuyez sur la touche<br />
CBL-SAT On-Off. Si votre récepteur câble/satellite ne répond pas, recommencez à<br />
partir <strong>de</strong> l’étape 2 et essayez <strong>de</strong> nouveau.<br />
Pour programmer la télécomman<strong>de</strong> afin <strong>de</strong> contrôler votre magnétoscope ou votre<br />
enregistreur vidéo numérique (tel qu’un modèle Tivo ou Replay TV)<br />
1. Activez le système 3•2•1 et votre magnétoscope (ou votre enregistreur vidéo<br />
numérique).<br />
2. Appuyez sur la touche AUX et maintenez-la enfoncée jusqu’à ce que la LED d’état<br />
s’allume (environ 5 secon<strong>de</strong>s).<br />
3. Vous pouvez également appuyer sur les touches Channel et AUX On-Off jusqu’à ce<br />
que votre magnétoscope ou votre enregistreur vidéo numérique soit désactivé.<br />
4. Appuyez sur Enter. Vérifiez que la LED <strong>de</strong> la télécomman<strong>de</strong> s’éteint.<br />
5. Dirigez la télécomman<strong>de</strong> vers votre magnétoscope ou votre enregistreur vidéo<br />
numérique et appuyez sur les touches AUX On-Off. Si votre magnétoscope ou<br />
enregistreur vidéo numérique ne répond pas, recommencez à partir <strong>de</strong> l’étape 2 et<br />
essayez <strong>de</strong> nouveau.<br />
37<br />
Français
Français<br />
38<br />
Contrôle d’autres appareils audio<br />
Vérification du co<strong>de</strong> d’un appareil<br />
Si vous avez besoin <strong>de</strong> connaître le co<strong>de</strong> utilisé par la télécomman<strong>de</strong> pour un appareil audio<br />
particulier, procé<strong>de</strong>z comme suit.<br />
1. Appuyez sur une touche <strong>de</strong> sélection d’une source (TV, CBL-SAT ou AUX) et<br />
maintenez-la enfoncée jusqu’à ce que la LED <strong>de</strong> la télécomman<strong>de</strong> s’allume (environ<br />
5secon<strong>de</strong>s)<br />
2. Appuyez sur la touche Info.<br />
3. Appuyez sur la touche 1 <strong>de</strong> la télécomman<strong>de</strong> et comptez combien <strong>de</strong> fois la LED<br />
s’allume (une longue pério<strong>de</strong> d’extinction <strong>de</strong> la LED correspond au chiffre zéro).<br />
Il s’agit du premier chiffre.<br />
4. Appuyez sur la touche 2 <strong>de</strong> la télécomman<strong>de</strong> et comptez combien <strong>de</strong> fois la LED<br />
s’allume (une longue pério<strong>de</strong> d’extinction <strong>de</strong> la LED correspond au chiffre zéro).<br />
Il s’agit du <strong>de</strong>uxième chiffre.<br />
5. Appuyez sur la touche 3 <strong>de</strong> la télécomman<strong>de</strong> et comptez combien <strong>de</strong> fois la LED<br />
s’allume (une longue pério<strong>de</strong> d’extinction <strong>de</strong> la LED correspond au chiffre zéro).<br />
Il s’agit du troisième chiffre.<br />
6. Appuyez sur la touche 4 <strong>de</strong> la télécomman<strong>de</strong> et comptez combien <strong>de</strong> fois la LED<br />
s’allume (une longue pério<strong>de</strong> d’extinction <strong>de</strong> la LED correspond au chiffre zéro).<br />
Il s’agit du quatrième chiffre.<br />
7. Appuyez sur Exit.<br />
Modification <strong>de</strong>s comman<strong>de</strong>s <strong>de</strong> sélection <strong>de</strong> chaînes<br />
Si vous utilisez votre système home cinéma 3•2•1 avec d’autres appareils audio, tels qu’un<br />
magnétoscope et un récepteur câble/satellite, vous pouvez changer les chaînes grâce à l’un<br />
<strong>de</strong> ces appareils plutôt que grâce au téléviseur.<br />
Vous pouvez facilement programmer votre télécomman<strong>de</strong> 3•2•1 afin <strong>de</strong> changer <strong>de</strong> chaîne<br />
grâce à un autre appareil audio.<br />
1. Appuyez sur la touche Last <strong>de</strong> la télécomman<strong>de</strong> 3•2•1 et maintenez-la enfoncée. La<br />
LED d’état <strong>de</strong> la télécomman<strong>de</strong> s’allume et clignote. Le nombre <strong>de</strong> clignotements<br />
correspond à l’appareil contrôlant la sélection <strong>de</strong>s chaînes.<br />
1 clignotement = TV<br />
2 clignotements = CBL-SAT<br />
3 clignotements = AUX<br />
2. Lorsque la LED cesse <strong>de</strong> clignoter, appuyez sur la touche <strong>de</strong> sélection <strong>de</strong> la source<br />
(TV, CBL-SAT ou AUX) correspondant à l’appareil que vous souhaitez utiliser pour<br />
sélectionner les chaînes.<br />
3. Appuyez sur la touche Exit <strong>de</strong> la télécomman<strong>de</strong> 3•2•1.<br />
Pour confirmer cette programmation, appuyez sur la touche Last <strong>de</strong> la télécomman<strong>de</strong> 3•2•1<br />
et maintenez-la enfoncée. Comptez le nombre <strong>de</strong> clignotements. Si la modification a bien été<br />
effectuée, appuyez sur Exit. Dans le cas contraire, répétez les étapes 2 et 3.
Utilisation <strong>de</strong>s menus <strong>de</strong> configuration<br />
Figure 24<br />
Exemple d’affichage du<br />
menu Configuration sur<br />
l’écran du téléviseur<br />
Figure 25<br />
Exemple d’affichage du<br />
menu Configuration sur<br />
l’écran du media center<br />
Modification <strong>de</strong> la configuration <strong>de</strong>s sources<br />
Lorsque vous visionnez une vidéo ou que vous écoutez <strong>de</strong> la musique, vous pouvez effectuer<br />
<strong>de</strong> rapi<strong>de</strong>s réglages qui vous permettront <strong>de</strong> mieux profiter <strong>de</strong> votre système. Pour ce faire,<br />
chaque source du système possè<strong>de</strong> son propre menu Configuration, qui comporte les<br />
fonctions appropriées à la source sélectionnée.<br />
Pour afficher les menus <strong>de</strong> configuration<br />
Vous pouvez afficher le menu Configuration <strong>de</strong> chaque source sur l’écran <strong>de</strong> votre téléviseur<br />
(Figure 24) et sur l’écran d’affichage du media center (Figure 25).<br />
1. Activez votre téléviseur et sélectionnez l’entrée TV correspondant à votre système 3•2•1.<br />
2. Appuyez sur une touche <strong>de</strong> sélection <strong>de</strong> source sur la télécomman<strong>de</strong> 3•2•1.<br />
3. Appuyez sur la touche Settings afin d’afficher le menu Configuration correspondant à la<br />
source sélectionnée.<br />
Si la liste <strong>de</strong>s éléments du menu est trop longue pour s’afficher entièrement à l’écran, une<br />
petite flèche vers le haut ou vers le bas vous indique que vous <strong>de</strong>vez faire défiler le menu<br />
afin d’afficher les autres éléments.<br />
4. Appuyez sur Exit pour quitter le menu Configuration.<br />
Nom <strong>de</strong> la source<br />
Éléments du<br />
menu<br />
Tuner<br />
Nom <strong>de</strong> l’élément du menu<br />
Mo<strong>de</strong> <strong>de</strong> sortie : Auto<br />
Zone <strong>de</strong> sélection<br />
Paramètre<br />
Ai<strong>de</strong> à la navigation. Indique quelles touches utiliser.<br />
Remarque : Toutes les modifications effectuées dans le menu Configuration affiché sur l’écran<br />
du téléviseur apparaîtront également sur l’écran d’affichage du media center.<br />
Sur l’écran d’affichage du media center, les éléments <strong>de</strong> menu apparaissent et disparaissent<br />
lorsque vous utilisez les touches <strong>de</strong> défilement vers le haut (<br />
télécomman<strong>de</strong>.<br />
) et vers le bas ( ) <strong>de</strong> la<br />
>Mo<strong>de</strong> <strong>de</strong> sortie : Auto<br />
Minuterie sommeil : Inactive<br />
CONFIGURATION<br />
39<br />
Français
Français<br />
40<br />
Modification <strong>de</strong> la configuration <strong>de</strong>s sources<br />
Figure 26<br />
Modification du mo<strong>de</strong> <strong>de</strong><br />
sortie du tuner FM<br />
Tuner<br />
Mo<strong>de</strong> <strong>de</strong> sortie : Auto<br />
L’élément <strong>de</strong> menu<br />
Mo<strong>de</strong> <strong>de</strong> sortie a été<br />
sélectionné en<br />
appuyant sur la<br />
flèche vers le bas.<br />
Pour effectuer <strong>de</strong>s modifications dans les menus <strong>de</strong> configuration<br />
Que vous utilisiez l’écran du téléviseur ou celui du media center pour modifier les paramètres,<br />
les mêmes instructions s’appliquent.<br />
Vous pouvez également appliquer la procédure précé<strong>de</strong>nte pour rétablir les réglages<br />
d’origine (par défaut). Procé<strong>de</strong>z ainsi si le résultat <strong>de</strong> la modification apportée ne vous<br />
convient pas ou si vous avez acci<strong>de</strong>ntellement apporté une modification non souhaitée. Les<br />
réglages par défaut pour chaque source sont indiqués dans les tableaux <strong>de</strong> menu figurant sur<br />
les pages suivantes.<br />
1. Activez votre téléviseur et sélectionnez l’entrée TV correspondant à votre système 3•2•1.<br />
2. Appuyez sur une touche <strong>de</strong> sélection <strong>de</strong> source sur la télécomman<strong>de</strong> 3•2•1.<br />
3. Appuyez sur la touche Settings afin d’afficher le menu Configuration correspondant à la<br />
source sélectionnée.<br />
4. À l’ai<strong>de</strong> <strong>de</strong>s flèches vers le bas ( ) et vers le haut ( ), sélectionnez l’élément <strong>de</strong> menu<br />
que vous souhaitez modifier.<br />
5. Appuyez sur la flèche vers la droite ( ) pour sélectionner le paramètre <strong>de</strong> l’élément <strong>de</strong><br />
menu.<br />
6. Appuyez sur les flèches vers le haut ( ) ou vers le bas ( ) pour modifier le paramètre.<br />
7. Appuyez sur Enter ou sur la flèche vers la gauche (<br />
choisi.<br />
) pour mémoriser le paramètre<br />
8. Appuyez sur Exit pour quitter le menu Configuration.<br />
La Figure 26 illustre la modification du mo<strong>de</strong> <strong>de</strong> sortie du tuner FM afin <strong>de</strong> changer le<br />
paramètre Auto en Stéréo.<br />
Tuner<br />
Mo<strong>de</strong> <strong>de</strong> sortie : Auto<br />
Le paramètre a<br />
été sélectionné<br />
en appuyant sur<br />
la flèche vers la<br />
droite.<br />
Tuner<br />
Mo<strong>de</strong> <strong>de</strong> sortie : Stéréo<br />
Le paramètre a été<br />
modifié <strong>de</strong> Auto à<br />
Stéréo en appuyant<br />
sur la flèche vers le<br />
haut ou vers le bas.<br />
Remarque : Pour rétablir les réglages par défaut <strong>de</strong> toutes les fonctions, choisissez l’option<br />
Restauration <strong>de</strong>s réglages d’usine du menu Système, dans la catégorie Media Center.<br />
Cette option restaure tous les réglages d’usine par défaut pour la source. Elle restaure également<br />
le paramètre Traitement audio sur Automatique (dans la catégorie Audio du menu<br />
Système).
Menu <strong>de</strong> configuration du tuner FM-AM<br />
Menu <strong>de</strong> configuration CD<br />
Modification <strong>de</strong> la configuration <strong>de</strong>s sources<br />
Pour afficher le menu Configuration du tuner FM-AM, appuyez sur la touche FM-AM <strong>de</strong> la<br />
télécomman<strong>de</strong>. Appuyez ensuite sur Settings. Appuyez sur Exit pour effacer le menu <strong>de</strong><br />
l’écran.<br />
Élément Nom Paramètres<br />
Mo<strong>de</strong> <strong>de</strong> sortie<br />
(uniquement en<br />
FM)<br />
Infos RDS<br />
(uniquement<br />
en FM et sur<br />
certains<br />
systèmes)<br />
Minuterie<br />
sommeil<br />
Auto, Stéréo,<br />
Mono<br />
Réglage<br />
par<br />
défaut Description<br />
Auto Permet d’écouter en stéréo ou en<br />
mono <strong>de</strong>s programmes diffusés en<br />
stéréo.<br />
Inactif, Actif Inactif Permet d’afficher <strong>de</strong>s informations<br />
sur la station et le programme<br />
diffusé (fournies par le système<br />
RDS, Radio Data System).<br />
Inactive, 10 à<br />
90 minutes<br />
Pour afficher le menu <strong>de</strong> configuration CD, appuyez sur la touche CD-DVD <strong>de</strong> la<br />
télécomman<strong>de</strong> lors <strong>de</strong> la lecture d’un CD. Appuyez ensuite sur Settings. Appuyez sur<br />
Exit pour effacer le menu <strong>de</strong> l’écran.<br />
Élément Nom Paramètres<br />
Inactive Met le système hors tension une fois<br />
écoulé le délai choisi. Choisissez<br />
Inactive pour désactiver la<br />
minuterie.<br />
Réglage<br />
par<br />
défaut Description<br />
Piste __ sur __ Permet <strong>de</strong> sélectionner une piste du<br />
disque en cours <strong>de</strong> lecture.<br />
Minuterie<br />
sommeil<br />
Inactive, 10 à<br />
90 minutes<br />
Inactive Met le système hors tension une fois<br />
écoulé le délai choisi. Choisissez<br />
Inactive pour désactiver la<br />
minuterie.<br />
41<br />
Français
Français<br />
42<br />
Modification <strong>de</strong> la configuration <strong>de</strong>s sources<br />
Menu <strong>de</strong> configuration DVD<br />
Élément Nom Paramètres<br />
Pour afficher le menu <strong>de</strong> configuration DVD, appuyez sur la touche CD-DVD <strong>de</strong> la<br />
télécomman<strong>de</strong> lors <strong>de</strong> la lecture d’un DVD vidéo. Appuyez ensuite sur la touche Settings.<br />
Appuyez sur Exit pour effacer le menu <strong>de</strong> l’écran.<br />
Équalisation cinéma* Active,<br />
Inactive<br />
Compression <strong>de</strong><br />
niveau*<br />
Active,<br />
Inactive<br />
Réglage<br />
par<br />
défaut Description<br />
Active Optimise la balance <strong>de</strong>s graves et <strong>de</strong>s aigus pour les<br />
films.<br />
Active Ajuste le volume pour maintenir l’intelligibilité <strong>de</strong>s<br />
dialogues. Empêche certains sons <strong>de</strong> recouvrir les<br />
autres.<br />
Décodage mono* Actif, Inactif Actif Active les circuits <strong>de</strong> décodage mono Vi<strong>de</strong>ostage ® 5 afin<br />
<strong>de</strong> traiter le son mono (son sur un canal) pour l’adapter à<br />
votre système.<br />
Heure _:_ _ 0:00 Affiche la durée écoulée du DVD en cours <strong>de</strong> lecture.<br />
Permet également d’accé<strong>de</strong>r à un moment spécifique du<br />
film en saisissant un nouvelle valeur <strong>de</strong> temps.<br />
Titre _ sur __ Permet <strong>de</strong> sélectionner un titre du DVD en cours <strong>de</strong><br />
lecture selon le numéro spécifié. Certains DVD ne<br />
permettent pas l’accès direct aux titres.<br />
Chapitre _____ Permet <strong>de</strong> sélectionner un chapitre du DVD en cours <strong>de</strong><br />
lecture selon le numéro spécifié. Certains DVD ne<br />
permettent pas l’accès direct aux chapitres.<br />
Piste audio Dépend du<br />
disque<br />
Langue <strong>de</strong> soustitrage<br />
Dépend du<br />
disque<br />
Permet <strong>de</strong> choisir une <strong>de</strong>s pistes audio disponibles sur le<br />
disque en cours <strong>de</strong> lecture.<br />
Permet <strong>de</strong> sélectionner l’une <strong>de</strong> langues <strong>de</strong> sous-titrage<br />
disponibles (uniquement si le disque en propose).<br />
Angle <strong>de</strong> caméra 1 sur ____ Permet <strong>de</strong> sélectionner l’un <strong>de</strong>s angles <strong>de</strong> caméra<br />
disponibles (uniquement si le disque en propose).<br />
Répéter AB A, B Répète une section du DVD, après définition <strong>de</strong>s points<br />
<strong>de</strong> début et <strong>de</strong> fin. Pour commencer :<br />
1. Avancez ou reculez vers l’endroit du DVD où vous<br />
voulez que la section commence.<br />
2. Appuyez sur Enter.<br />
3. Accé<strong>de</strong>z à l’endroit où vous voulez qu’elle se<br />
termine.<br />
4. Appuyez sur Enter.<br />
La répétition se poursuit jusqu’à ce que vous appuyiez<br />
sur la touche Exit ou Settings.<br />
Minuterie sommeil Inactive, 10 à<br />
90 minutes<br />
Inactive Met le système hors tension une fois écoulé le délai<br />
choisi. Choisissez Inactive pour désactiver la minuterie.<br />
*Disponible uniquement lorsque le paramètre Traitement audio est défini sur Réglage<br />
utilisateur. Reportez-vous à la section « Options audio », page 46 pour plus d’informations.
Menu <strong>de</strong> configuration TV, CBL-SAT et AUX<br />
Modification <strong>de</strong> la configuration <strong>de</strong>s sources<br />
Les réglages ci-<strong>de</strong>ssous affectent les programmes diffusés sur le téléviseur, même si la<br />
source est VCR, CBL/SAT ou AUX. Ces sources ne disposent pas <strong>de</strong> menus distincts.<br />
Les éléments Équalisation cinéma, Compression <strong>de</strong> niveau et Décodage mono apparaissent<br />
dans le menu uniquement si le paramètre Traitement audio est défini sur Réglage<br />
utilisateur. Le paramètre Traitement audio se trouve dans le menu Système, dans la<br />
catégorie Audio.<br />
Élément Nom Paramètres<br />
Équalisation<br />
cinéma*<br />
Compression <strong>de</strong><br />
niveau*<br />
Décodage<br />
mono*<br />
Dolby Digital<br />
1+1**<br />
Minuterie<br />
sommeil<br />
Active,<br />
Inactive<br />
Active,<br />
Inactive<br />
Réglage<br />
par<br />
défaut Description<br />
Active Optimise la balance <strong>de</strong>s graves et<br />
<strong>de</strong>s aigus pour les films.<br />
Active Ajuste le volume pour maintenir<br />
l’intelligibilité <strong>de</strong>s dialogues.<br />
Empêche certains sons <strong>de</strong> recouvrir<br />
les autres.<br />
Actif, Inactif Actif Active les circuits <strong>de</strong> décodage<br />
mono Vi<strong>de</strong>ostage ® 5 afin <strong>de</strong> traiter<br />
le son mono (son sur un canal) pour<br />
l’adapter à votre système.<br />
1, 2, Les Deux 1 Lit le contenu audio <strong>de</strong> la piste<br />
sonore sélectionnée.<br />
Le contenu <strong>de</strong> la <strong>de</strong>uxième piste<br />
sonore peut correspondre à une<br />
autre langue, par exemple.<br />
Inactive, 10 à<br />
90 minutes<br />
Inactive Met le système hors tension une fois<br />
écoulé le délai choisi. Choisissez<br />
Inactive pour désactiver la<br />
minuterie.<br />
*Disponible uniquement lorsque le paramètre Traitement audio est défini sur Réglage<br />
utilisateur. Reportez-vous à la section « Options audio », page 46 pour plus d’informations.<br />
** Disponible uniquement lorsqu’un signal Dolby Digital 1+1 est détecté.<br />
43<br />
Français
Français<br />
Utilisation du menu Système<br />
Figure 27<br />
Exemple <strong>de</strong> menu Système<br />
présentant les options<br />
Audio<br />
44<br />
Modification <strong>de</strong>s options du système<br />
Les modifications apportées aux options du système sont généralement apportées une fois<br />
pour toutes. Si votre système fonctionne comme vous le souhaitez, il est inutile d’y apporter<br />
<strong>de</strong>s changements. Dans certains cas, toutefois, <strong>de</strong>s changements sont requis pour rendre le<br />
système entièrement compatible avec les options d’installation sélectionnées.<br />
Pour afficher le menu Système<br />
Contrairement aux menus <strong>de</strong> configuration <strong>de</strong>s sources, le menu Système s’affiche<br />
uniquement sur l’écran <strong>de</strong> votre téléviseur.<br />
1. Activez votre téléviseur et sélectionnez l’entrée TV correspondant à votre système 3•2•1.<br />
2. Appuyez sur la touche System <strong>de</strong> la télécomman<strong>de</strong> 3•2•1. Le menu Système s’affiche.<br />
La catégorie Audio est sélectionnée et présente la liste <strong>de</strong>s options audio modifiables.<br />
3. Appuyez <strong>de</strong> nouveau sur la touche System ou appuyez sur Exit pour quitter le menu<br />
Système.<br />
Remarque : Le fait d’accé<strong>de</strong>r au menu Système entraîne la mise sur pause <strong>de</strong> tout DVD ou CD<br />
vidéo en cours <strong>de</strong> lecture.<br />
Liste <strong>de</strong>s options<br />
système pour la<br />
catégorie sélectionnée<br />
Ai<strong>de</strong> à la navigation. Indique<br />
quelles touches utiliser.<br />
Catégories d’options<br />
Audio<br />
Vidéo<br />
Sélectionnez Audio pour régler ces options<br />
système :<br />
Compensation <strong>de</strong>s graves<br />
Compensation <strong>de</strong>s aigus<br />
Traitement audio<br />
Niveaux d’entrée<br />
naviguer<br />
sélectionner<br />
Media<br />
center<br />
Télécomman<strong>de</strong> Verrouillage<br />
DVD
Pour modifier <strong>de</strong>s options système<br />
Modification <strong>de</strong>s options du système<br />
Apporter <strong>de</strong>s modifications aux options système dans ce menu est un processus similaire<br />
à la modification <strong>de</strong>s réglages d’une source.<br />
1. Activez votre téléviseur et sélectionnez l’entrée TV correspondant à votre système 3•2•1.<br />
2. Appuyez sur la touche System <strong>de</strong> la télécomman<strong>de</strong> 3•2•1.<br />
3. À l’ai<strong>de</strong> <strong>de</strong>s flèches <strong>de</strong> direction droite ( ) et gauche ( ), sélectionnez l’une <strong>de</strong>s<br />
catégories d’options (Audio, Vidéo, Media center, Télécomman<strong>de</strong> ou Verrouillage DVD).<br />
4. Appuyez sur Enter ou sur la flèche vers le bas ( ) pour sélectionner une catégorie<br />
d’options.<br />
5. À l’ai<strong>de</strong> <strong>de</strong>s flèches vers le bas ( ) et vers le haut ( ), sélectionnez l’option système que<br />
vous souhaitez modifier.<br />
6. Appuyez sur la flèche vers la droite ( ) pour afficher les paramètres <strong>de</strong> l’option système.<br />
7. Appuyez sur les flèches vers le haut ( ) ou vers le bas ( ) pour modifier le paramètre.<br />
8. Appuyez sur Enter ou sur la flèche vers la gauche ( ) pour mémoriser le paramètre<br />
choisi.<br />
9. Appuyez <strong>de</strong> nouveau sur la touche System ou appuyez sur Exit pour quitter le menu<br />
Système.<br />
45<br />
Français
Français<br />
46<br />
Modification <strong>de</strong>s options du système<br />
Options audio<br />
Figure 28<br />
Options système <strong>de</strong> la<br />
catégorie Audio<br />
Les options audio affectent le son délivré par le système.<br />
Remarque : Il peut être utile d’écouter une source audio lors <strong>de</strong> la modification <strong>de</strong>s options<br />
audio. Certains changements seront immédiatement perceptibles et donc utiles pour régler<br />
précisément vos sélections.<br />
Audio<br />
Vidéo Media<br />
center<br />
Télécomman<strong>de</strong><br />
Sélectionnez Audio pour régler ces options<br />
système :<br />
Compensation <strong>de</strong>s graves<br />
Compensation <strong>de</strong>s aigus<br />
Traitement audio<br />
Niveaux d’entrée<br />
naviguer<br />
sélectionner<br />
Verrouillage<br />
DVD<br />
Option système Paramètres Description<br />
Compensation <strong>de</strong>s graves 0 [par défaut]<br />
–14 à +14<br />
Compensation <strong>de</strong>s aigus 0 [par défaut]<br />
–14 à +14<br />
Traitement audio Automatique [par<br />
défaut]<br />
Régl. utilisat.<br />
Niveaux d’entrée :<br />
Niveau d’entrée analogique TV<br />
Niveau d’entrée numérique TV<br />
Niveau d’entrée analogique<br />
CBL/SAT<br />
Niveau d’entrée numérique<br />
CBL/SAT<br />
Niveau d’entrée analogique<br />
AUX<br />
Niveau d’entrée numérique<br />
AUX<br />
Normal [par défaut]<br />
–6, –3, +3, +6<br />
Reproduction normale <strong>de</strong>s basses fréquences.<br />
Reproduction <strong>de</strong>s basses fréquences réduite (–) ou<br />
augmentée (+).<br />
Reproduction normale <strong>de</strong>s hautes fréquences.<br />
Reproduction <strong>de</strong>s hautes fréquences réduite (–) ou<br />
augmentée (+).<br />
Traitement <strong>Bose</strong> ® standard appliqué.<br />
Options <strong>de</strong> traitement (Équalisation cinéma, Compression<br />
<strong>de</strong> niveau, Décodage mono) disponibles dans les menus <strong>de</strong><br />
configuration <strong>de</strong>s sources.<br />
Niveau <strong>de</strong> signal standard (force).<br />
Augmente ou diminue le niveau du signal (réglable pour<br />
s’adapter aux niveaux <strong>de</strong>s autres appareils audio).<br />
Remarque : Vous pouvez régler les niveaux d’entrée <strong>de</strong>s<br />
appareils audio externes <strong>de</strong> façon à ce qu’ils correspon<strong>de</strong>nt aux<br />
niveaux FM et CD internes du système.
Options vidéo<br />
Figure 29<br />
Options système <strong>de</strong> la<br />
catégorie Vidéo<br />
Modification <strong>de</strong>s options du système<br />
Les options vidéo affectent la qualité <strong>de</strong> l’image sur votre téléviseur.<br />
Audio Vidéo Media Télécom- Verrouillage<br />
center man<strong>de</strong> DVD<br />
Sélectionnez Vidéo pour régler ces options système :<br />
Rapport d’écran TV<br />
DVD écran large<br />
Connecteur vidéo<br />
Niveau noir vidéo<br />
Standard vidéo<br />
Balayage progressif<br />
naviguer<br />
sélectionner<br />
Option système Paramètres Description<br />
Rapport d’écran TV Normal [par défaut]<br />
Écran large<br />
DVD écran large Modifié [par défaut]<br />
Non modifié<br />
Connecteur vidéo* Composite + S-Vi<strong>de</strong>o [par<br />
défaut]<br />
Composante<br />
Niveau noir vidéo Normal [par défaut]<br />
Étendu<br />
Standard vidéo NTSC [par défaut]<br />
PAL<br />
Balayage<br />
progressif**<br />
Inactif [par défaut]<br />
Actif<br />
Rapport d’écran 4:3.<br />
Rapport d’écran large 16:9.<br />
Modifié [par défaut]<br />
Non modifié<br />
I<strong>de</strong>ntifie le type <strong>de</strong> connexion vidéo réalisée sur le panneau<br />
arrière du media center.<br />
Niveau <strong>de</strong> noir généralement approprié aux écrans <strong>de</strong> télévision.<br />
Augmente le niveau <strong>de</strong> noir <strong>de</strong> l’écran. Approprié pour certains<br />
téléviseurs.<br />
Correspond aux écrans NTSC (norme US).<br />
Correspond aux écrans PAL (norme européenne).<br />
L’image à l’écran prend le style standard.<br />
L’image à l’écran prend le style avancé (si disponible sur le<br />
téléviseur).<br />
* Élément non modifiable indiquant le type <strong>de</strong> connexion détecté automatiquement par le<br />
système.<br />
** S’affiche uniquement lorsque le paramètre Connecteur vidéo est défini sur<br />
Composante.<br />
47<br />
Français
Français<br />
48<br />
Modification <strong>de</strong>s options du système<br />
Options du media center<br />
Figure 30<br />
Options système <strong>de</strong> la<br />
catégorie Media center<br />
Les options <strong>de</strong> la catégorie Media center affectent le fonctionnement général du système.<br />
Audio<br />
naviguer<br />
Vidéo Media Télécom-<br />
center man<strong>de</strong><br />
sélectionner<br />
Verrouillage<br />
DVD<br />
Sélectionnez Media Center pour régler ces options<br />
système :<br />
Luminosité d’affichage<br />
Langue d’affichage<br />
Source optique<br />
Espacement canaux tuner<br />
Co<strong>de</strong> <strong>de</strong> salle <strong>Bose</strong> link<br />
Restauration <strong>de</strong>s paramètres<br />
Option système Paramètres Description<br />
Luminosité<br />
4 [par défaut]<br />
d’affichage<br />
1 (plus sombre) à 4 (plus lumineux)<br />
Langue d’affichage English [par défaut]<br />
Dansk, Deutsch, Español, Français,<br />
Italiano, Ne<strong>de</strong>rlands, Svenska<br />
Source optique Aucune [par défaut]<br />
TV, CBL/SAT, AUX<br />
Espacement canaux<br />
tuner<br />
Co<strong>de</strong> <strong>de</strong> salle <strong>Bose</strong><br />
link*<br />
Restauration <strong>de</strong>s<br />
paramètres<br />
USA [par défaut]<br />
Europe<br />
B [par défaut], C, D, E, F, G, H, I, J,<br />
K, L, M, N ou O<br />
Non<br />
Oui<br />
Le media center affiche les zones claires avec une<br />
luminosité moyenne.<br />
Assombrit ou éclaircit l’écran du media center.<br />
Les menus à l’écran s’affichent dans la langue<br />
sélectionnée.<br />
Aucun signal numérique reçu via le câble optique.<br />
Signal numérique reçu via le câble optique pour la source<br />
sélectionnée.<br />
Espacement <strong>de</strong>s canaux <strong>de</strong> stations <strong>de</strong> radio AM/FM<br />
défini pour la norme <strong>de</strong> la région sélectionnée.<br />
Affecte un co<strong>de</strong> <strong>de</strong> salle à votre système 3-2-1 série II<br />
lorsqu’il est connecté à un réseau <strong>Bose</strong>.<br />
Conserve les paramètres actuels du système.<br />
Restaure les paramètres d’usine par défaut.<br />
* S’affiche uniquement lorsqu’une source <strong>Bose</strong> link est connectée.
Options <strong>de</strong> la télécomman<strong>de</strong><br />
Figure 31<br />
Options système <strong>de</strong> la<br />
catégorie Télécomman<strong>de</strong><br />
Modification <strong>de</strong>s options du système<br />
Les options <strong>de</strong> la catégorie Télécomman<strong>de</strong> vous permettent <strong>de</strong> programmer votre<br />
télécomman<strong>de</strong> pour contrôler les autres appareils audio connectés à votre système.<br />
Audio<br />
naviguer<br />
Vidéo Media<br />
center<br />
sélectionner<br />
Télécomman<strong>de</strong><br />
Verrouillage<br />
DVD<br />
Sélectionnez Télécomman<strong>de</strong> pour régler ces options système :<br />
Marque <strong>de</strong> TV<br />
Co<strong>de</strong> TV<br />
Appareil CBL/SAT<br />
Marque CBL/SAT<br />
Co<strong>de</strong> d’appareil CBL/SAT<br />
Option système Paramètres Description<br />
Appareil AUX<br />
Marque d’appareil AUX<br />
Co<strong>de</strong> d’appareil AUX<br />
Marque <strong>de</strong> TV Marque Fournit une liste <strong>de</strong> marques <strong>de</strong> téléviseurs contrôlables à l’ai<strong>de</strong> <strong>de</strong> la<br />
télécomman<strong>de</strong> 3•2•1.<br />
Co<strong>de</strong> TV Co<strong>de</strong> Fournit la liste <strong>de</strong>s co<strong>de</strong>s d’appareils disponibles pour la marque <strong>de</strong><br />
téléviseur sélectionnée.<br />
Appareil CBL/SAT Câble, Satellite I<strong>de</strong>ntifie lequel <strong>de</strong> ces <strong>de</strong>ux appareils est connecté à l’entrée<br />
CBL-SAT.<br />
Marque CBL/SAT Marque Fournit une liste <strong>de</strong> marques <strong>de</strong> récepteurs câble/satellite contrôlables<br />
à l’ai<strong>de</strong> <strong>de</strong> la télécomman<strong>de</strong> 3•2•1.<br />
Co<strong>de</strong> d’appareil CBL/<br />
SAT<br />
Appareil AUX Magnétoscope,<br />
Graveur <strong>de</strong> DVD<br />
Marque d’appareil<br />
AUX<br />
Co<strong>de</strong> Fournit la liste <strong>de</strong>s co<strong>de</strong>s d’appareils disponibles pour la marque <strong>de</strong><br />
récepteur câble/satellite sélectionnée.<br />
I<strong>de</strong>ntifie lequel <strong>de</strong> ces <strong>de</strong>ux appareils est connecté à l’entrée AUX.<br />
Marque Fournit une liste <strong>de</strong> marques <strong>de</strong> magnétoscopes et <strong>de</strong> graveurs <strong>de</strong><br />
DVD contrôlables à l’ai<strong>de</strong> <strong>de</strong> la télécomman<strong>de</strong> 3•2•1.<br />
Co<strong>de</strong> d’appareil AUX Co<strong>de</strong> Fournit la liste <strong>de</strong>s co<strong>de</strong>s d’appareils disponibles pour la marque <strong>de</strong><br />
magnétoscope ou <strong>de</strong> graveur <strong>de</strong> DVD sélectionnée.<br />
Remarque : Pour i<strong>de</strong>ntifier la marque et le co<strong>de</strong> d’appareil correspondant à chaque élément<br />
connecté et contrôlé par le système 3•2•1, reportez-vous à la section « Device Co<strong>de</strong>s », page 1.<br />
49<br />
Français
Français<br />
50<br />
Modification <strong>de</strong>s options du système<br />
Options <strong>de</strong> verrouillage DVD<br />
Figure 32<br />
Options système <strong>de</strong> la<br />
catégorie Verrouillage DVD<br />
Les options <strong>de</strong> la catégorie Verrouillage DVD vous permettent <strong>de</strong> restreindre le visionnage<br />
<strong>de</strong>s DVD vidéo en fonctions <strong>de</strong> certains classements. Pour activer cette fonction, vous <strong>de</strong>vez<br />
définir un niveau <strong>de</strong> restriction et créer un mot <strong>de</strong> passe dans la section Verrouillage DVD du<br />
menu Système.<br />
Audio<br />
Vidéo Media<br />
center<br />
Télécomman<strong>de</strong><br />
Sélectionnez Verrouillage DVD pour régler ces<br />
options système :<br />
Verrouillage disques non évalués<br />
Verrouillage disques évalués au-<strong>de</strong>ssus <strong>de</strong><br />
Changer mot <strong>de</strong> passe<br />
naviguer<br />
sélectionner<br />
Option système Paramètres Description<br />
Verrouillage disques non<br />
évalués<br />
Verrouillage disques<br />
évalués au-<strong>de</strong>ssus <strong>de</strong><br />
Inactif<br />
Actif<br />
Verrouillage<br />
DVD<br />
Aucune restriction appliquée aux DVD non évalués.<br />
Limite l’accès aux titres non évalués lorsqu’un mot <strong>de</strong> passe est<br />
défini.<br />
1 à 8 Empêche le visionnage <strong>de</strong>s disques dont la classification est<br />
supérieure au chiffre sélectionné lorsqu’un mot <strong>de</strong> passe est<br />
défini.<br />
Changer mot <strong>de</strong> passe _ _ _ _ Crée un nouveau co<strong>de</strong> à quatre chiffres pour limiter l’accès aux<br />
films en fonction <strong>de</strong> leur classification.<br />
Définition d’un mot <strong>de</strong> passe et d’un niveau <strong>de</strong> restriction<br />
Le mot <strong>de</strong> passe empêchera le visionnage non autorisé <strong>de</strong> DVD dont la classification est<br />
supérieure au niveau <strong>de</strong> restriction que vous avez défini. Vous pouvez choisir parmi 8 niveaux<br />
correspondant à la classification établie par l’association Motion Picture Association of<br />
America (MPAA). Reportez-vous à la section « Système <strong>de</strong> classification <strong>de</strong> la Motion Picture<br />
Association of America (MPAA) », page 51.<br />
1. Activez votre téléviseur et sélectionnez l’entrée TV correspondant à votre système 3•2•1.<br />
2. Appuyez sur la touche System <strong>de</strong> la télécomman<strong>de</strong> 3•2•1.<br />
3. À l’ai<strong>de</strong> <strong>de</strong>s touches <strong>de</strong> direction droite ( ) et gauche ( ), sélectionnez la catégorie<br />
Verrouillage DVD.<br />
4. Appuyez sur Enter ou sur la flèche vers le bas ( ).<br />
Remarque : Si vous utilisez la catégorie Verrouillage DVD pour la première fois, saisissez un mot<br />
<strong>de</strong> passe à quatre chiffres. Saisissez-le ensuite une <strong>de</strong>uxième fois pour confirmer.
5. Saisissez votre mot <strong>de</strong> passe à quatre chiffres.<br />
Modification <strong>de</strong>s options du système<br />
6. À l’ai<strong>de</strong> <strong>de</strong> la touche <strong>de</strong> direction vers le bas ( ), faites défiler le menu jusqu’à l’option<br />
Verrouillage disques évalués au-<strong>de</strong>ssus <strong>de</strong>.<br />
7. Appuyez sur la flèche vers la droite ( ) pour afficher les paramètres disponibles.<br />
8. Appuyez sur les flèches vers le haut ( ) ou vers le bas ( ) pour sélectionner le<br />
paramètre souhaité.<br />
9. Appuyez sur Enter ou sur la flèche vers la gauche ( ) pour mémoriser le paramètre<br />
choisi.<br />
10. Appuyez sur Exit pour quitter le menu Système.<br />
Système <strong>de</strong> classification <strong>de</strong> la Motion Picture Association<br />
of America (MPAA)<br />
Réglage <strong>de</strong><br />
contrôle<br />
parental<br />
Classification<br />
MPAA Restriction<br />
8 Aucune<br />
7 NC-17 Public adulte<br />
6 R Public averti<br />
5 Public adolescent averti<br />
4 PG-13 Public adolescent<br />
3 PG Public préadolescent<br />
2 Enfants<br />
1 G Tout public<br />
Exemple : Si vous choisissez <strong>de</strong> régler le contrôle parental sur 4, l’accès aux DVD dont la<br />
classification est supérieure à PG-13 sera restreint. Ceux-ci ne pourront être visionnés<br />
qu’après saisie du mot <strong>de</strong> passe.<br />
Ce mot <strong>de</strong> passe permet également d’éviter que le paramètre <strong>de</strong> niveau <strong>de</strong> restriction ne soit<br />
modifié sans autorisation.<br />
51<br />
Français
Français<br />
52<br />
Entretien du système<br />
Nettoyage<br />
Figure 33<br />
Entretien <strong>de</strong>s disques<br />
Nettoyage du media center<br />
• Pour nettoyer les surfaces extérieures du media center, utilisez uniquement un chiffon doux<br />
et sec.<br />
• N’utilisez pas d’aérosols à proximité du système. N’utilisez pas <strong>de</strong> solvants, <strong>de</strong> produits<br />
chimiques, ni <strong>de</strong> liqui<strong>de</strong>s <strong>de</strong> nettoyage contenant <strong>de</strong> l’alcool, <strong>de</strong> l’ammoniac ou <strong>de</strong>s<br />
substances abrasives.<br />
• Veillez à ce qu’aucun liqui<strong>de</strong> ne pénètre dans les ouvertures.<br />
Nettoyage <strong>de</strong>s enceintes<br />
• Nettoyez la surface <strong>de</strong>s enceintes avec un chiffon doux et humi<strong>de</strong>. Vous pouvez utiliser un<br />
produit à vitres sans ammoniac sur un chiffon doux pour la finition.<br />
• N’utilisez pas d’aérosols à proximité <strong>de</strong>s enceintes. N’utilisez pas <strong>de</strong> solvants, <strong>de</strong> produits<br />
chimiques, ni <strong>de</strong> liqui<strong>de</strong>s <strong>de</strong> nettoyage contenant <strong>de</strong> l’alcool, <strong>de</strong> l’ammoniac ou <strong>de</strong>s<br />
substances abrasives.<br />
• Veillez à ce qu’aucun liqui<strong>de</strong> ne pénètre dans les ouvertures.<br />
• Les grilles <strong>de</strong>s enceintes ne nécessitent aucun entretien spécifique. Vous pouvez<br />
cependant passer l’aspirateur <strong>de</strong>ssus, avec précaution, si nécessaire.<br />
Nettoyage <strong>de</strong>s disques<br />
• Manipulez les disques par les bords afin d’éviter <strong>de</strong> laisser <strong>de</strong>s traces <strong>de</strong> doigts ou <strong>de</strong> les<br />
rayer (Figure 33a).<br />
• Pour effacer les tâches ou les empreintes <strong>de</strong> la surface d’un disque, utilisez un chiffon<br />
doux, sec et non pelucheux. Procé<strong>de</strong>z par mouvements droits, en partant du centre du<br />
disque vers les bords (Figure 33b). N’utilisez pas <strong>de</strong> produits chimiques. Ils risqueraient<br />
d’endommager le disque.<br />
• Ne faites pas <strong>de</strong> mouvements circulaires pour nettoyer le disque (Figure 33c).<br />
• N’écrivez pas sur la surface du disque et n’y fixez pas d’étiquette.<br />
• Pour réduire l’exposition à la poussière et à la saleté, replacez les disques dans leur boîtier<br />
après utilisation. Rangez chaque disque dans son boîtier et conservez-le dans un endroit<br />
sec, à l’abri <strong>de</strong> la lumière directe du soleil et <strong>de</strong> la chaleur.<br />
a. b. c.
Remplacement <strong>de</strong>s piles <strong>de</strong> la télécomman<strong>de</strong><br />
Figure 34<br />
Insertion <strong>de</strong>s piles<br />
Accessoires<br />
Figure 35<br />
Accessoires pour enceintes<br />
Entretien du système<br />
ATTENTION : Veillez à vous débarrasser <strong>de</strong> vos piles usagées conformément aux<br />
réglementations locales. Ne les incinérez pas.<br />
• Faites glisser le couvercle du compartiment à piles pour l’ouvrir (Figure 34).<br />
• Localisez les repères <strong>de</strong> polarité (+ et -) situés à l’intérieur du boîtier et positionnez les piles<br />
en conséquence. Veillez à remplacer les <strong>de</strong>ux piles.<br />
• Remettez le couvercle en place.<br />
Piles AA (IEC R6)<br />
Les enceintes <strong>de</strong>s systèmes <strong>Bose</strong> ® 3•2•1 série II et 3•2•1 GS série II sont compatibles avec<br />
<strong>de</strong>s accessoires <strong>de</strong> fixation <strong>Bose</strong>, notamment avec les supports muraux UB-20, les pieds <strong>de</strong><br />
sol UFS-20 et les pieds <strong>de</strong> table UTS-20 (Figure 35). <strong>Bose</strong> propose également <strong>de</strong>s<br />
adaptateurs <strong>de</strong> câbles permettant <strong>de</strong> faire passer les câbles d’enceintes dans les murs.<br />
Pour plus d’informations ou pour comman<strong>de</strong>r <strong>de</strong>s fixations, socles ou adaptateurs <strong>de</strong> câbles,<br />
veuillez contacter votre reven<strong>de</strong>ur <strong>Bose</strong> agréé ou <strong>Bose</strong> directement. Reportez-vous à la liste<br />
d’adresses incluse dans le carton d’emballage.<br />
Supports muraux<br />
UB-20<br />
Couvercle du compartiment à piles<br />
Pieds <strong>de</strong> table<br />
UT-S20<br />
Pieds <strong>de</strong> sol<br />
UFS-20<br />
53<br />
Français
Français<br />
54<br />
Dépannage<br />
Tableau <strong>de</strong> dépannage<br />
Problème Mesure corrective<br />
Le système ne<br />
fonctionne<br />
pas du tout.<br />
Impossible d’éjecter le<br />
disque.<br />
• Assurez-vous que le système est sous tension. Essayez d’appuyer sur la touche On-Off<br />
<strong>de</strong> la télécomman<strong>de</strong> et sur la touche On-Off du media center<br />
• Assurez-vous que le cordon d’alimentation est correctement connecté au module<br />
Acoustimass ® et correctement inséré dans une prise secteur murale en état <strong>de</strong> marche.<br />
• Vérifiez que vous avez sélectionné une source (CD/DVD, AM/FM, etc.).<br />
• Débranchez le cordon d’alimentation du module Acoustimass <strong>de</strong> la prise secteur pendant<br />
une minute, puis reconnectez-le. Cette opération permet au système <strong>de</strong> se réinitialiser.<br />
Après avoir rebranché le cordon d’alimentation, atten<strong>de</strong>z que le message « BOSE 3•2•1 »<br />
apparaisse sur l’écran d’affichage du media center.<br />
• Mettez le système hors tension.<br />
• Débranchez le cordon d’alimentation du module Acoustimass <strong>de</strong> la prise secteur pendant<br />
une minute, puis reconnectez-le. Cette opération permet au système <strong>de</strong> se réinitialiser.<br />
• Avant <strong>de</strong> mettre le système sous tension, appuyez sur la touche Eject du media center et<br />
maintenez-la enfoncée.<br />
Aucun son n’est émis. • Augmentez le volume.<br />
• Vérifiez si le mot MUTE (silence) apparaît sur l’écran d’affichage. Si tel est le cas, appuyez<br />
sur la touche Mute <strong>de</strong> la télécomman<strong>de</strong> pour rétablir le son.<br />
• Assurez-vous que le câble du module Acoustimass et le câble d’enceintes sont<br />
correctement insérés dans les prises respectives du media center et que le connecteur<br />
multi-broches situé à l’autre extrémité est correctement inséré dans la prise du module<br />
Acoustimass.<br />
• Vérifiez les branchements <strong>de</strong>s enceintes.<br />
• Désactivez le media center pendant 10 secon<strong>de</strong>s, puis réactivez-le, afin <strong>de</strong> restaurer la<br />
communication entre le media center et les enceintes.<br />
• Vérifiez les branchements <strong>de</strong>s appareils audio externes. Assurez-vous <strong>de</strong> sélectionner la<br />
source correspondant à l’entrée souhaitée.<br />
• Assurez-vous que le disque est bien en place, l’étiquette vers le haut, dans le tiroir CD.<br />
• Connectez les antennes FM et AM.<br />
• Débranchez le cordon d’alimentation du module Acoustimass <strong>de</strong> la prise secteur pendant<br />
une minute, puis connectez-le à nouveau. Cette opération permet au système <strong>de</strong> se<br />
réinitialiser.<br />
• Si vous utilisez une connexion audio numérique optique, vérifiez que la prise optique est<br />
bien affectée à la source appropriée dans le menu Système.<br />
• Vérifiez que le contrôle du volume n’est pas en position minimum sur votre téléviseur.<br />
• Vérifiez les paramètres <strong>de</strong> niveau d’entrée pour chaque appareil connecté, dans le menu<br />
Système.
Problème Mesure corrective<br />
Le son fonctionne,<br />
mais aucune image ne<br />
s’affiche.<br />
La télécomman<strong>de</strong><br />
fonctionne mal ou pas<br />
du tout.<br />
La radio ne fonctionne<br />
pas ou la réception est<br />
mauvaise.<br />
Impossible <strong>de</strong> lire un<br />
DVD ou un CD.<br />
La réception FM est<br />
mauvaise.<br />
Service client<br />
Dépannage<br />
• Assurez-vous que la télévision est allumée.<br />
• Lors <strong>de</strong> la lecture d’un DVD ou d’une autre source vidéo, assurez-vous que votre téléviseur<br />
est réglé sur l’entrée vidéo appropriée.<br />
• Vérifiez les piles et leur polarité (+ et –). Reportez-vous à la section « Remplacement <strong>de</strong>s<br />
piles <strong>de</strong> la télécomman<strong>de</strong> », page 53.<br />
• Pointez la télécomman<strong>de</strong> vers le media center.<br />
• Assurez-vous que les antennes sont correctement connectées.<br />
• Placez l’antenne AM à au moins 50 cm du media center.<br />
• Réglez la position <strong>de</strong> l’antenne pour améliorer la réception.<br />
• L’antenne AM doit être en position verticale.<br />
• Éloignez les antennes <strong>de</strong> la télévision ou <strong>de</strong> tout autre équipement électronique.<br />
• Il se peut que vous vous trouviez dans une zone <strong>de</strong> faible couverture.<br />
• Vérifiez si le symbole <strong>de</strong> lecture est allumé sur l’écran.<br />
• Après avoir appuyé sur la touche CD/DVD, atten<strong>de</strong>z quelques secon<strong>de</strong>s avant d’appuyer<br />
sur Play (lecture).<br />
• Assurez-vous que le disque est correctement positionné (étiquette dirigée vers le haut).<br />
• Éjectez le disque et essayez <strong>de</strong> le charger à nouveau.<br />
• Le disque est peut-être sale ou poussiéreux. Nettoyez-le. Reportez-vous à la section<br />
« Nettoyage <strong>de</strong>s disques », page 52.<br />
• Le CD est peut-être abîmé. Essayez un autre disque.<br />
• Assurez-vous que les numéros <strong>de</strong> zone du lecteur et du DVD sont i<strong>de</strong>ntiques.<br />
Reportez-vous à la section « Vérification <strong>de</strong> la compatibilité <strong>de</strong>s disques avec votre zone »,<br />
page 5.<br />
• Réglez la position <strong>de</strong> l’antenne pour réduire les interférences.<br />
Le son est mauvais. • Assurez-vous que les câbles <strong>de</strong>s enceintes ne sont pas endommagés et que les<br />
branchements sont corrects.<br />
• Diminuez le niveau <strong>de</strong> sortie <strong>de</strong>s appareils audio externes connectés au media center.<br />
• Diminuez le paramètre <strong>de</strong> niveau d’entrée pour l’appareil connecté dans le menu Système.<br />
L’image apparaît en noir<br />
et blanc, ou déformée.<br />
Vous avez oublié votre<br />
mot <strong>de</strong> passe.<br />
• Vérifiez les branchements <strong>de</strong>s câbles vidéo.<br />
• Vérifiez également le réglage du standard vidéo et modifiez-le si nécessaire<br />
(NTSC ou PAL). Reportez-vous à la section « Options vidéo », page 47.<br />
• Entrez le mot <strong>de</strong> passe 2673 pour accé<strong>de</strong>r au contrôle parental et créez un mot <strong>de</strong> passe.<br />
Pour obtenir <strong>de</strong> l’ai<strong>de</strong> en cas <strong>de</strong> problème, contactez le service client <strong>de</strong> <strong>Bose</strong> ® . Consultez la<br />
liste d’adresses incluse dans le carton d’emballage.<br />
55<br />
Français
Français<br />
Puissance nominale<br />
56<br />
États-Unis/Canada : 120 V 50/60 Hz 300 W<br />
International : 220-240 V 50/60 Hz 300 W<br />
Bi-tension : 115/230 V 50/60 Hz 300 W<br />
Entrées audio<br />
AUX - Left, Right (gauche, droite - analogique) ; D<br />
(numérique)<br />
CBL-SAT - L, R (gauche, droite - analogique) ; D<br />
(numérique)<br />
TV - L, R (gauche, droite - analogique) ; D (numérique)<br />
Optical (optique) - SPDIF numérique, assignable<br />
Sorties audio<br />
Acoustimass Module - SPDIF<br />
Entrées vidéo<br />
C (composite) - Norme NTSC ou PAL<br />
S-Vi<strong>de</strong>o<br />
Sorties vidéo<br />
C (composite) - Norme NTSC ou PAL<br />
S-Vi<strong>de</strong>o<br />
Component (composante) Y, Pb, Pr<br />
Antennes<br />
FM 75 Ω - antenne FM externe<br />
AM - antenne AM externe<br />
Informations techniques<br />
Température ambiante maximum<br />
45°C<br />
Dimensions<br />
Media center : 8,3 cm x 34,9 cm x 25,4 cm<br />
Télécomman<strong>de</strong> : 3,0 cm x 6,5 cm x 22,9 cm<br />
Enceintes 3•2•1 : 8,7 cm x 19,9 cm x 13,6 cm<br />
3•2•1 Enceintes GS : 10,5 cm x 14 cm x 6,4 cm<br />
Module Acoustimass ® : 36,7 cm x 22,2 cm x 48,5 cm<br />
Poids<br />
Media center : 3,0 kg<br />
Enceintes 3•2•1 : 1,2 kg chacune<br />
Enceintes GS : 0,45 kg chacune<br />
Module Acoustimass : 10,6 kg<br />
Finition :<br />
Media center : polymère<br />
Enceintes : polymère<br />
Module Acoustimass : polymère
Cable box <strong>de</strong>vice co<strong>de</strong>s<br />
Códigos <strong>de</strong> instalación para cable<br />
Co<strong>de</strong>s <strong>de</strong> configuration pour le câble<br />
ABC ............................. 0003, 0008, 0014,<br />
0007, 0013, 0047,<br />
0011, 0017, 0001<br />
ADB ............................. 1063<br />
Ajinvision ..................... 1271<br />
Alcate .......................... 0896, 0897<br />
Allegro ......................... 0315, 0153<br />
Americast .................... 0899<br />
Antronix ....................... 0022<br />
Anvision....................... 0211, 0111<br />
Archer.......................... 0797, 0153, 0022<br />
Belcor .......................... 0056<br />
Bell & Howell ............... 0014<br />
Bell South.................... 0899<br />
Bestlink........................<br />
Birmingham Cable<br />
0303<br />
Communications ......... 0276<br />
British Telecom............ 0003, 0105<br />
Cable & Wireless ......... 1068<br />
Cable Star ................... 0056<br />
Cabletenna .................. 0022<br />
Cabletime .................... 0448, 0377, 0271,<br />
0665<br />
Cableview.................... 0022<br />
Century........................ 0153<br />
Citizen ......................... 0315, 0153<br />
Colour Voice ................ 0025<br />
Comtec........................ 0274<br />
Comtronics.................. 0060, 0040<br />
Contec......................... 0019<br />
Cryptovision ................ 0600<br />
Daehan ........................ 0778<br />
Daeryung..................... 0877, 1877, 0477,<br />
0008, 0277<br />
Decsat ......................... 0423<br />
Director........................ 0476<br />
Eastern ........................ 0418, 0274, 0002<br />
Electricord ................... 0078<br />
Emerson ...................... 0797<br />
Everquest .................... 0015, 0040<br />
Filmnet......................... 0443<br />
Focus........................... 0400<br />
France Telecom........... 0897, 0896, 0451<br />
Funai............................ 0019, 0248<br />
Garrard ........................ 0153<br />
GC Electronics ............ 0056<br />
Gemini ......................... 0070, 0057, 0797,<br />
0015, 0242<br />
General Instrument ...... 0476, 0810, 0276,<br />
0003, 0014, 0015,<br />
0011, 0098<br />
GHZ ............................. 0078<br />
GMI.............................. 0057, 0015, 0797,<br />
0069<br />
Gol<strong>de</strong>n Channel........... 1063, 1110<br />
GoldStar ...................... 0144, 0040, 0838<br />
Goodmind.................... 0797<br />
Grundig........................ 0529<br />
Hamlin.......................... 0009, 0273, 0259,<br />
0034, 0020<br />
Hitachi.......................... 0014, 0011, 0255<br />
Hwalin.......................... 0303<br />
HyperVision ................. 0619<br />
Hytex ........................... 0007<br />
IEEC............................. 1018<br />
Jasco ........................... 0015, 0315, 0153<br />
Jebsee ......................... 0400<br />
Jerrold.......................... 0476, 0810, 0276,<br />
0003, 0012, 0014,<br />
0098, 0047, 0011,<br />
0015<br />
Leon............................. 0069, 0015<br />
LG ................................ 0144, 0040, 0838,<br />
0779<br />
Magnavox .................... 0069<br />
Memorex...................... 0000<br />
MNET........................... 0443, 0019<br />
Motorola ...................... 0476, 0810, 0276,<br />
1254, 1106<br />
Movie Time .................. 0063, 0078<br />
Mr. Zap ........................ 1112<br />
MS ............................... 0015, 1018, 0303,<br />
0069<br />
NET.............................. 0274<br />
Noos ............................ 0817<br />
Now ............................. 0776<br />
NSC ............................. 0063, 0070<br />
NTL .............................. 1068<br />
Oak .............................. 0007, 0248, 0019<br />
Ono.............................. 1068<br />
Optimus ....................... 0021<br />
Pace............................. 0237, 1060, 1068<br />
Pacific.......................... 0678<br />
Pacific Bell................... 0843<br />
Panasonic .................... 0000, 0008, 0107,<br />
0040, 0021<br />
Paragon ....................... 0000<br />
Device Co<strong>de</strong>s<br />
Philips .......................... 0305, 0317, 0652,<br />
0013, 0069, 0211,<br />
0290, 0619, 0060,<br />
0153, 0255, 0025,<br />
0111, 0242<br />
Pioneer......................... 0877, 1877, 0144,<br />
0533, 1021<br />
Popular Mechanics ...... 0400<br />
Pulsar...........................<br />
PVP Stereo Visual<br />
0000<br />
Matrix........................... 0003<br />
Quasar ......................... 0000<br />
RadioShack.................. 0315, 0303, 0883,<br />
0015, 0797<br />
Rampage ..................... 0255<br />
RCA.............................. 0021, 0843<br />
Recoton ....................... 0400<br />
Regal............................ 0279, 0273, 0020,<br />
0259<br />
Regency....................... 0002<br />
Rembrandt................... 0070, 0011<br />
Runco........................... 0000<br />
Sagem.......................... 0817<br />
Samsung...................... 0000, 0144, 0702,<br />
0070, 0840, 0040<br />
Scientific Atlanta .......... 0877, 1877, 0477,<br />
0008, 0006, 0277,<br />
0017<br />
Seawoo........................ 0073, 0780<br />
Sharp ........................... 0313<br />
Signal ........................... 0015, 0040<br />
Signature...................... 0011<br />
SL Marx........................ 0040<br />
Sony............................. 1006<br />
Sprucer ........................ 0021<br />
Starcom ....................... 0003, 0014, 0098,<br />
0047, 0015<br />
Stargate ....................... 0797, 0040, 0015<br />
Starquest ..................... 0015<br />
Storm ........................... 1018<br />
Supercable................... 0276<br />
Sylvania........................ 0001<br />
Tadiran ......................... 0040<br />
Tae Kwang ................... 0068<br />
Taepyung ..................... 0678<br />
Taihan........................... 0778<br />
Tandy ........................... 0258<br />
Teac.............................. 1018<br />
Tele+1........................... 0443<br />
Teleview ....................... 0040<br />
Telewest ....................... 1068<br />
A-1<br />
Device Co<strong>de</strong>s • Códigos <strong>de</strong> dispositivos • Co<strong>de</strong>s d’appareils
Device Co<strong>de</strong>s • Códigos <strong>de</strong> dispositivos • Co<strong>de</strong>s d’appareils<br />
A-2<br />
Device Co<strong>de</strong>s<br />
Cable box <strong>de</strong>vice co<strong>de</strong>s<br />
Códigos <strong>de</strong> instalación para cable<br />
Co<strong>de</strong>s <strong>de</strong> configuration pour le câble<br />
Texscan ....................... 0001<br />
Thomson ..................... 1110<br />
Timeless ...................... 0040, 0418, 0274<br />
Tocom.......................... 0012, 0013<br />
TongKook .................... 0840, 0777<br />
TopStone ..................... 1355<br />
Torx.............................. 0003<br />
Toshiba ........................ 0000<br />
Trans PX ...................... 0276, 0153, 0315,<br />
0303<br />
TS ................................ 0003, 0303, 0255,<br />
1018<br />
Tudi .............................. 0286<br />
Tusa ............................. 0015<br />
TV86 ............................ 0063<br />
UBS ............................. 0073<br />
Unika............................ 0153, 0022<br />
United Artists............... 0007<br />
United Cable................ 0003<br />
Universal...................... 0022, 0153, 0078,<br />
0056, 0191<br />
Satellite box <strong>de</strong>vice co<strong>de</strong>s<br />
Códigos <strong>de</strong> instalación para satellite<br />
Co<strong>de</strong>s <strong>de</strong> configuration pour le satellite<br />
ABsat........................... 0832, 0123<br />
Akai ............................. 0515<br />
Alba ............................. 0455, 0421, 0613,<br />
0515<br />
Al<strong>de</strong>s ........................... 0288<br />
AlphaStar..................... 0772<br />
Amstrad....................... 0847, 0338, 0501,<br />
0811, 0252, 0461,<br />
0689, 1113, 0345,<br />
0675<br />
Ankaro ......................... 0288, 0713, 0220,<br />
0519, 0369, 1094<br />
Anttron......................... 0421, 0183<br />
Arcon........................... 1043, 0834, 0368,<br />
1205<br />
Armstrong.................... 0243<br />
AST.............................. 0351, 0321<br />
Aston ........................... 1129, 0142<br />
Astra ............................ 0108<br />
Astro............................ 0501, 0358, 0548,<br />
0173, 0520<br />
Audioton...................... 0364<br />
Avalon.......................... 0396<br />
Axis.............................. 0530, 0369, 0834<br />
Best ............................. 0369<br />
Blaupunkt .................... 0173<br />
Boca ............................ 0243, 0829, 0513<br />
Brain Wave ..................<br />
British Sky<br />
0332<br />
Broadcasting ............... 1175, 0847<br />
BT................................ 0515, 0710, 0668<br />
Bush ............................ 0067, 0522<br />
Cambridge................... 0515<br />
Canal Digital ................ 0853<br />
Canal Satellite.............. 0853<br />
Canal+ ......................... 0853<br />
Chaparral ..................... 0216, 0053<br />
CityCom....................... 1176, 0818, 0115<br />
Clark ............................ 0811<br />
CNT ............................. 0520<br />
Commlink .................... 0288<br />
Connexions.................. 0396<br />
Conrad......................... 0607, 0115, 0809<br />
Crossdigital.................. 1109<br />
Crown .......................... 0243<br />
D-box........................... 1127, 0873, 0723<br />
Dae Young ................... 0735<br />
Daeryung ..................... 0396<br />
Digenius....................... 0299<br />
DirecTV ....................... 2001, 0392, 0566,<br />
2002, 0639, 1142,<br />
0247, 0749, 1749,<br />
0724, 0819, 1856,<br />
1076, 1109, 0099<br />
Dish Network<br />
1005, 2005, 0775,<br />
System......................... 2003, 1170, 2011<br />
Dishpro ........................ 1005, 2005, 0775,<br />
2003<br />
Distratel ....................... 0084, 0885<br />
DMT ............................. 1075<br />
DNT.............................. 0396<br />
DX Antenna.................. 0752<br />
Dynasat........................ 0679<br />
Vi<strong>de</strong>oway ..................... 0250<br />
Viewmaster .................. 0883<br />
Viewstar ....................... 0111, 0063, 0258,<br />
0060, 0211<br />
Visionetics.................... 1064<br />
Westminster ................. 0105, 0716<br />
Wiso ............................. 0078<br />
Zenith........................... 0000, 0525, 0899<br />
Zentek.......................... 0400<br />
Echostar....................... 2005, 1005, 2003,<br />
0775, 1169, 0280,<br />
0453, 0610, 0853,<br />
1086, 0167, 0396,<br />
0511, 1170, 0312,<br />
2011, 0454, 0713,<br />
0871<br />
EIF................................ 0674, 0417<br />
Elta............................... 0364<br />
Emanon........................ 0421<br />
Engel ............................ 0450, 1017<br />
Euro<strong>de</strong>c........................ 0526<br />
Eurostar........................ 0679, 1026, 1025<br />
Expressvu .................... 2003, 0775<br />
Ferguson...................... 0336, 0183, 0067,<br />
0711<br />
Fi<strong>de</strong>lity.......................... 0675, 0252, 0811<br />
Finlux ........................... 0397, 0108, 0455,<br />
0414<br />
Force NO AS................ 1101<br />
Foxtel ........................... 0879<br />
Fracarro........................ 0871<br />
Freecom....................... 0421, 0335<br />
Fresat........................... 0885<br />
FTE ............................... 0811, 0331, 0863<br />
Fuba............................. 0369, 0417, 0172,<br />
0414, 0396, 0421<br />
Funai ............................ 0338<br />
G-Sat ........................... 0183<br />
Galaxis ......................... 0656, 0834, 1111,<br />
0364, 0833, 1101,<br />
0288, 0813, 0863,<br />
0283<br />
Galaxisat ...................... 0321<br />
Gardiner ....................... 0818
Satellite box <strong>de</strong>vice co<strong>de</strong>s<br />
Códigos <strong>de</strong> instalación para satellite<br />
Co<strong>de</strong>s <strong>de</strong> configuration pour le satellite<br />
GE ............................... 0566<br />
General Instrument...... 0869<br />
GOI.............................. 2003, 0775<br />
Gold Box ..................... 0853<br />
GoldStar ...................... 0335<br />
Gooding....................... 0571<br />
Goodmans................... 1246<br />
Gradiente 2004, 0887<br />
Grothusen.................... 0335<br />
Grundig ....................... 0173, 0805, 0140,<br />
0750, 1150, 0139,<br />
0571, 0847<br />
HDT ............................. 1011, 1159<br />
Hinari ........................... 0183<br />
Hirschmann ................. 0396, 0495, 0573,<br />
0173, 0398, 0502,<br />
1085, 0397, 0501,<br />
0882<br />
Hitachi ......................... 0819, 0455, 0491,<br />
0489, 1250<br />
Homecable .................. 0238<br />
Houston....................... 0668<br />
HTS .............................<br />
Hughes Network<br />
0775, 2003<br />
Systems....................... 1142, 0749, 1749<br />
Humax......................... 0863, 0283, 1176,<br />
1048<br />
Hung Chang ................ 0732<br />
Huth............................. 0388, 0794, 0288,<br />
0368, 0589, 0243,<br />
0364, 0517, 0220,<br />
0346<br />
Hwalin.......................... 0885<br />
Hyundai ....................... 1011, 0758, 1159<br />
IEEC ............................ 0605<br />
Ikusi Allsat ................... 0368<br />
Indovision .................... 2004, 0887<br />
Innova.......................... 0099<br />
Intertronic .................... 0631<br />
Intervision.................... 0592<br />
InVi<strong>de</strong>o ........................ 0871<br />
IQ................................. 0210<br />
IQ Prism....................... 0210<br />
IRTE............................. 0816, 0609<br />
ISkyB .......................... 2004, 0887<br />
ITT ............................... 0108, 0172<br />
JiWon........................... 0364<br />
Johansson................... 0332<br />
JOK ............................. 0710<br />
JSR.............................. 0364<br />
JVC .............................. 2003, 0775, 0571,<br />
0492, 0515, 1170,<br />
0506, 2011, 0505<br />
Kabil............................. 0737<br />
Kathrein ....................... 0658, 0092, 0249,<br />
0442, 0622, 1224,<br />
0173, 0358, 0553,<br />
1057, 0123, 0331,<br />
0480<br />
KeyWest....................... 0794<br />
Kosmos........................ 0335, 0331<br />
Kreiselmeyer ................ 0173<br />
Kuang Yu ..................... 0635<br />
Kyostar ........................ 0421<br />
L&S Electronic ............. 1043<br />
LaSAT .......................... 0607, 0520, 0513<br />
Lenco........................... 0450, 0421, 0335<br />
Lennox......................... 0592<br />
LG ................................ 1226, 0461, 0335<br />
Lifesat .......................... 1122<br />
Logix ............................ 1017<br />
Lorenzen...................... 0299<br />
Lupus........................... 0369<br />
Luxor............................ 0172, 0108, 0573<br />
Macab.......................... 0586, 0179<br />
Magnavox .................... 0724, 0722<br />
Manhattan.................... 0520, 1017, 0455,<br />
0765, 0592, 1083<br />
Maspro......................... 0336, 0092, 0750,<br />
0495<br />
Matsui.......................... 0571<br />
Matsushita ................... 0500, 0340<br />
Mediamarkt.................. 0243<br />
MediaSat ..................... 0853<br />
Memorex...................... 0724<br />
Metronic....................... 0713, 0084, 1215<br />
Micronik....................... 1003<br />
Minerva ........................ 0571<br />
Mitsubishi .................... 0749, 0491<br />
Morgan’s...................... 0132, 0683, 0513,<br />
1103, 0243, 0829<br />
Motorola ...................... 0869<br />
Multichoice .................. 0879, 0642<br />
Multistar....................... 0331<br />
Muratto ........................ 0335<br />
Navex........................... 0332<br />
NEC ............................. 0499, 1270, 0496,<br />
0508, 0507<br />
Netsat .......................... 0099, 2004, 0887<br />
Neuhaus ...................... 0501, 0220<br />
Neusat ......................... 0692, 0834<br />
Device Co<strong>de</strong>s<br />
Next Level .................... 0869<br />
NextWave..................... 0732<br />
Nikko............................ 0713<br />
Nokia............................ 0397, 0723, 1023,<br />
0172, 0573, 0873,<br />
0108, 0455, 0751,<br />
1127<br />
Now.............................. 0757<br />
Oceanic........................ 0586<br />
OctalTV ....................... 2005, 1005<br />
Orbit............................. 1022<br />
Orbitech ....................... 0501, 1100<br />
Origo ............................ 0498<br />
Orion ............................ 0522<br />
Pace............................. 1175, 0241, 0497,<br />
0795, 0887, 0183,<br />
0455, 0791, 0867,<br />
2004, 0067, 0336,<br />
0720, 0847<br />
Palladium ..................... 0571<br />
Palsat ........................... 0501<br />
Panarex........................ 1159<br />
Panasat........................ 0879, 0615<br />
Panasonic .................... 0247, 0701, 0500,<br />
0847, 0340, 0739,<br />
1104<br />
Panda........................... 0455<br />
Pansat.......................... 1159<br />
Pantech........................ 0747<br />
Paysat .......................... 0724<br />
Philips .......................... 1142, 0749, 1749,<br />
0724, 1076, 0722,<br />
0099, 0133, 0571,<br />
0853, 1118, 0455,<br />
0710, 0805, 0292,<br />
0667, 0750, 0898<br />
Phonotrend .................. 0592, 0288, 1124<br />
Pioneer......................... 0352, 0329, 0853,<br />
0662<br />
Pixx .............................. 0552<br />
Plasmatic ..................... 0442<br />
Praxis ........................... 1123<br />
Preisner........................ 0132, 0513<br />
Promax......................... 0455<br />
Prosat........................... 0288<br />
Proscan........................ 0392, 2001, 0566<br />
ProVision...................... 0118<br />
Pyxis ............................ 0831<br />
Quadral ........................ 0628, 0519<br />
RadioShack.................. 0869<br />
Radix............................ 0882, 0396, 1255,<br />
1113<br />
A-3<br />
Device Co<strong>de</strong>s • Códigos <strong>de</strong> dispositivos • Co<strong>de</strong>s d’appareils
Device Co<strong>de</strong>s • Códigos <strong>de</strong> dispositivos • Co<strong>de</strong>s d’appareils<br />
A-4<br />
Device Co<strong>de</strong>s<br />
Satellite box <strong>de</strong>vice co<strong>de</strong>s<br />
Códigos <strong>de</strong> instalación para satellite<br />
Co<strong>de</strong>s <strong>de</strong> configuration pour le satellite<br />
RCA ............................ 2001, 0392, 0566,<br />
0855, 0143<br />
Realistic....................... 0052<br />
RFT .............................. 0288, 0220<br />
Saba ............................ 0690, 0520, 0885,<br />
0336, 0710<br />
Sabre........................... 0455<br />
Sagem ......................... 1253, 1114, 0820<br />
Salora .......................... 0172, 0108<br />
Samsung ..................... 1276, 1109, 1017,<br />
0773, 1243<br />
Sanyo .......................... 1219, 0493<br />
SAT.............................. 0321, 0461, 0351<br />
Satcom ........................ 0346, 0605<br />
Satec ........................... 0183<br />
Satmaster.................... 0346<br />
SatPartner ................... 0502, 0811, 0421,<br />
0692, 0335, 0520,<br />
0332<br />
Satplus ........................ 1009<br />
Satstation .................... 1083<br />
Schnei<strong>de</strong>r .................... 0805<br />
Schwaiger ................... 0552, 0183, 0116,<br />
1111<br />
Seemann ..................... 0530, 0396<br />
SEG ............................. 1087, 0742, 0421,<br />
0369<br />
Sharp........................... 0494<br />
Siemens....................... 0683, 0173<br />
SKY ............................. 0856, 0099, 2004,<br />
0847, 1175, 0887<br />
Sky Television.............. 1014<br />
Skylife.......................... 1255<br />
Skymaster.................... 0628, 1062, 0240,<br />
0605, 0880, 0519,<br />
0713, 0288<br />
SM Electronic .............. 0713, 0240, 0157,<br />
1200<br />
Smallear....................... 1103<br />
Smart ........................... 0132<br />
Sony............................. 2002, 0639, 1639,<br />
0294, 0847, 0278,<br />
0661<br />
Star .............................. 2004, 0887<br />
Star Choice.................. 0869<br />
Star Trak ...................... 0421<br />
Starland ....................... 1122<br />
Strong .......................... 0125, 0421, 1105,<br />
0354, 1088, 0132,<br />
0879, 1159<br />
STS .............................. 0210<br />
STVI ............................. 0417<br />
Sunstar ........................ 0513, 0794<br />
Supernova ................... 2004, 0887<br />
Tada ............................. 0368<br />
Tae Kwang ................... 0733<br />
Tantec .......................... 0336, 0455<br />
Techniland.................... 0346<br />
TechniSat ..................... 0005, 1099, 0548,<br />
1195, 0501, 1100<br />
Telefunken.................... 0421<br />
Teleka........................... 0243, 0613<br />
Telesat.......................... 0605<br />
Telestar ........................ 0114, 1100, 0501,<br />
0157<br />
Televisa ........................ 2004, 0887<br />
Thomson...................... 0455, 1012, 0853,<br />
0711, 1046<br />
TV <strong>de</strong>vice co<strong>de</strong>s<br />
Códigos <strong>de</strong> instalación para TV<br />
Co<strong>de</strong>s <strong>de</strong> configuration pour le téléviseur<br />
A-Mark......................... 0003<br />
Abex ............................ 0032<br />
Acura ........................... 0009<br />
Addison ....................... 0653, 0108<br />
Admiral ........................ 0093, 0087, 0163<br />
Advent ......................... 0783, 1933, 0817,<br />
0815<br />
Adventura .................... 0046<br />
Adyson ........................ 0217, 0032<br />
AGB............................. 0516<br />
Aiwa ............................. 1914, 1910, 1916,<br />
0701, 1915<br />
Akai.............................. 1537, 0009, 0351,<br />
0516, 0708, 0218,<br />
0448, 0696, 0208,<br />
0361, 0602<br />
Akito............................. 0272<br />
Akura ........................... 0264, 0218, 0493,<br />
0358<br />
Alaron .......................... 0179, 0216<br />
Thorens ........................ 0586<br />
Tonna ........................... 0668, 0346<br />
Topfield ........................ 1206<br />
Toshiba......................... 0749, 1749, 0790,<br />
0486, 1285, 0082<br />
TPS .............................. 1253, 0820<br />
Triad ............................. 0351, 0335, 0321<br />
Triasat .......................... 0501, 0414<br />
Triax ............................. 0115<br />
Twinner......................... 0136<br />
UltimateTV ................... 2001, 0392, 0639,<br />
2002<br />
Uni<strong>de</strong>n.......................... 0724, 0722, 0074,<br />
0052, 0238, 0831<br />
Unitor ........................... 0332<br />
Universum.................... 0173, 0571<br />
Victor............................ 0506, 0505, 0492<br />
Visiosat......................... 1042<br />
Vortec........................... 0631, 0421<br />
VTech ........................... 0690, 0351, 0321<br />
Winersat....................... 1045, 0332<br />
Wisi .............................. 0638, 0173, 0372,<br />
0455, 0351, 0406,<br />
0690, 0321, 0396<br />
Xsat.............................. 0123<br />
Yes ............................... 0887, 2004<br />
Zehn<strong>de</strong>r........................ 0321, 0552, 0114,<br />
0520, 1075, 0331,<br />
0818<br />
Zenith........................... 0856, 1856, 0635<br />
Zodiac.......................... 0396<br />
Zwergnase ................... 0794<br />
Alba.............................. 0668, 0036, 0218,<br />
0581, 0009, 0211,<br />
0371, 0037, 0235<br />
Albatron ....................... 0700<br />
Allorgan........................ 0294<br />
Ambassador................. 0177<br />
Amplivision................... 0400, 0217<br />
Amstrad ....................... 0171, 0009, 0177,<br />
0412, 0371, 0516,<br />
0037, 0354, 0433
TV <strong>de</strong>vice co<strong>de</strong>s<br />
Códigos <strong>de</strong> instalación para TV<br />
Co<strong>de</strong>s <strong>de</strong> configuration pour le téléviseur<br />
Anam ........................... 0250, 0009, 0700,<br />
0003, 0628<br />
Anam National............. 0250, 0650, 0055<br />
Anitech ........................ 0009<br />
AOC............................. 0451, 0093, 0178,<br />
0179, 0009, 0052,<br />
0003, 0019, 0108,<br />
0185, 0018<br />
Apex Digital ................. 1943<br />
Arcam .......................... 0217, 0216<br />
Archer.......................... 0003<br />
ASA ............................. 0104, 0087<br />
Asuka .......................... 0218<br />
Atlantic ........................ 0206<br />
Audiosonic .................. 0109, 0037<br />
Audiovox ..................... 0451, 0003<br />
Autovox ....................... 0206, 0087, 0544,<br />
0336<br />
Awa ............................. 0009, 0157<br />
Axion ........................... 1937<br />
Baird............................ 0343<br />
Bang & Olufsen ........... 0565, 0087<br />
Barco........................... 0380, 0552<br />
Basic Line.................... 0218, 0009<br />
Baur............................. 0361, 0535, 0349,<br />
0512, 0554, 0037,<br />
0505, 0544, 0010<br />
Beaumark .................... 0178<br />
Beko ............................ 0714, 0486, 0370,<br />
0715<br />
Belcor .......................... 0019<br />
Bell & Howell ............... 0016<br />
Beon............................ 0037<br />
Binatone ...................... 0217<br />
Blaupunkt .................... 0195, 0328, 0191,<br />
0327, 0554, 0200,<br />
0535<br />
Blue Sky ...................... 0218, 1037, 0668<br />
Blue Star...................... 0282<br />
Bondstec..................... 0247<br />
Boots........................... 0217<br />
BPL.............................. 0282<br />
Brandt.......................... 0205, 0198, 0196,<br />
0335, 0109<br />
Brionvega .................... 0559, 0087<br />
Britannia ...................... 0216<br />
Brockwood.................. 0019<br />
Broksonic .................... 0003, 1929, 1911,<br />
1938, 1905, 1935<br />
Bruns........................... 0087<br />
BSR ............................. 0294<br />
BTC ............................. 0218<br />
Bush ............................ 0036, 0698, 0218,<br />
0294, 0363, 0519,<br />
0009, 0668, 0211,<br />
1900, 0282, 0355,<br />
0374, 0581, 0037,<br />
1037, 0272, 0349,<br />
0371, 0552<br />
Candle ......................... 0046, 0186, 0056<br />
Carrefour...................... 0036<br />
Carver .......................... 0170<br />
Casca<strong>de</strong> ...................... 0009<br />
Cathay ......................... 0037<br />
CCE ............................. 0217, 0037<br />
Celebrity ...................... 0000<br />
Centurion ..................... 0037<br />
Century ........................ 0087<br />
CGE ............................. 0084, 0552, 0074,<br />
0306, 0247<br />
Ching Tai...................... 0179, 0009, 0003<br />
Chun Yun ..................... 0000, 0009, 0700,<br />
0003, 0179, 0033<br />
Chung Hsin.................. 0053, 0108, 0036,<br />
0033<br />
Cimline......................... 0009<br />
Cineral ......................... 0451<br />
Citizen.......................... 0039, 0186, 0056,<br />
1928, 0046, 0280<br />
Clairtone ...................... 0185<br />
Clarivox........................ 0037<br />
Clatronic ...................... 0370, 0247<br />
Clayton ........................ 0385<br />
Colt .............................. 1906<br />
Concerto...................... 0056<br />
Condor......................... 0320, 0370<br />
Contec ......................... 0036, 0216, 0009,<br />
0185, 0157<br />
Continental<br />
Edison..........................<br />
0205, 0198, 0196,<br />
0399<br />
Crosley......................... 0084, 0074, 0087<br />
Crown .......................... 0039, 0579, 0037,<br />
0418, 0009, 0370<br />
CS Electronics ............. 0414, 0216<br />
CTC ............................. 0247<br />
Curtis Mathes .............. 0451, 0093, 0145,<br />
0166, 0056, 1919,<br />
0039, 0466, 0016<br />
Cybertron..................... 0218<br />
Daewoo ....................... 0451, 0178, 0700,<br />
0019, 1921, 0039,<br />
0170, 0634, 0009,<br />
1909, 0037, 0108,<br />
0374, 0628, 0003,<br />
1902, 0032, 1928,<br />
0056, 0499<br />
Dainichi........................ 0218<br />
Device Co<strong>de</strong>s<br />
Dansai .......................... 0037<br />
Dayton.......................... 0009<br />
Daytron ........................ 0019<br />
De Graaf....................... 0208, 0548, 0363,<br />
0227<br />
Decca........................... 0249, 0244, 0516,<br />
0072, 0272, 0037<br />
Denon .......................... 0145<br />
Digatron ....................... 0037<br />
Dixi............................... 0037, 0009<br />
Dual.............................. 0544, 0519, 0336<br />
Dual Tec ....................... 0217<br />
Dumont ........................ 0070, 0019, 0087<br />
ECE .............................. 0037<br />
Elbe.............................. 0259<br />
Electroband.................. 0000, 0185<br />
Electrohome................. 0381<br />
Elin ............................... 0037, 0548<br />
Elite .............................. 0320, 0218<br />
Elta............................... 0009<br />
Emerson....................... 0178, 0171, 0185,<br />
0361, 1911, 0038,<br />
1944, 0179, 0282,<br />
1909, 0019, 1929,<br />
0087, 0280, 1905,<br />
1928, 0039, 0177<br />
Erres............................. 0037, 0012<br />
Ether............................. 0003, 0009<br />
Etron ............................ 0009<br />
Europhon ..................... 0516<br />
Expert........................... 0206<br />
Ferguson...................... 0109, 0238, 0343,<br />
0073, 0193, 0335,<br />
0037, 0190, 0324,<br />
0560<br />
Fi<strong>de</strong>lity.......................... 0544, 0216, 0432,<br />
0193, 0363, 0361<br />
Finlandia....................... 0359, 0346, 0208,<br />
0363<br />
Finlux ........................... 0070, 0104, 0346,<br />
0037, 0087, 0179,<br />
0516, 0072, 0105,<br />
0411<br />
Firstar........................... 0033, 0009<br />
Firstline ........................ 0217, 0321, 0216,<br />
0294, 0009, 0247,<br />
0668<br />
Fisher ........................... 0159, 0303, 0555,<br />
0104, 0217, 0544,<br />
0208, 0370<br />
Flint .............................. 0455<br />
Forgestone................... 0193<br />
Formenti....................... 0087, 0037, 0552,<br />
0320<br />
Fortress........................ 0093<br />
A-5<br />
Device Co<strong>de</strong>s • Códigos <strong>de</strong> dispositivos • Co<strong>de</strong>s d’appareils
Device Co<strong>de</strong>s • Códigos <strong>de</strong> dispositivos • Co<strong>de</strong>s d’appareils<br />
A-6<br />
Device Co<strong>de</strong>s<br />
TV <strong>de</strong>vice co<strong>de</strong>s<br />
Códigos <strong>de</strong> instalación para TV<br />
Co<strong>de</strong>s <strong>de</strong> configuration pour le téléviseur<br />
Frontech ...................... 0264, 0448, 0247,<br />
0414, 0163, 0363<br />
Fujitsu.......................... 0206, 0186, 0179,<br />
0683, 0072<br />
Funai............................ 0171, 0179, 0303,<br />
0294, 0264, 1904<br />
GBC............................. 0552<br />
GE ............................... 0451, 0178, 0560,<br />
1919, 0021, 0135,<br />
1917, 0055, 0282,<br />
1907, 1922, 0027<br />
GEC............................. 0043, 0217, 0037,<br />
0205, 0072, 0516<br />
Geloso ......................... 0009<br />
General........................ 0186, 0590<br />
Genexxa ...................... 0218, 0163<br />
Gibralter....................... 0019<br />
Gintai........................... 0354<br />
GoldStar ...................... 0178, 0019, 0039,<br />
0363, 0001, 0037,<br />
0109, 0290, 1926,<br />
0032, 0056, 0217,<br />
0377<br />
Goodmans................... 0037, 0217, 0371,<br />
0634, 0036, 0179,<br />
0343, 0499, 1909,<br />
0072, 0235, 0374,<br />
1900<br />
Gorenje........................ 0370<br />
GPM ............................ 0218<br />
Gradiente..................... 0053, 0170, 0056<br />
Graetz.......................... 0361, 0163<br />
Granada....................... 0037, 0146, 0217,<br />
0359, 0072, 0208,<br />
0351, 0516, 0045,<br />
0201, 0339, 0363<br />
Grandin........................ 0610, 0282<br />
Grundig ....................... 0706, 0191, 0487,<br />
0556, 1935, 0070,<br />
0205, 0554, 0037,<br />
0195, 0535, 0587<br />
Grunpy......................... 0179<br />
Haier............................ 0768<br />
Hallmark ...................... 0178<br />
Hanimex ...................... 1908<br />
Hankook ...................... 0178, 0019, 0628,<br />
0056<br />
Hanseatic .................... 0361, 0556, 0320,<br />
0544, 0037, 0428<br />
Hantarex...................... 0516<br />
Harley Davidson .......... 1904, 0179, 0043<br />
Havermy ...................... 0093<br />
HCM ............................ 0282, 0009, 0412<br />
Hello Kitty.................... 0451<br />
Hinari ........................... 0009, 0179, 0037,<br />
0036, 0218<br />
Hisawa ......................... 0400, 0282, 0455<br />
Hinari ........................... 1908<br />
Hitachi.......................... 0178, 0145, 0019,<br />
0563, 0036, 0196,<br />
0730, 0043, 0225,<br />
1904, 0105, 0349,<br />
0151, 0381, 0016,<br />
0165, 0548, 0032,<br />
0186, 0719, 0039,<br />
0217, 1225, 0056,<br />
0306, 0363, 0009,<br />
0163, 0481, 0027,<br />
0179, 0578, 0038,<br />
0198, 1037, 0044,<br />
0227, 0109, 0356,<br />
0157, 0441<br />
Hua Tun ....................... 0009<br />
Huanyu ........................ 0374, 0216<br />
Hypson ........................ 0282, 0264, 0037<br />
ICE ............................... 0371, 0264, 0217<br />
ICeS............................. 0218<br />
Imperial........................ 0247, 0552, 0084,<br />
0418, 0074, 0370,<br />
0630<br />
Indiana ......................... 0037<br />
Ingelen ......................... 0163<br />
Inno Hit ........................ 0516, 0072<br />
Innova .......................... 0037<br />
Interfunk....................... 0361, 0247, 0163,<br />
0512, 0037<br />
Intervision .................... 0102, 0377, 0037,<br />
0264, 0217<br />
IR ................................. 0074<br />
IRT ............................... 0628<br />
Isukai ........................... 0218<br />
ITC ............................... 0552<br />
ITS ............................... 0371<br />
ITT................................ 0548, 0163, 0544,<br />
0361, 0351<br />
Janeil ........................... 0046<br />
JCB.............................. 0000<br />
Jean ............................. 0003, 0179, 0009<br />
Jensen ......................... 0815, 1933, 0817<br />
JVC .............................. 0053, 0653, 0036,<br />
0190, 0606, 1923,<br />
0094, 0371, 0683,<br />
0192<br />
Kaisui ........................... 0009, 0218, 0217,<br />
0216, 0282<br />
Kamp ........................... 0216<br />
Kapsch......................... 0163, 0206<br />
Karcher ........................ 0610<br />
Kathrein ....................... 0556<br />
Kawasho...................... 0216<br />
Kaypani........................ 0052<br />
Kendo .......................... 0235, 0037<br />
Kennedy....................... 0552<br />
Kenwood...................... 0019<br />
Kingsley ....................... 0216<br />
Kioto............................. 0706<br />
Kloss ............................ 0046, 0024<br />
Kneissel........................ 0435, 0259<br />
Kolin............................. 0053, 0033, 0108,<br />
0036<br />
Konka........................... 0703, 1940, 0638,<br />
1939, 0632, 0707,<br />
0628<br />
Korpel .......................... 0037<br />
Korting ......................... 0087<br />
Koyoda......................... 0009<br />
KTV .............................. 0217, 0185, 0039,<br />
0280<br />
Lenco ........................... 0585<br />
Leyco ........................... 0037, 0294, 0264,<br />
0072<br />
LG ................................ 0178, 0001, 0032,<br />
0056, 0644, 1934,<br />
0019, 0038, 0714,<br />
0003, 0037, 0108,<br />
0700<br />
Liesenk & Tter .............. 0037<br />
Lloyd’s.......................... 1904<br />
Lloytron ........................ 0032<br />
Loewe .......................... 0087, 0512<br />
Logik ............................ 0016, 0001<br />
Luma ............................ 0363, 0206<br />
Luxman ........................ 0056<br />
Luxor............................ 0356, 0349, 0363,<br />
0194, 0361<br />
LXI................................ 0178<br />
M Electronic................. 0104, 0163, 0374,<br />
0057, 0109, 0346,<br />
0037, 0105, 0217,<br />
0480, 0009<br />
Magnadyne .................. 0102, 0544, 0087,<br />
0516, 0247<br />
Magnafon..................... 0516, 0102<br />
Magnasonic ................. 1928, 1913<br />
Magnavox .................... 0706, 0036, 0186,<br />
1931, 0024, 0179,<br />
0386, 1913, 0020,<br />
0096, 0187, 1904<br />
Magnin ......................... 1907<br />
Magnum....................... 0648<br />
Majestic........................ 0016<br />
Manesth ....................... 0217, 0320, 0264,<br />
0235<br />
Marantz........................ 0556, 0037, 0854<br />
Marelli .......................... 0087
TV <strong>de</strong>vice co<strong>de</strong>s<br />
Códigos <strong>de</strong> instalación para TV<br />
Co<strong>de</strong>s <strong>de</strong> configuration pour le téléviseur<br />
Mark ............................ 0037<br />
Matsui.......................... 0211, 0272, 0355,<br />
0011, 0443, 0037,<br />
0544, 0208, 0235,<br />
0354, 0009, 0371,<br />
0036, 0516, 0177,<br />
0217, 0294, 0363,<br />
0035, 0487, 0072,<br />
0579<br />
Matsushita................... 0250, 0650<br />
McMichael................... 0043<br />
Mediator ...................... 0037, 0012<br />
Medion ........................ 0668, 1037<br />
Megatron..................... 0178, 0145, 0003<br />
MEI .............................. 0185<br />
Memorex ..................... 0250, 0178, 1920,<br />
1927, 0009, 0179,<br />
1911, 1926, 1037,<br />
1924, 0016<br />
Memphis...................... 0337<br />
Mercury ....................... 0001<br />
Metz ............................ 0087, 0388, 0367,<br />
0535, 0275, 0447<br />
MGA ............................ 0178, 0019, 1907<br />
Midland ....................... 0039, 0032, 0135<br />
Minerva........................ 0487, 0070, 0554,<br />
0535<br />
Minoka......................... 0412<br />
Minutz.......................... 0021<br />
Mirror........................... 1900<br />
Mitsubishi .................... 0250, 0093, 0178,<br />
0381, 0019, 1917,<br />
0056, 0108, 0201,<br />
0358, 0535, 0036,<br />
0179, 0354, 0512,<br />
0033, 0087<br />
Mivar............................ 0291, 0609, 0290,<br />
0516, 0216, 0292<br />
Monivision ................... 0700<br />
Motorola ...................... 0093, 0055<br />
MTC............................. 0019, 0216, 0185,<br />
0512, 0056, 0349<br />
Multitech...................... 0009, 0217, 0216,<br />
0102, 0363<br />
Myryad ........................ 0556<br />
NAD............................. 0178, 0361<br />
National ....................... 0226<br />
NEC ............................. 0178, 0019, 0056,<br />
0455, 0009, 0046,<br />
0170, 0381, 0036,<br />
0165, 0186, 0704<br />
Neckermann................ 0191, 0505, 0087,<br />
0363, 0556, 0037,<br />
0349, 0554<br />
NEI............................... 0037, 0337<br />
Nesco .......................... 0414, 0179<br />
Netsat.......................... 0037<br />
Newave........................ 0093, 0178, 0009<br />
Nicam .......................... 0544<br />
Nicamagic.................... 0216<br />
Nikkai........................... 0032, 0072, 0264,<br />
0037, 0218, 0035,<br />
0216, 0337<br />
Nikko............................ 0178<br />
Nobliko ........................ 0102<br />
Nokia ........................... 1912, 0480, 0631,<br />
0473, 0606, 0361,<br />
0548<br />
Nordmen<strong>de</strong>.................. 0198, 0196, 0560,<br />
0109, 0343<br />
Noshi ........................... 0018<br />
Oceanic ....................... 0567, 0361, 0163<br />
Onking ......................... 0280<br />
Onwa ........................... 0433<br />
Optimus ....................... 0250, 0166, 1924,<br />
1913, 0650, 1927<br />
Optonica ...................... 0093, 0165<br />
Orion............................ 1905, 0179, 0320,<br />
0443, 0655, 1929,<br />
0177, 0294, 0355,<br />
0544, 1911, 0037,<br />
0235, 0321, 0516<br />
Osaki............................ 0032, 0218, 0493,<br />
0217, 0412, 0072,<br />
0264<br />
Oso .............................. 0218<br />
Osume ......................... 0072, 0032, 0157<br />
Otto Versand................ 0037, 0320, 0505,<br />
0552, 0036, 0217,<br />
0349, 0535, 0556,<br />
0010, 0191, 0343,<br />
0512, 0554<br />
Palladium..................... 0363, 0418, 0370<br />
Panama........................ 0264, 0217<br />
Panasonic .................... 0250, 1930, 0126,<br />
1947, 0226, 0340,<br />
1650, 1927, 0055,<br />
1946, 0214, 0274,<br />
0650, 1924, 0037,<br />
1941, 0163, 0367,<br />
1919<br />
Pathe Cinema .............. 0320, 0238, 0216,<br />
0552<br />
Pathe Marconi ............. 0198, 0196, 0205<br />
Pausa........................... 0009<br />
Penney......................... 0178, 0027, 0135,<br />
1919, 0003, 0021,<br />
0039, 1907, 0019,<br />
0032, 1926, 0018<br />
Perdio .......................... 0320<br />
Phase........................... 0032<br />
Device Co<strong>de</strong>s<br />
Philco ........................... 0178, 0145, 0084,<br />
0247, 1911, 0032,<br />
0074, 0096, 0186,<br />
0628, 0020, 0056,<br />
0087, 0552, 0019,<br />
0037<br />
Philex ........................... 0351<br />
Philips .......................... 0000, 0178, 0024,<br />
0043, 0108, 0187,<br />
0012, 0554, 0020,<br />
0037, 0087, 0186,<br />
0374, 0019, 0032,<br />
0056, 0193, 0013,<br />
0556<br />
Phoenix ........................ 0087<br />
Phonola........................ 0013, 0012, 0087,<br />
0037<br />
Pilot.............................. 0019, 0039<br />
Pioneer......................... 0166, 0109, 0423,<br />
0038, 0163<br />
Polytron........................ 0697<br />
Portland ....................... 0039, 0019<br />
Prandoni-Prince........... 0516<br />
Prima............................ 0817, 0815, 0783,<br />
1933<br />
Princeton...................... 0700<br />
Profex........................... 0009, 0363, 0361<br />
Proline.......................... 0321<br />
Proscan........................ 1922<br />
Protech ........................ 0552, 0037, 0247,<br />
0418, 0009, 0217,<br />
0337, 0668, 0102,<br />
0264<br />
Proton .......................... 0178, 0003, 0052,<br />
0644, 0001, 0039,<br />
0466, 0009<br />
Pulsar........................... 0019<br />
Pye............................... 0037, 0012<br />
Quasar ......................... 0250, 0650, 1924,<br />
0165, 1919, 0055<br />
Quelle........................... 0512, 0010, 0552,<br />
0070, 0104, 0327,<br />
0505, 0544, 0037,<br />
0084, 0306, 0361,<br />
0535, 0011, 0554,<br />
0074, 0200, 0328<br />
Questa ......................... 0036<br />
R-Line .......................... 0037<br />
Radiola......................... 0037, 0012<br />
Radiomarelli ................. 0087, 0516<br />
RadioShack.................. 0178, 0032, 0165,<br />
1920, 0019, 0056,<br />
1904, 0039<br />
Rank Arena .................. 0036<br />
RBM............................. 0070<br />
A-7<br />
Device Co<strong>de</strong>s • Códigos <strong>de</strong> dispositivos • Co<strong>de</strong>s d’appareils
Device Co<strong>de</strong>s • Códigos <strong>de</strong> dispositivos • Co<strong>de</strong>s d’appareils<br />
A-8<br />
Device Co<strong>de</strong>s<br />
TV <strong>de</strong>vice co<strong>de</strong>s<br />
Códigos <strong>de</strong> instalación para TV<br />
Co<strong>de</strong>s <strong>de</strong> configuration pour le téléviseur<br />
RCA ............................. 0000, 0178, 0018,<br />
0135, 1917, 1948,<br />
0038, 1907, 1922,<br />
0019, 1919<br />
Realistic....................... 0178, 0019, 0056,<br />
0039, 0032, 0165<br />
Rediffusion .................. 0201, 0361, 0351<br />
Reoc ............................ 0714<br />
Revox .......................... 0037<br />
Rex .............................. 0206, 0163, 0264,<br />
0259<br />
RFT .............................. 0428, 0087<br />
Rhapsody .................... 0216, 0185<br />
Roadstar...................... 0009, 0418, 0264,<br />
0218<br />
Rowa ........................... 0712, 0698<br />
Saba ............................ 0343, 0087, 0196,<br />
0335, 0163, 0205,<br />
0109, 0198<br />
Saccs .......................... 0238<br />
Sagem ......................... 0610<br />
Saisho ......................... 0009, 0177, 0264,<br />
0544, 0033, 0235,<br />
0516, 0011, 0211,<br />
0354<br />
Salora .......................... 0356, 0363, 0349,<br />
0361, 0194, 0359,<br />
0548, 0163<br />
Sambers ...................... 0516, 0102<br />
Sampo......................... 0093, 0178, 0171,<br />
0700, 0036, 0650,<br />
0032, 0052, 0009,<br />
0039<br />
Samsung ..................... 0178, 0644, 0032,<br />
0056, 0217, 0370,<br />
0618, 0019, 0039,<br />
0179, 0290, 0587,<br />
0009, 1903, 0037,<br />
0264, 0556<br />
Samsux ....................... 0039<br />
Sandra......................... 0216<br />
Sansei.......................... 0451<br />
Sansui.......................... 0706, 1929, 0655,<br />
1911, 1904<br />
Sanyo .......................... 0157, 0280, 1907,<br />
0045, 0146, 0208,<br />
0381, 0036, 0104,<br />
0159, 0339, 0011,<br />
0072<br />
SBR ............................. 0037, 0013, 0193,<br />
0012, 0043<br />
Schaub Lorenz ............ 0361<br />
Schnei<strong>de</strong>r .................... 0218, 0336, 0544,<br />
0057, 0303, 0394,<br />
1137, 0037, 0247,<br />
0371, 0668, 0013<br />
Scimitsu....................... 0019<br />
Scotch ......................... 0178<br />
Scott ............................ 0178, 0019, 0179<br />
Sears............................ 0178, 0171, 0159,<br />
0179, 0146, 1926,<br />
0056, 1904<br />
SEG ............................. 0036, 0552, 0264,<br />
0217, 0668<br />
SEI ............................... 0516, 0087, 0294,<br />
0010, 0177, 0544,<br />
0102<br />
Seleco.......................... 0206, 0163, 0411,<br />
0259<br />
Sentra .......................... 0035<br />
Sharp ........................... 0093, 1093, 0039,<br />
0165, 0650, 1917,<br />
0036, 0157, 0386,<br />
1193, 0032, 0256<br />
Shen Ying .................... 0003, 0179, 0009<br />
Sheng Chia .................. 0093, 0009, 0179,<br />
0033<br />
Shogun ........................ 0019<br />
Shorai .......................... 0294<br />
Siarem.......................... 0087, 0516, 0102<br />
Siemens....................... 0157, 0200, 0535,<br />
0037, 0195, 0328,<br />
0191, 0327, 0554<br />
Signature ..................... 0016<br />
Silver............................ 0036<br />
Simpson....................... 0187, 0186<br />
Singer .......................... 0087<br />
Sinudyne...................... 0177, 0516, 0102,<br />
0294, 0087, 0235,<br />
0544, 0010<br />
Skantic......................... 0356<br />
SKY.............................. 0037<br />
Skysonic ...................... 0696<br />
Skyworth...................... 0037<br />
Solavox........................ 0032, 0351, 0163<br />
Sonitron ....................... 0208<br />
Sonoko ........................ 0037, 0009<br />
Sonolor ........................ 0208, 0163<br />
Sontec ......................... 0037<br />
Sony............................. 0000, 0010, 0080,<br />
0650, 1505, 1925,<br />
0036, 0505, 1010,<br />
1904, 0011, 0111,<br />
0651, 1651<br />
Soun<strong>de</strong>sign.................. 0178, 0186, 0179<br />
Soundwave.................. 0037, 0418<br />
Sowa............................ 0178, 0036, 0226<br />
Spectricon ................... 0003<br />
Squareview .................. 0171<br />
SSS.............................. 0019<br />
Standard ...................... 0217, 0009, 0218<br />
Stern ............................ 0259, 0206, 0163<br />
Sunkai .......................... 0355, 0321, 0294<br />
SuperTech.................... 0216<br />
Supra ........................... 0056<br />
Supre-Macy ................. 0046<br />
Supreme ...................... 0000<br />
Susumu........................ 0218<br />
Sylvania........................ 0171, 0020, 0381,<br />
1944, 0096, 1931<br />
Symphonic................... 0171, 1904, 1913<br />
Synco........................... 0000, 0451, 0093,<br />
0178, 0036<br />
Sysline.......................... 0037<br />
T + A ............................ 0447<br />
Tacico........................... 0178, 0009, 0179<br />
Tai Yi............................. 0009<br />
Tandy ........................... 0093, 0163, 0414,<br />
0218, 0072, 0217,<br />
0039<br />
Tashiko......................... 0043, 0363, 0036,<br />
0359, 0033, 0217,<br />
0650<br />
Tatung .......................... 0072, 0249, 0009,<br />
0055, 0244, 0003,<br />
0037, 0217, 0516,<br />
0036<br />
Teac.............................. 0706, 0712, 1904,<br />
0037, 1932, 0412,<br />
0544, 1437, 0009,<br />
1913, 0282, 0455,<br />
0698, 1037, 1909,<br />
0264, 1949, 0418,<br />
0668<br />
Tec ............................... 0247, 0217, 0552<br />
Technema..................... 0320<br />
Technics....................... 0250, 0650<br />
Technol Ace ................. 0179<br />
Techwood .................... 0056, 0003<br />
Teco ............................. 0093, 0178, 0264,<br />
0036, 0218, 0653,<br />
0009, 0280<br />
Teknika......................... 0016, 0056, 0039,<br />
0186, 0019, 0179<br />
Teleavia ........................ 0343, 0205<br />
Telefunken.................... 0084, 0262, 0343,<br />
0625, 0074, 0109,<br />
0335, 0498, 0056,<br />
0101, 0306, 0471<br />
Telemeister................... 0320<br />
Teletech........................ 0009<br />
Teleton ......................... 0186, 0349, 0036,<br />
0217, 0206, 0363<br />
Tensai........................... 0294, 0218, 0320<br />
Tera .............................. 0466<br />
Texet ............................ 0216, 0218<br />
Thomas ........................ 1904
TV <strong>de</strong>vice co<strong>de</strong>s<br />
Códigos <strong>de</strong> instalación para TV<br />
Co<strong>de</strong>s <strong>de</strong> configuration pour le téléviseur<br />
Thomson ..................... 0343, 0560, 0109,<br />
0205, 0399, 0198,<br />
0349, 0625, 0196<br />
Thorn ........................... 0499, 0535, 0037,<br />
0084, 0192, 0361,<br />
0512, 0035, 0074,<br />
0190, 0343, 0505,<br />
0072, 0104, 0193<br />
Thorn-Ferguson........... 0343<br />
TMK............................. 0178, 0177, 0056<br />
Tomashi ....................... 0282<br />
Toshiba ........................ 0644, 1508, 1936,<br />
0035, 0243, 0618,<br />
0718, 1935, 0070,<br />
0508, 0650, 1918,<br />
1945, 0036, 0381<br />
Tosonic ........................ 0185<br />
Totevision .................... 0039<br />
Towada ........................ 0552<br />
Transonic..................... 0712, 0698<br />
Trical ............................ 0157<br />
Triumph........................ 0516, 0243, 0177<br />
Tuntex .......................... 0009<br />
Uher ............................. 0303, 0206, 0320<br />
Ultra ............................. 0192<br />
Ultravox ....................... 0102, 0351<br />
Universal...................... 0027<br />
Universum.................... 0421, 0552, 0037,<br />
0105, 0370, 0535,<br />
0104, 0346, 0492,<br />
1901, 0074, 0264<br />
Vestel ........................... 0037<br />
Victor ........................... 0250, 0053, 0036,<br />
0650, 0653<br />
Vi<strong>de</strong>osat....................... 0247<br />
Vi<strong>de</strong>otechnic................ 0217<br />
Vidtech......................... 0178, 0036, 0019<br />
Viking ........................... 0046<br />
Vision ........................... 0320<br />
VCR <strong>de</strong>vice co<strong>de</strong>s<br />
Códigos <strong>de</strong> instalación para VCR<br />
Co<strong>de</strong>s <strong>de</strong> configuration pour le magnétoscope<br />
ABS ............................. 1972<br />
Admiral ........................ 0048, 0209<br />
Adventura .................... 0000<br />
Aiko ............................. 0278<br />
Aiwa............................. 0037, 0000, 0352,<br />
0348, 0687, 0307,<br />
0479<br />
Akai ............................. 0041, 0315, 0106<br />
Akiba ........................... 0072<br />
Alba ............................. 0209, 0072, 0278,<br />
0352, 0315, 0293,<br />
0020<br />
Alienware..................... 1972<br />
Ambassador ................ 0020<br />
America Action............ 0278<br />
American High............. 0035<br />
Amstrad....................... 0000<br />
Anam ........................... 0162, 0037, 0240,<br />
0278, 0226<br />
Anam National............. 0162, 0454, 0226,<br />
1562<br />
Anitech ........................ 0072<br />
ASA ............................. 0037, 0081<br />
Asha ............................ 0240<br />
Asuka .......................... 0037<br />
Audiovox ..................... 0037, 0278<br />
Baird............................ 0000, 0104, 0041<br />
Bang & Olufsen ........... 0499<br />
Basic Line .................... 0072, 0278, 0020<br />
Beaumark .................... 0240<br />
Bell & Howell................ 0104<br />
Blaupunkt .................... 0162, 0227, 0034,<br />
0226, 0195<br />
Brandt.......................... 0493, 0321, 0320<br />
Brandt Electronic......... 0041<br />
Broksonic..................... 0184, 0121, 0209,<br />
0002, 0479, 0348,<br />
1479<br />
Bush ............................ 0209, 0072, 0278,<br />
0352, 0293<br />
Calix............................. 0037<br />
Canon .......................... 0035<br />
Capehart...................... 0020<br />
Carver .......................... 0081<br />
Catron.......................... 0020<br />
CCE ............................. 0072, 0278<br />
CGE ............................. 0000<br />
Cimline......................... 0072<br />
Cineral ......................... 0278<br />
Citizen.......................... 0037, 0278, 1278<br />
Clatronic ...................... 0020<br />
Colt .............................. 0072<br />
Combitech ................... 0352<br />
Condor......................... 0020<br />
Craig ............................ 0037, 0047, 0240,<br />
0072<br />
Device Co<strong>de</strong>s<br />
Visorex ......................... 0432<br />
Voxson ......................... 0087, 0163<br />
Waltham....................... 0356, 0217<br />
Wards........................... 0178, 0165, 0020,<br />
0056, 0111, 0179,<br />
0019, 0027, 0096,<br />
0016, 0021, 0080<br />
Watson......................... 0037, 0320<br />
Watt Radio ................... 0544, 0102, 0552<br />
Wega ............................ 0087, 0036<br />
White Westinghouse .... 0216, 0186, 1909,<br />
0037, 0320<br />
Yamaha ........................ 0019<br />
Yapshe ......................... 0250<br />
Yoko ............................. 0264, 0217, 0037<br />
Zanussi ........................ 0363, 0206<br />
Zenith........................... 0178, 0016, 1909,<br />
1904, 1929, 1911<br />
Zonda........................... 0003<br />
Crown .......................... 0072, 0278, 0020<br />
Curtis Mathes............... 0060, 0035, 0162,<br />
0041, 1035<br />
Cybernex ..................... 0240<br />
CyberPower ................. 1972<br />
Cyrus............................ 0081<br />
Daewoo........................ 0045, 0104, 0278,<br />
0642, 0637, 0020,<br />
1278<br />
Dansai .......................... 0072<br />
Daytron ........................ 0020<br />
De Graaf....................... 0042, 0166<br />
Decca........................... 0081, 0000<br />
Denon .......................... 0042<br />
Dual.............................. 0041<br />
Dumont ........................ 0081, 0000, 0104<br />
Dynatech...................... 0000<br />
Elbe.............................. 0038<br />
Elcatech ....................... 0072<br />
Electrohome................. 0037<br />
Electrophonic............... 0037<br />
Emerex......................... 0032<br />
Emerson....................... 0035, 0037, 0184,<br />
0240, 0045, 0000,<br />
0121, 0043, 0209,<br />
0002, 0278, 1278,<br />
0637, 0479, 1479<br />
ESC.............................. 0240, 0278<br />
A-9<br />
Device Co<strong>de</strong>s • Códigos <strong>de</strong> dispositivos • Co<strong>de</strong>s d’appareils
Device Co<strong>de</strong>s • Códigos <strong>de</strong> dispositivos • Co<strong>de</strong>s d’appareils<br />
Device Co<strong>de</strong>s<br />
VCR <strong>de</strong>vice co<strong>de</strong>s<br />
Códigos <strong>de</strong> instalación para VCR<br />
Co<strong>de</strong>s <strong>de</strong> configuration pour le magnétoscope<br />
Ferguson ..................... 0041, 0493, 0321,<br />
0320<br />
Fi<strong>de</strong>lity......................... 0000<br />
Finlandia...................... 0081, 0104<br />
Finlux........................... 0081, 0000, 0042,<br />
0104<br />
Firstline........................ 0037, 0045, 0043,<br />
0209, 0072<br />
Fisher........................... 0047, 0104<br />
Frontech ...................... 0020<br />
Fuji............................... 0035, 0033<br />
Fujitsu.......................... 0045, 0000<br />
Funai............................ 0000<br />
Garrard ........................ 0000<br />
Gateway ...................... 1972<br />
GE ............................... 0060, 0035, 0240,<br />
1060, 0226, 1035,<br />
0807<br />
GEC............................. 0081<br />
General........................ 0045, 0020<br />
Go Vi<strong>de</strong>o...................... 0432<br />
GoldHand .................... 0072<br />
GoldStar ...................... 0037, 0209, 0038,<br />
0225, 1237, 0226<br />
Goodmans................... 0037, 0000, 0072,<br />
0278, 0062, 0637,<br />
0020<br />
Gradiente..................... 0000, 0008<br />
Graetz.......................... 0240, 0104, 0041<br />
Granada....................... 0081, 0104<br />
Grandin........................ 0037, 0000, 0072<br />
Grundig ....................... 0081, 0072, 0195,<br />
0347, 0293, 0226,<br />
0034<br />
Hanseatic .................... 0037<br />
Harley Davidson .......... 0000<br />
Harman/Kardon........... 0081, 0038<br />
Harwood...................... 0072<br />
HCM ............................ 0072, 0293<br />
Hewlett Packard.......... 1972<br />
HI-Q............................. 0047<br />
Hinari ........................... 0240, 0072, 0293,<br />
0352, 0004<br />
Hitachi .........................<br />
Hughes Network<br />
0037, 0240, 0000,<br />
0042, 0041, 0004,<br />
0166<br />
Systems....................... 0042<br />
Hypson ........................ 0072<br />
iBUYPOWER ............... 1972<br />
Imperial........................ 0000<br />
Ingersol........................ 0004<br />
Interfunk ...................... 0081<br />
ITT ............................... 0240, 0104, 0041,<br />
0384, 0106<br />
A-10<br />
ITV................................ 0037, 0278<br />
Jensen ......................... 0041<br />
JVC .............................. 0045, 0067, 0041,<br />
0384, 0206, 0008<br />
Kaisui ........................... 0072<br />
KEC.............................. 0037, 0278<br />
Kendo .......................... 0209, 0106<br />
Kenwood ..................... 0067, 0041, 0038,<br />
0384<br />
KLH.............................. 0072<br />
Kodak .......................... 0035, 0037<br />
Kolin............................. 0043, 0041<br />
Korpel .......................... 0072<br />
Lenco........................... 0278<br />
Leyco ........................... 0072<br />
LG ................................ 0037, 0045, 0042,<br />
0209, 0038, 0040<br />
Lloyd’s ......................... 0000<br />
Loewe .......................... 0162, 0037, 0081,<br />
0454, 0004, 1562<br />
Logik ............................ 0240, 0072, 0004<br />
Luxor............................ 0048, 0104, 0043,<br />
0062, 0106<br />
LXI................................ 0037<br />
M Electronic................. 0000, 0038<br />
Magnasonic ................. 1278<br />
Magnavox .................... 0035, 0039, 0081,<br />
0000, 0149, 1781<br />
Magnin......................... 0240<br />
Manesth....................... 0045, 0072<br />
Marantz........................ 0035, 0081, 0062<br />
Marta ........................... 0037<br />
Matsui.......................... 0209, 0348, 0004,<br />
0352<br />
Matsushita ................... 0035, 0162, 0227,<br />
0226<br />
Media Center PC ......... 1972<br />
Medion......................... 0348<br />
MEI .............................. 0035<br />
Memorex...................... 0035, 0162, 0037,<br />
0048, 0039, 0047,<br />
0240, 0000, 0104,<br />
0209, 0307, 0479,<br />
0454, 0348, 1237<br />
Memphis...................... 0072<br />
Metz............................. 0162, 0037, 0347,<br />
1562, 0227, 0459,<br />
0195, 0454<br />
MGA............................. 0240, 0043<br />
MGN Technology......... 0240<br />
Microsoft...................... 1972<br />
Mind............................. 1972<br />
Minerva ........................ 0195<br />
Minolta......................... 0042<br />
Mitsubishi..................... 0081, 0067, 0043,<br />
0041, 0807<br />
Motorola....................... 0035, 0048<br />
MTC ............................. 0240, 0000<br />
Multitech ...................... 0000, 0072<br />
Murphy......................... 0000<br />
Myryad ......................... 0081<br />
NAD.............................. 0104<br />
National........................ 0226<br />
NEC.............................. 0035, 0037, 0048,<br />
0104, 0067, 0041,<br />
0038, 0008, 0206,<br />
0040<br />
Neckermann................. 0081<br />
Nesco........................... 0072<br />
Newave ........................ 0037<br />
Nikko............................ 0037<br />
Nikon............................ 0034<br />
Noblex.......................... 0240<br />
Nokia............................ 0240, 0104, 0041,<br />
0106<br />
Nordmen<strong>de</strong> .................. 0041, 0321, 0320,<br />
0494, 0384<br />
Northgate..................... 1972<br />
Oceanic........................ 0000, 0041<br />
Okano .......................... 0348, 0315<br />
Olympus....................... 0035, 0226<br />
Optimus ....................... 1062, 0162, 0037,<br />
0048, 0104, 0454,<br />
0432<br />
Optonica ...................... 0062<br />
Orion ............................ 0184, 0121, 0209,<br />
0002, 0348, 1479,<br />
0004, 0479, 0352<br />
Osaki............................ 0037, 0000, 0072<br />
Otto Versand................ 0081<br />
Palladium ..................... 0037, 0041, 0072<br />
Panasonic .................... 1062, 0035, 0162,<br />
0225, 0454, 0836,<br />
1562, 0227, 0616,<br />
0226, 0459, 1035,<br />
1662<br />
Pathe Marconi.............. 0041<br />
Penney ......................... 0035, 0037, 0240,<br />
0042, 0038, 1237,<br />
0040, 1035<br />
Pentax.......................... 0042<br />
Perdio........................... 0000<br />
Philco ........................... 0035, 0000, 0209,<br />
0038, 0479, 0226<br />
Philips .......................... 0035, 0081, 0000,<br />
0226, 0618, 0062,<br />
0384<br />
Phonola........................ 0081<br />
Pilot.............................. 0037<br />
Pioneer......................... 0081, 0042, 0067,<br />
0206
VCR <strong>de</strong>vice co<strong>de</strong>s<br />
Códigos <strong>de</strong> instalación para VCR<br />
Co<strong>de</strong>s <strong>de</strong> configuration pour le magnétoscope<br />
Polk Audio ................... 0081<br />
Portland....................... 0020<br />
Profitronic.................... 0240<br />
Proline ......................... 0000, 0293<br />
Proscan ....................... 0060, 1060<br />
Protec.......................... 0072<br />
Pulsar .......................... 0039<br />
Pye .............................. 0081<br />
Quasar......................... 0035, 0162, 1035,<br />
0454<br />
Quelle .......................... 0081<br />
Radiola ........................ 0081<br />
RadioShack................. 0000<br />
Radix ........................... 0037<br />
Ran<strong>de</strong>x ........................ 0037<br />
RCA ............................. 0060, 0035, 0240,<br />
0000, 0042, 0149,<br />
0106, 1035, 0226,<br />
0880, 0807, 1060<br />
Realistic....................... 0035, 0037, 0048,<br />
0047, 0000, 0104,<br />
0062<br />
Reoc ............................ 0348<br />
Rex .............................. 0041, 0384<br />
Ricoh ........................... 0034<br />
Roadstar...................... 0037, 0240, 0072,<br />
0278<br />
Runco.......................... 0039<br />
Saba ............................ 0041, 0320, 0494,<br />
0206, 0384, 0321<br />
Saisho ......................... 0209, 0004<br />
Salora .......................... 0043, 0106<br />
Sampo......................... 0037, 0048<br />
Samsung ..................... 0240, 0045, 1014,<br />
0432<br />
Sanky .......................... 0048, 0039<br />
Sansui.......................... 0000, 0067, 0209,<br />
0041, 0479, 1479<br />
Sanyo .......................... 0047, 0240, 0104<br />
Saville .......................... 0352<br />
SBR ............................. 0081<br />
Schaub Lorenz ............ 0000, 0104, 0041<br />
Schnei<strong>de</strong>r .................... 0081, 0000, 0072<br />
Scott............................ 0184, 0045, 0121,<br />
0043<br />
Sears............................ 0035, 0037, 0047,<br />
0000, 0042, 0104,<br />
1237<br />
SEG ............................. 0240<br />
SEI ............................... 0081, 0004<br />
Seleco.......................... 0041<br />
Semp ........................... 0045<br />
Sentra .......................... 0020<br />
Sharp ........................... 0048, 0209, 0062,<br />
0807<br />
Shintom ....................... 0104, 0072<br />
Shogun ........................ 0240<br />
Shorai .......................... 0004<br />
Siemens....................... 0037, 0081, 0104,<br />
0195<br />
Silva ............................. 0037<br />
Singer .......................... 0045, 0072<br />
Sinudyne...................... 0081, 0004<br />
Solavox........................ 0020<br />
Sonic Blue ................... 0614, 0616<br />
Sonolor ........................ 0062<br />
Sontec ......................... 0037<br />
Sony............................. 0035, 0032, 0033,<br />
0000, 0636, 1232,<br />
0034, 1032<br />
STS .............................. 0042<br />
Sunkai.......................... 0348<br />
Sunstar ........................ 0000<br />
Suntronic ..................... 0000<br />
Sylvania ....................... 0035, 0081, 0000,<br />
0043, 1781<br />
Symphonic................... 0000<br />
Tagar Systems ............. 1972<br />
Tandy ........................... 0000, 0104<br />
Tashiko......................... 0037, 0000<br />
Tatung.......................... 0081, 0045, 0000,<br />
0067, 0041, 0008<br />
Teac ............................. 0000, 0041, 0278,<br />
0642, 0637, 0307<br />
Tec ............................... 0020<br />
Technics....................... 0035, 0162, 0226<br />
Teco ............................. 0035, 0037, 0048,<br />
0041, 0038, 0040<br />
Teknika......................... 0035, 0037, 0000<br />
Digital vi<strong>de</strong>o recor<strong>de</strong>r <strong>de</strong>vice co<strong>de</strong>s<br />
Códigos <strong>de</strong> dispositivo <strong>de</strong> grabador <strong>de</strong> ví<strong>de</strong>o digital<br />
Co<strong>de</strong>s <strong>de</strong> configuration pour l’enregistreur vidéo numérique<br />
ReplayTV ..................... 0614, 0616<br />
Tivo.............................. 0636, 0618, 0722<br />
Device Co<strong>de</strong>s<br />
Teleavia ........................ 0041, 0493<br />
Telefunken.................... 0041, 0384, 0321,<br />
0494, 0320, 0493<br />
Tenosal......................... 0072<br />
Tensai........................... 0000<br />
Thomas ........................ 0000<br />
Thomson...................... 0060, 0067, 0041,<br />
0321, 0494, 0320,<br />
0493, 0722, 0384,<br />
0528<br />
Thorn............................ 0104, 0041<br />
TMK ............................. 0240<br />
Toshiba......................... 0081, 0045, 0067,<br />
0043, 0041, 0845,<br />
0008, 0384, 1145<br />
Totevision..................... 0037, 0240<br />
Touch ........................... 1972<br />
Uher ............................. 0240<br />
Unitech......................... 0240<br />
Universum.................... 0037, 0081, 0240,<br />
0000, 0106, 0195<br />
Vector........................... 0045<br />
Vector Research........... 0038, 0040<br />
Victor............................ 0067, 0041, 0008,<br />
0384<br />
Vi<strong>de</strong>o Concepts ........... 0045, 0040<br />
Vi<strong>de</strong>omagic .................. 0037<br />
Vi<strong>de</strong>osonic ................... 0240<br />
Viewsonic..................... 1972<br />
Villain............................ 0000<br />
Wards........................... 0060, 0035, 0048,<br />
0047, 0081, 0240,<br />
0000, 0042, 0072,<br />
0149, 0062<br />
Wharfedale................... 0615<br />
White Westinghouse .... 0209, 0072, 0637<br />
XR-1000....................... 0035, 0000, 0072<br />
Yamaha ........................ 0041, 0038<br />
Yamishi......................... 0072<br />
Yokan ........................... 0072<br />
Yoko ............................. 0240, 0020<br />
Zenith........................... 0039, 0033, 0000,<br />
0209, 1479, 0637,<br />
0034, 0479<br />
ZT Group...................... 1972<br />
A-11<br />
Device Co<strong>de</strong>s • Códigos <strong>de</strong> dispositivos • Co<strong>de</strong>s d’appareils
©2004 <strong>Bose</strong> Corporation, The Mountain,<br />
Framingham, MA 01701-9168 USA<br />
274559 AM Rev.00 CCM-000364