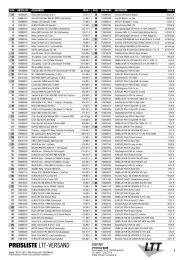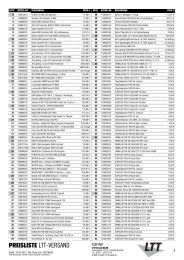
LED Bar 648/5 RGB
LED Bar 648/5 RGB
LED Bar 648/5 RGB

You also want an ePaper? Increase the reach of your titles
YUMPU automatically turns print PDFs into web optimized ePapers that Google loves.
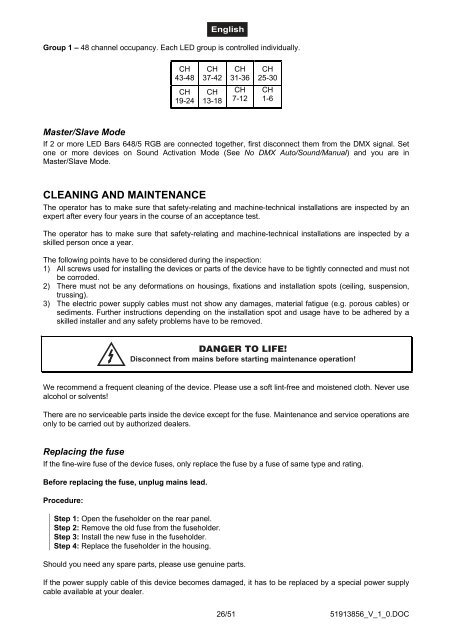
Group 1 – 48 channel occupancy. Each <strong>LED</strong> group is controlled individually.<br />
CH<br />
43-48<br />
CH<br />
19-24<br />
CH<br />
37-42<br />
CH<br />
13-18<br />
26/51<br />
CH<br />
31-36<br />
CH<br />
7-12<br />
CH<br />
25-30<br />
Master/Slave Mode<br />
If 2 or more <strong>LED</strong> <strong>Bar</strong>s <strong>648</strong>/5 <strong>RGB</strong> are connected together, first disconnect them from the DMX signal. Set<br />
one or more devices on Sound Activation Mode (See No DMX Auto/Sound/Manual) and you are in<br />
Master/Slave Mode.<br />
CLEANING AND MAINTENANCE<br />
The operator has to make sure that safety-relating and machine-technical installations are inspected by an<br />
expert after every four years in the course of an acceptance test.<br />
The operator has to make sure that safety-relating and machine-technical installations are inspected by a<br />
skilled person once a year.<br />
The following points have to be considered during the inspection:<br />
1) All screws used for installing the devices or parts of the device have to be tightly connected and must not<br />
be corroded.<br />
2) There must not be any deformations on housings, fixations and installation spots (ceiling, suspension,<br />
trussing).<br />
3) The electric power supply cables must not show any damages, material fatigue (e.g. porous cables) or<br />
sediments. Further instructions depending on the installation spot and usage have to be adhered by a<br />
skilled installer and any safety problems have to be removed.<br />
CH<br />
1-6<br />
DANGER TO LIFE!<br />
Disconnect from mains before starting maintenance operation!<br />
We recommend a frequent cleaning of the device. Please use a soft lint-free and moistened cloth. Never use<br />
alcohol or solvents!<br />
There are no serviceable parts inside the device except for the fuse. Maintenance and service operations are<br />
only to be carried out by authorized dealers.<br />
Replacing the fuse<br />
If the fine-wire fuse of the device fuses, only replace the fuse by a fuse of same type and rating.<br />
Before replacing the fuse, unplug mains lead.<br />
Procedure:<br />
Step 1: Open the fuseholder on the rear panel.<br />
Step 2: Remove the old fuse from the fuseholder.<br />
Step 3: Install the new fuse in the fuseholder.<br />
Step 4: Replace the fuseholder in the housing.<br />
Should you need any spare parts, please use genuine parts.<br />
If the power supply cable of this device becomes damaged, it has to be replaced by a special power supply<br />
cable available at your dealer.<br />
51913856_V_1_0.DOC