EUROLITE DMX Operator User Manual - Musik Produktiv
EUROLITE DMX Operator User Manual - Musik Produktiv
EUROLITE DMX Operator User Manual - Musik Produktiv

You also want an ePaper? Increase the reach of your titles
YUMPU automatically turns print PDFs into web optimized ePapers that Google loves.
16) MIDI input socket<br />
17) <strong>DMX</strong> output socket<br />
18) Strobe output socket<br />
19) Power supply socket<br />
20) Power switch<br />
21) Remote switch socket<br />
5. SETUP<br />
5.1 Installation<br />
Install the device on a plane surface or install it in rack.<br />
This device is built for 483 mm racks (19"). This rack should be a double-door rack where front panel and<br />
rear panel can be opened. The rack should be provided with a cooling fan. When mounting the device into<br />
the rack, please make sure that there is enough space around the device so that the heated air can be<br />
passed on. Steady overheating will damage your device. You can fix the device with four screws M6 in the<br />
rack. If several devices are to be installed, make sure that you leave 1 unit (1 u) space between the devices.<br />
Connect the connection cable of the power-unit with the DC IN-socket. Plug the power unit into your outlet.<br />
5.2 Sound-control<br />
The sound-control works via the built-in microphone.<br />
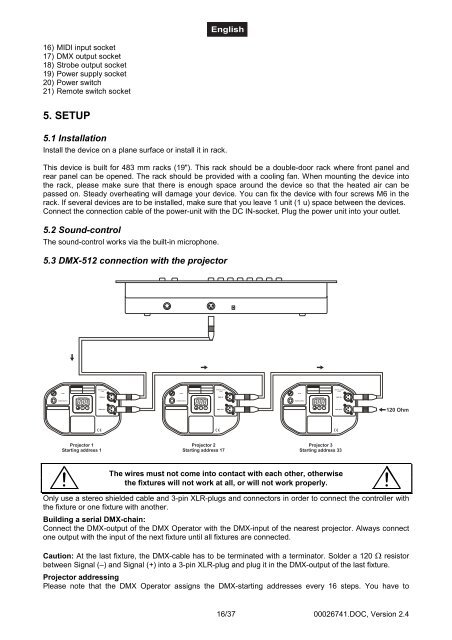
5.3 <strong>DMX</strong>-512 connection with the projector<br />
Projector 1<br />
Starting address 1<br />
Projector 2<br />
Starting address 17<br />
16/37<br />
Projector 3<br />
Starting address 33<br />
The wires must not come into contact with each other, otherwise<br />
the fixtures will not work at all, or will not work properly.<br />
Only use a stereo shielded cable and 3-pin XLR-plugs and connectors in order to connect the controller with<br />
the fixture or one fixture with another.<br />
Building a serial <strong>DMX</strong>-chain:<br />
Connect the <strong>DMX</strong>-output of the <strong>DMX</strong> <strong>Operator</strong> with the <strong>DMX</strong>-input of the nearest projector. Always connect<br />
one output with the input of the next fixture until all fixtures are connected.<br />
Caution: At the last fixture, the <strong>DMX</strong>-cable has to be terminated with a terminator. Solder a 120 resistor<br />
between Signal (–) and Signal (+) into a 3-pin XLR-plug and plug it in the <strong>DMX</strong>-output of the last fixture.<br />
Projector addressing<br />
Please note that the <strong>DMX</strong> <strong>Operator</strong> assigns the <strong>DMX</strong>-starting addresses every 16 steps. You have to<br />
00026741.DOC, Version 2.4