Download - Graupner
Download - Graupner
Download - Graupner

Create successful ePaper yourself
Turn your PDF publications into a flip-book with our unique Google optimized e-Paper software.
Anleitung<br />
zu Best.-Nr. 3247<br />
Eigenschaften<br />
• Praktische und wirtschaftliche Stromversorgung im Taschenformat<br />
• Durch einfaches zurückschieben des Außenrohrs wird der Glühkerzenstecker „an- und ausgesteckt“, kein Drücken<br />
oder Drehen notwendig<br />
• Immer wieder aufladbar<br />
• Passend für jede Glühkerze<br />
Anleitung<br />
1. Ziehen Sie das Außenrohr zurück und setzen Sie den Glühkerzenstecker auf die Kerze.<br />
2. Starten Sie den Motor. Wenn der Motor läuft, ziehen Sie das Außenrohr nochmals an, um den Glühkerzenstecker zu<br />
entfernen.<br />
3. Bitte vorsichtig vorgehen<br />
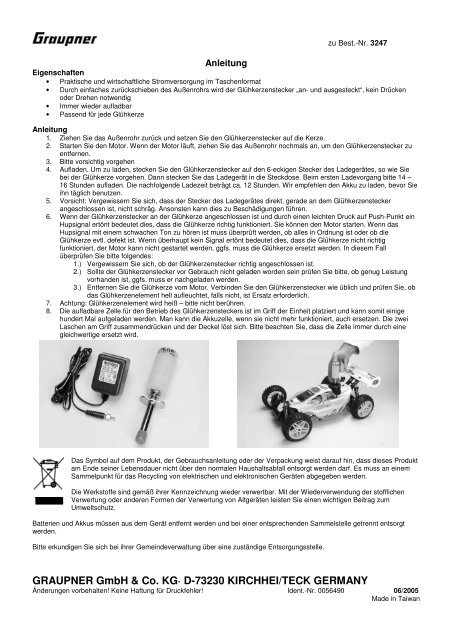
4. Aufladen. Um zu laden, stecken Sie den Glühkerzenstecker auf den 6-eckigen Stecker des Ladegerätes, so wie Sie<br />
bei der Glühkerze vorgehen. Dann stecken Sie das Ladegerät in die Steckdose. Beim ersten Ladevorgang bitte 14 –<br />
16 Stunden aufladen. Die nachfolgende Ladezeit beträgt ca. 12 Stunden. Wir empfehlen den Akku zu laden, bevor Sie<br />
ihn täglich benutzen.<br />
5. Vorsicht: Vergewissern Sie sich, dass der Stecker des Ladegerätes direkt, gerade an dem Glühkerzenstecker<br />
angeschlossen ist, nicht schräg. Ansonsten kann dies zu Beschädigungen führen.<br />
6. Wenn der Glühkerzenstecker an der Glühkerze angeschlossen ist und durch einen leichten Druck auf Push-Punkt ein<br />
Hupsignal ertönt bedeutet dies, dass die Glühkerze richtig funktioniert. Sie können den Motor starten. Wenn das<br />
Hupsignal mit einem schwachen Ton zu hören ist muss überprüft werden, ob alles in Ordnung ist oder ob die<br />
Glühkerze evtl. defekt ist. Wenn überhaupt kein Signal ertönt bedeutet dies, dass die Glühkerze nicht richtig<br />
funktioniert, der Motor kann nicht gestartet werden, ggfs. muss die Glühkerze ersetzt werden. In diesem Fall<br />
überprüfen Sie bitte folgendes:<br />
1.) Vergewissern Sie sich, ob der Glühkerzenstecker richtig angeschlossen ist.<br />
2.) Sollte der Glühkerzenstecker vor Gebrauch nicht geladen worden sein prüfen Sie bitte, ob genug Leistung<br />
vorhanden ist, ggfs. muss er nachgeladen werden.<br />
3.) Entfernen Sie die Glühkerze vom Motor. Verbinden Sie den Glühkerzenstecker wie üblich und prüfen Sie, ob<br />
das Glühkerzenelement hell aufleuchtet, falls nicht, ist Ersatz erforderlich.<br />
7. Achtung: Glühkerzenelement wird heiß – bitte nicht berühren.<br />
8. Die aufladbare Zelle für den Betrieb des Glühkerzensteckers ist im Griff der Einheit platziert und kann somit einige<br />
hundert Mal aufgeladen werden. Man kann die Akkuzelle, wenn sie nicht mehr funktioniert, auch ersetzen. Die zwei<br />
Laschen am Griff zusammendrücken und der Deckel löst sich. Bitte beachten Sie, dass die Zelle immer durch eine<br />
gleichwertige ersetzt wird.<br />
Das Symbol auf dem Produkt, der Gebrauchsanleitung oder der Verpackung weist darauf hin, dass dieses Produkt<br />
am Ende seiner Lebensdauer nicht über den normalen Haushaltsabfall entsorgt werden darf. Es muss an einem<br />
Sammelpunkt für das Recycling von elektrischen und elektronischen Geräten abgegeben werden.<br />
Die Werkstoffe sind gemäß ihrer Kennzeichnung wieder verwertbar. Mit der Wiederverwendung der stofflichen<br />
Verwertung oder anderen Formen der Verwertung von Altgeräten leisten Sie einen wichtigen Beitrag zum<br />
Umweltschutz.<br />
Batterien und Akkus müssen aus dem Gerät entfernt werden und bei einer entsprechenden Sammelstelle getrennt entsorgt<br />
werden.<br />
Bitte erkundigen Sie sich bei ihrer Gemeindeverwaltung über eine zuständige Entsorgungsstelle.<br />
GRAUPNER GmbH & Co. KG· D-73230 KIRCHHEI/TECK GERMANY<br />
Änderungen vorbehalten! Keine Haftung für Druckfehler! Ident.-Nr. 0056490 06/2005<br />
Made in Taiwan
No. 3247<br />
Instructions<br />
Propriétés<br />
• Source d’alimentation pratique et économique en format de poche.<br />
• Le soquet à bougie peut être connecté et dé-connecté par le simple tirage en arrière du tube extérieur ; aucune pression ni rotation ne sont nécessaires.<br />
• Toujours rechargeable.<br />
• Adaptée pour toutes les bougies.<br />
Instructions<br />
1. Tirer le tube extérieur en arrière et introduire le soquet sur la bougie.<br />
2. Démarrer le moteur. Lorsque le moteur tourne, tirer à nouveau le tube extérieur en arrière pour retirer le soquet de la bougie.<br />
3. Procéder avec précaution.<br />
4. Recharge : Pour recharger l’accu, connecter le soquet à bougie sur la prise à six pans du chargeur en procédant comme pour connecter la bougie. Brancher<br />
ensuite le chargeur sur une prise de courant secteur. Charger durant 14 à 16 heures pour le premier processus de charge. Les temps de charge suivants<br />
seront d’env. 12 heures. Nous conseillons de recharger l’accu avant chaque utilisation journalière.<br />
5. Précaution : S’assurer que la prise du chargeur soit introduite rectilignement dans le soquet et non de travers, autrement celui-ci pourrait être détérioré.<br />
6. Lorsque le soquet est connecté sur la bougie, une légère pression sur le point de contact déclenche un signal signifiant que la bougie fonctionne correctement.<br />
Vous pouvez alors démarrer le moteur. Si le signal émet un faible ton, il conviendra de vérifier si tout est en ordre ou si la bougie n’est pas éventuellement<br />
défectueuse. Si par contre aucun ton de signal ne se produit, cela signifie que la bougie ne fonctionne pas correctement et que le moteur ne pourra pas être<br />
démarré, la bougie devra être remplacée le cas échéant. Dans ce cas, vérifier ce qui suit :<br />
- S’assurer que le soquet est correctement connecté sur la bougie.<br />
- Si l’accu n’a pas été rechargé avant l’utilisation, vérifier qu’il a encore une capacité suffisante ; il devra être rechargé le cas échéant.<br />
- Démonter la bougie du moteur, connecter le soquet à bougie comme d’habitude et vérifier si le filament de la bougie brille d’une lueur claire, sinon un<br />
remplacement est nécessaire.<br />
7. Attention : Le filament de la bougie est chaud, ne pas le toucher !<br />
8. L’accu rechargeable du soquet à bougie est placé dans la poignée de celui-ci et pourra être rechargé quelques centaines de fois. Il pourra aussi être remplacé<br />
lorsqu’il ne fonctionnera plus. Presser ensemble les deux pattes sur la poignée et le couvercle se détachera. Noter que l’accu devra toujours être remplacé par<br />
un équivalent.<br />
Le symbole sur le produit, les instructions d’utilisation ou l’emballage stipulent que ce produit ne devra pas être jeté dans une poubelle domestique normale à la fin<br />
de sa durée de vie. Il devra être déposé dans un container réservé au recyclage des appareils électriques et électroniques.<br />
Informez-vous s’il existe un tel dépôt dans votre commune, ou remettez vos accus usagés à votre revendeur.<br />
Instructions<br />
Characteristics<br />
• Practical, economical pocket-sized glowplug driver<br />
• The glow driver is engaged and disengaged simply by sliding back the outer tube; no pushing or rotating is required<br />
• Rechargeable hundreds of times<br />
• Fits any glowplug<br />
Instructions<br />
1. Pull back the outer tube and place the glow clip on the glowplug.<br />
2. Start the motor. When the motor is running, slide the outer tube back again to remove the glow clip.<br />
3. Please work carefully.<br />
4. Recharging: to recharge the battery, connect the glow clip to the hexagon plug attached to the charger, as if you were connecting a glowplug.<br />
5. Caution: ensure that the charger connector is straight, and connects directly to the glow clip, i.e. not at an angle, otherwise you could cause<br />
damage.<br />
6. When the glow clip is connected to the glowplug, a light push should result in a clearly audible signal; this indicates that the glowplug is working<br />
correctly. You can now start the motor. If the audible signal is weak, you should check the condition of the system generally, and in particular<br />
whether the glowplug is defective. If you hear no signal at all, this means that the glowplug is not working properly, and you will not be able to start<br />
the motor; you may need to replace the glowplug. Please check the following points:<br />
1.) Ensure that the glow clip is connected correctly.<br />
2.) If the glow driver has not been recharged before use, please check that there is sufficient energy in the cell; it may need to be recharged.<br />
3.) Remove the glowplug from the motor. Connect the glow driver to it in the usual way, and check that the glowplug element glows brightly. If not, the<br />
plug needs to be replaced.<br />
7. Caution: the glowplug element becomes hot - please don’t touch it.<br />
8. The rechargeable cell which powers the glow clip is located in the handle of the glow driver, and can be recharged several hundred times. The cell<br />
can also be replaced when it eventually fails. Press the two lugs on the handle together and the cap will come loose. Please note that the cell must<br />
always be replaced by one of the same type.<br />
This symbol on the product, the instructions or the packaging indicates that you must not dispose of the product in the normal household waste at the end of<br />
its useful life. It must be taken to a collection point for the recycling of electrical and electronic equipment.<br />
The materials can be re-used according to the markings on them. You can make an important contribution to environmental protection by re-using the basic<br />
materials or parts of the equipment.<br />
Dry batteries and rechargeable batteries must be removed from the device when exhausted, and taken to a suitable collection point for safe and proper<br />
disposal.<br />
Please contact your local authority for the location of your nearest recycling centre.<br />
GRAUPNER GmbH & Co. KG D-73230 KIRCHHEIM/TECK GERMANY<br />
Sous réserve de modifications ! Nous ne sommes pas responsables d’éventuelles erreurs d’impression 06/2005<br />
We reserve the right to introduce modifications. No liability for printing errors.