GM-Racing 97160 Brushless Sport 120R 01 ... - Graupner
GM-Racing 97160 Brushless Sport 120R 01 ... - Graupner
GM-Racing 97160 Brushless Sport 120R 01 ... - Graupner
You also want an ePaper? Increase the reach of your titles
YUMPU automatically turns print PDFs into web optimized ePapers that Google loves.
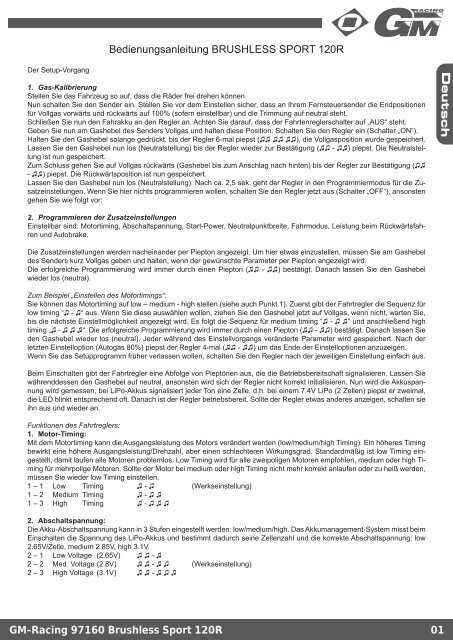
Der Setup-Vorgang<br />
Bedienungsanleitung BRUSHLESS SPORT <strong>120R</strong><br />
1. Gas-Kalibrierung<br />
Stellen Sie das Fahrzeug so auf, dass die Räder frei drehen können<br />
Nun schalten Sie den Sender ein. Stellen Sie vor dem Einstellen sicher, dass an Ihrem Fernsteuersender die Endpositionen<br />
für Vollgas vorwärts und rückwärts auf 100% (sofern einstellbar) und die Trimmung auf neutral steht.<br />
Schließen Sie nun den Fahrakku an den Regler an. Achten Sie darauf, dass der Fahrtenreglerschalter auf „AUS“ steht.<br />
Geben Sie nun am Gashebel des Senders Vollgas und halten diese Position. Schalten Sie den Regler ein (Schalter „ON“).<br />
Halten Sie den Gashebel solange gedrückt, bis der Regler 6-mal piepst (♫♫ ♫♫ ♫♫), die Vollgasposition wurde gespeichert.<br />
Lassen Sie den Gashebel nun los (Neutralstellung) bis der Regler wieder zur Bestätigung (♫♫ - ♫♫) piepst. Die Neutralstellung<br />
ist nun gespeichert.<br />
Zum Schluss gehen Sie auf Vollgas rückwärts (Gashebel bis zum Anschlag nach hinten) bis der Regler zur Bestätigung (♫♫<br />
- ♫♫) piepst. Die Rückwärtsposition ist nun gespeichert.<br />
Lassen Sie den Gashebel nun los (Neutralstellung). Nach ca. 2,5 sek. geht der Regler in den Programmiermodus für die Zusatzeinstellungen.<br />
Wenn Sie hier nichts programmieren wollen, schalten Sie den Regler jetzt aus (Schalter „OFF“), ansonsten<br />
gehen Sie wie folgt vor:<br />
2. Programmieren der Zusatzeinstellungen<br />
Einstellbar sind: Motortiming, Abschaltspannung, Start-Power, Neutralpunktbreite, Fahrmodus, Leistung beim Rückwärtsfahren<br />
und Autobrake.<br />
Die Zusatzeinstellungen werden nacheinander per Piepton angezeigt. Um hier etwas einzustellen, müssen Sie am Gashebel<br />
des Senders kurz Vollgas geben und halten, wenn der gewünschte Parameter per Piepton angezeigt wird.<br />
Die erfolgreiche Programmierung wird immer durch einen Piepton (♫♫ - ♫♫) bestätigt. Danach lassen Sie den Gashebel<br />
wieder los (neutral).<br />
Zum Beispiel „Einstellen des Motortimings“:<br />
Sie können das Motortiming auf low – medium - high stellen (siehe auch Punkt 1). Zuerst gibt der Fahrtregler die Sequenz für<br />
low timing “♫ - ♫“ aus. Wenn Sie diese auswählen wollen, ziehen Sie den Gashebel jetzt auf Vollgas, wenn nicht, warten Sie,<br />
bis die nächste Einstellmöglichkeit angezeigt wird. Es folgt die Sequenz für medium timing “♫ - ♫ ♫” und anschließend high<br />
timing „♫ - ♫ ♫ ♫“. Die erfolgreiche Programmierung wird immer durch einen Piepton (♫♫ - ♫♫) bestätigt. Danach lassen Sie<br />
den Gashebel wieder los (neutral). Jeder während des Einstellvorgangs veränderte Parameter wird gespeichert. Nach der<br />
letzten Einstelloption (Autogas 80%) piepst der Regler 4-mal (♫♫ - ♫♫) um das Ende der Einstelloptionen anzuzeigen.<br />
Wenn Sie das Setupprogramm früher verlassen wollen, schalten Sie den Regler nach der jeweiligen Einstellung einfach aus.<br />
Beim Einschalten gibt der Fahrtregler eine Abfolge von Pieptönen aus, die die Betriebsbereitschaft signalisieren. Lassen Sie<br />
währenddessen den Gashebel auf neutral, ansonsten wird sich der Regler nicht korrekt initialisieren. Nun wird die Akkuspannung<br />
wird gemessen, bei LiPo-Akkus signalisiert jeder Ton eine Zelle, d.h. bei einem 7.4V LiPo (2 Zellen) piepst er zweimal,<br />
die LED blinkt entsprechend oft. Danach ist der Regler betriebsbereit. Sollte der Regler etwas anderes anzeigen, schalten sie<br />
ihn aus und wieder an.<br />
Funktionen des Fahrtreglers:<br />
1. Motor-Timing:<br />
Mit dem Motortiming kann die Ausgangsleistung des Motors verändert werden (low/medium/high Timing). Ein höheres Timing<br />
bewirkt eine höhere Ausgangsleistung/Drehzahl, aber einen schlechteren Wirkungsgrad. Standardmäßig ist low Timing eingestellt,<br />
damit laufen alle Motoren problemlos. Low Timing wird für alle zweipoligen Motoren empfohlen, medium oder high Timing<br />
für mehrpolige Motoren. Sollte der Motor bei medium oder high Timing nicht mehr korrekt anlaufen oder zu heiß werden,<br />
müssen Sie wieder low Timing einstellen.<br />
1 – 1 Low Timing ♫ - ♫ (Werkseinstellung)<br />
1 – 2 Medium Timing ♫ - ♫ ♫<br />
1 – 3 High Timing ♫ - ♫ ♫ ♫<br />
2. Abschaltspannung:<br />
Die Akku-Abschaltspannung kann in 3 Stufen eingestellt werden: low/medium/high. Das Akkumanagement-System misst beim<br />
Einschalten die Spannung des LiPo-Akkus und bestimmt dadurch seine Zellenzahl und die korrekte Abschaltspannung: low<br />
2.65V/Zelle, medium 2.85V, high 3.1V.<br />
2 – 1 Low Voltage (2.65V) ♫ ♫ - ♫<br />
2 – 2 Med. Voltage (2.8V) ♫ ♫ - ♫ ♫ (Werkseinstellung)<br />
2 – 3 High Voltage (3.1V) ♫ ♫ - ♫ ♫ ♫<br />
<strong>GM</strong>-<strong>Racing</strong> <strong>97160</strong> <strong>Brushless</strong> <strong>Sport</strong> <strong>120R</strong> <strong>01</strong>
3. Motor Start:<br />
Hiermit kann die Gashebelstellung eingestellt werden, ab der der Motor anläuft. Mit einem niedrigen Wert läuft der Motor sofort<br />
an, mit einem höheren Wert muss der Gashebel weiter durchgezogen werden, bis der Motor startet. Die Start Funktion ist<br />
zwischen 9% und 30% einstellbar, um die optimale Regelbarkeit des Motors zu erreichen sollte die Werkseinstellung beibehalten<br />
werden.<br />
3 – 1 9% ♫ ♫ ♫ - ♫ (Werkseinstellung)<br />
3 – 2 15% ♫ ♫ ♫ - ♫ ♫<br />
3 – 3 20% ♫ ♫ ♫ - ♫ ♫ ♫<br />
3 – 4 25% ♫ ♫ ♫ - ♫ ♫ ♫ ♫<br />
3 – 5 30% ♫ ♫ ♫ - ♫ ♫ ♫ ♫ ♫<br />
4. Neutralstellung/Neutralpunktbreite:<br />
Mit den originalen RTR-Komponenten sollte die Werkseinstellung beibehalten werden, da sie optimal auf die Fernsteuerung<br />
angepasst ist. Bei Verwendung einer anderen Fernsteuerung kann ein höherer Wert probiert werden, sollte der Motor in Neutralstellung<br />
des Gashebels leicht ruckeln bzw. bei der leichtesten Berührung des Gashebels sofort anlaufen.<br />
4 – 1 4% ♫ ♫ ♫ ♫ - ♫ (Werkseinstellung)<br />
4 – 2 6% ♫ ♫ ♫ ♫ - ♫ ♫<br />
4 – 3 8% ♫ ♫ ♫ ♫ - ♫ ♫ ♫<br />
4 – 4 10% ♫ ♫ ♫ ♫ - ♫ ♫ ♫ ♫<br />
4 – 5 12% ♫ ♫ ♫ ♫ - ♫ ♫ ♫ ♫ ♫<br />
5. Fahrmodus:<br />
Sie können den Rückwärtsgang auch deaktivieren. Standardmäßig ist der Rückwärtsgang aktiviert.<br />
5 – 1 Rückwärts aus ♫ ♫ ♫ ♫ ♫ - ♫<br />
5 – 2 Rückwarts an ♫ ♫ ♫ ♫ ♫ - ♫ ♫ (Werkseinstellung)<br />
6. Leistung beim Rückwärtsfahren:<br />
Die maximale Rückwärtsleistung bzw. Geschwindigkeit beim Rückwärtsfahren ist zwischen 0 und 100% in acht Stufen einstellbar.<br />
Beachten Sie, nicht längere Zeit rückwärts zu fahren, da dies den Regler überlasten kann.<br />
6 – 1 0% ♫ ♫ ♫ ♫ ♫ ♫ - ♫<br />
6 – 2 30% ♫ ♫ ♫ ♫ ♫ ♫ - ♫ ♫<br />
6 – 3 40% ♫ ♫ ♫ ♫ ♫ ♫ - ♫ ♫ ♫<br />
6 – 4 50% ♫ ♫ ♫ ♫ ♫ ♫ - ♫ ♫ ♫ ♫ (Werkseinstellung)<br />
6 – 5 65% ♫ ♫ ♫ ♫ ♫ ♫ - ♫ ♫ ♫ ♫ ♫<br />
6 – 6 80% ♫ ♫ ♫ ♫ ♫ ♫ - ♫ ♫ ♫ ♫ ♫ ♫<br />
6 – 7 90% ♫ ♫ ♫ ♫ ♫ ♫ - ♫ ♫ ♫ ♫ ♫ ♫ ♫<br />
6 – 8 100% ♫ ♫ ♫ ♫ ♫ ♫ - ♫ ♫ ♫ ♫ ♫ ♫ ♫ ♫<br />
7. Drag brake - Automatikbremsfunktion:<br />
Mit der Autobremsfunktion kann eine Art „Motorbremse“ eingestellt werden, d.h. bereits in Neutralstellung des Gasgriffs<br />
bremst das Fahrzeug mit der eingestellten Bremsleistung automatisch ab. Das kann sinnvoll sein, um Kurven enger durchfahren<br />
zu können. Die Autobremsfunktion wirkt unabhängig von der eigentlichen Bremse beim Zurückdrücken des Gashebels.<br />
Das Autogas ist von 0 bis 80% in sieben Stufen einstellbar, höhere Werte als 30% sind allerdings selten nötig.<br />
7 – 1 0% ♫ ♫ ♫ ♫ ♫ ♫ ♫ - ♫<br />
7 – 2 10% ♫ ♫ ♫ ♫ ♫ ♫ ♫ - ♫ ♫<br />
7 – 3 30% ♫ ♫ ♫ ♫ ♫ ♫ ♫ - ♫ ♫ ♫ (Werkseinstellung)<br />
7 – 4 40% ♫ ♫ ♫ ♫ ♫ ♫ ♫ - ♫ ♫ ♫ ♫<br />
7 – 5 50% ♫ ♫ ♫ ♫ ♫ ♫ ♫ - ♫ ♫ ♫ ♫ ♫<br />
7 – 6 70% ♫ ♫ ♫ ♫ ♫ ♫ ♫ - ♫ ♫ ♫ ♫ ♫ ♫<br />
7 – 7 80% ♫ ♫ ♫ ♫ ♫ ♫ ♫ - ♫ ♫ ♫ ♫ ♫ ♫ ♫<br />
8. Übertemperatursicherung:<br />
Steigt die Reglertemperatur über 85° C, wird die Übertemperatursicherung aktiviert. Das Fahrzeug wird langsamer und kann<br />
auch nur noch langsam bewegt werden, bis der Regler abgekühlt ist.<br />
9. Sicherheitsschaltung Neutralstellung:<br />
Der Regler initialisiert sich aus Sicherheitsgründen beim Einschalten nur korrekt, wenn der Gasgriff auf neutral steht.<br />
Fehlermeldungen:<br />
1. Sollte der Fahrtregler nach dem Einschalten kein korrektes Gassignal erhalten, zeigt ein konstantes Piepsignal dies an. Bei<br />
einwandfreiem Signal hört der Piepton auf.<br />
2. Steht der Gashebel nach dem Einstellen der Zusatzeinstellungen nicht auf neutral, zeigt dies ebenfalls ein konstantes<br />
Piepsignal an. Stellen Sie den Gashebel zurück auf neutral, dann hört der Piepton auf und der Regler ist einsatzbereit.<br />
3. Bei manchen Sendern kann es notwendig werden, nach erfolgter Gas-Kalibrierung (siehe 1.) die Gastrimmung des Senders<br />
eine oder mehrere Rasten aus der Mittelstellung zu trimmen, damit das Piepsignal verstummt und der Regler korrekt<br />
funktioniert.<br />
02 <strong>GM</strong>-<strong>Racing</strong> <strong>97160</strong> <strong>Brushless</strong> <strong>Sport</strong> <strong>120R</strong>
Enter setting mode<br />
Manual BRUSHLESS SPORT <strong>120R</strong><br />
1. Throttle calibration:<br />
Place the vehicle in such a way that the wheels can turn freely.<br />
Switch on the transmitter now. Guarantee before adjusting the throttle trim stands on neutral.<br />
Connect the battery to the ESC. Make sure that the ESC switch stands on „OFF “.<br />
Pull the throttle trigger of the transmitter to full throttle and hold this position. Switch the ESC on (switch „ON “).<br />
Keep the throttle trigger pressed until the ESC beeps 6-times (♫♫ ♫♫ ♫♫), the full throttle position is stored. Release the throttle<br />
trigger now (neutral position) until the ESC beeps again for confi rmation (♫♫ - ♫♫). The neutral position is now stored.<br />
At last you have pull the throttle trigger on full reverse (throttle trigger to the mechanical end) until the ESC beeps (♫♫ - ♫♫)<br />
for confi rmation. The reverse position is now stored.<br />
Release the throttle trigger now (neutral position). After approximately 2,5 sec. the ESC goes into the programming mode for<br />
the additional settings specifi ed above. If you want to set nothing here, you can switch the ESC now off (switch „OFF “), otherwise<br />
the ESC goes automatically into the programming mode.<br />
2. Programming the additional settings:<br />
You can program the following additional settings: Motor timing, Cut-off voltage, starting voltage, range of middle position, run<br />
mode, reverse power and drag power.<br />
The additional settings are indicated successively by beep. In order to adjust something here, you must give full throttle briefl y<br />
at the throttle trigger of the transmitter, if the necessary parameter is indicated by a beep.<br />
Successful programming is always confi rmed by a beep (♫♫ - ♫♫).<br />
Take the Timing setting as an example. There are 3 items for Timing setting: low timing, middle timing and high timing. Firstly,<br />
the ESC will give „♫ - ♫“ to ask you that if you choose the low timing. If you choose it, you should pull the stick to the forward<br />
highest position, else wait for the next item. The next 2 item will be medium timing “♫ - ♫ ♫” and high timing „♫ - ♫ ♫ ♫“.<br />
Any parameter will be saved after it is set. After the last parameter (drag power 80%) is set, the ESC will beep 4-times (♫♫ -<br />
♫♫) to indicate that.<br />
When you get a new ESC, please connect the wiring for throttle signal and motor correctly. Then switch on your transmitter<br />
before switch on the ESC. Now, you will hear a number of beeps which is equal to the number of cells (e.g. a 7.4V LiPo -2<br />
cell- will beep 2 times), in addition the LED will blink.<br />
This means your ESC is ready to use, you can push your stick to start the motor.<br />
ESC Functions:<br />
1. Timing setting:<br />
Low/Medium/High timing. Higher timing offers more power output at the expense of effi ciency. Default is low timing, which is<br />
suitable for almost all motors. Normally, select low timing for 1 pair-of-poles motor, high timing for more pair-of-poles. If the<br />
motor starts-up not correctly or runs too hot at medium or high timing, re-adjust low timing.<br />
1 – 1 Low Timing ♫ - ♫ (factory default)<br />
1 – 2 Medium Timing ♫ - ♫ ♫<br />
1 – 3 High Timing ♫ - ♫ ♫ ♫<br />
2. Cut-off voltage for battery protection:<br />
Low/Medium/High. Default is medium value. The battery protection function will fi nd the number of cells of LiPo and decide the<br />
cut-off voltage, such as 2.65V/2.85V/3.1V for Low/Medium/High respectively.<br />
2 – 1 Low Voltage (2.65V) ♫ ♫ - ♫<br />
2 – 2 Med. Voltage (2.8V) ♫ ♫ - ♫ ♫ (factory default)<br />
2 – 3 High Voltage (3.1V) ♫ ♫ - ♫ ♫ ♫<br />
3. Starting Power (Starting voltage setting):<br />
With starting-voltage, the throttle position can be adjusted from which the motor starts running. With a lower value the motor will start<br />
immediately when pulling the throttle trigger, with a higher value, the throttle trigger must be pulled more in full speed direction until<br />
the motor starts running. Start-volt is adjustable between 9% and 30%, to achieve the optimal controllability of the motor the factory<br />
default setting should be maintained.<br />
3 – 1 9% ♫ ♫ ♫ - ♫ (factory default)<br />
3 – 2 15% ♫ ♫ ♫ - ♫ ♫<br />
3 – 3 20% ♫ ♫ ♫ - ♫ ♫ ♫<br />
3 – 4 25% ♫ ♫ ♫ - ♫ ♫ ♫ ♫<br />
3 – 5 30% ♫ ♫ ♫ - ♫ ♫ ♫ ♫ ♫<br />
<strong>GM</strong>-<strong>Racing</strong> <strong>97160</strong> <strong>Brushless</strong> <strong>Sport</strong> <strong>120R</strong> 03
4. Range neutral position:<br />
With the original RTR components the factory default setting should be maintained because it is optimally adapted to the radio<br />
control system. When using another radio control, a higher value maybe works better, if the motor slightly jerks in neutral<br />
position of the throttle trigger, or starts immediately at the slightest touch of the throttle trigger.<br />
4 – 1 4% ♫ ♫ ♫ ♫ - ♫ (factory default)<br />
4 – 2 6% ♫ ♫ ♫ ♫ - ♫ ♫<br />
4 – 3 8% ♫ ♫ ♫ ♫ - ♫ ♫ ♫<br />
4 – 4 10% ♫ ♫ ♫ ♫ - ♫ ♫ ♫ ♫<br />
4 – 5 12% ♫ ♫ ♫ ♫ - ♫ ♫ ♫ ♫ ♫<br />
5. Runmode (forward-reverse):<br />
You can set the controller in forward only or reverse.<br />
5 – 1 reverse disabled ♫ ♫ ♫ ♫ ♫ - ♫<br />
5 – 2 reverse enabled ♫ ♫ ♫ ♫ ♫ - ♫ ♫ (factory default)<br />
6. Reverse power:<br />
The maximum reverse power and speed is adjustable from 0-100% in eight steps. Remember not to drive longer in reverse<br />
mode, as this can damage the speed controller. The reverse power is settable in 8 levels, from 0 to 100%.<br />
6 – 1 0% ♫ ♫ ♫ ♫ ♫ ♫ - ♫<br />
6 – 2 30% ♫ ♫ ♫ ♫ ♫ ♫ - ♫ ♫<br />
6 – 3 40% ♫ ♫ ♫ ♫ ♫ ♫ - ♫ ♫ ♫<br />
6 – 4 50% ♫ ♫ ♫ ♫ ♫ ♫ - ♫ ♫ ♫ ♫ (factory default)<br />
6 – 5 65% ♫ ♫ ♫ ♫ ♫ ♫ - ♫ ♫ ♫ ♫ ♫<br />
6 – 6 80% ♫ ♫ ♫ ♫ ♫ ♫ - ♫ ♫ ♫ ♫ ♫ ♫<br />
6 – 7 90% ♫ ♫ ♫ ♫ ♫ ♫ - ♫ ♫ ♫ ♫ ♫ ♫ ♫<br />
6 – 8 100% ♫ ♫ ♫ ♫ ♫ ♫ - ♫ ♫ ♫ ♫ ♫ ♫ ♫ ♫<br />
7. Drag brake:<br />
With the drag brake function, a sort of „engine brake“ is set, i.e. in the neutral position of the throttle trigger the car already<br />
automatically brakes with the preset braking performance. This may be useful to drive through curves. The drag brake works<br />
independently of the brake function when pushing back the throttle trigger. The drag brake function is adjustable from 0 - 80%<br />
in seven steps, higher values than 30% are normally not necessary.<br />
Drag power is settable in 7 levels from 0 to 80%.<br />
7 – 1 0% ♫ ♫ ♫ ♫ ♫ ♫ ♫ - ♫<br />
7 – 2 10% ♫ ♫ ♫ ♫ ♫ ♫ ♫ - ♫ ♫<br />
7 – 3 30% ♫ ♫ ♫ ♫ ♫ ♫ ♫ - ♫ ♫ ♫ (factory default)<br />
7 – 4 40% ♫ ♫ ♫ ♫ ♫ ♫ ♫ - ♫ ♫ ♫ ♫<br />
7 – 5 50% ♫ ♫ ♫ ♫ ♫ ♫ ♫ - ♫ ♫ ♫ ♫ ♫<br />
7 – 6 70% ♫ ♫ ♫ ♫ ♫ ♫ ♫ - ♫ ♫ ♫ ♫ ♫ ♫<br />
7 – 7 80% ♫ ♫ ♫ ♫ ♫ ♫ ♫ - ♫ ♫ ♫ ♫ ♫ ♫ ♫<br />
8. Over heat protection:<br />
When the temperature of the ESC is higher than 85°, the ESC will activates the over temperature protection function, to maintain<br />
or lower the power and no more power increasing.<br />
9. Power on protection:<br />
When the power was switched on, but the ESC will not start the motor no matter where is the position of the throttle stick.<br />
Especially, when the stick is pushed at the upper 3 lines mark, the ESC will give “beep” to inform the fl yer the stick is not on<br />
zero position.<br />
10. Automatic throttle check:<br />
When the power is switched on, if the stick position is correct, the ESC will take this position as the throttle starting position.<br />
This function will also be worked with 1.0-2.0 or 0.9-2.1 ms PCM signal.<br />
Error messages:<br />
1. After switch on, if there is no normal throttle signal can be detected, the ESC will give continuous beep until correct signal<br />
has been found.<br />
2. After all parameters setting were completed, if the stick was not put at the correct position, the ESC will give continuous<br />
beep until the stick position is put at the correct position.<br />
3. With some transmitters it may be necessary to set the transmitter throttle trim, after the gas calibration (see point 1), one<br />
or two notches from the center position to stop the beeping sound and the ESC works properly.<br />
04 <strong>GM</strong>-<strong>Racing</strong> <strong>97160</strong> <strong>Brushless</strong> <strong>Sport</strong> <strong>120R</strong>
Mise en service<br />
VARIATEUR BRUSHLESS <strong>97160</strong><br />
1. Vous procédure comme suit au réglage sur la radiocommande :<br />
Établissez le véhicule de telle sorte que les roues puissent tourner librement.<br />
Maintenant, allumez l‘émetteur. Garantissez avant de ajuster qu‘à votre émetteur les positions extréités pour gaz sur 100% en<br />
avant et en arrière (pour autant que réglable) et le trim des gaz est sur neutre. Attachez maintenant l‘accu au variateur.<br />
Donnez maintenant gaz au levier de gaz de l‘émetteur et tenez cette position. Allumez le variateur (interrupteur „ON“).<br />
Tenez le levier de gaz, jusqu‘à ce que le régulateur fasse bip-bip 6-fois (♫♫ ♫♫ ♫♫), la position de gaz avez été stocké .<br />
Laissez le levier de gaz (position neutre), le variateur faites maintenant bip-bip (♫♫ - ♫♫) à la confi rmation. La position neutre<br />
est maintenant stockée.<br />
En vous allez conclusion sur gaz (leviers de gaz jusqu‘à l‘enclenchement vers l‘arrière), le variateur à la confi rmation faites<br />
bip-bip (♫♫ - ♫♫). Le position de marche arrière est maintenant stocké<br />
Libérez maintenant le levier de gaz (position neutre). Le régulateur va après env. 2,5 sec dans au mode de programmation<br />
pour les réglages d‘additif mentionnés ci-dessus. Si vous ne voulez ici rien programmer, vous mettez maintenant le régulateur<br />
hors circuit (interrupteur „OFF“), autrement le régulateur va automatiquement dans au mode de programmation.<br />
2. Les réglages d’additif<br />
Motor-Timing, Système de protection des batteries (cut-off voltage), Starting Power, Largeur de point neutre (range middle<br />
position), Run Mode (Modes de fonctionnement), Reverse Power (Marche arrière), Frein moteur (drag brake)<br />
Les réglages d‘additif sont indiqués successivement à argile de bip-bip. Pour ajuster ici quelque chose, vous devez donner<br />
brièvement à gaz au levier de gaz de l‘émetteur, si le paramètre nécessaire est indiqué à argile de bip-bip.<br />
La programmation réussie est toujours confi rmée par une argile de bip-bip (♫♫ - ♫♫).<br />
Par exemple ‘ajuster du timing’ :<br />
Vous pouvez choisir le Timing low – medium – high (voir aussi point 1). Le contrôler donne d‘abord la séquence pour low timing<br />
“♫ - ♫”. Si vous voulez choisir ceux-ci, vous tirezmaintenant le levier de gaz, sinon, vous attendez à la prochaine possibilité de<br />
réglage êtes indiqué. La séquence pour medium “♫ - ♫ ♫” et high timing ♫ - ♫ ♫ ♫“ suit. Ensuite réussie est toujours confi rmée<br />
par une argile de bip-bip - vous libérez à nouveau le levier de gaz (de manière neutre). Chaque paramètre modifi é pendant<br />
l‘ajustement est stocké. Après la dernière option de réglage ) autour de (gaz de voiture 80%), le régulateur fait bip-bip 4-fois<br />
(♫♫ - ♫♫) la fi n des options de réglage indiquer.<br />
Pour quitter les réglages d‘additif, vous mettez simplement le contrôler hors circuit (interrupteur „OFF“).<br />
En la mise en marche, le contrôler dépense une séquence de tons de bip-bip que l‘ordre de marche signaler. Laissez entretemps<br />
le levier de gaz sur neutre, autrement le régulateur ne s‘initialisera pas correctement. Le voltage de l‘accu, signale avec<br />
des LiPo-accus est mesuré chaque argile une cellule, c.-à-d. qu‘avec des 7.4V LiPo (2 cellules) il fait bip-bip deux fois, en plus<br />
le LED clignote deux fois. Si le régulateur devait indiquer autre chose, mise hors circuit et après mise en marche encore.<br />
Fonctions :<br />
1. Motor-Timing:<br />
Vous pourrez choisir entre Low/Medium/High pour adapter à différents moteurs brushless. Le timing le plus haut offre un rendement<br />
plus puissant aux dépens de l’effi cacité. Vérifi ez la consommation en courant après un changement d’option de timing<br />
afi n d’éviter une surcharge de la batterie. Low timing est concernant la norme prêt, tous les moteurs courent ainsi sans problèmes.<br />
Low timing est recommandé pour des moteurs bipolaire, medium ou high timing pour tous les moteurs multipolaire.<br />
Si le moteur à medium timing ou high timing ne démarre pas correctement ou trop chaud, vous devez réajuster le low timing.<br />
1 – 1 Low Timing ♫ - ♫ (Réglage d’usine)<br />
1 – 2 Medium Timing ♫ - ♫ ♫<br />
1 – 3 High Timing ♫ - ♫ ♫ ♫<br />
2. Système de protection des batteries:<br />
Cette fonction ’’Battery Management System’’ a été intégrée dans le contrôleur. La puissance du timing de coupure a été<br />
basée sur le nombre d’éléments et sur le rendement continu en courant de la batterie. Trois options sont à utiliser pour les<br />
batteries Li-Polymer: low/medium/high (low 2.65V/élément, medium 2.85V, high 3.1V.<br />
2 – 1 Low Voltage (2.65V) ♫ ♫ - ♫<br />
2 – 2 Med. Voltage (2.8V) ♫ ♫ - ♫ ♫ (Réglage d’usine)<br />
2 – 3 High Voltage (3.1V) ♫ ♫ - ♫ ♫ ♫<br />
3. Start-Power (Starting Voltage setting):<br />
Ceci contrôle la position du accélérateur peut être ajusté à partir de laquelle démarre le moteur. Avec une faible valeur du<br />
moteur sera immédiatement retiré par le biais d‘une plus grande valeur, la manette des gaz jusqu‘à ce que le moteur démarre.<br />
Vous pourrez régler le contrôleur sur 9%, 15%, 20%, 25% et 35%.<br />
<strong>GM</strong>-<strong>Racing</strong> <strong>97160</strong> <strong>Brushless</strong> <strong>Sport</strong> <strong>120R</strong> 05<br />
Français
Français<br />
3 – 1 9% ♫ ♫ ♫ - ♫ (Réglage d’usine)<br />
3 – 2 15% ♫ ♫ ♫ - ♫ ♫<br />
3 – 3 20% ♫ ♫ ♫ - ♫ ♫ ♫<br />
3 – 4 25% ♫ ♫ ♫ - ♫ ♫ ♫ ♫<br />
3 – 5 35% ♫ ♫ ♫ - ♫ ♫ ♫ ♫ ♫<br />
4. Largeur de point neutre<br />
Avec les composants RTR original devrait être maintenu au réglage d‘usine, car il est idéalement adapté à la télécommande.<br />
Utilisation d‘un autre radiocommande, une plus grande valeur sont essayé, le moteur en position neutre de la manette des gaz<br />
doit être légèrement saccadée, ou au moindre soupçon de début d‘accélérateur immédiatement.<br />
4 – 1 4% ♫ ♫ ♫ ♫ - ♫ (Réglage d’usine)<br />
4 – 2 6% ♫ ♫ ♫ ♫ - ♫ ♫<br />
4 – 3 8% ♫ ♫ ♫ ♫ - ♫ ♫ ♫<br />
4 – 4 10% ♫ ♫ ♫ ♫ - ♫ ♫ ♫ ♫<br />
4 – 5 12% ♫ ♫ ♫ ♫ - ♫ ♫ ♫ ♫ ♫<br />
5. Run Mode (Modes de fonctionnement)<br />
Vous pourrez régler le contrôleur en marche avant seulement, ou en avant et reverse.<br />
Vous pouvez également désactiver la fonction de reverse.<br />
5 – 1 reverse arrêt ♫ ♫ ♫ ♫ ♫ - ♫<br />
5 – 2 reverse marché ♫ ♫ ♫ ♫ ♫ - ♫ ♫ (Réglage d’usine)<br />
6. Reverse Power (Marche arrière)<br />
Le contrôler offre 7 options en mode reverse. Vous pourrez régler le contrôleur sur 0%, 30%, 40%, 50%, 65%, 80%, 90% et<br />
100%.<br />
6 – 1 0% ♫ ♫ ♫ ♫ ♫ ♫ - ♫<br />
6 – 2 30% ♫ ♫ ♫ ♫ ♫ ♫ - ♫ ♫<br />
6 – 3 40% ♫ ♫ ♫ ♫ ♫ ♫ - ♫ ♫ ♫<br />
6 – 4 50% ♫ ♫ ♫ ♫ ♫ ♫ - ♫ ♫ ♫ ♫ (Réglage d’usine)<br />
6 – 5 65% ♫ ♫ ♫ ♫ ♫ ♫ - ♫ ♫ ♫ ♫ ♫<br />
6 – 6 80% ♫ ♫ ♫ ♫ ♫ ♫ - ♫ ♫ ♫ ♫ ♫ ♫<br />
6 – 7 90% ♫ ♫ ♫ ♫ ♫ ♫ - ♫ ♫ ♫ ♫ ♫ ♫ ♫<br />
6 – 8 100% ♫ ♫ ♫ ♫ ♫ ♫ - ♫ ♫ ♫ ♫ ♫ ♫ ♫ ♫<br />
7. Frein moteur - fonction automatique de freinage:<br />
Avec la fonction de freinage automatique, une sorte de „frein moteur“ est réglé, c‘est à dire déjà dans la position neutre de la<br />
manette des gaz, la voiture freine automatiquement le jeu de la performance de freinage. Cela peut être utile de conduire dans<br />
les courbes pouvez fermer. La fonction de freinage automatique fonctionne indépendamment du frein lorsque repoussé la manette<br />
des gaz. Cette fonction est réglable de 0-80%, des valeurs supérieures à 30%, toutefois, sont rarement nécessaires.<br />
7 – 1 0% ♫ ♫ ♫ ♫ ♫ ♫ ♫ - ♫<br />
7 – 2 10% ♫ ♫ ♫ ♫ ♫ ♫ ♫ - ♫ ♫<br />
7 – 3 30% ♫ ♫ ♫ ♫ ♫ ♫ ♫ - ♫ ♫ ♫ (Réglage d’usine)<br />
7 – 4 40% ♫ ♫ ♫ ♫ ♫ ♫ ♫ - ♫ ♫ ♫ ♫<br />
7 – 5 50% ♫ ♫ ♫ ♫ ♫ ♫ ♫ - ♫ ♫ ♫ ♫ ♫<br />
7 – 6 70% ♫ ♫ ♫ ♫ ♫ ♫ ♫ - ♫ ♫ ♫ ♫ ♫ ♫<br />
7 – 7 80% ♫ ♫ ♫ ♫ ♫ ♫ ♫ - ♫ ♫ ♫ ♫ ♫ ♫ ♫<br />
8. Thermal Protection (Protection thermique)<br />
Le contrôleur adapté la coupure des protections en haute température s’ils atteignent 85° C, il n’est plus permis au moteur de<br />
démarrer. Si le contrôleur atteint 85° C durant le fonctionnement, la puissance sera forcément coupée.<br />
9. Circuit de protection position neutre<br />
Le contrôler ne s‘initialise correctement des raisons de sécurité en la mise sous tension, que si le levier de gaz est sur neutre.<br />
En la mise en marche, le contrôler dépense une séquence de tons de bip-bip que l‘ordre de marche signaler. Laissez entretemps<br />
le levier de gaz sur neutre, autrement le régulateur ne s‘initialisera pas correctement. Une argile particulière à laquelle<br />
le signal de gaz correct confi rme, vient d‘abord. Ensuite, le voltage de l‘accu, signale avec des LiPo-accus est mesuré chaque<br />
argile une cellule, c.-à-d. qu‘avec des 7.4V LiPo (2 cellules) il fait bip-bip deux fois. Une argile particulière fi nale indique l‘ordre<br />
de marche du régulateur. Si le régulateur devait indiquer autre chose, mise hors circuit et après mise en marche encore.<br />
Indication d’erreur :<br />
1. Après mise en marche, s‘il y a aucun signal normal de commande de puissance ne peut être détecté, le contrôler donnera<br />
le signal sonore continu jusqu‘à ce que le signal correct ait été trouvé.<br />
2. Après que tout l‘établissement de réglages d’additif été accomplis, si le levier de gaz pas mis à la position correcte, le<br />
contrôler donnera le signal sonore continu jusqu‘à ce que la position de bâton soit mise à la position correcte.<br />
3. Dans certaines émetteurs il peut être nécessaire, après la calibration de gaz (voir 1), le trim des gaz un ou de plusieurs<br />
crans de la position centrale, ce qui réduit le signal sonore et le contrôleur fonctionne correctement.<br />
06 <strong>GM</strong>-<strong>Racing</strong> <strong>97160</strong> <strong>Brushless</strong> <strong>Sport</strong> <strong>120R</strong>
Anschluß / Wiring / Connexion<br />
Fahrakku / Battery /<br />
Accu de propulsion<br />
Empfänger /<br />
Receiver /<br />
Récepteur<br />
+<br />
-<br />
Fahrtenregler /<br />
ESC / Variateur<br />
Kanal / Channel / Voie #2<br />
Techn. Daten / Specifi cations / Charactéristiques techniques<br />
Eingangsspannung<br />
Voltage<br />
Tension d‘entrée<br />
Dauerstrom<br />
Continuous current<br />
Courant permanent<br />
Impulsstrom<br />
Instantaneous current<br />
Courant pointé (< 1 sec.)<br />
7.4 - 14.8 V<br />
(2S - 4S LiPo)<br />
120A<br />
180A<br />
BEC 5.3 V/ 3A<br />
Abmesssungen<br />
58x42x42 mm<br />
Dimensions<br />
Dimensions<br />
<strong>Brushless</strong>-Motor /<br />
Motor brushless /<br />
Moteur brushless<br />
Flash 3.0<br />
<strong>GM</strong>-<strong>Racing</strong> <strong>97160</strong> <strong>Brushless</strong> <strong>Sport</strong> <strong>120R</strong> 07
Hinweise zum Umweltschutz<br />
Das Symbol auf dem Produkt, der Gebrauchsanleitung oder der Verpackung weist darauf hin, dass dieses<br />
Produkt am Ende seiner Lebensdauer nicht über den normalen Haushaltsabfall entsorgt werden<br />
darf. Es muss an einem Sammelpunkt für das Recycling von elektrischen und elektronischen Geräten<br />
abgegeben werden.<br />
Die Werkstoffe sind gemäß ihrer Kennzeichnung wieder verwertbar. Mit der Wiederverwendung, der<br />
stoffl ichen Verwertung oder anderen Formen der Verwertung von Altgeräten leisten Sie einen wichtigen<br />
Beitrag zum Umweltschutz.<br />
Batterien und Akkus müssen aus dem Gerät entfernt werden und bei einer entsprechenden Sammelstelle getrennt<br />
entsorgt werden.<br />
Bei RC-Modellen müssen Elektronikteile, wie z.B. Servos, Empfänger oder Fahrtenregler aus dem Produkt ausgebaut<br />
und getrennt bei einer entsprechenden Sammelstelle als Elektro-Schrott entsorgt werden.<br />
Bitte erkundigen Sie sich bei der Gemeindeverwaltung die zuständige Entsorgungsstelle.<br />
Environmental Protection Notes<br />
When this product comes to the end of its useful life, you must not dispose of it in the ordinary domestic<br />
waste. The correct method of disposal is to take it to your local collection point for recycling electrical and<br />
electronic equipment. The symbol shown here, which may be found on the product itself, in the operating<br />
instructions or on the packaging, indicates that this is the case.<br />
Individual markings indicate which materials can be recycled and re-used. You can make an important<br />
contribution to the protection of our common environment by re-using the product, recycling the basic<br />
materials or recycling redundant equipment in other ways.<br />
Remove batteries from your device and dispose of them at your local collection point for batteries.<br />
In case of R/C models, you have to remove electronic parts like servos, receiver or speed controller from the product in<br />
question, and these parts must be disposed of with a corresponding collection point for electrical scrap.<br />
If you don’t know the location of your nearest disposal centre, please enquire at your local council offi ce.<br />
Indications quand à la protection de l‘environnement<br />
Ce produit à la fi n de sa durée de vie ne doit pas être mis à la poubelle, mais être remis à une collecte<br />
pour le recycle ment d‘appareils électriques et électroniques. Le symbole inscrit sur le produit, dans la<br />
notice d‘instructions et sur son emballage l‘indique.<br />
Les matériaux selon leurs reconnaissances sont réutilisables. Avec le recyclage de matériaux et autres<br />
formes d‘appareils, vous contribuez à la protection de l‘environnement.<br />
Les batteries et accus doivent être retirés de l‘appareil et doivent être remis à un dépôt homologué pour ce type de<br />
produits.<br />
Pour les modèles radiocommandes, les pièces électroniques, comme par exemple les servos, récepteur ou variateur<br />
de vitesse, doivent être démontés et retirés du produit et être remis à une collecte spécialisée pour produits électroniques.<br />
Veuillez s.v.p. demander auprès de votre mairie l‘adresse exacte de la collecte la plus proche de chez vous.


