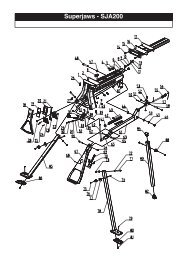
Manual de instrucciones - Triton Tools
Manual de instrucciones - Triton Tools
Manual de instrucciones - Triton Tools

You also want an ePaper? Increase the reach of your titles
YUMPU automatically turns print PDFs into web optimized ePapers that Google loves.
FUNCTIONS<br />
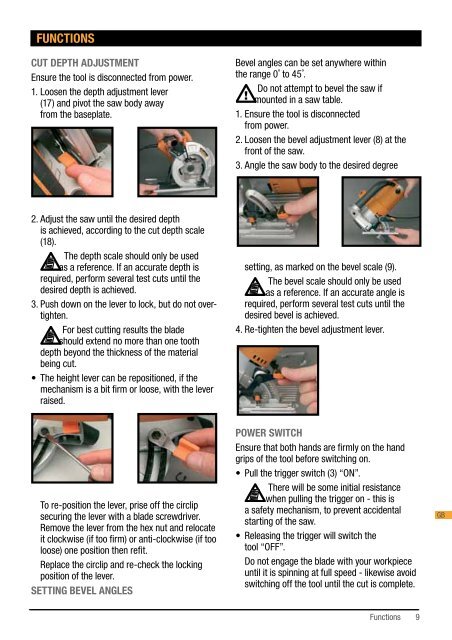
CUT DEPTH ADJUSTMENT<br />
Ensure the tool is disconnected from power.<br />
1. Loosen the <strong>de</strong>pth adjustment lever<br />
(17) and pivot the saw body away<br />
from the baseplate.<br />
2. Adjust the saw until the <strong>de</strong>sired <strong>de</strong>pth<br />
is achieved, according to the cut <strong>de</strong>pth scale<br />
(18).<br />
The <strong>de</strong>pth scale should only be used<br />
as a reference. If an accurate <strong>de</strong>pth is<br />
required, perform several test cuts until the<br />
<strong>de</strong>sired <strong>de</strong>pth is achieved.<br />
3. Push down on the lever to lock, but do not overtighten.<br />
For best cutting results the bla<strong>de</strong><br />
should extend no more than one tooth<br />
<strong>de</strong>pth beyond the thickness of the material<br />
being cut.<br />
• The height lever can be repositioned, if the<br />
mechanism is a bit firm or loose, with the lever<br />
raised.<br />
To re-position the lever, prise off the circlip<br />
securing the lever with a bla<strong>de</strong> screwdriver.<br />
Remove the lever from the hex nut and relocate<br />
it clockwise (if too firm) or anti-clockwise (if too<br />
loose) one position then refit.<br />
Replace the circlip and re-check the locking<br />
position of the lever.<br />
SETTING BEVEL ANGLES<br />
Bevel angles can be set anywhere within<br />
the range 0˚ to 45˚.<br />
Do not attempt to bevel the saw if<br />
mounted in a saw table.<br />
1. Ensure the tool is disconnected<br />
from power.<br />
2. Loosen the bevel adjustment lever (8) at the<br />
front of the saw.<br />
3. Angle the saw body to the <strong>de</strong>sired <strong>de</strong>gree<br />
setting, as marked on the bevel scale (9).<br />
The bevel scale should only be used<br />
as a reference. If an accurate angle is<br />
required, perform several test cuts until the<br />
<strong>de</strong>sired bevel is achieved.<br />
4. Re-tighten the bevel adjustment lever.<br />
POWER SWITCH<br />
Ensure that both hands are firmly on the hand<br />
grips of the tool before switching on.<br />
• Pull the trigger switch (3) “ON”.<br />
There will be some initial resistance<br />
when pulling the trigger on - this is<br />
a safety mechanism, to prevent acci<strong>de</strong>ntal<br />
starting of the saw.<br />
• Releasing the trigger will switch the<br />
tool “OFF”.<br />
Do not engage the bla<strong>de</strong> with your workpiece<br />
until it is spinning at full speed - likewise avoid<br />
switching off the tool until the cut is complete.<br />
Functions<br />
9<br />
GB