
You also want an ePaper? Increase the reach of your titles
YUMPU automatically turns print PDFs into web optimized ePapers that Google loves.
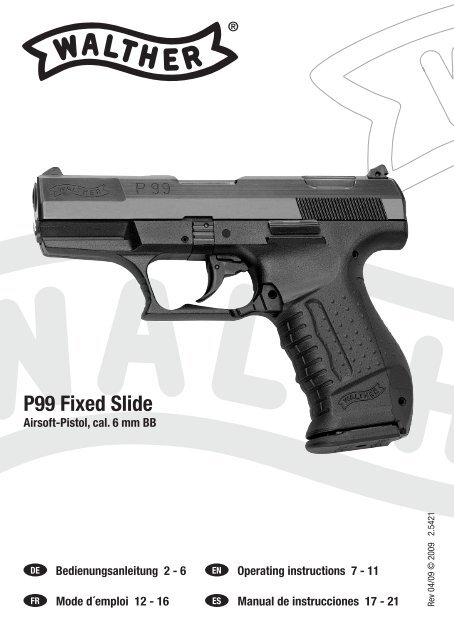
<strong>P99</strong> Fixed Slide<br />
Airsoft-Pistol, cal. 6 mm BB<br />
Bedienungsanleitung 2 - 6 Operating instructions 7 - 11<br />
Mode d´emploi 12 - 16 Manual de instrucciones 17 - 21<br />
21_<strong>P99</strong>_man_20.04.09_print_EK.indd 1 20.04.2009 10:04:00 Uh<br />
Rev 04/09 © 2009 2.5421
<strong>P99</strong><strong>FS</strong>_Anl.qxd 09.09.2005 10:13 Seite 2<br />
Diese Waffe ist frei erwerbbar ab 18 Jahren oder älter. Zu Ihrer eigenen und zur Sicherheit<br />
anderer lesen Sie bitte die Bedienungsanleitung vollständig durch, bevor Sie mit der Waffe<br />
den ersten Schiessversuch unternehmen.<br />
Käufer und Verkäufer haben die Pflicht, alle Regeln über den Gebrauch und den Besitz<br />
von Soft-Air-Waffen zu befolgen.<br />
Waffen unterscheiden sich in ihrer Handhabung. Sie sollten niemals mit einer Waffe schießen,<br />
bevor sie sich mit ihr vertraut gemacht haben. Lesen Sie die folgende Gebrauchsanleitung<br />
und üben Sie die Handhabung OHNE DIE WAFFE GELADEN ZU HABEN (Trockenübung<br />
auf ein sicheres Ziel), damit Sie in der Lage sind, die Waffe richtig und sicher zu<br />
bedienen.<br />
Achtung: Blowback-Gas ist brennbar. Bei der Handhabung nicht Rauchen. Gas nur<br />
in gut belüfteten Räumen nachfüllen. Nicht in offene Flammen schießen!<br />
Punkte zum sicheren Schießen:<br />
1. Lernen Sie die Einzelteile ihrer neuen Soft-Air-Pistole kennen<br />
2. Handhabung der Sicherung<br />
3. Laden der Soft-Air-Pistole<br />
4. Sicher zielen und schießen<br />
5. Shoot-Up<br />
6. Pflege und Wartung<br />
7. Verwenden der Laufverlängerung<br />
8. Sicherer Umgang mit Waffen<br />
9. Technische Daten<br />
Niemals eine gespannte oder geladene Waffe liegenlassen!<br />
Aufbewahrung und Lagerung Ihrer Waffe sollte nur in ungespanntem und ungeladenem<br />
Zustand erfolgen. Sicherung auf “gesichert” stellen und sorgfältig darauf achten, daß sich<br />
kein Geschoss im Lauf befindet. Waffe von Kindern und ungeübten Benutzern fernhalten.<br />
Waffe von den Geschossen getrennt aufbewahren, um sie von ungeübten Benutzern und<br />
unbefugten Personen fernzuhalten.<br />
1. Lernen Sie die Einzelteile Ihrer neuen Soft-Air-Pistole kennen<br />
Das Einprägen der Bezeichnungen der Einzelteile Ihrer neuen Pistole wird Ihnen helfen, die<br />
Gebrauchsanleitung zu verstehen. Lesen Sie diese Anleitung sorgfältig durch, um Freude<br />
an Ihrer neuen Waffe zu haben.<br />
1<br />
2<br />
3<br />
4<br />
5<br />
D<br />
Mündung<br />
Korn<br />
Schlitten<br />
Griffschale<br />
Magazinhalter<br />
6<br />
7<br />
8<br />
9<br />
10<br />
Abzug<br />
Sicherung<br />
Zerlegestift<br />
Montageschiene<br />
Ladeöffnung<br />
-2-<br />
11<br />
12<br />
13<br />
Magazinzuführer i<br />
Ventil<br />
Gaseinfüllöffnung f<br />
21_<strong>P99</strong>_man_20.04.09_print_EK.indd 2 20.04.2009 10:04:01 Uh<br />
<strong>P99</strong><strong>FS</strong><br />
1<br />
9<br />
2.<br />
<br />
<br />
<br />
<br />
<br />
<br />
<br />
Hin<br />
Vo<br />
<br />
<br />
3.<br />
3.1<br />
<br />
<br />
3.2<br />
<br />
<br />
<br />
<br />
<br />
<br />
Ac<br />
3.3
it<br />
fe<br />
ie-<br />
n-<br />
ch<br />
n.<br />
d<br />
ie<br />
<strong>P99</strong><strong>FS</strong>_Anl.qxd 09.09.2005 10:13 Seite 3<br />
1<br />
9<br />
8<br />
2<br />
7<br />
3<br />
6<br />
2. Handhabung der Sicherung<br />
<br />
<br />
<br />
<br />
<br />
<br />
<br />
5<br />
Hinweis: <br />
Vorsicht: <br />
<br />
<br />
3. Laden der Soft-Air-Pistole<br />
3.1 Magazin entnehmen:<br />
<br />
<br />
3.2 Gas einfüllen:<br />
<br />
<br />
<br />
<br />
<br />
<br />
Achtung! Brennbares Gas. Nicht rauchen!<br />
3.3 Magazin laden<br />
<br />
<br />
8<br />
4<br />
10<br />
11<br />
<br />
1<br />
12<br />
13<br />
-3- D<br />
21_<strong>P99</strong>_man_20.04.09_print_EK.indd 3 20.04.2009 10:04:02 Uh<br />
2
<strong>P99</strong><strong>FS</strong>_Anl.qxd 09.09.2005 10:14 Seite 4<br />
3.4 Magazin einsetzen<br />
Schieben Sie das Magazin in die Waffe, bis der Magazinhalter einrastet.<br />
4. Sicher zielen und schießen<br />
Achtung! Sorgen Sie dafür, dass der Lauf der Waffe stets in eine sichere Richtung gehalten<br />
wird. Niemals auf Menschen oder Tiere zielen. Behandeln Sie die Waffe immer so, als<br />
wäre Sie geladen und schussbereit.<br />
Zielen: Visieren Sie ein sicheres Ziel an: Halten Sie die Waffe so, dass<br />
die Kimme (hinterer Visierteil) und Korn (Vorderer Visierteil) gleichzeitig<br />
im Blick haben. Das Korn muß genau in der Mitte des Ausschnitts<br />
in der Kimme sitzen. Jetzt heben Sie die Waffe soweit, dass der<br />
Mittelpunkt der Zielscheibe mit seinem unteren Rand auf dem Korn<br />
aufsitzt. Oberkante Kimme - Oberkante Korn - Unterkante Zielpunkt<br />
müssen dabei in einer Linie liegen. Falsch: Richtig:<br />
Wenn die Kimme verstellt sein sollte, können Sie sie wie folgt wieder<br />
einstellen:<br />
bei Rechtsschuss – Einstellschraube im Uhrzeigersinnn drehen<br />
bei Linksschuss – Einstellschraube gegen den Uhrzeigersinnn drehen<br />
Schießen:<br />
1. Sicherung kontrollieren (entsichert)<br />
2. Abzug betätigen<br />
3. Die Kugel wird abgefeuert.<br />
5. Shoot-Up<br />
Die Waffe ist mit einem speziellen<br />
Shoot-Up-System ausgestattet. Durch das System wird das<br />
Geschoss beim Schuss in eine Drehung versetzt, die es mit<br />
höherer Stabilität antreibt. Dadurch wird die Reichweite um<br />
bis zu 50% erhöht und ein genaueres Schießen ermöglicht.<br />
Shoot-Up Einstellung<br />
Um den Shoot-Up einzustellen, drehen Sie zunächst die<br />
Schraube(1) ca. 1/2 Drehung nach rechts. Anschließend stellen<br />
Sie die Einstellung nach oben und unten ein.<br />
D<br />
Shoot-Up<br />
nach unten<br />
einstellen<br />
-4-<br />
Shoot-Up<br />
nach oben<br />
einstellen<br />
zu hoch - Schraube nach links<br />
zu tief - Schraube<br />
nach rechts<br />
21_<strong>P99</strong>_man_20.04.09_print_EK.indd 4 20.04.2009 10:04:02 Uh<br />
<strong>P99</strong><strong>FS</strong><br />
6.<br />
Bei<br />
Ihre<br />
Ac<br />
Ma<br />
Die<br />
zu<br />
6.1<br />
Sch<br />
noc<br />
7.<br />
Sch<br />
an<br />
8.<br />
Sie<br />
die<br />
als<br />
<br />
<br />
F<br />
l<br />
<br />
<br />
<br />
s<br />
n<br />
(
lls<br />
<strong>P99</strong><strong>FS</strong>_Anl.qxd 09.09.2005 10:14 Seite 5<br />
6. Pflege und Wartung<br />
Bei entsprechender Pflege und sorgfältiger Behandlung werden Sie viele Jahre Freude an<br />
Ihrer Waffe haben.<br />
Achtung: Versuchen Sie nicht, die Waffe zu reinigen, ohne sie vorher zu sichern, das<br />
Magazin zu entnehmen, und zu prüfen, dass sich kein Geschoss mehr im Lauf befindet.<br />
Die äußeren Metallteile müssen gelegentlich gereinigt werden. Dabei ist ein weiches Tuch<br />
zu verwenden, das zuvor leicht mit Waffenöl benetzt wurde.<br />
6.1 Entladen<br />
Entnehmen Sie das Magazin. Nehmen Sie die Kugeln<br />
aus dem Magazin, bis der Magazinzuführer an der<br />
Ladeöffnung sichtbar ist.<br />
Schieben Sie den Reinigungsstopfen durch den Lauf. Eine sich<br />
noch im Lauf befindliche Kugel würde jetzt aus dem Magazinschacht herausfallen.<br />
7. Verwenden der Laufverlängerung<br />
Schrauben Sie die Laufverlängerung wie abgebildet<br />
an die Waffe.<br />
Zum Entleeren des Gastanks drücken Sie mit einem Stift<br />
gegen den Ventilstößel bis das Gas komplett entwichen ist.<br />
8. Sicherer Umgang mit Waffen<br />
Sie sollten mit der richtigen, sichern Handhabung Ihrer Waffe vertraut sein. Im Hinblick auf<br />
die Grundregeln zum sicheren Schießen bedenken Sie, daß jede Berührung mit der Waffe<br />
als Handhabung verstanden wird.<br />
<br />
<br />
Finger immer außerhalb des Abzugbügels halten und nur zum Schuss an den Abzug<br />
legen.<br />
<br />
<br />
<br />
ständen und im befriedeten Besitztum erlaubt, wenn das Geschoß dieses beim Schuss<br />
nicht verlassen kann. Hierbei die maximale Reichweite des Geschosses beachten.<br />
(100m)<br />
-5- D<br />
21_<strong>P99</strong>_man_20.04.09_print_EK.indd 5 20.04.2009 10:04:03 Uh
<strong>P99</strong><strong>FS</strong>_Anl.qxd 09.09.2005 10:14 Seite 6<br />
<br />
<br />
<br />
<br />
<br />
<br />
<br />
<br />
<br />
<br />
<br />
<br />
<br />
<br />
<br />
<br />
<br />
<br />
<br />
9. Technische Daten<br />
<br />
<br />
<br />
<br />
<br />
D<br />
-6-<br />
21_<strong>P99</strong>_man_20.04.09_print_EK.indd 6 20.04.2009 10:04:03 Uh<br />
<strong>P99</strong><strong>FS</strong><br />
Thi<br />
the<br />
gu<br />
Bu<br />
han<br />
We<br />
we<br />
ling<br />
abl<br />
Ca<br />
ling<br />
flam<br />
Ru<br />
1.<br />
2.<br />
3.<br />
4.<br />
5.<br />
6.<br />
7.<br />
8.<br />
9.<br />
Ne<br />
Yo<br />
"sa<br />
dre<br />
fro<br />
1.<br />
It w<br />
par<br />
sho
<strong>P99</strong><strong>FS</strong>_Anl.qxd 09.09.2005 10:14 Seite 7<br />
This weapon may be freely acquired if 18 years old or above. For your own safety and for<br />
the safety of others, carefully read and understand these instructions before you fire this<br />
gun.<br />
Buyer and seller are obliged to adhere to all rules in respect to the ownership and safe<br />
handling of soft-air weapons.<br />
Weapons may differ in the way they are to be handled. You should never discharge a<br />
weapon you are not familiar with. Read the following instructions and practice the handling<br />
of the gun WITHOUT HAVING IT LOADED (dry-fire at a safe target) so that you are<br />
able to handle the weapon safely and properly.<br />
Caution: The gas used for blow-back weapons is inflammable. Do not smoke while handling<br />
the gun. Gas must only be charged in well-ventilated rooms. Do not fire into naked<br />
flames!<br />
Rules for safe firing:<br />
1. Get to know the single parts of your new soft-air pistol<br />
2. Operation of the safety<br />
3. Loading the gun<br />
4. Proper aiming and firing<br />
5. Shoot-up<br />
6. Care and maintenance<br />
7. Use of the barrel extension.<br />
8. Safe weapon handling<br />
9. technical data<br />
Never leave a cocked or loaded weapon unattended!<br />
You should store this weapon in unloaded and decocked condition. Put the safety on<br />
"safe" and make carefully sure that the barrel is clear. Keep the weapon away from children<br />
and persons not skilled in the use of arms. Keep weapon and projectiles separate<br />
from each other so that unauthorized persons have no access to it.<br />
1. Get to know the single parts of your new soft-air pistol<br />
It will help you to understand these instructions if you get to know the designation of the<br />
parts of your gun. Carefully read and understand these instructions in order to enjoy<br />
shooting this gun.<br />
-7- GB<br />
21_<strong>P99</strong>_man_20.04.09_print_EK.indd 7 20.04.2009 10:04:04 Uh
<strong>P99</strong><strong>FS</strong>_Anl.qxd 09.09.2005 10:14 Seite 8<br />
1<br />
2<br />
3<br />
4<br />
5<br />
1<br />
9<br />
GB<br />
8<br />
2<br />
7<br />
3<br />
6<br />
<br />
<br />
<br />
<br />
<br />
2. Operation of the safety<br />
<br />
<br />
<br />
<br />
<br />
<br />
<br />
Note: <br />
5<br />
Caution: <br />
<br />
3. Loading the gun<br />
6<br />
7<br />
8<br />
9<br />
10<br />
3.1 Removing the magazine:<br />
<br />
3.2 Charging gas:<br />
<br />
Caution! Gas is inflammable! Do not smoke!<br />
-8-<br />
8<br />
<br />
<br />
<br />
<br />
<br />
4<br />
10<br />
11<br />
<br />
11<br />
12<br />
13<br />
1<br />
12<br />
13<br />
i<br />
<br />
a<br />
21_<strong>P99</strong>_man_20.04.09_print_EK.indd 8 20.04.2009 10:04:05 Uh<br />
2<br />
<strong>P99</strong><strong>FS</strong><br />
Kee<br />
the<br />
ver<br />
gin<br />
the<br />
3.3<br />
Pul<br />
as<br />
3.4<br />
Pus<br />
hol<br />
4.<br />
Ca<br />
Ne<br />
to<br />
Aim<br />
sig<br />
tre<br />
edg<br />
sig<br />
get<br />
wro<br />
In c<br />
poi<br />
poi<br />
Fir<br />
1.<br />
2.<br />
3.<br />
5.<br />
A s<br />
the<br />
fire<br />
the<br />
te.
2<br />
<strong>P99</strong><strong>FS</strong>_Anl.qxd 09.09.2005 10:14 Seite 9<br />
Keep the magazine in the illustrated position, with<br />
the gas charging hole at the top. Keep the gas flask<br />
vertical and press the charging tube into the gas charging<br />
hole. As soon as the tank in the magazine is full<br />
there will be a discharge of gas.<br />
3.3 Loading the magazine<br />
Pull the follower down and load it with up to 20 BBs<br />
as illustrated.<br />
3.4 Inserting the magazine<br />
Push the magazine into the weapon until the magazine<br />
holder locks.<br />
4. Proper aiming and firing<br />
Caution! Make sure that the muzzle of the weapon always points into a safe direction.<br />
Never aim at animals or persons. Always treat your weapon as if it was loaded and ready<br />
to fire.<br />
Aim at a safe target. Hold the weapon in a way that you see rear<br />
sight and foresight in one line. The foresight must be right in the centre<br />
of the rear sight notch. Now you lift the weapon until the lower<br />
edge of the bull's eye of the target is on the upper edge of the foresight.<br />
Upper edge rear sight - upper edge foresight - lower edge target<br />
must all be in one line.<br />
wrong: right:<br />
In case the rear sight is out of adjustment, adjust it as follows:<br />
point of impact too far right - turn adjustment screw clockwise<br />
point of impact too far left - turn adjustment screw anti-clockwise<br />
Firing:<br />
1. check safety (must be on "fire")<br />
2. pull trigger<br />
3. The projectile will be fired.<br />
5. Shoot-Up<br />
A special system called the "shoot-up" has been fitted to<br />
the weapon. This system causes the projectile to rotate when<br />
fired, thus providing a higher rate of energy. This will increase<br />
the range by up to 50% and will make shooting more accurate.<br />
too far up - turn screw left<br />
too low - turn screw<br />
right<br />
-9- GB<br />
21_<strong>P99</strong>_man_20.04.09_print_EK.indd 9 20.04.2009 10:04:06 Uh
<strong>P99</strong><strong>FS</strong>_Anl.qxd 09.09.2005 10:15 Seite 10<br />
Shoot-Up Adjsutment<br />
To adjust the shoot-up, turn the screw to the right by<br />
approx. half a turn. Then make the other adjustments up or<br />
down (right and left).<br />
6. Care and maintenance<br />
Good care and maintenance of the weapon will provide you with many yours of pleasant<br />
shooting with the weapon.<br />
Caution: Never attempt to clean the weapon without having put the safety to "safe"<br />
first, remove the magazine and check the barrel, it must be clear.<br />
The metal parts on the outside have to be cleaned from time to time. Use a soft cloth<br />
slightly dampened with weapon oil.<br />
6.1 Unloading<br />
Remove the magazine. remove the BBs from the<br />
magazine until the follower is visible at the loading<br />
port.<br />
Push the cleaning rod through the barrel. This would cause a<br />
BB left in the barrel to fall out through the magazine well.<br />
7. Use of the barrel extension.<br />
Attach the barrel extension as illustrated<br />
GB<br />
Shoot-Up<br />
adjustment<br />
down<br />
To discharge the gas tank, use a pin to press the valve stud<br />
until all gas is discharged.<br />
8. Safe weapon handling<br />
You should be fully familiar with the proper and safe handling of your weapon. Bear in<br />
mind that your new weapon features a high muzzle velocity, this requires extra care.<br />
In respect to the basic rules of safe weapon handling it is to be understood that every<br />
touching of the weapon is to be interpreted as weapon handling.<br />
-10-<br />
Shoot-Up<br />
adjustment up<br />
21_<strong>P99</strong>_man_20.04.09_print_EK.indd 10 20.04.2009 10:04:06 Uh<br />
<strong>P99</strong><strong>FS</strong><br />
<br />
<br />
<br />
<br />
<br />
<br />
<br />
<br />
<br />
<br />
<br />
<br />
<br />
<br />
<br />
<br />
<br />
<br />
<br />
<br />
<br />
<br />
<br />
<br />
<br />
<br />
<br />
<br />
<br />
<br />
<br />
<br />
9.
t<br />
<strong>P99</strong><strong>FS</strong>_Anl.qxd 09.09.2005 10:15 Seite 11<br />
<br />
<br />
<br />
<br />
<br />
<br />
<br />
<br />
<br />
<br />
<br />
<br />
<br />
<br />
<br />
<br />
<br />
<br />
<br />
<br />
<br />
<br />
<br />
<br />
<br />
<br />
<br />
<br />
<br />
<br />
<br />
<br />
9. Technical data<br />
<br />
<br />
<br />
<br />
<br />
-11- GB<br />
21_<strong>P99</strong>_man_20.04.09_print_EK.indd 11 20.04.2009 10:04:07 Uh
<strong>P99</strong><strong>FS</strong>_Anl.qxd 09.09.2005 10:15 Seite 12<br />
Cette boîte contient: une réplique d'arme factice avec chargeur. Les AIR SOFT GUNS sont<br />
des modèles d'armes factices tirant des billes en plastique de 6 mm inoffensives. Ce<br />
modele a une énergie comprise entre 0.08 joule et inférieure ou égale a 2 joules.<br />
<br />
<br />
<br />
<br />
<br />
<br />
<br />
En vente libre aux personnes âgées de plus de 18 ans. Pour votre sécurité et celle d'autrui,<br />
lisez attentivement la notice d'emploi avant d'utiliser l'arme pour la première fois.<br />
Les vendeurs, tout comme les acheteurs, ont l'obligation de respecter le règlement relatif<br />
à l'utilisation et à la possession d'armes Soft-Air.<br />
Le maniement diffère d'une arme à l'autre. Pour cette raison, ne tirez jamais avec une<br />
arme que vous ne connaissez pas bien. Consultez la notice d'emploi suivante et<br />
entraînez-vous à manier l'arme SANS LA CHARGER (en visant une cible ne comportant<br />
aucun danger pour l'entourage) jusqu'à ce que vous soyez capable d'utiliser l'arme<br />
correctement et sans danger.<br />
Le gaz utilisé pour le déplacement de la glissière (blowback) est inflammable.<br />
Evitez de fumer lorsque vous maniez l'arme. Rechargez toujours le gaz dans un endroit<br />
bien ventilé. Ne tirez jamais sur des flammes ou du feu.<br />
<br />
1. Apprenez à connaître les différentes pièces de votre nouveau pistolet Soft-Air<br />
2. Maniement de la sûreté<br />
3. Chargement du pistolet Soft-Air<br />
4. Viser et tirer sur des cibles ne comportant aucun danger pour l'entourage<br />
5. Shoot-Up<br />
6. Soins et entretien<br />
7. Utilisation de la rallonge du canon<br />
8. Maniement des armes en toute sécurité<br />
9. Fiche technique<br />
Rangez et conservez l'arme toujours<br />
déchargée et non armée. Mettez la sûreté et vérifiez bien qu'il ne reste aucun projectile<br />
dans le canon. Tenez l'arme hors de portée des enfants ou des personnes non formées à<br />
son maniement. Rangez l'arme et les projectiles séparément. Vous empêcherez ainsi que<br />
des personnes non formées à son maniement ou non autorisées puissent l'utiliser.<br />
<br />
Le fait de mémoriser le nom des différents éléments de votre nouveau<br />
pistolet vous permettra de mieux comprendre les instructions d'utilisation. Lisez attentivement<br />
ces instructions afin de pouvoir profiter pleinement de votre nouvelle arme.<br />
F<br />
-12-<br />
21_<strong>P99</strong>_man_20.04.09_print_EK.indd 12 20.04.2009 10:04:08 Uh<br />
<strong>P99</strong><strong>FS</strong><br />
1<br />
2<br />
3<br />
4<br />
5<br />
2.<br />
<br />
1<br />
<br />
Re<br />
Att<br />
<br />
3.<br />
9<br />
3.1<br />
<br />
<br />
3.2
nt<br />
<br />
<br />
<br />
ui,<br />
if<br />
.<br />
<br />
-<br />
<strong>P99</strong><strong>FS</strong>_Anl.qxd 09.09.2005 10:15 Seite 13<br />
1<br />
2<br />
3<br />
4<br />
5<br />
1<br />
9<br />
8<br />
2<br />
7<br />
3<br />
6<br />
<br />
<br />
<br />
<br />
<br />
5<br />
6<br />
7<br />
8<br />
9<br />
10<br />
2. Maniement de la sûreté<br />
<br />
<br />
<br />
<br />
<br />
<br />
<br />
<br />
Remarque <br />
Attention <br />
<br />
3. Chargement du pistolet Soft-Air<br />
3.1 Extraction du chargeur:<br />
<br />
<br />
3.2 Introduction du gaz:<br />
<br />
Attention: Le gaz est inflammable. Il est interdit de fumer.<br />
8<br />
4<br />
<br />
<br />
<br />
<br />
<br />
10<br />
11<br />
<br />
11<br />
12<br />
13<br />
1<br />
12<br />
13<br />
<br />
<br />
<br />
<br />
-13- F<br />
21_<strong>P99</strong>_man_20.04.09_print_EK.indd 13 20.04.2009 10:04:08 Uh<br />
2
<strong>P99</strong><strong>FS</strong>_Anl.qxd 09.09.2005 10:15 Seite 14<br />
Tenez le chargeur tel qu'indiqué sur l'illustration de<br />
façon à ce que l'ouverture destinée au chargement du<br />
gaz soit orientée vers le haut. Tenez la bonbonne de<br />
recharge en position droite et appuyez avec l'aiguille<br />
de celle-ci au niveau de l'ouverture du chargeur.<br />
Lorsque vous remarquez que du gaz s'échappe au<br />
niveau de l'ouverture, cela signifie que le réservoir du<br />
chargeur est plein.<br />
3.3 Mise en place du chargeur<br />
Tirez le ressort du chargeur vers le bas et introduisez au<br />
maximum 20 projectiles dans celui-ci, comme indiqué<br />
sur l'illustration.<br />
3.4 Insertion du chargeur<br />
Poussez le chargeur dans le pistolet jusqu'à ce qu'il<br />
s'emboîte.<br />
4. Viser et tirer<br />
Attention Faites en sorte de toujours pointer le canon du pistolet dans une direction ne<br />
présentant pas de danger. Ne viser jamais des personnes ou des animaux. Maniez toujours<br />
le pistolet comme s'il était chargé et prêt à tirer.<br />
Visez une cible ne présentant aucun danger pour autrui : Tenez l'arme<br />
de sorte que le guidon (partie avant du viseur) soit dans l'alignement<br />
de l'œilleton (partie arrière du viseur). Le guidon doit se trouver exactement<br />
au centre de l'œilleton. Ensuite, levez l'arme jusqu'à ce que la<br />
marge inférieure du point central de la cible coïncide avec le guidon.<br />
L'extrémité supérieure de l'œilleton, l'extrémité supérieur du guidon et l'extrémité inférieure<br />
de la cible devront être alignées.<br />
Incorrect: Correct:<br />
Si vous souhaitez régler l'œilleton, faites-le de la façon suivante:<br />
pour que les tirs dévient vers la droite:<br />
tournez la vis d'ajustement latéral vers la droite<br />
pour que les tirs dévient vers la gauche:<br />
tournez la vis d'ajustement latéral vers la gauche<br />
Pour tirer:<br />
1. Vérifiez la sûreté (elle doit être enlevée)<br />
2. Appuyez sur la détente<br />
3. La bille est tirée.<br />
5. Shoot-Up<br />
Ce pistolet comporte un système spécial Shoot-Up incorporé.<br />
Ce système donne au projectile un mouvement rotatif au<br />
moment du tir, lui procurant ainsi une meilleure stabilité. Il<br />
permet d'augmenter la portée de tir de 50 % et d'obtenir des<br />
tirs plus précis.<br />
F<br />
-14-<br />
trop haut: tournez la vis de réglage<br />
vers la gauche<br />
trop bas: tournez la vis<br />
de réglage vers la droite<br />
21_<strong>P99</strong>_man_20.04.09_print_EK.indd 14 20.04.2009 10:04:09 Uh<br />
<strong>P99</strong><strong>FS</strong><br />
Sy<br />
Pou<br />
de<br />
aju<br />
Sh<br />
6.<br />
Si v<br />
ses<br />
At<br />
cha<br />
tem<br />
me<br />
6.1<br />
Int<br />
bill<br />
7.<br />
Vis<br />
ind<br />
8.<br />
Vo<br />
Da<br />
ave
s<br />
ge<br />
he<br />
<strong>P99</strong><strong>FS</strong>_Anl.qxd 09.09.2005 10:16 Seite 15<br />
Système de réglage du Shoot-Up<br />
Pour régler le système Shoot-Up, tournez tout d'abord la vis<br />
de réglage (1) d'environ un demi-tour vers la droite. Puis,<br />
ajustez le système vers le haut ou vers le bas.<br />
Régler le<br />
Shoot-Up vers<br />
le bas<br />
6. Soins et entretien<br />
Si vous entretenez et traitez soigneusement l'arme, vous pourrez en profiter de nombreuses<br />
années.<br />
Attention Ne nettoyez jamais l'arme sans avoir préalablement mis la sûreté, enlevé le<br />
chargeur et vérifié qu'il ne reste aucun projectile dans le canon. Nettoyez de temps en<br />
temps les parties métalliques externes de l'arme. Pour cela, utilisez un chiffon doux légèrement<br />
imbibé d'une huile spéciale pour armes.<br />
6.1 Déchargement<br />
Retirez le chargeur. Retirez les billes du chargeur jusqu'à<br />
ce que le ressort de celui-ci soit visible par l'ouverture<br />
du chargeur.<br />
Introduisez la tige de nettoyage à l'intérieur du canon. Ainsi, les<br />
billes qui pourraient rester dans le canon tomberont par le compartiment du chargeur.<br />
7. Utilisation de la rallonge du canon<br />
Vissez la rallonge du canon sur le pistolet comme<br />
indiqué sur l'illustration.<br />
Régler le<br />
Shoot-Up vers<br />
le haut<br />
Pour vider le réservoir de gaz, appuyez avec une tige sur la<br />
bielle de la valve jusqu'à ce que tout le gaz s'échappe.<br />
8. Maniement des armes en toute sécurité<br />
Vous devrez vous familiariser avec le maniement correct et sans danger de votre arme.<br />
Dans le cadre des règles de sécurité fondamentales de tir, considérez que chaque contact<br />
avec l'arme fait partie de son maniement<br />
<br />
-15- F<br />
21_<strong>P99</strong>_man_20.04.09_print_EK.indd 15 20.04.2009 10:04:10 Uh
<strong>P99</strong><strong>FS</strong>_Anl.qxd 09.09.2005 10:16 Seite 16<br />
<br />
<br />
<br />
<br />
<br />
<br />
<br />
<br />
<br />
<br />
<br />
<br />
<br />
<br />
<br />
<br />
<br />
<br />
<br />
<br />
<br />
<br />
<br />
<br />
<br />
<br />
<br />
<br />
<br />
<br />
9. Fiche technique<br />
<br />
<br />
<br />
<br />
<br />
F<br />
-16-<br />
21_<strong>P99</strong>_man_20.04.09_print_EK.indd 16 20.04.2009 10:04:10 Uh<br />
<strong>P99</strong><strong>FS</strong><br />
De<br />
det<br />
Tan<br />
rela<br />
El m<br />
qu<br />
ces<br />
enc<br />
At<br />
ble<br />
po<br />
Pu<br />
1.<br />
2.<br />
3.<br />
4.<br />
5.<br />
6.<br />
7.<br />
8.<br />
9.<br />
No<br />
Co<br />
pru<br />
fue<br />
arm<br />
fam<br />
1.<br />
co<br />
Si m<br />
com<br />
cio
<strong>P99</strong><strong>FS</strong>_Anl.qxd 09.09.2005 10:16 Seite 17<br />
De venta libre a mayores de 18 años. Para su propia seguridad y para la de los demás, lea<br />
detenidamente las instrucciones de uso antes de disparar el arma por primera vez.<br />
Tanto los vendedores como los compradores tienen la obligación de respetar las normas<br />
relativas al uso y posesión de armas Soft-Air.<br />
El manejo de cada arma es distinto. Por este motivo, no dispare nunca con un arma hasta<br />
que no esté familiarizado con ella. Consulte las siguientes instrucciones de uso y familiarícese<br />
con su manejo SIN CARGAR EL ARMA (apuntando a un blanco seguro) hasta que se<br />
encuentre en disposición de utilizar el arma de una forma correcta y segura.<br />
Atención El gas utilizado para el desplazamiento de la corredera (blowback) es inflamable.<br />
Evite fumar cuando maneje el arma. Recargue el gas únicamente en espacios que dispongan<br />
de una ventilación adecuada. No dispare nunca a llamas o fuego.<br />
Puntos a seguir para disparar con seguridad:<br />
1. Conozca los distintos componentes de su nueva pistola Soft-Air<br />
2. Manejo del seguro<br />
3. Carga de la pistola Soft-Air<br />
4. Apuntar y disparar a blancos seguros<br />
5. Shoot-Up<br />
6. Cuidados y mantenimiento<br />
7. Utilización del prolongador del cañón<br />
8. Manejo seguro de armas<br />
9. Especificaciones<br />
No deje nunca un arma cargada o amartillada.<br />
Conserve y guarde el arma siempre descargada y sin amartillar. Active el seguro y compruebe<br />
cuidadosamente que no quede ningún proyectil en el cañón. Mantenga el arma<br />
fuera del alcance de los niños o de usuarios no familiarizados con su manejo. Guarde el<br />
arma separada de los proyectiles. De este modo impedirá que la utilicen personas no<br />
familiarizadas o no autorizadas.<br />
1. Conozca los distintos componentes de su nueva pistola de aire<br />
comprimido<br />
Si memoriza el nombre de los distintos componentes de su nueva pistola, le ayudará a<br />
comprender con más facilidad las instrucciones de uso. Lea detenidamente estas instrucciones<br />
para poder disfrutar de su nueva arma.<br />
-17- E<br />
21_<strong>P99</strong>_man_20.04.09_print_EK.indd 17 20.04.2009 10:04:11 Uh
<strong>P99</strong><strong>FS</strong>_Anl.qxd 09.09.2005 10:16 Seite 18<br />
1<br />
2<br />
3<br />
4<br />
5<br />
1<br />
E<br />
9<br />
8<br />
2<br />
7<br />
3<br />
6<br />
<br />
<br />
<br />
<br />
<br />
5<br />
6<br />
7<br />
8<br />
9<br />
10<br />
2. Manejo del seguro<br />
<br />
<br />
<br />
<br />
<br />
1<br />
<br />
<br />
<br />
<br />
Nota: Cuando se acciona el seguro, el gatillo queda bloqueado.<br />
Atención: <br />
<br />
3. Carga de la pistola Soft-Air<br />
3.1 Extracción del cargador:<br />
<br />
<br />
3.2 Introducción del gas:<br />
<br />
<br />
Atención El gas es inflamable. Prohibido fumar.<br />
-18-<br />
8<br />
4<br />
<br />
<br />
<br />
<br />
<br />
10<br />
11<br />
<br />
11<br />
12<br />
13<br />
12<br />
13<br />
<br />
e<br />
a<br />
<br />
r<br />
s<br />
21_<strong>P99</strong>_man_20.04.09_print_EK.indd 18 20.04.2009 10:04:12 Uh<br />
2<br />
<strong>P99</strong><strong>FS</strong><br />
Sos<br />
con<br />
arr<br />
sio<br />
gad<br />
abe<br />
llen<br />
3.3<br />
Tire<br />
un<br />
ind<br />
3.4<br />
Em<br />
enc<br />
4.<br />
Ate<br />
apu<br />
est<br />
Ap<br />
alin<br />
(pa<br />
me<br />
arm<br />
mir<br />
ext<br />
Inc<br />
Si d<br />
par<br />
par<br />
Par<br />
1.<br />
2.<br />
3.<br />
5.<br />
Est<br />
rad<br />
tivo<br />
aum<br />
pre
2<br />
<strong>P99</strong><strong>FS</strong>_Anl.qxd 09.09.2005 10:17 Seite 19<br />
Sostenga el cargador como se indica en la ilustración<br />
con la abertura para la carga del gas mirando hacia<br />
arriba. Sostenga recta la bombona de repuesto y presione<br />
la aguja de la bombona en la abertura del cargador.<br />
Cuando detecte que se escapa gas junto a la<br />
abertura, significa que el depósito del cargador está<br />
lleno.<br />
3.3 Colocación del cargador<br />
Tire hacia abajo del resorte del cargador e introduzca<br />
un máximo de 20 proyectiles en el cargador como se<br />
indica en la ilustración.<br />
3.4 Inserción del cargador<br />
Empuje el cargador en la pistola hasta que quede<br />
encajado.<br />
4. Apuntar y disparar a blancos seguros<br />
Atención Procure mantener siempre el cañón de la pistola en una dirección segura. No<br />
apunte nunca a personas o animales. Trate la pistola siempre como si<br />
estuviera cargada y lista para disparar.<br />
Apunte a un blanco seguro: Sujete el arma de tal manera que tenga<br />
alineados la mira trasera (parte trasera del alza) y el punto de mira<br />
(parte delantera) a la vez. El punto de mira debe encontrarse exactamente<br />
en el centro del hueco de la mira. A continuación, levante el<br />
arma hasta que el margen inferior del punto central del blanco coincida con el punto de<br />
mira. El extremo superior de la mira trasera, el extremo superior del punto de mira y el<br />
extremo inferior del blanco deberán estar dispuestos en una línea recta.<br />
Incorrecto: Correcto:<br />
Si desea ajustar la mira trasera, hágalo como se indica a continuación:<br />
para que los disparos tiendan hacia la derecha:<br />
gire el tornillo de ajuste hacia la derecha<br />
para que los disparos tiendan hacia la izquierda:<br />
gire el tornillo de ajuste hacia la izquierda<br />
Para disparar:<br />
1. Compruebe el seguro (deberá estar desactivado)<br />
2. Accione el gatillo<br />
3. La bola sale disparada.<br />
5. Shoot-Up<br />
Esta pistola cuenta con un sistema especial Shoot-Up incorporado.<br />
Este sistema le imprime al proyectil un movimiento rotativo<br />
al disparar que le aporta mayor estabilidad. Esto permite<br />
aumentar el alcance hasta en un 50% y obtener disparos más<br />
precisos.<br />
demasiado alto: gire el tornillo<br />
hacia la izquierda<br />
demasiado bajo: gire<br />
el tornillo hacia la<br />
derecha<br />
-19- E<br />
21_<strong>P99</strong>_man_20.04.09_print_EK.indd 19 20.04.2009 10:04:12 Uh
<strong>P99</strong><strong>FS</strong>_Anl.qxd 09.09.2005 10:17 Seite 20<br />
Ajuste de Shoot-Up<br />
Para ajustar el sistema Shoot-Up, primero gire el tornillo (1)<br />
aproximadamente media vuelta hacia la derecha. A continuación,<br />
ajuste el sistema hacia arriba o hacia abajo.<br />
6. Cuidados y mantenimiento<br />
Si lleva a cabo el mantenimiento correspondiente y trata el arma con cuidado, podrá disfrutar<br />
de ella durante muchos años.<br />
Atención: No intente limpiar el arma sin activar el seguro primero, extraer el cargador y<br />
comprobar que no queda ningún proyectil en el cañón. Limpie ocasionalmente las partes<br />
metálicas exteriores del arma. Para ello, utilice un paño suave ligeramente humedecido<br />
con aceite especial para armas.<br />
6.1 Descarga<br />
Extraiga el cargador. Extraiga las bolas del cargador<br />
hasta que el resorte del mismo pueda verse en la<br />
abertura de carga.<br />
Empuje la varilla de limpieza por el interior del cañón. De este modo caerán las bolas que<br />
todavía podrían encontrarse en el cañón a través del alojamiento del cargador.<br />
7. Utilización del prolongador del cañón<br />
Enrosque el prolongador del cañón en la pistola como<br />
se indica en la ilustración.<br />
E<br />
Ajustar<br />
Shoot-Up<br />
hacia abajo<br />
Para vaciar el depósito del gas, presione con una varilla el vástago<br />
de la válvula hasta que salga todo el gas.<br />
8. Manejo seguro de armas<br />
Deberá estar familiarizado con el manejo correcto y seguro de su arma. Con respecto a las<br />
reglas básicas para disparar con seguridad, considere cada contacto con el arma como<br />
parte de su manejo.<br />
<br />
-20-<br />
Ajustar<br />
Shoot-Up<br />
hacia arriba<br />
21_<strong>P99</strong>_man_20.04.09_print_EK.indd 20 20.04.2009 10:04:13 Uh<br />
<strong>P99</strong><strong>FS</strong><br />
<br />
<br />
<br />
<br />
<br />
<br />
<br />
<br />
<br />
<br />
<br />
<br />
<br />
<br />
<br />
<br />
<br />
<br />
<br />
<br />
<br />
<br />
<br />
<br />
<br />
<br />
<br />
<br />
9.
-<br />
s<br />
e<br />
s-<br />
las<br />
<strong>P99</strong><strong>FS</strong>_Anl.qxd 09.09.2005 10:17 Seite 21<br />
<br />
<br />
<br />
<br />
<br />
<br />
<br />
<br />
<br />
<br />
<br />
<br />
<br />
<br />
<br />
<br />
<br />
<br />
<br />
<br />
<br />
<br />
<br />
<br />
<br />
<br />
<br />
<br />
9. Especificaciones<br />
<br />
<br />
<br />
<br />
<br />
-21- E<br />
21_<strong>P99</strong>_man_20.04.09_print_EK.indd 21 20.04.2009 10:04:14 Uh
<strong>P99</strong><strong>FS</strong>_Anl.qxd 09.09.2005 10:17 Seite 22 <strong>P99</strong><strong>FS</strong><br />
Zubehör / Accessories / Accessoires / Accessorios<br />
Bulls Eye<br />
Kugelfang<br />
mit Trefferanzeige<br />
Art.-Nr.:<br />
2.5015<br />
Shooting<br />
target<br />
Zielscheibe<br />
Art.-Nr.:<br />
2.5030<br />
BlowBack-<br />
Gas<br />
500 ml<br />
Art.-Nr.:<br />
2.5135<br />
BlowBack-<br />
Gas<br />
750 ml<br />
Art.-Nr.:<br />
2.5137<br />
D GB F E<br />
Bulls Eye<br />
Bullet trap<br />
with hit<br />
indicator<br />
Art.-Nr.:<br />
2.5015<br />
Shooting<br />
target<br />
target<br />
Art.-Nr.:<br />
2.5030<br />
BlowBack-<br />
Gas<br />
500 ml<br />
Art.-Nr.:<br />
2.5135<br />
BlowBack-<br />
Gas<br />
750 ml<br />
Art.-Nr.:<br />
2.5137<br />
-22-<br />
Bulls Eye<br />
capture de BB<br />
avec indicateur<br />
de l´atteinte<br />
Art.-Nr.:<br />
2.5015<br />
Shooting<br />
target<br />
cible<br />
Art.-Nr.:<br />
2.5030<br />
BlowBack-<br />
Gas<br />
500 ml<br />
Art.-Nr.:<br />
2.5135<br />
BlowBack-<br />
Gas<br />
750 ml<br />
Art.-Nr.:<br />
2.5137<br />
Bulls Eye<br />
captura de BB<br />
con indicador<br />
de impacto<br />
Art.-Nr.:<br />
2.5015<br />
Shooting<br />
target<br />
diana blanco<br />
Art.-Nr.:<br />
2.5030<br />
BlowBack-<br />
Gas<br />
500 ml<br />
Art.-Nr.:<br />
2.5135<br />
BlowBack-<br />
Gas<br />
750 ml<br />
Art.-Nr.:<br />
2.5137<br />
21_<strong>P99</strong>_man_20.04.09_print_EK.indd 22 20.04.2009 10:04:14 Uh
BB<br />
or<br />
o<br />
<strong>P99</strong><strong>FS</strong>_Anl.qxd 09.09.2005 10:17 Seite 23<br />
Zubehör / Accessories / Accessoires / Accessorios<br />
BB´s<br />
cal. 6 mm BB<br />
0,25 g<br />
2000 Stk.<br />
Art.-Nr.:<br />
2.5288<br />
BB´s<br />
cal. 6 mm BB<br />
0,2 g<br />
2000 Stk.<br />
Art.-Nr.:<br />
4.1830<br />
BB´s<br />
cal. 6 mm BB<br />
0,2 g<br />
4000 Stk.<br />
Art.-Nr.:<br />
4.1831<br />
Schutzbrille<br />
Art.-Nr.:<br />
2.5013<br />
D GB F E<br />
BB´s<br />
cal. 6 mm BB<br />
0,25 g<br />
2000 pcs<br />
Art.-Nr.:<br />
2.5288<br />
BB´s<br />
cal. 6 mm BB<br />
0,2 g<br />
2000 pcs<br />
Art.-Nr.:<br />
4.1830<br />
BB´s<br />
cal. 6 mm BB<br />
0,2 g<br />
4000 pcs<br />
Art.-Nr.:<br />
4.1831<br />
Protective<br />
glasses<br />
Art.-Nr.:<br />
2.5013<br />
-23-<br />
BB´s<br />
cal. 6 mm BB<br />
0,25 g<br />
2000 Stk.<br />
Art.-Nr.:<br />
2.5288<br />
BB´s<br />
cal. 6 mm BB<br />
0,2 g<br />
2000 Stk.<br />
Art.-Nr.:<br />
4.1830<br />
BB´s<br />
cal. 6 mm BB<br />
0,2 g<br />
4000 Stk.<br />
Art.-Nr.:<br />
4.1831<br />
Lunettes de<br />
protection<br />
Art.-Nr.:<br />
2.5013<br />
BB´s<br />
cal. 6 mm BB<br />
0,25 g<br />
2000 Stk.<br />
Art.-Nr.:<br />
2.5288<br />
BB´s<br />
cal. 6 mm BB<br />
0,2 g<br />
2000 Stk.<br />
Art.-Nr.:<br />
4.1830<br />
BB´s<br />
cal. 6 mm BB<br />
0,2 g<br />
4000 Stk.<br />
Art.-Nr.:<br />
4.1831<br />
Gafas<br />
protectoras<br />
Art.-Nr.:<br />
2.5013<br />
21_<strong>P99</strong>_man_20.04.09_print_EK.indd 23 20.04.2009 10:04:15 Uh
1 JOULE<br />
26<br />
UMAREX Sportwaffen GmbH + Co. <strong>KG</strong><br />
P.O. Box 27 20<br />
D-59717 Arnsberg | Germany<br />
Phone: +49 29 32 / 638-01<br />
Fax: +49 29 32 / 638-222<br />
verkauf@umarex.de | sales@umarex.de<br />
www.umarex.com<br />
Änderungen in Farbe und Design, sowie<br />
technische Verbesserungen, Druckfehler<br />
und Irrtum vorbehalten. Alle Angaben<br />
ohne Gewähr.<br />
We reserve the right to make color and<br />
design changes and technical improvements.<br />
No responsibility is accepeted for<br />
printing errors or incorrect information.<br />
Sauf modifications de la couleur et<br />
du design ainsi que des améliorations<br />
techniques, erreurs d‘impression et<br />
erreur. Toutes les données sont fournies<br />
sans garantie.<br />
Salvo modificaciones de color y de diseño<br />
así como mejoramientos técnicos, erratas<br />
y error. Todos los datos sin garantía .<br />
© UMAREX Sportwaffen GmbH & Co. <strong>KG</strong><br />
21_<strong>P99</strong>_man_20.04.09_print_EK.indd 24 20.04.2009 10:04:15 Uh