Owners Manual - Softair-Center KG
Owners Manual - Softair-Center KG
Owners Manual - Softair-Center KG
- No tags were found...

You also want an ePaper? Increase the reach of your titles
YUMPU automatically turns print PDFs into web optimized ePapers that Google loves.
<strong>KG</strong>36C<strong>Owners</strong> <strong>Manual</strong>Consumer WarningBe advised that this product may be mistaken for a firearmby law enforcement officers or others; Brandishing or displayingthe product in public may cause confusion and maybe a crime; Altering the coloration or markings required bystate or Federal law or regulations so as to make the productlook more like a fire arm is dangerous and may be a crime.WARNING! READ ALL INSTRUCTIONS ANDSAFETY RULES COMPLETELY BEFOREUSING THIS AIR SPORTS GUN.REMEMBER, “SAFETY BEGINS WITH YOU”
RULES COMPLETELY BEFORE USING THIS AIR SOFT GUNMANNER AND FOR SPORTING PURPOSES. IT IS UNLAWFUL TO REMOVE THE ORANGE TIP. REMEMBER, AIRSOFT GUNS ARE NOT TOYS.ALWAYS TRANSPORT AIR SOFTGUN IN A CARRYING CASE. DO NOTDISPLAY AIRSOFT GUN IN A PUBLICAREA.ALWAYS STORE AIR SOFT GUN INA SAFE PLACE AND KEEP OUT OFREACH OF CHILDRENAFTER SHOOTING, REMOVEMAGAZINE AND PLACE SAFETYCAP ON. THERE MAY BE BB’SLODGED IN THE CHAMBER.ALWAYS PLACE SAFETY CAP ON,MOVE SELECTOR SWITCH TO“SAFE” MODE. AND REMOVE THEMAGAZINE AND BATTERY WHEN YOU AREFINISHED SHOOTINGAWAYS KEEP YOUR FINGER OFFTHE TRIGGER AND ENGAGE THESAFETY WHEN YOU ARE NOT IN ASHOOTING POSITIONDO NOT DISASSEMBLE AIR SOFTGUN. DO NOT ALTER OR MODIFYAIR SOFT GUN. DO NOT REMOVEORANGE TIP.THE EFFECTIVE SHOOTING RANGE IS APPROX. 60 FT. MAKE SURE YOUR SHOOTNG DIRECTION IS FREE OFOBSTACLES BEFORE YOU SHOOT. DO NOT SHOOT AT PEOPLE, ANIMALS OR OBJECTS YOU DO NOT INTEND TOSHOOT.ALWAYS USE KWA 0.2G HIGH GRADE BB’S ONLY. USING KWA 0.2G HIGH GRADE BB’S WILL PROVIDE THE BESTPERFORMANCENEVER SHOOT AT GLASS, ROCKS, WATER OR ANY OTHER HARD SURFACES AS BB’S MAY RICOCHET ORSHATTER AND PIECES MAY CAUSE INJURYDO NOT PLACE ANY FOREIGN OBJECTS INTO BARRELALWAYS STORE AIRSOFT GUN IN A SAFE PLACE AND KEEP OUT OF REACH OF CHILDREN.AIR SOFT GUNS CANBE DANGEROUS AND CAUSE SERIOUS INJURY.IT IS USER’S RESPONSIBILITY TO HANDLE AIRSOFT GUNS IN A SAFE MANNER.ACCIDENTS OCCUR DUE TO NEGLIGENCE!3
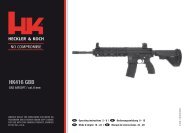
<strong>KG</strong>36CPARTSRetaining PinSling attachment pointFront SightCocking LeverStock Release LeverHand GuardRear SightBarrelSelector SwitchSling attachment pointSling attachment pointTriggerPistol GripShoulder PadEjection PortStock Locking clipMagazineSafety CapStockUSE 8.4V Ni-Cd BATTERY. KWA G36C IS DESIGNED TO ADAPT EITHER LARGE OR SMALL 8.4V BATTERIESBE SURE TO USE CHARGERS SPECIFIED FOR 8.4V Ni-Cd BATTERYREAD OWNER’S MANUAL BEFORE CHARGING BATTERYMagazine Release LeverBATTERY4USE ONLY 8.4V Ni-Cd BATTERY
SELECTOR SWITCH1. Safe1In safe mode the gun willnot fire. For safety, youshould keep the switchin this mode at all timeswhen you are not in afiring positionWarning2.Semi-autoIn this mode the gun willfire one shot for eachtime you pull the triggerDO NOT PULL TRIGGER WHEN SWITCHING THE SELECTOR.Set selector to safe mode. Remove safety cap. Remove hand guard retaining pin.Retaining pinWARNING:Before removing any parts, besure selector is set to “safe”Safety Cap23. Full AutoSlide hand guard off.In this mode the gun will firecontinuously as long as thetrigger is depressedBATTERY INSTALLATION1Selector Switch32Replace safety cap. Turn gun over.Place Battery into holder, back endfirst, then plug into connector.Connector PlugWARNING:Always place safety cap onbarrel tip when servicing gunWARNING:When servicing gun, neverput your finger on the triggerHand GuardRemove safety cap once more. Replace hand guard, making sure it aligns4with pins on side, and secure with the retaining pin. Replace safety cap untilgun is readyfor firing.RidgeNote:Be sure to push theretaining pin all theway in until it snapssecurly into place.Be sure cover aligns with pins5
<strong>KG</strong>36C1LOADINGMagazine Release Lever3Push magazine release lever and pull magazine downwardLoading safety tips:1.Switch selector to safe2.Be sure safety cap is on3.Keep your finger off trigger at all times.2Open magazine top plate and pour BB’s intochamber. Close plate when done.Magazine Capacity: 300 rounds maximumWARNING: Do not overload or force BB’sinto the magazine. Doing so may cause themagazine to become damaged and functionimproperly. Use only KWA 0.2G 6mm high grade BB’s.Using low grade BB’s may damage airsoft gun.Magazine Top PlateHolding the magazineupright, turn the windingwheel until clickingsound changes.HOP UP LEVERWinding Lever**See page 8 for HOP UP adjustmentTo fold: 1. Press stock release lever2. Fold stock around and click into place4Replace magazine in gun and push upwards until it clicks into placeFOLDING STOCKTo Unfold: 1. Gently lift up on stock to realease from body2. Swing stock into open position.3. Stock will click into place.6Pull back lever to expose Hop Up DialStockStock
SIGHT ADJUSTMENTAdjust the sight vertically by turningelevation adjusting screw using2.5mm hexagonal key for the M5setscrew. Turning adjusting screwclockwise andcounterclockwiseto lowerand raise therear sight respectively.Adjust the sight horizontally by turningwintage adjusting screw using2.5mm hexagonal key for the M5setscrew. Turning adjusting screwclockwise and counterclockwise toshift the rearsight to rightand left respectively.Close RangeBe sure to wear goggles during shooting. It is recommended to wear long sleeveclothing for skin protection.DO NOT look into muzzle. Sudden discharge can cause serious injury and possibleloss of sight.To avoid pellet ricochet, do not shoot at hard surfaces or objects.Recharge battery, when firing cycle slows down.After removal of jammed pellets, apply few drops of silicon oilinto the chamber from the entrance of magazine.Point Muzzleupwards to allow oil to flow into gearbox (see fig. A)DO NOT use anti-corrosive descaling spray or mineral oilWhen you remove the magazine,set the selector to semi-auto mode. Dry fire severalshots while aiming in a safe direction, there may be pellets remaining in chamber,even though magazine is empty.Remove battery when gun is not in use. Always attach protective cap to the gunduring storage.CAUTION:If there is no response to semi-auto mode when trigger ispulled, set selector to full auto and dry fire 5-6 rounds. Switchselector back to semi-auto mode.SiliconOilATroubleshooting GuideSTATUS CAUSE SOLUTIONSSelector set to Safe Mode Select Semi-Auto or Full-Auto ModeDead batteryCharge batteryOperation suspendedBattery charger was not plugin properlyCheck battery charger plugBattery polarity reversed Check and reconnect +/-Burned out fuseMotor is running but not firing Gear failureMotor damaged or bad connectionReplace a new fuseReturn gun for professional careReturn gun for professional careWeak batteryRecharge batteryFull-Auto suspendedMagazine may be clogged Remove clogged pelletsMotor damaged or bad connectionReturn gun for professional careInadequate timingSet selector to full-auto mode. Dryfire 10-20 rounds before return it tosemi-auto modeSemi-Auto suspendedWeak batteryRecharge batteryMotor damaged or bad connectionReturn gun for professional careFiring cycle slows down Weak battery Recharge batteryShort trajectory distanceUnusual high noiseChamber parking maybedamagedPiston O Ring worn outPiston springs exhaustedBad quality pelletsChamber needs to be lubricatedExcessive dry firingGear may be damagedBad quality pelletsSelector SwitchSHOOTINGReturn gun for professional careReturn gun for professional careReturn gun for professional careUse KWA Perfect BBsApply few drops of silicon oil intochamber from entrance of magazineReturn gun for professional careReturn gun for professional careUse KWA Perfect BBsYou may observe inconsistent trajectory within 200-300 roundsright after applying silicon oilLong RangeIT IS RECOMMNENDED THAT YOU DO NOT REMOVE PROTECTIVECAP UNTIL YOU ARE READY TO FIRETrigger7
HOP UP TROUBLESHOOTING GUIDEPHENOMENON CAUSE SOLUTIONSPellet travels upwards Excessive hop Turn hop adjustment dial downPellet drops instantly after firingNo hopTurn hop adjustment dial upInsufficiant hopTurn hop adjustment dial upExcessive oil in chamberFire 200 rounds to eliminate excessive oilIneffective HopChamber is contaminatedClean up chamberChamber may be damagedReturn gun to factory for repairHop Up Device can be adjusted Damaged adjustment dial or internal parts Return gun to factory for repairPellets begin to clogExcessive hopTurn hop adjustment dial downUsing recycled or low quality pelletsUse KWA Perfect BBsFUSE REPLACEMENTOverflow electrical (surge) current can blow-out a fuse.Follow directions in the “Battery Replacement” section for handguard removal,then replace the fuse with same size fuse.Fuse LocationWARNING:Make sure you replace the fuse withthe same size. Using the incorrectfuse can result in permanent damageto the motorMake sure safety cap is onGEAR AND MOTOR FINE ADJUSTMENTAdjust motor when cycling sound becomes high after operation for along period of time.Improper over or under tightening of the screw may cause damage tothe motor. It is recommended that this procedure be done by an experiencedtechnicianWARNING:Use a lock tie to hold screw in placeafter adjustment. Avoid constant adjustmentin this area.1.5 mm hex wrench9
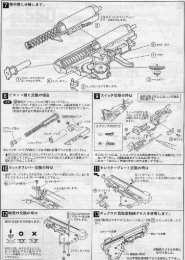
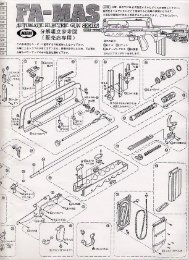
<strong>KG</strong>36CPARTS10Parts # Description1 FLASH SUPPRESSOR2 FLASH SUPPRESSOR SET SCREW3 BARREL HOLDER4 INNER BBL COVER5 INNER BARREL6 INNER BARREL HOUSING "RIGHT"7 INNER BARREL HOUSING "LEFT"8 HOP UP BUCKING9 INNER BBL SPRING10 ADJUSTING DIALBarrel and Rear Sight Assembly11 O-RING12 CHAMBER BLOCK13 BBL STOP14 BB STOP15 BB STOP16 BB STOP PIN17 HOP UP BAR18 HOP UP BAR PIN19 INNER BBL BODY SCREW (RIGHT)20 INNER BBL BODY SCREW (REAR) X221 BATTERY WIRE22 FUSE23 FUSE CONNECTIONS X250 REAR SIGHT BASE51 REAR SIGHT ELEVATION52 REAR SIGHT53 REAR SIGHT SPRING PLATE54 ELEVATION SPRING55 REAR SIGHT SPRING56 ELEVATION SCREW57 WINDAGE SCREW58 REAR SIGHT BASE ROLL PIN
PARTSParts # Description30 FRONT SIGHT31 UPPER MOUNT RAIL32 RAIL SET PLATE A33 RAIL SET PLATE B34 TOP RAIL SCREW X335 FRONT SIGHT ROLL PIN36 REAR SIGHT ROOL PIN37 UPPER WINDOW RAIL INLET38 TOP RAIL INSERT SCREWS39 COCKING SLIDE40 COCKING LEVER41 COCKING LEVER PIN42 COCKING LEVER SPRING43 COCKING LEVER BUSHING44 COCKING PLATE45 EJECTION PORT PLATE46 EJECTION PORT PLATE SCREWS X247 EJECTION PORT PLATE NUTS X248 INNER BODY BASE SCEWS X360 MAIN FRAME RIGHT61 MAIN FRAME LEFT62 STOCK HANGERMain BodyParts # Description63 MAIN FRAME NUT X364 MAIN FRAME INNER PIN X 3 SMALL65 MAIN FRAME PIN X2 LARGE66 STOCK HANGER SCREW X267 LOCK PIN A68 LOCK PIN B69 MAIN FRAME HEX SCREW X2 SMALL70 MAIN FRAME HEX SCREW X2 LARGE11
<strong>KG</strong>36CPARTSBattery Cover/Hand Guard Assembly12Parts # Description71 MAGAZINE WELL HOUSING72 FRAME LOCKING PIN73 FRAME LOCKING PIN SCREW74 STOCK HOLDING BLOCK75 STOCK SET PIN76 STOCK BASE ALLEN SCREW77 STOCK BASE ALLEN SCREW WASHER80 HAND GUARD81 FRONT SLING LOOP82 LOWER HAND GUARD RAIL83 LOWER RAIL SET SCREW A84 LOWER RAIL SET SCREW B85 HAND GUARD LOCKING PIN86 O - RINGStock Base
Parts # Description90 GEAR BOX91 MOTOR92 MOTOR BRAKET RIGHT93 MOTOR BRAKET LEFT94 MOTOR SET SPRINGPistol Grip AssemblyPARTSParts # Description95 MOTOR SET BUSHING PLATE96 SCREW PLATE97 MOTOR ADJUSTMENT SET SCREW98 MOTOR ADJUSTMENT SET SCREW X299 MOTOR ADJUSTMENT HEX SCREW100 GRIP101 MAGAZINE CATCH LEVER102 MAGAZINE CATCH LEVER SPRING103 SELECTOR LEVER RIGHT104 SELECTOR LEVER LEFT105 SELECTOR GEAR RIGHT106 SELECTOR GEAR LEFT107 JOINT GEAR108 BOLT CATCH109 BOLT CATCH SPRING110 LEVER PLUNGER111 LEVER PLUNGER SPRING112 MAGAZINE CATCH LEVER SET PIN113 GRIP SHAFT114 GRIP BASE PLATE115 GRIP BASE PLATE SCREW X2 SMALL116 MAIN BASE PLATE SCREW13
<strong>KG</strong>36CPARTSFolding Stock14Parts # Description200 FOLDING STOCK201 STOCK LOCKING BUTTON202 STOCK LOCKING BUTTON SPRING203 BUTT PLATE204 STOCK PLATE205 STOCK LOCKING LEVER206 STOCK LOCKING LEVER PIN207 STOCK LOCKING LEVER SPRING208 STOCK LOCKING PLATE SCREW PLATE SCREWS X4
PARTSParts # Description300 MAGAZINE CASE301 MAGAZINE BASE302 MAGAZINE PLATE HEX SCREW303 INNER MAGAZINE CASE RIGHT304 INNER MAGAZINE CASE LEFT305 MAGAZINE LOADING COVER306 BB STOP LEVER307 BB STOP LEVER SPRING308 BB STOP LEVER CAP309 MAGAZINE WINDING WHEEL310 BB LOADING WHEEL311 BB LOADING WHEEL GEAR #1312 BB LOADING WHEEL GEAR #2313 BB ROLLER314 BB SPRING315 MAGAZINE COIL SPRING316 #2 GEAR PIN317 #2 GEAR SPROCKET318 #2 GEAR SPROCKET WEIGHT319 INNER MAGAZINE BODY SCREWS320 INNER MAGAZINE BODY WASHER321 BB LOADING WHEEL SPRINGMagazine15
ENGINEERED TO OUTPERFORMKWA USAEMAIL: customerservice@kwausa.comwww.kwausa.com