S3 BLACK - Chicco
S3 BLACK - Chicco
S3 BLACK - Chicco

Create successful ePaper yourself
Turn your PDF publications into a flip-book with our unique Google optimized e-Paper software.
the wheel from the fork, carrying out the above operations in the<br />
reverse order.<br />
WARNING: Check that the wheel unit is safely locked into position.<br />
WARNING: Always check that the lever is locked correctly.<br />
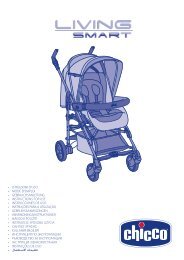
HOW TO FIT/REMOVE THE REAR WHEELS<br />
7. Insert the joint of the wheel into the correct slot, until a “clak” is<br />
heard, signalling that it is locked into position; repeat the operation<br />
with the other rear wheel (diag. 7).<br />
8. To remove the wheels, raise the release buttons shown in<br />
diagram 8, and remove the first wheel. Repeat the operation with<br />
the other rear wheel.<br />
WARNING: Check that the wheel units are fitted correctly.<br />
The wheels may be removed to make the stroller more compact<br />
when closed.<br />
HOW TO FIT/REMOVE THE FABRIC COVER<br />
9. Insert the small round plastic devices, located at the sides of the<br />
fabric cover, into the slots inside the tubes (diagram 9 A); ensure that<br />
they are completely fitted to the end of the slots (diagram 9 B).<br />
10. WARNING: The crotch strap is fixed to the seat support of the<br />
frame (as shown in diag. 10 A): To use the crotch strap correctly,<br />
slide it through the hole of the cover, as shown in diagram 10 B.<br />
To use the safety harness correctly, please refer to the paragraph<br />
“How to Use the Safety Harness”.<br />
11. Fasten the 2 press studs (diagram 11).<br />
12. Fit the two cover flaps of the armrests, inserting the plastic joints<br />
of the cover into the holes located on the armrests (diag. 12).<br />
13. Before fitting the seat to the frame, check that the adjustment<br />
strap of the backrest (component A of diag. 13) is inserted correctly<br />
inside the holes B. If it is not fitted correctly, insert the strap A<br />
inside the two holes B.<br />
14. Then fasten the 5 spring catches located on the fabric cover<br />
to the spring catches located on the frame, operating as shown in<br />
diagram 14.<br />
WARNING: Check that the fabric cover is fitted correctly to the<br />
frame of the stroller.<br />
HOW TO USE THE SAFETY HARNESS<br />
This stroller has a 5-point safety harness featuring two shoulder<br />
straps, a waist strap and a crotch strap with buckle.<br />
WARNING: When using the safety harness with children from birth<br />
up to approximately 6 months of age, it is necessary to first fit the<br />
shoulder straps through the two adjustment holes on the fabric<br />
backrest.<br />
15. Check that the shoulder straps are at the correct height for your<br />
child. If they are not at the correct height, insert them into the<br />
holes of the fabric cover to adjust them correctly (diag. 15).<br />
16. After sitting your child in the stroller, insert the 2 prongs into<br />
the buckle and, if necessary, adjust the waist strap operating the<br />
buckles (diag. 16).<br />
17. To unfasten the waist strap, press and pull at the same time the<br />
side prongs (diag. 17).<br />
WARNING: Children should be harnessed in at all times. To ensure<br />
your child’s safety, it is necessary to always use the safety harness.<br />
HOW TO ADJUST THE BACKREST<br />
The backrest can be adjusted through a belt adjustment system.<br />
18. To lower the backrest, it is necessary to operate the rear<br />
adjustment system. Press the two side buttons, as shown in diag.<br />
18, adjusting the backrest until the desired position has been<br />
reached.<br />
Vice versa, to raise the backrest, it is necessary to press the two<br />
side buttons of the adjustment system, and pull the strap until the<br />
desired position has been reached.<br />
WARNING: The child’s weight can make these operations difficult.<br />
REMOVABLE BUMPER BAR<br />
19. To remove the bumper bar, press the two buttons located on<br />
18<br />
the inner side of the armrests (diag. 19), and pull the bumper bar<br />
towards you.<br />
WARNING: Never use the bumper bar to lift the stroller with the<br />
child sitting in it.<br />
HEIGHT ADJUSTABLE HANDLE<br />
To make the stroller more ergonomic and compact, it is possible to<br />
adjust the height of the handle.<br />
20. To lower or raise the handle of the stroller, operate the external<br />
buttons, and adjust the handle to the position that you find most<br />
comfortable (diag. 20).<br />
SAFETY BRAKE<br />
The safety brake locks both of the rear wheels of the stroller at<br />
the same time.<br />
21. To operate the brakes of the stroller, push the lever located<br />
between the rear wheels in a downward direction, as shown in<br />
diagram 21. To release the brake, pull the lever located between<br />
the rear wheels in an upward direction.<br />
WARNING: Always apply the brakes whenever the stroller is<br />
stationary.<br />
WARNING: Never leave the stroller on a sloped surface, with a<br />
child on board, even with the brakes applied.<br />
SLOWING DOWN BRAKE<br />
WARNING: The intended use of the slowing down brake is to slow<br />
down the speed of the stroller. Never use the slowing down brake<br />
as a safety brake.<br />
22. To slow down the speed of the stroller, operate the brake lever<br />
located on the handle (diagram 22).<br />
FRONT SWIVEL WHEEL<br />
The stroller has a fixed/swivel front wheel.<br />
It is recommended to use the fix wheel when using the stroller<br />
on particularly uneven surfaces. The use of the swivel wheel is<br />
recommended to increase the manoeuvrability of the stroller.<br />
23. To use the front wheel in the swivel mode, push the front lever<br />
in a downward direction with your foot, as shown in diagram 23.<br />
To use the front wheel in the fixed mode, lift the lever with the<br />
foot: the wheel will lock in the straight position independently of<br />
its position.<br />
ADJUSTABLE REAR SUSPENSION<br />
The stroller has an adjustable rear suspension.<br />
24. To adjust the suspension, operate the lever indicated in diag. 24.<br />
By moving the lever inward, the suspension becomes softer (ideal<br />
for use with young children), while by moving the lever outward,<br />
the suspension becomes harder (ideal for older children).<br />
Both suspension units must be adjusted to the same setting when<br />
in use.<br />
HOW TO USE THE CHILD CAR SEAT AND CARRYCOT<br />
WARNING: Please read carefully the instruction booklets on how<br />
to use the carrycot and child car seat.<br />
WARNING: Only the CHICCO child car seats and carrycots featuring<br />
the CLIK CLAK devices can be fitted to the stroller. Before using the<br />
stroller with the carrycot or child car seat fitted to it, always check<br />
that the locking system is locked into the correct position.<br />
The stroller has the Clik Clak system, which allows you to fit the<br />
carrycot or child car seat without using any further locking devices.<br />
The stroller can be fitted with the carrycot or child car seat, both<br />
with or without fabric seat cover fitted to the stroller. To fit and<br />
remove the fabric cover of the stroller, please refer to the paragraph<br />
“How to fit/remove the fabric cover”.<br />
25. The Clik Clak locking system is located on the armrests of the<br />
stroller. First unfasten the fabric cover of the armrests as shown in<br />
diagram 25. It is recommended to raise the central part of the flap<br />
and then release the plastic joints from the openings located on the<br />
armrests. Remove the bumper bar.<br />
26. Operate the buttons on the rear of the armrests (diagram 26 A),