PEX 220 A - Axminster Power Tool Centre
PEX 220 A - Axminster Power Tool Centre
PEX 220 A - Axminster Power Tool Centre
You also want an ePaper? Increase the reach of your titles
YUMPU automatically turns print PDFs into web optimized ePapers that Google loves.
Sanding Plate Brake<br />
An integrated sanding plate brake reduces the<br />
stroke rate when running at no-load so that scoring<br />
is prevented when placing the machine onto<br />
the workpiece.<br />
If the no-load stroke rate continuously increases<br />
over the course of time, then the sanding plate is<br />
damaged and must be replaced or the sanding<br />
plate brake is worn. A worn sanding plate brake<br />
must be replaced by an authorised after-sales<br />
service agent for Bosch power tools.<br />
Working Advice<br />
Wait until the machine has come to a standstill<br />
before placing it down.<br />
Sanding Surfaces<br />
Switch the machine on, place it with the complete<br />
sanding surface on the surface to be<br />
worked and move the machine with moderate<br />
pressure over the workpiece.<br />
The removal capacity and the sanding pattern are<br />
mainly determined by the selection of the sanding<br />
sheet and the applied pressure.<br />
Only flawless sanding sheets achieve good sanding<br />
capacity and extend the service life of the<br />
machine.<br />
Pay attention to apply uniform sanding pressure;<br />
this increases the working life of the sanding<br />
sheets.<br />
Intensifiying the sanding pressure does not lead<br />
to an increase of the sanding capacity, but to increased<br />
wear of the machine and the sanding<br />
sheet.<br />
A sanding sheet that has been used for metal<br />
should not be used for other materials.<br />
Use only original Bosch sanding accessories.<br />
Rough Sanding<br />
Attach a sanding sheet with coarse grain.<br />
Apply only light pressure to the machine so that<br />
it runs at a higher stroke rate and high material<br />
removal is achieved.<br />
English | 19<br />
Fine Sanding<br />
Attach a sanding sheet with fine grain.<br />
By lightly varying the application pressure, the<br />
sanding plate stroke rate can be reduced whereby<br />
the orbital action is maintained.<br />
With moderate pressure, move the machine in a<br />
circular pattern or alternately in lengthwise and<br />
crosswise directions over the workpiece. Do not<br />
tilt the machine to avoid sanding through the<br />
workpiece (e.g. when sanding veneer).<br />
After finishing the working procedure, switch the<br />
power tool off.<br />
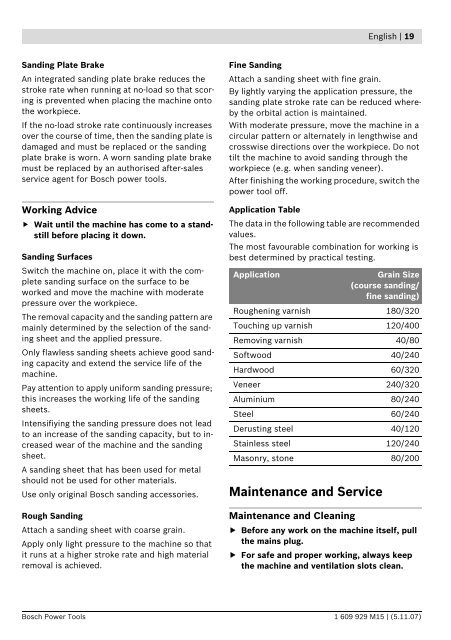
Application Table<br />
The data in the following table are recommended<br />
values.<br />
The most favourable combination for working is<br />
best determined by practical testing.<br />
Application Grain Size<br />
(course sanding/<br />
fine sanding)<br />
Roughening varnish 180/320<br />
Touching up varnish 120/400<br />
Removing varnish 40/80<br />
Softwood 40/240<br />
Hardwood 60/320<br />
Veneer 240/320<br />
Aluminium 80/240<br />
Steel 60/240<br />
Derusting steel 40/120<br />
Stainless steel 120/240<br />
Masonry, stone 80/200<br />
Maintenance and Service<br />
Maintenance and Cleaning<br />
Before any work on the machine itself, pull<br />
the mains plug.<br />
For safe and proper working, always keep<br />
the machine and ventilation slots clean.<br />
Bosch <strong>Power</strong> <strong>Tool</strong>s 1 609 929 M15 | (5.11.07)


