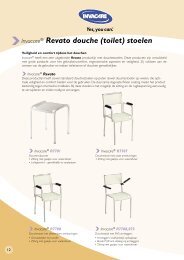
OCEAN/OCEAN XL - Invacare
OCEAN/OCEAN XL - Invacare
OCEAN/OCEAN XL - Invacare

Create successful ePaper yourself
Turn your PDF publications into a flip-book with our unique Google optimized e-Paper software.
6.5 Use<br />
When using the commode, observe the following safety<br />
rules:<br />
CAUTION!<br />
Seat surface may slip if loose<br />
Check whether the seat surface is firmly<br />
secured to the seat frame before use.<br />
Slipping caused by the chair rolling<br />
Lock all four casters with using the red<br />
foot pedals before getting into or out of<br />
the chair.<br />
Apply the locking brake if the grip wheels<br />
are used (optional).<br />
Rolling away<br />
Lock the casters in the parked position using<br />
the red foot pedal or the grip wheels<br />
(optional) with the locking brake.<br />
Tipping over<br />
Push the footrests to the sides or fold up<br />
the foot plates before getting into or out<br />
of the chair.<br />
Do not stand on the footrests.<br />
Risk of breakage<br />
Only lift the commode by the sides when<br />
someone is sitting in it.<br />
Catching in turning wheels<br />
When using the optional grip wheels, do not<br />
grip between the spokes or between the<br />
seat frame and the turning wheels.<br />
6.6 Folding the arm rests<br />
CAUTION!<br />
Catching in the folding mechanism<br />
When folding the armrests up and down,<br />
do not reach into the joint and make sure<br />
that no parts become jammed.<br />
When folding up the armrests, do not<br />
reach between the armrest and the<br />
backrest.<br />
EN<br />
6.7 Folding the footrests<br />
Position for getting in and out:<br />
1. Push the footrest slightly upwards along the guide<br />
until the groove (1, fig. 5) no longer catches the<br />
pin of the clip (6, fig. 5).<br />
2. Fold the footrest to the side.<br />
Driving position:<br />
CAUTION!<br />
Loose footrests can be dangerous<br />
Fix the footrests in the driving position.<br />
1. Turn the footrests inwards.<br />
2. Push down the footrest until the groove (1, fig. 5)<br />
catches the pin of the clip (6, fig. 5).<br />
6.8 Detaching and attaching the seat plate<br />
Detaching:<br />
Pull up the seat plate on both sides.<br />
Attaching:<br />
CAUTION!<br />
Risk of catching<br />
Do not reach between the seat surface and<br />
the seat frame when pressing down the<br />
seat plate.<br />
1. Place the seat plate on the seat frame with the<br />
hole at the front (fig. 1).<br />
2. Push the seat plate as far back as it will go.<br />
3. Using the palm of your hand, push the sides of the<br />
seat plate down, and then the front and the back,<br />
until the seat plate snaps into the seat frame.<br />
6.9 Removing and attaching the heel loop<br />
1. Open the velcro fastening (5, fig. 5) at the heel<br />
loop.<br />
Important!<br />
When the bolt is unscrewed, the nut below<br />
may fall out.<br />
2. Unscrew the bolt (3, fig. 5).<br />
3. Take off the screw with the spacer, and the nut underneath<br />
the foot plate.<br />
4. Pull the heel loop off the spacer.<br />
The heel loop can be fitted in the reverse order.<br />
Important!<br />
The velcro fastening of the heel loop should be<br />
inside when fitted.<br />
13