
You also want an ePaper? Increase the reach of your titles
YUMPU automatically turns print PDFs into web optimized ePapers that Google loves.
Kenwood<br />
instructions<br />
KM260 series
English 2 - 8<br />
Nederlands 9 - 15<br />
Français 16 - 22<br />
Deutsch 23 - 31<br />
Italiano 32 - 39<br />
Português 40 - 46<br />
Español 47 - 53<br />
Dansk 54 - 60<br />
Svenska 61 - 67<br />
Norsk 68 - 74<br />
Suomi 75 - 81<br />
Türkçe 82 - 88<br />
Ïesky 89 - 95<br />
Magyar 96 - 102<br />
Polski 103 - 110<br />
Русский 111 - 119<br />
Ekkgmij 120 - 128<br />
´¸∂w<br />
129 - 136
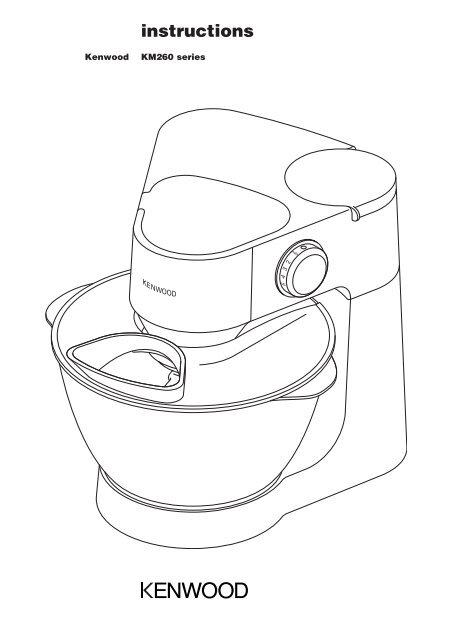
know your Kenwood kitchen machine<br />
safety<br />
● Switch off and unplug before fitting or removing tools, after use<br />
and before cleaning.<br />
● Never let the cord hang down where a child could grab it.<br />
● Keep your fingers away from moving parts and fitted tools. Never<br />
put your fingers etc in the hinge mechanism.<br />
● Never leave the machine on unattended.<br />
● Never use a damaged machine. Get it checked or repaired: see<br />
‘service’, page 8.<br />
● Never let the power unit, cord or plug get wet.<br />
● Never use an unauthorised attachment or more than one<br />
attachment at a time.<br />
● When using an attachment, read the safety information that<br />
comes with it.<br />
● Never exceed the maximum capacities on page 5.<br />
● Take care when lifting this appliance. Ensure the head is locked<br />
and that the bowl, tools, and cord are secure before lifting.<br />
● Do not let infirm people use the appliance without supervision.<br />
● Do not let children use or play with the appliance.<br />
● Only use the appliance for its intended domestic use. Kenwood<br />
will not accept any liability if the appliance is subject to improper<br />
use, or failure to comply with these instructions.<br />
before plugging in<br />
● Make sure your electricity supply is the same as the one shown on<br />
the underside of your machine.<br />
● This machine complies with European Economic Community<br />
Directive 89/336/EEC.<br />
2
efore using for the first time<br />
1 Remove all packaging.<br />
2 Push excess cord in the cord storage compartment in<br />
the back of the mixer.<br />
3 Wash the parts: see ‘care and cleaning’, page 8.<br />
know your Kenwood kitchen machine<br />
medium speed outlet<br />
high speed outlet<br />
tool socket<br />
head release lever<br />
mixer head<br />
bowl<br />
on/off and speed switch<br />
power unit<br />
cord storage compartment<br />
beater<br />
dough hook with removable guard<br />
whisk<br />
splashguard<br />
<br />
<br />
<br />
<br />
<br />
<br />
3
the mixer<br />
the mixing tools and some of their uses<br />
beater ● For making cakes, biscuits, pastry, icing, fillings, éclairs and<br />
mashed potato.<br />
whisk ● For eggs, cream, batters, fatless sponges, meringues, cheesecakes,<br />
mousses, soufflés. Don’t use the whisk for<br />
heavy mixtures (eg creaming fat and sugar) - you could<br />
damage it.<br />
dough hook ● For yeast mixtures.<br />
to use your mixer<br />
1 Press down on the head release lever and raise the mixer<br />
head until it locks into position.<br />
to insert a tool 2 Select a tool and push into the tool socket .<br />
● Always ensure the guard is fitted onto the shaft of the dough<br />
hook before inserting into the outlet. Once inserted fit the<br />
guard to the mixer outlet to prevent food ingress.<br />
3 Fit the bowl into the base and turn clockwise to lock into<br />
position .<br />
4 Press down on the head release lever and lower the mixer head until<br />
it locks into position.<br />
5 Plug into the power supply then switch on and turn the speed<br />
switch to the desired setting. To switch off turn to ‘0’.<br />
● Switch to pulse P for short bursts<br />
6 Unplug from the power supply.<br />
to remove a tool 7 Raise the mixer head and whilst holding it steady, pull the tool<br />
from the outlet.<br />
important ● Some movement of the mixer head is normal when<br />
mixing heavy loads such as bread dough.<br />
If the mixer head is raised during operation, the machine will stop<br />
working straight away. To re-start the mixer, lower the mixer head,<br />
turn the speed switch to the off position, wait a few seconds and then<br />
re-select the speed. The mixer should resume operating straight away.<br />
● If for any reason power to the mixer is interrrupted and the machine<br />
stops working, turn the speed switch to the off position, wait a few<br />
seconds and then re-select the speed. The mixer should resume<br />
operating straight away.<br />
● The mixer will not operate unless all the outlet covers are correctly<br />
fitted to the machine.<br />
● If you hear the machine labouring either switch off and remove<br />
some of the mixture or increase the speed.<br />
4
hints ● Switch off and scrape the bowl with a spatula when necessary.<br />
● Eggs at room temperature are best for whisking.<br />
● Before whisking egg whites, make sure there’s no grease or<br />
egg yolk on the whisk or bowl.<br />
● Use cold ingredients for pastry unless your recipe states otherwise.<br />
● When creaming fat and sugar for cake mixes, always use the fat at room temperature or soften<br />
it first.<br />
● Your mixer has been fitted with ‘soft start’ feature to minimise spillage. However if the machine<br />
is switched on with a heavy mixture in the bowl such as bread dough, you may notice that the<br />
mixer takes a few seconds to reach the selected speed.<br />
points for bread making<br />
important ● Never exceed the maximum capacities stated - you will overload the<br />
machine.<br />
● Some movement of the mixer head is normal when mixing heavy loads such as bread dough.<br />
● The ingredients mix best if you put the liquid in first.<br />
● At intervals stop the machine and scrape the mixture off the dough hook.<br />
● Different batches of flour vary considerably in the quantities of liquid required and the stickiness<br />
of the dough can have a marked effect on the load imposed on the machine. You are advised<br />
to keep the machine under observation whilst the dough is being mixed; the operation should<br />
take no longer than 6-8 minutes.<br />
speed switch<br />
These are a guide only and will vary depending upon the quantity of mix in the bowl and the<br />
ingredients being mixed.<br />
beater ● creaming fat and sugar start on min gradually increasing<br />
to a higher speed<br />
● beating eggs into creamed mixtures use a medium to high speed<br />
● folding in flour, fruit etc use a low to medium speed<br />
● all in one cakes start on a low speed gradually increasing<br />
to a higher speed<br />
● rubbing fat into flour use a low to medium speed<br />
whisk ● gradually increase to maximum<br />
dough hook ● use a low to medium speed<br />
maximum capacities<br />
shortcrust pastry 450g flour weight<br />
sponge cake (one stage mix) 1.6 Kg total mix<br />
fruit cake mix 1.8 Kg total mix<br />
bread dough 500g flour weight<br />
egg whites 8<br />
5
electronic speed sensor control<br />
Your mixer is fitted with an electronic speed sensor control that is designed to maintain the<br />
speed under different load conditions, such as when kneading bread dough or when eggs are<br />
added to a cake mix. You may therefore hear some variation in speed during the operation as<br />
the mixer adjusts to the load and speed selected - this is normal.<br />
to fit and use the splashguard<br />
1 Fit the bowl into the base and add the ingredients.<br />
2 Fit the tool then lower the mixer head<br />
3 Fit the splashguard onto the bowl by sliding the cut away<br />
section around the mixer head .<br />
4 To remove the splashguard reverse the above<br />
procedure.<br />
● During mixing, ingredients can be added<br />
directly to the bowl via the chute.<br />
6
the attachments available<br />
To buy an attachment not included in your pack, see service and customer care.<br />
attachment attachment code<br />
liquidiser 1.5 l acrylic AT262<br />
1.5 l stainless steel AT263<br />
mincer AT261 comes with medium and coarse screens<br />
food processing attachment AT264 comes with<br />
a knife blade<br />
b reversible thick slicer/shredder<br />
c reversible thin slicer/shredder<br />
d rasping plate (grates parmesan cheese and<br />
potato for German potato dumplings)<br />
e citrus juicer<br />
optional attachments f thin (julienne style) chipper plate<br />
g standard chipper plate<br />
h extra coarse shredder plate<br />
centrifugal juicer AT265<br />
d<br />
h<br />
c<br />
g<br />
b<br />
f<br />
<br />
a<br />
7<br />
e
cleaning and service<br />
care and cleaning<br />
● Always switch off and unplug before cleaning.<br />
power unit ● Wipe with a damp cloth, then dry.<br />
● Never use abrasives or immerse in water.<br />
bowl, tools, ● Wash by hand, then dry thoroughly or wash in the dishwasher.<br />
splashguard, ● Never use a wire brush, steel wool or bleach to clean your<br />
removable guard stainless steel bowl. Use vinegar to remove limescale.<br />
on dough hook ● Keep away from heat (cooker tops, ovens, microwaves).<br />
service and customer care<br />
● If the cord is damaged it must, for safety reasons, be replaced<br />
by <strong>KENWOOD</strong> or an authorised <strong>KENWOOD</strong> repairer.<br />
If you need help with:<br />
● using your machine<br />
● servicing or repairs<br />
Contact the shop where you bought your machine.<br />
recipe<br />
carrot and coriander soup<br />
ingredients ● 25g butter<br />
● 1 onion chopped<br />
● 1 clove garlic crushed<br />
● 750g carrot cut into 1.5 cm cubes<br />
(alternatively for a lighter soup use 600g carrot cut into 1.5 cm cubes)<br />
● cold chicken stock<br />
● 10-15ml ground coriander<br />
● salt and pepper<br />
method 1 Melt the butter in a pan, add the onion and garlic and fry until soft.<br />
2 Place the carrot into the liquidiser, add the onion and garlic. Add sufficient stock to reach the 1.5<br />
level marked on the goblet. Fit the lid and filler cap.<br />
3 Blend on the pulse setting for 5 seconds for a coarse soup or longer for a finer result.<br />
4 Transfer the mixture to a saucepan, add the coriander and seasoning and simmer the soup for 30<br />
to 35 minutes or until cooked.<br />
5 Adjust the seasoning as necessary and add extra liquid if required.<br />
8
faites connaissance avec votre robot de<br />
cuisine Kenwood<br />
sécurité<br />
● Éteignez et débranchez l'appareil avant d'adapter ou de retirer tout<br />
élément, après l'utilisation et avant le nettoyage.<br />
● Ne laissez jamais le cordon pendre de telle façon qu’un enfant puisse<br />
s’en saisir.<br />
● N’approchez jamais vos doigts des éléments ou des accessoires<br />
mobiles. Ne mettez jamais vos doigts etc. dans la charnière de<br />
l’appareil.<br />
● Ne laissez jamais l’appareil sous tension sans surveillance.<br />
● N’utilisez jamais un appareil en mauvais état. Faites-le vérifier ou réparer<br />
: reportez-vous à la rubrique « service après-vente »en page 24.<br />
● Ne mouillez jamais le bloc moteur, le cordon d’alimentation ou la prise.<br />
● N’utilisez jamais un accessoire non adapté à cet appareil ou plus d’un<br />
accessoire à la fois.<br />
● Lorsque vous utilisez un accessoire, lisez les instructions de sécurité<br />
fournies avec celui-ci.<br />
● Ne dépassez jamais les capacités maximales de charge de l’appareil<br />
telles qu’elles sont précisées en page 21.<br />
● Prenez des précautions lorsque vous soulevez cet appareil. Assurezvous<br />
que la tête est verrouillée et que le bol, les ustensiles et le cordon<br />
sont bloqués avant de soulever le robot.<br />
● Ne laissez pas les personnes handicapées se servir de l'appareil sans<br />
surveillance.<br />
● Ne laissez pas les enfants jouer avec l’appareil ni l’utiliser.<br />
● N’employez l’appareil qu’à la fin domestique prévue. Kenwood décline<br />
toute responsabilité dans les cas où l’appareil est utilisé incorrectement<br />
ou que les présentes instructions ne sont pas respectées.<br />
avant de brancher l’appareil<br />
● Assurez-vous que la tension de votre installation est la même que celle<br />
indiquée sous votre appareil.<br />
● Cet appareil est conforme à la Directive 89/336/CEE de la<br />
Communauté économique européenne<br />
16<br />
F
avant d’utiliser votre appareil pour la première fois<br />
1 Retirez tous les emballages.<br />
2 Poussez le surplus de cordon dans le compartiment range-cordon situé<br />
à l’arrière de l’appareil.<br />
3 Lavez les différentes parties de l’appareil : reportez-vous à la page 24 «<br />
entretien et nettoyage de l’appareil ».<br />
faites connaissance avec votre robot<br />
de cuisine Kenwood<br />
sortie vitesse moyenne<br />
sortie vitesse élevée<br />
douille pour accessoires<br />
manette de déblocage de la tête<br />
tête du batteur<br />
bol<br />
bouton marche/arrêt (on/off) et de réglage de<br />
la vitesse<br />
bloc moteur<br />
compartiment range-cordon<br />
batteur<br />
crochet pétrisseur et protection amovible<br />
fouet<br />
protection anti-projections <br />
<br />
<br />
<br />
<br />
<br />
17
le mixer<br />
les accessoires du batteur et quelques-unes de leurs<br />
utilisations possibles<br />
batteur ● Pour la confection de cakes, biscuits, pâtisseries, glaçages,<br />
garnitures, éclairs et purées de pommes de terre.<br />
fouet ● Pour les œufs, la crème, la pâte à beignet, les gâteaux sans<br />
matière grasse, les meringues, les gâteaux au fromage, les<br />
mousses, les soufflés. N’utilisez pas le fouet pour les mélanges<br />
épais (ex matière grasse et sucre) – vous pourriez l’endommager.<br />
crochet à pâte ● Pour les mélanges à base de levure.<br />
utilisation de votre batteur<br />
1 Appuyez sur la manette de déblocage de la tête et levez le batteur<br />
jusqu’à ce qu’il s’enclenche en position.<br />
pour insérer<br />
un ustensile 2 Sélectionnez un ustensile et enfoncez-le dans la sortie pour accessoires .<br />
● Assurez-vous toujours que la protection est installée sur l’arbre du<br />
crochet pétrisseur avant de l’insérer dans la sortie. Une fois<br />
l’ustensile inséré, placez la protection sur la sortie du batteur pour<br />
éviter les projections d’aliments.<br />
3 Placez le bol sur le socle et tournez dans le sens des aiguilles<br />
d’une montre pour le verrouiller dans sa position .<br />
4 Appuyez sur la manette de déblocage de la tête et abaissez la tête<br />
du batteur jusqu’à ce qu’elle s’enclenche dans sa position.<br />
5 Branchez l’appareil sur l’alimentation électrique, allumez-le, puis<br />
positionnez le sélecteur sur la vitesse désirée. Pour arrêter<br />
l’appareil, mettez-le en position « 0 ».<br />
● Sélectionnez la touche pulse P pour les courtes impulsions.<br />
6 Débranchez l’appareil de l’alimentation électrique.<br />
pour retirer<br />
un ustensile 7 Levez la tête du batteur et, tout en tenant l’appareil fermement, retirez<br />
l’ustensile de la sortie.<br />
important ● Les mouvements au niveau de la tête du batteur sont<br />
normaux lorsque vous mixez des ingrédients lourds, tels<br />
que la pâte à pain.<br />
● Si vous soulevez la tête du batteur alors que l’appareil fonctionne,<br />
celui-ci s’arrête immédiatement. Pour redémarrer le batteur,<br />
abaissez la tête, positionnez le sélecteur de vitesse sur "Arrêt",<br />
attendez quelques secondes, puis sélectionnez à nouveau une<br />
vitesse. Le batteur doit se remettre en marche immédiatement.<br />
● Si, pour une raison quelconque, l’alimentation électrique du<br />
batteur est interrompue et l’appareil s’arrête, positionnez le<br />
sélecteur de vitesse sur « arrêt », attendez quelques secondes,<br />
puis sélectionnez à nouveau une vitesse. Le batteur doit se<br />
remettre en marche immédiatement.<br />
● Le batteur ne fonctionnera pas si tous les caches des sorties ne sont<br />
pas correctement installés sur l’appareil.<br />
● Si vous entendez votre appareil forcer, éteignez-le et retirez un peu de<br />
la préparation ou augmentez la vitesse.<br />
18
astuces ● Éteignez l’appareil et raclez le bol avec la spatule si nécessaire.<br />
● Il est conseillé d’utiliser des œufs à température ambiante pour les battre.<br />
● Avant de monter des blancs en neige, vérifiez qu’il n’y a pas de graisse<br />
ou de jaune d’œuf sur le fouet ou dans le bol.<br />
● Utilisez des ingrédients froids pour la pâte sauf indications contraires<br />
mentionnées sur votre recette.<br />
● Si vous préparez des gâteaux à base de matière grasse et de sucre,<br />
utilisez-les toujours à température ambiante ou faites-les ramollir<br />
auparavant.<br />
● Votre batteur est équipé d’une fonction « démarrage lent » pour<br />
réduire les débordements. En revanche, si l’appareil est allumé avec un<br />
mélange épais dans le bol comme de la pâte à pain, vous pouvez<br />
remarquer que le batteur met quelques secondes pour atteindre la<br />
vitesse sélectionnée.<br />
points importants pour la fabrication du pain<br />
important ● Ne dépassez jamais les capacités maximales indiquées – vous<br />
surchargeriez l’appareil.<br />
● Les mouvements au niveau de la tête du batteur sont normaux lorsque<br />
vous mixez des ingrédients lourds, tels que la pâte à pain.<br />
● Les ingrédients se mélangeront mieux si vous versez les liquides en premier.<br />
● Arrêtez régulièrement l’appareil et raclez le mélange avec le crochet à pâte.<br />
● Différents types de farine varient considérablement dans les quantités<br />
de liquide nécessaires et la viscosité de la pâte peut avoir un effet<br />
important sur la charge imposée à la machine. Il est conseillé<br />
d’observer l’appareil pendant le mélange de la pâte ; l’opération ne doit<br />
pas durer plus de 6-8 minutes.<br />
sélecteur de vitesse<br />
Ces éléments sont donnés à titre indicatif et peuvent varier en fonction<br />
de la quantité de préparation dans le bol et des ingrédients travaillés.<br />
batteur ● Pour travailler la matière grasse et le sucre, commencez à<br />
vitesse minimale et augmentez progressivement à une vitesse plus élevée<br />
● Pour incorporer des œufs à des préparations crémeuses,<br />
utilisez une vitesse moyenne à élevée<br />
● Pour incorporer de la farine, des fruits, etc., utilisez une<br />
vitesse faible à élevée<br />
● Pour les gâteaux tout en un, commencez à basse vitesse et<br />
augmentez progressivement à une vitesse plus élevée.<br />
● Pour incorporer de la matière grasse à la farine, utilisez une<br />
vitesse faible à moyenne<br />
fouet ● augmentez progressivement à la vitesse maximale<br />
crochet pétrisseur ● utilisez une vitesse faible à moyenne<br />
capacités maximales<br />
pâte brisée 450 g de farine<br />
génoise (mélange en une étape) 1.6 kg de mélange en tout<br />
cake aux fruits 1.8 kg de mélange en tout<br />
pâte à pain 500 g de farine<br />
blancs d’œuf 8<br />
19
commande à capteur de vitesse électronique<br />
Votre batteur est équipé d’une commande à capteur de vitesse<br />
électronique conçu pour maintenir la vitesse dans différentes conditions<br />
de charge, comme lorsque l’on pétrit de la pâte à pain ou incorpore les<br />
œufs dans une pâte à gâteaux. Vous pouvez donc entendre des<br />
variations de vitesse pendant l’opération alors que le batteur s’adapte à<br />
la charge et à la vitesse sélectionnée – c’est normal.<br />
installation et utilisation de la<br />
protection anti-projections<br />
1 Installez le bol sur le socle et ajoutez les ingrédients.<br />
2 Installez l’ustensile, puis abaissez la tête du batteur<br />
3 Placez la protection sur le bol en faisant glisser la partie<br />
ouverte autour de la tête du batteur .<br />
4 Pour retirer la protection anti-projections,<br />
répétez la procédure ci-dessus dans l’ordre<br />
inverse.<br />
● Les ingrédients peuvent être ajoutés<br />
directement dans le bol par l’ouverture<br />
pendant le fonctionnement de l’appareil.<br />
20
les accessoires disponibles<br />
Pour acheter un accessoire non fourni avec votre appareil, consultez la section<br />
« Service après vente ».<br />
accessoire code accessoire<br />
mixeur 1.5 l acrylique AT262<br />
1.5 l acier inoxydable AT263<br />
hachoir AT261 fourni avec les grilles à hacher moyenne et<br />
grossière<br />
accessoire préparateur<br />
culinaire AT264 fourni avec<br />
a Une lame couteau<br />
b éminceur/râpe épais réversible<br />
c éminceur/râpe fin réversible<br />
d disque râpe (râpe le parmesan et les<br />
pommes de terre pour réaliser des boulettes)<br />
e presse-agrumes<br />
accessoires optionnels f grille à couper fin (pour couper en julienne)<br />
g grille à découper standard<br />
h grille à hacher extragros<br />
centrifugeuse AT265<br />
e<br />
d<br />
h<br />
c<br />
g<br />
b<br />
f<br />
<br />
a<br />
21
nettoyage et entretien<br />
entretien et nettoyage<br />
● Éteignez toujours votre appareil et débranchez-le avant de le nettoyer.<br />
bloc-moteur ● Essuyez avec un chiffon humide, puis séchez.<br />
● N’utilisez jamais d’abrasifs et n’immergez jamais l’appareil.<br />
bol, ustensiles, ● Lavez-les à la main, puis séchez soigneusement ou lavez-les au<br />
protection anti- lave-vaisselle.<br />
projections, ● N’utilisez jamais de brosse métallique, de paille de fer ou de chlore pour<br />
protection amovible nettoyer votre bol en acier inoxydable. Utilisez du vinaigre pour enlever<br />
du crochet le calcaire.<br />
pétrisseur ● Tenez votre robot toujours éloigné des sources de chaleurs (plaques de<br />
cuisson, fours, fours à micro-ondes).<br />
service après-vente et assistance clientèle<br />
● Si le cordon est endommagé, il faut impérativement, pour des raisons<br />
de sécurité, qu’il soit remplacé par <strong>KENWOOD</strong> ou par un réparateur<br />
agréé <strong>KENWOOD</strong>.<br />
Si vous avez besoin d’assistance pour :<br />
● utiliser votre appareil<br />
● faire réparer ou entretenir votre appareil<br />
Contactez le magasin où vous avez acheté votre appareil.<br />
recette<br />
soupe aux carottes et à la coriandre<br />
ingrédients ● 25 g de beurre<br />
● 1 oignon émincé<br />
● 1 gousse d’ail écrasée<br />
● 750 g de carottes coupées en cubes de 1,5 cm<br />
(pour une soupe plus légère, vous pouvez utiliser 600 g de carottes<br />
coupées en cubes de 1,5 cm)<br />
● bouillon de poulet froid<br />
● 10-15 ml (2 à 3 cuillères à café) de coriandre hachée<br />
● sel et poivre<br />
méthode 1 Faites fondre le beurre dans une poêle, ajoutez l’ail, l’oignon et faites<br />
fondre le tout.<br />
2 Placez les carottes dans le mixer, ajoutez l’oignon et l’ail. Ajoutez<br />
suffisamment de bouillon pour atteindre le niveau 1.5 marqué sur le bol.<br />
Mettez en place le couvercle et le bouchon de remplissage.<br />
3 Mélangez avec la touche pulse pendant 5 secondes pour obtenir une<br />
soupe épaisse ou plus longtemps pour obtenir une préparation plus<br />
fine.<br />
4 Versez le mélange dans une casserole, ajoutez la coriandre et<br />
l’assaisonnement faites frémir pendant 30 à 35 minutes ou jusqu’à<br />
cuisson complète.<br />
5 Ajustez l’assaisonnement si nécessaire et ajoutez éventuellement du<br />
liquide.<br />
22
Die Bestandteile Ihrer Kenwood<br />
Küchenmaschine<br />
Sicherheit<br />
● Schalten Sie das Gerät vor dem Anbringen oder Entfernen von<br />
Werkzeugen, nach dem Gebrauch und vor der Reinigung aus und<br />
ziehen Sie den Stecker aus der Steckdose.<br />
● Achten Sie darauf, dass kein Kabel in Reichweite eines Kindes ist.<br />
● Halten Sie Ihre Finger von beweglichen Teilen und aufgesetzten<br />
Werkzeugen entfernt. Stecken Sie Ihre Finger usw. niemals in den<br />
Scharniermechanismus.<br />
● Lassen Sie das Gerät niemals unbeaufsichtigt laufen.<br />
● Verwenden Sie niemals ein Gerät, das beschädigt ist. Lassen Sie es<br />
überprüfen oder reparieren. Siehe „Service“ auf Seite 33.<br />
● Achten Sie darauf, dass Motorblock, Kabel und Stecker niemals nass<br />
werden.<br />
● Verwenden Sie nur zugelassene Zubehörteile und immer nur eins auf<br />
einmal.<br />
● Vor Verwenden eines Zubehörteils, lesen Sie die mitgelieferten<br />
Sicherheitshinweise durch.<br />
● Überschreiten Sie niemals die auf Seite 30 aufgeführten<br />
Höchstmengen.<br />
● Achtung beim Anheben dieses Gerätes. Vor Anheben des Rührarms<br />
stellen Sie sicher, dass dieser verriegelt ist und Becher, Zubehör und<br />
Kabel gesichert sind.<br />
● Gebrechliche Personen dürfen die Maschine nicht ohne Aufsicht<br />
benutzen.<br />
● Kinder dürfen das Gerät weder benutzen, noch damit spielen.<br />
● Verwenden Sie das Gerät nur für seinen vorgesehenen Zweck im<br />
Haushalt. Bei unsachgemäßer Benutzung oder Nichteinhaltung dieser<br />
Anweisungen übernimmt Kenwood keinerlei Haftung.<br />
Vor dem Einschalten<br />
● Vergewissern Sie sich, dass Ihre Stromversorgung den Angaben auf<br />
der Unterseite des Geräts entspricht.<br />
● Dieses Gerät erfüllt die Anforderungen der EG-Leitlinie 89/336/EWG.<br />
23<br />
D
Vor dem ersten Gebrauch<br />
1 Entfernen Sie sämtliche Verpackungen.<br />
2 Drücken Sie überschüssiges Kabel in das Kabelfach an der Rückseite<br />
des Mixers.<br />
3 Waschen Sie die Teile wie unter „Pflege und Reinigung“ auf Seite 33<br />
beschrieben.<br />
Die Bestandteile Ihrer Kenwood Küchenmaschine<br />
Ausgang mittlere Drehzahl<br />
Ausgang hohe Drehzahl<br />
<br />
Werkzeug-Anschlussteil<br />
Freigabeschalter für Rührarm<br />
Mixerkopf<br />
Schüssel<br />
Ein/Ausschalter und Geschwindigkeitsschalter<br />
Antriebsaggregat<br />
Kabelfach<br />
Rührwerkzeug<br />
Knethaken mit abnehmbaren Schutz<br />
Schneebesen<br />
Spritzschutz<br />
<br />
<br />
<br />
<br />
<br />
<br />
24
Der Mixer<br />
Die Mischwerkzeuge und ihre Verwendung<br />
Rührwerkzeug ● Für Kuchen, Kekse, Gebäck, Glasuren, Füllungen, Eclairs und<br />
Kartoffelbrei.<br />
Schneebesen ● Für Eier, Sahne, Teig, fettfreien Biskuitteig, Baiser, Käsekuchen,<br />
Mousse, Soufflés. Der Schneebesen darf nicht für schwere<br />
Massen (z.B. zum Cremigrühren von Fett und Zucker) verwendet<br />
werden, weil er dadurch beschädigt werden könnte.<br />
Knethaken ● Für Hefeteig.<br />
Benutzen Ihres Mixers<br />
1 Drücken Sie den Freigabeschalter für den Rührarm nach unten<br />
und heben diesen soweit an, bis es einrastet.<br />
Einfügen eines<br />
Zubehörteils 2 Wählen Sie ein Zubehörteil und drücken es in die dafür vorgesehene<br />
Fassung .<br />
● Achten Sie immer darauf, dass der Sicherheitsschutz des Knethakens<br />
an der Welle angebracht ist, bevor Sie diesen in den Ausgang<br />
stecken. Sobald dieser eingerastet ist, bringen Sie den Schutz<br />
zum Ein- bzw. Austreten von Nahrungsmitteln an.<br />
3 Setzen Sie den Becher auf den Untersatz und drehen ihn im<br />
Uhrzeigersinn bis er einrastet .<br />
4 Drücken Sie den Freigabeschalter für den Rührarm nach unten<br />
und heben diesen soweit an, bis er einrastet.<br />
5 Gerät anstecken, einschalten und Drehzahl auf die gewünschte<br />
Stufe stellen. Zum Ausschalten auf '0' stellen.<br />
● Für kurze Intervallstöße auf Impulsstufe P stellen.<br />
6 Stromstecker ziehen.<br />
Entfernen eines<br />
Zubehörteils 7 Rührarm des Mixers anhebe, festhalten und das Zubehörteil vom<br />
Ausgang abziehen.<br />
wichtig ● Etwas Spiel des Rührarms, wenn Schweres, wie Brotteig,<br />
verarbeitet wird, ist normal.<br />
● Wird der Rührarm des Mixers während des Betriebs angehoben, stoppt<br />
das Gerät sofort automatisch. Zum Wiedereinschalten des Mixers,<br />
Rührarm absenken, Drehzahlregler abschalten, ein paar Sekunden<br />
warten und erneut die gewünschte Drehzahl wählen. Der Mixer<br />
sollte umgehend weiter machen.<br />
● Falls die Stromzufuhr aus irgendeinem Grund zum Mixer<br />
unterbrochen werden sollte und das Gerät ausgeschaltet wird,<br />
Drehzahlregler ausschalten, ein paar Sekunden warten und<br />
erneut die gewünschte Drehzahl wählen. Der Mixer sollte<br />
umgehend weiter machen.<br />
<br />
● Der Mixer funktioniert nur, wenn sämtliche Abdeckungen für<br />
Ausgänge am Gerät angebracht sind.<br />
● Sollten Sie den Eindruck haben, das Gerät arbeitet zu mühsam,<br />
schalten Sie es entweder ab und entfernen einen Teil der Mischung<br />
oder erhöhen Sie die Geschwindigkeit.<br />
25
Tipps ● Schalten Sie das Gerät ab und schaben Sie die Schüssel bei Bedarf mit<br />
einem Spatel aus.<br />
● Zum Schlagen eignen sich am besten Eier, die Raumtemperatur haben.<br />
● Vergewissern Sie sich vor dem Steifschlagen von Eiweiß, dass der<br />
Schneebesen und die Schüssel frei von Fett und Eigelb sind.<br />
● Wenn im Rezept nicht anders angegeben, sollten die Zutaten für<br />
Gebäck kalt sein.<br />
● Beim Cremigrühren von Fett und Zucker für Kuchenteig sollte das Fett<br />
immer Raumtemperatur haben oder es muss zuerst weich werden.<br />
● Ihr Mixer ist mit einem „Soft Start“ Merkmal ausgestattet, damit<br />
möglichst wenig verschüttet wird.<br />
Wenn das Gerät aber mit einem schweren Teig, wie z.B. Brotteig, in der<br />
Schüssel eingeschaltet wird, kann es sein, dass der Mixer einige<br />
Sekunden braucht, bis er die gewählte Geschwindigkeit erreicht hat.<br />
Hinweise zur Brotherstellung<br />
wichtig ● Befüllen Sie niemals mehr als die angegebene maximale Menge, das<br />
Gerät wird überladen.<br />
● Etwas Spiel des Rührarms, wenn Schweres, wie Brotteig, verarbeitet<br />
wird, ist normal.<br />
● Die Zutaten lassen sich am besten vermischen, wenn Sie zuerst die<br />
Flüssigkeit einfüllen.<br />
● Stoppen Sie das Gerät zwischendurch und schaben Sie den Teig vom<br />
Knethaken ab.<br />
● Je nach Mehlcharge kann die benötigte Flüssigkeitsmenge erheblich<br />
abweichen und die Klebrigkeit des Teigs kann einen starken Einfluss auf<br />
die Belastung Ihres Geräts haben. Wir raten Ihnen, das Gerät während<br />
des Mischens des Teigs zu beobachten – der Vorgang sollte nicht<br />
länger als 6-8 Minuten dauern.<br />
26
Drehzahlregler<br />
Das sind nur Richtwerte und hängen von der Menge der Mischung im<br />
Behälter und den zu vermischenden Zutaten ab.<br />
Schneebesen ● Cremig schlagen von Fett und Zucker – bei min starten und die<br />
Drehzahl langsam erhöhen<br />
● Hinzufügen von Eiern in cremig geschlagene Mixturen bei<br />
mittlerer Geschwindigkeit<br />
● Beimischen von Mehl, Früchten usw. bei niedriger bis mittlerer<br />
Drehzahl<br />
● Bei kompletten Backmischungen – mit niedriger Drehzahl starten<br />
und diese langsam erhöhen<br />
● Fett mit Mehl verreiben – bei niedriger bis mittlerer Drehzahl<br />
Schneebesen ● langsam auf maximale Drehzahl steigern<br />
Knethaken ● niedrige bis mittlere Geschwindigkeit<br />
Höchstmengen<br />
Mürbeteig 450g Mehl<br />
Biskuitkuchen (Einstufenmix) 1.6kg Gesamtmasse<br />
Früchtekuchenteig 1.8kg Mehl<br />
Brotteig 500g Mehl<br />
Eiweiß 8<br />
27
Elektronische Geschwindigkeitssensorkontrolle<br />
Ihr Mixer ist mit einer elektronischen Geschwindigkeitssensorkontrolle<br />
ausgestattet, die dazu dient, die Geschwindigkeit unter verschiedenen<br />
Belastungsbedingungen aufrechtzuerhalten, beispielsweise beim<br />
Kneten von Brotteig oder beim Einarbeiten von Eiern in einen<br />
Kuchenteig. Deshalb kann die Geschwindigkeit im Betrieb hörbar<br />
variieren, wenn der Mixer die Geschwindigkeit an die jeweilige<br />
Belastung und die gewählte Geschwindigkeit anpasst – das ist normal.<br />
Spritzschutz anbringen und<br />
verwenden<br />
1 Becher in das Unterteil stecken und Zutaten hineingeben.<br />
2 Zubehörteil einsetzen und Mixer-Rührarm absenken<br />
3 Setzen Sie den Spritzschutz auf den Becher,<br />
indem die den herausgetrennten Teil um den<br />
Mixer-Rührarm schieben .<br />
4 Zum Abnehmen des Spritzschutzes, gehen<br />
Sie in umgekehrter Reihenfolge vor.<br />
● Während des Mixens können Zutaten direkt<br />
über den Zufuhrtrichter in den Becher<br />
hinzugefügt werden.<br />
28
vorhandene Zubehörteile<br />
Zubehörteile, die nicht in Ihrem Lieferumfang dabei waren, finden Sie unter Service und Kundebetreuung.<br />
Zubehö Zubehör-Code<br />
Liquidiser 1.5 l Acryl AT262<br />
1.5 l Edelstahl AT263<br />
Fleischwolf AT261 wird mit einer mittleren und einer groben Scheibe geliefert<br />
Food Prozessor Zubehör AT264 wird ausgeliefert mit<br />
a Schneidmesser<br />
b Wendescheibe grob zum Schneiden/Hacken<br />
c Wendescheibe fein zum Schneiden/Hacken<br />
d Raspelscheibe (reibt Parmesan und Kartoffeln<br />
für Kartoffelpuffer) Kartoffel für Kartoffelpuffer)<br />
e Zitruspresse<br />
Optionale Zubehörteile f dünne Schneidplatte<br />
g standard Schneidplatte<br />
h extra grobe Schnitzelplatte<br />
Saftzentrifuge AT265<br />
d<br />
h<br />
c<br />
g<br />
b<br />
f<br />
<br />
a<br />
e<br />
29
Reinigung und Service<br />
Pflege und Reinigung<br />
● Schalten Sie vor jeder Reinigung das Gerät aus und ziehen Sie den<br />
Stecker aus der Steckdose.<br />
Antriebsaggregat ● Wischen Sie das Gehäuse mit einem feuchten Tuch ab und trocknen<br />
Sie es dann ab.<br />
● Verwenden Sie niemals scheuernde Mittel und tauchen Sie das Gerät<br />
niemals in Wasser.<br />
Schüssel, ● Waschen Sie die Teile von Hand und trocknen Sie sie gründlich ab oder<br />
Zubehör, waschen Sie die Teile in der Geschirrspülmaschine.<br />
Spritzschutz, ● Verwenden Sie zum Reinigung Ihrer Edelstahlschüssel niemals eine<br />
abnehmbarer Drahtbürste, Stahlwolle oder Bleichmittel. Kalkflecken können mit Essig<br />
Schutz entfernt werden.<br />
Knethaken ● Halten Sie das Gerät von Hitzequellen entfernt (Herdplatten,<br />
Öfen, Mikrowelle).<br />
Service und Kundendienst<br />
● Wenn das Kabel beschädigt ist, muss es aus Sicherheitsgründen von<br />
<strong>KENWOOD</strong> oder einem genehmigten <strong>KENWOOD</strong> Reparaturbetrieb<br />
ersetzt werden.<br />
Wenn Sie Hilfe benötigen:<br />
● bei der Verwendung des Geräts<br />
● für Service oder Reparatur<br />
kontaktieren Sie bitte den Händler, bei dem Sie Ihr Gerät gekauft<br />
haben.<br />
30
Rezepte<br />
Möhren-Koriander-Suppe<br />
Zutaten ● 25 g Butter<br />
● 1 gehackte Zwiebel<br />
● 1 zerdrückte Knoblauchzehe<br />
● 750 g Karotten in 1,5 cm Würfel geschnitten<br />
(alternativ für eine leichtere Suppe 600 g Karotten in 1,5 cm Würfel<br />
geschnitten)<br />
● kalte Hühnerbrühe<br />
● 10-15 ml (2-3 TL) gemahlener Koriander<br />
● Salz und Pfeffer<br />
Zubereitung 1 Butter in einer Pfanne schmelzen, Zwiebel und Knoblauch zufügen<br />
und glasig dünsten.<br />
2 Möhren in den Pürierer geben, Zwiebeln und Knoblauch zufügen. So<br />
viel Hühnerbrühe zufügen, dass die 1,5 Markierung auf dem Gefäß<br />
erreicht ist. Deckel und Füllkappe aufsetzen.<br />
3 Für eine etwas gröbere Suppe halten Sie die Impulsstufe etwa 5<br />
Sekunden gedrückt, für eine feinere länger.<br />
4 Suppe in einen Topf schütten, Koriander und Gewürze zufügen und<br />
Suppe 30 bis 35 Minuten lang köcheln lassen.<br />
5 Bei Bedarf nachwürzen und mehr Flüssigkeit zufügen.<br />
31
conoscere il vostro robot da cucina Kenwood<br />
sicurezza<br />
● Prima di montare o smontare gli accessori, dopo l’uso o prima della<br />
pulizia, spegnere l’apparecchio e togliere la spina dalla presa elettrica.<br />
● Non lasciare mai che il cavo penzoli da una superficie dove un bambino<br />
potrebbe afferrarlo.<br />
● Tenere le dita lontano dalle parti in movimento e dagli accessori<br />
montati. Non inserire mai le dita ecc. nel meccanismo a cerniera.<br />
● Non lasciare mai l’apparecchio incustodito.<br />
● Non utilizzare mai un apparecchio danneggiato. Farlo controllare o<br />
riparare: vedere la sezione ‘manutenzione’ a pagina 41.<br />
● Non lasciare mai che il corpo motore, il cavo o la spina si bagni.<br />
● Non usare mai un accessorio non autorizzato, oppure più di un<br />
accessorio alla volta.<br />
● Quando si usa un accessorio, leggere le informazioni sulla sicurezza in<br />
dotazione.<br />
● Non superare mai le capacità massime riportate a pagina 38.<br />
● Fare attenzione nel sollevare l’apparecchio. Prima verificare che testa,<br />
recipiente, utensili e cavo siano ben saldi.<br />
● Non lasciare che persone incapaci utilizzino l'apparecchiatura senza<br />
● Non consentire a bambini di utilizzare o giocare con l'apparecchio.<br />
● Utilizzare l'apparecchio solo per l'uso domestico per cui è stato<br />
realizzato. Kenwood non si assumerà alcuna responsabilità se<br />
l'apparecchio viene utilizzato in modo improprio o senza seguire le<br />
presenti istruzioni.<br />
prima di collegare l’apparecchio alla rete elettrica<br />
● Assicurarsi che la tensione della vostra rete elettrica corrisponda a<br />
quella riportata sulla targhetta posta sul fondo dell’apparecchio.<br />
● Questo apparecchio è conforme alla Direttiva della Comunità<br />
Economica Europea 89/336/EEC.<br />
32<br />
I
prima di usare l’apparecchio per la prima volta<br />
1 Togliere tutto il materiale di imballaggio.<br />
2 Spingere il cavo in eccedenza nell’apposita rientranza sul retro del<br />
mixer.<br />
3 Lavare le parti: vedere la sezione ‘manutenzione e pulizia’ a pagina 41.<br />
conoscere il vostro robot da cucina Kenwood<br />
attacco a media velocità<br />
attacco ad alta velocità<br />
attacco per gli accessori<br />
leva sblocca-testa<br />
testa del mixer<br />
ciotola<br />
interruttore acceso/spento e selettore della velocità<br />
corpo motore<br />
rientranza per il cavo<br />
frusta<br />
gancio impastatore con protezione rimovibile<br />
frullino<br />
paraspruzzi<br />
<br />
<br />
<br />
<br />
<br />
<br />
33
il mixer<br />
gli accessori per miscelare e il loro uso<br />
frusta ● Per preparare torte, biscotti, pasta frolla e simili, glassa, ripieni, bigné e<br />
purea di patate<br />
frullino ● Per uova, panna, pastelle, pan di spagna senza grassi, meringhe,<br />
cheesecake, mousse e soufflé. Non utilizzare il frullino nel caso di<br />
miscele dense (ad esempio per montare burro e zucchero),<br />
potrebbero danneggiarla.<br />
braccio impastatore ● Per impasti con lievito di birra.<br />
per usare il mixer<br />
1 Premere la leva sblocca-testa e sollevare la testa fino a bloccarla in<br />
posizione<br />
per inserire un utensile 2 Scegliere l’utensile desiderato e spingerlo nell’apposito attacco .<br />
● Controllare di montare sempre la protezione sull’albero del braccio<br />
impastatore, prima di inserirlo nell’attacco. Dopo averlo inserito,<br />
montare la protezione sull’attacco del mixer, per impedire l’ingresso<br />
degli alimenti.<br />
3 Montare il recipiente sulla base e girarlo in senso orario per<br />
bloccarlo in posizione .<br />
4 Premere la leva sblocca-testa e abbassare la testa del mixer fino a<br />
bloccarla in posizione.<br />
5 Inserire la spina nella presa di corrente, accendere e impostare la<br />
velocità come desiderato. Per spegnere, spostare il selettore su<br />
‘0’.<br />
● Per azionare l’apparecchio in modo intermittente, impostare su P.<br />
6 Togliere la spina dalla presa elettrica.<br />
per estrarre un utensile 7 Sollevare la testa del mixer. Mentre la si tiene ferma, tirare l’utensile ed<br />
estrarlo dall’attacco.<br />
importante ● Quando si lavorano ingredienti pesanti, come impasti per il<br />
pane, è normale che la testa del mixer si muova.<br />
● Se la testa del mixer viene sollevata con l’apparecchio in funzione,<br />
quest’ultimo si ferma immediatamente. Per farlo ripartire, abbassare la<br />
testa del mixer, impostare la velocità sulla posizione spenta, attendere<br />
qualche secondo e poi selezionare nuovamente la velocità. Il mixer<br />
dovrebbe rimettersi subito in funzione.<br />
● Se per qualunque motivo dovesse mancare la corrente e il mixer<br />
smette di funzionare, spostare il selettore sulla posizione spenta,<br />
attendere qualche secondo e poi selezionare nuovamente la velocità.<br />
Il mixer dovrebbe rimettersi subito in funzione.<br />
<br />
● Il mixer non funziona se prima non si montano correttamente tutti i<br />
coperchi sull’apparecchio.<br />
● Se si sente che l’apparecchio funziona con fatica, spegnerlo ed estrarre<br />
parte della miscela, o alternativamente alzare la velocità.<br />
34
suggerimenti ● Se necessario spegnere l’apparecchio e raschiare la ciotola con una<br />
spatola.<br />
● Per montare le uova è meglio utilizzare uova a temperatura ambiente.<br />
● Prima di montare albumi assicurarsi che il frullino o la ciotola non siano<br />
unti o sporchi di tuorlo.<br />
● Utilizzare ingredienti freddi per preparate pasta frolla e simili, a meno<br />
che la ricetta non indichi diversamente.● Quando si montano burro e<br />
zucchero per preparare torte utilizzare<br />
sempre burro a temperatura ambiente o farlo prima ammorbidire.<br />
● Il vostro mixer è dotato della funzione ‘partenza dolce’ per minimizzare<br />
il rischio di fuoriuscita degli ingredienti.<br />
Tuttavia, se l’apparecchio viene avviato con una miscela di consistenza<br />
elevata nella ciotola, come l’impasto per il pane, potreste notare che<br />
il mixer impiega alcuni secondi per raggiungere la velocità selezionata.<br />
punti da ricordate nella preparazione del pane<br />
importante ● Non superare mai le capacità massime indicate, altrimenti si<br />
sovraccarica l’apparecchio.<br />
● Quando si lavorano ingredienti pesanti, come impasti per il pane, è<br />
normale che la testa del mixer si muova.<br />
● Gli ingredienti si mescolano meglio se si versa prima il liquido.<br />
● Di tanto in tanto fermare l’apparecchio e pulire il braccio impastatore<br />
dall’impasto.<br />
● Partite di farina diverse richiedono quantità di liquido notevolmente<br />
diverse e la viscosità dell’impasto può avere effetti marcati sul carico<br />
imposto all’apparecchio. Si consiglia di tenere l’apparecchio sotto<br />
controllo mentre prepara l’impasto, questa operazione dovrebbe<br />
richiedere non più di 6-8 minuti.<br />
selettore della velocità<br />
Queste informazioni sono indicative e dipenderanno dalla quantità di<br />
ingredienti nel recipiente e dal tipo di alimenti lavorati.<br />
frusta ● per montare burro e zucchero, iniziare a velocità minima o poi<br />
aumentarla in modo graduale<br />
● per sbattere le uova, usare una velocità medio-alta<br />
● per incorporare farina, frutta, ecc., usare una velocità medio-bassa<br />
● per miscele per torte, iniziare a iniziare a velocità minima o poi<br />
aumentarla in modo graduale<br />
● per incorporare il burro nella farina, usare la frusta a velocità mediobassa<br />
● alzare gradualmente la velocità fino al massimo<br />
braccio impastatore ● usare una velocità medio-bassa<br />
capacità massime<br />
pasta frolla 450 g di farina<br />
pan di spagna<br />
(lavorazione monostadio) 1.6 kg di miscela totale<br />
composto per torta alla frutta 1.8 kg di miscela totale<br />
impasto per pane 500 g di farina<br />
albumi 8<br />
35
sensore elettronico della velocità<br />
Il vostro mixer è dotato di un sensore elettronico della velocità<br />
progettato allo scopo di mantenere costante la velocità in condizioni di<br />
carico diverse, per esempio nel caso della lavorazione del pane o<br />
quando si aggiungono uova a una miscela per dolci. Pertanto è<br />
possibile che la velocità vari durante la lavorazione, poiché il mixer si<br />
adatta al carico e alla velocità selezionata; tutto ciò è normale.<br />
per montare e usare il<br />
paraspruzzi<br />
1 Montare il recipiente sulla base e aggiungere gli ingredienti.<br />
2 Montare l’utensile e poi abbassare la testa del mixer.<br />
3 Installare il paraspruzzi sul recipiente facendo<br />
passare la sezione tagliata attorno alla testa del<br />
mixer .<br />
4 Per togliere il paraspruzzi, invertire la<br />
procedura suddetta.<br />
● Durante la miscelazione è possibile<br />
aggiungere ingredienti direttamente nel<br />
recipiente, usando lo scivolo di introduzione.<br />
36
accessori disponibili<br />
Per acquistare un accessorio non in dotazione, vedere la sezione ‘Manutenzione e assistenza<br />
tecnica’.<br />
accessorio cod. accessorio<br />
frullatore 1,5l acrilico AT262<br />
1,5l acciaio inox AT263<br />
tritatutto AT261, include filiera media e grossa<br />
accessorio robot AT264, include:<br />
a lama<br />
b affettatutto/sminuzzatutto grosso reversibile<br />
c affettatutto/sminuzzatutto fine reversibile<br />
d disco per grattugiare (per parmigiano e patate<br />
per fare gli gnocchi alla tedesca)<br />
e spremiagrumi<br />
accessori facoltativi f disco fine per patatine (a fiammifero)<br />
g disco standard per patatine<br />
h disco per sminuzzare extra-grosso<br />
spremitutto a centrifuga AT265<br />
d<br />
h<br />
c<br />
g<br />
b<br />
f<br />
<br />
a<br />
e<br />
37
pulizia e manutenzione<br />
manutenzione e pulizia<br />
● Prima delle operazioni di pulizia bisogna sempre spegnere<br />
l’apparecchio e togliere la spina dalla presa elettrica.<br />
corpo motore ● Pulire con un panno umido, quindi asciugare.<br />
● Non usare mai prodotti abrasivi o immergerlo in acqua.<br />
recipiente, ● Lavare a mano, quindi asciugare con cura oppure lavare nella<br />
utensili, lavastoviglie.<br />
paraspruzzi, ● Non utilizzare mai spazzole di metallo, spugnette di metallo o<br />
protezione rimovibile candeggina per pulire la ciotola in acciaio. Per rimuovere il calcare<br />
del braccio utilizzare aceto.<br />
impastatore ● Tenere lontano da fonti di calore (fornelli, forni, forni a microonde).<br />
manutenzione e assistenza clienti<br />
● Se il cavo elettrico è danneggiato, per motivi di sicurezza deve essere<br />
sostituito solo da <strong>KENWOOD</strong> o da un riparatore autorizzato<br />
<strong>KENWOOD</strong>.<br />
In caso di dubbi su:<br />
● come utilizzare il vostro apparecchio<br />
● manutenzione o riparazioni<br />
Contattare il negozio dove è stato acquistato l’apparecchio.<br />
38
icette<br />
minestra di carote e coriandolo<br />
ingredienti ● 25g di burro<br />
● 1 cipolla spezzettata<br />
● 1 spicchio d’aglio schiacciato<br />
● 750g di carote a dadini di 1,5cm<br />
(alternativamente, per una minestra più leggera usare 600g carote a<br />
dadini di 1,5cm)<br />
● brodo freddo di pollo<br />
● 10-15ml (2-3 cucchiaini) di coriandolo tritato<br />
● sale e pepe<br />
preparazione 1 Sciogliere il burro in una pentola, quindi aggiungere la cipolla e l’aglio<br />
e soffriggere a fuoco lento.<br />
2 Mettere le carote nel frullatore, poi aggiungere la cipolla e l’aglio.<br />
Aggiungere brodo sufficiente fino al livello 1,5 stampigliato sulla caraffa.<br />
Mettere il coperchio e il tappo di riempimento.<br />
3 Lavorare ad impulsi per 5 secondi per una minestra densa, oppure più<br />
a lungo per una minestra più liquida.<br />
4 Versare la miscela in una pentola, poi aggiungere il coriandolo, condire<br />
e sobbollire la minestra per 30 – 35 minuti, oppure fino a cottura<br />
ultimata.<br />
5 Aggiungere altro sale, pepe o brodo, secondo le preferenze.<br />
39
Kenwood Schumpf <strong>AG</strong><br />
6341 Baar, Lättichstrasse 6, Postfach 351<br />
Telefon 041-766 87 27 / Fax 041-766 87 77<br />
www.kenwood.ch