ASSEMBLY INSTRUCTIONS Notices d'assemblaGe - Trimetals, UK
ASSEMBLY INSTRUCTIONS Notices d'assemblaGe - Trimetals, UK
ASSEMBLY INSTRUCTIONS Notices d'assemblaGe - Trimetals, UK

You also want an ePaper? Increase the reach of your titles
YUMPU automatically turns print PDFs into web optimized ePapers that Google loves.
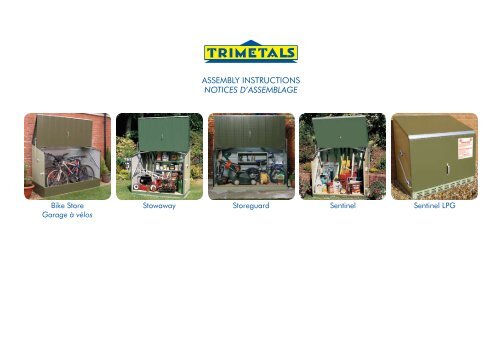
Bike Store<br />
Garage à vélos<br />
<strong>ASSEMBLY</strong> <strong>INSTRUCTIONS</strong><br />
<strong>Notices</strong> d’assemblaGe<br />
Stowaway Storeguard Sentinel Sentinel LPG
2<br />
imPortant attention<br />
A Before commencing assembly<br />
check parts in box with<br />
illustrations on components<br />
page and thoroughly read the<br />
assembly instructions.<br />
B These products must be secured<br />
to a hard base e.g. concrete or<br />
paving slabs.<br />
C Extra care should be taken to<br />
avoid cuts and abrasions from<br />
exposed edges during assembly.<br />
We strongly recommend the use<br />
of protective gloves.<br />
D We recommend that two people<br />
work on the assembly.<br />
E Precautions should be taken<br />
when storage units are being<br />
used in exposed areas subject<br />
to high wind speeds. In these<br />
circumstances the products<br />
should be securely fixed down,<br />
locked and care should be taken<br />
if they are to be opened to avoid<br />
damage.<br />
F For additional weatherproofing<br />
we recommend the use of a<br />
mastic type sealant that can be<br />
used to create a seal between<br />
panels.<br />
G In the unlikely event that this<br />
product has been delivered<br />
damaged, there are any parts<br />
not included or you are having<br />
difficulties with assembly please<br />
contact <strong>Trimetals</strong> direct NOT THE<br />
RETAILER. We will endeavour to<br />
correct any problems as quickly<br />
as possible.<br />
helP line:<br />
Tel: +44(0)1258 459441<br />
Fax: +44(0)1258 480408<br />
assembly instructions (to be read in conjunction with illustrations)<br />
For Faster assembly we recommend<br />
the use oF an electric screwdriver<br />
steP 1<br />
- For ease of assembly we recommend that the base be assembled<br />
on a flat surface and care must be taken to ensure the base is<br />
square before the fasteners are fully tightened. Check squareness by<br />
measuring from corner to diagonal corner - and then repeat for the<br />
other side - the measurements should be the same.<br />
- It is recommended that the complete product is fully assembled before<br />
securing to a solid surface which must be flat and level. Use the holes<br />
provided in the base sections to bolt the product down onto a hard<br />
base such as concrete using anchor bolts or similar (not supplied).<br />
- Part 37 is only used on the Storeguard product.<br />
steP 2<br />
- From now on all fasteners should be loosely fixed. Do not fully tighten<br />
them until you are told to do so.<br />
- when you see the red spanner icon<br />
tighten indicated fastners.<br />
- Only the Bike Store and Storeguard models have part 30. Please<br />
ignore part 30 if assembling any of the other models.<br />
- All bolts on this page are part 14 and all nuts are part 36.<br />
steP 3<br />
- Remember to only loosely fix the fasteners until you are told<br />
to tighten them.<br />
- Be sure to place part 34 the correct way round - see small<br />
detailed diagram.<br />
- The two parts 7b are not used on the Sentinel or Sentinel LPG<br />
steP 4<br />
- Part 7b is only used on the Stowaway product.<br />
steP 5<br />
- Only complete 5 if you have a Bike Store or Storeguard product.<br />
steP 6<br />
- All bolts on this page are part 14 and all nuts are part 36.<br />
- Make sure part 20 (top back panel) is inserted into top rail (part 34) as illustrated.<br />
steP 7<br />
- The left hand link arm part 12L (which is marked by a circle of coloured tape) must be fitted<br />
to the left hand side of the unit as shown in the diagram.<br />
- Identify part 12L and feed one washer (part 13) onto it followed by a link arm bracket (part<br />
11). Push both round until they are on the length of tube that has two holes pierced through<br />
it and so that the raised end of the bracket (part 11) will be facing away from the unit when<br />
attached. Feed the link arm (part 12L) through the hole in the left hand side panel (part 4L)<br />
from the outside and then through the side panel stiffener located on the inside of the side<br />
panel (part 4L) then feed another washer (13) onto the link arm (part 12L) from the inside<br />
and secure the assembly with two clips (part 19) through the two holes provided in the link<br />
arm (12L), one on the outside of the unit and one on the inside. Secure the link arm bracket<br />
(part 11) with parts 14 and 36.<br />
- Repeat the above procedure to attach the right hand link arm (part 12R).<br />
- In stage 7d make sure the hook on part 16 is facing the side panel<br />
(part 4) and do not over tighten the nut (part 35) at any time as the spring lever (part 16)<br />
must move freely.<br />
steP 8<br />
- Slide part 9 into the top rail (part 34) and secure with the end stop (part 23) and thread<br />
forming screw (part 17).<br />
steP 9<br />
- Note that part 27 is placed on the back of door panel.<br />
- The torsion bar (part 25) should already be in place at the back of the door.<br />
- Push the left hand link arm (12L) through the hole in the side of the door panel (part 9) and<br />
into the torsion bar (part 25), repeat this on the right hand side and twist the bar to line up<br />
with the holes (either end) in the link arms then screw in the thread forming screws (part 17)<br />
to secure. Do not close the door until these screws are fully tightened.<br />
- Identify the weatherstrip (part 22) and apply to side panels (part 4) along both the top and<br />
front edges. Strip the backing off a little at a time and starting at the top of the side panel<br />
butt the strip up against the top rail (part 34) and stick along the top edge of the side panel<br />
down to the plastic corner moulding. Cut weatherstrip (part 22) and continue from below the<br />
corner moulding down to the front base section. Repeat for the other side.<br />
note: weather strip not used on sentinel lPG<br />
- Both springs (part 18) are identical; one hooks upwards and the other hooks downwards.<br />
- Note that as fastener packs are standard for all units you may have some fasteners spare<br />
after completion of assembly.
avertissement imPortant<br />
A Avant de procéder à<br />
l’assemblage, comparez les pièces<br />
aux illustrations présentes sur la<br />
page Pièces et lisez attentivement<br />
les instructions d’assemblage.<br />
B Ces produits doivent être fixés à<br />
une base dure, par exemple du<br />
béton ou des pierres à paver.<br />
C Pendant l’assemblage, faites<br />
attention de ne pas vous couper<br />
ou de vous irriter au contact des<br />
bords dècouverts. Nous vous<br />
recommandons expressément<br />
d’utiliser des gants de protection.<br />
D Nous conseillons d’être deux pour<br />
procéder à l’assemblage.<br />
E Des précautions doivent être prises<br />
lors de l’utilisation des armoires<br />
dans des zones découvertes et<br />
soumises à des vents violents.<br />
Dans ce cas, les produits doivent<br />
être solidement fixés au sol et<br />
calés. Si vous devez les ouvrir,<br />
procédez avec précaution pour<br />
éviter tout dommage ou accident.<br />
F Pour renforcer l’étanchéité de<br />
l’armoire lors des intempéries,<br />
des intempéries, nous vous<br />
recommandons d’appliquer un<br />
joint de type mastic entre les<br />
panneaux.<br />
G Dans le cas improbable où<br />
ce produit vous aurait été<br />
livré endommagé, avec des<br />
pièces manquantes ou si vous<br />
rencontrez des difficultés à<br />
l’assemblage, veuillez contacter<br />
<strong>Trimetals</strong> directement et NON<br />
LE DÉTAILLANT. Nous veillerons<br />
à résoudre le problème le plus<br />
rapidement possible.<br />
assistance tÉlÉPhoniQue<br />
Tel: +44(0)1258 459441<br />
Fax: +44(0)1258 480408<br />
(Royaume-Uni seulement)<br />
instructions d’assemblaGe (à lire en parallèle avec les illustrations)<br />
Pour un assemblaGe Plus raPide, nous vous<br />
recommandons d’utiliser un tournevis ÉlectriQue.<br />
ÉtaPe 1<br />
- Pour un assemblage plus facile, nous vous recommandons<br />
d’assembler la base sur une surface plane. Assurez-vous que la<br />
base est bien assemblée en carré avant de procéder au serrage<br />
final des pièces de fixation. Pour cela, mesurez chaque diagonale<br />
de la base : les mesures doivent être identiques.<br />
- Il est conseillé d’assembler complètement le produit avant de le<br />
fixer à une surface solide, qui doit être plane et horizontale. Utilisez<br />
les trous présents sur les sections de la base pour boulonner le<br />
produit à une base solide telle que du béton, à l’aide de boulons<br />
d’ancrage ou de tout autre élément similaire (non fournis).<br />
- La pièce 37 ne concerne que le produit Storeguard.<br />
ÉtaPe 2<br />
- À ce stade, toutes les pièces de fixation doivent être légèrement<br />
serrées. Ne procédez pas au serrage final des pièces jusqu’à ce<br />
que la consigne vous en soit donnée.<br />
- lorsque vous voyez le pictogramme de clé rouge,<br />
serrez les pièces de fixation indiquées.<br />
- Seuls les modèles Bike Store et Storeguard disposent d’une pièce<br />
n° 30. Veuillez ignorer cette pièce si vous procédez à l’assemblage<br />
d’un autre modèle.<br />
- Tous les boulons présentés sur cette page portent le n° 14 et les<br />
écrous le n° 36.<br />
ÉtaPe 3<br />
- Rappelez-vous de ne pas serrer trop fort les pièces de fixation<br />
jusqu’à ce que la consigne vous en soit donnée.<br />
- Assurez-vous de placer la pièce 34 dans le bon sens (voir le petit<br />
diagramme détaillé).<br />
- Les deux pièces 7b ne concernent pas les produits Sentinel ou<br />
Sentinel LPG.<br />
ÉtaPe 4<br />
- La pièce 7b ne concerne que le produit Stowaway.<br />
ÉtaPe 5<br />
- Ne procédez à cette étape que si vous assemblez un produit Bike<br />
Store ou Storeguard.<br />
ÉtaPe 6<br />
- Tous les boulons présentés sur cette page portent le n° 14 et les écrous le n° 36.<br />
- Assurez-vous que la pièce 20 (panneau arrière supérieur) est insérée dans le rail supérieur (pièce<br />
34) comme illustré.<br />
ÉtaPe 7<br />
- La barre de soutien gauche, pièce 12L (indiquée par un ruban adhésif de couleur), doit<br />
correspondre au côté gauche de l’unité, comme indiqué par le diagramme. .<br />
- Identifiez la pièce 12L et placez une rondelle (pièce 13) dessus, suivie par un support de barre<br />
de soutien (pièce 11). Poussez les pièces jusqu’à ce qu’elles se trouvent sur la longueur de tube<br />
présentant deux trous, de manière à ce que, une fois fixée, l’extrémité surélevée du support<br />
(pièce 11) se trouve à l’opposé de l’unité. Insérez la barre de soutien (pièce 12L) dans le trou du<br />
panneau latéral gauche (pièce 4L) depuis l’extérieur, puis au travers du renfort du panneau latéral<br />
situé à l’intérieur du panneau latéral (pièce 4L). Disposez une autre rondelle (13) sur la barre de<br />
soutien (pièce 12L) depuis l’intérieur et fixez l’ensemble à l’aide de deux clips (pièce 19) passés à<br />
travers les deux trous de la barre (12L), l’un à l’extérieur de l’unité et l’autre à l’intérieur. Fixez le<br />
support de la barre de soutien (pièce 11) à l’aide des pièces 14 et 36.<br />
- Répétez la procédure ci-dessus pour fixer la barre de soutien droite (pièce12R).<br />
- À l’étape 7d, assurez-vous que le crochet de la pièce 16 fait face au panneau latéral (pièce 4) et<br />
ne serrez pas trop l’écrou (pièce 13) afin de permettre au levier à ressort (pièce 16) de bouger<br />
sans encombre.<br />
- Les deux ressorts (pièce 18) sont identiques : l’un s’accroche sur la partie supérieure et l’autre sur<br />
la partie inférieure.<br />
ÉtaPe 8<br />
- Faites glisser la pièce 9 dans le rail supérieur (pièce 34) et fixez-le à l’aide de la butée (pièce 23)<br />
et de la vis autotaraudeuse (pièce 17).<br />
ÉtaPe 9<br />
- Notez que la pièce 27 est placée sur l’arrière du panneau de porte<br />
- La barre de torsion (pièce 25) doit être déjà en place à l’arrière de la porte.<br />
- Poussez la barre de soutien gauche (12L) au travers du trou situé sur le côté du panneau de porte<br />
(pièce 9) et dans la barre de torsion (pièce 25). Répétez cette manipulation sur le côté droit et<br />
tordez la barre afin de l’aligner avec les trous (chaque extrémité) des barres de soutien. Vissez<br />
ensuite les vis autotaraudeuses (pièce 17) pour fixer l’ensemble. Ne fermez pas la porte tant que<br />
les vis ne sont pas complètement serrées.<br />
- Identifiez le joint d’étanchéité (pièce 22) et appliquez-le aux panneaux latéraux (pièce 4) le long<br />
du bord supérieur et du bord frontal. Retirez le revêtement petit à petit et, en commençant par<br />
le haut du panneau, appliquez la bande contre le rail supérieur (pièce 34), puis le long du bord<br />
supérieur du panneau latéral vers le bas, jusqu’à la moulure en plastique du coin. Coupez le joint<br />
d’étanchéité (pièce 22) et reprenez en partant de sous la moulure du coin vers le bas, jusqu’à la<br />
partie frontale de la base. Répétez la procédure de l’autre côté.<br />
remarque : le joint d’étanchéité ne concerne pas le produit sentinel lPG.<br />
- Notez que, les lots d’éléments de fixation étant standards pour toutes les unités, il se peut qu’il<br />
vous reste des pièces une fois l’assemblage terminé.<br />
3
4<br />
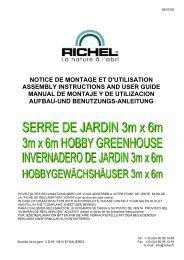
Part No<br />
Bike<br />
Store<br />
Stow<br />
Away<br />
11<br />
7b<br />
Store<br />
Sentinel<br />
Guard Sentinel LPG<br />
1 x2 x2 x2 x2 x2<br />
2 x2 x2 x2 x2 x2<br />
3 x4 x4 x4 x4 x4<br />
4L x1 x1 x1 x1 x1<br />
4R x1 x1 x1 x1 x1<br />
5 x2 x2 x2 x2 x2<br />
6 x1 x1 x1 x1 x1<br />
7 x2 x2 x2 x2 x2<br />
7a x1 - x1 - -<br />
7b x2 x3 x2 - -<br />
8 x2 x2 x2 x2 x2<br />
9 x1 x1 x1 x1 x1<br />
10 x4 x4 x4 x4 x4<br />
11 x2 x2 x2 x2 x2<br />
12L x1 x1 x1 x1 x1<br />
12R x1 x1 x1 x1 x1<br />
13 x4 x4 x4 x4 x4<br />
16 x2 x2 x2 x2 x2<br />
18 x2 x2 x2 x2 x2<br />
19 x4 x4 x4 x4 x4<br />
20 x1 x1 x1 x1 x1<br />
21 x2 x2 x2 x2 x2<br />
22 x2 x2 x2 x2 -<br />
23 x2 x2 x2 x2 x2<br />
26 x1 x1 x1 x1 x1<br />
27 x1 x1 x1 x1 x1<br />
30 x1 - x1 - -<br />
34 x1 x1 x1 x1 x1<br />
37 - x1 x1 x1 x1<br />
36 x55<br />
35 x28<br />
17 x4<br />
14 x53<br />
31 x26<br />
24 x2<br />
33 x2<br />
23<br />
Tighten<br />
nuts & bolts<br />
13<br />
22<br />
4L<br />
8<br />
30<br />
19<br />
10<br />
9<br />
4R<br />
5 34<br />
7a<br />
3<br />
7<br />
37<br />
12R<br />
12L<br />
1<br />
16<br />
18<br />
6<br />
21<br />
2<br />
20<br />
27<br />
26
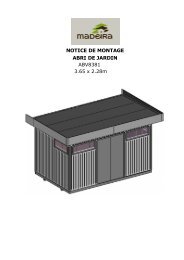
Note that parts 35 and 36 are lock nuts.<br />
These special nuts feature a plastic insert<br />
which helps to prevent them from shaking<br />
loose over time. It is important that you<br />
follow the text instructions and only loosely fix<br />
fasteners until you are told to tighten. Lock nuts<br />
must be fully tightened to ensure firm fixing.<br />
You will find assembly easier using two people,<br />
one using a screwdriver (electric version is<br />
strongly recommended) and the other holding<br />
the nut in place with a spanner whilst the screw<br />
is being tightened.<br />
2<br />
1<br />
3<br />
35<br />
step1<br />
Bikestore<br />
37<br />
1<br />
2<br />
1<br />
3<br />
2<br />
35<br />
step1<br />
Stowaway<br />
Storeguard<br />
Sentinel<br />
Sentinel LPG<br />
31<br />
31<br />
A noter : les pièces 35 et 36 sont des écroufreins.<br />
Ces écrous particuliers présentent un<br />
frein en plastique qui les empêche de prendre<br />
du jeu au fil du temps. Il est important de<br />
bien suivre les instructions et de ne serrer<br />
que légèrement les fixations. Ne procédez<br />
au serrage final des écrous que lorsque la<br />
consigne vous en a été donnée. Les écroufreins<br />
devront être fermement serrés pour<br />
assurer une bonne fixation. L’assemblage vous<br />
paraitra plus simple si vous vous y mettez à<br />
deux : une personne utilisant le tournevis (nous<br />
vous recommandons l’usage d’un tournevis<br />
électrique), l’autre tenant l’écrou en place à<br />
l’aide d’une clé pendant que la vis est serrée.<br />
1<br />
2<br />
5
6<br />
step 2<br />
Bike Store<br />
Stowaway<br />
Storeguard<br />
Sentinel<br />
Sentinel LPG<br />
10<br />
36<br />
4L<br />
14<br />
5<br />
6<br />
35mm<br />
30<br />
30<br />
10mm<br />
10mm<br />
10mm<br />
10mm<br />
40mm
step 3<br />
Bike Store<br />
Stowaway<br />
Storeguard<br />
Sentinel<br />
Sentinel LPG<br />
34<br />
36<br />
14<br />
7b<br />
36<br />
14<br />
14<br />
34<br />
7b<br />
36<br />
36<br />
14<br />
10<br />
14<br />
14<br />
4R<br />
7
8<br />
step 4<br />
Bike Store<br />
Storeguard<br />
14<br />
8<br />
33<br />
36<br />
7<br />
36<br />
14<br />
7a<br />
7<br />
36<br />
33<br />
14<br />
8<br />
14<br />
36<br />
33<br />
8<br />
7<br />
36<br />
7b<br />
14<br />
(Stowaway)<br />
36<br />
7<br />
33<br />
14<br />
step 4<br />
Stowaway<br />
Sentinel<br />
Sentinel LPG<br />
8
step 5<br />
Bike Store<br />
Storeguard<br />
35mm<br />
35mm<br />
20<br />
10mm<br />
10mm<br />
10mm<br />
10mm<br />
30<br />
10mm<br />
10mm<br />
10mm<br />
10mm<br />
40mm<br />
30<br />
20<br />
9
10<br />
step 6<br />
Bike Store<br />
Stowaway<br />
Storeguard<br />
Sentinel<br />
Sentinel LPG<br />
5<br />
4R<br />
36<br />
6<br />
34<br />
14<br />
20<br />
20<br />
36<br />
5<br />
14<br />
20
step 7<br />
Bike Store<br />
Stowaway<br />
Storeguard<br />
Sentinel<br />
Sentinel LPG<br />
step 7b<br />
step 7a 13<br />
It is critical that the<br />
correct link arm is used<br />
on each side of the unit<br />
- 12L (with the circle of<br />
coloured tape) must be<br />
used on the left side of<br />
the unit as shown.<br />
12L<br />
12L<br />
11<br />
14<br />
21<br />
step 7c<br />
14<br />
4L<br />
36<br />
12L<br />
36<br />
19<br />
36<br />
14<br />
19 13<br />
35<br />
16<br />
24<br />
step 7d<br />
12R<br />
21<br />
4R<br />
11
12<br />
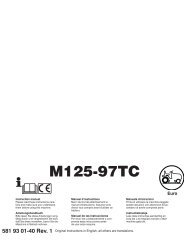
step 8<br />
Bike Store<br />
Stowaway<br />
Storeguard<br />
Sentinel<br />
Sentinel LPG<br />
When sliding part 9 (roof/door) into part<br />
34 (top rail / hinge) you must ensure<br />
that the roof / door is partially open (see<br />
diagram above) with the lower edge<br />
positioned just below the rubber buffer<br />
(part 8), otherwise the hinges will not line<br />
up and you will not be able to slide it into<br />
position properly (see top right illustration).<br />
Lorsque vous glisserez la pièce 9 (toit/porte) dans la<br />
pièce 34 (rail supérieur), veillez à ce que le toit/la<br />
porte soit partiellement ouvert(e) (comme illustré cidessus)<br />
de sorte que la partie inférieure de la porte soit<br />
positionnée juste en dessous du butoir en caoutchouc.<br />
A défaut, la charnière ne s’insèrera pas et vous serez<br />
dans l’incapacité de glisser la pièce 9 de manière<br />
appropriée (voir illustration en haut à droite)<br />
23<br />
17<br />
9
step 9<br />
Bike Store<br />
Stowaway<br />
Storeguard<br />
Sentinel<br />
Sentinel LPG<br />
18<br />
16<br />
35<br />
35<br />
18<br />
16<br />
24<br />
24<br />
18<br />
17<br />
31<br />
26<br />
27<br />
35<br />
25<br />
17<br />
17<br />
12R<br />
9<br />
13
14<br />
step10<br />
Bike Store<br />
Stowaway<br />
Storeguard<br />
Sentinel<br />
Suggested anchor bolt<br />
(Boulon d’ancrage recommandé)<br />
instructions relatives à l’installation des unités de rangement<br />
Notre gamme d’unités de rangement a été conçue pour être fixée à une base dure, plate et de niveau<br />
(béton), d’une épaisseur de 100mm.<br />
Vous aurez besoin de 8 boulons d’ancrage M8 (non fournis – l’illustration vous donnera un aperçu<br />
du type d’écrou recommandé) et d’une perceuse appropriée à l’usage sur béton (par exemple, une<br />
perceuse à percussion). Veillez à toujours utiliser des lunettes de protection lorsque vous percez du<br />
béton.<br />
Après l’assemblage, placez le produit au dessus de la surface en béton (procédez de préférence à deux<br />
personnes) et vérifiez à nouveau que la base de l’unité de rangement est d’équerre. Pour cela, mesurez<br />
chacune des diagonales : elles doivent être de taille identique. Puis, marquez au crayon la position des<br />
quatre trous situés sur la base du produit (deux trous sur chacune des sections les plus longues de la<br />
Sentinel LPG<br />
siting instructions (all products)<br />
Our range of storage units have been designed to be bolted down onto a hard, flat and level<br />
base (concrete) with a thickness of 100mm.<br />
You will need four M8 anchor bolts (not supplied – see image for suggested type) and a drill<br />
suitable for use with concrete (e.g. hammer drill). Always use goggles when drilling concrete.<br />
After final assembly move the product on top of the concrete base (using two people) and then<br />
recheck that the base of the product is square by measuring across both sets of diagonals.<br />
When square use a pencil to mark the position of the four holes located in the products base<br />
(two holes in each of the long base sections – part 1). Carefully move the unit to one side as you<br />
will now need to drill the holes you have marked on the concrete.<br />
You will need to drill holes in accordance with the anchor bolt manufacturer’s recommendations<br />
(regarding depth and diameter of hole) – this information can usually be found on their website.<br />
After you have drilled and inserted the anchor sleeves into the holes carefully move the unit back<br />
into place lining up the holes in the base with those you have drilled.<br />
Using a spanner tighten the bolts -it is recommended that you tighten each bolt evenly in turn<br />
until all are as tight as possible to ensure the base lays flat.<br />
base). Déplacez soigneusement l’unité de rangement sur le côté : vous pouvez maintenant percer les<br />
trous dans le béton aux endroits marqués au crayon.<br />
Il vous faudra percer les trous en répondant aux recommandations apportées par le fabricant des<br />
boulons d’ancrage utilisés (profondeur et diamètre). Ces informations sont habituellement précisées sur<br />
le site Internet du fabricant.<br />
Après avoir percé le béton et inséré les chevilles des boulons d’ancrage dans les trous, installez avec<br />
soin l’unité de rangement sur le béton en alignant les trous de la base avec les trous que vous venez<br />
de percer.<br />
A l’aide d’une clé de serrage, serrez les boulons. Nous vous recommandons de serrer chaque boulon<br />
de manière égale à tour de rôle, jusqu’à ce qu’ils soient aussi serrés que possible, de sorte que la base<br />
du produit reste entièrement étendue au sol.
Guarantee<br />
ExCLUSIONS<br />
<strong>Trimetals</strong> Ltd will not be liable under the Guarantee for:<br />
1.1 Explosion, Fire Lightning, Theft and those other perils normally provided by household contents insurance.<br />
1.2 Accidental damage including scratching, bruising or denting or from the direct application of a tool.<br />
1.3 Mishandling or neglect by the Registration Holder or any member of his family, household or staff or use of the<br />
product not in accordance with the manufacturer’s instructions.<br />
1.4 Failure of the Registration Holder to maintain or service the product in accordance with the manufacturer’s<br />
instructions.<br />
1.5 Spillage of chemicals or hazardous substances causing erosion or discolouration of parts, or storage of items that<br />
are not done in accordance with the manufacturer’s written instructions and normal laid down codes of practice.<br />
1.6 War, Civil War, Hostilities (whether war declared or not), riots, strikes or civil commotion.<br />
1.7 Ionising radiations, the hazardous properties of nuclear material or sonic bangs.<br />
1.8 All fixings and fasteners.<br />
2 Normal wear and tear, the cost of routine maintenance, adjustments or modifications or loss or damage arising<br />
therefrom.<br />
3 Loss of use of the appliance or consequential loss of any nature.<br />
4 The cost of materials and labour charges for which any manufacturer, supplier or any other person may be held<br />
responsible under the terms of the Sale of Goods Act or any Guarantee or Warranty.<br />
5 Cost incurred outside the United Kingdom.<br />
6 If the goods have been signed for as being received in good condition.<br />
eXclusions de Garantie<br />
En vertu de la garantie, <strong>Trimetals</strong> Ltd ne peut être tenu responsable des points suivants :<br />
1.1 Explosion, incendie, vol ainsi que tout autre sinistre normalement pris en charge par les assurances domestiques.<br />
1.2 Tout dégât accidentel, y compris les éraflures, bosses ou coups ou résultant de l’utilisation directe d’un outil.<br />
1.3 Mauvaise manipulation ou négligence du fait du détenteur de licence ou de tout membre de sa famille, de son<br />
foyer ou de son personnel ou toute utilisation du produit contrevenant aux instructions du fabricant.<br />
1.4 Défaut d’entretien ou de réparation du produit, malgré les instructions du fabricant, de la part du détenteur de<br />
licence.<br />
1.5 Déversement accidentel de produits chimiques ou de substances dangereuses provoquant l’érosion ou la<br />
décoloration de pièces ou entreposage d’articles non conforme aux instructions écrites du fabricant et aux codes<br />
de pratique normalement établis.<br />
1.6 Guerre, guerre civile, hostilités (que la guerre ait été déclarée ou non), émeutes, grèves ou actes séditieux.<br />
1.7 Rayonnements ionisants, propriétés dangereuses des composants nucléaires ou détonations supersoniques.<br />
1.8 Toutes les attaches et fixations.<br />
2 Usure normale, coût de l’entretien de routine, ainsi que tout réglage, modification, perte ou dégât survenant en<br />
conséquence.<br />
3 Perte d’usage du produit ou perte indirecte, de quelque nature qu’elle soit.<br />
4 Coût des matériaux et frais de main d’œuvre pour lesquels tout fabricant, fournisseur ou toute autre personne<br />
peut être tenu responsable, selon les conditions exposées par la Loi sur la vente des marchandises ou toute autre<br />
Garantie.<br />
5 Dépenses engagées en dehors du Royaume-Uni.<br />
6 Si les biens ont fait l’objet d’une signature par le réceptionnaire garantissant leur bon état.<br />
CONDITIONS<br />
1 In the event of failure of the product <strong>Trimetals</strong> Ltd or their agents may at their option repair or replace the defective<br />
part(s) or pay in cash for the cost of repair excluding labour and transport charges. In the event of the product as<br />
a result of failure being deemed beyond economic repair <strong>Trimetals</strong> Ltd will pay the market value of the product<br />
immediately prior to breakdown.<br />
2 <strong>Trimetals</strong> Ltd shall in no case be bound to accept notice of any transfer of interest and nothing contained in our<br />
Guarantee shall give any rights against <strong>Trimetals</strong> Ltd to any other person than the original Registration Holder who<br />
shall be a private individual.<br />
3 At the request of <strong>Trimetals</strong> Ltd the Registration Holder shall do and concur in doing all such acts and things as<br />
<strong>Trimetals</strong> Ltd may reasonably require with a view to obtaining compensation for failure covered by this guarantee<br />
and to enforce any rights that the Registration Holder may have against anyone in respect of any failure whether or<br />
not payment has been made by <strong>Trimetals</strong> Ltd.<br />
4 The Certificate of Registration will be rendered void in the event of the Certificate Holder’s fraud, non-disclosure,<br />
alteration of risk or any attempt threat, or the use of the product other than normal domestic purposes.<br />
5 These conditions in no way affect your statutory rights.<br />
6 Terms and Conditions are governed by English law and you submit to the non-exclusive jurisdiction of the English<br />
Court.<br />
CLAIMS PROCEDURE<br />
In the event of damage contact <strong>Trimetals</strong> Ltd on +44 (0)1258 459441. Please have the Model and Serial numbers<br />
available when you call plus the details or your registration card and copy of payment receipt. You will then be advised<br />
of the procedure in your area.<br />
CONDITIONS<br />
1 En cas de dysfonctionnement du produit, <strong>Trimetals</strong> Ltd ou ses agents peuvent à leur gré choisir de réparer ou de<br />
remplacer la ou les pièces défectueuses ou de rembourser les dépenses engagées pour la réparation, à l’exclusion<br />
des frais de main d’œuvre et de transport. Dans le cas où le produit défaillant présenterait un état économiquement<br />
irréparable, <strong>Trimetals</strong> Ltd remboursera au client la valeur du produit sur le marché juste avant que celui-ci ne tombe<br />
en panne.<br />
2 En aucun cas, <strong>Trimetals</strong> Ltd n’est tenu d’accepter l’avis d’un quelconque transfert d’intérêt et aucune clause de notre<br />
Garantie ne confère de droit à une autre personne que le détenteur de licence envers <strong>Trimetals</strong> Ltd, le détenteur<br />
devant être un particulier.<br />
3 À la demande de <strong>Trimetals</strong> Ltd, le détenteur de licence doit exécuter et contribuer à tout ce que <strong>Trimetals</strong> Ltd peut<br />
raisonnablement demander, en vue d’obtenir compensation d’un dysfonctionnement couvert par la présente<br />
garantie et d’appliquer les droits du détenteur de licence envers toute autre personne en cas de défaut, que le<br />
paiement ait été ou non effectué au bénéfice de <strong>Trimetals</strong> Ltd.<br />
4 Le Certificat d’enregistrement sera déclaré nul en cas de fraude du détenteur, de non-respect de la confidentialité,<br />
de modification du risque ou de toute tentative de menace ou de l’utilisation du produit à des fins autres que<br />
domestiques.<br />
5 Ces conditions n’affectent en rien vos droits statutaires.<br />
6 Les présentes Conditions générales d’utilisation sont régies par la loi anglaise et vous acceptez de vous soumettre à<br />
la juridiction non exclusive des tribunaux anglais.<br />
15
16<br />
<strong>Trimetals</strong> has been established for 40 years and is firmly placed as Europe’s leading<br />
producer of quality metal storage buildings and metal garden sheds.<br />
The unique designs which maximise strength and rigidity are unmatched by any other<br />
manufacturer and our 25 year panel guarantee is your assurance that our range of<br />
buildings are the very best available.<br />
Please do not confuse our products with cheap and flimsy substitutes or plastic<br />
alternatives. Our buildings are strong, secure, fire resistant and maintenance free,<br />
giving you real value for money. We pride ourselves in our reputation for superior<br />
products and are sure you will be completely satisfied with any product in our<br />
extensive range.<br />
www.trimetals.co.uk<br />
Design & Illustrations by: www.tandi.co.uk<br />
Créée en 1968, la société TRIMETALS est fermement implantée sur le marché<br />
européen, où elle occupe la place de leader en matière de construction d’abris et de<br />
rangements d’extérieur en métal.<br />
Solides et résistants, nos modèles de conception unique sont inégalés. En outre, nos<br />
panneaux, garantis 25 ans, sont la preuve que nos gammes de produits sont les<br />
meilleures du marché.<br />
Nos produits n’ont rien en commun avec ces substituts bon marché et peu solides ou<br />
encore avec les abris en plastique. Nos constructions sont robustes, sûres, résistent<br />
au feu et ne nécessitent aucun entretien ; en un mot, leur rapport qualité-prix est<br />
exceptionnel.<br />
Nous sommes fiers de pouvoir vous offrir des produits de qualité supérieure et<br />
sommes certains que vous serez entièrement satisfait, quel que soit le produit acheté<br />
parmi le vaste choix que nous vous proposons.<br />
www.trimetalsfrance.com<br />
Sunrise Business Park, Higher Shaftesbury Road,<br />
Blandford Forum, Dorset, DT11 8ST. <strong>UK</strong><br />
Tel: +44(0)1258 459441<br />
Fax: +44(0)1258 480408<br />
Email: trimetals@btconnect.com<br />
Web: www.trimetals.co.uk