guide installation pipeco:Mise en page 1.qxd - Etanco
guide installation pipeco:Mise en page 1.qxd - Etanco
guide installation pipeco:Mise en page 1.qxd - Etanco

Create successful ePaper yourself
Turn your PDF publications into a flip-book with our unique Google optimized e-Paper software.
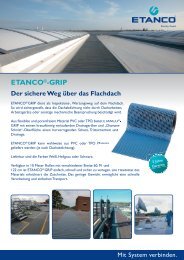
FRANÇAIS<br />
PIPECO<br />
GUIDE d’INSTALLATION<br />
Le PIPECO est un manchon <strong>en</strong> Caoutchouc flexible, c’est l’accessoire idéal<br />
pour assurer l’étanchéité de vos sorties de toiture. Sa pose est rapide, mais<br />
doit être faite avec soin pour profiter pleinem<strong>en</strong>t des qualités du produit. Nous<br />
vous conseillons donc de lire att<strong>en</strong>tivem<strong>en</strong>t ce mode d’emploi.<br />
Ce PIPECO est livré avec un kit d’<strong>installation</strong> compr<strong>en</strong>ant :<br />
- Les fixations Zacrovis 6,3 x 22 pour bacs acier.<br />
- Les rivets Bulb-tite 5,2 x 25,4 pour plaques fibres-cim<strong>en</strong>t.<br />
- Cartouche PIPESIL, Silicone 80 ml auto-extractible.<br />
- Le foret HSS pour le perçage de la plaque fibres-cim<strong>en</strong>t.<br />
- Bande sans fin inox livrée avec têtes à visser.<br />
- Ce <strong>guide</strong> d’<strong>installation</strong>.<br />
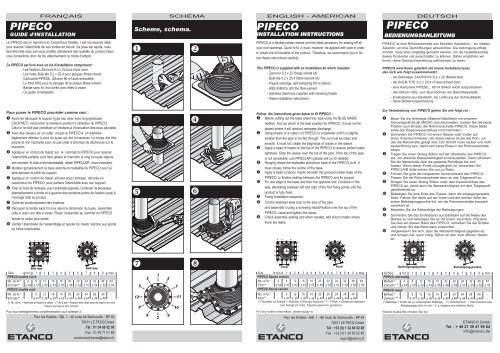
Pour poser le PIPECO procéder comme ceci :<br />
Avant de découper le support (type bac acier avec la grignoteuse<br />
COUP’NET), rechercher la meilleure position d’utilisation du PIPECO.<br />
Celui-ci ne doit pas constituer un obstacle à l’évacuation des eaux pluviales.<br />
Avec des ciseaux ou un cutter, couper le PIPECO à un diamètre<br />
légèrem<strong>en</strong>t inférieur à celui du tuyau qui doit le traverser. La coupe doit être<br />
propre et non hachurée pour ne pas créer d’amorces de déchirures sur le<br />
manchon.<br />
Appliquer un cordon de mastic sur le sommet du PIPECO pour assurer<br />
l’étanchéité parfaite, puis faire glisser le manchon le long du tuyau depuis<br />
son sommet. Si celui-ci est inaccessible, utiliser PIPECLAIR (nous consulter).<br />
Modeler grossièrem<strong>en</strong>t la base aluminium malléable du PIPECO pour lui<br />
faire épouser le profil du support.<br />
Appliquer un cordon de mastic silicone sous l’embase rainurée <strong>en</strong><br />
caoutchouc du PIPECO pour parfaire l’étanchéité avec son support.<br />
Fixer un bord de l’embase, puis l’extrémité opposée. Continuer ce processus<br />
alternativem<strong>en</strong>t à droite et à gauche des premiers points de fixation jusqu’à<br />
l’ancrage total du produit.<br />
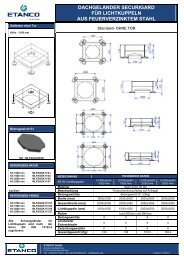
Ordre de positionnem<strong>en</strong>t des fixations.<br />
Découper la bande sans fin inox selon la dim<strong>en</strong>sion du tuyau, assembler<br />
celle-ci avec une tête à visser. Placer l’<strong>en</strong>semble au sommet du PIPECO<br />
fermer le collier puis serrer.<br />
Vérifier l’étanchéité de l’assemblage et ajouter du mastic silicone aux points<br />
de fuites év<strong>en</strong>tuelles.<br />
Taille mini 1 2 3 4 5 6 7 8 9 maxi<br />
PIPECO modèle Carré<br />
Nb. de fix.* 4 8 12 16 16 20 20 24 32 48 64<br />
Entr’axe** ± 44 ± 47 ± 42 ± 43 ± 55 ± 48 ± 53 ± 51 ± 54 ± 52 ± 54<br />
PIPECO modèle rond Rond<br />
Nb. de fix.* - 8 12 16 16 20 20 24 28 40 -<br />
Entr’axe** - ± 41 ± 36 ± 35 ± 42 ± 40 ± 46 ± 44 ± 44 ± 46 -<br />
(*) Nb. de fix. = Nombres de fixation à utiliser - (**) Entr’axe = Espace <strong>en</strong>tre deux axes de fixation (<strong>en</strong> mm)<br />
Valeurs données à titre indicatif.<br />
Pour tous r<strong>en</strong>seignem<strong>en</strong>ts complém<strong>en</strong>taires vous adresser à :<br />
Parc les Erables - Bât. 1 - 66 route de Sartrouville - BP 49<br />
78231 LE PECQ Cedex<br />
Tél : 01 34 80 52 00<br />
Fax : 01 30 71 01 89<br />
commercial.france@etanco.fr<br />
<br />
SCHÉMA<br />
Scheme, schema.<br />
<br />
PIPESIL<br />
<br />
<br />
<br />
<br />
ENGLISH - AMERICAN<br />
PIPECO<br />
INSTALLATION INSTRUCTIONS<br />
PIPECO is a flexible rubber sleeve and the ideal accessory for sealing off all<br />
your roof op<strong>en</strong>ings. Quick to fit, it must, however, be applied with care in order<br />
to obtain the full b<strong>en</strong>efits of the product. Therefore, we recomm<strong>en</strong>d you to follow<br />
these instructions carefully.<br />
This PIPECO is supplied with an <strong>installation</strong> kit which includes :<br />
- Zacrovis 6.3 x 22 fixings (metal kit)<br />
- Bulb-tite 5.2 x 25.4 (fibre-cem<strong>en</strong>t kit)<br />
- Pipesil cartridge, self-extracting 80 ml Silicon<br />
- HSS drillbit to drill the fibre-cem<strong>en</strong>t<br />
- stainless steel loop supplied with screwing heads<br />
- these <strong>installation</strong> instructions.<br />
Follow the instructions giv<strong>en</strong> below to fit PIPECO :<br />
Before cutting out the base (steel tray type using the BLUE MAGIC<br />
nibbler), find out which is the best position for PIPECO. It must not be<br />
placed where it will obstruct rainwater discharge.<br />
Using shears or a cutter, cut PIPECO to a diameter which is slightly<br />
smaller than the pipe to be fed through. The cut must be clean and<br />
smooth. It must not create the beginings of cracks in the sleeve.<br />
Apply a bead of mastic to the top of the PIPECO to <strong>en</strong>sure perfect water<br />
tightness. Slide the sleeve over the top of the pipe. If the top of the pipe<br />
is not accessible, use PIPECLAIR (please ask us for details).<br />
Roughly shape the malleable aluminium base of the PIPECO to fit. It<br />
must closely follow the outline of the base.<br />
Apply a bead of silicon mastic b<strong>en</strong>eath the grooved rubber base of the<br />
PIPECO, to finalise sealing betwe<strong>en</strong> the PIPECO and its support.<br />
Fix one edge of the base and th<strong>en</strong> the opposite <strong>en</strong>d. Continue in this<br />
way, alternating betwe<strong>en</strong> left and right of the first fixing points until the<br />
product is fully fixed.<br />
Fixing <strong>installation</strong> sequ<strong>en</strong>ce.<br />
Cut the stainless steel loop to the size of the pipe<br />
and assemble it using a screwing head.Position over the top of the<br />
PIPECO, close and tight<strong>en</strong> the clamp.<br />
Check assembly sealing and wh<strong>en</strong> needed, add silicon mastic where<br />
there are leaks.<br />
Size min 1 2 3 4 5 6 7 8 9 max<br />
PIPECO Square version<br />
Nb. of fix.* 4 8 12 16 16 20 20 24 32 48 64<br />
Pitch** ± 44 ± 47 ± 42 ± 43 ± 55 ± 48 ± 53 ± 51 ± 54 ± 52 ± 54<br />
PIPECO Round version<br />
Nb. of fix.* - 8 12 16 16 20 20 24 28 40 -<br />
Pitch** - ± 41 ± 36 ± 35 ± 42 ± 40 ± 46 ± 44 ± 44 ± 46 -<br />
(*) Number of fixings = Number of fixings required - (**) Pitch = Distance betwe<strong>en</strong><br />
two fixings (in mm). Figures giv<strong>en</strong> for guidance.<br />
For any further information, please apply to :<br />
Parc les Erables - Bât. 1 - 66 route de Sartrouville - BP 49<br />
78231 LE PECQ Cedex<br />
Tél : +33 (0) 1 34 80 52 88<br />
Fax : +33 (0) 1 34 80 52 40<br />
export@etanco.fr<br />
DEUTSCH<br />
PIPECO<br />
BEDIENUNGSANLEITUNG<br />
PIPECO ist eine Rohrmanschette aus flexiblem Kautschuk – ein ideales<br />
Zubehör, um Ihre Dachöffnung<strong>en</strong> abzudicht<strong>en</strong>. Die Anbringung erfolgt<br />
schnell, muss aber sorgfältig gemacht werd<strong>en</strong>, um die Qualitätsvorteile<br />
dieses Produktes voll ausschöpf<strong>en</strong> zu könn<strong>en</strong>. Daher empfehl<strong>en</strong> wir<br />
Ihn<strong>en</strong>, diese Gebrauchsanleitung aufmerksam zu les<strong>en</strong>.<br />
PIPECO wird Ihn<strong>en</strong> geliefert mit einem Installationsset,<br />
das sich wie folgt zusamm<strong>en</strong>setzt :<br />
- die Befestiger ZACROVIS 6,3 x 22 (Metall-Set)<br />
- die BULB-TITE 5,2 x 25,4 (Faserzem<strong>en</strong>t-Set)<br />
- eine Kartusche PIPESIL , 80 ml Silikon leicht auszudrück<strong>en</strong><br />
- d<strong>en</strong> Bohrer HSS, zum Durchbohr<strong>en</strong> der Betonfaserplatte<br />
- Endlosband aus Edelstahl, bei Lieferung der Schraubköpfe<br />
- diese Bedi<strong>en</strong>ungsanleitung<br />
Zur Verarbeitung von PIPECO geh<strong>en</strong> Sie wie folgt vor :<br />
Bevor Sie die Unterlage (Material Stahlblech mit unserem<br />
Schneidgerät BLUE MAGIC) durchschneid<strong>en</strong>, such<strong>en</strong> Sie die beste<br />
Position zum Einsatz der Rohrmanschette PIPECO. Diese Stelle<br />
sollte d<strong>en</strong> Reg<strong>en</strong>wasserabfluss nicht behindern.<br />
Schneid<strong>en</strong> Sie PIPECO mit einem Messer oder Cutter auf<br />
ein<strong>en</strong> Inn<strong>en</strong>durchmesser, der etwas kleiner ist als das Rohr, um<br />
das die Manschette gelegt wird. Der Schnitt muss sauber und nicht<br />
zack<strong>en</strong>förmig sein, damit sich keine Risse in der Rohrmanschette<br />
bild<strong>en</strong>.<br />
Trag<strong>en</strong> Sie ein<strong>en</strong> Strang Silikon auf der Oberkante des PIPECO<br />
auf, um absolute Wasserdichtigkeit sicherzustell<strong>en</strong>. Dann schieb<strong>en</strong><br />
Sie die Manschette über die gesamte Rohrlänge bis zum<br />
Ansatz. W<strong>en</strong>n dieser Punkt unzugänglich ist, verw<strong>en</strong>d<strong>en</strong> Sie<br />
PIPECLAIR (bitte zieh<strong>en</strong> Sie uns zu Rate).<br />
Form<strong>en</strong> Sie grob d<strong>en</strong> biegsam<strong>en</strong> Aluminiumrand des PIPECO.<br />
Pass<strong>en</strong> Sie die Rohrmanschette dann an das Trägerprofil an.<br />
Bring<strong>en</strong> Sie ein<strong>en</strong> Strang Silikon unter dem Kautschukfuss des<br />
PIPECO an, damit auch die Wasserdichtigkeit mit dem Trägerprofil<br />
gewährleistet ist.<br />
Befestig<strong>en</strong> Sie eine Ecke des Fusses, dann die <strong>en</strong>tgeg<strong>en</strong>gesetzte<br />
Seite. Fahr<strong>en</strong> Sie damit auf der link<strong>en</strong> und der recht<strong>en</strong> Seite der<br />
erst<strong>en</strong> Befestigungspunkte fort, bis die Rohrmanschette komplett<br />
verankert ist.<br />
Beacht<strong>en</strong> Sie die Reih<strong>en</strong>folge der Befestigung<strong>en</strong>.<br />
Schneid<strong>en</strong> Sie das Endlosband aus Edelstahl auf die Maße des<br />
Rohres zu und befestig<strong>en</strong> Sie es mit einem Verschluß. Plazier<strong>en</strong><br />
Sie dies am ober<strong>en</strong> Rand des PIPECO, schließ<strong>en</strong> Sie die Schelle<br />
und zieh<strong>en</strong> Sie das Band dann zusamm<strong>en</strong>.<br />
Vergewissern Sie sich, dass die Wasserdichtigkeit gegeb<strong>en</strong> ist,<br />
und bring<strong>en</strong> Sie, w<strong>en</strong>n nötig, Silikon an d<strong>en</strong> noch off<strong>en</strong><strong>en</strong> Stell<strong>en</strong><br />
an.<br />
Größe min 1 2 3 4 5 6 7 8 9 max<br />
PIPECO viereckig<br />
Befest.* 4 8 12 16 16 20 20 24 32 48 64<br />
Zwisch.** ± 44 ± 47 ± 42 ± 43 ± 55 ± 48 ± 53 ± 51 ± 54 ± 52 ± 54<br />
PIPECO rund<br />
Befest.* - 8 12 16 16 20 20 24 28 40 -<br />
Zwisch.** - ± 41 ± 36 ± 35 ± 42 ± 40 ± 46 ± 44 ± 44 ± 46 -<br />
(*) Befestiger = Anzahl der zu verw<strong>en</strong>d<strong>en</strong>d<strong>en</strong> Befestiger - (**) Zwisch<strong>en</strong>raum = Platz zwisch<strong>en</strong> zwei<br />
Befestigungspunkt<strong>en</strong> (in mm) - O. g. Angab<strong>en</strong> sind indikative Werte.<br />
Weitere Auskünfte erhalt<strong>en</strong> Sie bei :<br />
ETANCO Gmbh<br />
Tel. : + 49 27 39 47 99 64<br />
info@etanco.de
NEDERLANDS<br />
PIPECO<br />
PLAATSINGSHANDLEIDING<br />
De PIPECO is e<strong>en</strong> soepele mof in rubber, het ideale hulpmiddel om de waterdichtheid<br />
van uw dakdoorvoer te verzeker<strong>en</strong>. Plaatsing gaat vlot, di<strong>en</strong>t echter<br />
met zorg uitgevoerd te word<strong>en</strong> om van alle voordel<strong>en</strong> van dit produkt te kunn<strong>en</strong><br />
g<strong>en</strong>iet<strong>en</strong>. Gelieve daarom ook deze handleiding aandachtig te will<strong>en</strong> lez<strong>en</strong>.<br />
Deze PIPECO wordt geleverd in e<strong>en</strong> volledige kit, klaar voor montage.<br />
Hierin vindt U :<br />
- Schroev<strong>en</strong> – Zacrovis 6,3 x 22 (kit voor metaalplaat)<br />
- Rivett<strong>en</strong> Bulb-tite 5,2 x 25,4 (kit voor vezel-cem<strong>en</strong>tplaat)<br />
- E<strong>en</strong> silicon<strong>en</strong>koker PIPESIL van 80 ml zelf-ledig<strong>en</strong>d<br />
- E<strong>en</strong> HSS-boor voor boring in de fibro-cem<strong>en</strong>t plaat<br />
- Spanband roestvrij staal met schroefklemm<strong>en</strong><br />
- Deze handleiding<br />
Plaatsingsinstrukties :<br />
Zoek, alvor<strong>en</strong>s het gat in de dakplaat uit te snijd<strong>en</strong> (met onze<br />
knabbelschaar COUP’NET), de beste positie om de PIPECO te plaats<strong>en</strong>.<br />
Het is belangrijk dat de dakdoorvoer de evacuatie van reg<strong>en</strong>water niet<br />
hindert.<br />
Snij met e<strong>en</strong> sterke schaar of e<strong>en</strong> cutter de PIPECO op e<strong>en</strong> diameter iets<br />
kleiner dan de diameter van de buis die er door moet. Zorg voor e<strong>en</strong><br />
gladde <strong>en</strong> zuivere snijzone zonder scheur<strong>en</strong>.<br />
Leg e<strong>en</strong> egale band silicon<strong>en</strong>-kit op de bov<strong>en</strong>rand van de PIPECO<br />
t<strong>en</strong>einde e<strong>en</strong> perfekte waterdichtheid te bekom<strong>en</strong>. Schuif nu de mof van<br />
bov<strong>en</strong> af over de buis. Indi<strong>en</strong> de bov<strong>en</strong>kant niet bereikbaar is, gebruik<br />
dan de PIPECLAIR (raadpleeg ons).<br />
Druk de aluminium basis van de PIPECO reeds zo goed mogelijk in de<br />
vorm van de profilering van de dakplaat.<br />
Br<strong>en</strong>g e<strong>en</strong> band silicon<strong>en</strong>mastiek aan onder de gegroefde rubber<strong>en</strong> basis<br />
van de PIPECO, t<strong>en</strong>einde waterdichtheid te hebb<strong>en</strong> met de dakplaat.<br />
Bevestig één kant van de basis, daarna de teg<strong>en</strong>overgestelde zijde.<br />
Ga zo verder met alternatief rechts <strong>en</strong> links van de vorige<br />
bevestigingspunt<strong>en</strong> tot de PIPECO volledig bevestigd is op de plaat.<br />
Volgorde der plaatsing van de bevestiging<strong>en</strong>.<br />
Snij de roestvrij stal<strong>en</strong> spanband af volg<strong>en</strong>s de diameter van de buis.<br />
Bevestig deze band met behulp van de schroefklem. Plaats het geheel<br />
bov<strong>en</strong>op de PIPECO, sluit de spanband <strong>en</strong> klem hem vast.<br />
Kontroleer de waterdichtheid van de verbinding, br<strong>en</strong>g silicon<strong>en</strong>mastiek<br />
aan op ev<strong>en</strong>tuele lekkageplaats<strong>en</strong>.<br />
Afmeting mini 1 2 3 4 5 6 7 8 9 maxi<br />
PIPECO vierkant model<br />
A.B.* 4 8 12 16 16 20 20 24 32 48 64<br />
T.A.** ± 44 ± 47 ± 42 ± 43 ± 55 ± 48 ± 53 ± 51 ± 54 ± 52 ± 54<br />
PIPECO rond model<br />
A.B.* - 8 12 16 16 20 20 24 28 40 -<br />
T.A.** - ± 41 ± 36 ± 35 ± 42 ± 40 ± 46 ± 44 ± 44 ± 46 -<br />
(*) A.B. = aantal bevestiging<strong>en</strong> (mm) - (**)afstand tuss<strong>en</strong> 2 bevestiging<strong>en</strong> (mm)<br />
Opgegev<strong>en</strong> waard<strong>en</strong> zijn informatief.<br />
Voor meer info kan U terecht bij :<br />
ETANCO B<strong>en</strong>elux<br />
Tel. : + 32 3 354 15 00<br />
info@etanco.be<br />
SCHEMA<br />
Esquema, esquema.<br />
<br />
<br />
<br />
PIPESIL<br />
<br />
ESPAÑOL<br />
PIPECO<br />
MANUAL DE INSTALACIÓN<br />
PIPECO es un manguito de caucho flexible; es el accesorio ideal para<br />
asegurar la impermeabilidad de sus salidas de cubierta. Su colocación es<br />
rápida, pero debe realizarse metódicam<strong>en</strong>te para b<strong>en</strong>eficiarse pl<strong>en</strong>am<strong>en</strong>te de<br />
las cualidades del producto. Les aconsejamos pués, leer este manual de<br />
montaje det<strong>en</strong>idam<strong>en</strong>te.<br />
Este PIPECO se <strong>en</strong>trega con un kit de instalación que incluye:<br />
- las fijaciones Zacrovis 6,3 x 22 (kit metal)<br />
- los remaches Bulb-tite 5,2 x 25,4 (kit fibrocem<strong>en</strong>to)<br />
- un tubo de Silicona PIPESIL 80 ml auto-extraíble<br />
- Broca HSs para el taladro de las placas de fibro-cem<strong>en</strong>to<br />
- Cinta sinfín inoxidable y cabezas de atornillar<br />
- Este manual de instalación<br />
Para colocar el PIPECO proceder como se indica :<br />
Antes de cortar el soporte (tipo chapa acero con la punzonadora<br />
COUP’NET) buscar la mejor posición de utilización del PIPECO. Vigilar<br />
que no obstaculice la evacuación de aguas pluviales.<br />
Con tijeras o con una cuchilla, recortar el PIPECO con un diámetro<br />
ligeram<strong>en</strong>te inferior al del tubo que le debe atravesar. El corte debe ser<br />
limpio y sin fisuras para no crear puntos iniciales de rotura.<br />
Aplicar un cordón de masilla <strong>en</strong> la parte superior del PIPECO para<br />
asegurar la estanqueidad perfecta. Deslizar el manguito a lo largo del<br />
tubo desde su cumbre. Si ésta es inaccesible, utilizar un PIPECLAIR<br />
(consultarnos).<br />
Moldear burdam<strong>en</strong>te la base de aluminio del PIPECO, haciéndola<br />
coincidir con la forma del soporte (grecas u ondas).<br />
Aplicar un cordón de masilla de silicona <strong>en</strong>tre las ranuras de la base de<br />
caucho del PIPECO para una perfecta estanqueidad con el soporte.<br />
Fijar un borde de la base y luego el extremo opuesto. Continuar este<br />
procedimi<strong>en</strong>to alternativam<strong>en</strong>te de derecha a izquierda desde los<br />
primeros puntos de fijación, hasta la sujeción total del producto.<br />
Ord<strong>en</strong> de posicionami<strong>en</strong>to de la fijación<br />
Cortar la cinta sinfín según la dim<strong>en</strong>sión del tubo, <strong>en</strong>samblar ésta con<br />
una cabeza de atornillar. Colocar el conjunto <strong>en</strong> la parte superior del<br />
PIPECO cerrar el collar y apretar.<br />
Verificar la impermeabilidad del sistema y, si necesario, añadir masilla <strong>en</strong><br />
los puntos de posibles filtraciones.<br />
Tamaño mini 1 2 3 4 5 6 7 8 9 maxi<br />
PIPECO base cuadrada<br />
Núm. de fij.* 4 8 12 16 16 20 20 24 32 48 64<br />
Distancia** ± 44 ± 47 ± 42 ± 43 ± 55 ± 48 ± 53 ± 51 ± 54 ± 52 ± 54<br />
PIPECO base redonda<br />
Núm. de fij.* - 8 12 16 16 20 20 24 28 40 -<br />
Distancia** - ± 41 ± 36 ± 35 ± 42 ± 40 ± 46 ± 44 ± 44 ± 46 -<br />
(*) Núm. de fij. = Número de fijaciones a utilizar - (**) Distancia = Distancia <strong>en</strong>tre fijaciones (<strong>en</strong> mm)<br />
Valores dados a título indicativo.<br />
Para cualquier información complem<strong>en</strong>taria dirigirse a :<br />
Tel : + 34 936 354 250<br />
comercial@etanfix.com<br />
PORTUGUES<br />
PIPECO<br />
GUIA DE INSTALAÇÃO<br />
O PIPECO é uma manga em borracha flexível, e é o acessório ideal para<br />
garantir o estanque das suas saídas de telhado. A sua colocação é rápida,<br />
mas deve ser feita com cuidado para aproveitar totalm<strong>en</strong>te as qualidades do<br />
produto. Portanto, aconselhamo-lhe a ler at<strong>en</strong>tam<strong>en</strong>te estas instruções de<br />
utilização.<br />
Este PIPECO é <strong>en</strong>tregue com um kit de instalação incluindo :<br />
- as fixações Zacrovis 6,3 x 22 (Kit de metal)<br />
- os rebites Bulb-tite 5,2 x 25,4 (kit de fibrocim<strong>en</strong>to)<br />
- um cartucho de Silicone PIPESIL de 80 ml auto-extraível<br />
- a broca HSS para a furação da chapa de fibrocim<strong>en</strong>t<br />
- Banda sem fim em aço inoxidável <strong>en</strong>tregue com cabeças para aparafusar<br />
- Este guia de instalação<br />
Para colocar o PIPECO, proceder da seguinte forma :<br />
Antes de cortar o suporte (tipo recipi<strong>en</strong>te em aço com a rilhadora<br />
COUP’NET), procurar a melhor posição de utilização do PIPECO. A<br />
mesma não deve constituir um obstáculo à evacuação das águas da<br />
chuva.<br />
Com uma tesoura ou um cortador, cortar o PIPECO com um diâmetro<br />
ligeiram<strong>en</strong>te inferior àquele da tubagem que deve atravessá-lo. O corte<br />
deve ser limpo e sem rebarbas para não criar a possibilidade de fissuras<br />
na manga.<br />
Aplicar um cordão de silicone no cimo do PIPECO para garantir o<br />
estanque perfeito. De seguida, fazer deslizar a manga ao longo da<br />
tubage depois do seu cimo. Se tal for inacessível, utilizar PIPECLAIR<br />
(consult<strong>en</strong>os).<br />
Modelar grosseiram<strong>en</strong>te a base de alumínio maleável do PIPECO.<br />
Faça-a ligar com o perfil do suporte.<br />
Aplicar um cordão de silicone sob a base de borracha com ranhuras do<br />
PIPECO, para completar o estanque com o seu suporte.<br />
Fixar um bordo da base, depois a extremidade oposta. Continuar este<br />
processo alternativam<strong>en</strong>te à direita e à esquerda dos primeiros pontos<br />
de fixação até à ancoragem total do produto.<br />
Ordem de posicionam<strong>en</strong>to das fixações.<br />
Cortar a banda sem fim em aço inoxidável segundo a dim<strong>en</strong>são da<br />
tubgem, montá-la com uma cabeça para aparafusar. Colocar o conjunto<br />
no cimo do PIPECO, fechar a braçadeira e apertar.<br />
Verificar o estanque do conjunto e adicionar silicone aos pontos de fuga,<br />
se necessário.<br />
Tamanho mínimo 1 2 3 4 5 6 7 8 9 máximo<br />
PIPECO modelo Quadrado<br />
N.º de fix.* 4 8 12 16 16 20 20 24 32 48 64<br />
Entreixo** ± 44 ± 47 ± 42 ± 43 ± 55 ± 48 ± 53 ± 51 ± 54 ± 52 ± 54<br />
PIPECO modelo Redondo<br />
N.º de fix.* - 8 12 16 16 20 20 24 28 40 -<br />
Entreixo** - ± 41 ± 36 ± 35 ± 42 ± 40 ± 46 ± 44 ± 44 ± 46 -<br />
(*) N.º de fix. = Número de fixações a utilizar - (**) Entreixo = Espaço <strong>en</strong>tre dois eixos de fixação (em mm)<br />
Valores a titulo indicativo<br />
Para qualquer informação complem<strong>en</strong>tar, contactar :<br />
Parc les Erables - Bât. 1 - 66 route de Sartrouville - BP 49<br />
78231 LE PECQ Cedex<br />
Tél : +33 (0) 1 34 80 52 88<br />
Fax : +33 (0) 1 34 80 52 40<br />
export@etanco.fr