
Create successful ePaper yourself
Turn your PDF publications into a flip-book with our unique Google optimized e-Paper software.
6<br />
Note: There is no need to remove the terminal<br />
screws. Connections are not to be made under<br />
the screw heads.<br />
terminal screw<br />
clamp terminal<br />
washer conductor<br />
position<br />
to left of screw<br />
• Locate the cable and cable protector into the<br />
body correctly (see below, figure a). Then fit the<br />
cable clamp over the outer sheath of the cable<br />
and screw down until the screws are fully home.<br />
Failure to do this may result in the cover not<br />
fitting correctly to the connector body.<br />
• Before replacing the cover of the ‘female’<br />
connector make sure that the cable clamp is<br />
holding the outer sheath of the cable firmly with<br />
screws fully home and that the two leads are<br />
correctly fixed at the terminal screws and are not<br />
taut (see below, figure a).<br />
• Place the cover onto the body assembly<br />
ensuring that it seats flat, then retighten the fixing<br />
screw into the nut until the cover is securely held<br />
(see below, figure c).<br />
• Finally check that the cable protector is secure<br />
and that there are no gaps between the cover<br />
and the connector body.<br />
terminal screws<br />
clamping washers<br />
connector body fixing screw<br />
6mm<br />
cable<br />
clamp cover<br />
cable<br />
protector<br />
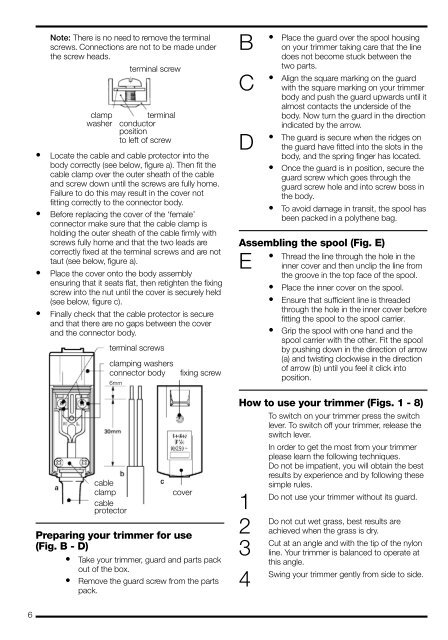
Preparing your trimmer for use<br />
(Fig. B - D)<br />
• Take your trimmer, guard and parts pack<br />
out of the box.<br />
• Remove the guard screw from the parts<br />
pack.<br />
B<br />
C<br />
D<br />
• Place the guard over the spool housing<br />
on your trimmer taking care that the line<br />
does not become stuck between the<br />
two parts.<br />
• Align the square marking on the guard<br />
with the square marking on your trimmer<br />
body and push the guard upwards until it<br />
almost contacts the underside of the<br />
body. Now turn the guard in the direction<br />
indicated by the arrow.<br />
• The guard is secure when the ridges on<br />
the guard have fitted into the slots in the<br />
body, and the spring finger has located.<br />
• Once the guard is in position, secure the<br />
guard screw which goes through the<br />
guard screw hole and into screw boss in<br />
the body.<br />
• To avoid damage in transit, the spool has<br />
been packed in a polythene bag.<br />
Assembling the spool (Fig. E)<br />
• Thread the line through the hole in the<br />
E inner cover and then unclip the line from<br />
the groove in the top face of the spool.<br />
• Place the inner cover on the spool.<br />
• Ensure that sufficient line is threaded<br />
through the hole in the inner cover before<br />
fitting the spool to the spool carrier.<br />
• Grip the spool with one hand and the<br />
spool carrier with the other. Fit the spool<br />
by pushing down in the direction of arrow<br />
(a) and twisting clockwise in the direction<br />
of arrow (b) until you feel it click into<br />
position.<br />
How to use your trimmer (Figs. 1 - 8)<br />
To switch on your trimmer press the switch<br />
lever. To switch off your trimmer, release the<br />
switch lever.<br />
In order to get the most from your trimmer<br />
please learn the following techniques.<br />
Do not be impatient, you will obtain the best<br />
results by experience and by following these<br />
simple rules.<br />
Do not use your trimmer without its guard.<br />
1<br />
2<br />
3<br />
4<br />
Do not cut wet grass, best results are<br />
achieved when the grass is dry.<br />
Cut at an angle and with the tip of the nylon<br />
line. Your trimmer is balanced to operate at<br />
this angle.<br />
Swing your trimmer gently from side to side.