D_F_GB_EBA_Klemmband_NG_3tlg_8-10.qxp ... - Dr. Hahn
D_F_GB_EBA_Klemmband_NG_3tlg_8-10.qxp ... - Dr. Hahn
D_F_GB_EBA_Klemmband_NG_3tlg_8-10.qxp ... - Dr. Hahn

Create successful ePaper yourself
Turn your PDF publications into a flip-book with our unique Google optimized e-Paper software.
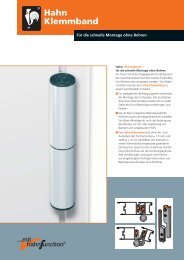
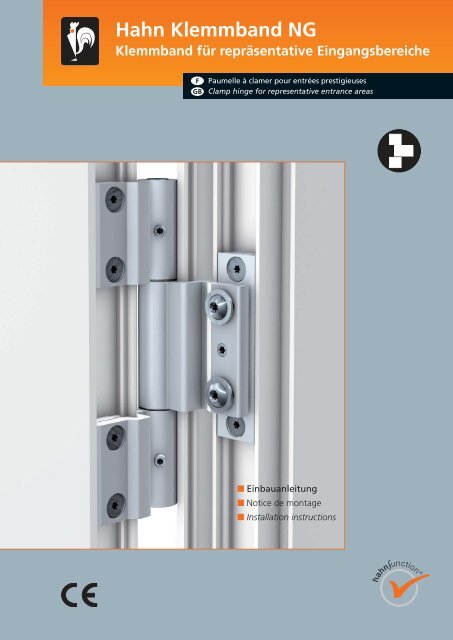
<strong>Hahn</strong> <strong>Klemmband</strong> <strong>NG</strong><br />
<strong>Klemmband</strong> für repräsentative Eingangsbereiche<br />
F<br />
<strong>GB</strong><br />
Paumelle à clamer pour entrées prestigieuses<br />
Clamp hinge for representative entrance areas<br />
■ Einbau anleitung<br />
■ Notice de montage<br />
■ Installation instructions
Einbau anleitung<br />
Notice de montage<br />
Installation instructions<br />
Vorbereitung • Préparation • Preparation<br />
200<br />
mm<br />
200<br />
mm<br />
max.<br />
150 kg<br />
Position markieren.<br />
Marquage du<br />
positionnement.<br />
Mark position.<br />
170 mm<br />
Dichtgummi des Flügels auf der gesamten<br />
Länge des Bandes zurückschneiden.<br />
Enlevez le joint correspondant à la longueur<br />
totale de la paumelle sur l’ouvrant.<br />
Cut rubber seal on the door for the whole<br />
height of the hinge.<br />
Montage des <strong>Klemmband</strong>es • Montage de la paumelle à clamer • Installation of clamp hinge<br />
8 – 10 Nm<br />
70 mm<br />
Alle Befestigungsplatten in das<br />
Rahmenprofil einschieben.<br />
Introduisez toutes les contreplaques<br />
dans le dormant.<br />
Insert all mounting plates in the section<br />
of the frame.<br />
Unteres Rahmenbandteil verschrauben,<br />
oberes Rahmenbandteil leicht fixieren.<br />
Fixez la partie dormante inférieure, vissez<br />
légérement la partie dormante supérieure.<br />
Screw bottom hinge blade of frame in<br />
place, gently screw upper hinge blade of<br />
frame in place.<br />
Exzenterbuchsen gemäß Darstellung<br />
ein setzen. ACHTU<strong>NG</strong>: Pfeilrichtung<br />
beachten.<br />
Positionnez les bagues excentriques selon<br />
l’illustr. ATTENTION: Veillez à la direction<br />
des flèches.<br />
Insert eccentric bushings as shown.<br />
IMPORTANT: Observe direction of arrow.<br />
Lagerbuchsen in Flügelbandteil<br />
einschieben.<br />
Introduisez les douilles dans<br />
la partie ouvrante.<br />
Insert bearing bushing in the<br />
sash part of the hinge.<br />
Verstellschraube in Klemmplatte einführen.<br />
Mit Flügelbandteil verschrauben bis Verstellschraube bündig<br />
abschließt.<br />
Introduisez la vis de réglage dans la clame.<br />
Vissez avec la partie ouvrante jusqu’à ce que la vis de réglage<br />
soit à fleur.<br />
Insert adjustment screw into clamping plate.<br />
Screw together with sash part of the hinge until adjustment<br />
screw is flush.<br />
Befestigungsplatte in<br />
Flügelprofil einschieben.<br />
Insérez la contreplaque dans<br />
le profil ouvrant.<br />
Insert mounting plate in the<br />
door leaf.
dreiteilig<br />
trois lames<br />
three-piece<br />
Montage des <strong>Klemmband</strong>es • Montage de la paumelle à clamer • Installation of clamp hinge<br />
8 – 10 Nm<br />
Flügelbandteil<br />
mit Klemm -<br />
platte verschrauben.<br />
Vissez la partie<br />
ouvrante à la<br />
contreplaque.<br />
Screw sash part<br />
of the hinge<br />
with clamping<br />
plate.<br />
8 – 10 Nm<br />
Durch<br />
zusätzliche<br />
Senkschrauben<br />
klemmen.<br />
Fixez à l’aide de vis<br />
à tête conique<br />
supplémentaires.<br />
Clamp using<br />
additional flatheaded<br />
screws.<br />
Flügel<br />
einsetzen.<br />
Placez<br />
l’ouvrant.<br />
Insert<br />
door leaf.<br />
Lager -<br />
bolzen<br />
von oben<br />
einführen.<br />
Introduisez<br />
l’axe depuis<br />
le dessus.<br />
Insert<br />
bearing pin<br />
from the<br />
top.<br />
Lagerbolzen am unteren<br />
Bandteil sichern, oberes Bandteil<br />
nachschieben, Lager bolzen am<br />
oberen Bandteil sichern.<br />
Serrez l’axe sur la partie dormante<br />
inférieure, rapprocher la partie<br />
dormante supérieure, serrez l’axe sur<br />
la partie dormante supérieure.<br />
Secure bearing pin at the bottom<br />
hinge blade, slide the upper hinge<br />
blade, secure bearing pin at the<br />
upper hinge blade.<br />
8 – 10 Nm<br />
Oberes<br />
Bandteil<br />
festziehen.<br />
Serrez la<br />
partie<br />
supérieure.<br />
Tighten<br />
upper hinge.<br />
Zubehör: Höhenverstellung • Accessoire: Outil de réglage en hauteur • Acessssory: Hight adjustment kit<br />
1<br />
3<br />
2<br />
8 –10 Nm<br />
Höhenverstellset<br />
unterhalb des<br />
unteren Bandes in<br />
das Rahmen profil<br />
einsetzten.<br />
Positionnez l‘outil de<br />
réglage en hauteur<br />
dans le profil dormant<br />
en- dessous de la<br />
paumelle basse.<br />
Insert height adjustment<br />
kit into the frame section<br />
below the bottom hinge.<br />
Höhenverstellset<br />
festschrauben.<br />
Fixez l‘outil de réglage<br />
en hauteur.<br />
Tighten the screws of<br />
the height adjustment<br />
kit.<br />
Die rahmenseitigen<br />
Befestigungsschrauben<br />
aller Bandteile lösen.<br />
Desserez les vis de<br />
fixation sur chaque<br />
partie dormante.<br />
Loosen the fastening<br />
screws in all hinge<br />
blades on the frame.<br />
Gewünschte Höhe<br />
mit der Verstellspindel<br />
des Sets einstellen.<br />
Réglage en hauteur<br />
souhaité à effectuer<br />
à l‘aide de la broche<br />
filetée de l‘outil.<br />
Adjust the height as<br />
desired using the kit’s<br />
adjustment spindle.<br />
Die rahmenseitigen<br />
Befestigungs schrauben aller<br />
Bandteile festziehen und das<br />
Höhenverstellset durch das<br />
Lösen der Klemmsteine aus<br />
der Rahmen nut entfernen.<br />
Serrez les vis de fixation de<br />
chaque partie dormante et<br />
retirez l‘outil de réglage en<br />
hauteur de la feuillure du dormant<br />
en desserant les clames.<br />
Tighten the fastening screws in<br />
all hinge blades on the frame<br />
and remove the height adjustment<br />
kit from the frame groove<br />
by loosening the clamping<br />
blocks.
Einstell anleitung<br />
Notice de réglage<br />
Adjustment instructions<br />
dreiteilig<br />
trois lames<br />
three-piece<br />
Verstellung der Bänder nur durch im Türenbau erfahrene Fachhandwerker.<br />
Réglage et montage des paumelles uniquement par des professionnels qualifiés.<br />
Adjustment and regulation only to be done by an experienced tradesman.<br />
Dichtungsandruck • Compression du joint • Sealing pressure<br />
Befestigungsschrauben<br />
des Flügelbandteils entfernen.<br />
Enlevez les vis de fixation de la partie<br />
ouvrante.<br />
Remove fastening screws of the sash part<br />
of the hinge.<br />
Zum Band<br />
drehen: Andruck<br />
erhöhen<br />
Flèches en direction<br />
de la paumelle :<br />
Augmenter la<br />
compression<br />
Turn towards<br />
hinge: Increase<br />
sealing pressure<br />
Exzenterbuchsen gemäß Darstellung einsetzen.<br />
Positionnez les bagues excentriques selon l’illustr.<br />
Insert eccentric bushings as shown.<br />
Exzenterbuchsen herausnehmen.<br />
Enlevez les bagues excentriques.<br />
Take out the eccentric bushings.<br />
Vom Band weg<br />
drehen: Andruck<br />
verringern<br />
Flèches en direction<br />
opposée de la<br />
paumelle : Diminuer<br />
la compression<br />
Turn away from<br />
hinge: Decrease<br />
sealing pressure<br />
Horizontalverstellung • Réglage horizontale • Horizontal adjustment<br />
–2 mm<br />
+ 2 mm<br />
Horizontalverstellung ± 2 mm<br />
Réglage horizontal ± 2 mm<br />
Horizontal adjustment ± 2 mm<br />
!<br />
Flügel vor Verstellung<br />
unterstützen.<br />
Calez le vantail avant d’effectuer<br />
les réglages.<br />
Support door leaf prior to adjusting.<br />
8 – 10 Nm<br />
Flügelbandteil wieder festschrauben.<br />
Resserrez la partie ouvrante.<br />
Retighten screws of the sash part of the<br />
hinge.<br />
Lagerbuchse aus wartungs freiem<br />
teflon haltigen Kunststoff – keinesfalls<br />
schmieren!<br />
Douille en matière plastique à teneur en<br />
téflon ne requérant aucun entretien – ne<br />
graisser en aucun cas !<br />
Bearing bushes made of absolutely maintenance-free<br />
PVC containing Teflon – do<br />
not lubricate!<br />
<strong>EBA</strong> / <strong>Klemmband</strong> <strong>NG</strong> 3teilig D /F/<strong>GB</strong>/D-<strong>EBA</strong>0088 / 08.10 LW750 Technische Änderungen vorbehalten. Sous réserve de modifications techniques. Right to alter technical details reserved.<br />
<strong>Dr</strong>. <strong>Hahn</strong> GmbH & Co. KG<br />
Trompeterallee 162 – 170 · D-41189 Mönchengladbach · Postfach 40 01 09 · D-41181 Mönchengladbach<br />
Phone + 49 (0) 2166 / 954-3 · Fax + 49 (0) 2166 / 954-444 · Internet www.dr-hahn.de · E-Mail sales@dr-hahn.com