chariot carriers baby supporter installation instructions help manual
chariot carriers baby supporter installation instructions help manual
chariot carriers baby supporter installation instructions help manual

You also want an ePaper? Increase the reach of your titles
YUMPU automatically turns print PDFs into web optimized ePapers that Google loves.
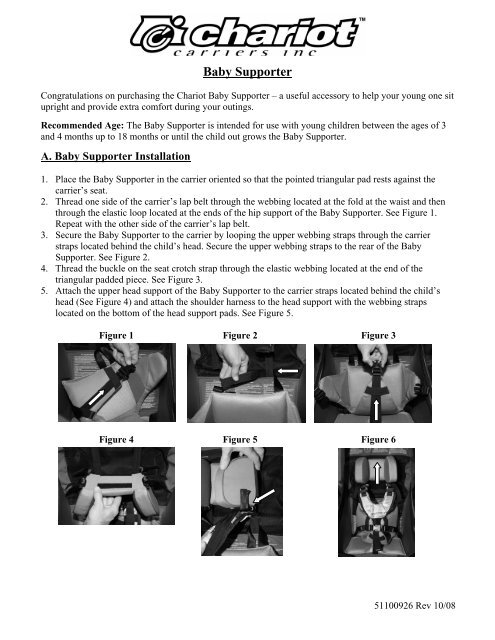
Baby Supporter<br />
Congratulations on purchasing the Chariot Baby Supporter – a useful accessory to <strong>help</strong> your young one sit<br />
upright and provide extra comfort during your outings.<br />
Recommended Age: The Baby Supporter is intended for use with young children between the ages of 3<br />
and 4 months up to 18 months or until the child out grows the Baby Supporter.<br />
A. Baby Supporter Installation<br />
1. Place the Baby Supporter in the carrier oriented so that the pointed triangular pad rests against the<br />
carrier’s seat.<br />
2. Thread one side of the carrier’s lap belt through the webbing located at the fold at the waist and then<br />
through the elastic loop located at the ends of the hip support of the Baby Supporter. See Figure 1.<br />
Repeat with the other side of the carrier’s lap belt.<br />
3. Secure the Baby Supporter to the carrier by looping the upper webbing straps through the carrier<br />
straps located behind the child’s head. Secure the upper webbing straps to the rear of the Baby<br />
Supporter. See Figure 2.<br />
4. Thread the buckle on the seat crotch strap through the elastic webbing located at the end of the<br />
triangular padded piece. See Figure 3.<br />
5. Attach the upper head support of the Baby Supporter to the carrier straps located behind the child’s<br />
head (See Figure 4) and attach the shoulder harness to the head support with the webbing straps<br />
located on the bottom of the head support pads. See Figure 5.<br />
Figure 1 Figure 2 Figure 3<br />
Figure 4 Figure 5 Figure 6<br />
51100926 Rev 10/08
B. Securing Your Child in the Carrier<br />
1. Seat your child into the Baby Supporter and snugly secure the lap belt around their waist. Then<br />
snugly secure the shoulder harness and crotch strap (refer to your carrier owner’s <strong>manual</strong> for proper<br />
seatbelts use).<br />
2. Adjust head support so that your child’s head is cupped in the head support. To adjust the head<br />
support, slide the head support along the carrier straps. See Figure 6.<br />
C. Using a bicycle trailer with the Baby Supporter<br />
Note: When using the Baby Supporter in a bicycle trailer, remove the upper head support section, as it<br />
may interfere with your child’s helmet.<br />
1. To remove the head support, detach the straps located on the backside of the head support and<br />
remove.<br />
Warning: Always secure your carrier’s seatbelt system around the occupant when using the<br />
Baby Supporter. Failure to properly attach seatbelts could result in serious injury or<br />
death to occupant(s) in the event of an accident. Please refer to the owner’s <strong>manual</strong><br />
for proper seatbelt use.
Guide D’utilisations du Support de Bébé<br />
Félicitation, vous venez de vous procurer un support de Bébé - un accessoire pour aider votre enfant à<br />
rester assis droit et pour plus de confort pendant ses siestes.<br />
L'age recommandé: Le support bébé est pour les jeunes enfants qui ont entre 3 et 4 mois jusqu'a 18<br />
mois. Plus précisément, un enfant peut commencer à l'utiliser dès qu'il peut s'asseoir tout seul jusqu'a ce<br />
qu'il soit trop grand pour le support bébé.<br />
Veuillez Notez: Chariot Carriers ne recommande pas l’utilisation de deux Soutiens de bébé dans une<br />
remorque double. Le Soutien bébé à beaucoup de cousinage additionnel ce qui fait que c’est trop serré<br />
quand deux sont utilisés un à côté de l’autre.<br />
A. L’Installation du Support de Bébé<br />
1. Placez le Support de Bébé dans la remorque, orientée de façon à ce que le coussin triangulaire repose<br />
sur le siège de la remorque.<br />
2. Enfilez un côté de la ceinture de sécurité pour la taille à travers la sangle située au repli de la ceinture<br />
et ensuite à travers l’anneau élastique situé à l’extrémité du support des hanches du Support de Bébé.<br />
Voir la figure 1. Répétez avec l’autre côté de la ceinture de sécurité pour la taille.<br />
3. Sécurisez le Soutien de Bébé dans la remorque en passant les sangles supérieures à travers les sangles<br />
du dossier de la remorque situées derrière la tête de l’enfant. Sécurisez les sangles supérieures à<br />
l’arrière du Support de Bébé. Voir la figure 2.<br />
4. Enfilez la boucle de la ceinture qui passe entre les jambes de l’enfant à travers l’anneau élastique situé<br />
à l’extrémité du coussin triangulaire. Voir la figure 3.<br />
5. Attachez la partie supérieure du support pour la tête du Soutien de Bébé aux sangles de la remorque<br />
situées derrière la tête de l’enfant (voir la figure 4) et ensuite attachez le harnais des épaules au<br />
support pour la tête avec les sangles situées au bas des coussinets du support pour la tête. Voir la<br />
figure 5.<br />
Figure 1 Figure 2 Figure 3<br />
Figure 4 Figure 5 Figure 6
B. Assurez la Sécurité de Votre Enfant Dans la Remorque<br />
1. Assoyez l’enfant dans le Support de Bébé et bien ajuster la ceinture de sécurité autour de sa taille.<br />
Ensuite, bien ajuster le harnais d’épaules et la ceinture qui passe entre les jambes de l’enfant (veuillez<br />
consulter le manuel du propriétaire pour les consignes appropriées pour l’usage des ceintures de<br />
sécurité).<br />
2. Ajustez le support pour la tête de façon à ce la tête de l’enfant soit centrer dans le support. Pour ajuster<br />
le support pour la tête, glisser le support le long des sangles de la remorque. Voir la figure 6.<br />
C. L’utilisation du Support de Bébé avec la trousse de vélo<br />
Notez: Lorsque vous utilisez la trousse de vélo, enlevez le support de tête puisqu’il peut s’entremettre<br />
avec le casque de sécurité de votre enfant.<br />
1. Pour enlever le support de tête, détachez le Velcro situé à l’arrière du Support à Bébé, enlevez le<br />
Support de Tête et les 2 baguettes en nylon.<br />
Mise en Garde : Il faut vous assurer que la ceinture de sécurité de la remorque est toujours bien<br />
attacher autour de votre enfant lorsque vous utilisez le Support à Bébé. En cas<br />
d’accident, si votre enfant n’est pas bien attaché dans la remorque cela pourrait<br />
causer des blessures sérieuses ou même entraîner la mort des occupants.<br />
Veuillez référer au manuel d’instruction pour l’utilisation convenable des<br />
ceintures de sécurités.
Bedienungsanleitung - Sitzstütze<br />
Wir bedanken uns dafür, dass Sie sich für die Chariot Sitzstütze entschieden haben. Dieses zweckmäßige<br />
Zubehör unterstützt Ihr Kleinkind beim Aufrechtsitzen und bietet zusätzlichen Komfort, wenn Ihr Kind<br />
schläft.<br />
Empfehlung: die Sitzstütze ist vorgesehen für Kinder im Alter zwischen 10 und 20 Monaten (bzw. bis<br />
Ihr Kind aus der Sitzstütze herausgewachsen ist).<br />
Wir empfehlen weiterhin, von der Benutzung zweier Sitzstützen nebeneinander abzusehen. Die Sitzstütze<br />
hat sehr viele seitliche Polster, die beim Einsatz von zwei Sitzstützen den Sitzraum in Ihrem Chariot zu<br />
eng machen.<br />
A. Einbau der Sitzstütze<br />
1. Setzen Sie die Sitzstütze so in den Wagen, dass das dreieckige Polster auf dem Sitz des Wagens<br />
ist.<br />
2. Führen Sie ein Ende des Hüftgurtes durch das Gurtband an der gefalteten Stelle an der Taille und<br />
dann durch die Gummischlaufe an den Enden des Hüftgurtes der Sitzstütze. Siehe Abb. 1.<br />
Wiederholen Sie den Vorgang auf der anderen Seite des am Wagen angebrachten Hüftgurtes.<br />
3. Sichern Sie die Sitzstütze am Wagen, indem Sie die oberen Gurte durch die Gurte des Wagens<br />
hinter dem Kopf des Kindes führen. Sichern Sie die oberen Gurte an der Rückseite der Sitzstütze.<br />
Siehe Abb. 2.<br />
4. Führen Sie die Schnalle des am Sitz befestigten Schrittgurtes durch das Gummiband am Ende des<br />
dreieckigen Polsters. Siehe Abb. 3.<br />
5. Befestigen Sie das Kopfteil der Sitzstütze von oben an den Gurten des Wagens, die sich hinter<br />
dem Kopf des Kindes befinden (siehe Abb. 4). Anschließend befestigen Sie den Schultergurt mit<br />
den Gurten, die sich unten an den Polstern des Kopfteils befinden, am Kopfteil. Siehe Abb. 5.<br />
Abb. 1 Abb. 2 Abb. 3<br />
Abb. 4 Abb. 5 Abb. 5
B. Anschnallen des Kindes<br />
1. Setzen Sie Ihr Kind in die Sitzstütze, legen Sie den Beckengurt um die Hüfte des Kindes, und<br />
ziehen Sie den Gurt stramm. Legen Sie dem Kind anschließend den Schultergurt und den<br />
Schrittgurt sicher an (siehe Bedienungsanleitung des Wagens).<br />
2. Stellen Sie die Höhe der Kopfstütze so ein, dass sich der Kopf Ihres Kindes in der Mitte der<br />
Kopfstütze befindet. Zum Verstellen schieben Sie das Kopfteil entlang der Gurte am Wagen.<br />
Siehe Abb. 6.<br />
C. Verwendung der Sitzstütze in einem Fahrrad-Anhänger<br />
Hinweis: Wenn Ihr Kind einen Helm trägt, was wir dringend empfehlen, stört eventuell das Kopfteil<br />
der Sitzstütze.<br />
1. Zum Entfernen des Kopfteils öffnen Sie die Riemen an der Rückseite der Kopfstütze.<br />
Anschließend nehmen Sie das Kopfteil ab.<br />
Warnung : Schnallen Sie das mitgeführte Kind auch bei Gebrauch der Sitzstütze in Ihrem<br />
Anhänger stets mit dem Sicherheitsgurtsystem des Anhängers an. Nicht<br />
vorschriftsmäßig angelegte Sicherheitsgurte können bei einem Unfall zu schweren<br />
Verletzungen oder zum Tod des/der Insassen führen. Informationen zum richtigen<br />
Anlegen der Sicherheitsgurte entnehmen Sie bitte der Bedienungsanleitung Ihres<br />
Kinder-Anhängers bzw. der Anleitung auf dem Sitz des Chariot-CTS.