Istruzioni per l'uso - Vanden Borre
Istruzioni per l'uso - Vanden Borre
Istruzioni per l'uso - Vanden Borre

You also want an ePaper? Increase the reach of your titles
YUMPU automatically turns print PDFs into web optimized ePapers that Google loves.
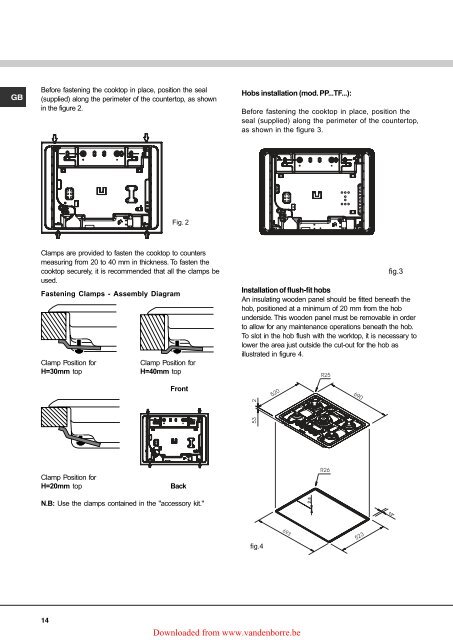
GB<br />
Before fastening the cooktop in place, position the seal<br />
(supplied) along the <strong>per</strong>imeter of the countertop, as shown<br />
in the figure 2.<br />
Hobs installation (mod. PP...TF...):<br />
Before fastening the cooktop in place, position the<br />
seal (supplied) along the <strong>per</strong>imeter of the countertop,<br />
as shown in the figure 3.<br />
Fig. 2<br />
Clamps are provided to fasten the cooktop to counters<br />
measuring from 20 to 40 mm in thickness. To fasten the<br />
cooktop securely, it is recommended that all the clamps be<br />
used.<br />
Fastening Clamps - Assembly Diagram<br />
Clamp Position for<br />
H=30mm top<br />
Clamp Position for<br />
H=40mm top<br />
Front<br />
fig.3<br />
Installation of flush-fit hobs<br />
An insulating wooden panel should be fitted beneath the<br />
hob, positioned at a minimum of 20 mm from the hob<br />
underside. This wooden panel must be removable in order<br />
to allow for any maintenance o<strong>per</strong>ations beneath the hob.<br />
To slot in the hob flush with the worktop, it is necessary to<br />
lower the area just outside the cut-out for the hob as<br />
illustrated in figure 4.<br />
Clamp Position for<br />
H=20mm top<br />
Back<br />
N.B: Use the clamps contained in the "accessory kit."<br />
2.5<br />
13*<br />
fig.4<br />
14<br />
Downloaded from www.vandenborre.be