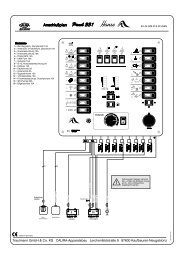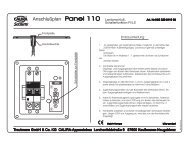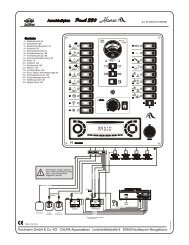
Electric-System EVS 38/20-DS/IU - Calira
Electric-System EVS 38/20-DS/IU - Calira
Electric-System EVS 38/20-DS/IU - Calira

Create successful ePaper yourself
Turn your PDF publications into a flip-book with our unique Google optimized e-Paper software.
Fig. 11<br />
' & "<br />
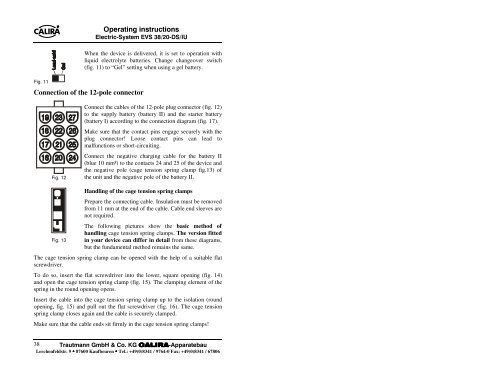
When the device is delivered, it is set to operation with<br />
liquid electrolyte batteries. Change changeover switch<br />
(fig. 11) to “Gel” setting when using a gel battery.<br />
Connection of the 12-pole connector<br />
Fig. 12<br />
Fig. 13<br />
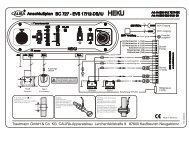
Connect the cables of the 12-pole plug connector (fig. 12)<br />
to the supply battery (battery II) and the starter battery<br />
(battery I) according to the connection diagram (fig. 17).<br />
Make sure that the contact pins engage securely with the<br />
plug connector! Loose contact pins can lead to<br />
malfunctions or short-circuiting.<br />
Connect the negative charging cable for the battery II<br />
(blue 10 mm²) to the contacts 24 and 25 of the device and<br />
the negative pole (cage tension spring clamp fig.13) of<br />
the unit and the negative pole of the battery II.<br />
Handling of the cage tension spring clamps<br />
Prepare the connecting cable. Insulation must be removed<br />
from 11 mm at the end of the cable. Cable end sleeves are<br />
not required.<br />
The following pictures show the basic method of<br />
handling cage tension spring clamps. The version fitted<br />
in your device can differ in detail from these diagrams,<br />
but the fundamental method remains the same.<br />
The cage tension spring clamp can be opened with the help of a suitable flat<br />
screwdriver.<br />
To do so, insert the flat screwdriver into the lower, square opening (fig. 14)<br />
and open the cage tension spring clamp (fig. 15). The clamping element of the<br />
spring in the round opening opens.<br />
Insert the cable into the cage tension spring clamp up to the isolation (round<br />
opening, fig. 15) and pull out the flat screwdriver (fig. 16). The cage tension<br />
spring clamp closes again and the cable is securely clamped.<br />
Make sure that the cable ends sit firmly in the cage tension spring clamps!<br />
<strong>38</strong><br />
! "#$ %&&<br />
Lerchenfeldstr. 9 87600 Kaufbeuren Tel.: +49(0)8341 / 9764-0 Fax: +49(0)8341 / 67806