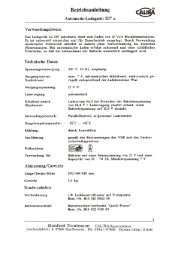
Füllstands-Sonde außen - Calira
Füllstands-Sonde außen - Calira
Füllstands-Sonde außen - Calira

You also want an ePaper? Increase the reach of your titles
YUMPU automatically turns print PDFs into web optimized ePapers that Google loves.
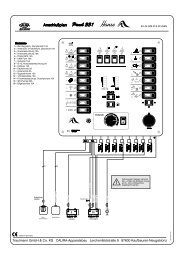
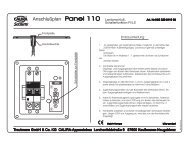
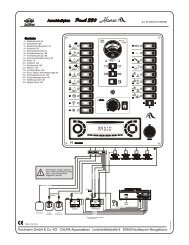
Einbauanleitung<br />
Installation instructions<br />
Instructions de montage<br />
<strong>Füllstands</strong>-<strong>Sonde</strong><br />
<strong>außen</strong><br />
Lerchenfeldstr. 9 87600 Kaufbeuren Tel.: 049 (0)8341 9764-0 Fax: 049 (0)8341 67806
Beschreibung<br />
! "! " #<br />
<strong>Füllstands</strong>-<strong>Sonde</strong> für Frisch- und Abwassertanks von min. 200mm bis max.<br />
380mm Außenhöhe. Verwendbar in Verbindung mit allen CALIRA Schalt-<br />
und Kontrolltafeln mit 5-Stufen Anzeige. Befestigung durch ¾“ Gewinde im<br />
Tank, Befestigungsmutter oder Schrauben von <strong>außen</strong> möglich.<br />
Stand: 20.01.2005<br />
Technische Änderungen vorbehalten<br />
2<br />
Lerchenfeldstr. 9 87600 Kaufbeuren Tel.: +49 (0)8341 9764-0 Fax: +49 (0)8341 67806
Einbau<br />
! "! " #<br />
1. Ermitteln sie die Tankhöhe (Außenmaß).<br />
2. Kürzen Sie bei Bedarf die Messstäbe mit einem Seitenschneider nach<br />
Tabelle. Dazu Isolierperle (ab 300mm Tankhöhe) zum Gehäuse schieben<br />
und nach dem Ablängen wieder in die richtige Lage bringen (siehe Skizze).<br />
Kürzungstabelle:<br />
Die Tabelle gilt nur für symetrisch geformte Tanks. Unsymetrische Tanks<br />
müssen ausgelitert werden.<br />
Tankhöhe<br />
Messstablänge in mm<br />
<strong>außen</strong> in mm 1 weiß 2 braun 3 grün 4 gelb, 5 grau<br />
max. 380 Originallänge<br />
370 13 72 163 253<br />
360 13 70 158 246<br />
350 13 67 153 238<br />
340 13 65 148 231<br />
330 13 62 143 223<br />
320 13 60 138 216<br />
310 13 57 133 208<br />
300 13 55 128 201<br />
290 13 52 123 193<br />
280 13 50 118 186<br />
270 8 47 113 178<br />
260 8 45 108 171<br />
250 8 42 103 163<br />
240 8 40 98 156<br />
230 8 37 93 148<br />
220 8 35 88 141<br />
210 8 32 83 133<br />
200 8 30 78 126<br />
3. Besitzt Ihr Tank ein integriertes ¾“-Gewinde für eine <strong>Füllstands</strong>-<strong>Sonde</strong>,<br />
schieben Sie die Flachdichtung aus dem Beipack über den Gewindestutzen<br />
der <strong>Füllstands</strong>-<strong>Sonde</strong> und schrauben die <strong>Sonde</strong> von <strong>außen</strong> in das Gewinde<br />
im Tank ein. Ziehen Sie die <strong>Füllstands</strong>-<strong>Sonde</strong> handfest an.<br />
3<br />
Lerchenfeldstr. 9 87600 Kaufbeuren Tel.: +49 (0)8341 9764-0 Fax: +49 (0)8341 67806
! "! " #<br />
Ist im Tank kein Gewinde für die <strong>Sonde</strong> vorhanden, bringen Sie bitte an<br />
der höchsten Stelle des Tanks, möglichst in Tankmitte und in der Nähe der<br />
Reinigungsöffnung eine Bohrung von 26,5mm Durchmesser ein. Entgraten<br />
Sie die Bohrung, damit diese bei der Montage sauber abgedichtet wird<br />
Schieben Sie die Flachdichtung aus dem Beipack über den Gewindestutzen<br />
der <strong>Füllstands</strong>-<strong>Sonde</strong> und stecken Sie die <strong>Sonde</strong> von <strong>außen</strong> in die<br />
Bohrung. Schrauben Sie durch die Reinigungsöffnung die <strong>Sonde</strong> mit der<br />
beiliegenden Befestigungsmutter fest. Ziehen Sie die Befestigungsmutter<br />
handfest an.<br />
Sollte Ihr Tank keine passende Öffnung (z. B. Reinigungsöffnung) besitzen,<br />
durch welche die Befestigungsmutter montiert werden kann, befestigen<br />
Sie die <strong>Sonde</strong> von oben, mittels der 3 mitgelieferten Edelstahlschrauben.<br />
Stecken Sie die <strong>Sonde</strong> in die vorbereitete Bohrung (26,5mm Durchmesser)<br />
und zeichnen Sie die Positionen für die Befestigungslöcher am Tank an.<br />
Nehmen Sie anschließend die <strong>Sonde</strong> wieder aus der Bohrung.<br />
Bohren Sie nun die 3 Kernlöcher für die Schrauben. Verwenden Sie einen<br />
Bohrer mit einem Durchmesser von 2,8 mm. Entgraten Sie auch diese<br />
Bohrungen.<br />
Schieben Sie die Flachdichtung aus dem Beipack über den Gewindestutzen<br />
der <strong>Füllstands</strong>-<strong>Sonde</strong> und stecken Sie die <strong>Sonde</strong> von <strong>außen</strong> in die<br />
Bohrung. Befestigen Sie nun die <strong>Füllstands</strong>-<strong>Sonde</strong> mit den 3 Edelstahlschrauben.<br />
Ziehen Sie die Schrauben gleichmäßig fest an, damit die <strong>Füllstands</strong>-<strong>Sonde</strong><br />
überall absolut plan am Tank aufliegt.<br />
4<br />
Lerchenfeldstr. 9 87600 Kaufbeuren Tel.: +49 (0)8341 9764-0 Fax: +49 (0)8341 67806
! "! " #<br />
Garantie<br />
Garantie wird in dem Zeitraum von zwei Jahren ab Kaufdatum gewährt.<br />
Mängel infolge Material- oder Fertigungsfehler werden kostenlos beseitigt<br />
wenn:<br />
Das Gerät dem Hersteller kostenfrei zugesandt wird.<br />
Der Kaufbeleg beiliegt<br />
Das Gerät bestimmungsgemäß behandelt und verwendet wurde.<br />
Keine fremden Ersatzteile eingebaut oder Eingriffe vorgenommen wurden.<br />
Nicht unter die Garantie fallen Folgekosten und natürliche Abnützung.<br />
Wichtig<br />
Bei Geltendmachung von Ansprüchen aus Garantie und Gewährleistung ist<br />
eine ausführliche Beschreibung des Mangels unerlässlich. Detaillierte Hinweise<br />
erleichtern und beschleunigen die Bearbeitung. Bitte haben Sie Verständnis<br />
dafür, dass wir Sendungen, die uns unfrei zugehen, nicht annehmen können.<br />
5<br />
Lerchenfeldstr. 9 87600 Kaufbeuren Tel.: +49 (0)8341 9764-0 Fax: +49 (0)8341 67806
Description<br />
$ ! ! !<br />
% &<br />
Level probe for fresh or waste water tanks with external heights between<br />
200mm and 380mm. Can be used in combination with all CALIRA switch and<br />
control panels with 5-stage display. Can be mounted via ¾“ thread in the tank,<br />
retaining nut or screws from outside.<br />
Version: 20.01.2005<br />
The right to make technical modifications is reserved.<br />
6<br />
Lerchenfeldstr. 9 87600 Kaufbeuren Tel.: +49 (0)8341 9764-0 Fax: +49 (0)8341 67806
Installation<br />
$ ! ! !<br />
% &<br />
1. Determine the tank height (external dimensions).<br />
2. If required, shorten the dipsticks according to the table, using side cutting<br />
pliers. To this end push the insulating bead (for tanks with a height of<br />
more than 300mm) to the housing and return it to the exact position after<br />
shortening the dipstick (see diagram).<br />
Shortening table:<br />
The table only applies to symmetric tanks. Asymmetric tanks have to be<br />
measured individually.<br />
Tank height<br />
external in<br />
mm<br />
Dipstick length in mm<br />
1 white 2 brown 3 green 4 yellow, 5<br />
grey<br />
380 max. Original length<br />
370 13 72 163 253<br />
360 13 70 158 246<br />
350 13 67 153 238<br />
340 13 65 148 231<br />
330 13 62 143 223<br />
320 13 60 138 216<br />
310 13 57 133 208<br />
300 13 55 128 201<br />
290 13 52 123 193<br />
280 13 50 118 186<br />
270 8 47 113 178<br />
260 8 45 108 171<br />
250 8 42 103 163<br />
240 8 40 98 156<br />
230 8 37 93 148<br />
220 8 35 88 141<br />
210 8 32 83 133<br />
200 8 30 78 126<br />
3. If your tank has an integrated ¾“ thread for a level probe, push the flat<br />
gasket from the accessories kit over the threaded connecting piece of the<br />
level probe and screw the probe into the thread in the tank from outside.<br />
Tighten the level probe by hand.<br />
7<br />
Lerchenfeldstr. 9 87600 Kaufbeuren Tel.: +49 (0)8341 9764-0 Fax: +49 (0)8341 67806
$ ! ! !<br />
% &<br />
If the tank does not have a thread for the sensor, make a 26.5mm diameter<br />
bore-hole at the highest point of the tank, if possible at the centre of the<br />
tank and near the cleaning hole. Deburr the bore-hole to ensure proper<br />
sealing during installation<br />
Push the flat gasket from the accessories kit over the threaded connecting<br />
piece of the level probe and insert the probe into the bore-hole from outside.<br />
Fix the probe through the cleaning hole using the enclosed retaining<br />
nut. Tighten the retaining nut by hand.<br />
If your tank does not have a suitable opening (e.g. cleaning hole) through<br />
which the retaining nut can be installed, attach the probe from above using<br />
the 3 stainless steel screws provided.<br />
Insert the probe into the prepared bore-hole (26.5mm diameter) and mark<br />
the positions for the mounting holes on the tank. Then remove the probe<br />
from the bore-hole.<br />
Now drill the 3 core holes for the screws. Use a 2.8 mm diameter drill.<br />
Deburr the bore-holes.<br />
Push the flat gasket from the accessories kit over the threaded connecting<br />
piece of the level probe and insert the probe into the bore-hole from outside.<br />
Now mount the level probe using the 3 stainless steel screws.<br />
Tighten the screws evenly to ensure uniform contact between the level<br />
probe and the tank.<br />
8<br />
Lerchenfeldstr. 9 87600 Kaufbeuren Tel.: +49 (0)8341 9764-0 Fax: +49 (0)8341 67806
$ ! ! !<br />
% &<br />
Warranty<br />
The warranty is in force for a period of two years from date of purchase.<br />
Defects arising from material or manufacturing faults will be rectified free of<br />
charge, provided that:<br />
The device is sent to the manufacturer postage paid.<br />
Proof of purchase is enclosed.<br />
The device has been handled and used according to its specified purpose.<br />
No foreign spare parts were installed and the device has not been interfered<br />
with.<br />
Consequential costs and normal wear and tear are excluded.<br />
Important<br />
Claims made under warranty should be accompanied by a detailed description<br />
of the fault. This facilitates and expedites the processing. Please bear in mind<br />
that we cannot accept items sent without the correct postage having been paid.<br />
9<br />
Lerchenfeldstr. 9 87600 Kaufbeuren Tel.: +49 (0)8341 9764-0 Fax: +49 (0)8341 67806
Description<br />
$ ! ! "<br />
" % ' " &<br />
<strong>Sonde</strong> de niveau pour réservoirs d’eau fraîche ou d’eaux usées d’une hauteur<br />
extérieure de min. 200 mm à max. 380 mm. Compatible avec tous les tableaux<br />
de contrôle et de commande CALIRA à affichage de 5 niveaux. Fixation au<br />
réservoir via filetage ¾“, écrou de fixation ou vis possibles pour fixation de<br />
l’extérieur.<br />
Révision : 20.01.2005<br />
Sous réserve de modifications techniques.<br />
10<br />
Lerchenfeldstr. 9 87600 Kaufbeuren Tel.: +49 (0)8341 9764-0 Fax: +49 (0)8341 67806
Montage<br />
$ ! ! "<br />
" % ' " &<br />
1. Déterminez la hauteur du réservoir (mesure extérieure).<br />
2. Raccourcissez si nécessaire les jauges de mesure selon le tableau cidessous,<br />
au moyen d’une pince diagonale. Pour ce faire, faites coulisser la<br />
perle isolante (à partir d’une hauteur de réservoir de 300 mm) vers le boîtier,<br />
puis ramenez-la en position correcte après avoir raccourci la jauge<br />
(voir esquisse).<br />
Tableau de raccourcissement :<br />
Le tableau ne vaut que pour des réservoirs aux formes symétriques. Les<br />
réservoirs asymétriques doivent faire l’objet d’un dosage volumétrique.<br />
Hauteur de<br />
réservoir<br />
ext., en mm<br />
Longueur de jauge, en mm<br />
1 blanc 2 brun 3 vert 4 jaune, 5 gris<br />
max. 380 Longueur originale<br />
370 13 72 163 253<br />
360 13 70 158 246<br />
350 13 67 153 238<br />
340 13 65 148 231<br />
330 13 62 143 223<br />
320 13 60 138 216<br />
310 13 57 133 208<br />
300 13 55 128 201<br />
290 13 52 123 193<br />
280 13 50 118 186<br />
270 8 47 113 178<br />
260 8 45 108 171<br />
250 8 42 103 163<br />
240 8 40 98 156<br />
230 8 37 93 148<br />
220 8 35 88 141<br />
210 8 32 83 133<br />
200 8 30 78 126<br />
3. Si votre réservoir dispose d’un filetage intégré ¾“ pour sonde de niveau,<br />
glissez le joint plat fourni dans l’emballage sur l’embout fileté de la sonde<br />
de niveau, et vissez la sonde de l’extérieur dans le filetage du réservoir.<br />
Serrez la sonde de niveau à la main.<br />
11<br />
Lerchenfeldstr. 9 87600 Kaufbeuren Tel.: +49 (0)8341 9764-0 Fax: +49 (0)8341 67806
$ ! ! "<br />
" % ' " &<br />
Si le réservoir n’est pas équipé d’un tel filetage pour sonde, veuillez aménager<br />
un perçage (diamètre de 26,5 mm) au point le plus élevé du réservoir,<br />
si possible au centre et à proximité de l’orifice de nettoyage. Ébavurez<br />
le perçage de manière à pouvoir rendre ce dernier étanche lors du<br />
montage.<br />
Glissez le joint plat fourni dans l’emballage sur l’embout fileté de la sonde<br />
de niveau, et insérez cette dernière de l’extérieur dans le perçage. Vissez<br />
la sonde via l’orifice de nettoyage, à l’aide de l’écrou de fixation fourni.<br />
Serrez l’écrou de fixation à la main.<br />
Si votre réservoir ne dispose pas d’un orifice approprié (p.ex. un orifice de<br />
nettoyage) par le biais duquel l’écrou de fixation peut être mis en place,<br />
fixez la sonde par le dessus au moyen des 3 vis en acier inoxydable fournies.<br />
Insérez la sonde dans le perçage préalablement aménagé (diamètre de 26,5<br />
mm), et marquez la position des trous de fixation sur le réservoir. Retirez<br />
ensuite la sonde du perçage.<br />
Percez maintenant les 3 avant-trous pour les vis. Utilisez un foret d’un<br />
diamètre de 2,8 mm. Ébavurez également ces perçages.<br />
Glissez le joint plat fourni dans l’emballage sur l’embout fileté de la sonde<br />
de niveau, et insérez cette dernière de l’extérieur dans le perçage. Fixez la<br />
sonde de niveau à l’aide des 3 vis en acier inoxydable. Serrez les vis de<br />
manière homogène de sorte que la sonde de niveau repose absolument à<br />
plat sur le réservoir.<br />
12<br />
Lerchenfeldstr. 9 87600 Kaufbeuren Tel.: +49 (0)8341 9764-0 Fax: +49 (0)8341 67806
$ ! ! "<br />
" % ' " &<br />
Garantie<br />
La garantie est assurée pendant une période de deux ans à compter de la date<br />
d’achat. Les défauts résultant d’un vice de matériel ou de fabrication sont<br />
réparés gratuitement lorsque :<br />
L’appareil a été renvoyé sans frais au fabricant.<br />
La quittance d’achat a été jointe.<br />
L’appareil a été manipulé et utilisé conformément aux prescriptions.<br />
Aucune pièce de rechange étrangère n’a été montée et aucune intervention<br />
n’a été effectuée.<br />
Les frais subséquents et l’usure naturelle ne tombent pas sous le coup de la<br />
garantie.<br />
Important<br />
En cas de mise en valeur de droits relevant de la garantie, il est indispensable<br />
d’effectuer une description détaillée du défaut en question. Des renseignements<br />
détaillés facilitent et accélèrent le traitement. Nous vous prions de bien<br />
vouloir faire preuve de compréhension sur le fait que nous ne pouvons pas<br />
accepter les envois, qui nous parviennent en port dû.<br />
13<br />
Lerchenfeldstr. 9 87600 Kaufbeuren Tel.: +49 (0)8341 9764-0 Fax: +49 (0)8341 67806
$ ! ! "<br />
" % ' " &<br />
14<br />
Lerchenfeldstr. 9 87600 Kaufbeuren Tel.: +49 (0)8341 9764-0 Fax: +49 (0)8341 67806
$ ! ! "<br />
" % ' " &<br />
15<br />
Lerchenfeldstr. 9 87600 Kaufbeuren Tel.: +49 (0)8341 9764-0 Fax: +49 (0)8341 67806
( ( )! " !<br />
( ! &<br />
(' * " &<br />
+ , $ ,<br />
. 1 2 3 4 %<br />
! " ! # # #<br />
$ ! !<br />
1 3 (<br />
% &'<br />
0 '<br />
0 $ '<br />
% ( )<br />
*<br />
* + !<br />
, - ./ !<br />
5 & 5 & 5 &<br />
- 5 - & Rue et n°<br />
678 9 : ; 4 7 !<br />
: : :! !<br />
0 0! $<br />
B50 200011 00