
Create successful ePaper yourself
Turn your PDF publications into a flip-book with our unique Google optimized e-Paper software.
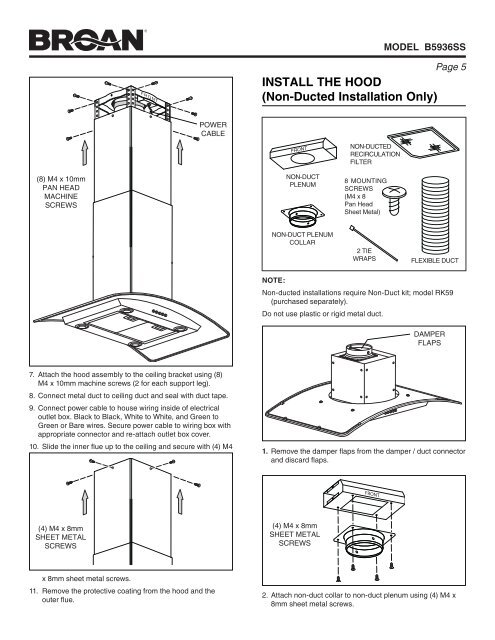
model B5936SS<br />
FRONT<br />
install the hood<br />
(Non-Ducted Installation Only)<br />
Page <br />
POWER<br />
CABLE<br />
(8) M4 x 10mm<br />
PAN HEAD<br />
MACHINE<br />
SCREWS<br />
FRONT<br />
NON-DUCT<br />
PLENUM<br />
NON-DUCTED<br />
RECIRCULATION<br />
FILTER<br />
8 MOUNTING<br />
SCREWS<br />
(M4 x 8<br />
Pan Head<br />
Sheet Metal)<br />
NON-DUCT PLENUM<br />
COLLAR<br />
2 TIE<br />
WRAPS<br />
FLEXIBLE DUCT<br />
NOTE:<br />
Non-ducted installations require Non-Duct kit; model RK59<br />
(purchased separately).<br />
Do not use plastic or rigid metal duct.<br />
DAMPER<br />
FLAPS<br />
7. Attach the hood assembly to the ceiling bracket using (8)<br />
M4 x 10mm machine screws (2 for each support leg).<br />
8. Connect metal duct to ceiling duct and seal with duct tape.<br />
9. Connect power cable to house wiring inside of electrical<br />
outlet box. Black to Black, White to White, and Green to<br />
Green or Bare wires. Secure power cable to wiring box with<br />
appropriate connector and re-attach outlet box cover.<br />
10. Slide the inner flue up to the ceiling and secure with (4) M4<br />
1. Remove the damper flaps from the damper / duct connector<br />
and discard flaps.<br />
FRONT<br />
(4) M4 x 8mm<br />
SHEET METAL<br />
SCREWS<br />
(4) M4 x 8mm<br />
SHEET METAL<br />
SCREWS<br />
x 8mm sheet metal screws.<br />
11. Remove the protective coating from the hood and the<br />
outer flue.<br />
2. Attach non-duct collar to non-duct plenum using (4) M4 x<br />
8mm sheet metal screws.