
Create successful ePaper yourself
Turn your PDF publications into a flip-book with our unique Google optimized e-Paper software.
model B5936SS<br />
Page <br />
FRONT<br />
NON-DUCT<br />
FILTER<br />
MOUNTING<br />
TABS<br />
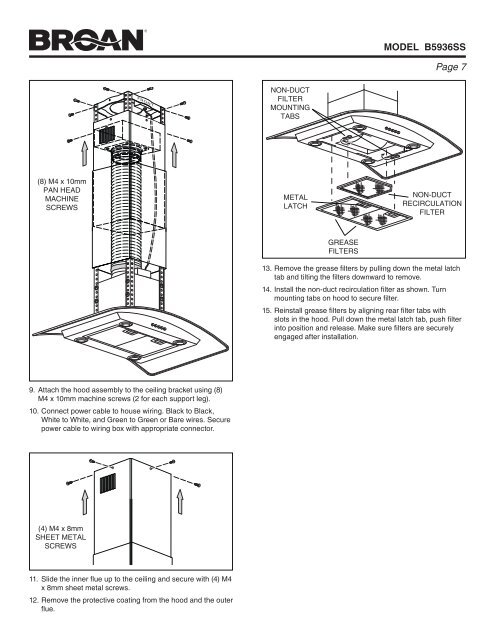
(8) M4 x 10mm<br />
PAN HEAD<br />
MACHINE<br />
SCREWS<br />
METAL<br />
LATCH<br />
NON-DUCT<br />
RECIRCULATION<br />
FILTER<br />
GREASE<br />
FILTERS<br />
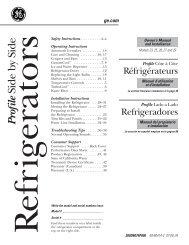
13. Remove the grease filters by pulling down the metal latch<br />
tab and tilting the filters downward to remove.<br />
14. Install the non-duct recirculation filter as shown. Turn<br />
mounting tabs on hood to secure filter.<br />
15. Reinstall grease filters by aligning rear filter tabs with<br />
slots in the hood. Pull down the metal latch tab, push filter<br />
into position and release. Make sure filters are securely<br />
engaged after installation.<br />
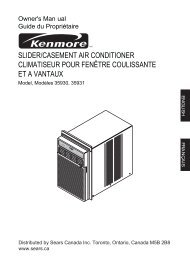
9. Attach the hood assembly to the ceiling bracket using (8)<br />
M4 x 10mm machine screws (2 for each support leg).<br />
10. Connect power cable to house wiring. Black to Black,<br />
White to White, and Green to Green or Bare wires. Secure<br />
power cable to wiring box with appropriate connector.<br />
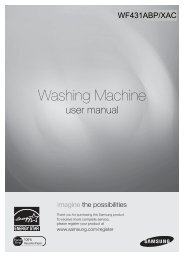
(4) M4 x 8mm<br />
SHEET METAL<br />
SCREWS<br />
11. Slide the inner flue up to the ceiling and secure with (4) M4<br />
x 8mm sheet metal screws.<br />
12. Remove the protective coating from the hood and the outer<br />
flue.