§ 70255 230 Volt · 72255 110 Volt Mzs-Digital-Starter-Set · MTS ...
§ 70255 230 Volt · 72255 110 Volt Mzs-Digital-Starter-Set · MTS ...
§ 70255 230 Volt · 72255 110 Volt Mzs-Digital-Starter-Set · MTS ...

You also want an ePaper? Increase the reach of your titles
YUMPU automatically turns print PDFs into web optimized ePapers that Google loves.
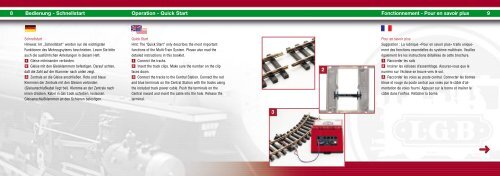
8 Bedienung - Schnellstart Operation - Quick Start<br />
Fonctionnement - Pour en savoir plus 9<br />
Schnellstart<br />
Hinweis: Im „Schnellstart“ werden nur die wichtigsten<br />
Funktionen des Mehrzugsytems beschrieben. Lesen Sie bitte<br />
auch die ausführlichen Anleitungen in diesem Heft.<br />
1 Gleise miteinander verbinden.<br />
2 Gleise mit den Gleisklammern befestigen. Darauf achten,<br />
daß die Zahl auf der Klammer nach unten zeigt.<br />
3 Zentrale an die Gleise anschließen. Rote und blaue<br />
Klemmen der Zentrale mit den Gleisen verbinden<br />
(Gleisanschlußkabel liegt bei). Klemme an der Zentrale nach<br />
innen drücken, Kabel in das Loch schieben, loslassen.<br />
Gleisanschlußklemmen an den Schienen befestigen.<br />
© DiskArt 1988<br />
Quick Start<br />
Hint: The "Quick Start” only describes the most important<br />
functions of the Multi-Train System. Please also read the<br />
detailed instructions in this booklet.<br />
1 Connect the tracks.<br />
2 Insert the track clips. Make sure the number on the clip<br />
faces down.<br />
3 Connect the tracks to the Central Station. Connect the red<br />
and blue terminals on the Central Station with the tracks using<br />
the included track power cable. Push the terminals on the<br />
Central inward and insert the cable into the hole. Release the<br />
terminal.<br />
1<br />
3<br />
2<br />
Pour en savoir plus<br />
Suggestion : La rubrique «Pour en savoir plus» traite uniquement<br />
des fonctions essentielles du système multitrain. Veuillez<br />
également lire les instructions détaillées de cette brochure.<br />
1 Raccorder les rails<br />
2 Insérer les éclisses d’assemblage. Assurez-vous que le<br />
numéro sur l’éclisse se trouve vers le sol.<br />
3 Raccorder les voies au poste central. Connecter les bornes<br />
bleue et rouge du poste central aux voies par le câble d’alimentation<br />
de voies fourni. Appuyer sur la borne et insérer le<br />
câble dans l’orifice. Relâcher la borne.<br />
➜