
Create successful ePaper yourself
Turn your PDF publications into a flip-book with our unique Google optimized e-Paper software.
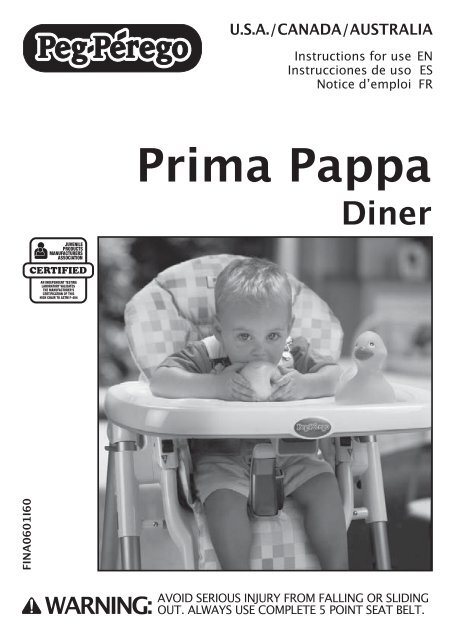
U.S.A./CANADA/AUSTRALIA<br />
Instructions for use EN<br />
Instrucciones de uso ES<br />
Notice dʼemploi FR<br />
<st<strong>ro</strong>ng>Prima</st<strong>ro</strong>ng> <st<strong>ro</strong>ng>Pappa</st<strong>ro</strong>ng><br />
<st<strong>ro</strong>ng>Diner</st<strong>ro</strong>ng><br />
FINA0601I60<br />
WARNING:<br />
AVOID SERIOUS INJURY FROM FALLING OR SLIDING<br />
OUT. ALWAYS USE COMPLETE 5 POINT SEAT BELT.
1 2<br />
3 4<br />
5 6
7<br />
8<br />
A<br />
9 10<br />
B<br />
A<br />
A<br />
A<br />
B<br />
11 12<br />
B
A<br />
13 14<br />
B<br />
2<br />
1<br />
15 16<br />
17 18
B<br />
A<br />
B<br />
A<br />
19 20<br />
21 23 22<br />
23 24
25<br />
26 Accessory<br />
<st<strong>ro</strong>ng>Prima</st<strong>ro</strong>ng> <st<strong>ro</strong>ng>Pappa</st<strong>ro</strong>ng> <st<strong>ro</strong>ng>Diner</st<strong>ro</strong>ng><br />
1 EMPP35•<br />
2 ARPI0355•<br />
3 SPST5025XD•<br />
SPST5025XS•<br />
4 SPST5024D•<br />
SPST5024S•<br />
5 SPST5459•<br />
6 SPST5458•<br />
7 SAPU5457GL<br />
8 SPST5727•<br />
9 SPST5728•<br />
10 SOTF0137•<br />
11 SAPU5730•<br />
12 SPST5942K•<br />
13 SAPI5934T•<br />
14 SAPI5897•<br />
15 SPST5942J•<br />
16 SPST5729J<br />
17 SOTF0130•<br />
18 SAPI5934•<br />
19 SPST5729K<br />
20 SAPU5298X•US<br />
21 SAPU5298X•<br />
22 IRTR0001B<br />
23 SPST5171•<br />
24 SPST5172•<br />
25 MUCI5P11•<br />
26 SPST4645•<br />
27 SPST4725•<br />
EN• Spare parts available in different colours to be specified when ordering.<br />
ES• Repuestos disponibles en ot<strong>ro</strong>s colores que se especificarán en el pedido.<br />
FR• Pièces de rechange disponibles en plusieurs couleurs à spécifier dans la<br />
demande.
25<br />
<st<strong>ro</strong>ng>Prima</st<strong>ro</strong>ng> <st<strong>ro</strong>ng>Pappa</st<strong>ro</strong>ng> <st<strong>ro</strong>ng>Diner</st<strong>ro</strong>ng><br />
1<br />
2<br />
22<br />
3<br />
USA & Canada ONLY<br />
21<br />
20<br />
24<br />
23<br />
5<br />
6<br />
7<br />
26<br />
27<br />
4<br />
10<br />
8<br />
17<br />
19<br />
9<br />
8<br />
11<br />
Eu<strong>ro</strong>pe<br />
only<br />
14<br />
16<br />
12<br />
9<br />
18<br />
15<br />
13
• IMPORTANT: read the instructions<br />
carefully before using the st<strong>ro</strong>ller. Save the<br />
instructions for future reference.<br />
• PEG PEREGO reserves the right to make any<br />
necessary changes or imp<strong>ro</strong>vements to the<br />
p<strong>ro</strong>ducts shown at any time without notice.<br />
CUSTOMER SERVICE<br />
If parts of the model are accidentally lost or<br />
damaged, use only original Peg Perego spare<br />
parts. Contact the Peg Perego Customer<br />
Service for all repair work, replacements,<br />
information about p<strong>ro</strong>ducts, and sale of<br />
original spare parts and accessories, at the<br />
following:<br />
USA:<br />
tel.: 800.671.1701<br />
fax: 260.471.6332<br />
Call us toll free: 1.800.671.1701<br />
CANADA:<br />
tel.: 905.839.3371<br />
fax: 905.839.9542<br />
Call us toll free: 1.800.661.5050<br />
www.pegperego.com<br />
EN•ENGLISH<br />
INSTRUCTIONS FOR USE<br />
ASSEMBLING THE HIGH CHAIR<br />
1• Attach the wheels, making sure to insert<br />
the ones with the brakes on the back part<br />
of the high chair.<br />
2• Attach the two f<strong>ro</strong>nt wheels, pressing in<br />
the direction shown by the ar<strong>ro</strong>w.<br />
3• When it comes out of the packaging, the<br />
seat of the high chair is not in the correct<br />
position for use (it is in packing position).<br />
To use the high chair, lift the seat as in<br />
the figure until you hear a click, placing<br />
it at one of the seven different possible<br />
heights. To place the seat in the position<br />
for it to be put back in its packaging, see<br />
directions below.<br />
TO OPEN THE HIGH CHAIR<br />
4• To open the high chair, push the little<br />
red levers on the sides downwards as in<br />
the figure, pressing down on the back<br />
supports.<br />
5• Lower the footrest, as shown in the<br />
figure.<br />
BRAKE<br />
6• The high chair has four swivel wheels,<br />
with brakes on two of them. To brake the<br />
high chair, lower the little brake levers on<br />
the rear wheels. To release the brakes, lift<br />
the levers. For your convenience, always<br />
make sure the brakes are set before<br />
carrying out any other operation on the<br />
high chair.<br />
TRAY<br />
7• To attach the tray, pull the lever under<br />
it towards you while slipping the tray<br />
onto the armrests. Push all the way in, as<br />
shown in the figure.<br />
8• The high chair tray can be adjusted to<br />
three different positions. The third<br />
position (marked with red notches)is not<br />
meant for use with the tray; it is used for<br />
folding up the tray.<br />
• To extend the tray, pull the lever under<br />
it towards you as you pull the tray out to<br />
the first position. Repeat the operation to<br />
set the tray in the second position.<br />
• To remove the tray, pull the lever as you<br />
pull the tray towards you.<br />
9• The high chair comes with two trays. The<br />
child can play on the lower tray and eat<br />
on the upper one, which is easy to wash<br />
and can be kept perfectly clean.<br />
• To remove the meal tray, unhook it f<strong>ro</strong>m<br />
the lower tray by lifting as shown in the<br />
figure.<br />
SAFETY BELT<br />
10• Make sure that the shoulder strap is<br />
correctly inserted, by pressing on it, as<br />
shown in figure A. Fasten the lap belt as<br />
shown in figure B.<br />
11• To unfasten the safety belt, press the<br />
sides of the buckle (fig. A) while pulling<br />
the lap belt outwards (fig. B).<br />
12• The shoulder straps can be adjusted to<br />
two different heights. Unfasten the safety<br />
belt f<strong>ro</strong>m behind the backrest by pushing<br />
the buckle downwards (fig. A). Slip the<br />
safety belt out of the sack (fig. B).<br />
13• Next, slip the safety belt buckle th<strong>ro</strong>ugh<br />
the other opening in the backrest (fig. A),<br />
and fasten the buckle to the peg, pulling<br />
the safety belt until it clicks into place<br />
(fig. B).<br />
7 HEIGHTS<br />
The high chair adjusts to 7 different<br />
heights.<br />
14• To lift the high chair, hold it under the<br />
tray and pull upwards.<br />
15• To lower the high chair, simultaneously<br />
press the two side buttons, stopping at<br />
the desired height.<br />
These operations can be carried out with<br />
the child in the high chair.<br />
RECLINING HIGH CHAIR<br />
16• The high chair reclines, and adjusts to<br />
four different positions: for mealtime,<br />
playtime, relaxing, or napping. To adjust<br />
it, lift the handle behind the backrest and<br />
set the high chair to the desired position.<br />
This operation can be carried out with the
child in the high chair.<br />
CLOSING AND OPENING THE TRAY<br />
17• To close the tray, pull it out to the third<br />
position marked with the red notches<br />
shown by the ar<strong>ro</strong>ws in the figure.<br />
18• Press button No. 1.<br />
19• Press button No. 2, while lifting the tray<br />
upwards until it clicks into place.<br />
• To open the tray again, press button No.<br />
2 and lower the tray to the first or second<br />
position.<br />
FOLDING UP THE HIGH CHAIR<br />
• Before folding up the high chair:<br />
- Close the tray.<br />
- Return the backrest to the upright<br />
position.<br />
- Lower the high chair to the lowest<br />
position.<br />
- Close the footrest.<br />
20• Unlock safety device A, by turning it in<br />
the direction shown by the ar<strong>ro</strong>w, then<br />
press pedal B.<br />
21• Hold the high chair as shown in the figure<br />
while unlocking the safety device and<br />
pressing the pedal, and pull upwards.<br />
• The high chair stands upright when it is<br />
closed.<br />
REMOVING THE HIGH CHAIR COVER<br />
22• To remove the high chair cover, remove<br />
the safety belt f<strong>ro</strong>m under the chair and<br />
the backrest.<br />
23• Lower the high chair completely, and<br />
unbutton the cover f<strong>ro</strong>m the sides of the<br />
backrest. Slip the cover off the top of the<br />
high chair.<br />
FOLDING THE HIGH CHAIR BACK UP INTO<br />
ITS PACKING POSITION<br />
• To fold the high chair back up into its<br />
“packing position” (for transporting it or<br />
storing it in its box):<br />
- Remove the tray.<br />
- Return the backrest to the upright<br />
position.<br />
- Lower the high chair to the lowest<br />
position.<br />
- Close the footrest.<br />
24• A small screwdriver is necessary for this<br />
step. Press the side button while slipping<br />
the screwdriver into the slit. Push to the<br />
right.<br />
25• Repeat the same operation, pushing the<br />
screwdriver to the left and lowering the<br />
high chair to the lowest position (the<br />
position in which it cannot be used).<br />
• Fold the high chair up and place it in its<br />
box.<br />
ACCESSORY LINE<br />
26• Cent<strong>ro</strong> Gioco: to attach the Cent<strong>ro</strong> Gioco,<br />
place it as shown in the figure, and<br />
attach. Do not attach the toy to the meal<br />
tray.<br />
CLEANING & MAINTENANCE<br />
Your p<strong>ro</strong>duct requires only minimal<br />
maintenance. Cleaning and maintenance<br />
operations must be performed only by adults.<br />
• Be sure to keep all moving parts clean,<br />
lubricating them with light oil if necessary.<br />
• Dry off metal parts to prevent rusting.<br />
• Regularly clean the plastic parts with a<br />
damp cloth. Do not use solvents or similar<br />
p<strong>ro</strong>ducts.<br />
• Remove any dust and sand f<strong>ro</strong>m the wheels.<br />
• P<strong>ro</strong>tect the p<strong>ro</strong>duct against smog, water,<br />
rain and snow. Continued and extended<br />
exposure to sunlight can change the<br />
colours of many materials.<br />
• Store the p<strong>ro</strong>duct in a dry area.<br />
• If the bag is made of PVC, do not soak it<br />
in water but clean it with a damp cloth and<br />
neutral soap.<br />
WARNING<br />
• ALL ASSEMBLY AND OPERATING<br />
PROCEDURES SHOULD BE<br />
PERFORMED BY AN ADULT; DO<br />
NOT USE THE PRODUCT IF IT HAS<br />
BROKEN OR MISSING PARTS.<br />
• PREVENT SERIOUS INJURY OR<br />
DEATH FROM FALLS OR SLIDING<br />
OUT; ALWAYS USE COMPLETE<br />
5 POINT SEATBELT; THE CHILD<br />
SHOULD BE SECURED IN THE HIGH<br />
CHAIR AT ALL TIMES, EITHER IN<br />
THE RECLINED OR IN THE UPRIGHT<br />
POSITION.<br />
• NEVER LEAVE THE CHILD<br />
UNATTENDED; ALWAYS KEEP CHILD<br />
IN VIEW WHILE IN THE HIGHCHAIR.<br />
• TRAY AND ACCESSORY TRAYS ARE<br />
NOT DESIGNED TO SUPPORT THE<br />
CHILDʼS WEIGHT; TRAY IS NOT<br />
DESIGNED TO HOLD THE CHILD IN<br />
THE CHAIR.<br />
• ALWAYS USE THE HIGHCHAIR ON A<br />
FLAT, HORIZONTAL SURFACE.<br />
• IT IS RECOMMENDED THAT THE<br />
HIGH CHAIR BE USED IN THE<br />
UPRIGHT POSITION ONLY BY<br />
CHILDREN CAPABLE OF SITTING<br />
UPRIGHT.<br />
• BE CAREFUL OF WHERE YOU PLACE<br />
THE PRODUCT. AVOID PLACING<br />
THE CHILD NEAR SAFETY HAZARDS
SUCH AS ELECTRICAL CORDS,<br />
SOURCES OF HEAT, OR FLAMES.<br />
• DO NOT PUT FINGERS IN THE<br />
MECHANISM. MAKE SURE YOUR<br />
CHILDʼS ARMS AND LEGS ARE<br />
CLEAR OF THE MOVING PARTS<br />
DURING ADJUSTMENT.<br />
• USING ACCESSORIES THAT<br />
HAVE NOT BEEN APPROVED BY<br />
THE MANUFACTURER MAY BE<br />
HAZARDOUS.<br />
• DO NOT USE THE PRODUCT NEAR<br />
STAIRS OR STEPS.<br />
• BE CAREFUL NOT TO PLACE THE<br />
PRODUCT NEAR SOURCES OF HEAT<br />
OR FLAMES, SUCH AS GAS STOVES,<br />
ELECTRIC HEATERS, ETC.<br />
ES•ESPAÑOL<br />
• IMPORTANTE: leer detenidamente las<br />
instrucciones antes del uso y conservarlas<br />
para poder utilizarlas en el futu<strong>ro</strong>.<br />
• PEG PEREGO podrá modificar los modelos<br />
decritos en este p<strong>ro</strong>specto, por razones<br />
técnicas o commerciales.<br />
SERVICIO DE ASISTENCIA<br />
Si por casualidad alguna parte del modelo<br />
se pierde o se <strong>ro</strong>mpe, usar sólo piezas de<br />
repuesto originales Peg Perego. Para todo<br />
lo que concierne las reparaciones, cambios,<br />
informaciones sobre los p<strong>ro</strong>ductos y la venta de<br />
repuestos originales y accesorios, contacte con<br />
el Servicio de Asistencia Peg-Perego:<br />
USA:<br />
tel.: 800.671.1701<br />
fax: 260.471.6332<br />
Call us toll free: 1.800.671.1701<br />
www.pegperego.com<br />
INSTRUCCIONES DE USO<br />
PARA MONTAR LA SILLA<br />
1• Poner las ruedas colocando las que llevan<br />
frenos en la parte posterior de la silla.<br />
2• Poner las dos ruedas delanteras<br />
presionando como indica el sentido de la<br />
flecha.<br />
3• Cuando se quita del embalaje, la silla<br />
está en una posición incorrecta para<br />
ser utilizada (posición embalaje). Para<br />
utilizarla, levantar la silla como indica la<br />
figura hasta oír clic, poniéndola en una de<br />
las siete alturas posibles de la silla. Para<br />
volver a poner la silla en la posición que<br />
se utiliza exclusivamente en el embalaje<br />
véanse las indicaciones más adelante.<br />
PARA ABRIR LA SILLA<br />
4• Para abrir la silla, empujar hacia abajo las<br />
palanquitas <strong>ro</strong>jas laterales como indica la<br />
figura, haciendo presión en los bastidores<br />
posteriores.<br />
5• Bajar el peldaño reposapiés, como indica<br />
la figura.<br />
FRENO<br />
6• La silla tiene cuat<strong>ro</strong> ruedas giratorias,<br />
dos de las cuales se pueden bloquear<br />
con los frenos. Para frenarlas, bajar<br />
las palanquitas del freno de las ruedas<br />
traseras; para desbloquear los frenos,<br />
hacer la operación en el sentido contrario.<br />
Por motivos de comodidad, antes de<br />
hacer cualquier operación, asegurarse de<br />
que la silla esté frenada.
BANDEJA<br />
7• Para aplicar la bandeja, tirar hacia sí la<br />
palanca que está debajo de la bandeja y<br />
al mismo tiempo meterla en los brazos<br />
empujando hasta el fondo como indica la<br />
figura.<br />
8• La bandeja de la silla se alarga en<br />
tres posiciones, la tercera posición (la<br />
identificada con referencias <strong>ro</strong>jas) no<br />
tiene que utilizarse pues sirve para volver<br />
a cerrar la bandeja.<br />
• Para alargar la bandeja, tirar de la<br />
palanquita que está debajo de la misma y<br />
tirar la bandeja hacia sí hasta la primera<br />
posición y repetir la operación para poner<br />
la bandeja en la segunda posición.<br />
• Para extraer la bandeja, tirar de la<br />
palanquita y al mismo tiempo empujar<br />
hacia sí la bandeja hasta extraerla.<br />
9• La silla lleva una bandeja doble, en la de<br />
abajo se puede jugar y en la de arriba se<br />
puede comer con la máxima higiene pues<br />
se lava fácilmente.<br />
• Para quitar la bandeja de la comida, hay<br />
que desengancharla de la bandeja de<br />
abajo levantándola como indica la figura.<br />
CINTURÓN DE SEGURIDAD<br />
10• Asegurarse de que el tirante esté metido<br />
correctamente, empujando como indica la<br />
figura A. Enganchar la correa de la cintura<br />
como indica la figura B.<br />
11• Para desenganchar el cinturón, presionar<br />
a los lados de la hebilla (fig. A) y al<br />
mismo tiempo tirar hacia fuera la correa<br />
de la cintura (fig. B).<br />
12• La altura de los tirantes de la correa<br />
puede regularse en dos posiciones;<br />
desenganchar el cinturón por detrás del<br />
respaldo, empujando la hebilla hacia<br />
abajo (fig. A). Sacar el cinturón por la<br />
funda (fig. B).<br />
13• Luego meter la hebilla del cinturón en<br />
la otra ranura del respaldo (fig. A) y<br />
enganchar la hebilla a la espiga, tirando<br />
del cinturón hasta el clic de enganche<br />
(fig. B).<br />
7 ALTURAS<br />
La altura del asiento se puede regular en<br />
7 posiciones.<br />
14• Para levantar el asiento coger por debajo<br />
la bandeja y tirar hacia arriba.<br />
15• Para bajar el asiento, presionar al<br />
mismo tiempo los dos botones laterales,<br />
parándose en la posición deseada.<br />
Estas operaciones pueden ser realizadas<br />
también con el niño en la silla.<br />
ASIENTO RECLINABLE<br />
16• El asiento se puede reclinar hasta cuat<strong>ro</strong><br />
posiciones: para comer, jugar, descansar<br />
o dormir. Para regularlo subir el asa que<br />
está detrás del respaldo y bloquearlo<br />
en la posición deseada. Esta operación<br />
puede ser realizada también con el niño<br />
en la silla.<br />
PARA VOLVER A CERRAR Y A ABRIR LA<br />
BANDEJA<br />
17• Para volver a cerrar la bandeja, alargar<br />
la bandeja hasta la tercera posición<br />
identificada con las referencias <strong>ro</strong>jas<br />
indicadas por las flechas de la figura.<br />
18• Bajar el botón identificado con el núme<strong>ro</strong><br />
1.<br />
19• Bajar el botón identificado con el núme<strong>ro</strong><br />
2 y al mismo tiempo subir la bandeja<br />
hasta bloquearla arriba.<br />
• Para volver a abrir la bandeja hay que<br />
bajar el botón identificado con el núme<strong>ro</strong><br />
2, bajar la bandeja y ponerla en la<br />
primera o en la segunda posición.<br />
PARA CERRAR LA SILLA<br />
• Antes de cerrar la silla:<br />
- Volver a cerrar la bandeja.<br />
- Poner el respaldo en la posición erecta.<br />
- Bajar el asiento en la última posición.<br />
- Volver a cerrar el peldaño reposapiés.<br />
20• Desbloquear el dispositivo de seguridad<br />
A, girándolo en el sentido de la flecha y<br />
sucesivamente presionar el pedal B.<br />
21• Simultáneamente a las operaciones A y<br />
B, coger la silla como indica la figura y<br />
cerrarla, tirando hacia arriba.<br />
• La silla cuando está cerrada se sostiene<br />
en pie sola.<br />
POSIBILIDAD DE QUITAR LA FUNDA<br />
22• Para quitar la funda de la silla, sacar el<br />
cinturón que hay debajo del asiento y del<br />
respaldo.<br />
23• Reclinar completamente la silla para<br />
desab<strong>ro</strong>char la funda por los lados del<br />
respaldo y sacar la funda por arriba.<br />
PARA VOLVER A PONER LA SILLA EN LA<br />
“POSICIÓN DE EMBALAJE”<br />
• Para volver a poner la silla en la “posición<br />
embalaje” (por exigencias de transporte o<br />
para volver a meterla en la caja), hay que:<br />
- Quitar la bandeja.<br />
- Poner el respaldo en la posición erecta.<br />
- Bajar el asiento en la última posición.<br />
- Volver a cerrar el peldaño reposapiés.<br />
24• Coger un destornillador pequeño.<br />
Presionar el botón lateral y al mismo<br />
tiempo meter el destornillador en la<br />
ranura empujando hacia la derecha.<br />
25• Repetir la misma operación, empujando<br />
el destornillador hacia la izquierda y bajar<br />
hasta el fondo el asiento (en la posición<br />
no utilizable).<br />
• Luego volver a cerrar la silla y meterla en<br />
su caja.<br />
LÍNEA DE ACCESORIOS<br />
26• Bandeja de juegos: para enganchar la<br />
Bandeja de juegos hay que ponerla y<br />
engancharla como indica la figura. No<br />
enganchar la bandeja de juegos a la
andeja para comer.<br />
LIMPIEZA & MANTENIMIENTO<br />
Su p<strong>ro</strong>ducto necesita un mínimo<br />
mantenimiento. Las operaciones delimpieza y<br />
mantenimiento tiene que ser efectuadas sólo<br />
por adultos.<br />
• Se aconseja mantener limpias las partes en<br />
movimiento y si hiciera falta, lubricarlas con<br />
aceite lige<strong>ro</strong>.<br />
• Secar las partes de metal del p<strong>ro</strong>ducto para<br />
evitar que se oxiden.<br />
• Limpiar periódicamente las partes de<br />
plástico con un paño húmedo, no usar<br />
disolventes ni ot<strong>ro</strong>s p<strong>ro</strong>ductos parecidos.<br />
• Mantener limpias las ruedas quitando polvo<br />
y arena.<br />
• P<strong>ro</strong>teger el p<strong>ro</strong>ducto contra los agentes<br />
atmosféricos, agua, lluvia o nieve; la<br />
exposición continua y p<strong>ro</strong>longada al sol<br />
puede causar cambios de color en muchos<br />
materiales.<br />
• Conservar el p<strong>ro</strong>ducto en un sitio seco.<br />
• Si el saco es de PVC no meterlo en agua;<br />
limpiarlo con un paño húmedo y detergente<br />
neut<strong>ro</strong>.<br />
CUIDADO<br />
• LAS OPERACIONES DE MONTAJE Y<br />
DE REGULACIÓN DEL PRODUCTO<br />
TIENEN QUE SER REALIZADAS<br />
POR UN ADULTO; NO UTILIZAR<br />
EL PRODUCTO SI EL MONTAJE NO<br />
HA SIDO COMPLETADO Y SI EL<br />
PRODUCTO PRESENTA ROTURAS O<br />
FALTAN PIEZAS.<br />
• PREVENIR HERIDAS SERIAS O LA<br />
MUERTE DEL NIÑO CAUSADAS POR<br />
LA CAÍDA O EL RESBALAMIENTO<br />
DEL MISMO; UTILIZAR SIEMPRE<br />
LOS CINTURONES DE SEGURIDAD<br />
DE CINCO PUNTOS; UTILIZAR LOS<br />
CINTURONES TANTO EN POSICIÓN<br />
RECLINADA COMO EN POSICIÓN<br />
ERECTA.<br />
• NO DEJAR NUNCA AL NIÑO SIN<br />
VIGILANCIA; NO PERDER NUNCA DE<br />
VISTA AL NIÑO.<br />
• LA BANDEJA Y SUS ACCESORIOS<br />
NO HAN SIDO CONCEBIDOS<br />
PARA SOPORTAR EL PESO DEL<br />
NIÑO; LA BANDEJA NO HA SIDO<br />
DISEÑADA PARA SUJETAR AL NIÑO<br />
EN EL ASIENTO Y NO SIRVE COMO<br />
CINTURÓN DE SEGURIDAD.<br />
• ASEGURARSE DE QUE EL PRODUCTO<br />
ESTÉ SOBRE UNA SUPERFICIE<br />
HORIZONTAL.<br />
• UTILIZAR EL PRODUCTO EN<br />
POSICIÓN ERECTA SOLO CUANDO<br />
EL NIÑO SEA CAPAZ DE ESTAR<br />
SENTADO SOLO.<br />
• PONER EL PRODUCTO DE MANERA<br />
QUE EL NIÑO ESTÉ LEJOS DE<br />
POSIBLES PELIGROS COMO CABLES<br />
ELÉCTRICOS, FUENTES DE CALOR O<br />
LLAMAS.<br />
• NO INTRODUCIR LOS DEDOS EN<br />
LOS MECANISMOS Y PRESTAR<br />
ATENCIÓN A LA POSICIÓN DE<br />
LAS EXTREMIDADES DEL NIÑO<br />
DURANTE LAS OPERACIONES DE<br />
REGULACIÓN.<br />
• PUEDE SER PELIGROSO UTILIZAR<br />
ACCESORIOS NO HOMOLOGADOS<br />
POR EL FABRICANTE.<br />
• NO UTILIZAR EL PRODUCTO CERCA<br />
DE ESCALERAS O ESCALONES.<br />
• PRESTAR ATENCIÓN A NO PONER<br />
EL PRODUCTO CERCA DE FUENTES<br />
DE CALOR O FUEGO COMO<br />
HORNILLOS DE GAS, ESTUFAS<br />
ELÉCTRICAS, ETC.
• AVERTISSEMENT: lire attentivement les<br />
instructions avant dʼutiliser le p<strong>ro</strong>duit et les<br />
conserver pour toute référence ultérieure.<br />
• Pour des raisons techniques et commerciales,<br />
PEG PEREGO pourra apporter à tout moment<br />
des modifications aux modèles décrits dans ce<br />
manuel.<br />
SERVICE DʼASSISTANCE<br />
En cas de perte ou dommage fortuit de pièces<br />
du modèle, utilisez exclusivement les pièces<br />
de rechange originales Peg Perego. Pour<br />
les éventuelles réparations, substitutions,<br />
informations sur les p<strong>ro</strong>duits, la vente de<br />
pièces de rechange originales et dʼaccessoires,<br />
contactez le Service dʼassistance Peg-Perego:<br />
CANADA:<br />
tel.: 905.839.3371<br />
fax: 905.839.9542<br />
Call us toll free: 1.800.661.5050<br />
www.pegperego.com<br />
FR•FRANÇAIS<br />
NOTICE DʼEMPLOI<br />
POUR ASSEMBLER LA CHAISE HAUTE<br />
1• Montez les <strong>ro</strong>ues en faisant attention à<br />
insérer celles avec les freins à lʼarrière de<br />
la chaise haute.<br />
2• Montez les deux <strong>ro</strong>ues avant en faisant<br />
pression dans le sens de la flèche.<br />
3• Une fois sorti de son emballage, le siège<br />
de la chaise haute est dans une position<br />
inadaptée à son utilisation (position<br />
emballage). Pour lʼutiliser, soulever le<br />
siège comme sur la figure jusquʼau déclic<br />
et enclenchez-le à une des hauteurs de<br />
réglage de la chaise haute. Pour faire<br />
reprendre au siège la position emballage,<br />
voir ci-après.<br />
POUR OUVRIR LA CHAISE HAUTE<br />
4• Pour ouvrir la chaise haute, pousser vers<br />
le bas les languettes <strong>ro</strong>uges situées sur<br />
les côtés, comme sur la figure, en faisant<br />
levier sur les montants postérieurs.<br />
5• Abaisser la pédale repose-pieds, comme<br />
sur la figure.<br />
FREIN<br />
6• La chaise haute est équipée de quatre<br />
<strong>ro</strong>ulettes pivotantes dont deux avec<br />
frein. Pour bloquer les freins, baissez les<br />
petites manettes des <strong>ro</strong>ues arrières, pour<br />
les débloquer, relevez-les.<br />
PLATEAU<br />
7• Pour appliquer le plateau, tirer vers<br />
soi le levier situé sous le plateau tout<br />
en enfilant à fond ce dernier dans les<br />
accoudoirs, comme indiqué sur la figure.<br />
8• Le plateau de la chaise haute est<br />
allongeable en t<strong>ro</strong>is positions; ne pas<br />
utiliser la t<strong>ro</strong>isième position (indiquée en<br />
<strong>ro</strong>uge), qui sert à refermer le plateau.<br />
• Pour allonger le plateau, tirer vers soi le<br />
levier situé sous le plateau et ce dernier<br />
jusquʼen première position et répéter<br />
lʼopération pour lʼamener en deuxième<br />
position.<br />
• Pour extraire le plateau, tirer vers soi le<br />
levier situé sous le plateau et ce dernier<br />
jusquʼà lʼextraire.<br />
9• La chaise haute est dotée dʼun double<br />
plateau, celui du bas pour jouer et celui<br />
du haut pour manger en conditions<br />
maximales dʼhygiène car il se lave<br />
facilement.<br />
• Pour démonter le plateau repas, le<br />
déc<strong>ro</strong>cher du plateau sous-jacent en le<br />
soulevant comme indiqué sur la figure.<br />
CEINTURE DE SECURITE<br />
10• Assurez-vous que la bretelle est bien<br />
insérée en appuyant comme indiqué sur<br />
la Figure A. Attachez la ceinture du tour<br />
de taille comme indiqué sur la figure B.<br />
11• Pour détacher la ceinture, enfoncez les<br />
côtés de la boucle (fig. A) tout en tirant la<br />
ceinture du tour de taille vers lʼextérieur<br />
(fig. B)<br />
12• Les bretelles de la ceinture peuvent être<br />
réglées en hauteur en deux positions:<br />
détachez la ceinture à lʼarrière du dossier<br />
en tirant la boucle vers le bas (fig. A).<br />
Retirez la ceinture par la housse (fig. B)<br />
13• Enfilez la boucle de la ceinture dans<br />
lʼautre fente du dossier (fig. A) et<br />
acc<strong>ro</strong>chez la boucle à lʼergot en tirant la<br />
ceinture jusquʼau Clic dʼenclenchement<br />
(fig. B)<br />
7 HAUTEUR<br />
La hauteur du siège est réglable en 7<br />
positions.<br />
14• Pour relever le siège, empoigner le<br />
plateau et tirer le siège vers le haut.<br />
15• Pour abaisser le siège, appuyer<br />
simultanément sur les deux boutons<br />
latéraux et sʼarrêter sur la position<br />
voulue.<br />
Ces opérations peuvent également être<br />
effectuées alors que lʼenfant est assis sur<br />
la chaise haute.<br />
SIÈGE INCLINABLE<br />
16• Le siège est inclinable en quatre<br />
positions: repas, jeu, détente et sieste.<br />
Pour régler lʼinclinaison du siège, relever<br />
la poignée située derrière le dossier et<br />
bloquer le siège dans la position voulue.<br />
Cette opération peut également être<br />
effectuée alors que lʼenfant est assis sur<br />
la chaise haute.
FERMETURE ET RÉOUVERTURE DU<br />
PLATEAU<br />
17• Pour refermer le plateau, lʼamener en<br />
t<strong>ro</strong>isième position, marquée en <strong>ro</strong>uge et<br />
indiquée par les flèches sur la figure.<br />
18• Abaisser le bouton indiqué par le chiffre<br />
1.<br />
19• Abaisser le bouton indiqué par le chiffre<br />
2 tout en relevant le plateau jusquʼà le<br />
bloquer en hauteur.<br />
• Pour <strong>ro</strong>uvrir le plateau, abaisser le<br />
bouton indiqué par le chiffre 2, abaisser<br />
le plateau et lʼamener en première ou<br />
deuxième position.<br />
FERMETURE DE LA CHAISE HAUTE<br />
• Avant de fermer la chaise haute:<br />
- refermer le plateau;<br />
- redresser le dossier;<br />
- abaisser complètement le siège;<br />
- refermer le repose-pied.<br />
20• Débloquez le dispositif de sécurité A en le<br />
faisant pivoter dans le sens de la flèche,<br />
puis appuyez sur la pédale B.<br />
21• Dans le même temps, saisissez-vous de<br />
la chaise haute comme sur la figure et<br />
refermez-la en tirant vers le haut.<br />
• Lorsquʼelle est refermée, la chaise haute<br />
tient debout toute seule.<br />
POUR ENLEVER LA HOUSSE<br />
22• Pour enlever la housse de la chaise haute,<br />
retirez la ceinture de sous lʼassise et du<br />
dossier.<br />
23• Abaissez complètement le siège pour<br />
déboutonner le sac des côtés du dossier<br />
et retirez le sac par le haut.<br />
POUR REMETTRE LA CHAISE HAUTE EN<br />
«-POSITION DʼEMBALLAGE-»<br />
• Pour remettre la chaise haute en «position<br />
dʼemballage» (pour la transporter ou la<br />
remettre dans son carton):<br />
- démonter le plateau;<br />
- redresser le dossier;<br />
- abaisser complètement le siège;<br />
- refermer le repose-pied.<br />
24• Se munir dʼun petit tournevis. Appuyer<br />
sur le bouton latéral tout en enfilant le<br />
tournevis dans la fente et en le poussant<br />
vers la d<strong>ro</strong>ite.<br />
25• Répéter lʼopération en poussant le<br />
tournevis vers la gauche et abaisser à<br />
fond le siège (en position dʼemballage).<br />
• Refermer la chaise haute et la mettre<br />
dans son carton.<br />
LIGNE DʼACCESSOIRES<br />
26• Plateau de jeu: pour monter le Plateau de<br />
jeu, positionnez-le et montez-le comme<br />
sur la figure. Ne montez pas le jeu sur le<br />
plateau repas.<br />
NETTOYAGE ET ENTRETIEN<br />
Votre p<strong>ro</strong>duit nécessite un minimum<br />
dʼentretien. Les opérations de nettoyage<br />
et dʼentretien doivent être effectuées<br />
uniquement par des adultes.<br />
• Il est recommandé de maintenir toutes les<br />
parties mobiles p<strong>ro</strong>pres et, au besoin, de<br />
les lubrifier avec une huile légère.<br />
• Essuyer les parties métalliques du p<strong>ro</strong>duit<br />
pour prévenir la formation de <strong>ro</strong>uille.<br />
• Nettoyer régulièrement les parties en<br />
plastique avec un chiffon humide, ne pas<br />
utiliser de solvants ou dʼautres p<strong>ro</strong>duits du<br />
même type.<br />
• Éliminer les dépôts de poussière et de sable<br />
des <strong>ro</strong>ues.<br />
• P<strong>ro</strong>téger le p<strong>ro</strong>duit contre les agents<br />
atmosphériques, lʼeau, la pluie ou la neige ;<br />
lʼexposition continue et p<strong>ro</strong>longée au soleil<br />
pourrait altérer les couleurs de nombreux<br />
matériaux.<br />
• Conserver le p<strong>ro</strong>duit dans un end<strong>ro</strong>it sec.<br />
• Si la housse est en PVC, ne pas la plonger<br />
dans lʼeau, mais la nettoyer avec un chiffon<br />
humide et un détergent neutre.<br />
AVERTISSEMENT<br />
• LES OPÉRATIONS DE MONTAGE<br />
ET DE RÉGLAGE DU PRODUIT<br />
DOIVENT ÊTRE EFFECTUÉES PAR<br />
UN ADULTE; NE PAS UTILISER LE<br />
PRODUIT SI LE MONTAGE NʼEST PAS<br />
CONVENABLEMENT TERMINÉ ET SI<br />
LE PRODUIT PRÉSENTE DES PIÈCES<br />
CASSÉES OU MANQUANTES.<br />
• EMPÊCHER DE GRAVES BLESSURES<br />
OU LA MORT DE LʼENFANT DUES À<br />
SA CHUTE OU À SON GLISSEMENT:<br />
TOUJOURS UTILISER LES CEINTURES<br />
DE SÉCURITÉ À CINQ POINTS;<br />
UTILISER LES CEINTURES EN<br />
POSITION INCLINÉE ET À LA<br />
VERTICALE.<br />
• NE JAMAIS LAISSER LʼENFANT SANS<br />
SURVEILLANCE; TOUJOURS GARDER<br />
LʼENFANT EN VUE.<br />
• LE PLATEAU ET SES ACCESSOIRES<br />
NʼONT PAS ÉTÉ CONÇUS POUR<br />
SUPPORTER LE POIDS DE LʼENFANT;<br />
LE PLATEAU NʼA PAS ÉTÉ CONÇU<br />
POUR MAINTENIR LʼENFANT EN<br />
POSITION ASSISE ET NE REMPLACE<br />
PAS LA SANGLE DE SÉCURITÉ.
• SʼASSURER QUE LE PRODUIT EST<br />
INSTALLÉ SUR UNE SURFACE<br />
HORIZONTALE.<br />
• NʼUTILISER LE PRODUIT EN<br />
POSITION VERTICALE QUE SI<br />
LʼENFANT EST CAPABLE DE RESTER<br />
ASSIS TOUT SEUL.<br />
• INSTALLER LE PRODUIT DE MANIÈRE<br />
À CE QUE LʼENFANT NE PUISSE ÊTRE<br />
MIS EN DANGER PAR DES CÂBLES<br />
ÉLECTRIQUES, DES SOURCES DE<br />
CHALEUR OU DES FLAMMES.<br />
• NE PAS METTRE LES DOIGTS<br />
DANS LES MÉCANISMES ET FAIRE<br />
ATTENTION À LA POSITION DES<br />
MEMBRES DE LʼENFANT AU COURS<br />
DES OPÉRATIONS DE RÉGLAGE.<br />
• LʼUTILISATION DʼACCESSOIRES<br />
NʼAYANT PAS ÉTÉ APPROUVÉS<br />
PAR LE FABRICANT PEUT ÊTRE<br />
DANGEREUSE.<br />
• NE PAS UTILISER LE PRODUIT<br />
À PROXIMITÉ DE MARCHES OU<br />
DʼESCALIERS.<br />
• FAIRE ATTENTION À NE PAS<br />
POSITIONNER LE PRODUIT À<br />
PROXIMITÉ DE SOURCES DE<br />
CHALEUR OU DE FEUX COMME LES<br />
POÊLES À GAZ, LES RADIATEURS<br />
ÉLECTRIQUES, ETC.
<st<strong>ro</strong>ng>Prima</st<strong>ro</strong>ng> <st<strong>ro</strong>ng>Pappa</st<strong>ro</strong>ng><br />
<st<strong>ro</strong>ng>Diner</st<strong>ro</strong>ng><br />
PEG PEREGO S.p.A.<br />
VIA DE GASPERI 50 20043 ARCORE MI ITALIA<br />
tel. 0039•039•60881 fax 0039•039•615869-616454<br />
Servizio Post Vendita - After Sale:<br />
tel. 0039•039•6088213 fax: 0039•039•3309992<br />
PEG PEREGO U.S.A. Inc.<br />
3625 INDEPENDENCE DRIVE FORT WAYNE INDIANA 46808<br />
phone 260•482•8191 fax 260•484•2940<br />
Call us toll free 1•800•671•1701<br />
PEG PEREGO CANADA Inc.<br />
585 GRANITE COURT PICKERING ONTARIO CANADA L1W3K1<br />
phone 905•839•3371 fax 905•839•9542<br />
Call us toll free 1•800•661•5050<br />
www.pegperego.com<br />
02-03-06