
Create successful ePaper yourself
Turn your PDF publications into a flip-book with our unique Google optimized e-Paper software.
<strong>GM</strong>-<strong>GENIUS</strong> <strong>RACE</strong> <strong>40R</strong> BL - ESC für Wettbewerbs und Sport-Autos Bedienungsanleitung<br />
Best.-Nr. <strong>7154</strong><br />
Herzlichen Glückwunsch zum Kauf des vielseitigen Reglers für Bürstenlose und Bürstenmotoren von Graupner. Bürstenlose Antriebe bieten<br />
eine hohe Leistung und hohen Wirkungs<strong>gr</strong>ad bei geringem Gewicht und kleinen Abmessungen. Eine erfol<strong>gr</strong>eiche Anwendung setzt aber die<br />
Einhaltung bestimmter Grundsätze voraus.<br />
Lesen Sie bitte vor der Inbetriebnahme diese Bedienungsanleitung aufmerksam durch.<br />
Warnhinweise:<br />
- Das CE-Zertifikat des Reglers entbindet nicht der Verpflichtung, äußerste Vorsicht zu wahren.<br />
- Sollte der Motor einmal nicht wie gewünscht anlaufen oder bei einem Absturz stellen Sie den Senderknüppel sofort auf Motorposition aus, um<br />
eine Überlastung des Reglers zu vermeiden. Überprüfen Sie noch mal den richtigen Anschluss des Motors, kürzen Sie eventuell die Kabel und<br />
stellen Sie bei Bedarf am Sender eine Zeitverzögerung für die Gasannahme ein, um Timingfehler zu verhindern.<br />
- Benutzen Sie nur Motoren von <strong>GM</strong>-Racing oder Graupner, die für den verwendeten Spannungsbereich vorgesehen sind!<br />
- Verwenden Sie nur Hochleistungsakkus von <strong>GM</strong>-Racing oder Graupner. Akkus mit einem zu hohen Innenwiderstand können zur Zerstörung<br />
des Reglers führen! Benutzen Sie auf keinen Fall ein Netzteil für die Stromversorgung!<br />
- Lassen Sie Ihr RC-Modell niemals unbeaufsichtigt, solange ein Akku angesteckt ist. Im Falle eines Defektes, könnte dies Feuer am Modell<br />
oder seiner Umgebung verursachen.<br />
- Der Fahrtenregler oder andere elektronische Komponenten dürfen niemals mit Wasser in Berührung kommen. Der Fahrtenregler ist vor Staub,<br />
Schmutz, Feuchtigkeit, Vibration und anderen Fremdteilen zu schützen.<br />
- Sie dürfen niemals den Motor mit einem separaten Akku laufen lassen. Dies zerstört den Regler und Motor und führt zum Verlust der Garantie.<br />
- Verpolen Sie Ihren Regler nicht. Benutzen Sie verpolsichere Stecksysteme. Vermeiden Sie Kurzschlüsse und blockierende Motoren.<br />
- Alle Kabel und Verbindungen sollen gut isoliert sein. Kurzschlüsse können zur Zerstörung Ihres Reglers führen.<br />
- Nicht für Kinder unter 14Jahren, kein Spielzeug!<br />
- Die Regler sind ausschließlich für den Einsatz in Batterie- bzw. Akkubetriebenen, funkferngesteuerten Modellen vorgesehen, ein anderweitiger<br />
Betrieb ist nicht zulässig. Der Gebrauch in einem Modell zur Personenbeförderung ist verboten!<br />
- Motoren, Getriebe, Schiffs- oder Luftschrauben sind gefährliche Gegenstände. Halten Sie sich daher niemals neben oder vor dem<br />
Gefährdungsbereich des Antriebes auf!<br />
- Technische Defekte mechanischer oder elektronischer Teile können zum unverhofften Anlaufen des Motors und herumfliegenden Teilen führen,<br />
die erhebliche Verletzungen verursachen können.<br />
- Führen Sie immer zuerst einen Reichweitetest und Funktionstest am Boden durch (halten Sie dabei Ihr Modell fest), bevor Ihr Modell zum<br />
Einsatz kommt. Wiederholen Sie den Test bei laufendem Motor und mit kurzen Gasstößen.<br />
- Es dürfen keinerlei Veränderungen am Regler durchgeführt werden, es sei denn, diese sind in der Anleitung beschrieben.<br />
- Haftungsausschluss: Sowohl die Einhaltung der Montage- und Bedienungsanleitung, als auch die Bedingungen und Methoden bei Installation,<br />
Betrieb, Verwendung und Wartung des Fahrtenreglers können von der Fa. Graupner nicht überwacht werden. Daher übernimmt die Fa.<br />
Graupner keinerlei Haftung für Verluste, Schäden oder Kosten, die sich aus fehlerhafter Verwendung und Betrieb ergeben, oder in irgendeiner<br />
Weise damit zusammenhängen.<br />
- Es dürfen nur von uns empfohlene Komponenten und Zubehörteile verwendet werden. Verwenden Sie nur zueinander passende, Original<br />
GRAUPNER - Steckverbindungen und Zubehörteile.<br />
- Vergewissern Sie sich vor jeder Inbetriebnahme bevor Sie den Fahrtenregler einstecken, dass: Ihr Sender als einziger auf der Frequenz Ihres<br />
Empfängers sendet und Ihr Sender eingeschaltet ist und der Gashebel auf der Position STOP steht.
Merkmale des ESC (elektronischer Fahrtregler).<br />
1. Voll proportionaler Vorwärtsgang mit Bremse EIN/AUS und Rückwärtsgang<br />
2. Sanfte Reaktion auf Gasänderungen<br />
3. Motortyp wählbar (Sensorless BLDC, Sensored BLDC, Brushed DC)<br />
(Bürstenloser Motor ohne / mit Sensor, Bürstenmotor)<br />
4. Verwendbar mit Li-Po, Li-Fe und NiMH (NiCd) - Akkus<br />
5. Verschiedene Bremssysteme (Speed Mixing – Bremse (geschwindigkeitsabhängige Bremse), ABS -<br />
Bremse, Auto / Minimum / Maximum Bremse)<br />
6. Nur vorwärts / Vor- und Rückwärtsfahrt wählbar<br />
7. Einfaches Einstellen und Auslesen von Fahrt-Informationen mit Hilfe der Pro<strong>gr</strong>ammier-Karte.<br />
8. Mit Bürstenkollektor (2 kHz), mit Sensor (2 kHz Schaltfrequenz), ohne Sensor (32KHz)<br />
9. Schutzfunktion gegen Überhitzung<br />
*** Wenn der Sensorlose Betrieb gewählt wird, muss es sich um einen Motor ohne Sensoren handeln<br />
oder die Sensoren dürfen nicht eingesteckt sein.<br />
Einstellen der ESC-Senderwege<br />
ESC-Sounds : Do, Re, Mi, Fa, So, La, Ti Do.<br />
1. Schalten Sie den Sender ein.<br />
2. Schließen Sie den Akku an und schalten Sie den ESC ein.<br />
3. Wenn alle Verbindungskabel richtig angeschlossen sind, muss der Motor je nach Gashebel-Stellung<br />
folgende Pieptöne ausgeben:<br />
Do, Re ~~ Do, Re, Mi : bei Neutralstellung des Gashebels<br />
Do, Re ~~<br />
: bei jeder anderen Stellung des Gashebels<br />
4. Wenn Sie die Einstell-Taste länger als 1 Sekunde drücken, muss die <strong>gr</strong>üne LED blinken. Lassen Sie<br />
jetzt die Taste los; nun muss die <strong>gr</strong>üne LED leuchten und der Motor muss mit folgenden Pieptönen: So,<br />
So, La, La, So, So anzeigen, dass die Neutralstellung gespeichert ist.<br />
5. Bringen Sie den Gashebel in die Vollgas-Stellung. Nun muss die rote LED leuchten und damit<br />
anzeigen, dass die Vollgasstellung gespeichert ist.<br />
6. Bringen Sie den Gashebel nach hinten in die Vollbremsungs- oder Volle Rückwärtsfahrt-Stellung, nun<br />
müssen die rote und die <strong>gr</strong>üne LED leuchten und damit anzeigen, dass die Stellung Vollbremsung oder<br />
Volle Rückwärtsfahrt gespeichert ist.<br />
7. Bringen Sie den Gashebel in die Neutralstellung. Nun müssen die rote und die <strong>gr</strong>üne LED im Wechsel<br />
leuchten und der Motor muss die Töne So, Fa, Mi, Re, Do ausgeben. Dann muss die <strong>gr</strong>üne LED<br />
leuchten und damit anzeigen, dass der ESC jetzt betriebsbereit ist.<br />
Hinweis 1: Dieses anfängliche Speichern der Gasstellungen wird nur dann wieder erforderlich, wenn Sie<br />
einen anderen Sender benützen, oder wenn sich die Einstellungen verändert haben<br />
Hinweis 2: Nach dem Einschalten des ESC kann die Gashebelstellung nur eingerichtet werden, bevor<br />
der Motor läuft.<br />
Hinweis 3: Wenn sich die Vollgasstellung nicht speichern lässt, verändern Sie bitte die Stellung<br />
Rückwärts / Normal.
Einstellungen im Benutzer-Modus<br />
1. Schalten Sie den Sender ein.<br />
2. Schließen Sie den Akku an und schalten Sie den ESC ein.<br />
3. Wenn alle Verbindungskabel richtig angeschlossen sind, muss der Motor je nach Stellung des<br />
Gashebels folgende Pieptöne ausgeben:<br />
Do, Re ~~ Do, Re, Mi : bei Neutralstellung des Gashebels<br />
Do, Re ~~<br />
: bei jeder anderen Stellung des Gashebels<br />
4. Wenn Sie die Einstell-Taste länger als 1 Sekunde drücken, muss die <strong>gr</strong>üne LED 2 Sek. lang blinken,<br />
dann muss die rote LED sofort anfangen zu blinken. Lassen Sie jetzt die Taste los; nun muss der Motor<br />
die Pieptöne: Mi, Re, Do, Re, Mi ausgeben, und die rote LED muss mit einer Blinkfolge zeigen, dass<br />
der ESC sich jetzt im Setup des Benutzer- Modus ( user mode setup ) befindet.<br />
Bei einmaligem längerem Blinken geht der Motor in das Menu Einstellen des Motortyps über. 18<br />
verschiedene Pro<strong>gr</strong>amm-Merkmale können in den Regler eingegeben werden, wie im Folgenden gezeigt.<br />
Wenn im Pro<strong>gr</strong>ammier-Modus die Setup-Taste kurz gedrückt und wieder losgelassen wird, verlässt der<br />
ESC den Pro<strong>gr</strong>ammiermodus und ist betriebsbereit.<br />
1. Motortyp wählen<br />
2. Akku-Typ<br />
3. Unterspannungsabregelung<br />
4. Leistungskurve<br />
5. Motortiming<br />
6. Beschleunigung<br />
7. Startleistung<br />
8. Rückwärtsfunktion<br />
9. Rückwärtsverzögerung<br />
10. Maximale Rückwärtsfahrt<br />
11. Neutralpunktbreite<br />
12. Geschwindigkeitsabhängige Bremse<br />
13. A.B.S.-Bremse<br />
14. Automatikbremse<br />
15. Minimale Bremse<br />
16. Maximale Bremse<br />
17. Werkseinstellung<br />
Immer wenn Sie den Gashebel von Neutral auf Vollgas und zurück bewegen (Gas zu (Neutral) > ganz<br />
auf (Vollgas) > zu (Neutral) ist ein Steuer/Pro<strong>gr</strong>ammschritt), wird das nächste Pro<strong>gr</strong>amm aufgerufen. Die<br />
rote LED blinkt dabei nach folgendem Schema:<br />
1) Rote LED blinkt einmal ( Motortyp wählen ist aktiviert )<br />
2) Rote LED blinkt zweimal (Akku-Typ wählen ist aktiviert )<br />
……<br />
16) Rote LED blinkt 16 mal ( Maximale Bremse einstellen ist aktiviert )<br />
17) Rote LED blinkt 17 mal ( Werkseinstellung einstellen ist aktiviert )
Wenn Sie nach Anwahl einer zu pro<strong>gr</strong>ammierenden Funktion den Gashebel mehr als 4 Sekunden lang<br />
in der Vollgasstellung festhalten, müssen die rote und die <strong>gr</strong>üne LED anfangen zu blinken, um<br />
anzuzeigen, dass Sie jetzt einen eingestellten Parameter durch einen neuen Parameter ersetzen können.<br />
Um den eingestellten Parameter zu ändern, bringen Sie den Gashebel erst in die (untere) Minimum-<br />
Stellung und dann in die Vollgasstellung. Der gewählte Parameter wird so angezeigt:<br />
Ohne Sensor Mit Sensor Kollektortyp Voreingest.<br />
1 Motortyp Bürstenlos ohne Sensor (1) / mit Sensor (2) / Kollektortyp(3) Mit Sensor<br />
2 Akkutyp LiPo(1) / LiFe(2) / NiMh (NiCd) (3) LiMh<br />
3 Unterspg.-Abregelung Auto(1) / 3.0V(2) ~ 9.0V(14) (0.5V Schritte) Auto<br />
4 Leistungskurve Sanft (1) / Linear(2) / Hart(3) Linear<br />
5 Motortiming 0`(1) ~ 25`(6) / 0(1) ~ 10(6) 25’ / 10<br />
6 Beschleunigung Sehr niedrig(1) / Niedrig / Normal / Hoch / sehr Hoch(5) Sehr Hoch<br />
7 Startleistung Sehr niedrig(1) / Niedrig / Normal / Hoch / sehr Hoch(5) Sehr Hoch<br />
8 Rückwärtsfunktion Eine Richtung (1) / Zwei Richtungen 1 (2) / Zwei Richtungen 2 (3) Zwei R.(2)<br />
9 Reverse Delay 0.2s(1) / 0.5s / 0.8s / 1.3s / 1.8s / 2.5s (6) 2.5s<br />
10 Max. Rückwärtsfahrt 20% (1) ~ 100%(9) 60%<br />
11 Neutralpunktbreite Schmal(1) / Normal(2) / Breit(3) Normal<br />
12 Geschw.-abh. Bremse 0%(1) ~ 100%(11) 0%<br />
13 A.B.S.-Bremse Aus (1) / Sehr schwach / Schwach / Normal / Stark / Sehr stark (6) Aus<br />
14 Automatikbremse 0 % (1) ~ 100% (11) 0%<br />
15 Minimale Bremse 0 % (1) ~ 100% (11) 30%<br />
16 Maximale Bremse 0 % (1) ~ 100% (11) 100%<br />
17 Werkseinstellung Alle Parameter werden auf Auslieferungszustand gesetzt (2)<br />
• Die Zahlen in den Klammern oben zeigen, wie oft die LED blinkt.<br />
• Die Abschaltspannung beträgt im Automatik-Modus:<br />
- LiPo : Der höhere Wert aus 5.5V und 66% der Spannung nach dem Einschalten.<br />
- LiFe : Der höhere Wert aus 5.0V und 67% der Spannung nach dem Einschalten.<br />
- NiMh/ NiCd : Der höhere Wert aus 4.0V und 66% der Spannung nach dem Einschalten.<br />
Wenn Sie den Parameter wie gewünscht eingestellt haben, hallten Sie den Gashebel über mehr als 4<br />
Sek. in Neutralstellung. Die rote LED muss blinken und der Motor muss die Töne Mi, Re, Do, Re, Mi<br />
ausgeben, um anzuzeigen, dass der gewählte Parameter im ESC gespeichert ist und dass jetzt andere<br />
Parameter verändert werden können. Wenn alle Parameter geändert sind, drücken Sie kurz die Taste.<br />
Dann ist der ESC im Standby-Modus.<br />
Wenn Sie jetzt noch einen anderen Pro<strong>gr</strong>amm-Parameter ändern wollen, wiederholen Sie die obige<br />
Prozedur; wenn alle Einstellungen getroffen sind, schalten Sie den Fahrtregler ab.<br />
• Anzeige des Status des ESC, nachdem er mit der Setup-Taste eingeschaltet wurde:<br />
- Wenn der ESC korrekte Signale von einem Empfänger bekommt, muss der Motor die Töne Do und<br />
Re ausgeben, und wenn der Gashebel dabei in der Neutralstellung steht, zeigen die Töne Do, Re und
Mi an, dass der ESC jetzt im Standby-Modus ist.<br />
- Wenn der ESC keine Signale von einem Empfänger bekommt, muss die rote LED blinken<br />
Hinweis: Sowohl das Einrichten der Gashebel-Stellungen als auch das Einstellen der pro<strong>gr</strong>ammierbaren<br />
Parameter kann nur direkt nach dem Einschalten des ESC, und solange der Motor noch nicht gelaufen<br />
ist, durchgeführt werden.<br />
• Anzeige des Status des ESC im Betrieb:<br />
Vollgas : Rote LED an<br />
Neutral : Grüne LED an<br />
Voll rückwärts oder Vollbremsung : Beide LEDs an<br />
Fehler : Rote LED blinkt<br />
• Beschreibung der Fehlercodes:<br />
Kein Signal : Die rote LED muss zuerst 1 Sek. lang aus sein und dann blinken. Nach 5 Sek. muss die<br />
rote LED ausgehen; es wird auf das richtige Signal gewartet.<br />
Niedriger Batteriestand : Die rote LED muss zuerst 1 Sek. lang aus sein und dann mehrmals doppelt<br />
blinken.<br />
Sensor Fehler: Der Regler schaltet automatisch in den sensorlosen Betrieb. Der Sensor Fehler Status<br />
kann nur mit dem Pro<strong>gr</strong>ammer ausgelesen werden.<br />
Hohe Temperatur : Die rote LED muss zuerst 1 Sek. lang aus sein und dann mehrmals vierfach<br />
blinken.<br />
• Wenn der ESC an die Pro<strong>gr</strong>ammierkarte angeschlossen ist, können Sie die max. Geschwindigkeit,<br />
Durchschnittsgeschwindigkeit und die max. Temperatur auf dem Display ablesen. Sobald der ESC<br />
richtig an die Pro<strong>gr</strong>ammierkarte angeschlossen ist, werden die früheren Fahrtdaten automatisch<br />
gelöscht. Und wenn nach dem Einschalten des ESC der Gashebel 5 Sekunden lang in Neutralposition<br />
gehalten wird, werden die früheren Fahrdaten ebenfalls automatisch gelöscht.<br />
Beim Einstellen der Werkseinstellung bleiben Motortyp und Gashebel-Position erhalten!<br />
• Überprüfen Sie die Verbindungskabel zwischen ESC und Motor sorgfältig, da sonst der ESC<br />
beschädigt werden kann. Vor allem bei Änderungen müssen Sie sehr sorgfältig vorgehen.<br />
Dieser ESC kann sowohl Brushless-DC-Motoren (bürstenloser Motor) wie auch Bürstenmotoren steuern.<br />
Sie müssen deshalb sehr sorgfältig vorgehen, wenn Sie den ESC an den vorgesehenen Motor<br />
anschließen (siehe die folgende Skizze zum korrekten Anschluss des Motors an den ESC).<br />
Hinweis : Bei Verwendung eines DC-Motors mit Bürsten müssen Sie unbedingt darauf achten, dass die<br />
Verkabelung zwischen ESC und Motor und die für den ESC gewählte Konfiguration zueinander passen<br />
müssen ( einfache Vorwärtsfahrt oder 2-Gang mit Rückwärtsgang). Siehe auch die detaillierte<br />
Beschreibung der Verkabelung in der nachfolgenden Skizze).<br />
Sollten Sie mehr als 5 Sekunden am ESC Lötarbeiten vornehmen, kann der ESC beschädigt werden.
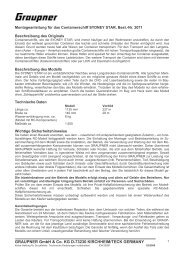
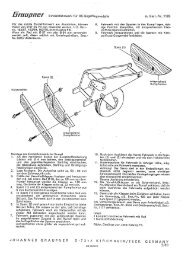
• Die Konfiguration der Verkabelung zwischen ESC und Motor.
BLACK BATT = SCHWARZ: AKKU (-)<br />
RED BATT = ROT: AKKU (+)<br />
BRUSHLESS MOTOR = BÜRSTENLOSER MOTOR<br />
ORENGE = ORANGE (MOTOR C)<br />
YELLOW = GELB (MOTOR B)<br />
BLUE = BLAU (MOTOR A)<br />
SENSOR = SENSOR<br />
BLACK BATT = SCHWARZ: AKKU (-)<br />
RED BATT = ROT: AKKU (+)<br />
BRUSHED MOTOR = BÜRSTENMOTOR<br />
ORENGE = ORANGE: + (MOTOR)<br />
YELLOW = GELB: + (MOTOR)<br />
BLUE = BLAU: – (MOTOR)<br />
BLACK BATT = SCHWARZ: AKKU (-)<br />
RED BATT = ROT: AKKU (+), MOTOR (+)<br />
BRUSHED MOTOR = BÜRSTENMOTOR<br />
ORENGE = ORANGE: - (MOTOR)<br />
YELLOW = GELB: - (MOTOR)<br />
BLUE = BLAU: - (MOTOR)
EG-Konformitätserklärung:<br />
Für die folgende bezeichneten Erzeugnisse<br />
<strong>GM</strong>-<strong>GENIUS</strong> <strong>RACE</strong> <strong>40R</strong> Best.-Nr. <strong>7154</strong><br />
<strong>GM</strong>-<strong>GENIUS</strong> <strong>RACE</strong> 80R Best.-Nr. 7157<br />
PROGRAMMIERGERÄT für <strong>GM</strong>-<strong>GENIUS</strong> <strong>RACE</strong> <strong>40R</strong>, 80R Best.-Nr. 7152<br />
wird hiermit bestätigt, dass es den wesentlichen Schutzanforderungen entspricht, die in der Richtlinie des Rates zur Angleichung der<br />
Rechtsvorschriften der Mitgliedstaaten über die elektromagnetische Verträglichkeit 2004/108/EC<br />
festgelegt sind.<br />
Zur Beurteilung des Erzeugnisses wurden folgende Normen herangezogen:<br />
EN 61000-6-1<br />
EN 61000-6-3<br />
Diese Erklärung wird verantwortlich für den Hersteller/Importeur<br />
Graupner GmbH & Co. KG<br />
Henriettenstr. 94-96<br />
73230 Kirchheim/Teck<br />
abgegeben durch den Geschäftsführer Hans Graupner<br />
73230 Kirchheim/Teck, den 05.03.09 Unterschrift<br />
Hinweise zum Umweltschutz<br />
Das Symbol auf dem Produkt, der Gebrauchsanleitung oder der Verpackung weist darauf hin, dass dieses Produkt<br />
am Ende seiner Lebensdauer nicht über den normalen Haushaltsabfall entsorgt werden darf. Es muss an einem<br />
Sammelpunkt für das Recycling von elektrischen und elektronischen Geräten abgegeben werden.<br />
Die Werkstoffe sind gemäß ihrer Kennzeichnung wiederverwertbar. Mit der Wiederverwendung, der stofflichen Verwertung oder<br />
anderen Formen der Verwertung von Altgeräten leisten Sie einen wichtigen Beitrag zum Umweltschutz.<br />
Batterien und Akkus müssen aus dem Gerät entfernt werden und bei einer entsprechenden Sammelstelle getrennt entsorgt<br />
werden.<br />
Bitte erkundigen Sie sich bei der Gemeindeverwaltung die zuständige Entsorgungsstelle.
Order-No. <strong>7154</strong><br />
<strong>GM</strong>-<strong>GENIUS</strong> <strong>RACE</strong> <strong>40R</strong> COMPETIION AND PRO CAR BL ESC instruction manuals<br />
Con<strong>gr</strong>atulations for buying this state of the art brushless and brushed speed controller. It is adapted for use with high efficient and<br />
powerful brushless motors.<br />
Important notice: Please read this manual carefully before using your controller. Only then can you have full profit of the potential of<br />
your controller, and avoid mistakes.<br />
Warnings:<br />
- The controller's CE certificate doesn't unbind users from their obligation to use ultimate caution<br />
- Should the motor refuse to start up, or after a crash, then you should immediately set the transmitter's control stick to the OFF position to avoid<br />
any overload to the controller.<br />
- Use only motors delivered by <strong>GM</strong>-Racing or Graupner which are designed for the intended range of voltages!<br />
- Use only high performance batteries by Graupner or <strong>GM</strong>-Racing. Using batteries with an increased internal resistance may lead to<br />
the destruction of the controller! Do never use a power supply.<br />
- Never leave your transmitter unattended when a battery is connected. In case of a deficiency this may cause an outbreak of fire on the model<br />
or its environment.<br />
- Neither the controller nor any other electronic components should ever come in touch with water. Protect the controller against dust, dirt,<br />
humidity, vibrations, or other dangerous elements (with the<br />
exception of water-sealed controllers).<br />
- Never run the motor on a separate battery. This will destroy the controller or the motor, and leads to the loss of our warranty.<br />
- Never mix up polarities. Use plug systems which offer protection against wrong polarity. Avoid short-circuiting and blocking the motors.<br />
- All cables and connectors should have good insulation. Short-circuits may lead to the destruction of your motor.<br />
- This product isn't designed for use by children under the age of 14, it isn't a toy!<br />
- Graupner-controllers are designed for use in battery-driven, radio-controlled models only, any other use is not permissible. Using this device on<br />
a passenger-carrying model is forbidden!<br />
- Motors, gears or gearboxes, and propellers are dangerous objects. Never keep next to or in front of the danger area of the drive!<br />
- Technical defects or failures of mechanical or electronic parts may lead to an unexpected start-up of the motor, with parts of it flying off, maybe<br />
causing severe injuries.<br />
- Always check the service range of transmission of your model first thing while it's still on the <strong>gr</strong>ound (hold the model tightly!). Try again with<br />
motor on and also with fast changes of the throttle stick.<br />
- Don't make any changes on the structure and design of your controller unless they are described in the manual!<br />
- Limited warranty: Graupner Ltd cannot survey the proper application of the mounting and using regulations, nor the working methods and<br />
conditions during the installation, use, operation, and servicing of the controller. Therefore Graupner Ltd cannot take on any liability for any loss,<br />
damage, or costs resulting from an incorrect use or operation of the product, or connected in any<br />
way with incorrect use or operation.<br />
- Only those components and accessory parts which have been recommended by us may be used. Use only genuine and matching Graupner<br />
connectors and accessory parts.<br />
- Make sure whenever you start connecting and operating the controller, that:<br />
- your transmitter is the only one working on that frequency,<br />
- is switched on,<br />
- and has the throttle set to position “STOP”.<br />
- Use only high-quality batteries by Graupner or <strong>GM</strong>-Racing. Cheap or old batteries with a high internal resistance may lead to poor<br />
performance or even to the destruction of the controller.
ESC features.<br />
1. Fully proportional forward with on/off brake and reverse<br />
2. Smooth throttle response<br />
3. Selectable Motor type (Sensorless BLDC, Sensored BLDC, Brushed DC)<br />
4. Li-Po, Li-Fe, NiMH(NiCd) battery compatible<br />
5. Various Brake System(Speed Mixing Brake, ABS Brake, Auto / Minimum / Maximum Brake)<br />
6. Selectable One Way / Two Way<br />
7. Easy setting and providing traveling information when using the pro<strong>gr</strong>am card.<br />
8. Brushed (2 kHz) Sensored(2 kHz switching frequency), Sensorless(32KHz)<br />
9. Thermal protection Function<br />
*** when sensorless mode is used, sensorless motor or motor without<br />
sensor wires must be used.<br />
ESC Stick Position setup<br />
ESC sound : Do, Re, Mi, Fa, So, La, Ti Do.<br />
1. Turn on the transmitter.<br />
2. Connect the power battery, and switch on the ESC.<br />
3. If all connections are correctly completed, the motor should beep depending on the throttle stick<br />
location.<br />
Do, Re ~~ Do, Re, Mi : If the stick is at the neutral position,<br />
Do, Re ~~<br />
: If the stick is at other position instead of neutral position.<br />
4. If you press and hold the setup button for over 1second, the Green LED should flash. At this time,<br />
detach your hand from the button, then the Green LED should be ON and the motor should beep (So, So,<br />
La, La, So, So sound ) to indicate that the neutral position has been set.<br />
5. Move the throttle stick to the full power position, then the red LED should be ON to indicate that the<br />
full power position has been set.<br />
6. Move back the throttle stick to the full reverse or full brake position, then the red and Green LEDs<br />
should be ON to indicate that the full reverse or full brake position has been set.<br />
7. Move the throttle stick to the neutral position, then the red and Green LEDs should flash alternatively,<br />
and the motor should beep (So, Fa, Mi, Re, Do sound ), then the Green LED should be ON to indicate<br />
that the ESC is now ready to be used.<br />
Note 1: It is ONLY necessary to make this initial throttle setup again if you are using a different<br />
transmitter or the settings have been changed.<br />
Note 2: After switching on the ESC, the stick position setup COULD be done ONLY before a motor turns.<br />
Note 3: If full power position setting can not be done, pls change the Throttle reverse / Normal.
User Mode Setup<br />
1. Turn on the transmitter.<br />
2. Connect the power battery, and switch on the ESC.<br />
3. If all connections are correctly completed, the motor should beep depending on the throttle stick<br />
location.<br />
Do, Re ~~ Do, Re, Mi : If the stick is at the neutral position,<br />
Do, Re ~~<br />
: If the stick is at other position instead of neutral position.<br />
4. If you press and hold the setup button for over 1 second, the Green LED should flash for 2 seconds<br />
then the red LED should immediately flash. At this time, detach your hand from the button, the motor<br />
should beep (Mi, Re, Do, Re, Mi sound), the red LED should flash once constantly to indicate that the<br />
ESC is now in the User mode setting.<br />
Flashing repeatedly once enters the Motor type setting. 18 different pro<strong>gr</strong>am features can be set in this<br />
controllers as below.<br />
In the pro<strong>gr</strong>ammable mode, if the setup button is shortly pressed and detached, it comes out of the<br />
pro<strong>gr</strong>ammable mode, the ESC is ready to be used.<br />
1. Select Motor Type<br />
2. Battery Type<br />
3. Cut Off Voltage<br />
4. Power Curve<br />
5. Advance Timing<br />
6. Acceleration<br />
7. Start Power<br />
8. Reverse Function<br />
9. Reverse Delay<br />
10. Max Reverse Amount<br />
11. Neutral Width<br />
12. Speed Mixing Brake<br />
13. ABS Brake Function<br />
14. Auto Brake Amount<br />
15. Minimum Brake Amount<br />
16. Maximum Brake Amount<br />
17. Factory Setting<br />
Every time the throttle stick is moved from the closed position to the full power position and again to the<br />
closed position (closed > full power > closed is one cycle) the pro<strong>gr</strong>am will change. The Red LED will<br />
flash in accordance with the features as follows<br />
1) Red LED flashes once (Motor type setting available)<br />
2) Red LED flashes twice (Battery type setting available)<br />
……<br />
16) Red LED flashes 16 times (Maximum Brake Amount setting available)<br />
17) Red LED flashes 17 times (Factory setting available)
At the selected pro<strong>gr</strong>am function to be changed, if the throttle stick is stayed at the full power position for<br />
over 4 seconds, the red and <strong>gr</strong>een LED should flash to indicate that you can now change an existing<br />
parameter to a new parameter. In order to change the existing parameter, move the stick to the minimum<br />
or lower position then again to the full power position. The selected parameter will indicate as follows.<br />
Sensorless Sensored Brushed Defalut<br />
1 Motor Type Brushless sensorless(1) / Brushless sensored(2) / Brushed(3) Sensored<br />
2 Battery Type LiPo(1) / LiFe(2) / NiMh (NiCd) (3) LiMh<br />
3 Cut Off Voltage Auto(1) / 3.0V(2) ~ 9.0V(14) (0.5V steps) Auto<br />
4 Power Curve Soft (1) / Linear(2) / Hard(3) Linear<br />
5Advance Timing 0`(1) ~ 25`(6) / 0(1) ~ 10(6) 25’ / 10<br />
6 Acceleration Lowest(1) / Low / Normal / High / Highest(5) Highest<br />
7 Start Power Lowest(1) / Low / Normal / High / Highest(5) Highest<br />
8 Reverse Function One Way(1) / Two Way1(2) / Two Way2(3) Two Way 2<br />
9 Reverse Delay 0.2s(1) / 0.5s / 0.8s / 1.3s / 1.8s / 2.5s (6) 2.5s<br />
10 M-Reverse Amount 20%(1) ~ 100%(9) 60%<br />
11 Neutral Width Narrow(1) / Normal(2) / Wide(3) Normal<br />
12 Speed Mixing Brk 0%(1) ~ 100%(11) 0%<br />
13 A.B.S Brake Off(1) / Weakest / Weak / Normal / Strong / Strongest(6) Off<br />
14 Auto Brk Amount 0 % (1) ~ 100% (11) 0%<br />
15 Min Brake Amount 0 % (1) ~ 100% (11) 30%<br />
16 Max Brake Amount 0 % (1) ~ 100% (11) 100%<br />
17 Factory Setting All parameters to be initialized as factory default values(2)<br />
• The inside number of the brackets above is the number of the LED flashing.<br />
• The cutoff voltage in automatic mode is as like:<br />
- LiPo : the higher voltage between 5.5V and 66% voltage when the switch is on<br />
- LiFe : the higher voltage between 5.0V and 67% voltage when the switch is on.<br />
- NiMh/ NiCd : the higher voltage between 4.0V and 50%voltage when the switch is on.<br />
After you select your wanted parameter, stay the throttle stick at the neutral position for over 4 seconds,<br />
the red LED should flash and the motor should beep (Mi, Re, Do, Re, Mi sound) to indicate that the<br />
selected parameter is stored at the ESC and other parameters can be selected.<br />
After changing all parameters, if the button is shortly pressed, the ESC is now in standby mode.<br />
At this stage, if you want to change another pro<strong>gr</strong>am parameter, repeat the procedure above, or if all<br />
settings are complicated, turn off the speed controller.<br />
• The ESC status when the ESC is powered on through by the setup button.
If the ESC receives correct signals from a receiver, the motor should beep ( Do and Re sound ), and if<br />
the throttle stick is at the neutral position at this time, the motor should beep ( Do, Re, and Mi sound ) to<br />
indicate the ESC is now in the standby mode.<br />
If the ESC does not receive any signals from the receiver, the red LED should flash.<br />
Note) Both stick position setting and pro<strong>gr</strong>ammable parameter setting can be ONLY proceeded through<br />
by the setup button right after the ESC is turned ONLY before a motor turns.<br />
• The LED status during operation.<br />
Full Throttle : Red LED on<br />
Neutral : Green LED on<br />
Full Reverse or Full Brake : Both LED on<br />
Error : Red LED flashes<br />
• Error description<br />
No Signal : The red LED should be off for 1 second then flash. After 5 seconds, the red LED should be<br />
OFF then waiting for the proper signal.<br />
Low Battery : The red LED should be off for 1 second then double flashes repeatedly.<br />
Sensor Error : it is automatically converted to sensorless mode, and you can check the error status<br />
ONLY in the pro<strong>gr</strong>ammer.<br />
High Temperature : The red LED should be off for 1 second then 4times- flashes repeatedly.<br />
• Under the ESC connected to the pro<strong>gr</strong>ammer, max speed, average speed, and max temperature can<br />
be seen on the screen of the pro<strong>gr</strong>ammer. Once the ESC is correctly connected with the pro<strong>gr</strong>ammer,<br />
the previous traveling data is automatically removed. And, the after switching on the ESC, if the throttle<br />
stick stays at the neutral position for over 5 seconds, the previous traveling data is also automatically<br />
removed.<br />
When doing factory setting, the motor type and stick position should stay as they are.<br />
• Please make sure the configuration between the ESC and the motor. Otherwise, it can damage the<br />
ESC. You do need <strong>gr</strong>eat care, especially when change<br />
This ESC can handle both brushless DC motor and brushed DC motor, therefore, you do need <strong>gr</strong>eat<br />
care when connecting the ESC with a motor to be used. ( see the figure below for the correct<br />
configuration between the ESC and a motor )<br />
Note : when using a brushed DC motor, please ensure that the configuration between the ESC and the<br />
motor must be in accordance with the selected application in the ESC ( one way-forward or two wayreversible<br />
). See the detailed configuration in the figure below )<br />
If soldering would be applied to the ESC over 5 seconds, it could damage the ESC.
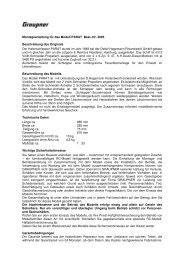
• The configuration between the ESC and the motor.
EG declaration of conformity<br />
for the products<br />
PROGRAMMER for #<strong>7154</strong>, 7157 Order-No. 7230<br />
<strong>GM</strong>-<strong>GENIUS</strong> <strong>RACE</strong> <strong>40R</strong>, 80R Order.-No. <strong>7154</strong>, 7157<br />
We confirm that the electromagnetic compatibility directives (2004/108/CE) are met.<br />
Harmonized standards applied:<br />
EN 61000-6-1<br />
EN 61000-6-3<br />
Graupner GmbH & Co. KG<br />
Henriettenstr. 94-96<br />
73230 Kirchheim/Teck<br />
Managing Director Hans Graupner<br />
73230 Kirchheim/Teck, 05.03.09 Signature<br />
Environmental Protection Notes<br />
When this product comes to the end of its useful life, you must not dispose of it in the ordinary domestic waste. The correct<br />
method of disposal is to take it to your local collection point for recycling electrical and electronic equipment. The symbol shown<br />
here, which may be found on the product itself, in the operating instructions or on the packaging, indicates that this is the case.<br />
Individual markings indicate which materials can be recycled and re-used. You can make an important contribution to the protection of our<br />
common environment by re-using the product, recycling the basic materials or recycling redundant equipment in other ways.<br />
Remove batteries from your device and dispose of them at your local collection point for batteries.<br />
If you don’t know the location of your nearest disposal centre, please enquire at your local council office.
Instructions d’utilisation pour le ESC <strong>GM</strong>-<strong>GENIUS</strong> <strong>RACE</strong> <strong>40R</strong> BL pour les voitures R/C de<br />
sport et de compétition.<br />
Réf.-N°. <strong>7154</strong><br />
Félicitations pour votre acquisition d’un régulateur Graupner pour les moteurs Brushless/brushed. Les<br />
propulsions avec un moteur Brushless offrent une très <strong>gr</strong>ande puissance et un haut rendement pour un<br />
faible poids et de petites dimensions.<br />
Veuillez lire attentivement ces instructions d’utilisation avant la mise en service.<br />
Avertissements :<br />
- Le certificat CE du régulateur ne dispense pas de prendre des précautions d’utilisation.<br />
- Si le moteur ne démarre pas comme souhaité ou après un crash, ramenez immédiatement le<br />
manche des gaz sur la position moteur coupé pour éviter une surcharge au régulateur. Vérifiez à<br />
nouveau le raccordement correct du moteur, raccourcissez éventuellement les fils d’alimentation<br />
et réglez au besoin un temps de retardement de la mise des gaz dans l’émetteur pour éviter une<br />
erreur de calage.<br />
- Utilisez uniquement des moteurs de la marque <strong>GM</strong>-Racing ou Graupner pour lesquels la plage<br />
des tensions utilisées est prévue !<br />
- Utilisez uniquement les accus de haute puissance <strong>GM</strong>-Racing ou Graupner. Les accus avec une<br />
résistance trop élevée peuvent conduire à la destruction du régulateur ! N’utilisez en aucun cas<br />
un transformateur de courant secteur pour l’alimentation !<br />
- Ne laissez jamais votre modèle R/C sans surveillance tant qu’un accu de propulsion est connecté.<br />
Dans le cas d’une défectuosité, le modèle peut prendre feu et le communiquer à son<br />
environnement.<br />
- Les régulateurs ou les autres éléments électroniques ne doivent jamais venir en contact avec<br />
l’eau. La régulateur devra être protégé de la poussière, des salissures, de l’humidité, des<br />
vibrations et d’autres corps étrangers.<br />
- Ne faites jamais tourner le moteur avec un accu séparé. Ceci détruira le régulateur et le moteur<br />
et conduira à la perte du bénéfice de la garantie.<br />
- N’inversez jamais les polarités du régulateur ; utilisez un système de connecteurs avec sécurité<br />
contre les inversions de polarité .Evites les court-circuits et les blocages du moteur.<br />
- Tous les fils et les raccordements devront être bien isolés ; un court-circuit pourra détruire le<br />
régulateur<br />
- Cet appareil ne convient pas aux enfants en dessous de 14 ans, ce n’est pas un jouet !<br />
- Le régulateur est exclusivement prévu pour l’équipement des modèles radiocommandés avec<br />
une alimentation par des accus. toute autre utilisation n’est pas admissible !<br />
- Les moteurs, les réducteurs, les hélices marines ou aériennes sont des objets dangereux. Pour<br />
cette raison, ne vous tenez jamais à côté ou devant la zone dangereuse des propulsions !<br />
- Une défectuosité mécanique ou électrique inopinée au démarrage du moteur peut provoquer la<br />
projection de pièces et causer de sérieuses blessures.
- Effectuez toujours d’abord un essai de porté et des fonctions au sol avant de faire voler votre<br />
modèle (en le maintenant fermement !). Répétez ces essais avec le moteur en marche, avec de<br />
courts passages à plein gaz.<br />
- Aucunes modifications ne devront être apportées sur le régulateur, mises à part celles décrites<br />
dans ces instructions.<br />
- Exclusion de responsabilité : Le respect des instructions de montage et d’utilisation, aussi bien<br />
que les conditions et les méthodes d’installation, d’utilisation et d’entretien ne peuvent pas être<br />
surveillées par la Firme Graupner. Pour cette raison, la Firme Graupner décline toute<br />
responsabilité pour les pertes, les dégâts ou les coûts survenus à la suite d’une mauvaise<br />
utilisation, ou sa participation d’une façon quelconque aux dédommagements.<br />
- Il conviendra d’utiliser uniquement les composants et les accessoires que nous conseillons.<br />
Utilisez uniquement des connecteurs et des accessoires d’origine GRAUPNER adaptés entreeux<br />
.<br />
- Avant de connecter votre régulateur, assurez-vous que votre émetteur est le seul à émettre sur la<br />
fréquence que vous utilisez et avant de le mettre en contact, que le manche des gaz est sur la<br />
position STOP.<br />
Particularités du ESC (Régulateur de vitesse électronique) :<br />
1. Passage en marche avant totalement proportionnel avec frein CONTACT/COUPE et passage en<br />
marche arrière.<br />
2. Réaction souple aux changements des gaz.<br />
3. Type de moteur sélectionnable (Sans palpeur BLDC, avec palpeur BLDC, Brushed DC)<br />
(Moteurs sans balais avec/sans palpeur, moteurs avec balais)<br />
4. Utilisable avec accus Li-Po, Li-Fe et NiMH (NiCd)<br />
5. Différents systèmes de frein (Mixage Speed-Frein (Freinage dépendant de la vitesse), freinage ABS,<br />
freinage Auto / Minimum / Maximum).<br />
6. Seulement Marche avant / Marches avant et arrière sélectionnables.<br />
7. Réglages et lecture simples des informations de marche à l’aide de la carte de pro<strong>gr</strong>ammation.<br />
8. Avec collecteur à balais (2 kHz), avec palpeur (2 kHz de fréquence de commutation), sans palpeur<br />
(32KHz).<br />
9. Fonction de protection contre les surchauffes.<br />
***Si le mode sensorless est utilisé, le moteur sensorless ou le moteur doit être utilisé sans<br />
cordon sensor.
Réglage de la course ESC dans l’émetteur<br />
Sons ESC : Do, Ré, Mi, Fa, Sol, La, Si, Do.<br />
1. Mettez l’aémetteur en contact.<br />
2. Reliez l’accu et commlutez le ESC.<br />
3. Lorsque tous les cordons de liaison sont correctement connectés, le moteur soit émettre les sons<br />
suivants, selon la position du manche des gaz :<br />
Do, Ré ~~ Do, Ré, Mi : avec la position neutre du manche des gaz<br />
Do, Ré ~~<br />
: avec chaque autre position du manche des gaz<br />
4. Lorsque la touche de réglage est pressée durant plus de 1 seconde, le LED vert doit clignoter.<br />
Relâchez maintenant la touche, le LED vert doit alors s’allumer en permanence et le moteur doit<br />
émettre les sons suivants : Sol, Sol, La, La, Sol, Sol indiquant que la position neutre est mémorisée.<br />
5. Placer le manche des gaz sur la position plein gaz. Le LED rouge doit maintenant s’allumer en<br />
indiquant ainsi que la position plein gaz est mémorisée.<br />
6. Tirez le manche des gaz en arrière sur la position plein freinage ou pleine marche arrière, les LED<br />
vert et rouge doivent maintenant s’allumer en indiquant ainsi que la position plein freinage ou pleine<br />
marche arrière est mémorisée.<br />
7. Placez le manche des gaz sur la position neutre. Les LED vert et rouge doivent maintenant s’allumer<br />
en alternance et le moteur doit émettre les sons Sol, Fa, Mi, Ré, Do., le LED vert doit ensuite<br />
s’allumer et indiquer ainsi que le ESC est maintenant prêt au service.<br />
Note 1 : Cette mémorisation initiale des positions de gaz sera ensuite seulement à nouveau nécessaire<br />
lorsque vous utiliserez un autre émetteur, ou lorsque vous aurez changé les réglages.<br />
Note 2 : Après la mise en contact du ESC, la position du manche des gaz pourra seulement être<br />
disposée avant que le moteur tourne.<br />
Note 3 : Lorsque la position plein gaz ne peut pas être mémorisée, changez les positions Marche arrière<br />
/ Normal.<br />
Réglages dans le Mode Utilisateur<br />
1. Mettez l’aémetteur en contact.<br />
2. Reliez l’accu et commlutez le ESC.<br />
3. Lorsque tous les cordons de liaison sont correctement connectés, le moteur soit émettre les sons<br />
suivants, selon la position du manche des gaz :<br />
Do, Ré ~~ Do, Ré, Mi : avec la position neutre du manche des gaz<br />
Do, Ré ~~<br />
: avec chaque autre position du manche des gaz<br />
4. Lorsque la touche de réglage est pressée durant plus de 1 seconde, le LED vert doit clignoter<br />
durant 2 secondes et le LED rouge doit commencer à clignoter immédiatement. Relâchez maintenant la<br />
touche, le moteur doit alors émettre les sons Mi, Ré, Do, Ré, Mi et le LED rouge doit indiquer par une<br />
suite de clignotements que le ESC se trouve maintenant dans le Réglage du Mode Utilisateur.<br />
Avec un unique et long clignotement, le moteur passe dans le menu Réglage du type de moteur. 18<br />
particulatités de pro<strong>gr</strong>amme différentes pourront être enregistrées dans le régulateur, comme montré à<br />
la suite. Lorsque la touche Setup est brièvement pressée et relâchée dans le Mode pro<strong>gr</strong>ammation, le
ESC quitte celui-ci et il est prêt au service.<br />
1. Sélection du trype de moteur<br />
2. Type d’accu<br />
3. Régulation en sous tension<br />
4. Courbe de puissance<br />
5. Timing moteur<br />
6. Accélération<br />
7. Puissance au départ<br />
8. Fonction marche arrière<br />
9. Retardement marche arrière<br />
10. Marche avant maximale<br />
11. Largeur du point neutre<br />
12. Freinage dépendant de la vitesse<br />
13. Freinage ABS<br />
14. Freinage automatique<br />
15. Freinage minimal<br />
16. Freinage maximal<br />
17. Réglages d’usine<br />
Lorsque le manche des gaz est déplacé du neutre sur plein gaz et vice versa (Gaz vers (Neutre) ><br />
totalement sur (Plein gaz) > vers (Neutre), c’est toujours un Pas de pro<strong>gr</strong>ammation qui appellera le<br />
prochain pro<strong>gr</strong>amme. Le LED rouge clignote alors selon le schéma suivant :<br />
1) Le LED rouge clignote une fois (la sélection du type de moteur est activée)<br />
2) Le LED rouge clignote deux fois (la sélection du type d’accu est activée)<br />
… …<br />
16) Le LED rouge clignote 18 fois (Le réglage du freinage maximal est activé)<br />
17) Le LED rouge clignote 19 fois (Les réglages d’usine sont activés)<br />
Lorsque après la sélection d’une fonction à pro<strong>gr</strong>ammer le manche des gaz est maintenu durant plus de<br />
4 secondes sur le position plein gaz, les LED rouge et verte doivent commencer à clignoter pour indiquer<br />
qu’un paramètre réglé pourra maintenant être échangé par un nouveau paramètre. Pour changer le<br />
paramètre réglé, placer d’abord le manche des gaz sur la position minimum (en bas) et ensuite sur la<br />
position plein gaz. Le paramètre sélectionné sera indiqué.
Sans palpeur Avec palpeur Type de collecteur Pré-<br />
Réglage.<br />
1 Type de moteur Brushless sans palpeur (1) / avec palpeur (2) / Type de collecteur (3)<br />
Avec<br />
palpeur<br />
2 Type d’accu LiPo(1) / LiFe(2) / NiMh (NiCd) (3) LiMh<br />
3 Régulation sous tension Auto(1) / 3.0V(2) ~ 9.0V(14) (Pas de 0.5V) Auto<br />
4 Courbe de puissance Souple (1) / Linéaire (2) / Dure (3) Linéraire<br />
5 Timing moteur 0`(1) ~ 25`(6) / 0(1) ~ 10(6) 25’ / 10<br />
6 Accélération Très faible (1) / Faible / Normale / Haute / Très haute (5) Très haute<br />
7 Puissance au départ Très faible (1) / Faible / Normale / Haute / Très haute (5) Très haute<br />
8 Fonction marche arrière Une direction (1) / Deux directions 1 (2) / Deux directions 2 (3) Deux D.(2)<br />
9 Délai d’inversion 0.2s(1) / 0.5s / 0.8s / 1.3s / 1.8s / 2.5s (6) 2.5s<br />
10 Marche arrière Max. 20% (1) ~ 100%(9) 60%<br />
11 Largeur point neutre Etroit (1) / Normal(2) / Large (3) Normal<br />
12 Freinage dépendant de la<br />
vitesse<br />
0%(1) ~ 100%(11) 0%<br />
13 Freinage A.B.S. Coupé (1) / Très faible / Faible / Normal / Fort / Très fort (6) Coupé<br />
14 Freinage automatique 0 % (1) ~ 100% (11) 0%<br />
15 Frein Minimal 0 % (1) ~ 100% (11) 30%<br />
16 Frein Maximal 0 % (1) ~ 100% (11) 100%<br />
17 Réglages d’usine Tous les paramètres seront remis sur l’état à la livraison<br />
• Les chiffres entre parenthèses indiquent le nombre de clignotements du LED.<br />
• La tension de coupure dans le Mode automatique est :<br />
- LiPo : La plus haute valeur hors de 5.5V et 66% de la tension après la mise en contact.<br />
- LiFe : La plus haute valeur hors de 5.0V et 67% de la tension après la mise en contact.<br />
- NiMh/ NiCd : La plus haute valeur hors de 4.0V et 66% de la tension après la mise en<br />
contact.<br />
Lorsque vous avez réglé le paramètre comme désiré, maintenez le manche des gaz durant plus de 4<br />
secondes sur la position neutre. Le LED rouge doit clignoter et le moteur doit émettre les sons Mi, Ré,<br />
Do, Ré, Mi pour indiquer que le paramètre sélectionné est mémorisé dans le ESC et que maintenant un<br />
autre paramètre pourra être changé. Lorsque tous les paramètres ont été changés, pressez brièvement<br />
la touche. Le ESC passe ensuite dans le Mode Standby.<br />
Lorsque vous voulez maintenant encore changer un autre paramètre, répétez le processus ci-dessus ;<br />
lorsque tous les réglages sont enregistrés, coupez le régulateur.
• Indication des Status du ESC après sa mise en contact avec la touche Setup.<br />
- Lorsque le ESC reçoit un signal correct du récepteur, le moteur doit émettre les sons Do et<br />
Ré et lorsque le manche des gaz est placé sur la position neutre, les sons Do, Ré et Mi<br />
indiquent que le ESC est maintenant dans le Mode Standby.<br />
- Lorsque le ESC ne reçoit aucun signal du récepteur, le LED rouge doit clignoter.<br />
Note : L’enregistrement des positions du manche des gaz aussi bien que le réglage des paramètres<br />
pro<strong>gr</strong>ammés pourront être directement effectués seulement après la mise en contact du ESC et tant que<br />
le moteur n’a pas encore démarré.<br />
• Indication des Status du ESC en fonctionnement :<br />
Plein gaz<br />
LED rouge allumé<br />
Neutre<br />
LED verte allumé<br />
Pleine marche arrière ou plein freinage Les deux LED allumés<br />
Erreur<br />
LED rouge clignotant<br />
• Description du Code d’erreur<br />
Aucun signal : Le LED rouge doit d’abord être éteint durant 1 seconde et ensuite clignoter. Après 5<br />
secondes, le LED rouge doit s’éteindre dans l’attente du signal correct.<br />
Faible tension de batterie : Le LED rouge doit d’abord être éteint durant 1 seconde et faire ensuite<br />
plusieurs doubles clignotements.<br />
Erreur sensor : il est automatiquement converti dans le mode sensorless et vous pouvez vérifier l'erreur<br />
UNIQUEMENT dans le pro<strong>gr</strong>ammeur.<br />
Haute température : Le LED rouge doit d’abord être éteint durant 1 seconde et faire ensuite plusieurs<br />
quadruples clignotements.<br />
• Lorsque le ESC est relié à la carte de pro<strong>gr</strong>ammation, vous pourrez lire la vitesse maximum, la vitesse<br />
moyenne et la température maximum sur l’affichage. Dès que le ESC est relié correctement à la carte de<br />
pro<strong>gr</strong>ammation, les données préalables seront automatiquement effacées et lorsque le manche des gaz<br />
sera maintenu sur la position neutre durant 5 seconde, après la mise en contact du ESC, les données<br />
préalables seront de même automatiquement effacées.<br />
• Avec le changement des réglages d’usine, le type de moteur et les positions de manche restent<br />
contenus.<br />
• Vérifiez soigneusement le cordon de liaison entre le ESC et le moteur, car autrement le ESC sera<br />
détérioré. Vous devrez surtout procéder très soigneusement avec les changements.<br />
Cet ESC peut commander aussi bien des moteurs Brushless DC (Moteurs sans balais) que des moteurs<br />
avec balais. C’est pourquoi vous devez procéder très soigneusement lorsque vous reliez le ESC au<br />
moteur prévu (Voir les schémas suivants pour le raccordement correct du moteur au ESC).<br />
Note : Avec l’utilisation d’un moteur DC avec balais, vous devez absolument veiller à ce que le câblage<br />
entre le ESC et le moteur ainsi que la configuration sélectionnée pour le ESC soient adaptés entre eux<br />
(Simple marche avant ou 2 rapports avec passage en marche arrière). Voir aussi la description détaillée<br />
du câblage sur les schémas suivants).<br />
Si des travaux de soudures sont effectués durant plus de 5 secondes sur le ESC, celui-ci pourra être<br />
détérioré.
• La configuration du câblage entre le ESC et le moteur
Légendes des schémas :<br />
BLACK BATT = NOIR: ACCU (-)<br />
RED BATT = ROUGE: ACCU (+)<br />
BRUSHLESS MOTOR = MOTEUR SANS BALAIS<br />
ORENGE = ORANGE (MOTEUR C)<br />
YELLOW = JAUNE (MOTEUR B)<br />
BLUE = BLEU (MOTEUR A)<br />
SENSOR = PALPEUR<br />
BLACK BATT = NOIR: ACCU (-)<br />
RED BATT = ROUGE : ACCU (+)<br />
BRUSHED MOTOR = MOTEUR AVEC BALAIS<br />
ORENGE = ORANGE: + (MOTEUR)<br />
YELLOW = JAUNE: + (MOTEUR)<br />
BLUE = BLEU: – (MOTEUR)<br />
BLACK BATT = NOIR: ACCU (-)<br />
RED BATT = ROUGE : ACCU (+), MOTEUR (+)<br />
BRUSHED MOTOR = MOTEUR AVEC BALAIS<br />
ORENGE = ORANGE: - (MOTEUR)<br />
YELLOW = JAUNE: - (MOTEUR)<br />
BLUE = BLEU: - (MOTEUR)
Déclaration de conformité EG :<br />
Pour les produits suivants :<br />
<strong>GM</strong>-<strong>GENIUS</strong> <strong>RACE</strong> <strong>40R</strong> Réf. N° <strong>7154</strong><br />
<strong>GM</strong>-<strong>GENIUS</strong> <strong>RACE</strong> 80R Réf. N° 7157<br />
Pro<strong>gr</strong>ammeur pour <strong>GM</strong>-<strong>GENIUS</strong> <strong>RACE</strong> <strong>40R</strong>, 80R Réf. N° 7152<br />
Nous confirmons que la compatibilité électronique correspond aux directives 2004/108/EC.<br />
Normes appliquées :<br />
EN 61000-6-1<br />
EN 61000-6-3<br />
Graupner GmbH & Co. KG<br />
Henriettenstr. 94-96<br />
73230 Kirchheim/Teck<br />
Le Directeur d’Entreprise, Hans Graupner<br />
73230 Kirchheim/Teck, 05.03.09<br />
Signature<br />
Indications quand à la protection de l'environnement<br />
Ce produit à la fin de sa durée de vie ne doit pas être mis à la poubelle, mais être remis à une<br />
collecte pour le recycle ment d'appareils électriques et électroniques. Le symbole inscrit sur le<br />
produit, dans la notice d'instructions et sur son emballage l'indique.<br />
Les matériaux selon leurs reconnaissances sont réutilisables. Avec le recyclage de matériaux et autres<br />
formes d'appareils, vous contribuez à la protection de l'environnement.<br />
Les batteries et accus doivent être retirés de l'appareil et doivent être remis à un dépôt homologué pour<br />
ce type de produits.<br />
Veuillez s.v.p. demander auprès de votre mairie l'adresse exacte de la collecte la plus proche de chez<br />
vous.