DEH-20UB - Pioneer Electronics
DEH-20UB - Pioneer Electronics
DEH-20UB - Pioneer Electronics

Create successful ePaper yourself
Turn your PDF publications into a flip-book with our unique Google optimized e-Paper software.
Before You Start<br />
Section<br />
01<br />
After-sales service for<br />
<strong>Pioneer</strong> products<br />
Please contact the dealer or distributor from<br />
where you purchased this unit for after-sales<br />
service (including warranty conditions) or any<br />
other information. In case the necessary information<br />
is not available, please contact the<br />
companies listed below:<br />
Please do not ship your unit to the companies<br />
at the addresses listed below for repair without<br />
advance contact.<br />
U.S.A.<br />
<strong>Pioneer</strong> <strong>Electronics</strong> (USA) Inc.<br />
CUSTOMER SUPPORT DIVISION<br />
P.O. Box 1760<br />
Long Beach, CA 90801-1760<br />
800-421-1404<br />
CANADA<br />
<strong>Pioneer</strong> <strong>Electronics</strong> of Canada, Inc.<br />
CUSTOMER SATISFACTION DEPARTMENT<br />
300 Allstate Parkway<br />
Markham, Ontario L3R 0P2<br />
1-877-283-5901<br />
905-479-4411<br />
For warranty information please see the Limited<br />
Warranty sheet included with this unit.<br />
In case of trouble<br />
Should this product fail to operate properly,<br />
contact your dealer or nearest authorized<br />
<strong>Pioneer</strong> Service Station.<br />
Protecting your unit from<br />
theft<br />
The front panel can be detached to deter theft.<br />
Important<br />
! Handle gently when removing or attaching<br />
the front panel.<br />
! Avoid subjecting the front panel to excessive<br />
shock.<br />
! Keep the front panel out of direct sunlight and<br />
high temperatures.<br />
! Before detaching, be sure to remove the AUX/<br />
USB cable and USB device from the front<br />
panel. Otherwise, this unit, connected device<br />
or vehicle interior may be damaged.<br />
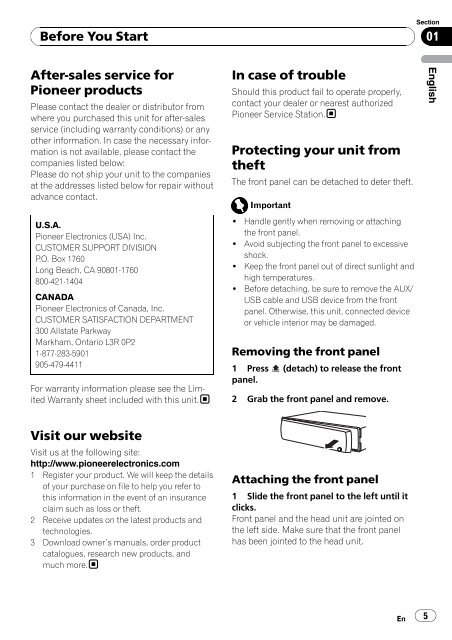
Removing the front panel<br />
1 Press (detach) to release the front<br />
panel.<br />
2 Grab the front panel and remove.<br />
English<br />
Visit our website<br />
Visit us at the following site:<br />
http://www.pioneerelectronics.com<br />
1 Register your product. We will keep the details<br />
of your purchase on file to help you refer to<br />
this information in the event of an insurance<br />
claim such as loss or theft.<br />
2 Receive updates on the latest products and<br />
technologies.<br />
3 Download owner’s manuals, order product<br />
catalogues, research new products, and<br />
much more.<br />
Attaching the front panel<br />
1 Slide the front panel to the left until it<br />
clicks.<br />
Front panel and the head unit are jointed on<br />
the left side. Make sure that the front panel<br />
has been jointed to the head unit.<br />
En 5