5 6 2 1 HTP-2920 Quick Start Guide 7 - Pioneer Electronics
5 6 2 1 HTP-2920 Quick Start Guide 7 - Pioneer Electronics
5 6 2 1 HTP-2920 Quick Start Guide 7 - Pioneer Electronics

Create successful ePaper yourself
Turn your PDF publications into a flip-book with our unique Google optimized e-Paper software.
FRONT<br />
FRONT<br />
SURROUND<br />
CENTER<br />
SUB WOOFER<br />
ADVANCED ST/DIRECT/<br />
STANDARD SURR AUTO SURR<br />
LISTENING MODE<br />
STANDBY/ON<br />
PHONES<br />
FRONT<br />
SURROUND<br />
DVD/LD TV/SAT DVR CD CD-R/TAPE/MD FRONT AUDIO FM AM<br />
ANALOG MIDNIGHT/<br />
DIMMER ATT LOUDNESS SLEEP<br />
MUTE<br />
TUNER<br />
EDIT<br />
TONE<br />
QUICK<br />
SETUP SETUP RETURN<br />
MULTI JOG<br />
CENTER<br />
SUB WOOFER<br />
ENTER<br />
TUNING STATION MPX<br />
FRONT<br />
AUDIO INPUT<br />
AUDIO MULTI-CHANNEL RECEIVER SX-218<br />
DOWN<br />
VSB DIALOGUE<br />
MODE ENHANCEMENT<br />
MULTI JOG<br />
UP<br />
MASTER<br />
VOLUME<br />
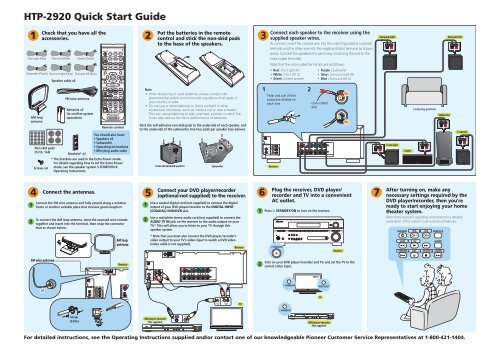
<strong>HTP</strong>-<strong>2920</strong> <strong>Quick</strong> <strong>Start</strong> <strong>Guide</strong><br />
1<br />
Front right (Red)<br />
AM loop<br />
antenna<br />
Screws x4<br />
Check that you have all the<br />
accessories.<br />
Non-skid pads<br />
(1x16, 1x4)<br />
Front left (White)<br />
Speaker cable x6<br />
Center (Green)<br />
Subwoofer (Purple) Surround right (Grey) Surround left (Blue)<br />
FM wire antenna<br />
Batteries x2<br />
(to confirm system<br />
operation)<br />
Brackets* x2<br />
RECEIVER<br />
INPUT SELECTOR<br />
F.AUDIO<br />
CD CD-R FM AM<br />
STANDARD ADV.SURR STEREO<br />
MIDNIGHT/<br />
LOUDNESS<br />
TOP MENU<br />
SETUP<br />
DVD<br />
TUNER EDIT<br />
S.RETRIEVER<br />
EFFECT/CH SEL<br />
DVD/DVR<br />
GUIDE<br />
DISPLAY<br />
SLEEP<br />
TV<br />
HDD<br />
CLASS<br />
MPX<br />
ENTER<br />
VOLUME<br />
REC<br />
LEVEL<br />
DVD<br />
TUNING<br />
RECEIVER<br />
DIMMER ANALOG ATT<br />
DVR<br />
DVD/DVR<br />
TUNER<br />
RECEIVER<br />
MENU<br />
DIALOG E<br />
ONE<br />
TOUCH<br />
COPY<br />
MUTE<br />
RETURN<br />
SUBTITLE<br />
AUDIO<br />
TIMER REC INFO REC STOP JUKEBOX<br />
SHIFT<br />
CH<br />
CH<br />
STATION<br />
Remote control<br />
You should also have:<br />
• Speakers x5<br />
• Subwoofer<br />
• Operating instructions<br />
• Mini plug audio cable<br />
* The brackets are used in the Extra Power mode.<br />
For details regarding how to set the Extra Power<br />
mode, see the speaker system S-FCRW3100-K<br />
Operating Instructions.<br />
2<br />
Put the batteries in the remote<br />
control and stick the non-skid pads<br />
to the base of the speakers.<br />
Note<br />
• When disposing of used batteries, please comply with<br />
governmental and/or environmental regulations that apply in<br />
your country or area.<br />
• Do not use or store batteries in direct sunlight or other<br />
excessively hot places, such as inside a car or near a heater.<br />
This can cause batteries to leak, overheat, explode or catch fire.<br />
It can also reduce the life or performance of batteries.<br />
Stick the self-adhesive non-skid pads to the underside of each speaker, and<br />
to the underside of the subwoofer. Use four pads per speaker (see below).<br />
Front and surround speakers<br />
Subwoofer<br />
3<br />
CD<br />
DIGITAL IN<br />
OPT<br />
Connect each speaker to the receiver using the<br />
supplied speaker wires.<br />
To connect, insert the colored wire into the matching positive (colored)<br />
terminal and the other wire into the negative (black) terminal as shown<br />
below. Connect the speakers the same way (matching the wire to the<br />
color-coded terminal).<br />
Note that the color-coded terminals are as follows:<br />
• Red : Front right (R)<br />
• Purple : Subwoofer<br />
• White : Front left (L)<br />
• Grey : Surround right (R)<br />
• Green : Center speaker • Blue : Surround left (L)<br />
1 2<br />
Twist and pull off the<br />
protective shields on<br />
each wire.<br />
COAX IN<br />
DVR<br />
COAX IN<br />
DVD/LD<br />
OUT<br />
R<br />
AUDIO<br />
Receiver<br />
L<br />
TV /<br />
SAT<br />
CD-R<br />
/TAPE<br />
/MD<br />
FM UNBAL<br />
75 Ω<br />
AM<br />
LOOP<br />
ANTENNA<br />
S R<br />
P<br />
E<br />
A<br />
K<br />
E<br />
R<br />
S<br />
L R<br />
color-coded<br />
wire<br />
L<br />
Surround right<br />
Front right<br />
Center<br />
Listening position<br />
Subwoofer<br />
Surround left<br />
Front left<br />
4<br />
1<br />
2<br />
Connect the antennas.<br />
Connect the FM wire antenna and fully extend along a window<br />
frame or another suitable place that receives good reception.<br />
To connect the AM loop antenna, twist the exposed wire strands<br />
together and insert into the terminal, then snap the connector<br />
shut as shown below.<br />
AM loop<br />
antenna<br />
5<br />
1<br />
2<br />
Connect your DVD player/recorder<br />
(optional-not supplied) to the receiver.<br />
Use a coaxial digital cord (not supplied) to connect the digital<br />
output of your DVD player/recorder to the DIGITAL INPUT<br />
(COAXIAL) DVD/DVR jack.<br />
Use a red/white stereo audio cord (not supplied) to connect the<br />
AUDIO TV IN jack on the receiver to the audio output on your<br />
TV.* This will allow you to listen to your TV through this<br />
speaker system.<br />
* Note that you must also connect the DVD player/recorder’s<br />
video output to your TV’s video input to watch a DVD video<br />
(video cable is not supplied).<br />
Receiver<br />
6<br />
Plug the receiver, DVD player/<br />
recorder and TV into a convenient<br />
AC outlet.<br />
1 Press STANDBY/ON to turn on the receiver.<br />
STANDBY/ON<br />
Receiver<br />
7<br />
After turning on, make any<br />
necessary settings required by the<br />
DVD player/recorder, then you’re<br />
ready to start enjoying your home<br />
theater system.<br />
Refer to the receiver’s operating instructions for a detailed<br />
explanation of this system’s surround sound features.<br />
DVD/DVR<br />
GUIDE<br />
HDD<br />
CH<br />
REC<br />
DVD<br />
CH<br />
SUBTITLE<br />
AUDIO<br />
TIMER REC INFO REC STOP JUKEBOX<br />
FM wire antenna<br />
OPT<br />
FM UNBAL<br />
75 Ω<br />
AM<br />
LOOP<br />
ANTENNA<br />
Receiver<br />
CD<br />
DIGITAL IN<br />
OPT<br />
COAX IN<br />
DVR<br />
COAX IN<br />
DVD/LD<br />
OUT<br />
R<br />
AUDIO<br />
L<br />
TV /<br />
SAT<br />
CD-R<br />
/TAPE<br />
/MD<br />
FM UNBAL<br />
75 Ω<br />
AM<br />
LOOP<br />
ANTENNA<br />
S R<br />
P<br />
E<br />
A<br />
K<br />
E<br />
R<br />
S<br />
L R<br />
L<br />
2<br />
Turn on your DVD player/recorder and TV, and set the TV to the<br />
correct video input.<br />
VIDEO 1<br />
CD<br />
DIGITAL IN<br />
COAX IN<br />
DVR<br />
COAX IN<br />
DVD/LD<br />
OUT<br />
R<br />
AUDIO<br />
L<br />
TV /<br />
SAT<br />
CD-R<br />
/TAPE<br />
/MD<br />
S R<br />
P<br />
E<br />
A<br />
K<br />
E<br />
R<br />
S<br />
VIDEO<br />
IN<br />
R<br />
AUDIO<br />
OUT<br />
L<br />
TV<br />
STANDBY/ON<br />
VIDEO SELECT<br />
TV<br />
STANDBY/ON<br />
10 mm<br />
(3/8 in.)<br />
DVD player/ recorder<br />
(Not supplied)<br />
DIGITAL<br />
OUT<br />
VIDEO<br />
OUT<br />
DVD player/ recorder<br />
(Not supplied)<br />
For detailed instructions, see the Operating Instructions supplied and/or contact one of our knowledgeable <strong>Pioneer</strong> Customer Service Representatives at 1-800-421-1404.
ADVANCED ST/DIRECT/<br />
STANDARD SURR AUTO SURR<br />
STANDBY/ON<br />
LISTENING MODE<br />
PHONES<br />
DVD/LD TV/SAT DVR CD CD-R/TAPE/MD FRONT AUDIO FM AM<br />
ANALOG MIDNIGHT/<br />
DIMMER ATT LOUDNESS SLEEP<br />
MUTE<br />
TUNER<br />
EDIT<br />
TONE<br />
QUICK<br />
SETUP SETUP RETURN<br />
MULTI JOG<br />
ENTER<br />
TUNING STATION MPX<br />
FRONT<br />
AUDIO INPUT<br />
AUDIO MULTI-CHANNEL RECEIVER<br />
DOWN<br />
VSB DIALOGUE<br />
MODE ENHANCEMENT<br />
MULTI JOG<br />
UP<br />
MASTER<br />
VOLUME<br />
Setting Up Your <strong>HTP</strong>-<strong>2920</strong> Home Theater System At-a-Glance<br />
Refer to the following diagram when making system connections for a full surround sound<br />
setup. Note that the TV, DVD player/recorder and some accessories are not included. Refer to<br />
the reverse side of this sheet to check what’s supplied with the <strong>HTP</strong>-<strong>2920</strong>.<br />
DVD player/ recorder COAXIAL OUT VIDEO OUT<br />
(Not supplied)<br />
Using the front panel audio input<br />
Use the supplied mini-plug cable to connect an audio device<br />
(portable audio player, etc.) to the front panel audio input for<br />
playback through this system.<br />
SX-218<br />
Mini plug audio cable<br />
menu<br />
Wall mounting the speakers<br />
The front, center and surrond speakers has a mounting hole which can be used to mount the speaker on the<br />
wall.<br />
Mounting screw<br />
(not supplied)<br />
5 mm<br />
(3/16 in.)<br />
10 mm<br />
(3/8 in.)<br />
5 mm to 7 mm<br />
(3/16 in. to 1/4 in.)<br />
Before mounting (see above), keep in mind the following points:<br />
• Remember that the speaker system is heavy and that its weight could cause the screws to work loose, or<br />
the wall material to fail to support it, resulting in the speaker falling. Make sure that the wall you intend to<br />
mount the speakers on is strong enough to support them. Do not mount on plywood or soft surface walls.<br />
• Mounting screws are not supplied. Use screws that are suitable for the wall material and can support the<br />
weight of the speaker.<br />
Caution<br />
• If you are unsure of the qualities and strength of the walls, consult a professional for advice.<br />
• <strong>Pioneer</strong> is not responsible for any accidents or damage that result from improper installation.<br />
• Do not hang the subwoofer on the wall or from the ceiling as they might fall and cause injury.<br />
• When placing this unit, ensure that it is firmly secured and avoid areas where it may be likely to fall and<br />
cause injuly in the event of a natural disaster (such as an earthquake).<br />
For more information about speaker installation, please see the instructions that come with the speakers.<br />
Not supplied<br />
Not supplied<br />
Not supplied<br />
TV<br />
(White)<br />
AUDIO<br />
OUT<br />
VIDEO<br />
IN<br />
(Red)<br />
Receiver<br />
Subwoofer<br />
–<br />
+<br />
–<br />
+<br />
FM UNBAL<br />
75 Ω<br />
AM<br />
LOOP<br />
ANTENNA<br />
Front L.<br />
Front R.<br />
Center<br />
CD<br />
OPT<br />
–<br />
+<br />
(Green)<br />
DIGITAL IN<br />
COAX IN<br />
DVR<br />
COAX IN<br />
DVD/LD<br />
OUT<br />
R<br />
AUDIO<br />
L<br />
TV /<br />
SAT<br />
CD-R<br />
/TAPE<br />
/MD<br />
S<br />
P<br />
E<br />
A<br />
K<br />
E<br />
R<br />
S<br />
R<br />
FRONT<br />
L R<br />
SURROUND<br />
L<br />
CENTER<br />
SUB WOOFER<br />
(Blue)<br />
– +<br />
(Purple)<br />
Surround L. Surround R.<br />
(Grey)<br />
The illustration above shows the connection<br />
for a DVD player (the DVD/LD jack). Connect to<br />
the DVR jack when connecting a DVD recorder.<br />
–<br />
+<br />
–<br />
+<br />
For detailed instructions, see the Operating Instructions supplied and/or contact one of our knowledgeable <strong>Pioneer</strong> Customer Service Representatives at 1-800-421-1404.<br />