refrigerator user instructions - Commercial Laundry Equipment ...
refrigerator user instructions - Commercial Laundry Equipment ...
refrigerator user instructions - Commercial Laundry Equipment ...

You also want an ePaper? Increase the reach of your titles
YUMPU automatically turns print PDFs into web optimized ePapers that Google loves.
Water Supply Requirements<br />
Gather the required tools and parts before starting installation.<br />
Read and follow the <strong>instructions</strong> provided with any tools listed<br />
here.<br />
TOOLS NEEDED:<br />
■<br />
■<br />
Flat-blade screwdriver<br />
⁷⁄₁₆" and ¹⁄₂" Open-end or two<br />
adjustable wrenches<br />
NOTE: Your <strong>refrigerator</strong> dealer has a kit available with a<br />
¹⁄₄" (6.35 mm) saddle-type shutoff valve, a union, and copper<br />
tubing. Before purchasing, make sure a saddle-type valve<br />
complies with your local plumbing codes. Do not use a piercingtype<br />
or ³⁄₁₆" (4.76 mm) saddle valve which reduces water flow and<br />
clogs more easily.<br />
IMPORTANT:<br />
■ All installations must meet local plumbing code requirements.<br />
■ Use copper tubing and check for leaks. Install copper tubing<br />
only in areas where the household temperatures will remain<br />
above freezing.<br />
Water Pressure<br />
A cold water supply with water pressure of between 30 and<br />
120 psi (207 and 827 kPa) is required to operate the water<br />
dispenser and ice maker. If you have questions about your water<br />
pressure, call a licensed, qualified plumber.<br />
Reverse Osmosis Water Supply<br />
IMPORTANT: The pressure of the water supply coming out of a<br />
reverse osmosis system going to the water inlet valve of the<br />
<strong>refrigerator</strong> needs to be between 30 and 120 psi (207 and<br />
827 kPa).<br />
If a reverse osmosis water filtration system is connected to your<br />
cold water supply, the water pressure to the reverse osmosis<br />
system needs to be a minimum of 40 to 60 psi (276 to 414 kPa).<br />
If the water pressure to the reverse osmosis system is less than<br />
40 to 60 psi (276 to 414 kPa):<br />
■ Check to see whether the sediment filter in the reverse<br />
osmosis system is blocked. Replace the filter if necessary.<br />
■ Allow the storage tank on the reverse osmosis system to refill<br />
after heavy usage.<br />
If you have questions about your water pressure, call a licensed,<br />
qualified plumber.<br />
■<br />
■<br />
■<br />
¹⁄₄" Nut driver<br />
¹⁄₄" Drill bit<br />
Cordless drill<br />
Connect the Water Supply<br />
Read all directions before you begin.<br />
IMPORTANT: If you turn the <strong>refrigerator</strong> on before the water line<br />
is connected, turn the ice maker OFF.<br />
Connect to Water Line<br />
1. Unplug <strong>refrigerator</strong> or disconnect power.<br />
2. Turn OFF main water supply. Turn ON nearest faucet long<br />
enough to clear line of water.<br />
3. Locate a ½" to 1¹⁄₄" (1.25 cm to 3.18 cm) vertical cold water<br />
pipe near the <strong>refrigerator</strong>.<br />
IMPORTANT:<br />
■ Make sure it is a cold water pipe.<br />
■ Horizontal pipe will work, but drill on the top side of the<br />
pipe, not the bottom. This will help keep water away from<br />
the drill and normal sediment from collecting in the valve.<br />
4. Determine the length of copper tubing you need. Measure<br />
from the connection on the lower left rear of <strong>refrigerator</strong> to the<br />
water pipe. Add 7 ft (2.1 m) to allow for cleaning. Use<br />
¹⁄₄" (6.35 mm) O.D. (outside diameter) copper tubing. Be sure<br />
both ends of copper tubing are cut square.<br />
5. Using a cordless drill, drill a ¹⁄₄" hole in the cold water pipe<br />
you have selected.<br />
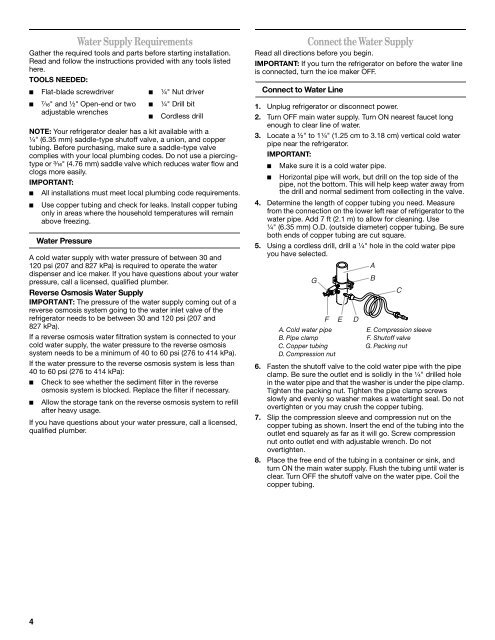
A<br />
G<br />
B<br />
C<br />
F<br />
A. Cold water pipe<br />
B. Pipe clamp<br />
C. Copper tubing<br />
D. Compression nut<br />
E<br />
D<br />
E. Compression sleeve<br />
F. Shutoff valve<br />
G. Packing nut<br />
6. Fasten the shutoff valve to the cold water pipe with the pipe<br />
clamp. Be sure the outlet end is solidly in the ¹⁄₄" drilled hole<br />
in the water pipe and that the washer is under the pipe clamp.<br />
Tighten the packing nut. Tighten the pipe clamp screws<br />
slowly and evenly so washer makes a watertight seal. Do not<br />
overtighten or you may crush the copper tubing.<br />
7. Slip the compression sleeve and compression nut on the<br />
copper tubing as shown. Insert the end of the tubing into the<br />
outlet end squarely as far as it will go. Screw compression<br />
nut onto outlet end with adjustable wrench. Do not<br />
overtighten.<br />
8. Place the free end of the tubing in a container or sink, and<br />
turn ON the main water supply. Flush the tubing until water is<br />
clear. Turn OFF the shutoff valve on the water pipe. Coil the<br />
copper tubing.<br />
4