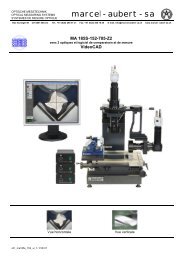
MA 1710 - marcel aubert sa
MA 1710 - marcel aubert sa
MA 1710 - marcel aubert sa

Create successful ePaper yourself
Turn your PDF publications into a flip-book with our unique Google optimized e-Paper software.
OPTISCHE MESSTECHNIK<br />
OPTICAL MEASURING SYSTEMS<br />
SYSTEMES DE MESURE OPTIQUE<br />
<strong>marcel</strong> - <strong>aubert</strong> - <strong>sa</strong><br />
Rue Gurnigel 48 CH-2501 Bienne Tél.: +41 (0)32 365 51 31 Fax: +41 (0)32 365 76 20 E-mail: info@<strong>marcel</strong>-<strong>aubert</strong>-<strong>sa</strong>.ch www.<strong>marcel</strong>-<strong>aubert</strong>-<strong>sa</strong>.ch<br />
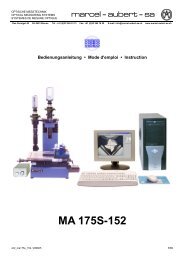
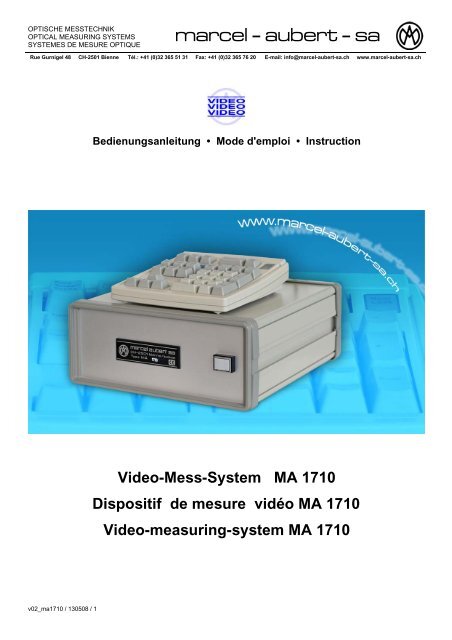
Bedienung<strong>sa</strong>nleitung • Mode d'emploi • Instruction<br />
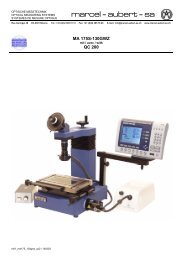
Video-Mess-System <strong>MA</strong> <strong>1710</strong><br />
Dispositif de mesure vidéo <strong>MA</strong> <strong>1710</strong><br />
Video-measuring-system <strong>MA</strong> <strong>1710</strong><br />
v02_ma<strong>1710</strong> / 130508 / 1
v02_ma<strong>1710</strong> / 130508 / 2
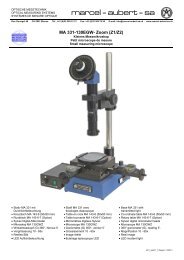
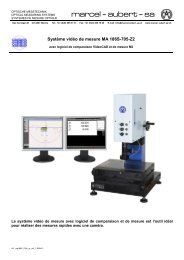
Die Einheit <strong>MA</strong> <strong>1710</strong> dient zum vermessen von Werkstücken die auf dem Bildschirm abgebildet<br />
sind. Breite und Höhe werden auf der X und Y Achse mittels zwei senkrechten und zwei<br />
waagrechten Linien gemessen.<br />
Die Länge und der Winkel einer Diagonale (Distanz zwischen 2 Punkten) kann ebenfalls auf dem<br />
Bildschirm gemessen werden.<br />
In der Standardausführung dient eine Tastatur mit 32 Tasten zum eingeben von Befehlen,<br />
verschieben von Messpunkten und zum ändern der Parameter.<br />
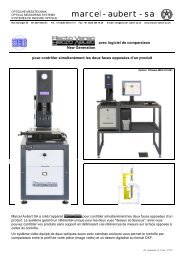
Für die Vorrichtung mit verschiedenen Vergrösserungen (maximal 10 Objektive), können über<br />
eine Datenbank die Kalibrierungsparameter abgerufen werden.<br />
L'unité <strong>MA</strong> <strong>1710</strong> est destinée à la mesure dimensionnelle de pièces visibles sur l'écran d'un<br />
moniteur vidéo.<br />
Des largeurs et des hauteurs peuvent être mesurées sur les axes X et Y au moyen de deux lignes<br />
verticales et de deux lignes horizontales. La longueur et l’angle d’une diagonale (distance entre<br />
deux points) peut également être mesurée et affichée à l'écran.<br />
Avec le modèle standard, un clavier d'ordinateur à 32 touches est utilisé pour entrer les<br />
commandes, déplacer les points de mesure et pour modifier les paramètres.<br />
En ce qui concerne les installations pour lesquelles différents grossissements (maximum<br />
10 objectifs) sont utilisés, une base de données intégrée permet de modifier rapidement les<br />
paramètres d’étalonnage.<br />
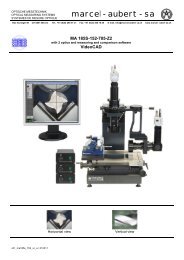
The <strong>MA</strong> <strong>1710</strong> unit is used for the measurement of pieces that are visible on the screen of a video<br />
monitor.<br />
Lengths and heights can be measured on the X and Y axes between two vertical lines and two<br />
horizontal lines. The length and the angle of a diagonal (distance between two points) can be<br />
equally measured and displayed on the screen.<br />
A 32 keys keyboard is used with the standard model to enter commands, move the measure<br />
value points and modify parameters.<br />
In the set ups where different magnifications (maximum 10 objectives) are used, an integrated<br />
data base allows the calibration parameters to be modified quickly.<br />
v02_ma<strong>1710</strong> / 130508 / 3
v02_ma<strong>1710</strong> / 130508 / 4
Tastenfunktionen:<br />
< Enter > Wahl der zu verschiebenden Linien:<br />
Die gewählten Linien erscheinen gestrichelt auf dem Bildschirm.<br />
Bei jeder Enter-Eingabe wird das zweite Linienpaar (horizontal und vertikal) gewählt. Die<br />
nicht gewählten Linien dienen als Referenz für die Messungen.<br />
< > und < > Verschieben der, durch die Taste < Enter >, gewählten waagrechten Linie in die gewünschte<br />
Richtung.<br />
< > und < > Verschieben der, durch die Taste < Enter >, gewählten senkrechten Linie in die gewünschte<br />
Richtung.<br />
< Insert > Messwerte auf dem Bildschirm anzeigen.<br />
< Delete > Messwerte auf dem Bildschirm nicht anzeigen.<br />
< Page up > Anzeige am oberen Bildrand.<br />
< Page down > Anzeige am unteren Bildrand.<br />
< / > Wählen der Anzeige des Abstandes zwischen den Zentren der beiden auf dem Bildschirm<br />
sichtbaren Fadenkreuze, sowie der Winkel der Diagonale.<br />
< * > X und Y Messungen anzeigen.<br />
< + > Farbton der Linien erhöhen (weiss).<br />
< - > Farbton der Linien vermindern (schwarz).<br />
Numerische Wählen der Objektive und zum Abrufen der gespeicherten Parameter des gewählten Objektives.<br />
Tasten 0 - 9<br />
< Print > Sendet die Messwerte über das Interface RS232 (seriell) auf einen Drucker mit seriellem<br />
Schnittstellenanschluss.<br />
< Home > Einheitsparameter speichern:<br />
Lage der Linien, Eichung usw. Diese Parameter werden nach jedem wieder einschalten<br />
der Einheit automatisch zurückgerufen.<br />
< End > Gespeicherte Parameter zurückrufen:<br />
Die Parameter können, ohne dass das Gerät aus- oder eingeschaltet wird, zurückgerufen<br />
werden.<br />
< Esc > Eichen der X und Y Achse des gewählten Objektives:<br />
Bevor das Eichungsmenü aufgerufen wird, müssen die beiden waagrechten und<br />
senkrechten Linien mit einem Referenzstück eingestellt werden.<br />
Vorgehen:<br />
1) Linien mit Referenzstück einstellen<br />
2) Menü Eichen mit < ESC > aufrufen<br />
3) Sicherheitscode „160750“ und < Enter > eingeben<br />
4) Mass zwischen den beiden senkrechten Linien (X-Achse) eingeben und mit < Enter ><br />
bestätigen<br />
5) Mass zwischen den beiden waagrechten Linien (Y-Achse) eingeben und mit < Enter ><br />
bestätigen<br />
6) Abspeichern der Werte mit der < Home > Taste<br />
Bemerkungen:<br />
Wenn eine Achse nicht geeicht werden muss, Taste < Enter > drücken ohne einen Wert<br />
einzugeben.<br />
Bei Eingabe eines negativen Wertes kehrt sich die Polarität der Koordinaten um.<br />
Für Korrekturen Taste < Backspace > benützen.<br />
Zurückrufen der Werkparameter:<br />
Wenn nötig können die Werkparameter zurückgerufen werden.<br />
Bei Parameteränderungen wie folgt vorgehen:<br />
1) Einheit aus- und wieder einschalten<br />
2) Während der Anzeige „Self Test...“, Taste < Esc > drücken<br />
3) Sicherheitscode „160750“ und < Enter > eingeben<br />
4) Nach Aufruf der Werkparameter müssen die X und Y Achsen neu geeicht werden<br />
Die Werkparameter stehen wieder zu Ihrer Verfügung.<br />
v02_ma<strong>1710</strong> / 130508 / 5
v02_ma<strong>1710</strong> / 130508 / 6
Fonctions des touches du clavier:<br />
< Enter > Sélectionner les lignes verticales et horizontales devant être déplacées. Les lignes sélectionnées<br />
apparaissent en pointillé sur l'écran du moniteur.<br />
Chaque pression sur la touche fait "basculer" la sélection vers la seconde paire de lignes<br />
(verticale et horizontale).Les lignes qui ne sont pas sélectionnées sont utilisées comme origines<br />
pour les mesures.<br />
< > et < > Déplacer la ligne horizontale sélectionnée par la touche dans la direction désirée.<br />
< > et < > Déplacer la ligne verticale sélectionnée par la touche dans la direction désirée.<br />
< Insert > Réactiver l'affichage des mesures sur l'écran du moniteur.<br />
< Delete > Supprimer l'affichage des mesures<br />
< Page up > Déplacer l'affichage des mesures sur le haut de l'écran du moniteur.<br />
< Page down > Déplacer l'affichage vers le bas de l'écran.<br />
< / > Sélectionner l'affichage de la distance séparant le centre des deux croix visibles sur l'écran ainsi<br />
que l’angle de cette diagonale.<br />
< * > Sélectionner l'affichage des axes X et Y.<br />
< + > Augmenter la teinte de surimpression des lignes (blanche).<br />
< - > Diminuer la teinte de surimpression des lignes (noire).<br />
Touches Les touches numériques permettent d’appeler les paramètres correspondant à l’objectif<br />
numériques 0 - 9 sélectionné.<br />
< Print > Commande la transmission des valeurs mesurées vers une imprimante ou un ordinateur au<br />
moyen de l’interface RS232.<br />
< Home > Les paramètres de l'appareil (position des lignes, étalonnage, etc.) peuvent être <strong>sa</strong>uvegardés<br />
dans une mémoire non volatile au moyen de la touche . Ces paramètres sont rappelés<br />
automatiquement chaque fois que l'appareil est enclenché.<br />
< End > Permet de rappeler les paramètres <strong>sa</strong>uvegardés <strong>sa</strong>ns avoir besoin de déclencher et de réenclencher<br />
l'appareil.<br />
< Esc > Permet d'appeler le menu d'étalonnage des axes X et Y.<br />
Avant d'appeler le menu d'étalonnage, il faut positionner les deux lignes horizontales et (ou) les<br />
deux lignes verticales sur les arêtes d'un objet dont la dimension est connue (par ex. une règle de<br />
référence).<br />
Procédure:<br />
1) Positionner les lignes sur une référence<br />
2) Appeler le menu d'étalonnage en pres<strong>sa</strong>nt la touche <br />
3) Entrer le code de sécurité "160750"<br />
4) Entrer la distance séparant les deux arêtes de l'axe X. Presser la touche .<br />
5) Entrer la distance séparant les deux arêtes de l'axe Y. Presser la touche .<br />
6) Sauvegarder en pres<strong>sa</strong>nt sur la touche .<br />
Notes:<br />
Si l'un des axes ne doit pas être étalonné, presser la touche <strong>sa</strong>ns entrer de<br />
données.<br />
L'entrée d'un nombre négatif inverse la polarité des coordonnées.<br />
La touche (retour arrière) peut être utilisée pour effectuer des corrections.<br />
Rappel des paramètres d'usine:<br />
En cas de besoin, les paramètres programmés à l'usine peuvent être rappelés. Pour changer ces paramètres, il faut<br />
procéder de la manière suivante:<br />
1) Déclencher et ré-enclencher l'appareil<br />
2) Presser la touche pendant que le mes<strong>sa</strong>ge "Test" est affiché à l'écran<br />
3) Entrer le code de sécurité "160750"<br />
4) Après le rappel du paramètre d’usine, les axes Y et X doivent être étalonnés<br />
Les paramètres d'usine sont ensuite utilisés et transférés dans la mémoire de <strong>sa</strong>uvegarde.<br />
v02_ma<strong>1710</strong> / 130508 / 7
v02_ma<strong>1710</strong> / 130508 / 8
Summary of keys functions:<br />
< Enter > Selection of vertical and horizontal lines before being scrolled. The selected lines appear as<br />
dotted lines on the monitor screen.<br />
Every time the < Enter> key is pressed, it „toggles“ the selection towards the second set of lines<br />
(vertical and horizontal).<br />
The lines that are not selected are used as origins for the measurements.<br />
< > and < > Horizontal line selected by pressing to be scrolled in the desired direction.<br />
< > and < > Vertical line selected by pressing to be scrolled in the desired direction.<br />
< Insert > Displays the measurements on the screen.<br />
< Delete > Does not display the measurements on the screen.<br />
< Page up > Moves the display to the top of the screen.<br />
< Page down > Moves the display to the bottom of the screen.<br />
< / > Selects the display of the distance that separates the centre of two visible crosses on the screen<br />
as well as the angle of that diagonal.<br />
< * > Selects the display of the X and Y axes.<br />
< + > Increases the colour intensity of lines superimpression (white).<br />
< - > Reduces the colour intensity of lines superimpression (black).<br />
Number keys Recall of the corresponding parameters of the selected object.<br />
0 - 9<br />
< Print > Transfers the measured values to a printer or computer by an RS 232 interface.<br />
< Home > The unit settings (lines position, settings, etc.) can be <strong>sa</strong>ved in a non volatile memory by the<br />
key. These parameters can be recalled automatically every time the unit is switched on.<br />
< End > Recalls the <strong>sa</strong>ved settings without having to switch the unit off and on.<br />
< Esc > Calibrating of the X and Y axes of the selectioned objective:<br />
Before recalling the calibration menu, the two horizontal lines and / or the two vertical<br />
lines must be positioned on the edges of an object whose dimensions are known<br />
(e.g. measuring rule).<br />
Method:<br />
1) Place the lines on a reference<br />
2) Call the calibration menu , pressing the key<br />
3) Enter the password „160750“. Press <br />
4) Enter the distance that separates the two points on the axis X. Press <br />
5) Enter the distance that separates the two points on the axis Y. Press <br />
6) Save with the key<br />
Notes:<br />
If one of the axis does not have to be set, press the key without entering the<br />
data.<br />
When a negative value is entered this reverses the coordinates polarity.<br />
The key can be used to make the corrections.<br />
Recalling factory settings:<br />
If neces<strong>sa</strong>ry the factory programmed settings can be recalled.<br />
To change the settings, follow this method:<br />
1) Switch off and on the unit<br />
2) Press during the display of the mes<strong>sa</strong>ge „Self Test“, on the screen<br />
3) Enter the password „160750“ and press the key <br />
4) After recalling the factory settings, the axis X and Y have to be set up<br />
The parameters of inizialization are at your dispo<strong>sa</strong>l.<br />
v02_ma<strong>1710</strong> / 130508 / 9
Interface RS 232:<br />
− Die Messwerte des <strong>MA</strong> <strong>1710</strong> können über das Interface RS 232 auf einen Drucker oder Computer übertragen<br />
werden.<br />
− Die Verbindung kann über die Tastatur oder einen Computer hergestellt werden.<br />
− Der Computer stellt die Verbindung mit der Befehlszeile < #print > < Enter > her.<br />
Parameter:<br />
− Uebertragungsgeschwindigkeit 9600 bauds / 8 bit / 1 Stop-bit, no parity<br />
Steckeranschlüsse:<br />
DB 25 weiblich (<strong>MA</strong> <strong>1710</strong>)<br />
DB 9 männlich (Computer)<br />
Stift Signal Stift Signal<br />
2 Rxd 2 Rxd<br />
3 Txd 3 Txd<br />
7 Gnd 5 Gnd<br />
Achtung, die unbenutzten Stifte beim Stecker DB 25, dürfen nicht belegt werden.<br />
Interface RS 232:<br />
− Les valeurs mesurées peuvent être transmises vers une imprimante ou un ordinateur au moyen d’une<br />
interface RS 232.<br />
− La transmission peut être commandée par le clavier ou par un ordinateur.<br />
− L’ordinateur peut commander la transmission des données en envoyant la ligne de commande<br />
< #print > < Enter >.<br />
Paramètres:<br />
− 9600 bauds / 8 bits / 1 bit d’arrêt, pas de parité.<br />
Branchement des connecteurs:<br />
DB 25 femelle (<strong>MA</strong> <strong>1710</strong>)<br />
DB 9 mâle (Ordinateur)<br />
Borne Signal Borne Signal<br />
2 Rxd 2 Rxd<br />
3 Txd 3 Txd<br />
7 Gnd 5 Gnd<br />
Attention, ne pas connecter les bornes inutilisées de la prise DB 25.<br />
Interface RS 232:<br />
− The measuring values of the <strong>MA</strong> <strong>1710</strong> can be transmitted by the interface RS 232 on the printer or computer.<br />
− The connection can be done by the keyboard or the computer.<br />
− The computer will order the transmission of the values in sending the orderline < #print > < Enter >.<br />
Parameters:<br />
− 9600 Baud’s / 8 Bits / 1 Stop-bit, no parity<br />
Plug connections:<br />
DB 25 female (<strong>MA</strong> <strong>1710</strong>)<br />
DB 9 male (Computer)<br />
Pin Signal Pin Signal<br />
2 Rxd 2 Rxd<br />
3 Txd 3 Txd<br />
7 Gnd 5 Gnd<br />
Attention, dont connect the not used pins of the plug DB25 .<br />
v02_ma<strong>1710</strong> / 130508 / 10
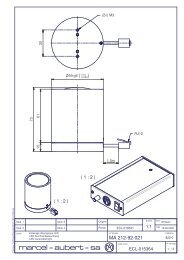
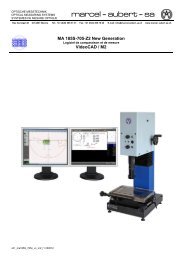
Anschluss - Schema / Schéma de branchement / Connection<br />
<strong>MA</strong> <strong>1710</strong><br />
Farbsignal / Signal couleur / Signal color :<br />
Y/C (S-VHS / S-VIDEO<br />
Technische Daten / Caractéristiques / Characteristics:<br />
Gehäuse ( h x b x t )<br />
Gewicht<br />
Tastatur ( h x b x t )<br />
Gewicht Tastatur<br />
Video Eingang<br />
115 x 260 x 265 mm<br />
3.1 kg.<br />
45 x 170 x 175 mm<br />
0.6 kg.<br />
CCIR Zeilensprungverfahren, 75 Ohms, schwarz/weiss oder Farbe<br />
Dimensions de l’appareil ( h x l x p )<br />
Poids de l’appareil<br />
Dimensions du clavier ( h x l x p )<br />
Poids du clavier<br />
Entrée vidéo<br />
115 x 260 x 265 mm<br />
3.1 kg.<br />
45 x 170 x 175 mm<br />
0.6 kg.<br />
CCIR entrelacé, 75 Ohms, noir / blanc ou couleur<br />
Dimensions ( h x w x d )<br />
Weight<br />
Keyboard dimensions ( h x w x d )<br />
Keyboard weight<br />
Video port<br />
115 x 260 x 265 mm<br />
3.1 kg.<br />
45 x 170 x 175 mm<br />
0.6 kg.<br />
CCIR interlinked, 75 Ohms, monochrom or colour<br />
v02_ma<strong>1710</strong> / 130508 / 11
OPTISCHE MESSTECHNIK<br />
OPTICAL MEASURING SYSTEMS<br />
SYSTEMES DE MESURE OPTIQUE<br />
<strong>marcel</strong> - <strong>aubert</strong> - <strong>sa</strong><br />
Rue Gurnigel 48 CH-2501 Bienne Tél.: +41 (0)32 365 51 31 Fax: +41 (0)32 365 76 20 E-mail: info@<strong>marcel</strong>-<strong>aubert</strong>-<strong>sa</strong>.ch www.<strong>marcel</strong>-<strong>aubert</strong>-<strong>sa</strong>.ch<br />
Besuchen Sie uns • Visit us at • Visitez notre site<br />
www.<strong>marcel</strong>-<strong>aubert</strong>-<strong>sa</strong>.ch<br />
v02_ma<strong>1710</strong> / 130508 / 12