OWNER'S MANUAL MANUAL DEL PROPIETARIO GUIDE ... - Shark
OWNER'S MANUAL MANUAL DEL PROPIETARIO GUIDE ... - Shark
OWNER'S MANUAL MANUAL DEL PROPIETARIO GUIDE ... - Shark

Create successful ePaper yourself
Turn your PDF publications into a flip-book with our unique Google optimized e-Paper software.
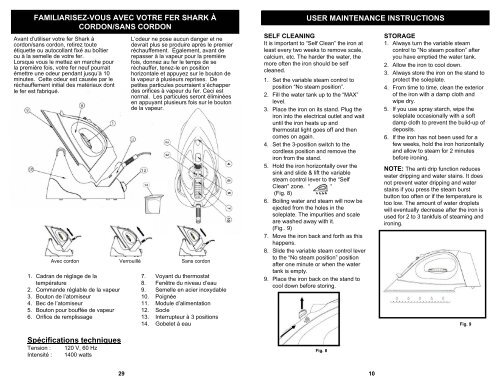
FAMILIARISEZ-VOUS AVEC VOTRE FER SHARK À<br />
CORDON/SANS CORDON<br />
Avant d’utiliser votre fer <strong>Shark</strong> à<br />
cordon/sans cordon, retirez toute<br />
étiquette ou autocollant fixé au boîtier<br />
ou à la semelle de votre fer.<br />
Lorsque vous le mettez en marche pour<br />
la première fois, votre fer neuf pourrait<br />
émettre une odeur pendant jusqu’à 10<br />
minutes. Cette odeur est causée par le<br />
réchauffement initial des matériaux dont<br />
le fer est fabriqué.<br />
Avec cordon Verrouillé Sans cordon<br />
1. Cadran de réglage de la<br />
température<br />
2. Commande réglable de la vapeur<br />
3. Bouton de l’atomiseur<br />
4. Bec de l’atomiseur<br />
5. Bouton pour bouffée de vapeur<br />
6. Orifice de remplissage<br />
Spécifications techniques<br />
Tension :<br />
Intensité :<br />
120 V, 60 Hz<br />
1400 watts<br />
L’odeur ne pose aucun danger et ne<br />
devrait plus se produire après le premier<br />
réchauffement. Également, avant de<br />
repasser à la vapeur pour la première<br />
fois, donnez au fer le temps de se<br />
réchauffer, tenez-le en position<br />
horizontale et appuyez sur le bouton de<br />
la vapeur à plusieurs reprises. De<br />
petites particules pourraient s’échapper<br />
des orifices à vapeur du fer. Ceci est<br />
normal. Les particules seront éliminées<br />
en appuyant plusieurs fois sur le bouton<br />
de la vapeur.<br />
7. Voyant du thermostat<br />
8. Fenêtre du niveau d’eau<br />
9. Semelle en acier inoxydable<br />
10. Poignée<br />
11. Module d’alimentation<br />
12. Socle<br />
13. Interrupteur à 3 positions<br />
14. Gobelet à eau<br />
USER MAINTENANCE INSTRUCTIONS<br />
SELF CLEANING<br />
It is important to “Self Clean” the iron at<br />
least every two weeks to remove scale,<br />
calcium, etc. The harder the water, the<br />
more often the iron should be self<br />
cleaned.<br />
1. Set the variable steam control to<br />
position “No steam position”.<br />
2. Fill the water tank up to the “MAX”<br />
level.<br />
3. Place the iron on its stand. Plug the<br />
iron into the electrical outlet and wait<br />
until the iron heats up and<br />
thermostat light goes off and then<br />
comes on again.<br />
4. Set the 3-position switch to the<br />
cordless position and remove the<br />
iron from the stand.<br />
5. Hold the iron horizontally over the<br />
sink and slide & lift the variable<br />
steam control lever to the “Self<br />
Clean” zone. “ “<br />
(Fig. 8)<br />
6. Boiling water and steam will now be<br />
ejected from the holes in the<br />
soleplate. The impurities and scale<br />
are washed away with it.<br />
(Fig.. 9)<br />
7. Move the iron back and forth as this<br />
happens.<br />
8. Slide the variable steam control lever<br />
to the “No steam position” position<br />
after one minute or when the water<br />
tank is empty.<br />
9. Place the iron back on the stand to<br />
cool down before storing.<br />
Fig. 8<br />
STORAGE<br />
1. Always turn the variable steam<br />
control to “No steam position” after<br />
you have emptied the water tank.<br />
2. Allow the iron to cool down.<br />
3. Always store the iron on the stand to<br />
protect the soleplate.<br />
4. From time to time, clean the exterior<br />
of the iron with a damp cloth and<br />
wipe dry.<br />
5. If you use spray starch, wipe the<br />
soleplate occasionally with a soft<br />
damp cloth to prevent the build-up of<br />
deposits.<br />
6. If the iron has not been used for a<br />
few weeks, hold the iron horizontally<br />
and allow to steam for 2 minutes<br />
before ironing.<br />
NOTE: The anti drip function reduces<br />
water dripping and water stains. It does<br />
not prevent water dripping and water<br />
stains if you press the steam burst<br />
button too often or if the temperature is<br />
too low. The amount of water droplets<br />
will eventually decrease after the iron is<br />
used for 2 to 3 tankfuls of steaming and<br />
ironing.<br />
Fig. 9<br />
29<br />
10