OWNER'S MANUAL MANUAL DEL PROPIETARIO GUIDE ... - Shark
OWNER'S MANUAL MANUAL DEL PROPIETARIO GUIDE ... - Shark
OWNER'S MANUAL MANUAL DEL PROPIETARIO GUIDE ... - Shark

Create successful ePaper yourself
Turn your PDF publications into a flip-book with our unique Google optimized e-Paper software.
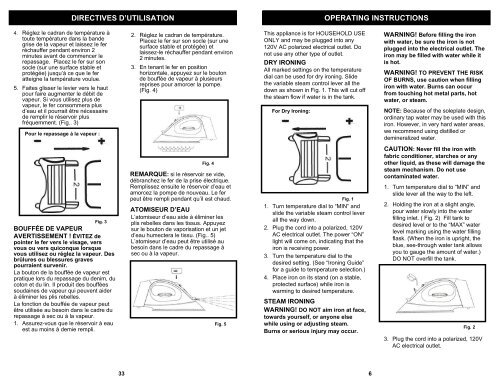
DIRECTIVES D’UTILISATION<br />
OPERATING INSTRUCTIONS<br />
4. Réglez le cadran de température à<br />
toute température dans la bande<br />
grise de la vapeur et laissez le fer<br />
réchauffer pendant environ 2<br />
minutes avant de commencer le<br />
repassage. Placez le fer sur son<br />
socle (sur une surface stable et<br />
protégée) jusqu’à ce que le fer<br />
atteigne la température voulue.<br />
5. Faites glisser le levier vers le haut<br />
pour faire augmenter le débit de<br />
vapeur. Si vous utilisez plus de<br />
vapeur, le fer consommera plus<br />
d’eau et il pourrait être nécessaire<br />
de remplir le réservoir plus<br />
fréquemment. (Fig.. 3)<br />
Pour le repassage à la vapeur :<br />
2. Réglez le cadran de température.<br />
Placez le fer sur son socle (sur une<br />
surface stable et protégée) et<br />
laissez-le réchauffer pendant environ<br />
2 minutes.<br />
3. En tenant le fer en position<br />
horizontale, appuyez sur le bouton<br />
de bouffée de vapeur à plusieurs<br />
reprises pour amorcer la pompe.<br />
(Fig. 4)<br />
This appliance is for HOUSEHOLD USE<br />
ONLY and may be plugged into any<br />
120V AC polarized electrical outlet. Do<br />
not use any other type of outlet.<br />
DRY IRONING<br />
All marked settings on the temperature<br />
dial can be used for dry ironing. Slide<br />
the variable steam control lever all the<br />
down as shown in Fig. 1. This will cut off<br />
the steam flow if water is in the tank.<br />
For Dry Ironing:<br />
WARNING! Before filling the iron<br />
with water, be sure the iron is not<br />
plugged into the electrical outlet. The<br />
iron may be filled with water while it<br />
is hot.<br />
WARNING! TO PREVENT THE RISK<br />
OF BURNS, use caution when filling<br />
iron with water. Burns can occur<br />
from touching hot metal parts, hot<br />
water, or steam.<br />
NOTE: Because of the soleplate design,<br />
ordinary tap water may be used with this<br />
iron. However, in very hard water areas,<br />
we recommend using distilled or<br />
demineralized water.<br />
Fig. 3<br />
BOUFFÉE DE VAPEUR<br />
AVERTISSEMENT ! ÉVITEZ de<br />
pointer le fer vers le visage, vers<br />
vous ou vers quiconque lorsque<br />
vous utilisez ou réglez la vapeur. Des<br />
brûlures ou blessures graves<br />
pourraient survenir.<br />
La bouton de la bouffée de vapeur est<br />
pratique lors du repassage du denim, du<br />
coton et du lin. Il produit des bouffées<br />
soudaines de vapeur qui peuvent aider<br />
à éliminer les plis rebelles.<br />
La fonction de bouffée de vapeur peut<br />
être utilisée au besoin dans le cadre du<br />
repassage à sec ou à la vapeur.<br />
1. Assurez-vous que le réservoir à eau<br />
est au moins à demie rempli.<br />
Fig. 4<br />
REMARQUE: si le réservoir se vide,<br />
débranchez le fer de la prise électrique.<br />
Remplissez ensuite le réservoir d’eau et<br />
amorcez la pompe de nouveau. Le fer<br />
peut être rempli pendant qu’il est chaud.<br />
ATOMISEUR D’EAU<br />
L’atomiseur d’eau aide à éliminer les<br />
plis rebelles dans les tissus. Appuyez<br />
sur le bouton de vaporisation et un jet<br />
d’eau humectera le tissu. (Fig.. 5)<br />
L’atomiseur d’eau peut être utilisé au<br />
besoin dans le cadre du repassage à<br />
sec ou à la vapeur.<br />
Fig. 5<br />
Fig. 1<br />
1. Turn temperature dial to “MIN” and<br />
slide the variable steam control lever<br />
all the way down.<br />
2. Plug the cord into a polarized, 120V<br />
AC electrical outlet. The power “ON”<br />
light will come on, indicating that the<br />
iron is receiving power.<br />
3. Turn the temperature dial to the<br />
desired setting. (See “Ironing Guide”<br />
for a guide to temperature selection.)<br />
4. Place iron on its stand (on a stable,<br />
protected surface) while iron is<br />
warming to desired temperature.<br />
STEAM IRONING<br />
WARNING! DO NOT aim iron at face,<br />
towards yourself, or anyone else<br />
while using or adjusting steam.<br />
Burns or serious injury may occur.<br />
CAUTION: Never fill the iron with<br />
fabric conditioner, starches or any<br />
other liquid, as these will damage the<br />
steam mechanism. Do not use<br />
contaminated water.<br />
1. Turn temperature dial to “MIN” and<br />
slide lever all the way to the left.<br />
2. Holding the iron at a slight angle,<br />
pour water slowly into the water<br />
filling inlet. ( Fig. 2) Fill tank to<br />
desired level or to the “MAX” water<br />
level marking using the water filling<br />
flask. (When the iron is upright, the<br />
blue, see-through water tank allows<br />
you to gauge the amount of water.)<br />
DO NOT overfill the tank.<br />
Fig. 2<br />
3. Plug the cord into a polarized, 120V<br />
AC electrical outlet.<br />
33<br />
6