
You also want an ePaper? Increase the reach of your titles
YUMPU automatically turns print PDFs into web optimized ePapers that Google loves.
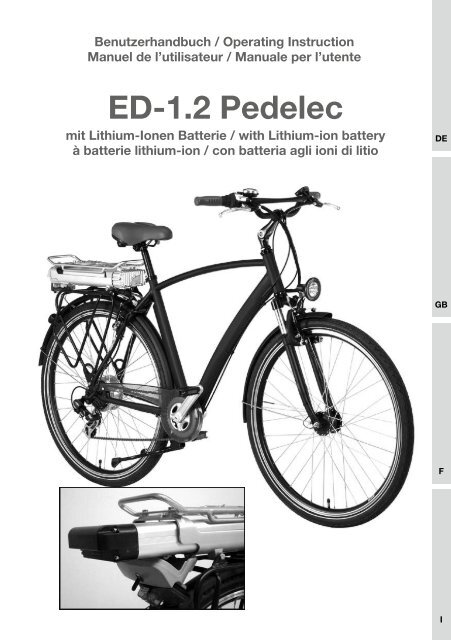
Benutzerhandbuch / Operating Instruction<br />
Manuel de l’utilisateur / Manuale per l’utente<br />
<strong>ED</strong>-<strong>1.2</strong> <strong>Pedelec</strong><br />
mit Lithium-Ionen Batterie / with Lithium-ion battery<br />
à batterie lithium-ion / con batteria agli ioni di litio<br />
DE<br />
GB<br />
F<br />
I
Quickstart!<br />
Auch wenn Sie es kaum erwarten können Ihr<br />
neu erworbenes <strong>ED</strong>-<strong>1.2</strong> <strong>Pedelec</strong> zu benutzen<br />
müssen wir Sie bitten, die folgenden Schritte<br />
unbedingt vor Antritt der ersten Fahrt zu<br />
befolgen.<br />
Das <strong>ED</strong>-<strong>1.2</strong> <strong>Pedelec</strong> fährt mit einer<br />
Lithium-Ionen Batterie. Eine neue <strong>ED</strong>-<br />
<strong>1.2</strong> <strong>Pedelec</strong> Batterie befindet sich im<br />
„Liefermodus“, d.h. die Batterie-interne<br />
Elektronik ist fast völlig abgeschaltet und<br />
die Batterie gibt keinen Strom ab.Um<br />
die Batterie zu aktivieren belassen Sie<br />
diese in der Aufnahme und schließen<br />
sie das mitgelieferte Ladegerät an. Nach<br />
ca. 30 sec. ist die Elektronik wieder voll<br />
eingeschaltet. Bitte überprüfen sie nun den<br />
aktuellen Ladezustand durch drücken der<br />
Taste der L<strong>ED</strong>-Anzeige an Ihrer Batterie.<br />
• Laden Sie nun die Batterie zunächst voll auf!<br />
Bitte nur das original PanTerra Lithium-<br />
Ionen Ladegerät verwenden.<br />
• Einstellung von Lenker und Sattel<br />
vornehmen, Antrieb und Bremse auf<br />
Funktionsbereitschaft überprüfen und alle<br />
Schrauben, insbesondere die Radmuttern<br />
auf festen Sitz prüfen.<br />
• Das System links am Lenker einschalten:<br />
Einschalter „I“ am Bedien-Panel drücken.<br />
Das <strong>ED</strong>-<strong>1.2</strong> <strong>Pedelec</strong> ist jetzt fahrbereit.<br />
• Beginnen Sie mit den Pedalen zu treten.<br />
Nach einer halben Umdrehung der Pedale<br />
wird der Motor aktiviert.<br />
• Fahren Sie zum ersten Mal, bitten wir Sie<br />
abseits belebter Straßen alle 4 Fahrmodi<br />
auszuprobieren.<br />
• Es gibt 4 Fahrmodi. Modus 1–3 begrenzt den<br />
Fahrstrom. Dadurch lässt sich die Reichweite<br />
erhöhen.<br />
• Am Ende der Fahrt das System links durch<br />
Drücken von „I“ abschalten.<br />
• Das <strong>Pedelec</strong> fährt Sie auch mit leerer<br />
Fahrbatterie wie ein gewöhnliches Fahrrad<br />
nach Hause. Die Batterieelektronik verhindert<br />
eine Tiefentladung der Fahrbatterie und der<br />
Motor hat einen Freilauf.<br />
• Bei längerer Nichtbenutzung die Fahrbatterie<br />
nach 3 Monaten spätestens wieder voll<br />
aufladen.<br />
• Bitte beachten Sie die allgemeinen<br />
Sicherheitshinweise und halten Sie sich an<br />
die Straßen-Verkehrsregeln.<br />
• Nehmen Sie Rücksicht auf die anderen<br />
Verkehrsteilnehmer und tragen Sie zu Ihrer<br />
eigenen Sicherheit einen Helm.<br />
Wir wünschen Ihnen viel Freude<br />
bei der Fahrt mit dem <strong>ED</strong>-<strong>1.2</strong> <strong>Pedelec</strong>!<br />
Die Elektronik schaltet jedoch nach ca.<br />
8 Min. Inaktivität zur Energieeinsparung<br />
selbständig ab! Geschieht das, einfach aus<br />
und wieder einschalten.<br />
2
<strong>ED</strong>-<strong>1.2</strong> <strong>Pedelec</strong> mit Lithium-Ionen Batterie<br />
Inhalt<br />
Quickstart!......................................................... 2<br />
Willkommen!..................................................... 4<br />
Allgemeine Sicherheitshinweise........................ 5<br />
Ihr <strong>ED</strong>-<strong>1.2</strong> <strong>Pedelec</strong> und seine Bauteile............. 5<br />
Richtiges Verhalten im Straßenverkehr............. 6<br />
Bestimmungsgemäße Verwendung.................. 7<br />
Bestimmungen zur Sachmängelhaftung........... 7<br />
Grenzen der Sachmängelhaftung..................... 7<br />
Geltendmachung der Sachmängelhaftung....... 8<br />
Ausschluss der Sachmängelhaftung................ 8<br />
Inbetriebnahme des <strong>ED</strong>-<strong>1.2</strong> <strong>Pedelec</strong>s.............. 8<br />
Inbetriebnahme der Fahrbatterie...................... 8<br />
Aus- und Einbau der Batterie............................ 9<br />
Laden der Fahrbatterie:.................................. 10<br />
Einstellungen vor Fahrtantritt.......................... 12<br />
Lenker und Lenkervorbau............................... 12<br />
„Ahead“ Vorbau.............................................. 13<br />
Bremse............................................................ 13<br />
Hinterrad-Rücktrittbremse.............................. 13<br />
Pedale............................................................. 13<br />
Tretkurbeln...................................................... 14<br />
Lenkungslager................................................. 14<br />
Speichen......................................................... 14<br />
Schnellspanner............................................... 14<br />
Reifen und Felgen........................................... 15<br />
Felgen............................................................. 15<br />
Kettenspannung.............................................. 15<br />
Drehmomentvorgaben ................................... 15<br />
Bedienung des <strong>Pedelec</strong> Antriebs.................... 16<br />
Empfohlene Fahrweise.................................... 16<br />
Reichweite und bestimmende Faktoren......... 16<br />
Bedienung allgemein...................................... 17<br />
Schaltung........................................................ 17<br />
Kettenschaltung.............................................. 17<br />
Nabenschaltung mit Rücktrittbremse............. 17<br />
Bremsen.......................................................... 17<br />
Rücktrittbremse.............................................. 18<br />
Handbremsen ................................................ 18<br />
V-Brake Bremse.............................................. 18<br />
Hydraulikbremse............................................. 18<br />
Rollenbremse.................................................. 18<br />
Scheibenbremse............................................. 18<br />
Lastentransport............................................... 19<br />
Pflegehinweise................................................ 19<br />
Allgemeine Pflegehinweise............................. 20<br />
Erhalt im Winter............................................... 20<br />
Ausbau des Vorderrades................................. 20<br />
Einbau............................................................. 21<br />
Batterie-Rückgabe/-Recycling........................ 21<br />
Technische Daten ........................................... 22<br />
Störungen/Ursachen/Behebung..................... 22<br />
EG-Konformitätserklärung.............................. 23<br />
DE<br />
3
Willkommen!<br />
PanTerra – intelligent electric!<br />
Sehr geehrte Kundin – sehr geehrter Kunde,<br />
vielen Dank, dass Sie sich mit dem <strong>ED</strong>-<br />
<strong>1.2</strong> <strong>Pedelec</strong> für ein Modell mit PanTerra<br />
Antriebstechnologie entschieden haben! Durch<br />
diesen Antrieb wird eine leichte, alternative<br />
Mobilität technisch möglich. So haben Sie<br />
Teil an dieser zukunftsorientierten Form der<br />
umweltschonenden Art der Fortbewegung!<br />
Das Elektrofahrrad <strong>ED</strong>-<strong>1.2</strong> ist ein so genanntes<br />
<strong>Pedelec</strong> 1 , d.h. der elektrische Zusatzantrieb<br />
unterstützt Sie bis zu einer Geschwindigkeit von<br />
25 km/h bei gleichzeitigem Treten der Pedale.<br />
Das <strong>Pedelec</strong> entspricht in seiner technischen<br />
Ausführung der europäischen Norm EN15194 für<br />
elektromotorisch unterstütze Fahrräder und der<br />
europäischen Fahrradnorm EN 14764.<br />
Wenn Sie die zahlreichen Ratschläge, die in<br />
diesem Handbuch zusammengestellt wurden,<br />
befolgen, werden Sie Ihr <strong>Pedelec</strong> in einem<br />
optimalen Zustand erhalten können und damit<br />
selbst viel zur eigenen Sicherheit beitragen.<br />
Dieses Benutzerhandbuch gilt für<br />
unterschiedliche Ausstattungsvarianten<br />
des <strong>Pedelec</strong>s. Rahmenform und<br />
Schaltungsausführung können variieren.<br />
Beachten Sie dann bitte nur die Abschnitte,<br />
die auf Ihr Fahrrad zutreffen.<br />
Die Zeichnungen und Fotos dienen der<br />
Prinzipdarstellung und erheben keinen Anspruch<br />
alle Varianten richtig wiederzugeben.<br />
Lassen Sie sich elektrisieren!<br />
Eine Helmpflicht besteht nicht. Wir empfehlen<br />
jedoch zu Ihrer eigenen Sicherheit bei der Fahrt<br />
stets einen Fahrradhelm zu tragen! Das von<br />
Ihnen erworbene Qualitätserzeugnis wird Ihnen<br />
viel Freude bringen. Ob zum Einkaufen, für<br />
den Weg zur Arbeit, zur Freizeitgestaltung, für<br />
Ausflüge oder als Begleiter im Urlaub.<br />
Große Sorgfalt legen wir schon in die<br />
Konstruktion und der Auswahl der<br />
Komponenten, damit auch Sie zu der<br />
begeisterten Gruppe der „elektrifizierten“<br />
Radfahrer gehören können!<br />
In der Betriebsanleitung haben wir alle<br />
Stellen, die Ihre Sicherheit betreffen, mit<br />
diesem Zeichen versehen. Geben Sie alle<br />
Sicherheitsanweisungen auch an andere<br />
Benutzer Ihres Fahrrades weiter!<br />
1 Der Begriff <strong>Pedelec</strong> besteht aus den Worten Pedal,<br />
Electric und Cycle und beschreibt einen besonderen<br />
Typ Elektrofahrrad, der sich vom so genannten E-Bike<br />
insofern absetzt, da von Gesetz her festgelegt ist, dass<br />
sein Zusatzantrieb nur gleichzeitig mit dem Pedalantrieb<br />
wirken darf.<br />
4
<strong>ED</strong>-<strong>1.2</strong> <strong>Pedelec</strong> mit Lithium-Ionen Batterie<br />
Ihr <strong>ED</strong>-<strong>1.2</strong> <strong>Pedelec</strong> und seine Bauteile<br />
Fahrbatterie<br />
Statusanzeige der Fahrbatterie<br />
Verriegelung der Fahrbatterie<br />
Motorsteuerung (Elektronik)<br />
Lade-Eingangsbuchse<br />
Kurbel mit Drehsensor<br />
Nabenmotor<br />
Motorstecker-Abdeckung<br />
Lenker-Bedienelemente<br />
<br />
<br />
<br />
<br />
<br />
<br />
DE<br />
<br />
<br />
<br />
Allgemeine<br />
Sicherheitshinweise<br />
Verkehrssicherheit<br />
Laut Vorschriften der StVZO müssen <strong>Pedelec</strong>s<br />
wie Fahrräder folgenden gesetzlichen<br />
Mindestanforderungen entsprechen:<br />
• Zwei voneinander unabhängig<br />
funktionsfähige Bremsen<br />
• Eine hell tönende Glocke<br />
• Dynamo (Nennspannung 6V und<br />
Nennleistung 3 Watt) mit Prüfzeichen<br />
„K - - - “,<br />
• Vorne eine Lampe mit weißem Licht<br />
• Einen weißen reflektierenden Frontstrahler<br />
• Hinten ein Rücklicht mit rotem Licht,<br />
angebracht höher als 25cm über der<br />
Fahrbahnoberfläche<br />
• Einen roten Rückstrahler, nicht höher als<br />
60cm über der Fahrbahn<br />
5
• Einen roten großflächigen Rückstrahler mit<br />
dem Buchstaben Z<br />
• Pedalen mit nach vorn und hinten wirkenden<br />
gelben Rückstrahlern mit Prüfzeichen<br />
„K - - - “.<br />
• Je zwei gelbe reflektierende Strahler<br />
in Vorderrad und Hinterrad oder weiße<br />
reflektierende Seitenstreifen vorn und hinten<br />
an Reifen bzw. Felgen.<br />
• Jedes Teil der Beleuchtungseinrichtung<br />
muss mit dem Prüfzeichen „K - - - “<br />
gekennzeichnet sein.<br />
Denken Sie daran:<br />
• Funktionsprüfung vor jeder Fahrt!<br />
• Verbogene sicherheitsrelevante Teile,<br />
wie Rahmen, Gabel, Lenker, Tretkurbel,<br />
Sattelstützen, Schutzblechstreben und<br />
Pedale keinesfalls richten, sondern<br />
umgehend austauschen. Es besteht<br />
Bruchgefahr!<br />
• Nur Originalersatzteile verwenden!<br />
Achtung!: Durch unsachgemäße<br />
Reparaturen entstehen Gefahren<br />
für den Benutzer und der<br />
Sachmängelhaftungsanspruch erlischt!<br />
Richtiges Verhalten im Straßenverkehr<br />
• Benutzen Sie, sofern vorhanden,<br />
Radfahrwege.<br />
• Fahren Sie immer ganz rechts, überholen Sie<br />
links.<br />
• Vor jedem Abbiegen geben Sie deutlich mit<br />
ausgestrecktem Arm Zeichen.<br />
• Fahren Sie immer in der vorgegebenen<br />
Fahrtrichtung.<br />
• Passen Sie Ihre Fahrgeschwindigkeit den<br />
Witterungsbedingungen an, eine nasse<br />
Fahrbahn verlängert Ihren Bremsweg!<br />
• Nachts und bei schlechten Sichtverhältnissen<br />
nur mit eingeschalteter Beleuchtung fahren.<br />
• Nehmen Sie Rücksicht auf Pflanzen und<br />
Tiere, falls Sie abseits der Straße fahren.<br />
• Schützen Sie Ihren Kopf, indem Sie einen<br />
geprüften Fahrradhelm (nach DIN-EN 1078)<br />
tragen!<br />
• Beim Fahrradfahren keine Musik über<br />
Kopfhörer (z.B. Walkman, MP3-Player)<br />
empfangen!<br />
• Tragen Sie zweckmäßige Kleidung (enge<br />
Beinkleider, ggf. Hosenklammern, festes<br />
Schuhwerk), bei Dunkelheit und ungünstiger<br />
Witterung reflektierende Kleidung.<br />
• Bei weiten Röcken und langen Mänteln nur<br />
mit Mantelschoner fahren.<br />
• Achtung: Bei Nässe lässt die Wirkung von<br />
Bremsen und Dynamo nach! Stellen Sie Ihre<br />
Fahrweise darauf ein.<br />
Unfallgefahren:<br />
Freihändig Fahren und das Anhängen an<br />
andere Fahrzeuge ist lebensgefährlich und<br />
verboten.<br />
Nebeneinander Fahren behindert den<br />
Verkehr, vermeiden Sie es deshalb.<br />
Nie zu zweit auf einem Fahrrad fahren<br />
(Ausnahme: Mitführen eines Kindes auf<br />
speziellem Kindersitz).<br />
Sorgfältiger Umgang mit dem <strong>Pedelec</strong><br />
• Vor dem Transport des Fahrrades am<br />
oder auf dem Auto alle Teile, die sich<br />
durch den Transport lösen können<br />
(Akku, Werkzeugtasche, Gepäckkörbe,<br />
Gepäcktaschen, Pumpen, Kindersitze etc.)<br />
entfernen!<br />
Belastung des <strong>Pedelec</strong>s<br />
• Die zulässige Gesamtbelastung (Fahrer und<br />
Gepäck) für das <strong>Pedelec</strong> beträgt 120 kg.<br />
6
<strong>ED</strong>-<strong>1.2</strong> <strong>Pedelec</strong> mit Lithium-Ionen Batterie<br />
• Die zulässige Belastung des Gepäckträgers<br />
entnehmen Sie bitte dem auf dem<br />
Gepäckträger angegebenen Wert.<br />
• Ist Ihr Fahrrad mit einem Frontkorb<br />
ausgestattet so beträgt die zulässige<br />
Zuladung hier 5kg.<br />
Bremsverhalten<br />
• In engen Kurven, sandigen und rutschigen<br />
Straßen, nassem Asphalt und bei Glatteis<br />
sollte mit der Vorderradbremse vorsichtig<br />
gebremst werden, damit das Vorderrad nicht<br />
wegrutscht und das <strong>Pedelec</strong> lenkbar bleibt!<br />
• Die Bremsen müssen mit Gefühl betätigt<br />
werden. Blockierende Räder haben eine<br />
geringere Bremswirkung und können zum<br />
Schleudern und Sturz führen!<br />
• Grundsätzlich nicht in, sondern vor den<br />
Kurven bremsen; Bremsen erhöht die<br />
Rutschgefahr!<br />
• Die am Lenker befestigten Bremshebel<br />
müssen immer fest sitzen. Diese regelmäßig<br />
auf festen Sitz prüfen und gegebenenfalls<br />
nachziehen.<br />
• Arbeiten an der Bremsanlage nur von den<br />
Fachhändlern durchführen lassen!<br />
Bestimmungsgemäße Verwendung<br />
• Ihr <strong>Pedelec</strong> ist aufgrund seiner Konzeption<br />
und Ausstattung dazu bestimmt, auf<br />
öffentlichen Straßen und befestigten Wegen<br />
wie ein Fahrrad eingesetzt zu werden.<br />
• Die sicherheitstechnische Ausstattung muss<br />
vom Benutzer regelmäßig überprüft und falls<br />
erforderlich, instand gesetzt werden.<br />
• Bei Nichteinhaltung der<br />
sicherheitstechnischen Hinweise<br />
dieser Bedienungsanleitung und für die<br />
daraus resultierenden Schäden haftet<br />
der Hersteller nicht. Insbesondere gilt<br />
dies bei der Benutzung des <strong>Pedelec</strong><br />
im Gelände, bei Überladung und nicht<br />
ordnungsgemäßer Beseitigung von Mängeln.<br />
Bei diesen Nutzungen besteht keine<br />
Sachmängelhaftung.<br />
Beachten Sie auch alle weiteren in diesem<br />
Handbuch aufgeführten Montage-, Wartungsund<br />
Pflegehinweise sowie die Angaben der<br />
Schaltungshersteller.<br />
Bestimmungen zur<br />
Sachmängelhaftung<br />
Grundsätzlich besteht die gesetzliche<br />
24-monatige Sachmängelhaftung. Der<br />
Hersteller leistet auf etwaige Material- und<br />
Konstruktionsfehler an Ihrem <strong>Pedelec</strong> unter<br />
folgenden Voraussetzungen Gewähr:<br />
• Ihren Anspruch auf Sachmängelhaftung<br />
können Sie nur unter Vorlage des<br />
Übergabeprotokolls und des Kaufbeleges<br />
geltend machen.<br />
• Der Zeitraum der Sachmängelhaftung<br />
beginnt mit dem Tage des Kaufes.<br />
• Findet während dieses Zeitraums ein<br />
Eigentümerwechsel statt, muss dieser auf<br />
dem Übergabeprotokoll vermerkt sein.<br />
Garantie des Batteriepacks:<br />
6 Monate<br />
Der Erhalt der Leistungsfähigkeit der<br />
Fahrbatterie unterliegt verschiedenen<br />
Bedingungen. Es wird innerhalb der 6 Monate<br />
nach dem Kauf genau geprüft, ob normaler<br />
Verschleiß, unsachgemäße Verwendung oder ein<br />
durch Fertigungsmängel defektes Batteriepack<br />
zum Ausfall führte.<br />
Grenzen der<br />
Sachmängelhaftung<br />
Die Sachmängelhaftung erlischt bei<br />
• nicht bestimmungsgemäßer oder<br />
unsachgemäßer Benutzung oder<br />
Beschädigung des <strong>Pedelec</strong>s durch einen<br />
Verkehrsunfall oder einen Sturz.<br />
DE<br />
7
• Schäden, die auf eine normale<br />
Abnutzung von Teilen, wie z. B. Reifen,<br />
Kette, Bowdenzüge und Bremsklötze<br />
zurückzuführen sind.<br />
• Schäden an Lack oder Chrom, die durch<br />
Wetter-, Feuchtigkeits- und Umwelteinflüsse<br />
(insbesondere salzhaltige Luft) sowie<br />
aggressive Ammoniakhaltige Umgebung<br />
entstanden sind.<br />
• mangelhafter, d.h. nicht wie in dieser<br />
Anleitung beschrieben durchgeführter<br />
Wartung des <strong>Pedelec</strong>s.<br />
• Reparaturen, die nicht vom<br />
Zweiradspezialisten durchgeführt wurden.<br />
• Änderungen am Antriebssystem, die<br />
außerhalb des Rahmens der technischen<br />
Standardspezifikation liegen.<br />
• bauliche Änderungen gegenüber dem<br />
Lieferzustand des <strong>Pedelec</strong>s.<br />
• einem Bruch der elektrischen Leiter, der nicht<br />
auf Konstruktionsfehler zurückzuführen ist.<br />
• Mängel durch Fremdeinwirkung.<br />
• Schäden durch Verwendung des <strong>Pedelec</strong>s<br />
bei Wettkämpfen.<br />
• nicht bestimmungsgemäßer Verwendung der<br />
Fahrbatterie.<br />
Geltendmachung der Sachmängelhaftung<br />
• Bitte wenden Sie sich im Schadensfall<br />
an Ihren Händler. Er wird jederzeit ein<br />
kompetenter Ansprechpartner sein.<br />
Inbetriebnahme<br />
des <strong>ED</strong>-<strong>1.2</strong> <strong>Pedelec</strong>s<br />
Die folgenden Kapitel des Benutzerhandbuchs<br />
für das <strong>ED</strong>-<strong>1.2</strong> <strong>Pedelec</strong> gehen davon aus,<br />
dass alle Fahrradtypischen ergonomischen<br />
Grundeinstellungen und notwendige<br />
Sicherheitsüberprüfungen bereits vorgenommen<br />
wurden:<br />
• Lenker und Sattel sind in die gewünschte<br />
Position gebracht und entsprechend fest<br />
angezogen worden.<br />
• Die Laufräder sind mit ausreichend<br />
Reifendruck versehen und deren<br />
Achsmuttern ebenfalls fest angezogen.<br />
• Bremsen und Pedalantrieb sind auf<br />
Funktion überprüft.<br />
• Die Beleuchtungsanlage ist funktionsbereit.<br />
Weiteres dazu im Kapitel<br />
„Einstellungen vor Fahrtantritt“.<br />
Inbetriebnahme der Fahrbatterie<br />
Entnehmen Sie nun die Fahrbatterie der<br />
Aufnahme am Gepäckträger. Prüfen Sie den<br />
Ladestand der Batterie. Drücken Sie dazu den<br />
Knopf am L<strong>ED</strong>-Display am hinteren Ende der<br />
Batterie unter dem Tragegriff. Die Abbildung<br />
zeigt die Situation an Ihrem <strong>Pedelec</strong>.<br />
Ausschluss der Sachmängelhaftung:<br />
• Ausgeschlossen von der Sachmängelhaftung<br />
sind Personenschäden oder Schäden<br />
an anderen Teilen als Originalteilen Ihres<br />
<strong>Pedelec</strong>s, sofern gesetzlich zulässig.<br />
8
<strong>ED</strong>-<strong>1.2</strong> <strong>Pedelec</strong> mit Lithium-Ionen Batterie<br />
Prüfen Sie jetzt den Ladezustand der<br />
Batterie durch Drücken der Taste an der<br />
L<strong>ED</strong>-Ladezustandsanzeige.<br />
Sollten nicht alle 5 L<strong>ED</strong> aufleuchten empfiehlt<br />
PanTerra die Batterie zunächst voll<br />
aufzuladen. Verbinden Sie dazu die Fahrbatterie<br />
mit dem mitgelieferten Ladegerät. Siehe Kapitel<br />
„Laden der Fahrbatterie“.<br />
• Achten Sie darauf, dass die Kontakte der<br />
Batterie (5) in die Kontakte des Akku-<br />
Controllers (4) gleiten. Die Batterie dazu<br />
mit sanftem Druck in den Batterieschacht<br />
schieben.<br />
Sollte der Verschlussdeckel sich nicht komplett<br />
schließen lassen, sitzt der Akku nicht komplett in<br />
den Kontakten des Controllers.<br />
Das Verriegeln des Schlüsselschalters (1)<br />
sorgt für einen sicheren Halt der Batterie,<br />
um Beschädigungen durch Erschütterungen<br />
zu vermeiden. Damit ist auch der optimale<br />
elektrische Kontakt der Batterie zur Elektronik im<br />
Controller gewährleistet.<br />
DE<br />
Lithium-Ionen Batterien weisen eine<br />
wesentlich niedrigere Selbstentladung als<br />
Nickel-Batterien auf und können daher<br />
ca. 3 Monate ohne Nachladen gelagert<br />
werden. Erfolgt aber nach dieser Zeit keine<br />
Nachladung, können dennoch Schäden am<br />
chemischen Aufbau der Zellen entstehen.<br />
Das beeinträchtigt die Leistungsfähigkeit<br />
der Batterie erheblich und kann zu ihrer<br />
Unbrauchbarkeit führen.<br />
(1)<br />
offen<br />
Schlüssel<br />
(2)<br />
Aus- und Einbau der Batterie<br />
Entnahme der Batterie<br />
Zur Entnahme der Batterie gehen Sie wie folgt<br />
vor (siehe Abbildungen):<br />
• Schlüsselschalter nach links drehen<br />
und die Verriegelung öffnen (1)<br />
• Verschlussdeckel öffnen (2)<br />
• Batterie an der Griffmulde aus dem<br />
Batterieschacht herausziehen (3)<br />
Beim Wiedereinsetzen gehen Sie in umgekehrter<br />
Reihenfolge vor.<br />
9
(3)<br />
Griffmulde<br />
(4)<br />
Kontakte<br />
(5)<br />
Laden der Fahrbatterie:<br />
Das <strong>ED</strong>-<strong>1.2</strong> <strong>Pedelec</strong> fährt mit einer 37V 8,8Ah<br />
Lithium-Ionen Batterie. Es werden dazu dazu<br />
hochwertige Markenzellen verwendet, die zu<br />
einem 37V-Zellenpaket verbunden sind. Darüber<br />
hinaus enthält die Batterie eine Schutzelektronik,<br />
die Tiefentladung und Überladung verhindert.<br />
Vermeiden Sie die Lagerung einer vollständig<br />
leeren Batterie über Wochen. Verwenden<br />
Sie immer nur das mitgelieferte hochwertige<br />
Lithium-Ionen Ladegerät (siehe Abb.) zum<br />
Aufladen Ihrer Fahrbatterie. Das originale<br />
Ladegerät arbeitet mit CC-CV 1 Technik.<br />
Im Zusammenspiel mit der Batterie-<br />
Schutzelektronik wird gewährleistet, dass die<br />
Batterie zu keiner Zeit durch falsche Ladeströme<br />
beschädigt oder überladen werden kann.<br />
Das Ladegerät ist nur für den Innenbereich<br />
bestimmt und sollte nicht Wasser oder Staub<br />
ausgesetzt werden. Lesen Sie die beiliegende<br />
Bedienungsanleitung des Ladegerätes vor dem<br />
ersten Gebrauch. Entnehmen Sie das Ladegerät<br />
dem Karton, lösen Sie die Kabelbündelung und<br />
schließen Sie es an der Fahrbatterie befindlichen<br />
Ladebuchse an (siehe Abb.). Die Batterie kann<br />
auch am Fahrrad geladen werden.<br />
Ladebuchse<br />
Kontakte am Akku<br />
Ihr <strong>Pedelec</strong> ist nun fahrbereit!<br />
1<br />
CC-CV = Constant Current – Constant Voltage:<br />
Zunächst wird mit kontrollierter Stromstärke<br />
schnell geladen und die Batteriespannung steigt.<br />
Beim Erreichen der maximalen Kapazität wird die<br />
Stromstärke reduziert und nur noch mit exakter maximal<br />
vorgegebener Spannung die Restkapazität aufgefüllt.<br />
10
<strong>ED</strong>-<strong>1.2</strong> <strong>Pedelec</strong> mit Lithium-Ionen Batterie<br />
Laden der<br />
Batterie extern<br />
Batterie<br />
Original<br />
Ladegerät<br />
Zum Laden bitte zuerst die Batterie anschließen,<br />
dann den Netzstecker einstecken.<br />
Bei Konstantstrom-Ladung leuchtet die<br />
Ladeanzeige rot (0–95% – ca. 4h).<br />
Nach Abschluss dieser Ladephase beginnt<br />
die Konstantspannungs-Ladung mit Zellen-<br />
Balancierung (95%–100% – ca. 1h). Die Anzeige<br />
blinkt grün.<br />
Nach Abschluss der Ladung leuchtet die<br />
Ladeanzeige Dauerlicht grün. Die Batterie ist nun<br />
fahrbereit.<br />
Für die optimale Zellen-Balancierung belassen<br />
Sie das Ladegerät jede zehnte volle Ladung<br />
weitere 2h an der Batterie.<br />
Um die Ladung zu beenden trennen Sie zuerst<br />
den Netzstecker, dann die Batterie.<br />
Kurzschlussgefahr! Achten Sie darauf,<br />
dass keine metallischen Gegenstände in<br />
die Nähe der Kontakte der Batterie und<br />
des Ladesteckers kommen. Bei zu hohen<br />
oder zu tiefen Temperaturen (unter -10<br />
°C und über +40 °C) soll die Batterie nicht<br />
geladen werden. Wir empfehlen, das<br />
Fahrrad während des Ladens nicht in voller<br />
Sonneneinstrahlung stehen zu lassen.<br />
Langzeit-Erhaltungsladung<br />
Lithium-Ionen Batterien erhalten keine Langzeit-<br />
Erhaltungsladung. Ihre Selbstentladung ist zu<br />
gering und die Ladegeräte sehen das nicht vor.<br />
Es ist daher wenig sinnvoll die Batterie speziell<br />
im Winter oder bei langer Abwesenheit immer<br />
an das Ladegerät anzuschließen. Es würde<br />
durch die Batterieschutzelektronik zwar keinen<br />
Schaden anrichten, jedoch das Ladegerät als<br />
Verbraucher voll durchlaufen.<br />
Wir empfehlen daher bei längerer Nichtnutzung<br />
des <strong>Pedelec</strong> alle 3 Monate die Lithium-Ionen<br />
Batterie wieder aufzuladen.<br />
DE<br />
Ladegerät-L<strong>ED</strong>:<br />
Grün Dauerlicht:<br />
Rot Dauerlicht:<br />
Grün blinkend:<br />
Grün Dauerlicht:<br />
Modus:<br />
Stand-by / keine Batterie<br />
Haupt-Ladung<br />
(CC) 0–95%<br />
Abschlussladung<br />
(CV) 95–100%<br />
Ladung abgeschlossen/<br />
Zellen-Balancierung<br />
Elektrische Geräte sollten über einen<br />
längeren Zeitraum nicht unbeaufsichtigt<br />
am Netz angeschlossen sein. Daher<br />
sollten Sie während des Urlaubs oder<br />
längerer Abwesenheit den Netzstecker<br />
herausziehen.<br />
11
Einstellungen vor Fahrtantritt<br />
Prüfen Sie vor jeder Fahrt ob<br />
• alle Schrauben, die Laufradmuttern bzw. der<br />
Schnellspanner fest sind und die Bremsen<br />
funktionieren,<br />
• der Luftdruck der Bereifung ausreicht,<br />
• die Beleuchtungsanlage intakt ist,<br />
• die Glocke in Ordnung ist.<br />
Neigung zur Sitzfläche und Abstand zum<br />
Lenker:<br />
• Mutter Sattelkloben bzw. Innen-<br />
Sechskantschraube (Abb., Pos. 2) lösen<br />
• Sattel vor- oder zurückschieben<br />
• Sattel neigen<br />
• Mutter bzw. Innen-Sechskantschraube<br />
festziehen<br />
Sattel und Lenker<br />
Ihr Fahrrad ist durch den Fachhändler fahrfertig<br />
montiert, Lenker und Sattelposition auf Ihre<br />
Körpermaße eingestellt.<br />
Beim Einstellen der Sattel- und Lenkerhöhe<br />
auf die Markierung der Mindesteinstecktiefe an<br />
Lenkervorbau-Schaft und Sattelstütze achten<br />
und niemals den Lenker oder Sattel über die<br />
Markierung herausziehen!<br />
Sattel<br />
Der Sattel ist in drei Richtungen verstellbar:<br />
Höhe, Neigung und Abstand zum Lenker.<br />
Höhe:<br />
• Sattelklemmbolzen bzw. Schnellspanner<br />
(Abb., Pos. 1) lösen<br />
• Sattelstütze heraus- oder hineinbewegen<br />
• Nach dem Einstellen Klemmung gut<br />
festziehen.<br />
Sie haben die Sattelhöhe für Ihre Körpergröße<br />
richtig eingestellt, wenn Sie, auf dem Sattel<br />
sitzend, mit beiden Fußspitzen den Boden<br />
berühren.<br />
Achtung! Die Sattelstütze muss<br />
mindestens bis zur Markierung<br />
eingeklemmt bleiben. Sonst besteht Bruch<br />
– und damit Sturzgefahr! Ledersättel<br />
können bei der ersten Benutzung und beim<br />
Feuchtwerden auf Kleidung abfärben.<br />
Durch häufiges Verstellen der Sattelhöhe<br />
verkratzt die Oberfläche der Sattelstütze<br />
durch die mechanische Bewegung.<br />
Diese Beschädigung fällt unter den<br />
normalen Verschleiß und stellt keinen<br />
Sachmängelhaftungsfall dar.<br />
Lenker und Lenkervorbau<br />
Der Lenker kann wie folgt verstellt werden<br />
Achtung! Nach einem Sturz auf den Lenker<br />
müssen Lenker und Vorbau erneuert<br />
werden. Unsichtbare Mikro-Risse bedeuten<br />
Bruch- und damit Sturzgefahr!<br />
Höhe einstellen:<br />
• Mutter bzw. Innen-Sechskantschraube der<br />
Klemmspindel lösen (Abb., Pos.1).<br />
12
<strong>ED</strong>-<strong>1.2</strong> <strong>Pedelec</strong> mit Lithium-Ionen Batterie<br />
• Mit einem leichten Hammerschlag die<br />
Spindel lockern und die richtige Lenkerhöhe<br />
einstellen.<br />
• Anschließend Klemmspindel festziehen.<br />
„Ahead“ Vorbau<br />
Diesen Vorbau kann man nicht in der Höhe<br />
verstellen!<br />
DE<br />
Achtung!: Achten Sie wieder auf die<br />
Markierung, die keinesfalls aus dem<br />
Steuerrohr ragen darf. Bruch – und damit<br />
Sturzgefahr!<br />
Durch häufiges Verstellen der Lenkerhöhe<br />
kann die Oberfläche verkratzt werden.<br />
Diese Beschädigung fällt unter den<br />
normalen Verschleiß und kann keinen<br />
Sachmängelhaftungsanspruch darstellen.<br />
Neigung des Lenkers einstellen<br />
– Lösen der Verschraubung (Abb., Pos.2)<br />
– Drehen in die richtige Position<br />
– Festziehen der Verschraubung.<br />
Winkelverstellbarer Lenkervorbau<br />
Mit diesem Vorbau sind Sie noch flexibler bei<br />
der Einstellung der Lenkerposition:<br />
Bremse<br />
Vor jeder Fahrt muss die Funktionsfähigkeit der<br />
Bremsanlage überprüft werden. Die Einstellung<br />
der Bremsen nur vom Fachhändler durchführen<br />
lassen.<br />
Das erforderliche Nachstellen der Bremsen ist<br />
an dem immer größer werdendem Leerweg<br />
des Handbremshebels zu erkennen, d.h.<br />
durch die Abnutzung der Bremsgummis lässt<br />
sich der Bremsgriff immer dichter an den<br />
Lenkergriff heranziehen. Regelmäßig muss<br />
dies ausgeglichen werden. Die Bremsgummis<br />
sind Verschleißteile und unterliegen nicht der<br />
Sachmängelhaftung.<br />
Hinterrad-Rücktrittbremse<br />
Diese Bremse ist einstellfrei. Beachten Sie, dass<br />
die Bremse unwirksam wird sobald die Kette<br />
einen Defekt hat oder abgesprungen ist.<br />
Einstellung<br />
• Lösen der Verschraubung.<br />
• Drehen Sie den Lenker in die gewünschte<br />
Position.<br />
• Festziehen der Verschraubung.<br />
Pedale<br />
Die Pedale müssen jederzeit fest angezogen<br />
sein. Achten Sie beim Montieren bzw.<br />
Demontieren (z.B. zu Transportzwecken) darauf,<br />
dass Pedale zweierlei Gewinde haben. Die<br />
Gewinde an Pedale und Tretkurbel sind sehr<br />
hohen Kräften ausgesetzt. Sie halten nur, wenn<br />
die Pedale fest angezogen sind.<br />
Das rechte Pedal (Kettenseite) ist am Achs-Ende<br />
mit „R“ gekennzeichnet und hat Rechtsgewinde.<br />
Das linke Pedal ist am Achs-Ende mit „L“<br />
13
gekennzeichnet und hat Linksgewinde. Das<br />
rechte Pedal muss daher in Uhrzeigerrichtung,<br />
das linke Pedal in entgegen gesetzter Richtung<br />
eingeschraubt werden.<br />
Tretkurbeln<br />
Die Tretkurbeln sind mit Innen-Sechskant- bzw.<br />
Sechskantschrauben auf den Vierkantansätzen<br />
der Tretlagerachse befestigt. Der feste Sitz der<br />
Tretkurbel ist regelmäßig zu prüfen, entfernen<br />
Sie die Schutzkappen und ziehen anschließend<br />
die darunter liegenden Schrauben fest.<br />
Lenkungslager<br />
Prüfung:<br />
Betätigen Sie den Bremsgriff und schieben<br />
Sie das Fahrrad vor und zurück. Ist durch<br />
nutzungsbedingten Verschleiß Spiel vorhanden,<br />
muss das Lager unverzüglich eingestellt<br />
werden. Lassen Sie das Einstellen durch eine<br />
Fachwerkstatt erledigen.<br />
Speichen<br />
Durch die Benutzung dehnen und entspannen<br />
sich die Speichen. Sie müssen gemäß dem<br />
Grad der Nutzung regelmäßig zentriert<br />
werden. Überlassen Sie das Zentrieren des<br />
Laufrades und Spannen der Speichen einer<br />
Fachwerkstatt. Eine gleichmäßige und stramme<br />
Speichenspannung ist für den Rundlauf<br />
der Räder erforderlich. Lose Speichen,<br />
ungleichmäßige Spannung oder Überlastung<br />
führen zu Speichenbrüchen.<br />
Schnellspanner<br />
Schnellspanner sind je nach Modell an Vorderund<br />
Hinterrad sowie zur Sattelrohrklemmung zu<br />
finden.<br />
Prüfen Sie vor Fahrtantritt den geschlossenen<br />
und festen Zustand. Sollten Sie bemerken,<br />
dass z.B. die Vorderradklemmung sich lockert,<br />
halten Sie umgehend an und ziehen den<br />
Schnellspanner fest.<br />
Der Schnellspannhebel hat 2 Positionen:<br />
CLOSE = ZU und OPEN = OFFEN.<br />
Stellen Sie zunächst mit der Mutter M die<br />
Festigkeit ein. Drücken Sie dann den Hebel mit<br />
etwas Kraft in die Position ZU.<br />
Achtung!Ein loses Laufrad, insbesondere<br />
Vorderrad, bedeutet höchste Sturzgefahr!<br />
14
<strong>ED</strong>-<strong>1.2</strong> <strong>Pedelec</strong> mit Lithium-Ionen Batterie<br />
Reifen und Felgen<br />
Der maximal zulässige Reifendruck ist auf den<br />
Seitenflanken der Bereifung angegeben. Fahren<br />
Sie nicht mit zu wenig Luft (Rad schwimmt) oder<br />
zuviel Luft (Schlauch platzt). Falscher Luftdruck<br />
führt zu erhöhtem Verschleiß, auch wenn das<br />
Fahrrad platt steht.<br />
Unsere Empfehlung:<br />
Reifengröße<br />
Luftdruck<br />
vorn hinten<br />
47-559 (26“x1,75x2) 2,5 3,0<br />
50-559 (26“x1,90) 2,0 2,5<br />
52-559 (26“x2,25x2) 2,0 2,5<br />
57-559 (26“x2,125) 2,0 2,5<br />
37-622 (28“x1 3/8x1 5/8) 3,5 4,0<br />
40-622 (28“x1 3/8) 3,0 3,5<br />
47-622 (28“x1,75x2) 2,5 3,0<br />
50-622 (28“x1,90) 2,5 3,0<br />
Für Fahrradschläuche existieren 3 Ventilsysteme.<br />
Beachten Sie bitte, dass beim Sclaverand<br />
Ventil zum Luft-Aufpumpen bzw. -Ablassen<br />
nach dem Abschrauben der Staubkappe (1) erst<br />
die Rändelmutter (2) gelöst werden muss.<br />
Achten Sie immer auf ausreichend Profil und<br />
eine unbeschädigte Karkasse der Reifen.<br />
Felgen<br />
Felgenverschleißindikator<br />
Viele Aluminiumfelgen sind mit einem<br />
Verschleißindikator ausgestattet. Lassen Sie sich<br />
vom Fachhändler die Bedeutung erklären.<br />
Vorsicht vor Felgen-Verschleiß! Prüfen<br />
Sie regelmäßig den Zustand Ihrer<br />
Felgen. Wenden Sie sich rechtzeitig<br />
an Ihren Fachhändler. BRUCH- und<br />
UNFALLGEFAHR!<br />
Kettenspannung<br />
Achten Sie auch darauf, dass die Kette als<br />
wichtigstes Antriebselement richtig gespannt<br />
ist. Durch eine nutzungsbedingte Dehnung der<br />
Kette ist eine regelmäßige Kontrolle notwendig.<br />
Lassen Sie die Kette gegebenenfalls von einen<br />
Fachhändler Nachspannen. Wie in Abb. 12<br />
dargestellt, sollte sich die Kette in der Mitte der<br />
beiden Kettenräder ca. 1,5 cm leicht auf- und ab<br />
bewegen lassen.<br />
DE<br />
Drehmomentvorgaben<br />
Achsmuttern:<br />
Vorderrad 20 Nm<br />
Hinterrad 25 Nm<br />
Tretkurbelbefestigung 30 Nm<br />
Bremsklotzbefestigung 5 Nm<br />
Dynamobefestigung 10 Nm<br />
15
Sonstige Schrauben:<br />
M4 2,1 Nm<br />
M5 4,2 Nm<br />
M6 7,3 Nm<br />
M8 17 Nm<br />
M10 34 Nm<br />
Bedienung des <strong>Pedelec</strong><br />
Antriebs<br />
Für die Bedienung der Fahrradfunktionen lesen<br />
Sie bitte Kapitel „Bedienung allgemein.“<br />
Am Lenker befindet sich links ein Bedien-Paneel<br />
zur Kontrolle des elektrischen Zusatzantriebs<br />
(siehe Abb.). Hier wird das <strong>ED</strong>-<strong>1.2</strong> <strong>Pedelec</strong><br />
ein- und ausgeschaltet sowie der gewünschte<br />
Fahrmodus aktiviert. Eine vierstufige L<strong>ED</strong><br />
links zeigt den Batterie Ladestand, d.h. die<br />
verbleibende Kapazität an.<br />
unteren Schalter können Sie in den 4 Fahrstufen<br />
wechseln. Diese begrenzen den Fahrstrom<br />
nach oben hin und helfen damit deutlich<br />
Batteriekapazität zu sparen. Der Zusatzantrieb<br />
des <strong>ED</strong>-<strong>1.2</strong> <strong>Pedelec</strong> startet automatisch nach<br />
einer halben Pedalumdrehung. Damit entspricht<br />
das <strong>ED</strong>-<strong>1.2</strong> <strong>Pedelec</strong> der europäischen Norm für<br />
diesen Fahrzeugtyp.<br />
Empfohlene Fahrweise<br />
Nach dem Einschalten des Systems wählen<br />
Sie den Fahrmodus aus und setzen das <strong>ED</strong>-<br />
<strong>1.2</strong> <strong>Pedelec</strong> durch Pedallieren in Bewegung.<br />
Es empfiehlt sich besonders an leichten<br />
Anstiegen mit den Füßen das <strong>Pedelec</strong> leicht<br />
nach vorne abzustoßen, damit der Motor nicht<br />
vom Stillstand hohe Antriebskräfte entwickeln<br />
muss. Er zöge dabei viel Strom und entwickelt<br />
zwischen 0–3 km/h noch keine großen Kräfte. Im<br />
Interesse der Reichweite sollten Sie aber in allen<br />
Fahrsituationen mit den Pedalen nach Kräften<br />
mit treten, da die Reichweite beim Fahren mit<br />
überwiegend Motorkraft deutlich unter den<br />
Möglichkeiten des Systems liegt. Der aktivierte<br />
Fahrmodus 1,2,3 begrenzt den maximalen<br />
Fahrstrom und spart damit Batteriekapazität ein.<br />
Die geringere Unterstützung werden Sie nur am<br />
Berg und in der Beschleunigung spüren.<br />
EIN / AUS-Schalter<br />
Kapazitätsanzeige<br />
Reichweite und bestimmende Faktoren<br />
Die Reichweite, die mit einem vollständig<br />
geladenen Akku erzielt werden kann wird<br />
deutlich bestimmt durch begleitende<br />
Faktoren wie Steigungen, Gegenwind,<br />
Fahrbahnbeschaffenheit, Reifendruck,<br />
Verwendung der Gangschaltung sowie<br />
Trittunterstützung und dem Gewicht des Fahrers.<br />
Bei einer durchschnittlichen Trittunterstützung<br />
des Fahrenden und vollständig geladenem Akku<br />
beträgt die typische Reichweite zwischen<br />
20 und 70 km.<br />
4-Mode<br />
Modus 1<br />
Modus 2<br />
Modus 3<br />
Modus 4<br />
bis zu 70 km<br />
bis zu 45 km<br />
bis zu 35 km<br />
bis zu 25 km<br />
Drücken Sie den mittleren Schalter ON/OFF<br />
um das System einzuschalten. Es leuchten ein<br />
bis vier L<strong>ED</strong> für den Status der Fahrbatterie<br />
und die L<strong>ED</strong> für den Fahrmodus auf. Mit dem<br />
16<br />
Es ist unmöglich, eine verbindliche<br />
Reichweitenangabe zu machen, da verschiedene<br />
Faktoren Einfluss auf die Unterstützungsleistung<br />
haben. Zunächst muss die Batterie optimal
<strong>ED</strong>-<strong>1.2</strong> <strong>Pedelec</strong> mit Lithium-Ionen Batterie<br />
geladen sein. Das gewährleistet das originale<br />
Ladegerät, die ausreichende Ladezeit, das<br />
Alter der Batterie sowie deren erhaltende<br />
Pflege. Sind alle Umstände optimal, d.h. auch<br />
die Betriebstemperatur ist zwischen 5° und<br />
35°C und eine volle Ladung ist erfolgt, sollten<br />
37V x 8,8Ah = 325Wh gespeicherte Energie<br />
zu Beginn der Fahrt zur Verfügung stehen.<br />
Mit zunehmendem Alter der Batterie kann die<br />
maximale Menge an gespeicherter Energie<br />
um 1/3 sinken und somit auch die gefahrene<br />
Distanz. Lithium-Ionen Batterien können in der<br />
Regel bis zu 500 volle Ladezyklen erleben, aber<br />
die Kapazität wird im Laufe der Zeit auf 85–65%<br />
sinken, da mit der Nutzung allmählich eine<br />
Alterung des inneren Zellenaufbaus eintritt.<br />
DE<br />
Bei guter Pflege ist eine Lebensdauer von<br />
ca. 3 Jahren möglich. Die Kapazität wird<br />
langsam, aber gleichmäßig zurückgehen.<br />
Bedienung allgemein<br />
Schaltung<br />
Sollten Sie noch nicht mit einer Gangschaltung<br />
vertraut sein, üben sie außerhalb des<br />
Straßenverkehrs mit Ihrem neuen <strong>Pedelec</strong><br />
umzugehen, zu bremsen und Kurven zu fahren.<br />
Kettenschaltung<br />
Schalten Sie zunächst einmal die Kette auf das<br />
hintere mittlere Ritzel. Schalten Sie die vorderen<br />
Kettenblätter. Danach dasselbe umgekehrt.<br />
So lernen Sie leicht die Funktionsweise der<br />
Schaltung. Schalten Sie nie im Stillstand<br />
oder beim Rückwärtstreten. Wählen Sie Ihre<br />
Übersetzung je nach Gelände vorn und regeln<br />
mit den hinteren Zahnkränzen nach. Die<br />
Kette darf nicht über Kreuz, d.h. sehr schräg<br />
laufen, da sonst Kette und Zahnräder schneller<br />
verschleißen. Nutzen Sie die Kettenschaltung<br />
wie in der Abb. skizziert.<br />
Schaltungseinstellung:<br />
Je nach Art und Nutzung der Schaltung muss<br />
diese regelmäßig eingestellt werden. Lassen<br />
Sie alle Einstellungen an der Schaltung vom<br />
Fachhandel ausführen.<br />
Nabenschaltung mit Rücktrittbremse<br />
Bei einer Nabenschaltung halten Sie beim<br />
Schalten kurz mit dem Treten inne, damit das<br />
Getriebe umschalten kann. Die Nabenschaltung<br />
bedarf aufgrund der Schaltzug-Dehnung<br />
eines regelmäßigen Nachstellens durch den<br />
Fachhändler.<br />
Gebräuchlich sind zurzeit 3-, 4-, 5-, 7-, 8- und<br />
9- Gang-Nabenschaltungen verschiedener<br />
Hersteller. <strong>Pedelec</strong>s mit NuVinci Nabe haben<br />
ein stufenlos verstellbares Getriebe, welches<br />
über den Drehgriff am Lenker bedient wird.<br />
Zur Einstellung Ihrer speziellen Schaltung<br />
wenden Sie sich bitte an Ihren Fachhändler,<br />
bzw. orientieren sich an der beigelegten<br />
Bedienungsanleitung des Schaltungs-<br />
Herstellers.<br />
Bremsen<br />
Ihr <strong>Pedelec</strong> ist mit zwei unabhängigen Bremsen<br />
ausgestattet. Der linke Bremshebel wirkt<br />
auf die Vorderradbremse und der rechte auf<br />
die Hinterradbremse. Eine Änderung dieser<br />
Anordnung ist durch Umhängen der Bremszüge<br />
am Bremshebel möglich. Lassen Sie dies durch<br />
den Fachhändler ausführen.<br />
17
Rücktrittbremse<br />
Die Rücktrittbremse ist eine Hinterradbremse,<br />
die durch das Rückwärtstreten betätigt wird.<br />
Durch Probe fahren erhalten Sie ein Gefühl<br />
dafür, wann die Bremse anspricht.<br />
Bei langen und steilen Abfahrten unbedingt<br />
die zweite Bremse d.h. die Vorderradbremse<br />
abwechselnd benutzen, damit die<br />
Hinterradbremse abkühlen kann!<br />
Zu starkes Erhitzen der Rücktrittnabe führt<br />
zu Schmiermittelverlust! Nachschmierung<br />
erforderlich! Die Bremskörper einer<br />
Rücktrittbremse unterliegen auch Verschleiß und<br />
müssen dem Grad der Benutzung entsprechend<br />
regelmäßig gewechselt werden. Lassen Sie dies<br />
durch den Fachhändler durchführen.<br />
Handbremsen<br />
Die Bremsen vor jeder Fahrt auf gute<br />
Funktion überprüfen. Falls Nachlassen der<br />
Bremswirkung festgestellt wird Fachhändler<br />
aufsuchen! Die Bremsgummis bzw.<br />
Bremsschuhe sind gekennzeichnet. Ersatzteile<br />
immer gleicher Kennzeichnung verwenden.<br />
V-Brake Bremse<br />
Diese Bremse wird durch Ziehen des<br />
Bremshebels am Lenker Ihres Fahrrades<br />
betätigt. Es wirken zwei Bremsschuhe auf die<br />
Felgenflanken.<br />
Die V-Brake zeichnet sich aufgrund ihrer<br />
verbesserten Konstruktion durch sehr gute<br />
Trocken- und Nassbremswerte aus, birgt aber<br />
gewisse Gefahren in sich, insbesondere für den<br />
ungeübten Fahrradfahrer.<br />
Bei falscher Anwendung der Bremsen können<br />
Sie die Kontrolle über Ihr Rad verlieren. Üben<br />
Sie, besonders als Anfänger, den Einsatz dieser<br />
Bremsen. Fahren Sie zunächst langsam und<br />
betätigen Sie die Bremshebel leicht, um sich mit<br />
dem Ansprechverhalten der Bremsen vertraut zu<br />
machen.<br />
Hydraulikbremse<br />
Diese Bremse wird ebenfalls durch Ziehen<br />
des Bremshebels am Lenker Ihres Fahrrades<br />
betätigt. Es wirken zwei Bremsgummis auf die<br />
Felgenflanken. Statt Bowdenzüge hat diese<br />
Bremse Bremsleitungen, die mit Hydrauliköl<br />
gefüllt sind.<br />
Lassen Sie sich vom Fachhändler beraten<br />
und lesen Sie gründlich die ausführlichen<br />
technischen Unterlagen des Herstellers. Die<br />
Hydraulikbremse ist sehr feinfühlig und lässt sich<br />
genau dosieren. Durch Probe fahren können Sie<br />
das Bremsverhalten testen.<br />
Achtung! Sturz- und Verletzungsgefahr bei<br />
Not-Bremsungen!<br />
Rollenbremse<br />
Auch diese Bremse betätigen Sie mittels<br />
Bremshebel am Lenker. Der Bremsmechanismus<br />
wirkt an der Laufradnabe und ist vor<br />
Witterungseinflüssen gut geschützt. Beachten<br />
Sie, dass bei langem Bremsen (lange und steile<br />
Abfahrten) eine große Reibungswärme entsteht,<br />
die einen Wärmestau verursacht.<br />
Achtung! Erhitzte Nabenkörper nicht<br />
berühren. Abkühlzeit nach langen<br />
gebremsten Abfahrten bis ca. 30 Minuten.<br />
Scheibenbremse<br />
Auch diese Bremse betätigen Sie mittels<br />
Bremshebel am Lenker. Das Prinzip ähnelt dem<br />
der Felgenbremse, nur dass diese Bremse auf<br />
der Nabe sitzt. Die Bremsklötze wirken auf eine<br />
Bremsscheibe.<br />
18
<strong>ED</strong>-<strong>1.2</strong> <strong>Pedelec</strong> mit Lithium-Ionen Batterie<br />
Lastentransport<br />
Pflegehinweise<br />
Lastentransport<br />
• Bei Mitnahme von Lasten diese gut<br />
befestigen und unbedingt die zulässige<br />
Tragfähigkeit des Gepäckträgers beachten!<br />
• Keine Taschen oder andere Gegenstände<br />
an den Lenker hängen! Die Fahrsicherheit<br />
wir dadurch beeinträchtigt. Aluminiumlenker<br />
sind nicht für die Aufnahme von Lasten<br />
konstruiert!<br />
Anhänger<br />
• Beachten Sie die max. zulässige<br />
Geschwindigkeit von 25 km/h bei<br />
Anhängernutzung.<br />
• Max. Zulässige Anhängerzuladung 40kg.<br />
• Nur geprüfte Anhängerkupplungen<br />
verwenden und an den vorgeschriebenen<br />
Stellen befestigen.<br />
• Nur Anhänger verwenden, die dem Stand der<br />
Sicherheitstechnik entsprechen.<br />
• Vor der ersten Fahrt üben Sie durch<br />
Probefahrten ohne Last.<br />
• Beachten Sie die StVZO-Forderungen für die<br />
Beleuchtungseinrichtungen des Anhängers.<br />
• Keine Haftung für durch Anhängernutzung<br />
am Fahrrad entstandene Schäden!<br />
Vorderradgepäckträger, Korb<br />
• Halten Sie sich bei der Zuladung an die<br />
Herstellerangaben auf den Bauteilen.<br />
• Vermeiden Sie Überladung!<br />
• Transportieren Sie keine lebenden Tiere!<br />
Hinterradgepäckträger<br />
• Halten Sie sich bei der Zuladung an die<br />
Herstellerangaben auf den Bauteilen.<br />
• Verwenden Sie die im Handel üblichen<br />
Transporttaschen, -Körbe und<br />
Spanneinrichtungen.<br />
• Transportieren Sie keine Personen und<br />
lebende Tiere.<br />
Achtung! Das Fahr- und Bremsverhalten<br />
des Fahrrades ändert sich. Sturz- und<br />
Verletzungsgefahr!<br />
Das <strong>Pedelec</strong> ist genau wie ein gewöhnliches<br />
Fahrrad zu pflegen um anhaltende Freude am<br />
Komfort der vielen Funktionen zu ermöglichen.<br />
Darüber hinaus ist die regelmäßige Kontrolle der<br />
Bremsen, des Reifendrucks, der verschiedenen<br />
Schraubverbindungen, insbesondere Lenker,<br />
Sattel und Achsmuttern zwingend erforderlich<br />
um die Fahrsicherheit zu gewährleisten.<br />
Pflege des <strong>Pedelec</strong> Antriebs<br />
Die Pflege des elektrischen<br />
Zusatzantriebssystems lässt sich unterteilen<br />
in den Erhalt der maximalen Kapazität der<br />
Fahrbatterie durch entsprechenden Umgang<br />
und in den Schutz der anderen elektrischen<br />
Bestandteile vor anhaltender Nässe.<br />
Im Winter oder bei anderer größerer<br />
Nutzungsunterbrechung sollte spätestens<br />
nach 2–3 Monaten wieder aufgeladen werden.<br />
Nur dieser Umgang ermöglicht eine lange<br />
Lebensdauer. Bei längerer Nicht-Benutzung die<br />
Batterie dem <strong>Pedelec</strong> entnehmen.<br />
Nach einer Fahrt im Regen oder wenn viel<br />
Schlamm auf Gehäuseteile gespritzt ist sollte<br />
dieser mit einem angefeuchteten Schwammtuch<br />
möglichst umgehend entfernt werden, das<br />
<strong>Pedelec</strong> gereinigt und trocken gestellt werden.<br />
Das Reinigen sollte zu keiner Zeit<br />
mit einem Druckwasserstrahl oder<br />
Dampfreinigungsgerät erfolgen. Das System ist<br />
zwar spritzwassergeschützt, aber nicht völlig<br />
versiegelt.<br />
Durch völliges Durchnässen des Kabelbaums<br />
können Kurzschlüsse entstehen, die die digitale<br />
Steuerung des Systems zerstören.<br />
Daher ist es völlig zu vermeiden, das <strong>Pedelec</strong><br />
mit eingesetzter Batterie bei Regen auf dem<br />
Autogepäckträger zu transportieren.<br />
Der starke Fahrtwind drückt Wasser an jede<br />
Stelle im Rahmen und im Batteriegehäuse.<br />
Ist dieser Transport dennoch erforderlich, die<br />
Batterie unbedingt dem <strong>Pedelec</strong> entnehmen<br />
19<br />
DE
und nach Ankunft vor dem Wiedereinsetzen<br />
der Batterie für ausreichendes Abtrocknen des<br />
durchnässten Fahrrades sorgen.<br />
Allgemeine Pflegehinweise<br />
• Nur geprüfte Anhängerkupplungen<br />
verwenden und an den vorgeschriebenen<br />
Stellen befestigen.<br />
• Nur Anhänger verwenden, die dem Stand der<br />
Sicherheitstechnik entsprechen.<br />
• Vor der ersten Fahrt üben Sie durch<br />
Probefahrten ohne Last.<br />
• Beachten Sie die StVZO-Forderungen für die<br />
Beleuchtungseinrichtungen des Anhängers.<br />
• Keine Haftung für durch Anhängernutzung<br />
am Fahrrad entstandene Schäden!<br />
Ausbau des Vorderrades<br />
Sollte bei einem Reifenschaden der Ausbau des<br />
Vorderrades notwendig werden, gehen Sie bitte<br />
wie folgt vor:<br />
Ausbau:<br />
Öffnen Sie die auf der rechten Seite der Gabel<br />
befindliche Kabelsteckverbindung sowie den<br />
Kabelbinder zur Befestigung des Kabels an<br />
der Gabel. Schieben Sie die Gummiabdeckung<br />
der Achsmutter zur Seite und lösen Sie die<br />
Achsmuttern auf beiden Seiten. Jetzt können Sie<br />
das Rad herausnehmen.<br />
Erhalt im Winter<br />
Eine Konservierung des <strong>Pedelec</strong> empfiehlt<br />
sich besonders bei längerer Lagerung in den<br />
Wintermonaten. Auch hier ist zu beachten,<br />
dass das <strong>Pedelec</strong> in einen mit konstanter<br />
Temperatur versehenen Raum gestellt wird.<br />
Große Temperatur-Schwankungen sowie<br />
Luftfeuchtigkeit wirken sich negativ auf alle<br />
Chrom- und Leichtmetallteile aus. Für die<br />
Überwinterung empfiehlt es sich, das <strong>Pedelec</strong><br />
insgesamt auf Schäden zu überprüfen, um einen<br />
Werkstattaufenthalt im Frühjahr zu vermeiden.<br />
Entlasten Sie die Reifen des <strong>Pedelec</strong>s, indem<br />
Sie es aufhängen.<br />
Bei längerer Nichtnutzung des <strong>Pedelec</strong>s<br />
entnehmen Sie die Batterie und lagern Sie diese<br />
in einem kühlen und trockenen Raum.<br />
Die empfohlene Lagertemperatur für die<br />
Batterie ist 15°C.<br />
20
<strong>ED</strong>-<strong>1.2</strong> <strong>Pedelec</strong> mit Lithium-Ionen Batterie<br />
Einbau<br />
Setzen Sie das Vorderrad wieder ein und<br />
bringen Sie die Drehmomentstütz-Scheiben<br />
auf der Nabenachse innerhalb der Gabel,<br />
die Distanzscheiben und die Grundplatte der<br />
Abdeckung wieder in Position.<br />
Drehen Sie die Achsmuttern auf. Richten Sie das<br />
Vorderrad aus und ziehen Sie die Achsmuttern<br />
fest. Verbinden Sie die Steckverbinder. Das<br />
Kabel wird wieder mit Kabelbindern an der<br />
Gabel fixiert.<br />
Modelle mit Hinterrad-Nabenmotor<br />
Die Montage des Hinterrades ist vergleichbar.<br />
Batterie-Rückgabe/-Recycling<br />
Bitte das Batterie-Pack nicht in den Hausmüll<br />
geben. Zur fachgerechten Batterie-Entsorgung<br />
stehen im Batterie vertreibenden Handel sowie<br />
den kommunalen Sammelstellen entsprechende<br />
Behälter bereit.<br />
Zum Versenden eines Batterie-Packs sprechen<br />
Sie bitte Ihren Händler an, da Lithium-<br />
Ionen Batterien nicht ohne Kennzeichnung<br />
in die Paketbeförderung dürfen. Lithium-<br />
Ionen Batterien sind durch den Bestandteil<br />
Lithium, der sehr reaktionsfreudig ist, als<br />
Gefahrgut eingestuft. Sie durchlaufen<br />
daher in der Entwicklung vorgeschriebene<br />
Unfallsicherheitstests, die sicherstellen, dass<br />
bei zerstörerischer Einwirkung von Außen keine<br />
unkontrollierten Prozesse eintreten können.<br />
Vorgeschrieben ist in diesem Zusammenhang<br />
auch, dass durch korrekte Kennzeichnung<br />
im Paketversand zum Beispiel die Feuerwehr<br />
bei Fahrzeugunfällen sofort erkennt welche<br />
Löschtechniken nötig sind. Zusätzlich wird<br />
durch Technologien im Zellenaufbau und die<br />
Schutzschaltung gesichert, dass auch im<br />
normalen Betrieb keine elektrische Überlastung<br />
eintritt 1 .<br />
Bitte beachten Sie auch die Hinweise auf der<br />
Unterseite der Batterie:<br />
DE<br />
21
Technische Daten<br />
Antriebsystem<br />
EN15194 <strong>Pedelec</strong> oder EPAC (=Electrical Power<br />
Assist Cycle). Fahrrad-Zusatzantrieb mit 250W<br />
Motor, bis 25km/h unterstützend, durch Pedal-<br />
Drehsensor aktiviert.<br />
Motor<br />
BLDC-Getriebe-Motor. BLDC steht für<br />
Brushless-DC d.h. ein bürstenloser, elektronisch<br />
kommutierter 3-Phasen Gleichstrommotor<br />
arbeitet mit maximal 250W Nenndauerleistung.<br />
Steuerung<br />
BLDC Motorregler mit digitaler<br />
Programmsteuerung gemäß Euro-Norm. Es gibt<br />
4 Fahrmodi. Der Zusatz-Antrieb schaltet sich bei<br />
Pedalbenutzung automatisch ein und unterstützt<br />
bis 25km/h. Wird die Bremse betätigt wird der<br />
Zusatzantrieb automatisch abgestellt.<br />
Batterie<br />
37V 8,8Ah (325Wh) Lithium-Ionen Batterie<br />
aus europäischer Fertigung mit 5 L<strong>ED</strong><br />
Kapazitätsanzeige, Gewicht 2,4 kg, bis<br />
zu 500 volle Ladezyklen oder 3–4 Jahre<br />
Lebenserwartung bei optimalem Gebrauch.<br />
Ladegerät<br />
CC-CV Ladegerät mit 2,0A Ladestrom.<br />
Vollladung der 37V 8,8Ah Batterie dauert ca.<br />
5 Stunden. Jedes 10. Mal sollte 2 Stunden<br />
länger geladen werden, um optimale Zellen-<br />
Balancierung zu erreichen.<br />
Reichweite<br />
Stark abhängig von gewähltem Fahrmodus,<br />
persönlicher Fahrweise und anderen Faktoren!<br />
Modus 1<br />
Modus 2<br />
Modus 3<br />
Modus 4<br />
bis zu 70 km<br />
bis zu 45 km<br />
bis zu 35 km<br />
bis zu 25 km<br />
Siehe auch Kapitel<br />
„Reichweite und ihre Faktoren“.<br />
Störungen/Ursachen/<br />
Behebung<br />
1. Bedienungseinheit<br />
1.1 Beim Einschalten des Bedienpaneels<br />
leuchtet keine L<strong>ED</strong>.<br />
Ursache: Behebung:<br />
Batterie nicht richtig<br />
eingelegt<br />
> Batterie neu einsetzen<br />
Defekt der Batterie > Händler aufsuchen<br />
Kabel-/Kontaktfehler > Händler aufsuchen<br />
Elektronik defekt > Händler aufsuchen<br />
<strong>1.2</strong> Das Bedienpaneel schaltet während der<br />
Fahrt ab.<br />
Ursache: Behebung:<br />
Batterie leer > Batterie wieder<br />
voll aufladen<br />
Elektronik defekt > Händler aufsuchen<br />
Steckverbindungen<br />
hat sich gelöst > Händler aufsuchen<br />
2. Batterie<br />
2.1 Beim Drücken des Batterie Ladestand<br />
Display leuchtet keine L<strong>ED</strong>.<br />
Ursache: Behebung:<br />
Batterie leer > Batterie voll aufladen<br />
Sicherung in der<br />
Batterie ist defekt > Sicherung ersetzten<br />
Zellen im Batteriepack<br />
defekt > Händler aufsuchen<br />
2.2 Die Reichweite der Batterie hat sich<br />
drastisch reduziert.<br />
Ursache: Behebung:<br />
Die Batterie ist verbraucht<br />
(gealtert) > Austausch der Batterie<br />
Das Ladegerät<br />
ist defekt<br />
> Händler aufsuchen<br />
Ladestecker/Ladekabel<br />
beschädigt > Händler aufsuchen<br />
22
<strong>ED</strong>-<strong>1.2</strong> <strong>Pedelec</strong> mit Lithium-Ionen Batterie<br />
3. Motor<br />
3.1 Der Motor gibt keine Leistung ab,<br />
aber die Bedienungseinheit und die Batterie<br />
funktionieren.<br />
Ursache: Behebung:<br />
Motorsteckverbinder<br />
ist nicht korrekt<br />
verbunden<br />
> Stecker kontrollieren<br />
Anderer Kabel- /<br />
Kontaktfehler > Händler aufsuchen<br />
Trittsensor defekt > Händler aufsuchen<br />
Elektronik defekt > Händler aufsuchen<br />
4. Tritt Sensor<br />
4.1 Der Motor gibt nur wenig Leistung ab;<br />
Das Bedienpaneel und die Batterie funktionieren.<br />
Ursache: Behebung:<br />
Trittsensor defekt > Händler aufsuchen<br />
5. Ladegerät<br />
Siehe Kapitel im Handbuch oder Pos. 2.2 dieser<br />
Aufstellung.<br />
DE<br />
DE<br />
EG-Konformitätserklärung<br />
nach Maschinenrichtlinie 2006/42/EG<br />
nach EMV Richtlinie 2004/108/EG<br />
Der Hersteller:<br />
Pantherwerke AG<br />
Alter Postweg 190<br />
32584 Löhne<br />
erklärt hiermit, dass alle unsere Produkte mit den Antriebssystemen:<br />
<strong>ED</strong><strong>1.2</strong><br />
den Bestimmungen der oben angegebenen Richtlinien – einschließlich der<br />
zum Zeitpunkt der Erklärung geltenden Änderungen – entspricht.<br />
Folgende Normen wurden angewandt:<br />
DIN EN 15194<br />
DIN EN 14764<br />
Löhne, 2. Januar 2012, der Geschäftsführer<br />
23
Quickstart!<br />
Even though you might be eager to use your<br />
newly purchased <strong>Pedelec</strong> immediately, we<br />
request you to observe the following steps<br />
without fail before taking your first ride. we will<br />
not acceptany guarantee obligations otherwise!<br />
The <strong>ED</strong>-<strong>1.2</strong> <strong>Pedelec</strong> is powered by a<br />
lithium-ion battery. A new <strong>ED</strong>-<strong>1.2</strong> <strong>Pedelec</strong><br />
battery comes in „ship-mode“. Batteryinternal<br />
electronics is almost fully shut<br />
down and no voltage is available. To<br />
activate the battery please keep it in<br />
the carrier bay and connect the charger.<br />
Approx. 30 sec. later the battery is fully<br />
switched on. Please check current<br />
charging status by pressing the key on<br />
battery L<strong>ED</strong> display.<br />
• Now charge the battery fully first! Please use<br />
the original Lithium-ion charging device only.<br />
• Adjust the handle bar and seat; check to<br />
ensure that the drive and brakes function<br />
and that all screws, especially the wheel nuts<br />
are properly fixed (refer to Page 34).<br />
• Start pedalling. The motor is activated after a<br />
half-rotation of the pedals.<br />
• If you are riding this bicycle for the first time,<br />
please try out the available operation modes<br />
in low-traffic areas.<br />
• Of the available operation modes 1 to 3<br />
restrict the max power level. This facilitates<br />
an increase in operating distance.<br />
• At the end of the ride, shut off the system by<br />
pressing the “ON/OFF“ button.<br />
• The <strong>Pedelec</strong> will take you home even on<br />
an empty battery like an ordinary cycle. The<br />
battery electronics prevents an excessive<br />
discharge of the battery.<br />
• Recharge the fully empty Lithium-ion battery<br />
after completing the ride.<br />
• If you do not use the battery for more than 3<br />
month, recharge it fully.<br />
Enjoy riding your <strong>Pedelec</strong>!<br />
• Switch the system on at the left of the handle<br />
bar: Press the switch to “I” on the control<br />
unit. The <strong>Pedelec</strong> is now ready for a ride. The<br />
electronic circuit however is deactivated after<br />
approx. 8 min of inactivity in order to save<br />
energy! If this happens, switch off and then<br />
on again.<br />
24
<strong>ED</strong>-<strong>1.2</strong> <strong>Pedelec</strong> with Lithium-ion battery<br />
Content<br />
Quickstart!....................................................... 24<br />
Welcome!........................................................ 26<br />
General safety guidelines................................ 27<br />
Your <strong>ED</strong>-<strong>1.2</strong> <strong>Pedelec</strong> and his components..... 27<br />
Proper conduct as a road user....................... 28<br />
Careful handling of the <strong>Pedelec</strong>...................... 28<br />
Permissible load for the <strong>Pedelec</strong>.................... 28<br />
Proper use of the <strong>Pedelec</strong>.............................. 29<br />
Provisions on liability for defects of quality.... 29<br />
Limitations on liability for defects of quality.... 29<br />
Assertion of liability for defects of quality....... 30<br />
Disclaimer for defects of quality..................... 30<br />
Start-up of the <strong>Pedelec</strong>................................... 30<br />
Initial operation of the drive battery................ 30<br />
Removal and installation of battery................ 31<br />
Removal of the battery.................................... 31<br />
Loading the vehicle battery: ........................... 32<br />
Long-term trickle charging:............................. 33<br />
Adjustments before a ride............................... 34<br />
Check the following before each ride............. 34<br />
Seat and handle bar:....................................... 34<br />
Seat:................................................................ 34<br />
Height:............................................................. 34<br />
Handle bar and handle bar stem.................... 34<br />
„Ahead“ Stem................................................. 35<br />
Brake............................................................... 35<br />
Coaster brake hub.......................................... 35<br />
Pedals............................................................. 36<br />
Foot pedals..................................................... 36<br />
Handle bar bearing......................................... 36<br />
Spokes............................................................ 36<br />
Quick release.................................................. 36<br />
Tyres and rims................................................. 37<br />
Rims................................................................ 37<br />
Chain tensioning ............................................ 37<br />
Torque specifications ..................................... 38<br />
Operation of the <strong>Pedelec</strong> Drive....................... 38<br />
Recommended manner of driving ................. 38<br />
Operational range and its factors................... 38<br />
General operation .......................................... 39<br />
Gear changing................................................. 39<br />
Derailleur......................................................... 39<br />
Gear adjustment:............................................ 39<br />
Brakes............................................................. 39<br />
Hand brakes.................................................... 39<br />
V-brake............................................................ 39<br />
Hydraulic brake............................................... 40<br />
Roller brake..................................................... 40<br />
Disk brake....................................................... 40<br />
Load transportation........................................ 41<br />
Trailer............................................................... 41<br />
Maintenance instructions................................ 41<br />
Maintenance of the <strong>Pedelec</strong> drive.................. 41<br />
Operating instructions..................................... 42<br />
Preserving in Winter........................................ 42<br />
Dismantling the front wheel............................ 43<br />
Assembly: ...................................................... 43<br />
Battery return / recycling................................ 44<br />
Technical data................................................. 45<br />
Drive system................................................... 45<br />
Faults / Cause / Remedy................................ 45<br />
EC Declaration of Conformity......................... 47<br />
GB<br />
25
Welcome!<br />
PanTerra – intelligent electric!<br />
Dear Customer,<br />
Thank you for choosing the <strong>Pedelec</strong> – a model<br />
with PanTerra drive technology! PanTerra<br />
offers the technology for an easy, alternative<br />
mobility. You will enjoy this modern and ecofriendly<br />
mode of travel!<br />
This electric bicycle is a so-called <strong>Pedelec</strong> 1 ,<br />
i.e., the additional electrical drive assists you up<br />
to a speed of 25 km/h while you are pedalling.<br />
The technical design of <strong>Pedelec</strong> complies with<br />
the European standard EN15194 for electric<br />
motor-assisted wheels and the European<br />
bicycle standard EN 14764. The <strong>ED</strong>-<strong>1.2</strong> is not<br />
designated for use upsite public roads. Always<br />
comply with the respective national rules on<br />
road traffic.<br />
For your own safety, we recommend that you<br />
wear a bicycle helmet while riding the bicycle!<br />
This quality product will be a source of joy<br />
wherever you go, whether for shopping, to<br />
office, for leisure, for picnics or as companion<br />
during vacations!<br />
As you have purchased this <strong>Pedelec</strong> from a<br />
dealer, it is guaranteed that you have received a<br />
fully assembled cycle. In case of any problems<br />
or questions associated with repairs, assembly<br />
or accessories, you can always count on<br />
professional help. This user manual is valid for<br />
different models of <strong>Pedelec</strong>.<br />
Frame and gear shift can vary. Hence, consider<br />
only those sections that are relevant to your<br />
cycle. The technical design of <strong>Pedelec</strong> complies<br />
with the upcoming European standard EN15194<br />
for electric motor assisted cycles and with the<br />
statutory safety specifications, especially the<br />
European bicycle standard DIN-EN 14764.<br />
Get ready to be electrified!<br />
CAUTION! In the Operating Instructions,<br />
you find this sign wherever your safety is<br />
concerned. Please inform other users of<br />
your cycle about the safety instructions as<br />
well!<br />
We have taken a lot of care in designing and<br />
selecting the components so that you have the<br />
right vehicle for joining the enthusiastic group of<br />
“electrified” bikers! If you follow the numerous<br />
suggestions compiled in this manual, you can<br />
maintain your <strong>Pedelec</strong> in an optimal condition<br />
and ensure your own safety<br />
1 The created term <strong>Pedelec</strong> consists of the words<br />
pedal, electric and cycle, and denotes a special type of<br />
electric cycle that is different from the so-called e-bike,<br />
because law stipulates that its additional drive must<br />
work simultaneously with the paddle drive.<br />
26
<strong>ED</strong>-<strong>1.2</strong> <strong>Pedelec</strong> with Lithium-ion battery<br />
Your <strong>ED</strong>-<strong>1.2</strong> <strong>Pedelec</strong> and his components<br />
Drive battery<br />
Status display of the drive battery<br />
Lock of the drive battery<br />
Motor control (electronic)<br />
Charging input bushing<br />
Crank with rotary sensor<br />
Hub motor<br />
Motor plug cover<br />
Handlebars: operational<br />
controls (panel)<br />
<br />
<br />
<br />
<br />
<br />
<br />
<br />
GB<br />
<br />
<br />
General safety guidelines<br />
Roadworthiness<br />
According to the regulations set forth in the<br />
StVZO, <strong>Pedelec</strong>s as well as bicycles must meet<br />
the following statutory minimum requirements:<br />
• Two brakes which function properly and<br />
independent of each other.<br />
• A bell with a clear sound<br />
• Dynamo (nominal voltage 6V and nominal<br />
output 3W) bearing the test symbol “K - - - “.<br />
• At the front, a lamp emitting white light.<br />
• A white-reflecting front reflector.<br />
• A taillight emitting red light, affixed higher<br />
than 25 cm above the roadway surface.<br />
• A red rear reflector, affixed no higher than<br />
60 cm above the roadway surface.<br />
• A large red rear reflector bearing the letter Z.<br />
• Pedals equipped with yellow rear reflectors<br />
emitting to the front and rear, bearing the test<br />
symbol “K - - - “.<br />
• In the front and rear wheel, two yellowemitting<br />
reflectors (or white-reflective side<br />
strips at the front and rear, on the tyres and/<br />
or rims).<br />
27
• Each part of the lighting installation must be<br />
marked with the test symbol “K - - - “.<br />
Always remember the following:<br />
• Check the function of the cycle and its parts<br />
prior to each trip!<br />
• Never adjust any bent safety-relevant parts<br />
(such as the frame, wheel fork, handlebars,<br />
treadles, seat bearings, mudguard struts<br />
and pedals); instead, replace them promptly.<br />
Danger of breakage!<br />
• Only use original spare parts!<br />
shoes); in darkness and in inclement<br />
weather, also wear reflective clothing.<br />
• When travelling in full skirts and long coats,<br />
only ride wearing a coat guard.<br />
• WARNING: In wet conditions, the efficacy<br />
of the brakes and the dynamo decreases!<br />
Adapt your cycling manoeuvres accordingly.<br />
Accident risks:<br />
Cycling free-handed and hitching the cycle<br />
to other vehicles is potentially fatal and<br />
also prohibited.<br />
Caution: Improper Repairs may result<br />
in hazards for the user and the Defects<br />
liability is void!<br />
Proper conduct as a road user<br />
• Use bicycle paths wherever these are<br />
available.<br />
• Always cycle on the far right; overtake from<br />
the left.<br />
• Prior to each turn, give a clear signal with<br />
your outstretched arm.<br />
• Always cycle in the specified direction of<br />
travel.<br />
• Always ride at a speed suitable to the<br />
prevailing weather conditions; on a wet<br />
roadway, the braking distance is always<br />
longer!<br />
• At night and whenever visibility is low, only<br />
ride with lights on.<br />
• Take care to avoid harm to plants and<br />
animals when cycling off-road.<br />
• Protect your head by wearing a cycling<br />
helmet (certified according to DIN-EN 1078)!<br />
• When cycling, never listen to music via<br />
headphones (e.g. on a Walkman/Discman,<br />
MP3 player)!<br />
• Wear functional clothing (tight-fitting leg<br />
warmers, cycle clips if necessary, sturdy<br />
Cycling parallel to each other impairs the<br />
flow of traffic; therefore, always ride single<br />
file.<br />
Only the cyclist can ride on the bicycle; no<br />
passengers allowed! (Exception: a child on<br />
the specially-designed child seat)<br />
Careful handling of the <strong>Pedelec</strong><br />
• Prior to the transport of this cycle either at<br />
the rear or on the roof of a motor vehicle,<br />
always remove any parts which may loosen<br />
in transit (tool bag, luggage baskets, luggage<br />
bags, pumps, child seats, drive battery etc.)!<br />
Permissible load for the <strong>Pedelec</strong><br />
• The permissible total load (cyclist and<br />
luggage) for the EBK <strong>ED</strong> <strong>1.2</strong> <strong>Pedelec</strong><br />
amounts to 120 kg.<br />
• The permissible load of the luggage carrier is<br />
mentioned on the luggage carrier.<br />
• If your cycle is equipped with a front basket,<br />
the additional load allowed here is 5kg.<br />
28
<strong>ED</strong>-<strong>1.2</strong> <strong>Pedelec</strong> with Lithium-ion battery<br />
Braking response<br />
• To ensure that the front wheel does not slip<br />
and the <strong>Pedelec</strong> retains its steering capacity,<br />
/perform careful braking maneuvers with the<br />
front-wheel brake at tight curves/bends, on<br />
sandy/slippery roads, wet asphalt and black<br />
ice!<br />
• The brakes must be applied gently and<br />
precisely. Blocked wheels have a lesser<br />
braking effect and can therefore lead to<br />
skidding and falls!<br />
• As a rule, brake prior to approaching a bend,<br />
not in the bend itself; braking increases the<br />
risk of slippage!<br />
• The brake levers attached to the handlebars<br />
must always be firmly attached. Check them<br />
regularly to ensure their firm attachment;<br />
adjust as necessary.<br />
• Any work on the brake system should be<br />
performed solely by specialized dealers!<br />
Proper use of the <strong>Pedelec</strong><br />
• Your <strong>Pedelec</strong> is (due to its design and<br />
equipment) designated for the same kind<br />
of use as a typical bicycle: to use on public<br />
roads.<br />
• The safety equipment has been assembled<br />
by manufacture: it must be regularly checked<br />
by the user, and corrective maintenance<br />
must be performed by the specialized dealer<br />
as necessary.<br />
• In the event of non-compliance with the<br />
safety guidelines indicated in these operating<br />
instructions, We assumes no liability for any<br />
resulting incidence of injury or damage. This<br />
particularly applies to the use of the <strong>Pedelec</strong><br />
as well as to overloading and the improper<br />
remedy of defects. Under these conditions,<br />
there is no liability on our part for defects of<br />
quality.<br />
• The <strong>ED</strong>-<strong>1.2</strong> is not equipped for use in<br />
competitive events.<br />
Please also observe all other guidelines<br />
for assembly, maintenance and upkeep<br />
indicated in this handbook (along with the<br />
specifications set forth by the gearshiftassembly<br />
manufacturer).<br />
Provisions on liability for<br />
defects of quality<br />
As a rule, the 24-month statutory period of<br />
liability for defects of quality applies. The<br />
manufacturer shall warrant any material defects<br />
or design errors on your <strong>Pedelec</strong> under the<br />
following prerequisites:<br />
• You can only asset your claim on any defects<br />
of quality by submitting the record of delivery<br />
and the purchase receipt.<br />
• The period of liability for defects of quality<br />
begins with the day of purchase.<br />
• If a change of ownership takes place during<br />
this period, then this must be duly noted on<br />
the record of delivery.<br />
Warranty on Battery: 6 month<br />
The maintenance of the drive battery is subject<br />
to various conditions. Within the first six months<br />
of purchase, We will conduct precise tests to<br />
determine whether such failure was caused by<br />
normal wear, inappropriate use or a battery pack<br />
which was defective due to production faults.<br />
Limitations on liability for<br />
defects of quality<br />
The liability for defects of quality shall lapse under the<br />
following conditions:<br />
• unauthorised or inappropriate use of/damage<br />
to the <strong>Pedelec</strong>s (traffic accident, fall).<br />
29<br />
GB
• damage which is attributable to normal wear<br />
of parts such as tires, the chain, Bowden<br />
controls and brake shoes.<br />
• damage to the paint or chrome due to the<br />
effects of weather, moisture and ambient<br />
conditions (particularly salty air) as well<br />
as aggressive environments containing<br />
ammonia.<br />
• deficient maintenance of the <strong>Pedelec</strong> (in<br />
deviation from the specifications described<br />
in these operating instructions.<br />
• repairs which were not performed by a<br />
bicycle specialist.<br />
• modifications of the drive system which<br />
exceed the framework set forth by the<br />
technical standard specification.<br />
• structural modifications to the <strong>Pedelec</strong> which<br />
deviate from its condition upon delivery.<br />
This particularly applies to the drive battery.<br />
Any modifications lead to the lapse of the<br />
warranty!<br />
• breakage of the electrical conductor which is<br />
not attributable to design errors.<br />
• defects caused by extraneous force.<br />
• damage caused by the use of the <strong>Pedelec</strong> at<br />
competitions.<br />
• use of the drive battery in a manner<br />
which is not compliant with the attendant<br />
specifications.<br />
Start-up of the <strong>Pedelec</strong><br />
The following chapters of the user manual of<br />
the <strong>Pedelec</strong> presume that all basic ergonomic<br />
settings and necessary safety checks of your<br />
bike have already been done:<br />
• Handle bar and seat have been brought<br />
to the desired position and tightened<br />
appropriately.<br />
• The wheels have sufficient tire pressure and<br />
their axle nuts have been tightened too.<br />
• The function of the brakes and pedal drive<br />
has been checked.<br />
• The lighting system is functioning.<br />
For more information refer to the Chapter<br />
“Adjustments before ride”.<br />
Initial operation of the drive battery<br />
Now remove the battery of the vehicle recording<br />
on the luggage carrier. Check the the battery<br />
charge level. To do so the button on the L<strong>ED</strong><br />
display at the rear end of the battery under the<br />
carrying handle. The figure shows the situation<br />
at your pedelec.<br />
Assertion of liability for defects of quality<br />
• In the event of damage, please consult<br />
your bicycle dealer. This is your competent<br />
contact person at any time.<br />
Disclaimer for defects of quality<br />
Excluded from liability for defects of quality:<br />
Personal injury or damage to any parts of your<br />
<strong>Pedelec</strong> which are not original parts (insofar as<br />
legally permissible).<br />
The performance of repair work neither extends<br />
nor renews the warranty on the product as a<br />
whole.<br />
Now check the charge status of<br />
the Battery by pressing the button on<br />
the L<strong>ED</strong> power indicator.<br />
30
<strong>ED</strong>-<strong>1.2</strong> <strong>Pedelec</strong> with Lithium-ion battery<br />
Recommends<br />
Should not light up all 5 L<strong>ED</strong> supply the battery<br />
with a fully recharge. Connect to the vehicle<br />
battery with the supplied charger. See Chapter<br />
”Charging the drive battery.”<br />
Locking the key switch (1) ensures a secure hold<br />
on the battery and the optimal electrical contact<br />
to the electronics in the battery Controller.<br />
(1)<br />
Lithium-ion batteries have a significantly<br />
lower self-discharge as Nickel batteries<br />
and can therefore stored for about 3<br />
months without recharging. If after this<br />
time the battery is not charged it can still<br />
damage the chemical structure of the<br />
batterycell.<br />
(2)<br />
open<br />
Key<br />
GB<br />
Removal and installation<br />
of battery<br />
Removal of the battery<br />
To remove the battery, proceed as follows (see<br />
illustrations):<br />
(3)<br />
• Key switch to the left<br />
• and open the lock (1)<br />
• Open the cap (2)<br />
• Pull out the battery (3)<br />
When reinstalling, you go in reverse sequence.<br />
• Make sure that the contacts of the Battery<br />
(5) get the contacts of the battery controller<br />
(4). Therefore put the battery with gentle<br />
pressure in the battery bay.<br />
taking hold<br />
If the cap is not completely closed, the battery<br />
is not seated completely in the contacts of the<br />
controller. <br />
31
(4)<br />
contacts<br />
(5)<br />
Loading the vehicle battery: <br />
The <strong>ED</strong>-<strong>1.2</strong> <strong>Pedelec</strong> travels with a 37V<br />
8.8 Ah Lithium-ion battery. Premium<br />
brand cells are connected to one 37V-cell<br />
package. The battery’s contains a protection<br />
circuit, which prevents overcharging and deep<br />
discharge. Avoid storing a complete battery<br />
empty for weeks. Always use the supplied<br />
high-quality Lithium-ion battery charger<br />
(see illustration) to recharge your battery.<br />
The original charger works with CCCV 1<br />
technology. The charger is for indoor use.<br />
Read the enclosed manual of the charger<br />
before first use. Remove the charger the box,<br />
loosen the cable bundle and connect it to the<br />
traction battery located charging socket (see<br />
illustration). The battery can also be loaded on<br />
the bike.<br />
charging socket<br />
Contacts on the battery<br />
Your <strong>Pedelec</strong> is now ready to drive.<br />
Charging the<br />
battery externally<br />
Original<br />
Charger<br />
Battery<br />
1 CC-CV = Constant Current – Constant Voltage:<br />
Controlled current strength is first used to charge<br />
quickly and the battery voltage increases. On<br />
approaching the maximum capacity, the current<br />
strength is reduced and the remaining capacity is filled<br />
only with exact maximum specified voltage.<br />
32
<strong>ED</strong>-<strong>1.2</strong> <strong>Pedelec</strong> with Lithium-ion battery<br />
To charge please connect first the battery, then<br />
plug the power cord. In constant-current chargecharge<br />
indicator lights up red (0-95% - about 4<br />
hours). Upon completion of the loading phase<br />
constant-voltage charge-balancing begins<br />
with cells (95% -100% - about 1 hour). The<br />
light flashes green. After completete charge<br />
the ndicator lights steady green. For optimal<br />
cell balancing leave the charger on the battery<br />
further 2 h. To stop the charge, first disconnect<br />
the power cord, then the battery.<br />
Charger L<strong>ED</strong> code:<br />
Green constant:<br />
Stand-by / no battery<br />
Long-term trickle charging:<br />
Lithium-ion batteries do not receive longterm Trickle<br />
charge. Its self-discharge is<br />
low. It is therefore not very useful that the<br />
battery specially in winter or a long absence,<br />
always be connected to the charger. It would be<br />
no damage on the battery , but the charger<br />
as Consumers go through fully working . Please<br />
charge the battery after not using the <strong>Pedelec</strong><br />
for 3 month.<br />
If you do not use the <strong>Pedelec</strong> for long intervals,<br />
please recharge the Lithium-ion battery once<br />
every six months.<br />
Red constant:<br />
Standard charge<br />
(CC) 0 - 95 %<br />
Green flashing:<br />
Final charge / cell balancing<br />
(CV) 95 - 100 %<br />
Green constant: Charge completed /<br />
cell balancing<br />
Electrical equipment should have<br />
a extended period of unsupervised be<br />
connected to the network.<br />
GB<br />
Short circuit! Take care that no metal<br />
objects come in contact of the battery and<br />
the charging plug. At too high or too low<br />
temperatures (below -10 ° C and 40 ° C)<br />
do not charge the battery. We recommend<br />
that the Bicycle while charging do<br />
not stand the full sunlight.<br />
33
Adjustments before a ride<br />
Check the following before each ride<br />
• All screws, wheel nuts or quick release<br />
are tight<br />
• The brakes function<br />
• The air pressure of the tyres is sufficient<br />
• The lighting system is intact<br />
• The bell is OK.<br />
Seat and handle bar:<br />
You bicycle is assembled by the dealer and is<br />
in a road-worthy condition. The handle bar and<br />
seat position is adjusted to your height. While<br />
adjusting the seat and handle bar height, pay<br />
attention to the minimum insertion depth marked<br />
on the handle stem shaft and seat support.<br />
Never pull out the handle bar or seat above<br />
the marking! Electrical devices should not be<br />
connected to the mains over long periods<br />
without supervision. Hence, you should pull out<br />
the power plug from the mains socket during<br />
vacations or during long periods of absence.<br />
Seat:<br />
The seat can be adjusted in three directions:<br />
height, inclination and distance from handle bar.<br />
Height:<br />
• Loosen the seat clamping bolts or quick<br />
release.<br />
• Move the seat support in or out<br />
• Tighten the clamp after making the<br />
adjustment.<br />
You have adjusted the seat height according to<br />
your body size, so that, while sitting on the seat,<br />
the tips of your toes touch the ground on both<br />
sides.<br />
Inclination of the seat and distance from<br />
handle bar<br />
• Loosen the nut of seat piston or inner<br />
hexagon bolt (2)<br />
• Move seat forward or backward<br />
• Incline the seat<br />
• Tighten the nut or inner hexagon bolt<br />
Caution! The seat support must remain<br />
clamped at least up to the mark. Otherwise<br />
it might break, leading to a fall! Leather<br />
seats can discolour clothes when used<br />
initially under wet conditions. Frequent<br />
re-adjustments of the seat can leave<br />
permanent scratches on the surface of the<br />
seat support due to the mechanical action.<br />
These damages fall under normal wear<br />
and tear, and do not constitute a case of<br />
materials defect liability.<br />
Handle bar and handle bar stem<br />
The handle bar can be adjusted as follows:<br />
Caution! After a fall on the handle bar, you<br />
must replace the handle bar and stem.<br />
Invisible micro cracks can lead to breakage<br />
and therefore, pose a risk of falling!<br />
34
<strong>ED</strong>-<strong>1.2</strong> <strong>Pedelec</strong> with Lithium-ion battery<br />
Adjustment:<br />
• Loosen the screw joint.<br />
• Rotate the handle bar to the desired position.<br />
• Tighten the screw joint.<br />
„Ahead“ Stem<br />
This front end cannot be height-adjusted!<br />
Adjusting height:<br />
• Loosen the nut or inner hexagon bolt of the<br />
expander bolt (Figure, pos.1)<br />
• Loosen the bolt with a gentle hammer blow<br />
and adjust the correct handle bar height.<br />
• Tighten the expander bolt finally.<br />
Caution! Please pay attention to the<br />
marking, which should under no<br />
circumstance project out of the control<br />
tube. Danger of breaking – and therefore,<br />
risk of falling!<br />
GB<br />
Frequent re-adjustments of the seat can leave<br />
permanent scratches on the surface of the<br />
seat support due to mechanical action. These<br />
damages falls under normal wear and tear, and<br />
does not constitute a case of materials defect<br />
liability.<br />
Adjusting the inclination of the handle bar:<br />
• Loosing the joint (see Figure, pos. 2)<br />
• Rotate to the correct position<br />
• Tighten the joint<br />
Angular adjustment of handle bar stem:<br />
This stem offers more flexibility in adjusting the<br />
handle bar position:<br />
Brake<br />
The brake system must be checked before each<br />
ride. Only the dealer should be entrusted with<br />
the job of adjusting the brakes. Readjustment<br />
of the brakes is required when you observe an<br />
increasing idle travel of the hand brake lever.<br />
The same comes closer and closer to the<br />
handle bar grip due to the wear and tear of<br />
the brake rubber (shoe). Regular readjustment<br />
is necessary. The brake rubbers are parts<br />
subjected to wear and tear and they do not<br />
constitute a materials defect liability.<br />
Coaster brake hub<br />
The coaster brake hub is a rear wheel brake that<br />
is activated when you pedal backwards. You<br />
must practice a little to get the hang of when the<br />
brake is triggered.<br />
35
Pedals<br />
The pedals must be fixed tightly at all times.<br />
During assembly and dismantling, please<br />
keep in mind that the pedals have two types<br />
of threads. The threads on the pedals and the<br />
treadle are exposed to strong forces. They hold<br />
only if the pedals are screwed tightly. The right<br />
pedal (chain side) is marked with R at the axle<br />
end and has right-hand threads. The left pedal is<br />
marked with L at the axle end and has left-hand<br />
threads.<br />
The right pedal must therefore be screwed in the<br />
clockwise direction, while the left pedal must be<br />
screwed in the opposite direction.<br />
Foot pedals<br />
The foot pedals are mounted with hexagon<br />
bolts on the square attachments of the bottom<br />
bracket axle. The stable hub of the foot pedal<br />
must be checked regularly. Remove the safety<br />
caps and tighten the screws located below<br />
them.<br />
Handle bar bearing<br />
Check:<br />
Apply the brake for the front wheel and move the<br />
cycle forward and backward. If there is too much<br />
tolerance due to wear and tear, the bearing<br />
must be adjusted without delay. The adjustment<br />
should be done by a specialized workshop.<br />
Spokes<br />
The spokes expand and become loose in<br />
course of time. They must be centred regularly<br />
according to the degree of use. The centring of<br />
the wheel and tightening of the spokes should<br />
be entrusted to a specialized workshop. A<br />
uniform and proper tightening of the spokes is<br />
necessary for a uniform rotation of the wheels.<br />
Loose spokes, non-uniform spanning or<br />
overload may lead to broken spokes.<br />
Quick release<br />
Quick release is found at the front and rear<br />
wheels as well as at the seat tube clamp,<br />
depending on the model.<br />
Before going on a ride, check that the quick<br />
release is closed and fixed. If the front wheel<br />
clamp gets loose when you apply the brakes,<br />
stop right away and tighten the quick release.<br />
The quick release lever has two positions,<br />
CLOSE and OPEN.<br />
First adjust the tightness with the nut M. Then<br />
press the lever with a little force to the position<br />
CLOSE.<br />
36
<strong>ED</strong>-<strong>1.2</strong> <strong>Pedelec</strong> with Lithium-ion battery<br />
Caution! A loose wheel, especially a loose<br />
front wheel poses maximum risk of falling!<br />
There are 3 valve systems for cycle tubes:<br />
Please note that in case of Sclaverand valves,<br />
you must first remove the dust cap and loosen<br />
the knurled screw to pump or vent air. Always<br />
make sure that the tyres have sufficient profile<br />
and an undamaged body.<br />
Rims<br />
Rim wear indicator:<br />
Many aluminium rims are equipped with a<br />
wear indicator. Request your dealer to provide<br />
detailed information.<br />
GB<br />
Tyres and rims<br />
The maximum permissible tyre pressure is<br />
specified on the outer side of the tyre. Do not<br />
ride the cycle with too little air (wheel skims) or<br />
too much air (tube explodes). Wrong air pressure<br />
or flat tyres lead to increased wear and tear even<br />
if the bicycle is not used.<br />
Our recommendation:<br />
Tyre size<br />
Air pressure<br />
front rear<br />
47-559 (26“x1,75x2) 2,5 3,0<br />
50-559 (26“x1,90) 2,0 2,5<br />
52-559 (26“x2,25x2) 2,0 2,5<br />
57-559 (26“x2,125) 2,0 2,5<br />
37-622 (28“x1 3/8x1 5/8) 3,5 4,0<br />
40-622 (28“x1 3/8) 3,0 3,5<br />
47-622 (28“x1,75x2) 2,5 3,0<br />
50-622 (28“x1,90) 2,5 3,0<br />
Caution! A loose wheel, especially a loose<br />
front wheel poses maximum risk of falling!<br />
Chain tensioning<br />
Ensure that the chain is tensioned correctly; it<br />
is the most important part of the drive module.<br />
A regular check is necessary since the chain<br />
stretches in course of time. If necessary get the<br />
chain re-tensioned by the dealer. As shown in<br />
Figure, it should be possible to slightly move the<br />
chain up and down by approximately 1.5 cm at<br />
the centre of the two sprockets.<br />
37
Torque specifications<br />
Axle nuts :<br />
front wheel 20 Nm<br />
rear wheel 25 Nm<br />
Foot pedal mounting 30 Nm<br />
Brake pad mounting 5 Nm<br />
Dynamo mounting 10 Nm<br />
Other screws:<br />
M4 2,1 Nm<br />
M5 4,2 Nm<br />
M6 7,3 Nm<br />
M8 17 Nm<br />
M10 34 Nm<br />
Operation of the<br />
<strong>Pedelec</strong> Drive<br />
For operation of the bike’s functions, please<br />
refer to „General operation“. On the handle<br />
bar towards the left there is a control panel for<br />
controlling the auxiliary electrical drive. Here,<br />
the <strong>ED</strong> <strong>1.2</strong> <strong>Pedelec</strong> is switched on and off. The<br />
desired drive mode is also activated here. A<br />
four-phase L<strong>ED</strong> at the left displays the battery<br />
charge status, i.e., the remaining capacity.<br />
Press the switch “ON/OFF” to switch the system<br />
on. Up to four L<strong>ED</strong>s light up to indicate the drive<br />
battery status. The lower can be used to activate<br />
the 4 modes. It limits the driving power and<br />
helps significantly to spare battery capacity.<br />
The auxiliary drive of the <strong>Pedelec</strong> starts<br />
automatically after half a pedal rotation. Thus<br />
the <strong>Pedelec</strong> complies completely with the<br />
European standard for this vehicle type.<br />
Recommended manner of driving:<br />
After activating the system, select the drive<br />
mode and set the <strong>Pedelec</strong> in motion by<br />
pedaling. At gradual ascents, the <strong>Pedelec</strong><br />
should be pushed gently on foot so that the<br />
motor does not have to gain force from zero<br />
rotation. Otherwise, it would draw a lot of<br />
power and would not develop any appreciable<br />
propulsion between 0 to 3 km/h.<br />
To increase the mileage, you should also apply<br />
force on the pedals in all driving situations,<br />
because if you drive with motor power only,<br />
the performance of the system remains<br />
conspicuously below its possibilities. The<br />
activation of the “1 - 4 Mode” restricts the max.<br />
operating-power level, which saves battery<br />
capacity.<br />
4-Mode Control Panel:<br />
ON / OFF<br />
drive battery status<br />
Mode 1 - 4<br />
Operational range and its factors<br />
The range that can be attained with a fully<br />
charged battery is dependent upon additional<br />
factors such as incline, headwind, condition of<br />
road surface, tire pressure, use of gears as well<br />
as the pedal assistance and the weight of the<br />
driver. Typical distance with an average use of<br />
pedal assistance and a fully charged battery<br />
ranges between 20 and 70 km according to the<br />
mode selected.<br />
38
<strong>ED</strong>-<strong>1.2</strong> <strong>Pedelec</strong> with Lithium-ion battery<br />
mode 1<br />
mode 2<br />
mode 3<br />
mode 4<br />
up to 70 km<br />
up to 45 km<br />
up to 35 km<br />
up to 25 km<br />
It is practically impossible to provide absolute<br />
data regarding the range as various factors<br />
influence the assistance performance. To begin<br />
with, the battery must be optimally charged.<br />
This can be ensured by using the original<br />
charger, through sufficient charging time, the<br />
age of the battery as well as its continuous<br />
maintenance.<br />
If all these factors are favorable, i.e. the<br />
operating temperature is also between 5 and 35<br />
°C and a full charge has taken place, then 37V<br />
x 8.8Ah = 325 Wh of stored energy should be<br />
available to begin driving.<br />
Then try the same in the reverse direction. This<br />
way you will learn the functioning of the gear.<br />
Do not ever change gear when the cycle is<br />
stationary or during reverse pedalling. Select<br />
your gear transmission ratio in front according<br />
to the terrain and exercise additional control<br />
with the rear sprocket. The chain should not<br />
run crosswise, i.e., with very steep inclination,<br />
because otherwise chain and gear wheel will<br />
wear out fast. Use the derailleur as illustrated in<br />
Figure.<br />
With the battery’s increasing age, the maximum<br />
amount of stored energy can sink by a third and<br />
in so doing the running distance too.<br />
On the whole, lithium-ion batteries can<br />
experience up to 500 full charge cycles, but<br />
through aging the capacity will sink in due<br />
course down to 85 - 65 %.<br />
GB<br />
Providing good maintenance is taken, then a<br />
life expectancy of approximately 3 – 5 years<br />
is possible. The capacity will decrease slowly<br />
but steadily.<br />
General operation<br />
Gear changing<br />
If you are not yet familiar with a gear change,<br />
practice handling your new <strong>Pedelec</strong>, braking<br />
and negotiating curves but do it away from<br />
public roads.<br />
Derailleur<br />
First switch the chain to the centre pinion at<br />
the rear. Switch between the front chain rings.<br />
Gear adjustment:<br />
The gear must be adjusted regularly, depending<br />
on the type of gear usage. Let your dealer do all<br />
the gear settings.<br />
Brakes<br />
Your <strong>Pedelec</strong> is equipped with two independent<br />
brakes. The right brake lever works on the front<br />
wheel brake, and the left one on the rear wheel<br />
brake. You can change this order by changing<br />
the brake wires on the brake lever. Get this done<br />
by your dealer.<br />
Hand brakes<br />
Check the smooth functioning of the brakes<br />
before each trip. Contact the dealer if you detect<br />
slackening of the braking effect! The brake shoe<br />
or shoes are labelled. Always use spare parts of<br />
the same label.<br />
V-brake<br />
This brake is activated by pulling the brake<br />
lever at the handle bar of your cycle. Two brake<br />
39
shoes act on the rim edges. Due to its improved<br />
design, the V-brake achieves excellent braking<br />
values under dry and wet conditions, but holds<br />
certain risks, especially for inexperienced cycle<br />
riders.<br />
You can lose control over your cycle if you apply<br />
the brake in the wrong way. Practice applying<br />
this brake, particularly if you are a beginner. Ride<br />
slowly at first and use the brake lever carefully<br />
to familiarize yourself with the response of the<br />
brakes.<br />
Please contact your dealer to learn how to<br />
adjust the braking power and study the relevant<br />
instruction leaflet of the manufacturer.<br />
Hydraulic brake<br />
This brake is also activated by pulling the<br />
brake lever at the handle bar of your cycle. Two<br />
brake rubbers act on the rim edges. Instead of<br />
Bowden control cables, this brake has brake<br />
tubes that are filled with hydraulic oil. Consult<br />
your dealer and read the detailed technical<br />
instructions of the manufacturer. The hydraulic<br />
brake is very sensitive and can be exactly<br />
calibrated. You can test the brake response<br />
through a trial run.<br />
Roller brake<br />
This brake too is activated with the help of<br />
the brake lever on the handle bar. The braking<br />
mechanism acts on the wheel hub and is well<br />
protected from bad weather. Please note that<br />
a large frictional heat is generated, resulting in<br />
heat accumulation, if you apply the brake for a<br />
long time (going downhill).<br />
Caution! Do not touch the heated hub<br />
body. Cooling-off time after prolonged<br />
braking when going downhill is<br />
approximately 30 minutes.<br />
Disk brake<br />
This brake too is activated with the help of the<br />
brake lever on the handle bar. The principle<br />
is similar to that of the rim brake, the only<br />
difference being that this brake sits on the hub.<br />
The brake pads act on a brake disk.<br />
Caution! Risk of fall and injury when<br />
applying the brake suddenly in emergency<br />
situations!<br />
40
<strong>ED</strong>-<strong>1.2</strong> <strong>Pedelec</strong> with Lithium-ion battery<br />
Load transportation<br />
Maintenance instructions<br />
• When transporting loads, ensure they<br />
are fastened well. Always observe the<br />
permissible carrying capacity of the luggage<br />
carrier!<br />
• Do not carry any bags or other objects on<br />
your handle bar! This affects the driving<br />
safety. Aluminium handle bars are not<br />
designed to support loads!<br />
Trailer<br />
• Observe the maximum permissible speed of<br />
25 km/h if you use a trailer.<br />
• Max. permissible trailer load is 40 kg<br />
• Use only tested trailer couplings and fix them<br />
at the prescribed positions.<br />
• Use only trailers that correspond to the latest<br />
safety technology.<br />
• First try out the trailer without load.<br />
• Follow the StVZO (Road Traffic Licensing<br />
Regulations) requirements for the lighting<br />
equipment of the trailer.<br />
• No liability for damages on account of trailer<br />
usage!<br />
Front wheel luggage carrier, basket<br />
• Follow the manufacturer specifications on<br />
the components for loading.<br />
• Avoid overloading!<br />
• Do not transport any living animals!<br />
Rear wheel luggage carrier<br />
• Observe the manufacturer specifications on<br />
the components for loading.<br />
• Use the standard transportation bags,<br />
baskets and clamping devices.<br />
• Do not transport any persons or living<br />
animals.<br />
To enjoy the comfort of the numerous functions<br />
for a long time to come, the <strong>Pedelec</strong> should be<br />
maintained just like a normal cycle. Besides, to<br />
guarantee riding safety, regular checks must be<br />
performed on the brake, the tyre pressure, the<br />
different screw joints, especially handle bar, seat<br />
and axle nuts without fail.<br />
Maintenance of the <strong>Pedelec</strong> drive:<br />
When maintaining the auxiliary electrical drive<br />
system, ensure through appropriate handling<br />
the maximum capacity of the drive battery and<br />
protection of the other electrical components<br />
against prolonged wet conditions. As far as<br />
possible, the Lithium-ion battery should be<br />
recharged only after complete discharge. Please<br />
try to avoid immediate re-charging of a nearly<br />
full battery after a short ride.<br />
In winter or during longer periods of non-use,<br />
the battery should be recharged at the latest<br />
after 2 - 3 month. Only this way you can ensure<br />
a long product life. If you do not use the battery<br />
over longer periods, take the battery out of<br />
the <strong>Pedelec</strong>. fter a ride in rain or if a lot of mud<br />
gets deposited on the housing components,<br />
the dirt must be wiped away as thoroughly as<br />
possible with a wet sponge. Let the <strong>Pedelec</strong> dry<br />
afterwards.<br />
Never use a pressurized water jet or a steamcleaning<br />
device. The system is protected<br />
against water sprays and is therefore rainproof,<br />
however, the electrical system is not fully sealed.<br />
Thorough wetting of the cable harness can lead<br />
to short-circuits that can destroy the digital<br />
control of the system. Hence, avoid transporting<br />
the <strong>Pedelec</strong> on the luggage rack of your car with<br />
the battery inserted when it is raining. The strong<br />
slip stream forces water all across the frame and<br />
into the battery housing.<br />
GB<br />
Caution! Risk of fall and injury when<br />
applying the brake suddenly in emergency<br />
situations!<br />
41
If such transportation is required, do not forget<br />
to take the battery out of the <strong>Pedelec</strong> in advance<br />
and upon arrival, dry the wet bicycle sufficiently<br />
before re-inserting the battery.<br />
Operating instructions<br />
• Before using the <strong>Pedelec</strong>, it is recommended<br />
that you protect the chrome parts and<br />
the frame with any commercial cycle care<br />
product.<br />
• Clean the cycle regularly from dust and dirt<br />
with a sponge or soft cloth. Use a normal<br />
cycle cleaning product and a protective<br />
agent .<br />
• Never use high-pressure cleaners to clean<br />
hubs and pedal bearing. This will damage<br />
the components.<br />
• Ensure that the tyres and brake rubber do<br />
not come in contact with oil.<br />
Preserving in Winter<br />
The <strong>Pedelec</strong> should be carefully preserved in<br />
case of long-term storage in the winter months.<br />
Ensure that the <strong>Pedelec</strong> is parked in a room<br />
with constant temperature. Large temperature<br />
fluctuations as well as humidity have a<br />
negative effect on all Chromium and light metal<br />
components. To store it away for winter, check<br />
the <strong>Pedelec</strong> on the whole for damages to avoid<br />
any workshop repairs in spring. Unburden the<br />
tyres by hanging up the <strong>Pedelec</strong>.<br />
If you do not intend using the <strong>Pedelec</strong> for longer<br />
periods, pull out the fuse of the battery and store<br />
it in a cool and dry room.<br />
The recommended storage temperature for<br />
the battery is 15°C.<br />
42
<strong>ED</strong>-<strong>1.2</strong> <strong>Pedelec</strong> with Lithium-ion battery<br />
Dismantling the front wheel<br />
If due to a tire damage you have to dismantle<br />
the front wheel, please proceed as follows:<br />
Dismantling:<br />
Open the connector on the right site of the fork.<br />
Remove the rubbercap of the axle and loosen<br />
the axelnuts of the wheel.<br />
Now you can remove the wheel.<br />
Assembly:<br />
Insert the front wheel and place the torque<br />
protection washers on the hub axle inside the<br />
fork. Give a few turns to the axle nuts. Align the<br />
front wheel and tighten the axle nuts.<br />
Reconnect the plug-in connector.<br />
Models with rear hub motor<br />
Please apply the same procedures as shown<br />
above.<br />
GB<br />
43
Battery return / recycling<br />
Please do not dispose the battery pack<br />
with other household garbage. Appropriate<br />
containers have been provided by the battery<br />
industry as well as the community collection<br />
centres for the proper disposal of batteries. If<br />
you want to send a battery pack, please talk<br />
to your dealer, because Lithium-ion batteries<br />
cannot be shipped without labelling.<br />
Lithium ion batteries are classified as hazardous<br />
substances due to their Lithium content, which<br />
is chemically very reactive. They are therefore<br />
subjected to mandatory accident safety tests in<br />
the development phase, which ensure that an<br />
external destructive impact does not trigger any<br />
uncontrollable processes. The correct labeling<br />
on dispatch packages e.g. helps the fire brigade<br />
to decide which fire extinguishing system should<br />
be used in case of car accident. Certain cell<br />
structure technologies and a protective circuit<br />
ensure that no electrical overloads occur during<br />
normal operation 1 .<br />
Please also observe the instructions printed at<br />
the bottom of the battery:<br />
44
<strong>ED</strong>-<strong>1.2</strong> <strong>Pedelec</strong> with Lithium-ion battery<br />
Technical data<br />
of <strong>ED</strong>-2.1 <strong>Pedelec</strong><br />
Drive system<br />
<strong>Pedelec</strong>/EPAC (Electrical Power Assist Cycle)<br />
Extra cycle drive with 250W motor, supports up<br />
to 25 km/h, activated via Pedal rotary sensor.<br />
Motor<br />
BLDC gear - motor. The full form of BLDC is<br />
Brushless-DC i.e., a brushless electronically<br />
commuted 3-phase DC motor, works with max.<br />
250W steady nominal power.<br />
Control<br />
BLDC motor controller with digital program<br />
control according to Euro standard. 2 Drive<br />
modes: normal and Eco. The auxiliary actuator<br />
is automatically activated upon use of the pedal,<br />
and assists travel at speeds of up to max. 25<br />
km/h. If the brake is activated, the auxiliary<br />
actuator is automatically shut off. In Eco mode,<br />
the operating power level is restricted.<br />
Battery<br />
37V 8,8Ah (325Wh) Lithium-ion Battery of<br />
European manufacture with 5 L<strong>ED</strong> capacity<br />
display, weight 2.4 kg, up to 500 full charging<br />
cycles or 3 - 4 years life expectancy under<br />
optimum use conditions.<br />
Charging device<br />
CC-CV charging device with 2.0A charging<br />
current full charging of 37V 8,8Ah battery lasts<br />
about 5 h. Another 2 hours of further charging<br />
for optimized cell balancing is recommended<br />
every tenth full charge.<br />
Mileage<br />
Depends significantly on the selected operation<br />
mode, one’s individual manner of driving - along<br />
with other factors!<br />
Faults / Cause / Remedy<br />
1. Operating unit<br />
1.1 No L<strong>ED</strong> lights up at the left on activating the<br />
<strong>Pedelec</strong><br />
Cause:<br />
Battery is not inserted<br />
properly<br />
Fault in battery<br />
Cable / contact fault<br />
Electronic circuit is<br />
defective<br />
Remedy:<br />
> Re-insert battery<br />
>Contact dealer<br />
> Contact dealer<br />
> Contact dealer<br />
<strong>1.2</strong> The <strong>Pedelec</strong> switches off during the drive<br />
Cause:<br />
Battery is empty<br />
Electronic circuit<br />
is defective<br />
Plug-in connection<br />
has disengaged<br />
2. Battery<br />
Remedy:<br />
> Recharge battery<br />
fully<br />
> Contact dealer<br />
> Contact dealer<br />
2.1 No L<strong>ED</strong> lights up on pressing the battery<br />
charging status display switch<br />
Cause:<br />
Remedy:<br />
Battery is empty > Charge the battery<br />
fully.<br />
Fuse in the battery<br />
is defective<br />
> Replace fuse<br />
Cells in the battery pack<br />
are defective<br />
> Contact dealer<br />
2.2 The capacity of the battery has come<br />
down drastically<br />
Cause:<br />
Remedy:<br />
The battery is<br />
used-up (old)<br />
> Replace the battery<br />
The charging device<br />
is defective<br />
> Contact dealer<br />
Charging plug / charging<br />
cable is damaged > Contact dealer<br />
GB<br />
45
3. Motor<br />
3.1 The motor does not run, but the operating<br />
elements and the battery function<br />
Cause:<br />
The motor cable has<br />
no contact<br />
Other cable /<br />
contact fault<br />
Pedal sensor<br />
is defective<br />
Electronic circuit<br />
is defective<br />
Remedy:<br />
> Check plug, it is not<br />
inserted properly<br />
> Contact dealer<br />
> Contact dealer<br />
> Contact dealer<br />
4. Pedal sensor<br />
4.1 The motor does not work, but the operating<br />
elements and the battery function<br />
Cause:<br />
Remedy:<br />
Pedal sensor is defective > Contact dealer<br />
5. Charging device<br />
Refer to Chapter “Charging the drive battery”<br />
or Item 2.2 of this list<br />
46
<strong>ED</strong>-<strong>1.2</strong> <strong>Pedelec</strong> with Lithium-ion battery<br />
GB<br />
EC Declaration of Conformity -<br />
The manufacturer:<br />
Pantherwerke AG<br />
Alter Postweg 190<br />
32584 Löhne<br />
Herewith we declare, that the <strong>Pedelec</strong>s with drive units:<br />
<strong>ED</strong><strong>1.2</strong><br />
is complying with all essential requirements of the Machinery Directive 2006/42/EC<br />
and Directive 2004/108/EC relating to electromagnetic compatibility<br />
The following technical standards were used:<br />
DIN EN 15194<br />
DIN EN 14764<br />
Löhne, 02.0<strong>1.2</strong>012. The Managing Director<br />
GB<br />
47
Démarrage rapide !<br />
Bien que vous soyez impatients d’utiliser votre<br />
nouveau <strong>Pedelec</strong> <strong>ED</strong>-<strong>1.2</strong>, il est impératif de<br />
suivre les étapes suivantes avant votre première<br />
sortie.<br />
Le <strong>Pedelec</strong> <strong>ED</strong>-<strong>1.2</strong> roule avec une<br />
batterie lithium-ion. Une nouvelle batterie<br />
<strong>Pedelec</strong> <strong>ED</strong>-<strong>1.2</strong> est en “mode livraison”.<br />
Cela signifie que l’électronique interne<br />
de la batterie est presque entièrement<br />
déconnectée et que la batterie n’émet<br />
pas de courant électrique.Afin d’activer<br />
la batterie, laissez-la dans la station<br />
d’accueil et connectez le chargeur compris<br />
dans la livraison. Après env. 30 secondes,<br />
l’électronique est de nouveau entièrement<br />
en marche. Veuillez maintenant vérifier<br />
l’état de charge actuel en appuyant sur la<br />
touche du voyant DEL sur votre batterie.<br />
• Chargez maintenant entièrement la batterie !<br />
Utiliser uniquement le chargeur lithium-ion<br />
original PanTerra.<br />
• Ajuster le guidon et la selle, contrôler le bon<br />
fonctionnement de l’entraînement et des<br />
freins, et vérifier que les vis, et en particulier<br />
les écrous des rues, sont bien serrés.<br />
• Commencez à pédaler. Après un demi-tour<br />
de pédale, le moteur est activé.<br />
• Si vous roulez pour la première fois, veuillez<br />
essayer les 4 modes de conduite dans une<br />
rue sans passage.<br />
• Il y a 4 modes de conduite.. Les modes 1-3<br />
limitent le régime pendant la conduite. Il est<br />
ainsi possible d’augmenter l’autonomie.<br />
• À la fin du trajet, éteindre le système à<br />
gauche en appuyant sur « I ».<br />
• Le <strong>Pedelec</strong> peut également s’utiliser avec<br />
la batterie à plat, comme un vélo habituel.<br />
L’électronique de la batterie évite qu’elle se<br />
décharge complètement (décharge profonde)<br />
et le moteur possède une roue libre.<br />
• Si vous n’utilisez pas la batterie de<br />
vélo pendant longtemps, rechargez-la<br />
complètement au plus tard 3 mois après.<br />
• Attention à respecter les règles générales de<br />
sécurité et le code de la route.<br />
• Faites attention aux autres usagers de la<br />
route et portez un casque pour votre propre<br />
sécurité.<br />
Nous vous souhaitons bonne route sur votre<br />
<strong>Pedelec</strong> <strong>ED</strong>-<strong>1.2</strong> !<br />
• Mettre en marche le système à gauche du<br />
guidon : Appuyer sur l’interrupteur « I » du<br />
panneau de commande. Le <strong>Pedelec</strong> <strong>ED</strong>-<strong>1.2</strong><br />
est maintenant prêt à rouler.<br />
L’électronique s’éteint cependant<br />
automatiquement après environ 8 minutes<br />
d’inactivité afin d’économiser l’énergie.<br />
Si cela se produit, il suffit d’éteindre et de<br />
rallumer.<br />
48
<strong>Pedelec</strong> <strong>ED</strong>-<strong>1.2</strong> à batterie lithium-ion<br />
Sommaire<br />
Démarrage rapide !......................................... 48<br />
Sommaire........................................................ 49<br />
Bienvenue !..................................................... 50<br />
Votre <strong>Pedelec</strong> <strong>ED</strong>-<strong>1.2</strong> et ses composants...... 51<br />
Consignes générales de sécurité.................... 52<br />
Bien se comporter sur la route....................... 52<br />
Manier le <strong>Pedelec</strong> avec précaution................. 53<br />
Poids maximum supporté par le <strong>Pedelec</strong>....... 53<br />
Utilisation conforme........................................ 53<br />
Responsabilité pour vices cachés.................. 54<br />
Limites de responsabilité<br />
pour vices cachés........................................... 54<br />
Revendication de la responsabilité<br />
pour vices cachés........................................... 54<br />
Exclusion de la responsabilité<br />
pour vices cachés........................................... 54<br />
Mise en marche du <strong>Pedelec</strong> <strong>ED</strong>-<strong>1.2</strong>.............. 55<br />
Mise en marche de la batterie de vélo............ 55<br />
Retirer et placer la batterie.............................. 56<br />
Charger la batterie de vélo.............................. 57<br />
Charge d’entretien longue durée.................... 58<br />
Partie classique du vélo :................................ 59<br />
Selle et guidon................................................ 59<br />
Guidon et potence.......................................... 59<br />
Potence « Ahead ».......................................... 60<br />
Freins.............................................................. 60<br />
Frein à rétropédalage de la roue arrière.......... 60<br />
Pédales........................................................... 60<br />
Manivelles de pédalier.................................... 61<br />
Douille de direction......................................... 61<br />
Rayons............................................................ 61<br />
Attache rapide................................................. 61<br />
Pneus et jantes............................................... 62<br />
Jantes............................................................. 62<br />
Tension de la chaîne....................................... 62<br />
Maniement de l’assistance électrique<br />
du <strong>Pedelec</strong>...................................................... 63<br />
Conseils de conduite...................................... 63<br />
Autonomie et facteurs déterminants............... 64<br />
Utilisation générale......................................... 64<br />
Vitesses........................................................... 64<br />
Dérailleur......................................................... 64<br />
Freins.............................................................. 65<br />
Frein à rétropédalage...................................... 65<br />
Freins manuels ............................................... 65<br />
Frein « V-Brake »............................................. 65<br />
Frein hydraulique............................................ 65<br />
Frein à tambour............................................... 65<br />
Frein à disque................................................. 66<br />
Transport de charges...................................... 66<br />
Remorque....................................................... 66<br />
Consignes d’entretien..................................... 66<br />
Entretien de l’assistance<br />
électrique du <strong>Pedelec</strong>..................................... 66<br />
Consignes d’entretien générales.................... 67<br />
Entretien en hiver............................................ 67<br />
Démonter la roue avant................................... 67<br />
Monter la roue avant....................................... 68<br />
Retourner/recycler la batterie......................... 68<br />
Technical Data ................................................ 69<br />
Pannes/causes/solution.................................. 69<br />
Déclaration de conformité UE......................... 71<br />
F<br />
49
Bienvenue !<br />
PanTerra – intelligent electric!<br />
Cher/chère client(e),<br />
Nous vous remercions d’avoir choisi le <strong>Pedelec</strong><br />
<strong>ED</strong>-<strong>1.2</strong>, un modèle doté de la technologie<br />
d’assistance électrique PanTerra ! Cette<br />
assistance électrique offre un mode de<br />
déplacement facile et alternatif. Vous participez<br />
ainsi à une forme de déplacement tournée vers<br />
l’avenir en matière d’écologie !<br />
Le vélo électrique <strong>ED</strong>-<strong>1.2</strong> est un <strong>Pedelec</strong>1 ;<br />
cela signifie que l’assistance électrique<br />
supplémentaire vous soutient jusqu’à une<br />
vitesse de 25km/h tout en pédalant. La<br />
réalisation technique du <strong>Pedelec</strong> est conforme<br />
à la norme européenne EN15194 pour les<br />
vélos électromoteurs et la norme européenne<br />
concernant les vélos EN14764.<br />
Le casque n’est pas obligatoire. Pour votre<br />
propre sécurité, nous vous recommandons de<br />
porter un casque de vélo à chaque sortie ! Vous<br />
êtes en possession d’un produit de qualité qui<br />
vous apportera beaucoup de plaisir. Que ce soit<br />
pour aller faire les courses, pour aller au travail<br />
ou pour vos loisirs, des excursions ou pour vous<br />
accompagner en vacances.<br />
La fabrication et le choix des composants<br />
se font avec grand soin afin que vous aussi<br />
puissiez faire partie du groupe enthousiaste des<br />
vélos “électrifiés” !<br />
En suivant les nombreux conseils prodigués<br />
dans ce manuel, vous pouvez conserver votre<br />
<strong>Pedelec</strong> en parfait état et contribuer grandement<br />
à votre propre sécurité.<br />
Ce manuel de l’utilisateur est valable pour toutes<br />
les variantes d’équipements du <strong>Pedelec</strong>. Le<br />
cadre et le type de dérailleur peuvent varier.<br />
Attention à ne prendre en compte que les<br />
passages concernant votre modèle de vélo.<br />
Le but des dessins et des photos est d’illustrer<br />
les explications, mais leur prétention n’est pas<br />
de reproduire toutes les variantes.<br />
Laissez-vous électrifier !<br />
Tous les paragraphes concernant votre<br />
sécurité dans ce mode d’emploi sont<br />
marqués d’un symbole d’avertissement.<br />
Tous les utilisateurs de votre vélo doivent<br />
avoir accès aux consignes de sécurité<br />
prodiguées dans ce manuel !<br />
1<br />
Le terme <strong>Pedelec</strong> a été composé à partir des mots<br />
pédale, électrique et cycle. Il décrit un type particulier<br />
de vélo électrique qui se distingue du dénommé E-Bike<br />
dans la mesure où la loi stipule que son assistance<br />
supplémentaire ne peut fonctionner qu’avec un<br />
pédalage simultané.<br />
50
<strong>Pedelec</strong> <strong>ED</strong>-<strong>1.2</strong> à batterie lithium-ion<br />
Votre <strong>Pedelec</strong> <strong>ED</strong>-<strong>1.2</strong> et ses composants<br />
Batterie de vélo<br />
Indicateur de l’état de la batterie<br />
Verrouillage de la batterie<br />
Boîtier électronique moteur<br />
Prise d’entrée de charge<br />
Manivelle à détecteur de rotation<br />
Moteur moyeu<br />
Coiffe de connecteur moteur<br />
Éléments de réglage<br />
sur le guidon<br />
<br />
<br />
<br />
<br />
<br />
<br />
<br />
<br />
F<br />
51
Consignes générales de<br />
sécurité<br />
Sécurité routière<br />
Conformément à la législation allemande sur<br />
les licences routières, les vélos <strong>Pedelec</strong> doivent<br />
satisfaire, comme tout vélo, les exigences<br />
minimales légales :<br />
• Deux freins en état de marche, indépendants<br />
l’un de l’autre<br />
• Une sonnette à tonalité aiguë<br />
• Une dynamo (tension nominale 6V et<br />
puissance nominale 3W) avec la marque de<br />
contrôle « K - - - »,<br />
• Une lampe à lumière blanche à l’avant<br />
• Une lampe à L<strong>ED</strong> blanche réfléchissante<br />
devant<br />
• Une lampe au dos à lumière rouge, placée au<br />
moins 25 cm au-dessus de la chaussée<br />
• Une lampe à L<strong>ED</strong> rouge derrière, placée à<br />
60 cm max. au-dessus de la chaussée<br />
• Une grande lampe à L<strong>ED</strong> rouge avec la lettre<br />
Z<br />
• Pédales dotées de bandes réfléchissantes<br />
jaunes devant et derrière, avec la marque de<br />
contrôle « K - - - ».<br />
• Deux réflecteurs jaunes sur la roue avant<br />
ainsi que sur la roue arrière ou des bandes<br />
réfléchissantes blanches latérales devant et<br />
au dos aux niveau des rayons.<br />
• Chaque élément d’éclairage doit être doté de<br />
la marque de contrôle « K - - - ».<br />
Pensez-y :<br />
• Vérifier le bon fonctionnement du vélo avant<br />
chaque virée !<br />
• Ne pas redresser, mais remplacer<br />
immédiatement les pièces tordues relevant<br />
de la sécurité comme le cadre, la fourche,<br />
le guidon, le pédalier, la tige de selle, les<br />
tringles en métal et les pédales. Danger de<br />
brisure !<br />
• N’utiliser que des pièces de rechange<br />
d’origine !<br />
Attention ! Les réparations non conformes<br />
peuvent entraîner des accidents et<br />
annulent la responsabilité pour vices<br />
cachés.<br />
Bien se comporter sur la route<br />
• Utilisez, si possible, les pistes cyclables.<br />
• Roulez toujours bien à droite et dépassez à<br />
gauche.<br />
• Avant de tourner, indiquez clairement votre<br />
intention de tourner avec le bras gauche ou<br />
droit tendu.<br />
• Roulez toujours dans le sens de conduite<br />
indiqué.<br />
• Adaptez votre vitesse aux conditions<br />
météo : une chaussée mouillée allonge votre<br />
distance de freinage.<br />
• De nuit et en cas de mauvaise visibilité,<br />
toujours rouler avec les lampes allumées.<br />
• Faites attention aux plantes et aux animaux<br />
si vous roulez sur le côté de la chaussée.<br />
• Protégez votre tête en portant un casque de<br />
vélo certifié (selon la norme DIN-EN 1078) !<br />
• Ne portez pas d’écouteurs, ni de casque<br />
audio en roulant à vélo.<br />
• Portez des vêtements adaptés (évitez les<br />
pantalons larges, utilisez des pinces au<br />
bas des jambes, portez des chaussures<br />
bien attachées), ainsi que des vêtements<br />
réfléchissants la nuit ou en cas d’intempérie.<br />
• Fixez un pare-jupe si vous roulez avec une<br />
jupe large ou un long manteau.<br />
• Attention : L’effet des freins et de la dynamo<br />
diminue par temps humide. Adaptez votre<br />
conduite en fonction de ces facteurs.<br />
52
<strong>Pedelec</strong> <strong>ED</strong>-<strong>1.2</strong> à batterie lithium-ion<br />
Risques d’accident :<br />
Rouler sans les mains ou s’accrocher à<br />
d’autres véhicules est interdit et peut être<br />
fatal.<br />
Évitez de rouler côte à côte, car cela gêne<br />
la circulation.<br />
Ne jamais rouler à deux sur un vélo<br />
(exception : un enfant dans un siège<br />
homologué).<br />
Manier le <strong>Pedelec</strong> avec précaution<br />
• Avant de transporter le vélo dans ou sur<br />
la voiture, retirer toutes les pièces qui<br />
pourraient se détacher pendant le transport<br />
(chargeur, panier, sacoches, pompe, siège<br />
enfant, etc.) !<br />
Poids maximum supporté par le <strong>Pedelec</strong><br />
• Le poids total autorisé (cycliste + bagage) sur<br />
le <strong>Pedelec</strong> est 120 kg.<br />
• Le poids additionnel du porte-bagages<br />
devrait être indiqué dessus.<br />
• Si votre vélo dispose d’un panier à l’avant, il<br />
peut peser 5 kg en plus du poids autorisé.<br />
• Les leviers de frein au niveau du guidon<br />
doivent toujours être fermement fixés.<br />
Vérifiez régulièrement leur fixation et<br />
resserrer en cas de besoin.<br />
• Faites réparer vos freins uniquement par un<br />
vélociste expérimenté !<br />
Utilisation conforme<br />
• En raison de sa conception et de ses<br />
équipements, votre <strong>Pedelec</strong> est prévu,<br />
comme un VTC, pour les routes publiques et<br />
les voies balisées.<br />
• L’équipement doit être régulièrement vérifié<br />
par l’utilisateur et, si nécessaire, remis en<br />
état.<br />
• Le fabricant n’est pas responsable en<br />
cas de non-respect des consignes de<br />
sécurité contenues dans ce manuel et<br />
des dommages engendrés. Cela vaut en<br />
particulier pour l’utilisation du <strong>Pedelec</strong> sur<br />
un terrain non viabilisé, en cas de surcharge<br />
ou lorsque les défauts n’ont pas été réparés<br />
de manière conforme. Ces utilisations<br />
n’entraînent aucune responsabilité pour<br />
vices cachés.<br />
Respectez également toutes les consignes<br />
de montage, de réparation et d’entretien ainsi<br />
que les informations fournies par le fabricant<br />
du circuit.<br />
Freinage<br />
• Freinez avec précaution à l’aide du frein de<br />
roue avant dans les virages serrés, sur les<br />
routes ensablées et glissantes, la chaussée<br />
mouillée et verglacée, afin que la roue<br />
avant ne glisse pas et que le <strong>Pedelec</strong> reste<br />
maniable !<br />
• Les freins doivent être utilisés avec diligence.<br />
Des roues qui bloquent ont un effet de<br />
freinage moindre et peuvent entraîner une<br />
accélération et une chute.<br />
• En principe, il faut freiner avant le virage et<br />
non dedans ; les freins augmentent le risque<br />
de glisser !<br />
F<br />
53
Responsabilité pour vices<br />
cachés<br />
D’un point de vue légal, la responsabilité pour<br />
vices cachés est de 24 mois. La garantie du<br />
fabricant s’applique aux défauts de matériaux et<br />
de construction sous les conditions suivantes :<br />
• Vous pouvez faire valoir la responsabilité<br />
pour vices cachés uniquement sur<br />
présentation du procès-verbal de remise et<br />
de la preuve d’achat.<br />
• La durée de la responsabilité pour vices<br />
cachés débute au jour de l’achat.<br />
• Si le vélo change de propriétaire durant cette<br />
période, le nouveau propriétaire doit être<br />
mentionné sur le procès-verbal de remise.<br />
Garantie du pack batterie :<br />
6 mois<br />
La capacité de la batterie de vélo peut être<br />
maintenue à plusieurs conditions. Dans les<br />
6 mois suivant l’achat, il faut procéder à une<br />
vérification minutieuse pour savoir si l’usure<br />
normale, l’utilisation non conforme ou un pack<br />
batterie défectueux à cause d’un défaut de<br />
fabrication a entraîné la panne.<br />
• de dégâts sur la peinture ou le chrome<br />
qui sont le résultat d’influences de<br />
l’environnement, de la météo et de l’humidité<br />
(en particulier l’air à forte teneur en sel) ainsi<br />
qu’un environnement agressif à forte teneur<br />
en ammoniaque.<br />
• de mauvaise réparation, c’est-à-dire une<br />
réparation non conforme à ce qui est décrit<br />
dans ce manuel du <strong>Pedelec</strong>.<br />
• de réparations n’ayant pas été effectuées par<br />
un vélociste.<br />
• de modifications effectuées au système<br />
d’assistance dépassant le cadre des<br />
spécifications techniques standard.<br />
• de modifications de construction par rapport<br />
à la condition du <strong>Pedelec</strong> au moment de la<br />
livraison.<br />
• de coupure du conducteur d’électricité dont<br />
l’origine ne provient pas d’un défaut de<br />
construction.<br />
• de défauts dus à une influence extérieure.<br />
• de dégâts causés par l’utilisation du <strong>Pedelec</strong><br />
en compétition.<br />
• d’utilisation non conforme de la batterie de<br />
vélo.<br />
Revendication de la responsabilité pour vices<br />
cachés<br />
• En cas de sinistre, veuillez vous adresser<br />
à votre revendeur qui sera toujours un<br />
interlocuteur compétent.<br />
Limites de responsabilité pour<br />
vices cachés<br />
La responsabilité pour vices cachés est<br />
caduque en cas<br />
Exclusion de la responsabilité pour vices<br />
cachés<br />
• Les dommages à la personne ou les<br />
dommages à d’autres pièces que les pièces<br />
d’origine de votre <strong>Pedelec</strong>, dans la mesure<br />
où cela est légalement autorisé, sont exclus<br />
de la responsabilité pour vices cachés.<br />
• d’une utilisation non conforme ou<br />
inappropriée ou d’endommagement du<br />
<strong>Pedelec</strong> suite à un accident de la route ou<br />
une chute.<br />
• de dommages résultant de l’usure normale<br />
des pièces, par ex. les roues, la chaîne, les<br />
câbles Bowden et les sabots de frein.<br />
54
<strong>Pedelec</strong> <strong>ED</strong>-<strong>1.2</strong> à batterie lithium-ion<br />
Mise en marche du <strong>Pedelec</strong><br />
<strong>ED</strong>-<strong>1.2</strong>.<br />
Les chapitres suivants du manuel pour le<br />
<strong>Pedelec</strong> <strong>ED</strong>-<strong>1.2</strong> partent du principe que tous<br />
les réglages de base concernant l’ergonomie<br />
propre au vélo et tous les contrôles de sécurité<br />
nécessaires ont déjà été effectués.<br />
• Le guidon et la selle doivent être réglés à la<br />
position souhaitée et correctement fixés.<br />
• Les roues sont suffisamment gonflées et<br />
leurs écrous d’axe sont bien serrés.<br />
• Le bon fonctionnement des freins et des<br />
pédales a été testé.<br />
• Le système d’éclairage fonctionne<br />
correctement.<br />
Consultez le chapitre « Réglages avant la<br />
première sortie » pour plus d’informations.<br />
Mise en marche de la batterie de vélo<br />
Veuillez retirer la batterie de vélo de sa station<br />
d’accueil sur le porte-bagages. Vérifiez l’état de<br />
charge de la batterie. Pour ce faire, appuyez sur<br />
le bouton du voyant DEL à l’autre extrémité de<br />
la batterie, sous la poignée. La figure montre la<br />
situation sur votre <strong>Pedelec</strong>.<br />
Veuillez maintenant vérifier l’état de charge<br />
de la batterie en appuyant sur la touche du<br />
voyant DEL concernant l’état de charge.<br />
Si les 5 voyants DEL ne sont pas tous allumés,<br />
PanTerra recommande tout d’abord de<br />
charger complètement la batterie. Pour ce<br />
faire, connectez la batterie de vélo au chargeur<br />
compris dans la livraison. Voir le chapitre<br />
« Charger la batterie de vélo ».<br />
Les batteries lithium-ion s’auto-déchargent<br />
bien moins vite que les batteries nickel<br />
et c’est pourquoi elle peuvent être<br />
entreposées environ 3 mois sans avoir<br />
besoin d’être rechargées. Si elles ne sont<br />
pas rechargées après 3 mois, elles peuvent<br />
cependant présenter des dommages<br />
au niveau de la structure chimique des<br />
cellules. Cela altère considérablement<br />
la performance de la batterie et peut la<br />
rendre inutilisable.<br />
F<br />
55
Retirer et placer la batterie<br />
(1)<br />
Retirer la batterie<br />
Pour retirer la batterie, suivez les étapes<br />
suivantes (cf. images) :<br />
• Tournez la clé de contact vers la gauche pour<br />
déverrouiller (1)<br />
• Ouvrir le couvercle (2)<br />
• Retirer la batterie hors de sa station d’accueil<br />
à l’aide du creux de poignée (3)<br />
Pour la remettre à l’intérieur, procédez de<br />
manière inversée.<br />
ouvrir<br />
clé<br />
• Assurez-vous que les contacts de la<br />
batterie (5) sont alignés sur les contacts du<br />
contrôleur de charge (4). Poussez la batterie<br />
avec une légère pression dans la station<br />
d’accueil.<br />
(2)<br />
Si vous n’arrivez pas à bien refermer le<br />
couvercle, cela signifie que la batterie n’est<br />
pas correctement placée sur les contacts du<br />
contrôleur.<br />
Le verrouillage à l’aide de la clé (1) permet de<br />
bien maintenir la batterie afin d’éviter tout dégât<br />
lié aux vibrations. Cela garantit également le bon<br />
positionnement des contacts électriques de la<br />
batterie sur le contrôleur.<br />
(3)<br />
poignée<br />
56
<strong>Pedelec</strong> <strong>ED</strong>-<strong>1.2</strong> à batterie lithium-ion<br />
(4)<br />
contacts<br />
(5)<br />
Grâce au dispositif électronique de protection<br />
de la batterie, il est garanti que la batterie ne<br />
peut être endommagée à aucun moment par un<br />
mauvais régime de charge, ni surchargée.<br />
Le chargeur est uniquement destiné au domaine<br />
interne et ne peut être mis au contact de l’eau<br />
ou de la poussière. Lisez le mode d’emploi du<br />
chargeur avant la première utilisation. Sortez<br />
le chargeur du carton, défaites l’emballage du<br />
câble et raccordez le chargeur à la douille de<br />
chargement se trouvant sur la batterie de vélo<br />
(cf. fig.). La batterie peut également être chargée<br />
sur le vélo.<br />
prise de charge<br />
Contacts de la batterie<br />
Votre <strong>Pedelec</strong> est maintenant prêt pour la<br />
route !<br />
Charger la batterie de vélo<br />
Le <strong>Pedelec</strong> <strong>ED</strong>-<strong>1.2</strong> fonctionne avec une batterie<br />
lithium-ion 37V 8,8Ah. Elle est composée de<br />
cellules de marque de qualité supérieure, reliées<br />
à un lot de cellules 37V. De plus, la batterie<br />
contient un dispositif électronique de protection<br />
qui évite la décharge complète et la surcharge.<br />
Évitez de stocker une batterie déchargée<br />
pendant des semaines Utilisez uniquement<br />
le chargeur haute qualité fourni pour batterie<br />
lithium-ion (cf. fig.) pour recharger votre batterie<br />
de vélo. Le chargeur d’origine fonctionne avec la<br />
méthode CC-CV1.<br />
1<br />
CC-CV = Constant Current – Constant Voltage :<br />
Chargement rapide grâce à une puissance de courant<br />
contrôlée et augmentation de la tension de batterie.<br />
Pour atteindre la capacité maximale, la puissance<br />
de courant est réduite pour remplir complètement la<br />
capacité résiduelle avec une tension maximale donnée<br />
exacte.<br />
Charge de la<br />
batterie externe<br />
batterie<br />
chargeur<br />
d’origine<br />
F<br />
57
Pour le chargement, connectez d’abord la<br />
batterie et branchez ensuite à la prise.<br />
En cas de charge à courant constant, le voyant<br />
de charge est rouge (0–95 % – env. 4h).<br />
Après la phase de chargement, la charge à<br />
courant constant commence avec l’égalisation<br />
des cellules (95 %–100 % – env. 1h). Le voyant<br />
est vert clignotant.<br />
Le chargement terminé, le voyant de charge est<br />
vert en continu. La batterie est maintenant prête<br />
pour la route.<br />
Pour une égalisation des cellules optimale,<br />
gardez le chargeur connecté deux heures de<br />
plus à la batterie tous les dix chargements<br />
complets.<br />
Pour arrêter le chargement, débranchez d’abord<br />
la prise, puis la batterie.<br />
Chargeur DEL : Mode :<br />
Voyant vert continu : Veille / pas de<br />
batterie :<br />
Voyant rouge continu : Charge principale<br />
(CC) 0–95 %<br />
Voyant vert clignotant : Charge finale (CV)<br />
95–100 %<br />
Voyant vert continu : Charge terminée /<br />
égalisation des cellules<br />
Charge d’entretien longue durée<br />
Les batteries lithium-ion ne maintiennent aucune<br />
charge d’entretien longue durée. Leur autodécharge<br />
est trop faible et les chargeurs ne la<br />
perçoivent pas.<br />
C’est pourquoi il est peu judicieux de connecter<br />
la batterie au chargeur en continu, spécialement<br />
en hiver ou lors d’un longue absence. Cela<br />
ne causerait aucun dégât grâce au dispositif<br />
électronique de protection de la batterie, mais<br />
cela finirait par user complètement le chargeur.<br />
Si vous n’utilisez pas le <strong>Pedelec</strong> pendant<br />
longtemps, nous vous conseillons donc de<br />
recharger la batterie lithium-ion tous les 3 mois.<br />
Ne laissez pas d’appareil électrique<br />
branché sans surveillance pendant une<br />
longue période de temps. Débranchez<br />
la fiche de secteur si vous partez en<br />
vacances ou pendant une longue absence.<br />
58<br />
Risque de court-circuit ! Faites bien<br />
attention à ce qu’aucun objet métallique<br />
ne se trouve à proximité des contacts de<br />
la batterie et de la prise du chargeur. Par<br />
température trop basse ou trop élevée<br />
(en-dessous de -10 °C ou au-dessus<br />
de +40 °C), la batterie ne doit pas être<br />
chargée. Nous vous conseillons de ne pas<br />
exposer le vélo complètement au soleil<br />
pendant le processus de charge.
<strong>Pedelec</strong> <strong>ED</strong>-<strong>1.2</strong> à batterie lithium-ion<br />
Partie classique du vélo :<br />
Réglages avant le départ<br />
• Avant chaque sortie, vérifiez que<br />
• les vis, les écrous des roues ainsi que<br />
l’attache rapide sont bien serrés et que les<br />
freins fonctionnent,<br />
• la pression d’air des pneus est suffisante,<br />
• le système d’éclairage est intact,<br />
• la sonnette fonctionne.<br />
Selle et guidon<br />
Votre vélo a été monté par un vélociste. La<br />
position du guidon et de la selle a été réglée par<br />
rapport à votre taille corporelle.<br />
En réglant la hauteur de la selle et du guidon,<br />
faites attention au repère d’insertion minimum<br />
au niveau de la tige de potence et de selle. Ne<br />
fixez jamais le guidon ou la selle au-dessus de<br />
ce repère.<br />
Selle<br />
La selle est réglable dans trois directions<br />
différentes : Hauteur, inclinaison et éloignement<br />
du guidon.<br />
Hauteur :<br />
• Déserrer la vis de fixation de la selle, qui plus<br />
est le collier de selle (cf. fig., n°1)<br />
• Enfoncer ou sortir la tige de selle.<br />
• Resserrez bien après tous les réglages.<br />
La hauteur de la selle est correctement ajustée à<br />
votre taille lorsque, assis sur la selle, vos pointes<br />
de pieds touchent le sol.<br />
• Déserrer l’écrou du chariot de selle, qui plus<br />
est la vis à six pans creux (fig., n°2)<br />
• Pousser la selle vers l’avant ou vers l’arrière<br />
• Incliner la selle<br />
• Resserrer l’écrou du chariot de selle, qui plus<br />
est la vis à six pans creux<br />
Attention ! La tige de selle doit être insérée<br />
au moins jusqu’au repère d’insertion<br />
minimum. Le cas contraire, elle risque de<br />
se briser et donc de vous faire tomber !<br />
Les selles en cuir peuvent déteindre sur les<br />
vêtements lors de la première utilisation ou<br />
si elles sont mouillées. Un réglage fréquent<br />
de la hauteur de selle peut rayer la surface<br />
de la tige à cause du frottement. Cette<br />
détérioration relève de l’usure normale<br />
et en aucun cas de la responsabilité pour<br />
vices cachés.<br />
Guidon et potence<br />
Le guidon peut être réglé comme décrit cidessous<br />
:<br />
Attention ! Après une chute sur le guidon,<br />
le guidon et la potence doivent être<br />
remplacés. De micro fissures invisibles<br />
à l’œil nu peuvent entraîner un risque de<br />
cassure et de chute !<br />
F<br />
Inclinaison de l’assise et éloignement du<br />
guidon :<br />
Régler la hauteur :<br />
• Déserrer l’écrou, qui plus est la vis à six pans<br />
creux de l’axe de fixation (fig., n°1).<br />
59
• Avec un léger coup de marteau, débloquer<br />
l’axe de fixation et régler le guidon à la<br />
hauteur voulue.<br />
• Ensuite, resserrer l’axe de fixation.<br />
Attention ! Faites attention au repère qui<br />
ne doit en aucun cas dépasser du tube de<br />
direction. Risque de cassure et de chute !<br />
Un réglage fréquent de la hauteur du guidon<br />
peut rayer la surface. Cette détérioration relève<br />
de l’usure normale et en aucun cas de la<br />
responsabilité pour vices cachés.<br />
Régler l’inclinaison du guidon<br />
– déserrer les vis (fig., n°2)<br />
– pivoter le guidon jusqu’à la position voulue<br />
– resserrer les vis.<br />
Potence à angle réglable<br />
Cette potence vous offre encore plus de<br />
flexibilité pour régler la position du guidon :<br />
Réglage<br />
• Déserrer les vis.<br />
• Faites pivoter le guidon jusqu’à la position<br />
voulue.<br />
• Resserrer les vis.<br />
Potence « Ahead »<br />
Cette potence ne peut pas se régler en hauteur !<br />
Freins<br />
Avant chaque sortie, vous devez vérifier le bon<br />
fonctionnement du système de frein. Seul un<br />
vélociste peut procéder au réglage des freins.<br />
Un frein qui a besoin de réglables<br />
supplémentaires se reconnaît à un jeu de plus<br />
en plus grand au niveau du levier de frein<br />
manuel. Cela signifie que la poignée de frein<br />
se rapproche de plus en plus de la poignée du<br />
guidon à cause de l’usure du patin de frein.<br />
Les freins doivent faire l’objet d’un équilibrage<br />
régulier. Les patins de frein sont des pièces<br />
d’usure qui ne sont pas concernées par la<br />
responsabilité pour vices cachés.<br />
Frein à rétropédalage de la roue arrière<br />
Ce frein ne nécessite aucun réglage. Faites<br />
attention cependant : le frein est sans effet si la<br />
chaîne est défectueuse ou si elle a déraillé.<br />
Pédales<br />
Les pédales doivent toujours être correctement<br />
fixées. Attention lors du montage et du<br />
démontage (par exemple pour des raisons de<br />
transport) : les pédales possèdent deux sortes<br />
de vis filetées. Les vis filetées des pédales et de<br />
la manivelle de pédalier sont soumises à de très<br />
grandes contraintes. Elles tiennent seulement<br />
lorsque les pédales sont correctement fixées.<br />
60
<strong>Pedelec</strong> <strong>ED</strong>-<strong>1.2</strong> à batterie lithium-ion<br />
La pédale droite (côté de la chaîne) est marquée<br />
d’un « R » à l’extrémité de l’axe et possède un<br />
filetage à droite. La pédale gauche est marquée<br />
d’un « L » à l’extrémité de l’axe et possède un<br />
filetage à gauche. Par conséquent, la pédale<br />
droite doit aller dans le sens des aiguilles d’une<br />
montre et la pédale gauche doit être vissée pour<br />
aller dans la direction opposée.<br />
Rayons<br />
Lors de l’utilisation du vélo, les rayons des<br />
roues s’étendent et se détendent. Ils doivent<br />
être régulièrement recentrés selon le degré<br />
d’utilisation. Confiez votre vélo à un atelier<br />
spécialisé pour recentrer les roues et tendre<br />
les rayons. Les rayons doivent être tendus<br />
de manière uniforme afin que les roues aient<br />
un mouvement parfaitement circulaire. Les<br />
rayons détendus, une tension irrégulière ou une<br />
surcharge peut entraîner leur rupture.<br />
Attache rapide<br />
Selon le modèle, l’attache rapide se trouve sur<br />
la roue avant ou arrière, au niveau du collier de<br />
serrage de la tige de selle.<br />
Manivelles de pédalier<br />
Les manivelles du pédalier sont dotés de<br />
vis à six pans creux ou non, vissées sur les<br />
embouts carrés de l’essieu de pédalier. Vérifiez<br />
régulièrement le bon maintien du pédalier, retirez<br />
les carters protège-pédalier et serrez les vis<br />
dessous.<br />
Douille de direction<br />
Essai de freinage :<br />
Actionnez la poignée de frein et poussez le vélo<br />
vers l’avant et l’arrière. S’il y du jeu résultant<br />
d’une utilisation normale, la douille doit être<br />
immédiatement ajustée. Faites faire les réglages<br />
par un atelier spécialisé.<br />
Avant toute sortie, vérifiez qu’il est fermé et<br />
bien fixé. Si vous remarquez, par exemple,<br />
que le collier de serrage de la roue avant est<br />
lâche, arrêtez-vous immédiatement et serrez<br />
correctement l’attache rapide.<br />
Le levier de l’attache rapide possède 2<br />
positions :<br />
CLOSE = FERMÉE et OPEN = OUVERTE.<br />
Réglez tout d’abord le bon maintien de l’écrou<br />
M. Appuyez ensuite fermement sur le levier pour<br />
le mettre en position fermée.<br />
Attention ! Une roue lâche, en particulier la<br />
roue avant, entraîne un très grand risque<br />
de chute !<br />
F<br />
61
Les chambres à air peuvent avoir 3 types de<br />
valves différents : Attention : pour gonfler ou<br />
dégonfler l’air d’une valve Sclaverand, il faut<br />
dévisser la valve (1) et déserrer ensuite l’écrou<br />
moleté (2).<br />
Assurez-vous toujours d’être suffisamment de<br />
profil et du bon état de la carcasse des pneus.<br />
Pneus et jantes<br />
La pression maximale autorisée des pneus<br />
est indiquée sur le flanc du train de pneus. Ne<br />
roulez pas avec trop peu d’air (la roue nage)<br />
ou un trop-plein d’air (la chambre à air éclate).<br />
Une pression d’air inadéquate accélère l’usure,<br />
même si le vélo est crevé.<br />
Notre conseil :<br />
Taille du pneu Pression d’air<br />
devant derrière<br />
47-559 (26“x1,75x2) 2,5 3,0<br />
50-559 (26“x1,90) 2,0 2,5<br />
52-559 (26“x2,25x2) 2,0 2,5<br />
57-559 (26“x2,125) 2,0 2,5<br />
37-622 (28“x1 3/8x1 5/8) 3,5 4,0<br />
40-622 (28“x1 3/8) 3,0 3,5<br />
47-622 (28“x1,75x2) 2,5 3,0<br />
50-622 (28“x1,90) 2,5 3,0<br />
Jantes<br />
Témoin d’usure des jantes<br />
Des nombreuses jantes en aluminium sont<br />
dotées d’un témoin d’usure. Demandez à votre<br />
vélociste de vous expliquer son fonctionnement.<br />
Attention à l’usure des jantes ! Vérifiez<br />
régulièrement l’état de vos jantes ! Passez<br />
chez votre vélociste à temps. RISQUE DE<br />
CASSURE et DE CHÛTE !<br />
Tension de la chaîne<br />
La chaîne est l’élément d’entraînement le plus<br />
important, il faut donc faire attention à ce qu’elle<br />
soit bien tendue. La chaîne s’étire naturellement<br />
lors de l’utilisation du vélo, il faut donc contrôler<br />
régulièrement son état. Le cas échéant, faites la<br />
retendre par un vélociste. Comme illustré dans<br />
la fig. 12, la chaîne doit pouvoir se soulever ou<br />
s’abaisser légèrement (env. 1,5 cm) au milieu<br />
des deux roues.<br />
62
<strong>Pedelec</strong> <strong>ED</strong>-<strong>1.2</strong> à batterie lithium-ion<br />
Interrupteur ON / OFF<br />
Jauge de capacité<br />
Références du moment de force<br />
Écrous d’axe :<br />
Roue avant 20 Nm<br />
Roue arrière 25 Nm<br />
Fixation du pédalier 30 Nm<br />
Fixation du sabot de frein 5 Nm<br />
Fixation de la dynamo 10 Nm<br />
Autres vis :<br />
M4 2,1 Nm<br />
M5 4,2 Nm<br />
M6 7,3 Nm<br />
M8 17 Nm<br />
M10 34 Nm<br />
Maniement de l’assistance<br />
électrique du <strong>Pedelec</strong><br />
Pour le maniement des fonctions du vélo,<br />
veuillez lire le chapitre « Utilisation générale ».<br />
Un panneau de commande se trouve sur le<br />
guidon à gauche pour contrôler l’assistance<br />
électrique supplémentaire (cf. fig.). Il sert à<br />
allumer et éteindre le <strong>Pedelec</strong> <strong>ED</strong>-<strong>1.2</strong>, ainsi qu’à<br />
activer le mode de conduite souhaité. Un voyant<br />
DEL à quatre niveaux à gauche indique l’état de<br />
charge de la batterie, c’est-à-dire la capacité<br />
restante.<br />
4 Mode<br />
Appuyer sur l’interrupteur ON/OFF au milieu<br />
pour allumer le système. Un à quatre voyant(s)<br />
DEL s’allument pour indiquer l’état de la batterie<br />
et le voyant DEL pour le mode de conduite est<br />
également allumé. L’interrupteur du bas permet<br />
d’intervertir les 4 modes de conduite. Ces<br />
derniers limitent le régime pendant la conduite<br />
vers le haut et aident ainsi à économiser la<br />
capacité de la batterie de manière visible.<br />
L’assistance électrique du <strong>Pedelec</strong> <strong>ED</strong>-<strong>1.2</strong><br />
débute automatique après un demi-tour de<br />
pédalage. De cette façon, le <strong>Pedelec</strong> <strong>ED</strong>-<strong>1.2</strong> est<br />
conforme à la norme européenne relative à ce<br />
type de véhicule.<br />
Conseils de conduite<br />
Après avoir allumé le système, sélectionnez le<br />
mode de conduite et faites avancer le <strong>Pedelec</strong><br />
<strong>ED</strong>-<strong>1.2</strong> en pédalant. En cas de petite montée,<br />
nous conseillons de pousser le <strong>Pedelec</strong><br />
légèrement vers l’avant à l’aide des pieds afin<br />
que le moteur n’ait pas à exercer une force<br />
d’entraînement élevée à partir de l’arrêt. Cela<br />
entraînerait un régime élevé car il n’exerce, entre<br />
0 à 3 km/h, encore aucune force élevée. Dans<br />
l’intérêt de l’autonomie, nous vous conseillons<br />
cependant de pédaler du mieux possible<br />
en même temps, car l’autonomie lors de la<br />
conduite avec une force de moteur majoritaire<br />
est visiblement inférieure aux possibilités du<br />
système. Le mode de conduite 1,2,3 activé<br />
limite le régime de conduite maximum et<br />
économise ainsi la capacité de la batterie. Vous<br />
63<br />
F
sentirez le soutien moindre uniquement en<br />
montée et en descente.<br />
Autonomie et facteurs déterminants<br />
L’autonomie pouvant être atteinte avec une<br />
batterie complètement chargée est visiblement<br />
déterminée par des facteurs concomitants<br />
comme les montées, le vent de face, l’état de<br />
la route, la pression des pneus, l’utilisation du<br />
dérailleur ainsi que la force de pédalage et le<br />
poids du cycliste. Pour un pédalage moyen du<br />
cycliste et une batterie complètement chargée,<br />
l’autonomie typique est entre 20 et 70 km.<br />
Mode 1<br />
Mode 2<br />
Mode 3<br />
Mode 4<br />
jusqu’à 70 km<br />
jusqu’à 45 km<br />
jusqu’à 35 km<br />
jusqu’à 25 km<br />
Il est impossible de fournir des données<br />
précises sur l’autonomie, car différents facteurs<br />
influencent la performance de l’assistance. La<br />
batterie doit également être chargée de manière<br />
optimale. Cela est garanti par le chargeur<br />
d’origine, un temps de charge suffisant, l’âge<br />
de la batterie ainsi que la manière dont elle a<br />
été entretenue. Si toutes les circonstances sont<br />
optimales, c’est-à-dire que la température en<br />
marche est entre 5 °C et 35 °C et que la batterie<br />
a été complètement chargée, elles devraient<br />
mettre à disposition 37V x 8,8Ah = 325Wh<br />
d’énergie emmagasinée au début du trajet. Avec<br />
l’âge, la quantité maximale d’énergie pouvant<br />
être emmagasinée par la batterie peut diminuer<br />
d’un tiers et par conséquent réduire la distance<br />
pouvant être parcourue. Les batteries lithium-ion<br />
peuvent, en règle générale, vivre jusqu’à 500<br />
cycles de charge complets, mais leur capacité<br />
décroit de 85 à 65 % au fil du temps, car leur<br />
utilisation entraîne peu à peu un vieillissement<br />
des cellules internes.<br />
Si la batterie est bien entretenue, sa durée de<br />
vie sera d’env. 3 ans. Sa capacité diminuera<br />
lentement, mais de manière égale.<br />
Utilisation générale<br />
Vitesses<br />
Si le changement de vitesses ne vous est pas<br />
familier, apprenez à manier votre nouveau<br />
<strong>Pedelec</strong> sur une route non fréquentée, en<br />
freinant et en prenant des virages.<br />
Dérailleur<br />
Commencez par dérailler la chaîne une fois sur<br />
le pignon moyen arrière. Déraillez les plateaux<br />
avant. Puis, faites l’inverse. Vous apprendrez<br />
ainsi facilement comment fonctionne le<br />
dérailleur. Ne déraillez jamais à l’arrêt ou en<br />
pédalant en arrière. Sélectionnez les vitesses à<br />
l’avant et les plateaux à l’arrière en fonction du<br />
terrain. La chaîne ne doit pas tourner de manière<br />
croisée, c.-à-d. très en biais, car sinon la chaîne<br />
et les plateaux s’usent plus vite. Utilisez le<br />
dérailleur comme illustré dans la figure ci-contre.<br />
Réglage des vitesses<br />
Selon le type de dérailleur et son utilisation,<br />
celui-ci doit être régulièrement réglé. Faites faire<br />
tous les réglages du dérailleur par un vélociste.<br />
Moyeu à vitesses intégrées et frein à<br />
rétropédalage<br />
Dans le cas d’un moyeu à vitesses intégrées,<br />
marquez un court temps d’arrêt en déraillant afin<br />
que le changement de vitesse puisse s’effectuer.<br />
En raison de l’étirement causé par la manœuvre,<br />
64
<strong>Pedelec</strong> <strong>ED</strong>-<strong>1.2</strong> à batterie lithium-ion<br />
le moyeu à vitesses intégrées doit faire l’objet<br />
d’un réglage régulier par le vélociste.<br />
À l’heure actuelle, les vitesses les plus courantes<br />
sont 3-, 4-, 5-, 7-, 8- et 9 pour divers fabricants.<br />
Avec NuVinci, <strong>Pedelec</strong> possède un système de<br />
vitesse réglable en continu, actionné à l’aide<br />
d’une manette au guidon. Pour régler votre<br />
dérailleur spécialisé, veuillez vous adresser<br />
à votre vélociste et consultez la notice du<br />
fabricant de dérailleur.<br />
Freins<br />
Votre <strong>Pedelec</strong> est équipé de deux freins<br />
indépendants. Le levier de frein gauche actionne<br />
le frein de la roue avant et le droit celui de la<br />
roue arrière. Il est possible de les inverser en<br />
changeant le raccordement des câbles de<br />
frein au niveau du levier de frein. Demandez au<br />
vélociste d’effectuer cette opération.<br />
Frein à rétropédalage<br />
Le frein à rétropédalage est un frein de roue<br />
arrière actionné par un pédalage en arrière.<br />
Faites un tour d’essai pour sentir quand le frein<br />
peut être utile.<br />
Pour les longues descentes à pic, il est<br />
nécessaire d’utiliser le deuxième frein, le frein de<br />
roue avant, de manière alternée, afin que le frein<br />
de roue arrière puisse refroidir !<br />
Si le moyeu de rétropédalage s’échauffe<br />
trop, cela entraîne une perte de lubrifiant !<br />
Regraissage nécessaire ! L’étrier d’un frein à<br />
rétropédalage est également soumis à l’usure et<br />
doit être remplacé régulièrement en fonction de<br />
la fréquence d’utilisation du vélo. Faites le faire<br />
par le vélociste.<br />
Freins manuels<br />
Vérifier le bon fonctionnement des freins<br />
avant chaque sortie. Si vous remarquez une<br />
défaillance des freins, rendez visite à un<br />
vélociste ! Les patins de freins sont marqués.<br />
Toujours utiliser des pièces de rechange avec le<br />
même marquage.<br />
Frein « V-Brake »<br />
Ces freins sont actionnés en tirant sur le levier<br />
de frein vers le guidon. Deux patins de frein sont<br />
actionnés sur les flancs de la jante.<br />
Le frein V-Brake se caractérise par sa<br />
construction améliorée avec des valeurs de<br />
freinage excellentes par temps sec et humide,<br />
mais il présente certains dangers, en particulier<br />
pour les cyclistes inexpérimentés.<br />
Si les freins ne sont pas utilisés correctement,<br />
vous pouvez perdre le contrôle de votre vélo.<br />
Entraînez-vous, en particulier si vous êtes<br />
débutant, à utiliser ces freins. Commencez<br />
par rouler lentement et pressez légèrement le<br />
levier de frein afin de vous familiariser avec le<br />
comportement de réponse du frein.<br />
Frein hydraulique<br />
Ce frein est également actionné en tirant sur le<br />
levier de frein vers le guidon. Deux plaquettes de<br />
frein sont actionnées sur les flancs de la jante.<br />
Au lieu de câbles Bowden, ces freins possèdent<br />
des chambres hydrauliques remplies avec du<br />
liquide de freinage.<br />
Demandez conseil à votre vélociste et lisez<br />
attentivement la documentation technique<br />
détaillée fournie par le fabricant. Le frein<br />
hydraulique est très délicat et peut se doser<br />
de manière précise. Faites un tour d’essai pour<br />
tester le comportement des freins.<br />
Attention ! Risque de chute et de blessure<br />
en cas de freinages d’urgence !<br />
Frein à tambour<br />
Ce frein est actionné à l’aide du levier de frein au<br />
niveau du guidon. Le mécanisme de freinage est<br />
effectif au niveau du moyeu de roue et bénéficie<br />
d’une bonne protection contre les intempéries.<br />
Un freinage long (longues descentes à pic)<br />
entraîne une grande chaleur de frottement<br />
causant à son tour une accumulation de chaleur.<br />
65<br />
F
Attention ! Ne pas toucher le corps du<br />
moyeu échauffé. Temps de refroidissement<br />
après de longs freinages en descente :<br />
jusqu’à env. 30 minutes.<br />
Frein à disque<br />
Ce frein est actionné à l’aide du levier de frein<br />
au niveau du guidon. Le principe est similaire<br />
au frein de jante, sauf que le frein repose sur le<br />
moyeu. Les sabots de freins commandent un<br />
disque de frein.<br />
Porte-bagages avant, panier<br />
• Observez les indications du fabricant sur les<br />
pièces lors du chargement.<br />
• Évitez de surcharger !<br />
• Ne transportez pas d’animal vivant !<br />
Porte-bagages arrière<br />
• Observez les indications du fabricant sur les<br />
pièces lors du chargement.<br />
• Utilisez les sacoches, les paniers et les<br />
dispositifs de fixation courants dans le<br />
commerce.<br />
• Ne transportez aucune personne, ni animal.<br />
Transport de charges<br />
Transport de charges<br />
• Si vous transportez des charges, il faut bien<br />
les attacher et surtout respecter la capacité<br />
autorisée du porte-bagages.<br />
• Ne pas accrocher aucun autre sac ou objet<br />
au guidon ! Cela entrave la sécurité de<br />
conduite. Les guidons en aluminium ne sont<br />
pas prévus pour porter des charges !<br />
Remorque<br />
• Si vous utilisez une remorque, respectez la<br />
vitesse autorisée qui est de 25 km/h.<br />
• Charge de remorque max. autorisée : 40 kg.<br />
• Utiliser uniquement des raccords de<br />
remorque dont vous avez vérifié le bon<br />
fonctionnement et les attacher aux endroits<br />
requis.<br />
• Utiliser uniquement une remorque conforme<br />
aux normes de sécurité.<br />
• Avant la première sortie, testez la remorque<br />
à vide.<br />
• Respectez la législation allemande sur<br />
les licences routière en ce qui concerne<br />
l’éclairage de la remorque.<br />
• Nous n’assumons aucune responsabilité<br />
vis-à-vis d’éventuels dégâts causés au vélo<br />
suite à l’utilisation d’une remorque.<br />
Attention ! Le comportement de conduite<br />
et de freinage du vélo change. Risque de<br />
chute et de blessure !<br />
Consignes d’entretien<br />
Le <strong>Pedelec</strong> s’entretient comme un vélo<br />
classique afin de jouir durablement de toutes<br />
ses fonctions. C’est pourquoi il est impératif de<br />
contrôler régulièrement les freins, la pression<br />
des pneus, le serrage des vis, en particulier au<br />
niveau du guidon, de la selle et des écrous d’axe<br />
afin de garantir votre sécurité.<br />
Entretien de l’assistance électrique du<br />
<strong>Pedelec</strong><br />
L’entretien du dispositif d’assistance<br />
électrique comprend le maintien de la capacité<br />
maximale de la batterie de vélo grâce à un<br />
maniement conforme et la protection des<br />
autres composants électriques d’une humidité<br />
continue.<br />
En hiver ou si le vélo n’est pas utilisé pendant<br />
une longue période, il faut recharger la batterie<br />
au plus tard après 2-3 mois. C’est uniquement<br />
avec cette action que vous pouvez garantir une<br />
longue durée de vie pour la batterie. Si le vélo<br />
n’est pas utilisé pendant une longue période,<br />
retirer la batterie du <strong>Pedelec</strong>.<br />
66
<strong>Pedelec</strong> <strong>ED</strong>-<strong>1.2</strong> à batterie lithium-ion<br />
Après une sortie sous la pluie ou si beaucoup<br />
de boue a giclé sur les carters, nettoyez le vélo<br />
avec un chiffon humide immédiatement à votre<br />
retour et séchez-le.<br />
Le nettoyage du vélo ne doit en aucun cas<br />
s’effectuer avec un jet d’eau ou un nettoyeur<br />
à vapeur. Le système est certes protégé des<br />
éclaboussures, mais il n’est pas complètement<br />
étanche.<br />
Un faisceau de câbles complètement mouillé<br />
peut entraîner des courts-circuits qui à leur tour<br />
peuvent détruire la commande numérique du<br />
système.<br />
C’est pourquoi il faut absolument éviter de<br />
transporter le <strong>Pedelec</strong> avec la batterie par temps<br />
de pluie sur le porte-vélos de la voiture.<br />
Entretien en hiver<br />
Le <strong>Pedelec</strong> doit être conservé à l’abri s’il n’est<br />
pas utilisé pendant les mois d’hiver. Gardez<br />
le <strong>Pedelec</strong> dans une pièce à température<br />
constante. Les variations importantes de<br />
température ainsi que l’humidité de l’air ont un<br />
impact néfaste sur toutes les parties chromées<br />
ou en métal léger. Pendant l’hiver, il est conseillé<br />
de contrôler assidûment l’ensemble du <strong>Pedelec</strong><br />
afin d’éviter un séjour en atelier en début<br />
d’année. Accrocher le <strong>Pedelec</strong> en hauteur pour<br />
soulager ses pneus.<br />
Si le <strong>Pedelec</strong> n’est pas utilisé pendant une<br />
longue période, retirez la batterie et conservez-la<br />
dans une pièce au frais et au sec.<br />
Température de stockage recommandée pour<br />
la batterie : 15 °C.<br />
Un vent fort entraîne l’eau dans tous les recoins<br />
du cadre et dans le boîtier de batterie. Si vous<br />
devez absolument transporter le vélo, retirez la<br />
batterie du <strong>Pedelec</strong> et remettez-la à l’arrivée,<br />
après avoir bien séché le vélo trempé.<br />
Consignes d’entretien générales<br />
• Utiliser uniquement des raccords de<br />
remorque dont vous avez vérifié le bon<br />
fonctionnement et les attacher aux endroits<br />
requis.<br />
• Utiliser uniquement une remorque conforme<br />
aux normes de sécurité.<br />
• Avant la première sortie, testez la remorque<br />
à vide.<br />
• Respectez la législation allemande sur<br />
les licences routière en ce qui concerne<br />
l’éclairage de la remorque.<br />
Nous n’assumons aucune responsabilité vis-àvis<br />
d’éventuels dégâts causés au vélo suite à<br />
l’utilisation d’une remorque.<br />
Démonter la roue avant<br />
Si un dégât causé à la roue nécessite de<br />
démonter la roue avant, veuillez procéder<br />
comme suit :<br />
Démontage :<br />
Ouvrez le connecteur de câble se trouvant à<br />
droite de la fourche ainsi que le collier fixant<br />
le câble à la fourche. Poussez la protection<br />
en caoutchouc de l’écrou d’axe sur le côté et<br />
dévisser les écrous d’axe de chaque côté. Vous<br />
pouvez maintenant retirer la roue.<br />
F<br />
67
Retourner/recycler la batterie<br />
Ne pas jeter le pack batterie avec les ordures<br />
ménagères. Recyclez la batterie en la déposant<br />
chez un commerce fournisseur de batteries ou à<br />
un point de collecte de votre commune.<br />
Pour envoyer le pack batterie, adressez-vous<br />
à votre revendeur, car les batteries lithium-ion<br />
ne peuvent pas être envoyées sans déclaration<br />
conforme. Les batteries lithium-ion sont, en<br />
raison de leur teneur en lithium (un métal<br />
alcalin très réactif) considérées comme une<br />
marchandise dangereuse. C’est pourquoi elles<br />
passent de tests de sûreté imposés lors de<br />
leur développement afin de s’assurer qu’aucun<br />
processus incontrôlé ne pourra se produire en<br />
cas d’action destructrice venant de l’extérieur.<br />
Dans ce contexte, une marquage conforme<br />
sur le paquet est nécessaire afin que, dans<br />
l’éventualité d’un accident de la route, les<br />
pompiers puissent immédiatement adopter la<br />
technique d’extinction adaptée. De plus, les<br />
technologies des cellules et du disjoncteur<br />
permettent d’éviter toute surcharge électrique1<br />
en utilisation normale.<br />
Monter la roue avant<br />
Remettez la roue et placez correctement les<br />
rondelles d’appui sur l’axe de moyeu à l’intérieur<br />
de la fourche, les rondelles d’écartement et la<br />
carcasse du couvercle.<br />
Attention aux consignes au dos de la batterie :<br />
Déserrez les écrous d’axe. Alignez la roue avant<br />
et serrez les écrous d’axe. Reliez le connecteur.<br />
Fixez de nouveau la câble à la fourche à l’aide<br />
du collier de serrage.<br />
Modèles avec moteur au moyeu arrière<br />
Le montage de la roue arrière est similaire.<br />
68
<strong>Pedelec</strong> <strong>ED</strong>-<strong>1.2</strong> à batterie lithium-ion<br />
Technical Data<br />
Système d’assistance électrique<br />
EN15194 <strong>Pedelec</strong> ou EPAC (=Electrical Power<br />
Assist Cycle). Assistance électrique pour vélo<br />
à moteur 250W, jusqu’à 25 km/h, activé par un<br />
capteur de mouvement de la pédale.<br />
Moteur<br />
Moteur-transmission BLDC. BLDC signifie<br />
« Brushless DC », un moteur électronique à<br />
courant continu et commutation triphasée,<br />
travaillant avec 250W max. de puissance<br />
continue nominale.<br />
Conduite<br />
Contrôleur de moteur BLDC à commande<br />
de programmes numérique selon la norme<br />
européenne. Il y a 4 modes de conduite.<br />
L’assistance électrique s’enclenche<br />
automatiquement dès le début du pédalage et<br />
fournit une assistance jusqu’à 25 km/h. L’usage<br />
des freins arrête automatiquement l’assistance<br />
électrique.<br />
Batterie<br />
Batterie lithium-ion 37V 8,8Ah (325Wh) fabriquée<br />
en Europe, à 5 voyants DEL, poids 2,4 kg,<br />
jusqu’à 500 cycles de charge complets ou 3-4<br />
ans d’espérance de vie avec une utilisation<br />
optimale.<br />
Chargeur<br />
Chargeur CC-CV à régime de charge 2,0A. La<br />
charge complète de la batterie 37V 8,8Ah dure<br />
env. 5 heures. Toutes les 10 recharges, laissez la<br />
batterie branchée 2 heures de plus afin d’obtenir<br />
une égalisation des cellules optimale.<br />
Autonomie<br />
Dépend fortement des modes de conduite<br />
sélectionnés, de la manière individuelle de<br />
conduire et d’autres facteurs !<br />
Mode 1<br />
Mode 2<br />
Mode 3<br />
Mode 4<br />
jusqu’à 70 km<br />
jusqu’à 45 km<br />
jusqu’à 35 km<br />
jusqu’à 25 km<br />
Voir aussi le chapitre<br />
« Autonomie et ses facteurs ».<br />
Pannes/causes/solution<br />
1. Unité de commande<br />
1.1 En allumant le panneau de commande,<br />
aucun voyant DEL ne s’allume.<br />
Cause : Solution :<br />
Batterie placée de<br />
manière incorrecte > replacer la batterie<br />
correctement<br />
Batterie défectueuse > chercher un vélociste<br />
Erreur de câble/<br />
contact<br />
> chercher un vélociste<br />
Électronique<br />
défectueuse<br />
> chercher un vélociste<br />
<strong>1.2</strong> Le panneau de commande s’éteint<br />
pendant le trajet.<br />
Cause : Solution :<br />
Batterie vide<br />
> recharger<br />
complètement la<br />
batterie Électronique<br />
défectueuse<br />
> chercher un vélociste<br />
Le connecteur<br />
s’est détaché > chercher une vélociste<br />
2. Batterie<br />
2.1 En appuyant sur le témoin de l’état de la<br />
batterie, aucun voyant DEL ne s’allume.<br />
Cause : Solution :<br />
Batterie vide<br />
> recharger<br />
complètement la<br />
batterie Fusible de<br />
batterie défectueux > remplacer le fusible<br />
Cellules du pack<br />
batterie défectueuses > chercher un vélociste<br />
2.2 L’autonomie de la batterie a<br />
considérablement réduit.<br />
Cause : Solution :<br />
La batterie est<br />
usagée (décatie) > remplacer la batterie<br />
69<br />
F
Le chargeur est<br />
défectueux<br />
> chercher une vélociste<br />
Prise de charge/câble de<br />
charge endommagé(e) > chercher un vélociste<br />
3. Moteur<br />
3.1 Le moteur ne transmet pas suffisamment de<br />
puissance ; l’unité de commande et la batterie<br />
fonctionnent.<br />
Cause : Solution :<br />
La prise moteur n’est<br />
pas correctement<br />
connectée<br />
> vérifier la prise<br />
Autre erreur de<br />
câble/contact > chercher un vélociste<br />
Capteur de pédalage<br />
défectueux<br />
> chercher un vélociste<br />
Électronique<br />
défectueuse<br />
> chercher un vélociste<br />
4. Capteur de pédalage<br />
4.1 Le moteur n’est pas suffisamment puissant ;<br />
le panneau de commande et la batterie<br />
fonctionnent.<br />
Cause : Solution :<br />
Capteur de pédalage<br />
défectueux<br />
> chercher un vélociste<br />
5. Chargeur<br />
Voir le chapitre dans le manuel ou le sous dans<br />
ce chapitre.<br />
70
<strong>Pedelec</strong> <strong>ED</strong>-<strong>1.2</strong> à batterie lithium-ion<br />
F<br />
Déclaration de conformité UE<br />
selon la directive européenne relative au machines 2006/42/CE<br />
selon la directive européenne relative à la compatibilité électromagnétique 2004/108/CE<br />
Le fabricant,<br />
Pantherwerke AG<br />
Alter Postweg 190<br />
32584 Löhne<br />
déclare, par la présente, que tous ses produits dotés du système d’assistance électrique :<br />
<strong>ED</strong><strong>1.2</strong>,<br />
sont conformes aux directives mentionnées ci-dessus, y compris<br />
les modifications valables au moment de la déclaration.<br />
Les normes suivantes sont appliquées :<br />
DIN EN 15194<br />
DIN EN 14764<br />
F<br />
71
Quickstart!<br />
Anche se non vedete l’ora di usare la vostra<br />
<strong>Pedelec</strong> <strong>ED</strong>-<strong>1.2</strong> appena acquisita, vi chiediamo<br />
di seguire i passi di seguito descritti prima di<br />
mettervi in sella per la prima corsa.<br />
La <strong>Pedelec</strong> <strong>ED</strong>-<strong>1.2</strong> funziona con una<br />
batteria agli ioni di litio. Una batteria<br />
nuova per la <strong>Pedelec</strong> <strong>ED</strong>-<strong>1.2</strong> viene<br />
fornita in “modalità di consegna”, ossia,<br />
l’elettronica interna della batteria è<br />
quasi completamente disinnestata e la<br />
batteria non produce corrente elettrica.<br />
Per attivare la batteria lasciatela nel suo<br />
alloggiamento e collegate il caricabatterie<br />
in dotazione. Dopo 30 secondi, l’elettronica<br />
sarà completamente attivata. Controllate<br />
lo stato di carica premendo il pulsante<br />
dell’indicatore a L<strong>ED</strong> sulla batteria.<br />
• Per prima cosa, caricate completamente<br />
la batteria! Utilizzate esclusivamente il<br />
caricabatterie originale PanTerra agli ioni<br />
di litio.<br />
• Regolate manubrio e sella, verificate il<br />
funzionamento di freni e azionamento e<br />
controllate che tutte le viti, specialmente i<br />
dadi delle ruote, siano saldamente serrate.<br />
• Iniziate a pedalare. Dopo mezzo giro dei<br />
pedali il motore si attiva.<br />
• Per la prima corsa, consigliamo di provare<br />
tutte e 4 le modalità di corsa lontano da<br />
strade trafficate.<br />
• Ci sono quattro modalità di corsa. Modalità<br />
1-3 limita la corrente di corsa. In questo<br />
modo, è possibile aumentare l’autonomia.<br />
• Una volta terminata la corsa, spegnete il<br />
sistema premendo “I”.<br />
• Per tornare a casa, potrete usare la <strong>Pedelec</strong><br />
anche con batteria scarica come una<br />
normale bicicletta. L’elettronica della batteria<br />
previene una scarica profonda della batteria<br />
di trazione e il motore ha una ruota libera.<br />
• In caso di lungo periodo di inutilizzo, la<br />
batteria di trazione al più tardi dopo 3 mesi<br />
dovrà essere ricaricata completamente.<br />
• Vi preghiamo di osservare le norme di<br />
sicurezza generali e di rispettare il codice<br />
della strada.<br />
•<br />
Prestate attenzione agli altri utenti della<br />
strada e indossate il casco protettivo.<br />
Vi auguriamo buon divertimento con la<br />
<strong>Pedelec</strong> <strong>ED</strong>-<strong>1.2</strong>!<br />
• Accendete il sistema agendo sul lato sinistro<br />
del manubrio: premete il pulsante “I” sul<br />
pannello di controllo. La <strong>Pedelec</strong> <strong>ED</strong>-<strong>1.2</strong> è<br />
ora pronta all’uso.<br />
• L’elettronica si spegne automaticamente<br />
dopo circa 8 minuti di inattività per<br />
risparmiare energia! Qualora ciò accadesse,<br />
semplicemente spegnere e riaccendere.<br />
72
<strong>Pedelec</strong> <strong>ED</strong>-<strong>1.2</strong> con batteria agli ioni di litio<br />
Indice<br />
Quickstart!....................................................... 72<br />
Benvenuti!....................................................... 74<br />
La vostra <strong>Pedelec</strong> <strong>ED</strong>-<strong>1.2</strong><br />
e i suoi componenti......................................... 75<br />
Avvertenze per la sicurezza............................ 76<br />
Corretto comportamento sulla strada............. 76<br />
Gestione accurata della <strong>Pedelec</strong>.................... 77<br />
Carico della <strong>Pedelec</strong>....................................... 77<br />
Comportamento dei freni................................ 77<br />
Uso conforme................................................. 77<br />
Disposizioni in materia di responsibilità<br />
per danni da prodotti difettosi........................ 78<br />
Limiti della responsabilità per danni<br />
da prodotti difettosi......................................... 78<br />
Rivendicazione della responsabilità<br />
per danni da prodotti difettosi........................ 78<br />
Esclusione della responsabilità per danni da<br />
prodotti difettosi.............................................. 78<br />
Messa in servizio della <strong>Pedelec</strong> <strong>ED</strong> -<strong>1.2</strong> ....... 79<br />
Messa in servizio della batteria di trazione..... 79<br />
Smontaggio e montaggio della batteria.......... 79<br />
Rimozione della batteria................................. 79<br />
Carica della batteria di trazione:..................... 80<br />
Carica di mantenimento a lungo termine........ 82<br />
Parti della bicicletta:........................................ 82<br />
Regolazioni prima della partenza.................... 82<br />
Sella e manubrio............................................. 82<br />
Manubrio e attacco del manubrio................... 83<br />
Attacco del manubrio con<br />
angolazione regolabile.................................... 83<br />
Attacco “Ahead”............................................. 84<br />
Freni................................................................ 84<br />
Freno a contropedale su ruota posteriore...... 84<br />
Pedali.............................................................. 84<br />
Pedivelle.......................................................... 84<br />
Cuscinetti di sterzo......................................... 84<br />
Raggi............................................................... 85<br />
Sgancio rapido................................................ 85<br />
Pneumatici e cerchi......................................... 85<br />
Cerchi.............................................................. 86<br />
Tensionamento della catena........................... 86<br />
Funzionamento dell’azionamento<br />
della <strong>Pedelec</strong>................................................... 86<br />
Modalità di guida raccomandate.................... 87<br />
Autonomia e fattori collegati........................... 87<br />
Funzionamento generale................................. 88<br />
Cambio............................................................ 88<br />
Deragliatore..................................................... 88<br />
Cambio epicicloidale con<br />
freno a contropedale....................................... 88<br />
Freni................................................................ 88<br />
Freno a contropedale...................................... 88<br />
Freno a mano ................................................. 89<br />
Freno V-brake................................................. 89<br />
Freno idraulico................................................ 89<br />
Freno a rulli..................................................... 89<br />
Freno a disco.................................................. 89<br />
Trasporto di carichi......................................... 89<br />
Carrello rimorchio............................................ 90<br />
Portapacchi anteriore, cestino........................ 90<br />
Portapacchi posteriore.................................... 90<br />
Istruzioni di manutenzione.............................. 90<br />
Cura dell’azionamento della <strong>Pedelec</strong>............. 90<br />
Istruzioni di manutenzione generali................ 91<br />
Conservazione durante l’inverno.................... 91<br />
Smontaggio della ruota anteriore ................... 91<br />
Montaggio....................................................... 92<br />
Restituzione/sostituzione della batteria.......... 92<br />
Technical Data................................................. 93<br />
Guasti/Cause/Rimedi...................................... 93<br />
Dichiarazione di conformità CE...................... 95<br />
73<br />
I
Benvenuti!<br />
PanTerra – intelligent electric!<br />
Gentile cliente,<br />
Grazie per aver scelto la <strong>Pedelec</strong> <strong>ED</strong>-<strong>1.2</strong><br />
nella versione con tecnologia di azionamento<br />
PanTerra! Questo azionamento rende<br />
tecnicamente possibile un sistema di mobilità<br />
alternativo e leggero. In questo modo, potrete<br />
condividere questa forma di trasporto rispettosa<br />
dell’ambiente e orientata al futuro!<br />
La bicicletta elettrica <strong>ED</strong>-<strong>1.2</strong> è una <strong>Pedelec</strong>1,<br />
ossia il motore elettrico ausiliario supporta<br />
la vostra pedalata fino a una velocità di 25<br />
km/h e per procedere è necessario pedalare.<br />
La <strong>Pedelec</strong> nella sua esecuzione tecnica è<br />
conforme alla norma europea EN15194 in<br />
materia di biciclette elettriche a pedalata<br />
assistita e alla norma europea EN 14764 in<br />
materia di biciclette da città e da trekking.<br />
Non c’è l’obbligo di indossare un casco.<br />
Tuttavia, per la vostra sicurezza consigliamo di<br />
indossare sempre il casco protettivo durante la<br />
guida! Il prodotto di qualità da voi acquistato<br />
sarà fonte di gioia sia che si tratti di un acquisto<br />
per andare al lavoro, per il tempo libero, per un<br />
viaggio o un compagno di vacanza.<br />
Se seguirete i molti consigli che sono stati<br />
inseriti in questa guida, potrete mantenere<br />
la vostra <strong>Pedelec</strong> in condizioni ottimali e<br />
contribuire alla vostra sicurezza.<br />
Questo manuale per l’utente si applica a diversi<br />
modelli di <strong>Pedelec</strong>. La forma del telaio e il tipo<br />
di cambio possono variare. Prestate quindi<br />
attenzione solo alle sezioni che si applicano alla<br />
vostra bicicletta.<br />
Le figure e le fotografie sono indicative e non<br />
sono destinate a rappresentare tutti i modelli nei<br />
minimi dettagli.<br />
Lasciatevi elettrizzare!<br />
Nel manuale di istruzioni, abbiamo<br />
contrassegnato tutti i punti che riguardano<br />
la vostra sicurezza con questo simbolo.<br />
Informate anche gli altri utenti della<br />
bicicletta di tutte le precauzioni di<br />
sicurezza!<br />
Poniamo una grande attenzione nella fase di<br />
progettazione e nella scelta dei componenti, in<br />
modo che anche voi potrete entrare a far parte<br />
del gruppo dei ciclisti “elettrici”.<br />
1<br />
Il termine <strong>Pedelec</strong> è composto dalle parole<br />
pedale, elettrico e ciclo e descrive un particolare<br />
tipo di bicicletta elettrica che si differenzia dalle<br />
cosiddette e-bike poiché la legge stabilisce che il suo<br />
azionamento ausiliario può funzionare esclusivamente<br />
simultaneamente alla pedalata.<br />
74
<strong>Pedelec</strong> <strong>ED</strong>-<strong>1.2</strong> con batteria agli ioni di litio<br />
La vostra <strong>Pedelec</strong> <strong>ED</strong>-<strong>1.2</strong> e i suoi componenti<br />
Batteria di trazione<br />
Indicatore dello stato della batteria di trazione<br />
Blocco della batteria di trazione<br />
Comando del motore (elettronica)<br />
Presa di carica<br />
Pedivella con sensore di rotazione <br />
Motore sul mozzo<br />
Copertura del connettore del motore<br />
Elementi di comando sul manubrio<br />
<br />
<br />
<br />
<br />
<br />
<br />
<br />
<br />
75<br />
I
Avvertenze per la sicurezza<br />
Sicurezza stradale<br />
Secondo le disposizioni del regolamento<br />
sull’ammissione alla circolazione stradale<br />
(StVZO), la <strong>Pedelec</strong> essendo una bicicletta deve<br />
avere i seguenti requisiti minimi previsti dalla<br />
legge:<br />
• due freni funzionanti in modo indipendente;<br />
• un campanello dal tono squillante;<br />
• dynamo (tensione nominale 6V e potenza<br />
nominale 3 Watt) con marchio di controllo “K<br />
- - -”;<br />
• una lampada anteriore con luce bianca;<br />
• un catarifrangente anteriore bianco;<br />
• una lampada posteriore con una luce rossa,<br />
posta ad un’altezza superiore a 25 cm dalla<br />
superficie stradale;<br />
• un catarifrangente posteriore rosso, posto ad<br />
un’altezza non oltre 60 cm dalla superficie<br />
stradale;<br />
• un catarifrangente posteriore rosso con<br />
lettera Z;<br />
• pedali con catarifrangenti gialli visibili da<br />
davanti e da dietro con marchio di controllo <br />
“K - - -”;<br />
• due catarifrangenti gialli su ciascuna<br />
ruota anteriore e posteriore o delle strisce<br />
catarifrangenti bianche sui pneumatici o i<br />
cerchi anteriori e posteriori;<br />
• ogni componente del dispositivo di<br />
illuminazione deve essere contrassegnato<br />
con il marchio di controllo “K - - -”.<br />
Importante:<br />
• eseguite un controllo del funzionamento<br />
prima di ogni corsa!<br />
• Non tentate mai di raddrizzare eventuali parti<br />
di sicurezza deformate quali telai, forcelle,<br />
manubrio, pedivelle, reggisella, parafango e<br />
pedali, ma provvedete alla loro sostituzione<br />
immediata. Potrebbe verificarsi il rischio di<br />
rottura!<br />
• Utilizzate soltanto parti di ricambio originali!<br />
Attenzione!: Riparazioni non eseguite a<br />
regola d’arte potrebbero esporre l’utente a<br />
pericoli e la garanzia per prodotto difettoso<br />
sarà invalidata!<br />
Corretto comportamento sulla strada<br />
• Utilizzate, se del caso, piste ciclabili.<br />
• Guidate sempre a destra e sorpassate a<br />
sinistra.<br />
• Prima di qualsiasi svolta, datene chiara<br />
indicazione estendendo il braccio<br />
lateralmente.<br />
• Guidate sempre nel senso di marcia indicato.<br />
• Regolate la velocità in base alle condizioni<br />
atmosferiche, una strada bagnata estende la<br />
distanza di frenata!<br />
• Di notte e in condizioni di scarsa visibilità<br />
procedete solo con le luci accese.<br />
• Prestate attenzione a piante e animali, se<br />
viaggiate fuori dalla strada.<br />
• Proteggete la vostra testa indossando un<br />
casco protettivo omologato (secondo la<br />
norma DIN EN 1078)!<br />
• Andando in bicicletta, non ascoltate della<br />
musica con le cuffie (ad esempio, Walkman,<br />
lettore MP3)!<br />
• Indossate un abbigliamento adeguato<br />
(pantaloni stretti, possibilmente bretelle,<br />
calzature robuste), se viaggiate di notte<br />
o in presenza di condizioni atmosferiche<br />
non favorevoli indossate un abbigliamento<br />
catarifrangente.<br />
• Con gonne ampie e lunghi cappotti, utilizzate<br />
dei paraveste.<br />
• Attenzione! In caso di umidità, l’efficacia di<br />
freni e dinamo diminuisce! Regolate lo stile di<br />
guida in base alle necessità del caso.<br />
76
<strong>Pedelec</strong> <strong>ED</strong>-<strong>1.2</strong> con batteria agli ioni di litio<br />
Pericolo di incidenti:<br />
la guida senza mani e il traino da parte di<br />
altri veicoli sono azioni pericolose per la<br />
vita e sono vietate.<br />
Guidare appaiati ostacola il traffico ed è<br />
quindi da evitare.<br />
Non montare mai in due su una bicicletta<br />
(unica eccezione: in caso si porti un<br />
bambino su un apposito seggiolino).<br />
Gestione accurata della <strong>Pedelec</strong><br />
• Prima di trasportare la bici sulla macchina,<br />
rimuovere tutte le parti che potrebbero<br />
staccarsi durante il trasporto (batteria,<br />
borsa porta-attrezzi, portapacchi, borse da<br />
trasporto, pompe, seggiolini ecc.)!<br />
Carico della <strong>Pedelec</strong><br />
• Il carico totale ammissibile (ciclista e pacchi)<br />
della <strong>Pedelec</strong> è di 120 kg.<br />
• Per il carico ammissibile del portapacchi, fate<br />
riferimento al valore indicato sullo stesso.<br />
• La vostra bicicletta è dotata di un cestino<br />
anteriore, il carico ammissibile del quale è<br />
di 5 kg.<br />
• La leva del freno montata sul manubrio<br />
dovrà sempre essere saldamente fissata.<br />
Controllate regolarmente la posizione della<br />
leva e serrate, se necessario.<br />
• Operazioni sull’impianto frenante possono<br />
essere eseguite esclusivamente dai<br />
rivenditori!<br />
Uso conforme<br />
• Grazie al suo design e al suo<br />
equipaggiamento, la vostra <strong>Pedelec</strong> è<br />
studiata per essere utilizzata su strade<br />
pubbliche e piste ciclabili come una<br />
bicicletta.<br />
• L’equipaggiamento di sicurezza dovrà<br />
essere controllato periodicamente da parte<br />
dell’utente e, se necessario, dovrà essere<br />
riparato.<br />
• Il costruttore declina qualsiasi responsabilità<br />
per il mancato rispetto delle norme di<br />
sicurezza contenute in questo manuale e<br />
per i danni da esso risultanti. Ciò si applica<br />
in particolare se si utilizza la <strong>Pedelec</strong> su<br />
strade sterrate, in sovraccarico e in caso di<br />
riparazione impropria di difetti. In presenza<br />
di questi usi impropri, si declina qualsiasi<br />
responsabilità per danni da prodotti difettosi.<br />
Prestate attenzione anche a tutte le<br />
istruzioni di montaggio, manutenzione e cura<br />
contenute nel presente manuale, nonché alle<br />
indicazioni del costruttore del cambio.<br />
Comportamento dei freni<br />
• In presenza di curve strette, strade sabbiose<br />
e scivolose, asfalto bagnato e ghiaccio, si<br />
dovrà usare il freno anteriore con attenzione,<br />
in modo tale che la ruota anteriore non<br />
scivoli e la <strong>Pedelec</strong> rimanga governabile!<br />
• I freni dovranno essere azionati con<br />
delicatezza. Le ruote bloccate hanno meno<br />
forza frenante e possono causare sbandate<br />
e cadute!<br />
• Fondamentalmente, frenate prima della<br />
curva e non mentre la si percorre; la frenata<br />
aumenta il rischio di scivolamento!<br />
77<br />
I
Disposizioni in materia di<br />
responsibilità per danni da<br />
prodotti difettosi<br />
In linea di principio, la garanzia per prodotti<br />
difettosi è di 24 mesi come previsto dalla legge.<br />
Il costruttore garantisce qualsiasi difetto di<br />
materiale e di progettazione della vostra <strong>Pedelec</strong><br />
nelle seguenti condizioni:<br />
• potrete far valere il vostro diritto di garanzia<br />
per responsabilità per danni da prodotti<br />
difettosi solo dietro presentazione del<br />
protocollo di consegna e della prova di<br />
acquisto.<br />
• Il periodo della garanzia per responsabilità<br />
per danni da prodotti difettosi decorre dalla<br />
data di acquisto.<br />
• Qualora, durante questo periodo, avesse<br />
luogo un cambio di proprietà, si dovrà<br />
provvedere ad annotare tale cambio sul<br />
protocollo di consegna.<br />
Garanzia del pacco batteria:<br />
6 mesi<br />
Il mantenimento dell’efficienza della batteria di<br />
trazione dipende da diverse condizioni. Durante<br />
i 6 mesi dopo l’acquisto, si dovrà verificare se<br />
eventuali anomalie sono provocate da normale<br />
usura, uso improprio o batteria guasta per<br />
difetto di produzione.<br />
Limiti della responsabilità per<br />
danni da prodotti difettosi<br />
La responsabilità per danni da prodotti<br />
difettosi viene invalidata in caso di:<br />
• uso improprio o non idoneo o danni alla<br />
<strong>Pedelec</strong> causati da un incidente stradale o<br />
una caduta.<br />
• Danni dovuti alla normale usura dei pezzi,<br />
come pneumatici, catene, guaine e pastiglie<br />
dei freni.<br />
• Danni sulla vernice o sul cromo dovuti a<br />
fattori atmosferici e ambientali (in particolare<br />
aria salmastra), umidità e ambienti con livelli<br />
elevati di emissioni di ammoniaca.<br />
• Manutenzione difettosa, ossia in caso di una<br />
manutenzione della <strong>Pedelec</strong> eseguita senza<br />
attenersi a quanto descritto nel presente<br />
manuale.<br />
• Riparazioni non eseguite da persone<br />
qualificate in materia di biciclette.<br />
• Modifiche al sistema di trasmissione, che<br />
non fanno parte del campo di applicazione<br />
delle specifiche tecniche standardizzate.<br />
• Cambiamenti strutturali rispetto allo stato al<br />
momento della consegna della <strong>Pedelec</strong>.<br />
• Una rottura del conduttore elettrico non<br />
dovuta da un errore di progettazione.<br />
• Difetti dovuti a influenze esterne.<br />
• Danni causati dall’uso della <strong>Pedelec</strong> in<br />
competizioni.<br />
• Un uso improprio della batteria di trazione.<br />
Rivendicazione della responsabilità per danni<br />
da prodotti difettosi<br />
• Vi preghiamo di contattare il vostro<br />
rivenditore in caso di danni. Egli sarà sempre<br />
un partner di riferimento competente.<br />
Esclusione della responsabilità per danni da<br />
prodotti difettosi<br />
• Sono esclusi dalla responsabilità per danni<br />
da prodotti difettosi lesioni a persone o danni<br />
ad altre parti originali della vostra <strong>Pedelec</strong>,<br />
nella misura in cui ciò sia consentito dalla<br />
legge.<br />
78
<strong>Pedelec</strong> <strong>ED</strong>-<strong>1.2</strong> con batteria agli ioni di litio<br />
Messa in servizio della<br />
<strong>Pedelec</strong> <strong>ED</strong> -<strong>1.2</strong><br />
La lettura dei seguenti capitoli del manuale<br />
utente della <strong>Pedelec</strong> <strong>ED</strong>-<strong>1.2</strong> presume che tutte<br />
le regolazioni ergonomiche di base, tipiche delle<br />
biciclette, e i controlli di sicurezza necessari<br />
siano già stati eseguiti:<br />
• manubrio e sella sono stati portati nella<br />
posizione desiderata e le viti serrate di<br />
conseguenza.<br />
• Le ruote sono dotate di sufficiente pressione<br />
e i relativi dadi dell’asse sono stati ben<br />
serrati.<br />
• È stata controllata la funzionalità di freni e<br />
pedali.<br />
• Il sistema di illuminazione è operativo.<br />
Ulteriori informazioni in merito si possono<br />
trovare nel capitolo “Regolazioni prima della<br />
partenza.”<br />
Messa in servizio della batteria di trazione<br />
Ora rimuovete la batteria di trazione dal relativo<br />
alloggiamento sul portapacchi. Controllate<br />
il livello di carica della batteria. A questo<br />
proposito, premete il tasto sul display a L<strong>ED</strong><br />
sull’estremità posteriore della batteria sotto<br />
la maniglia di trasporto. La figura mostra la<br />
situazione della vostra <strong>Pedelec</strong>.<br />
Ora controllate il livello di carica<br />
della batteria premendo il pulsante<br />
sull’indicatore di carica a L<strong>ED</strong>.<br />
Qualora non dovessero accendersi tutti i 5 L<strong>ED</strong>,<br />
PanTerra consiglia per prima cosa di caricare<br />
completamente la batteria. Collegate la batteria<br />
al caricabatterie in dotazione. Si veda il capitolo<br />
“Carica della batteria di trazione”.<br />
Le batterie agli ioni di litio hanno<br />
un’autoscarica molto più bassa rispetto<br />
alle batterie al nichel e pertanto possono<br />
essere conservate per circa 3 mesi<br />
senza necessità di ricarica. Dopo questo<br />
periodo senza ricarica, potrebbero tuttavia<br />
verificarsi dei danni alla struttura chimica<br />
delle celle. Ciò influenza notevolmente le<br />
prestazioni della batteria e può portare alla<br />
loro inutilità.<br />
Smontaggio e montaggio<br />
della batteria<br />
Rimozione della batteria<br />
Per rimuovere la batteria, procedere come segue<br />
(si vedano le figure):<br />
• Girate l’interruttore a chiave verso sinistra e<br />
aprite la serratura (1)<br />
• Aprite il coperchio (2)<br />
• Estraete la batteria afferrandola dall’incavo<br />
della maniglia dall’alloggiamento (3)<br />
Per il rimontaggio, procedete seguendo la<br />
sequenza in senso inverso.<br />
• Assicurarsi che i contatti della batteria (5)<br />
si inseriscano nei contatti del controllore<br />
79<br />
I
dell’accumulatore (4). Spingere la batteria<br />
nel relativo alloggiamento applicando una<br />
leggera pressione.<br />
(3)<br />
Qualora non si riuscisse a chiudere<br />
completamente il coperchio, significherà che la<br />
batteria non è inserita del tutto nei contatti del<br />
controllore.<br />
Il blocco dell’interruttore a chiave (1) serve<br />
a mantenere in posizione sicura la batteria<br />
per evitare danni a causa delle vibrazioni. In<br />
questo modo, si assicura anche un contatto<br />
elettrico ottimale della batteria all’elettronica del<br />
controllore.<br />
(4)<br />
presa<br />
(1)<br />
Contatti<br />
aprire<br />
chiave<br />
(5)<br />
(2)<br />
Contatti della batteria<br />
La vostra <strong>Pedelec</strong> ora è pronta per essere<br />
usata!<br />
Carica della batteria di trazione:<br />
La <strong>Pedelec</strong> <strong>ED</strong>I-<strong>1.2</strong> funziona con una batteria<br />
agli ioni di litio da 37V 8,8 Ah. Vengono utilizzate<br />
celle di alta qualità, che sono collegate ad un<br />
pacco batteria da 37V. Inoltre, la batteria ha un<br />
circuito di protezione che impedisce la scarica<br />
profonda e la sovraccarica.<br />
80
<strong>Pedelec</strong> <strong>ED</strong>-<strong>1.2</strong> con batteria agli ioni di litio<br />
Evitate di conservare una batteria<br />
completamente scarica per settimane. Utilizzate<br />
sempre il caricabatterie agli ioni di litio di alta<br />
qualità in dotazione (si veda la fig.) per ricaricare<br />
la batteria di trazione. Il caricabatterie originale<br />
funziona con Tecnologia CC-CV1.<br />
In combinazione con il circuito di protezione, si<br />
assicura che la batteria non possa mai essere<br />
danneggiata a causa di correnti di carica errate<br />
o sovraccariche.<br />
Carica della<br />
batteria<br />
esternamente<br />
batteria<br />
caricabatterie<br />
originale<br />
Il caricabatterie è progettato per uso interno<br />
e non deve essere esposto ad acqua o<br />
polvere. Leggete il manuale del caricabatterie<br />
allegato prima del primo utilizzo. Rimuovete<br />
il caricabatterie dalla confezione, sciogliete il<br />
fascio di cavi e collegatelo alla presa di carica<br />
che si trova sulla batteria di trazione (si veda la<br />
fig.). La batteria può essere caricata anche sulla<br />
bicicletta.<br />
presa di ricarica<br />
Per eseguire la carica, collegate prima la batteria<br />
al cavo di alimentazione e poi inserite il cavo<br />
nella presa di alimentazione.<br />
Durante la ricarica a corrente costante la spia<br />
di carica della batteria diventa rossa (0-95% - 4<br />
ore circa).<br />
Dopo il completamento di questa fase di<br />
carica, inizia la carica a tensione costante con<br />
bilanciamento delle celle (95%-100% – 1 ora<br />
circa). La spia lampeggia di colore verde.<br />
Una volta terminata la carica la spia di carica<br />
sarà verde e fissa. La batteria è ora pronta<br />
all’uso.<br />
Per un bilanciamento ottimale delle celle, dopo<br />
dieci cariche complete lasciate il caricabatterie<br />
collegato alla batteria per altre 2 ore.<br />
Per interrompere la carica, scollegate prima il<br />
cavo di alimentazione e poi la batteria.<br />
L<strong>ED</strong> caricabatterie:<br />
Modalità:<br />
1<br />
CC-CV = corrente costante - tensione costante:<br />
Inizialmente, viene caricata rapidamente con una<br />
corrente controllata e la tensione della batteria<br />
aumenta. Quando viene raggiunta la capacità massima,<br />
la corrente viene ridotta, e la capacità residua viene<br />
riempita solo con un’esatta tensione massima<br />
predeterminata.<br />
Verde fisso:<br />
standby / senza batteria<br />
Rosso fisso:<br />
carica principale<br />
(CC) 0-95%<br />
Verde lampeggiante: carica finale<br />
(CV) 95-100%<br />
Verde fisso: carica completa /<br />
bilanciamento delle celle<br />
81<br />
I
Parti della bicicletta:<br />
Rischio di corto circuito! Assicurarsi che<br />
nessun oggetto metallico si trovi nelle<br />
vicinanze dei contatti della batteria e del<br />
caricabatterie. In presenza di temperature<br />
eccessivamente alte o basse (sotto ai<br />
-10 °C e sopra ai 40 °C), la batteria non<br />
potrà essere caricata. Durante la carica,<br />
si consiglia di non lasciare la bicicletta in<br />
pieno sole.<br />
Carica di mantenimento a lungo termine<br />
Le batterie al litio non tollerano alcuna carica<br />
di mantenimento a lungo termine. La loro<br />
autoscarica è troppo bassa e il caricabatterie<br />
non la prevede.<br />
È quindi poco sensato mantenere la batteria<br />
sempre collegata al caricabatterie soprattutto<br />
in inverno o dopo un lungo periodo di<br />
inutilizzo. Ciò non causerebbe danni grazie<br />
all’elettronica di protezione della batteria,<br />
tuttavia il caricabatterie, come utenza, sarebbe<br />
completamente attraversato dalla corrente.<br />
Pertanto, in caso di lunghi periodi di inattività<br />
della <strong>Pedelec</strong> si consiglia di ricaricare la batteria<br />
agli ioni di litio ogni 3 mesi.<br />
Regolazioni prima della<br />
partenza<br />
Prima di ogni corsa verificate se:<br />
• tutte le viti, i dadi delle ruote o lo sgancio<br />
rapido sono saldamente serrati e se i freni<br />
funzionano;<br />
• la pressione dei pneumatici è sufficiente;<br />
• il sistema di illuminazione è intatto;<br />
• il campanello è in buono stato.<br />
Sella e manubrio<br />
La vostra bicicletta è stata montata dal<br />
rivenditore ed è pronta all’uso, si dovrà regolare<br />
la posizione di manubrio e sella in base alla<br />
vostra corporatura.<br />
Quando si regola l’altezza di sella e manubrio,<br />
fate attenzione alle tacche relative alla profondità<br />
minima di inserimento dell’albero dell’attacco<br />
del manubrio e del reggisella e non sollevare mai<br />
il manubrio o la sella oltre le tacche!<br />
Sella<br />
La sella può essere regolata in tre direzioni:<br />
altezza, inclinazione e distanza dal manubrio.<br />
Le apparecchiature elettriche non devono<br />
essere collegate alla rete di alimentazione<br />
per lungo tempo se incustodite. Pertanto,<br />
si dovrà staccare la presa di alimentazione<br />
durante le vacanze o in caso di assenza<br />
prolungata.<br />
Altezza:<br />
• svitare il bullone di serraggio sella o lo<br />
sgancio rapido (fig., punto 1)<br />
• spostare il reggisella verso l’alto o verso il<br />
basso<br />
• Dopo la regolazione serrare bene i morsetti.<br />
Avrete regolato l’altezza della sella in base alla<br />
vostra corporatura, quando da seduti sulla sella<br />
potrete toccare con entrambe le punte dei piedi<br />
il suolo.<br />
82
<strong>Pedelec</strong> <strong>ED</strong>-<strong>1.2</strong> con batteria agli ioni di litio<br />
Inclinazione della seduta e distanza dal<br />
manubrio:<br />
• allentare il dado del perno della sella o la vite<br />
a testa cava esagonale (fig., punto 2)<br />
• spostare la sella in avanti o indietro<br />
• inclinare la sella<br />
• serrare il dado del perno della sella o la vite a<br />
testa cava esagonale<br />
Attenzione! Il reggisella deve rimanere<br />
incastrato almeno fino alla tacca.<br />
Altrimenti si possono verificare il rischio<br />
di rottura e il rischio di caduta! Al primo<br />
utilizzo o in caso di umidità, le selle in<br />
pelle potrebbero perdere colore sui<br />
vestiti. Con una regolazione frequente<br />
dell’altezza della sella, la superficie del<br />
reggisella potrebbe essere danneggiata<br />
del movimento meccanico. Questo tipo di<br />
danno è considerato normale usura e non<br />
costituisce alcuna responsabilità per danni<br />
da prodotti difettosi.<br />
Manubrio e attacco del manubrio<br />
Il manubrio può essere regolato come segue:<br />
Regolazione dell’altezza:<br />
• allentare il dado o la vite a testa cava<br />
esagonale della vite expander (fig., punto 1).<br />
• Con una leggera martellata allentare<br />
l’expander e regolare l’altezza del manubrio.<br />
• Infine, serrare la vite expander.<br />
Attenzione!: Prestate attenzione alle<br />
tacche che non devono sporgere dal tubo<br />
di sterzo. Rottura e conseguente rischio di<br />
caduta!<br />
Con frequenti regolazioni dell’altezza del<br />
manubrio, la superficie potrebbe venir<br />
danneggiata. Questo tipo di danno è<br />
considerato normale usura e non costituisce<br />
alcuna responsabilità per danni da prodotti<br />
difettosi.<br />
Regolazione dell’inclinazione del manubrio<br />
- Allentare la vite (fig., punto 2)<br />
- Ruotare nella giusta posizione<br />
- Serrare la vite.<br />
Attacco del manubrio con angolazione<br />
regolabile<br />
Con questo attacco avrete una maggior<br />
flessibilità nella regolazione della posizione del<br />
manubrio:<br />
Attenzione! Dopo una caduta sul manubrio,<br />
si dovrà provvedere al ripristino di<br />
manubrio e attacco manubrio. Delle microcrepe<br />
invisibili sono segno di rottura da cui<br />
può derivare il rischio di caduta!<br />
83<br />
I
esponsabilità per danni dovuti a prodotti<br />
difettosi.<br />
Freno a contropedale su ruota posteriore<br />
Questo freno non necessità regolazione. Fate<br />
attenzione che il freno diventa inefficace quando<br />
la catena ha un difetto o si stacca.<br />
Regolazione<br />
• Allentare la vite.<br />
• Ruotare il manubrio nella posizione<br />
desiderata.<br />
• Serrare la vite.<br />
Attacco “Ahead”<br />
Questo attacco non può essere regolato in<br />
altezza!<br />
Pedali<br />
I pedali devono essere sempre saldamente<br />
fissati. Fate sempre attenzione durante il<br />
montaggio o lo smontaggio (ad esempio per<br />
il trasporto) che i pedali hanno due filettature.<br />
Le filettature sui pedali e sulla pedivella sono<br />
soggette a forze molto elevate. Possono<br />
sopportare tali forze solo se i pedali sono<br />
saldamente fissati.<br />
Il pedale destro (lato catena) si trova<br />
sull’estremità dell’asse contrassegnata con “R”<br />
e ha la filettatura sulla destra. Il pedale sinistro<br />
si trova sull’estremità dell’asse contrassegnata<br />
con “L” e ha la filettatura sulla sinistra. Il pedale<br />
destro dovrà essere avvitato in senso orario,<br />
mentre il pedale sinistro in senso antiorario.<br />
Freni<br />
Prima di ogni corsa, è necessario controllare<br />
il funzionamento del sistema frenante. La<br />
regolazione dei freni può essere eseguire<br />
esclusivamente dai rivenditori.<br />
La necessità di regolare i freni si può notare dalla<br />
corsa a vuota della leva del freno che diventa<br />
sempre maggiore, ossia a causa dell’usura<br />
delle pastiglie dei freni la leva del freno si può<br />
tirare sempre più vicino alla manopola del<br />
manubrio. Si dovrà eseguire regolarmente<br />
un bilanciamento. Le pastiglie dei freni sono<br />
soggette ad usura e ciò non costituisce alcuna<br />
Pedivelle<br />
Le pedivelle sono fissate con viti a testa cava<br />
esagonale o a testa esagonale sugli attacchi<br />
quadrangolari dell’asse del movimento centrale.<br />
La solidità della posizione della pedivella deve<br />
essere controllata regolarmente, rimuovete il<br />
cappuccio protettivo e serrate le viti sottostanti.<br />
Cuscinetti di sterzo<br />
Verifica:<br />
agite sulla leva del freno e spingete la bicicletta<br />
avanti e indietro. Qualora si notasse un<br />
allentamento legato all’usura, il cuscinetto<br />
dovrà essere immediatamente regolato.<br />
84
<strong>Pedelec</strong> <strong>ED</strong>-<strong>1.2</strong> con batteria agli ioni di litio<br />
Lasciate eseguire la regolazione a un’officina<br />
specializzata.<br />
Attenzione! Una ruota libera, in particolare<br />
la ruota anteriore, presenta maggiore<br />
rischio di caduta!<br />
Raggi<br />
Il normale utilizzo della bicicletta fa tendere<br />
e allentare i raggi. In base al livello d’uso, i<br />
raggi dovranno essere regolarmente centrati.<br />
Lasciate eseguire il centraggio della ruota<br />
e il tensionamento dei raggi a un’officina<br />
specializzata. È necessaria una tensione dei<br />
raggi uniforme e solida per l’eccentricità delle<br />
ruote. Raggi allentati, tensione irregolare e<br />
sovraccarico causano la rottura dei raggi.<br />
Sgancio rapido<br />
Lo sgancio rapido si trova a seconda del<br />
modello sulla ruota anteriore e posteriore<br />
nonché sul meccanismo di bloccaggio del tubo<br />
reggisella.<br />
Prima di mettersi alla guida verificare che lo<br />
sgancio sia chiuso saldamente. Qualora notaste<br />
che il meccanismo di bloccaggio della ruota<br />
anteriore è allentato, fermatevi immediatamente<br />
e stringete lo sgancio rapido.<br />
La leva dello sgancio rapido ha 2 posizioni:<br />
CLOSE = CHIUSO e OPEN = APERTO.<br />
Per prima cosa regolate con il dado M la<br />
stabilità. Quindi premere la leva con una certa<br />
forza nella posizione di CHIUSO.<br />
Pneumatici e cerchi<br />
La pressione massima ammissibile è indicata<br />
sui lati dei pneumatici. Non mettetevi in marcia<br />
se non avete sufficiente pressione (la gomma<br />
è afflosciata) o se avete troppa pressione (la<br />
gomma esplode). Una pressione dell’aria errata<br />
porta ad una maggiore usura, anche se la<br />
bicicletta è sgonfia.<br />
Il nostro consiglio:<br />
Dimensione dei pneumatici Pressione dell’aria<br />
anteriore posteriore<br />
47-559 (26“x1,75x2) 2,5 3,0<br />
50-559 (26“x1,90) 2,0 2,5<br />
52-559 (26“x2,25x2) 2,0 2,5<br />
57-559 (26“x2,125) 2,0 2,5<br />
37-622 (28“x1 3/8x1 5/8) 3,5 4,0<br />
40-622 (28“x1 3/8) 3,0 3,5<br />
47-622 (28“x1,75x2) 2,5 3,0<br />
50-622 (28“x1,90) 2,5 3,0<br />
85<br />
I
Per le gomme delle biciclette ci sono 3 sistemi<br />
di valvole. Fate attenzione che con le valvole<br />
Presta per gonfiare o sgonfiare le gomme dopo<br />
aver svitato il tappo (1), si deve in primo luogo<br />
allentare il dado zigrinato (2).<br />
Mantenete sempre un profilo adeguato e una<br />
carcassa del pneumatico integra.<br />
Caratteristiche di coppia<br />
Dadi dell’asse:<br />
Ruota anteriore 20 Nm<br />
Ruota posteriore 25 Nm<br />
Fissaggio pedivella 30 Nm<br />
Fissaggio ceppo del freno 5 Nm<br />
Fissaggio dynamo 10 Nm<br />
Cerchi<br />
Indicatore di usura dei cerchi<br />
Molti cerchi in alluminio sono dotati di un<br />
indicatore di usura. Fatevi spiegare l’importanza<br />
di questa caratteristica del vostro rivenditore.<br />
Altre viti:<br />
M4 2,1 Nm<br />
M5 4,2 Nm<br />
M6 7,3 Nm<br />
M8 17 Nm<br />
M10 34 Nm<br />
Nm<br />
Prestare attenzione all’usura dei cerchi!<br />
Controllate regolarmente le condizioni<br />
dei vostri cerchi. Consultate il vostro<br />
rivenditore per tempo. ROTTURE e<br />
RELATIVO RISCHIO DI CADUTA!<br />
Tensionamento della catena<br />
Assicuratevi che la catena, elemento principale<br />
dell’azionamento, sia ben tesa. L’utilizzo<br />
della bicicletta può causare l’afflosciamento<br />
della catena, pertanto, è necessario<br />
eseguire regolarmente un controllo della<br />
stessa. Eventualmente, lasciate eseguire il<br />
tensionamento della catena da un rivenditore.<br />
Come mostrato in Figura 12, la catena dovrebbe<br />
spostarsi facilmente in alto e in basso di circa<br />
1,5 cm a metà tra le due ruote dentate.<br />
86
<strong>Pedelec</strong> <strong>ED</strong>-<strong>1.2</strong> con batteria agli ioni di litio<br />
Funzionamento<br />
dell’azionamento della<br />
<strong>Pedelec</strong><br />
Per la gestione delle funzioni della bicicletta, si<br />
veda il capitolo “Funzionamento generale.”<br />
Sul manubrio sulla sinistra si trova un pannello<br />
di comando per controllare il sistema di<br />
azionamento elettrico ausiliario (si veda la fig.).<br />
Tramite questo pannello, è possibile accendere<br />
e spegnere la <strong>Pedelec</strong> <strong>ED</strong>-<strong>1.2</strong> e selezionare la<br />
modalità di guida desiderata. Un L<strong>ED</strong> a quattro<br />
livelli sulla sinistra mostra lo stato di carica della<br />
batteria, vale a dire la capacità rimanente.<br />
Interruttore ON / OFF<br />
Indicatore di capacità<br />
Modalità di guida raccomandate<br />
Dopo aver acceso il sistema, selezionate la<br />
modalità di guida e pedalando mettete in moto<br />
la <strong>Pedelec</strong> <strong>ED</strong>-<strong>1.2</strong>. Soprattutto nel caso di<br />
salite leggere, si raccomanda di agevolare la<br />
<strong>Pedelec</strong> leggermente aiutandosi con i piedi<br />
in modo che il motore non abbia bisogno<br />
di generare da fermo forze motrici elevate.<br />
Consumerebbe molta corrente e tra 0-3 km/h<br />
non sviluppa ancora forze elevate. Nell’interesse<br />
dell’autonomia, in tutte le situazioni di guida<br />
dovreste per quanto possibile agevolare la corsa<br />
pedalando poiché l’autonomia durante una<br />
corsa in cui si usa in prevalenza la forza motore<br />
è chiaramente molto al di sotto delle potenzialità<br />
del sistema. Le modalità di guida attivabili 1,2,3<br />
limitano la corrente massima di trasmissione,<br />
risparmiando così la capacità della batteria.<br />
Sentirete un supporto inferiore solo in montagna<br />
e in accelerazione.<br />
Autonomia e fattori collegati<br />
L’autonomia che si può ottenere con una<br />
batteria completamente carica è determinata<br />
da fattori concomitanti quali pendenza, vento<br />
contrario, condizioni stradali, pressione delle<br />
gomme, utilizzo del cambio, pedalata e peso del<br />
ciclista. Con una pedalata media del ciclista e<br />
una batteria completamente carica, l’autonomia<br />
tipica è da 20 a 70 km.<br />
4 Mode<br />
Modalità 1<br />
Modalità 2<br />
Modalità 3<br />
Modalità 4<br />
fino a 70 km<br />
fino a 45 km<br />
fino a 35 km<br />
fino a 25 km<br />
Premete il tasto centrale ON/OFF per accendere<br />
il sistema. Si accenderanno i L<strong>ED</strong> da 1 a 4 per<br />
lo stato della batteria di trazione e il L<strong>ED</strong> per la<br />
modalità di guida. Con il selettore sottostante<br />
potrete modificare i 4 livelli di guida. In questo<br />
modo, si limita la corrente di guida contribuendo<br />
in modo significativo al risparmio della capacità<br />
della batteria. L’azionamento ausiliario della<br />
<strong>Pedelec</strong> <strong>ED</strong>-<strong>1.2</strong> si avvia automaticamente dopo<br />
mezza pedalata rendendo la <strong>Pedelec</strong> <strong>ED</strong>-<strong>1.2</strong><br />
conforme alla norma europea per questo tipo di<br />
veicolo.<br />
Non è possibile presentare dei dati relativi<br />
all’autonomia vincolanti, in quanto diversi fattori<br />
influenzano le prestazioni. In primo luogo, la<br />
batteria deve essere caricata in modo ottimale.<br />
Ciò è garantito dall’uso del caricabatterie<br />
originale, dal sufficiente tempo di carica, dall’età<br />
della batteria e dalla relativa cura. Se tutte le<br />
circostanze sono ottimali, ossia la temperatura<br />
è tra 5 °C e 35 °C ed è stata eseguita una carica<br />
completa, all’inizio della corsa dovrebbe essere<br />
disponibile un’energia pari a 37V x 8,8Ah =<br />
325Wh . Con l’aumentare dell’età della batteria,<br />
la massima quantità di energia immagazzinata,<br />
e quindi la distanza percorsa, diminuisce di 1/3.<br />
Le batterie agli ioni di litio in genere hanno una<br />
87<br />
I
durata fino a 500 cicli di ricarica completi, ma la<br />
capacità nel corso del tempo scenderà all’85-<br />
65%, poiché con l’uso avviene gradualmente un<br />
invecchiamento della struttura interna delle celle.<br />
Con una buona cura, è possibile raggiungere<br />
una vita utile di circa 3 anni. La capacità si<br />
ridurrà lentamente ma costantemente.<br />
Funzionamento generale<br />
Cambio<br />
Se non avete familiarità con il funzionamento del<br />
cambio, fate pratica in zone non trafficate per<br />
imparare a spostarvi, frenare e fare le curve con<br />
la vostra nuova <strong>Pedelec</strong>.<br />
Deragliatore<br />
In primo luogo, spostate la catena sulla corona<br />
media posteriore. Spostate le corone anteriori.<br />
Poi eseguite la stessa procedura in senso<br />
contrario. In questo modo, imparerete facilmente<br />
come funziona il cambio. Non spostate mai la<br />
catena da fermi o durante la pedalata all’indietro.<br />
Scegliete la trasmissione anteriore a seconda<br />
del terreno e regolatela con il pacco pignoni<br />
posteriore. La catena non si deve incrociare,<br />
ossia non deve essere obliqua durante la corsa,<br />
altrimenti la catena e pignoni si usurano più<br />
velocemente. Utilizzare il deragliatore come<br />
illustrato nella fig.<br />
Regolazione del cambio:<br />
Si dovrà provvedere alla regolazione del cambio<br />
a seconda della tipo e dell’uso. Lasciate<br />
eseguire tutte le regolazioni sul cambio dal<br />
rivenditore.<br />
Cambio epicicloidale con freno a<br />
contropedale<br />
In presenza di un cambio epicicloidale, smettete<br />
brevemente di pedalare quando cambiate<br />
marcia in modo che l’ingranaggio possa<br />
spostarsi. A causa dell’afflosciamento del cavo<br />
del cambio, il cambio epicicloidale necessita<br />
di essere periodicamente sottoposto ad una<br />
regolazione da parte del rivenditore.<br />
Attualmente sono in uso cambi epicicloidale a<br />
3, 4, 5, 7, 8 e 9 rapporti di differenti produttori.<br />
Le <strong>Pedelec</strong> con mozzo NuVinci hanno un<br />
ingranaggio regolabile in continuo che è<br />
azionato tramite la manopola sul manubrio. Per<br />
regolare il vostro cambio speciale, contattate il<br />
vostro rivenditore o fate riferimento al manuale<br />
del produttore del cambio allegato.<br />
Freni<br />
La vostra <strong>Pedelec</strong> è equipaggiata con due freni<br />
indipendenti. La leva del freno a sinistro agisce<br />
sul freno della ruota anteriore e quella a destra<br />
sul freno della ruota posteriore. Un cambiamento<br />
di questa configurazione è possibile assegnando<br />
diversamente i cavi dei freni alle leve dei freni.<br />
Lasciate fare questa operazione al rivenditore.<br />
Freno a contropedale<br />
Il freno a contropedale è un freno sulla ruota<br />
posteriore, che viene azionato pedalando<br />
all’indietro. Facendo delle corse di prova potrete<br />
capire, quando mettere in azione il freno.<br />
In caso di lunghe e ripide discese è<br />
assolutamente necessario utilizzare in alternanza<br />
il secondo freno, ossia il freno della ruota<br />
anteriore, in modo da lasciar raffreddare il freno<br />
posteriore!<br />
88
<strong>Pedelec</strong> <strong>ED</strong>-<strong>1.2</strong> con batteria agli ioni di litio<br />
Un riscaldamento eccessivo del mozzo<br />
posteriore porta a perdite di lubrificante!<br />
Lubrificazione necessaria! I corpi frenanti di un<br />
freno a contropedale sono soggetti ad usura<br />
e devono essere sostituiti periodicamente a<br />
seconda del livello di utilizzo. Lasciate fare<br />
questa operazione al rivenditore.<br />
Freno a mano<br />
Controllare il funzionamento dei freni prima<br />
di ogni corsa. Se si riscontra un allentamento<br />
dell’effetto frenante, contattate il rivenditore!<br />
Le pastiglie o le ganasce dei freni sono<br />
contrassegnate. Utilizzare sempre pezzi di<br />
ricambio con la stessa marcatura.<br />
Attenzione! Rischio di cadute e di lesioni in<br />
caso di frenata di emergenza!<br />
Freno a rulli<br />
Anche questo freno viene azionato con la leva<br />
del freno sul manubrio. Il meccanismo frenante<br />
agisce sul mozzo della ruota portante ed è ben<br />
protetto dagli agenti atmosferici. Fate attenzione<br />
che in caso di lunghe frenate (discese lunghe e<br />
ripide) si verifica un elevato calore d’attrito che<br />
provoca un accumulo di calore.<br />
Freno V-brake<br />
Questi freni vengono azionati tirando la leva del<br />
freno sul manubrio della vostra bicicletta. Due<br />
ganasce agiranno sui lati dei cerchi.<br />
Grazie al loro design migliorato, i freni V-brake<br />
si contraddistinguono per gli eccellenti valori<br />
nelle frenate sull’asciutto e sul bagnato, tuttavia<br />
nascondono dei rischi soprattutto per i ciclisti<br />
meno esperti.<br />
Un uso scorretto dei freni, potrebbe farvi perdere<br />
il controllo della bicicletta. Esercitatevi sull’uso<br />
di questi freni soprattutto se siete ciclisti poco<br />
esperti. Inizialmente guidate lentamente e<br />
premete delicatamente la leva del freno per<br />
familiarizzare con la risposta di frenata.<br />
Freno idraulico<br />
Questo freno viene azionati tirando la leva del<br />
freno sul manubrio della vostra bicicletta. Due<br />
ganasce agiranno sui lati dei cerchi. Invece<br />
di cavi Bowden, questo freno dispone di un<br />
sistema di tubazioni che vengono riempite di olio<br />
idraulico.<br />
Lasciatevi consigliare dal rivenditore e leggete<br />
la dettagliata documentazione tecnica del<br />
costruttore. Il freno idraulico è molto sensibile e<br />
può essere dosato con precisione. Esercitatevi<br />
sull’uso di questi freni per capire il loro<br />
comportamento in frenata.<br />
Attenzione! Non toccare il corpo del mozzo<br />
surriscaldato. Il tempo di raffreddamento<br />
dopo una lunga frenata è di circa 30 minuti.<br />
Freno a disco<br />
Anche questo freno viene azionato con la leva<br />
del freno sul manubrio. Il principio è simile a<br />
quello dei freni dei cerchi tranne che questo<br />
freno è situato sul mozzo. I ceppi dei freni<br />
agiscono su un disco del freno.<br />
Trasporto di carichi<br />
Trasporto di carichi<br />
• Durante il trasporto, fissare bene i carichi e<br />
osservare la capacità di carico ammissibile<br />
del portapacchi!<br />
• Non appendere eventuali borse o altri oggetti<br />
sul manubrio! Ciò influenzerebbe la sicurezza<br />
di guida. I manubrio in alluminio non sono<br />
progettati per trasportare carichi!<br />
89<br />
I
Carrello rimorchio<br />
• Osservate la velocità ammissibile massima di<br />
25 km/h, se si utilizza un carrello rimorchio.<br />
• Carico massimo ammissibile del rimorchio<br />
40 kg.<br />
• Utilizzate esclusivamente ganci di rimorchio<br />
approvati e fissateli nelle apposite posizioni.<br />
• Utilizzate esclusivamente rimorchi che<br />
soddisfano il livello di sicurezza più alto.<br />
• Prima della prima corsa, esercitatevi senza<br />
trasportare carichi.<br />
• Rispettate i requisiti previsti dal regolamento<br />
sull’ammissione alla circolazione stradale<br />
(StVZO) per i dispositivi di illuminazione del<br />
rimorchio.<br />
• Si declina qualsiasi responsabilità per danni<br />
sulla bicicletta causati dall’uso del rimorchio!<br />
Portapacchi anteriore, cestino<br />
• Attenersi ai dati del produttore per il carico<br />
dei componenti.<br />
• Evitare sovraccarichi!<br />
• Non trasportare animali vivi!<br />
Portapacchi posteriore<br />
• Attenersi ai dati del produttore per il carico<br />
dei componenti.<br />
• Utilizzate le borse di trasporto, i cestini e i<br />
dispositivi di tensione commercialmente in<br />
uso.<br />
• Non trasportare persone e animali vivi.<br />
Attenzione! Il comportamento di guida e<br />
di frenata della bicicletta può cambiare.<br />
Rischio di caduta e di lesioni!<br />
Istruzioni di manutenzione<br />
La <strong>Pedelec</strong> deve essere curata come una<br />
normale bicicletta al fine di mantenere lo stesso<br />
comfort delle molte funzioni. In aggiunta, è<br />
necessario eseguire un regolare controllo dei<br />
freni, della pressione delle gomme, delle varie<br />
connessioni a vite, in particolare del manubrio,<br />
della sella e del dado dell’asse per garantire la<br />
sicurezza di guida.<br />
Cura dell’azionamento della <strong>Pedelec</strong><br />
• La manutenzione del sistema elettrico di<br />
azionamento ausiliario può essere suddiviso<br />
nel mantenimento della capacità massima<br />
della batteria mediante un’appropriata<br />
gestione e nella protezione degli altri<br />
componenti elettrici dall’esposizione<br />
prolungata all’umidità.<br />
• Durante l’inverno o durante altri lunghi<br />
periodi di inutilizzo, la batteria dovrà essere<br />
ricaricata al più tardi dopo 2-3 mesi. Solo<br />
questo approccio consente una lunga vita<br />
utile. In caso di lunghi periodi di inutilizzo,<br />
rimuovere la batteria della <strong>Pedelec</strong>.<br />
• Dopo aver guidato sotto la pioggia o se<br />
molto fango si è depositato su parti del<br />
corpo, con un panno umido rimuovere al<br />
più presto le macchie, pulire ed asciugare la<br />
<strong>Pedelec</strong>.<br />
• La pulizia non dovrà essere eseguita in<br />
nessun caso con un getto d’acqua ad alta<br />
pressione o con degli apparecchi di pulizia<br />
a vapore. Il sistema è a prova di schizzi ma<br />
non completamente sigillato.<br />
• Se i cablaggi dovessero venir completamente<br />
bagnati potrebbero verificarsi dei cortocircuiti<br />
che potrebbero danneggiare il comando<br />
digitale del sistema.<br />
• Pertanto, si dovrà assolutamente evitare di<br />
trasportare la <strong>Pedelec</strong> con batteria inserita<br />
sotto la pioggia.<br />
• Il vento forte spinge l’acqua in qualsiasi<br />
punto del telaio e nell’alloggiamento della<br />
90
<strong>Pedelec</strong> <strong>ED</strong>-<strong>1.2</strong> con batteria agli ioni di litio<br />
batteria. Qualora fosse necessario questo<br />
trasporto, rimuovere la batteria della<br />
<strong>Pedelec</strong> e all’arrivo prima di reinserire la<br />
batteria assicurarsi che la bicicletta sia<br />
sufficientemente asciutta.<br />
Istruzioni di manutenzione generali<br />
• Utilizzate esclusivamente ganci di rimorchio<br />
approvati e fissateli nelle apposite posizioni.<br />
• Utilizzate esclusivamente rimorchi che<br />
soddisfano il livello di sicurezza più alto.<br />
• Prima della prima corsa, esercitatevi senza<br />
trasportare carichi.<br />
• Rispettate i requisiti previsti dal regolamento<br />
sull’ammissione alla circolazione stradale<br />
(StVZO) per i dispositivi di illuminazione del<br />
rimorchio.<br />
• Si declina qualsiasi responsabilità per danni<br />
sulla bicicletta causati dall’uso del rimorchio!<br />
Smontaggio della ruota<br />
anteriore<br />
Qualora in caso di danno al pneumatico,<br />
fosse necessario smontare la ruota anteriore è<br />
necessario, procedere come segue:<br />
Smontaggio:<br />
aprite il connettore che si trova sul lato destro<br />
della forcella e le fascette che fissano i cavi<br />
alla forcella. Fate scorrere di lato la copertura<br />
di gomma del dado e svitate i dadi dell’asse su<br />
entrambi i lati. Ora sarà possibile rimuovere la<br />
ruota.<br />
Conservazione durante l’inverno<br />
La conservazione della <strong>Pedelec</strong> è<br />
particolarmente utile in caso di inutilizzo a lungo<br />
termine nei mesi invernali. Anche in questo<br />
caso, bisogna fare attenzione che <strong>Pedelec</strong> sia<br />
messa in una stanza con temperatura costante.<br />
Elevate oscillazioni di temperatura e l’umidità<br />
hanno effetti negativi su tutti i componenti in<br />
cromo e lega. Dopo lunghi periodi di inutilizzo, si<br />
consiglia di controllare la presenza di eventuali<br />
danni sulla <strong>Pedelec</strong> per evitare di dover<br />
portare la bicicletta in officina in primavera.<br />
Per alleggerire i pneumatici della <strong>Pedelec</strong><br />
appendetela.<br />
In caso di lunghi periodi di inutilizzo della<br />
<strong>Pedelec</strong>, rimuovere la batteria e conservarla in<br />
un locale fresco e asciutto.<br />
La temperatura di stoccaggio raccomandata<br />
per la batteria è di 15 °C.<br />
91<br />
I
Montaggio<br />
Reinserite la ruota anteriore e portate la rondella<br />
del braccio di reazione sull’asse del mozzo<br />
all’interno della forcella, rimettete in posizione<br />
i distanziali e la piastra di fondazione della<br />
copertura.<br />
Avvitate i dadi dell’asse. Allineate la ruota<br />
anteriore e serrate i dadi dell’asse. Collegate il<br />
connettore. Il cavo viene fissato nuovamente<br />
con fascette alla forcella.<br />
Modelli con motore sul mozzo posteriore<br />
Il montaggio della ruota posteriore è<br />
paragonabile a quanto descritto sopra.<br />
Restituzione/sostituzione<br />
della batteria<br />
Si prega di non gettare il pacco batteria nella<br />
spazzatura domestica. Gli appositi contenitori<br />
per lo smaltimento corretto sono disponibili<br />
presso i rivenditori di batterie e i centri di<br />
raccolta comunali.<br />
Per spedire un pacco batteria, contattate il<br />
vostro rivenditore, in quanto le batterie agli ioni<br />
di litio non dovrebbero essere spedite senza<br />
marcatura. Le batterie agli ioni di litio a causa<br />
della componente di litio altamente reattiva,<br />
sono classificate come merce pericolosa.<br />
Durante lo sviluppo, sono sottoposte a prove<br />
obbligatorie in materia di sicurezza in caso di<br />
incidenti che garantiscono che nell’eventualità<br />
di effetti distruttivi non si verifichino dei processi<br />
incontrollati. A questo proposito, è anche<br />
obbligatorio che in caso di spedizione del pacco<br />
venga applicata la corretta etichettatura in modo<br />
tale che nell’eventualità di incidenti stradali i<br />
vigili del fuoco possano subito riconoscere che<br />
tecniche di estinzione sono necessarie. Inoltre,<br />
grazie alle tecnologie di assemblaggio delle<br />
celle e al circuito di protezione si garantisce che<br />
anche durante il normale funzionamento non si<br />
verifichi un sovraccarico elettrico1.<br />
Prestate attenzione alle istruzioni sul fondo della<br />
batteria:<br />
92
<strong>Pedelec</strong> <strong>ED</strong>-<strong>1.2</strong> con batteria agli ioni di litio<br />
Technical Data<br />
Sistema di trasmissione<br />
EN15194 <strong>Pedelec</strong> o EPAC (=Electrical Power<br />
Assist Cycle). Azionamento ausiliario per<br />
bicicletta con motore da 250W, supporto fino<br />
a 25 km/h, attivato dal sensore di rotazione del<br />
pedale.<br />
Motore<br />
Motoriduttore BLDC. Per BLDC si intende DC<br />
brushless, vale a dire un motore in corrente<br />
continua senza spazzole a commutazione<br />
elettronica con 3 fasi che funziona con potenza<br />
nominale continua massima di 250W.<br />
Comando<br />
Controllore del motore BLDC con comando<br />
digitale del programma ai sensi della<br />
normativa Euro. Ci sono quattro modalità<br />
di corsa. L’azionamento ausiliario si attiva<br />
automaticamente con la pedalata e può<br />
raggiungere fino a 25 km/h. Se il freno viene<br />
azionato, l’azionamento ausiliario si arresta<br />
automaticamente.<br />
Batteria<br />
Batteria agli ioni di litio da 37V 8,8 Ah (325Wh)<br />
prodotte in Europa con 5 L<strong>ED</strong> di indicazione di<br />
capacità, peso 2,4 kg, fino a 500 cicli di ricarica<br />
completi, o durata utile di 3-4 anni con utilizzo<br />
ottimale.<br />
Caricabatterie<br />
Caricabatterie CC-CV con corrente di carica di<br />
2,0 A. La carica completa della batteria da 37V<br />
8,8 Ah dura circa 5 ore. Ogni 10 volte dovrà<br />
essere caricata 2 ore in più in modo da ottenere<br />
un bilanciamento ottimale delle celle.<br />
Autonomia<br />
Altamente dipendente dalla modalità di guida<br />
selezionata, dall’uso individuale e da altri fattori<br />
Modalità 1 fino a 70 km<br />
Modalità 2 fino a 45 km<br />
Modalità 3 fino a 35 km<br />
Modalità 4 fino a 25 km<br />
Si veda anche il capitolo<br />
“Autonomia e fattori collegati”.<br />
Guasti/Cause/Rimedi<br />
1. Unità di comando<br />
1.1 Quando si accende il pannello di controllo<br />
non si accende nessun L<strong>ED</strong>.<br />
Causa:<br />
La batteria non è<br />
posizionata<br />
correttamente<br />
Batteria difettosa <br />
rivenditore<br />
Difetto nei contatti /<br />
nei cavi<br />
rivenditore<br />
Elettronica difettosa<br />
Rimedio:<br />
> Riposizionare la<br />
batteria<br />
> Contattare il<br />
> Contattare il<br />
> Contattare il<br />
rivenditore<br />
<strong>1.2</strong> Il pannello di controllo si spegne<br />
durante la guida.<br />
Causa:<br />
La batteria è scarica<br />
Elettronica difettosa<br />
I connettori si <br />
sono allentati<br />
rivenditore<br />
2. Batteria<br />
Rimedio:<br />
> Caricare la batteria<br />
> Contattare il<br />
rivenditore<br />
> Contattare il<br />
2.1 Quando si preme il display del livello di<br />
carica della batteria non si accende nessun L<strong>ED</strong>.<br />
Causa:<br />
La batteria è scarica<br />
I fusibili nella batteria<br />
sono difettosi<br />
Le celle del pacco<br />
batteria sono difettose<br />
2.2 L’autonomia della batteria si<br />
è drasticamente ridotta.<br />
Rimedio:<br />
> Caricare la batteria<br />
> Sostituire i fusibili<br />
> Contattare il<br />
rivenditore<br />
93<br />
I
Causa:<br />
La batteria è esaurita<br />
(età)<br />
Il caricabatterie è<br />
difettoso<br />
Il connettore/cavo di<br />
carica è danneggiato<br />
Rimedio:<br />
> Sostituire la batteria<br />
> Contattare il<br />
rivenditore<br />
> Contattare il<br />
rivenditore<br />
3. Motore<br />
3.1 Il motore non parte, ma l’unità di controllo e<br />
la batteria funzionano.<br />
Causa:<br />
Rimedio:<br />
Il connettore del<br />
motore non è collegato<br />
correttamente > Controllare il<br />
connettore<br />
Altro difetto nei contatti/<br />
nei cavi<br />
Sensore di rotazione <br />
dei pedali difettoso<br />
Elettronica difettosa<br />
> Contattare il<br />
rivenditore<br />
> Contattare il<br />
rivenditore<br />
> Contattare il<br />
rivenditore<br />
4. Sensore di rotazione dei pedali<br />
4.1 Il motore genera poca potenza; il pannello di<br />
controllo e la batteria funzionano.<br />
Causa:<br />
Sensore di rotazione <br />
dei pedali difettoso<br />
Rimedio:<br />
> Contattare il<br />
rivenditore<br />
5. Caricabatterie<br />
Si veda il capitolo del manuale di questo elenco.<br />
94
<strong>Pedelec</strong> <strong>ED</strong>-<strong>1.2</strong> con batteria agli ioni di litio<br />
IT<br />
Dichiarazione di conformità CE<br />
in conformità con la Direttiva Macchine 2006/42/CE<br />
in conformità con la Direttiva EMC 2004/108/CE<br />
Il costruttore:<br />
Pantherwerke AG<br />
Alter Postweg 190<br />
32584 Löhne<br />
dichiara che tutti i nostri prodotti con i sistemi di azionamento:<br />
<strong>ED</strong><strong>1.2</strong>,<br />
sono conformi alle disposizioni delle direttive di cui sopra incluse<br />
le modifiche vigenti al momento della dichiarazione.<br />
Vengono applicate le seguenti norme:<br />
DIN EN 15194<br />
DIN EN 14764<br />
95<br />
I
Vertrieb/Distribution<br />
Migros-Genossenschafts-Bund, CH-8031 Zürich<br />
Migros France S.A., F-74100 Etrembières<br />
Migros Deutschland GmbH, D-79539 Lörrach<br />
Info-Line:<br />
CH-08 48 84 08 48<br />
06820-00255