Manual de uso - Philips StorageUpdates
Manual de uso - Philips StorageUpdates
Manual de uso - Philips StorageUpdates

You also want an ePaper? Increase the reach of your titles
YUMPU automatically turns print PDFs into web optimized ePapers that Google loves.
IFU external drive_man_new.qxd 05-04-2002 12:15 Pagina 1<br />
2 USA GB 3<br />
D<br />
4<br />
F<br />
5<br />
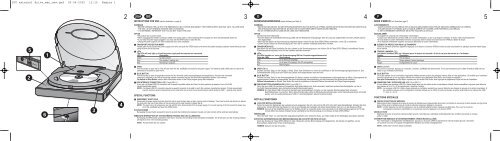
INSTRUCTIONS FOR USE (see the illustration on page 2)<br />
BEDIENUNGSANWEISUNG (siehe Abbildung auf Seite 2)<br />
MODE D’EMPLOI (voir illustration page 2)<br />
5<br />
2<br />
6<br />
1<br />
3<br />
4<br />
WARNINGS<br />
• BEFORE OPENING THE LID WITH THE EMERGENCY EJECT, PLEASE DISCONNECT THE POWER SUPPLY AND WAIT UNTIL YOU ARE SURE<br />
THE DISC IS NOT SPINNING ANYMORE (SEE LID WINDOW)<br />
• IT IS EXTREMELY IMPORTANT THAT YOU DO NOT TOUCH THE LENS<br />
OFF/ON<br />
This product has no power switch.<br />
• When unplugging the interface connection (USB) or the power cable, or when switching off the computer, the drive will automatically switch off.<br />
• If you keep the power supply plugged in you may use the OPEN button to eject the disc.<br />
• Unplug the power supply if you want to <strong>de</strong>activate your drive completely.<br />
TRANSPORT PROTECTION INSERT<br />
Please open the lid (connect the power supply to the drive and push the OPEN button) and remove the plastic transport protection insert before you start<br />
using the drive for the first time.<br />
LEDs<br />
The LEDs will only light up if both the power supply and the computer are connected.<br />
LED color<br />
Description<br />
Green<br />
No disc present<br />
Blue<br />
Disc present / reading disc<br />
Red<br />
Recording in progress<br />
OPEN<br />
Push this button to open the lid. This will only work with the JackRabbit connected to the power supply. The interface cable (USB) does not need to be<br />
connected or be active to open the lid.<br />
BLUE BUTTON<br />
Push this button to open an application window for this drive with useful Internet addresses and applications. (Provi<strong>de</strong>d the connected<br />
computer is switched on and has a functioning Internet connection and has the Blue Button application resi<strong>de</strong>nt in its memory.)<br />
For <strong>de</strong>tails on Blue Button: see the More Information section in the <strong>Philips</strong> program group after installation.<br />
USB INTERFACE CONNECTION (USB 2.0 and USB 1.1)<br />
If you use a Hi-Speed USB 2.0 connection with hi-speed compatible cables and hubs, the drive performs at speeds of up to 24x12x40<br />
(record/rewrite/read speed).<br />
NOTE: A Hi-Speed USB 2.0 connection requires a powerful computer to be able to reach the maximum (re)write/read speeds. If these requirements<br />
(see the minimum system requirements on the retail box) are not met, the drive performance will be limited to USB 1.1 speeds (max 4x4x6).<br />
SPECIAL FUNCTIONS<br />
EMERGENCY EJECT HOLE<br />
Disconnect the power supply from the drive first and be sure the disc does not spin anymore (see lid window). Then insert a short and slen<strong>de</strong>r pin behind<br />
the stud within the hole in the bottom of the drive and pull the stud forward to release the lid.<br />
NOTE: The eject hole is for emergency use only with the drive disconnected from the power supply. For normal opening of the lid connect the power supply<br />
to the JackRabbit and push the OPEN button.<br />
PLAYBACK MODE<br />
By keeping the open button pressed for about 2 seconds the conditions for playback of audio and vi<strong>de</strong>o content will be optimised automatically.<br />
IMMEDIATE INTERRUPTION OF THE RECORDING PROCESS (RED LED ILLUMINATED).<br />
By keeping the OPEN button pressed for more than 4 seconds, the recording will be interrupted immediately. The lid will open and the recording software<br />
will report an error in the recording process.<br />
NOTE: This will ren<strong>de</strong>r the disc useless.<br />
WARNUNG<br />
• BEVOR SIE DEN DECKEL MIT DER ÖFFNUNGSVORRICHTUNG FÜR NOTFÄLLE ÖFFNEN, ZIEHEN SIE BITTE DEN STECKER DES GERÄTS AUS<br />
DER STECKDOSE UND WARTEN SIE, BIS SICH DIE CD NICHT MEHR DREHT (SIEHE DECKELFENSTER).<br />
• ES IST EXTREM WICHTIG, DASS SIE DIE LINSE NICHT BERÜHREN.<br />
OFF/ON<br />
Das Gerät hat keinen Netzschalter.<br />
• Wird <strong>de</strong>r Stecker <strong>de</strong>r Schnittstellenverbindung (USB) o<strong>de</strong>r <strong>de</strong>r Netzstecker herausgezogen o<strong>de</strong>r <strong>de</strong>r Computer ausgeschaltet, wird das Laufwerk automatisch<br />
abgeschaltet.<br />
• Wenn Sie <strong>de</strong>n Stecker <strong>de</strong>r Stromversorgung eingesteckt lassen, können Sie die Taste OPEN (Öffnen) verwen<strong>de</strong>n, um die CD zu entnehmen.<br />
• Ziehen Sie <strong>de</strong>n Stecker <strong>de</strong>r Stromversorgung ab, wenn Sie Ihr Laufwerk vollständig <strong>de</strong>aktivieren möchten.<br />
TRANSPORTSCHUTZ<br />
Bitte öffnen Sie <strong>de</strong>n Deckel (schließen Sie das Laufwerk an die Stromversorgung an und drücken Sie die Taste OPEN (Öffnen)) und entfernen Sie <strong>de</strong>n<br />
Plastiktransportschutzeinsatz, bevor Sie das Laufwerk erstmals verwen<strong>de</strong>n.<br />
LEDs<br />
Die LEDs leuchten nur, wenn die Stromversorgung UND <strong>de</strong>r Computer angeschlossen sind.<br />
Farbe <strong>de</strong>r LEDs<br />
Beschreibung<br />
Grün<br />
Es ist keine CD eingelegt<br />
Blau<br />
Es ist eine CD eingelegt / Die CD wird gelesen<br />
Rot<br />
Brennvorgang<br />
OPEN (Öffnen)<br />
Drücken Sie diese Taste, um <strong>de</strong>n Deckel zu öffnen. Diese Taste funktioniert nur, wenn <strong>de</strong>r JackRabbit an die Stromversorgung angeschlossen ist. Das<br />
Schnittstellenkabel (USB) muss zum Öffnen <strong>de</strong>s Deckels nicht angeschlossen o<strong>de</strong>r aktiv sein.<br />
BLUE BUTTON<br />
Drücken Sie diese Taste, um ein Anwendungsfenster für dieses Laufwerk mit nützlichen Internetadressen und Anwendungen zu öffnen. (Vorausgesetzt <strong>de</strong>r<br />
angeschlossene Computer ist eingeschaltet, hat eine funktionieren<strong>de</strong> Internetanbindung und die Anwendung Blue Button wur<strong>de</strong> installiert.)<br />
Weitere Informationen zur Blauen Taste fin<strong>de</strong>n Sie nach <strong>de</strong>r Installation im Abschnitt Weitere Informationen <strong>de</strong>r <strong>Philips</strong>-Programmgruppe.<br />
USB-SCHNITTSTELLENANSCHLUSS (USB 2.0 und USB 1.1)<br />
Wenn Sie einen USB-2.0-Anschluss mit kompatiblen High-Speed-Kabeln und -Hubs verwen<strong>de</strong>n, bietet das Laufwerk Geschwindigkeiten von bis zu<br />
24x12x40 (Geschwindigkeiten beim Aufzeichnen/erneuten Beschreiben/Lesen).<br />
HINWEIS: Ein High-Speed-USB-2.0-Anschluss benötigt einen leistungsfähigen Computer, um die maximale Geschwindigkeit beim (erneuten)<br />
Beschreiben/Lesen zu erreichen. Wenn diese Anfor<strong>de</strong>rungen (siehe die Min<strong>de</strong>stsystemanfor<strong>de</strong>rungen auf <strong>de</strong>r Verkaufsverpackung) nicht erfüllt<br />
wer<strong>de</strong>n, wird die Laufwerksleistung auf USB-1.1-Geschwindigkeiten reduziert (maximal 4x4x6).<br />
NOTFALLFUNKTIONEN<br />
LOCH FÜR NOTFALLÖFFNUNG<br />
Ziehen Sie zuerst <strong>de</strong>n Netzstecker <strong>de</strong>s Laufwerks ab und vergewissern Sie sich, dass sich die CD nicht mehr dreht (siehe Deckelfenster). Schieben Sie dann<br />
einen kurzen, dünnen Stift hinter <strong>de</strong>n Bolzen im Loch an <strong>de</strong>r Unterseite <strong>de</strong>s Laufwerks und ziehen Sie <strong>de</strong>n Bolzen nach vorn, um <strong>de</strong>n Deckel zu öffnen.<br />
HINWEIS: Das Loch für die Notfallöffnung dient nur für Notfälle und darf nur verwen<strong>de</strong>t wer<strong>de</strong>n, wenn das Gerät von <strong>de</strong>r Stromversorgung getrennt ist. Für das<br />
normale Öffnen <strong>de</strong>s Deckels schließen Sie <strong>de</strong>n JackRabbit an die Stromversorgung an und drücken die Taste OPEN (Öffnen).<br />
WIEDERGABE<br />
Wenn die Taste “Open” ca. zwei Sekun<strong>de</strong>n lang gedrückt gehalten wird, wer<strong>de</strong>n die Audio- und Vi<strong>de</strong>o-Inhalte für die Wie<strong>de</strong>rgabe automatisch optimiert.<br />
SOFORTIGE UNTERBRECHUNG DES BRENNVORGANGS (ES LEUCHTET DIE ROTE LED AUF).<br />
Durch das Drücken <strong>de</strong>r Taste OPEN (Öffnen) für über 4 Sekun<strong>de</strong>n wird <strong>de</strong>r Brennvorgang sofort abgebrochen. Der Deckel wird geöffnet, und die<br />
Brennsoftware mel<strong>de</strong>t einen Fehler im Brennprozess.<br />
HINWEIS: Dadurch wird die CD wertlos.<br />
AVERTISSEMENTS<br />
• AVANT D’OUVRIR LE COUVERCLE PAR LE BIAIS DU MÉCANISME D’ÉJECTION DE SECOURS, DÉBRANCHEZ LE CORDON<br />
D’ALIMENTATION ET ATTENDEZ QUE LE DISQUE ARRÊTE DE TOURNER (VOIR FENÊTRE DU COUVERCLE).<br />
• IL EST EXTRÊMEMENT IMPORTANT DE NE PAS TOUCHER LA LENTILLE<br />
MARCHE-ARRÊT<br />
Cet appareil ne comporte pas d’interrupteur d’alimentation.<br />
• Lorsque vous débranchez la connexion USB ou le cordon d’alimentation, ou que vous éteignez l’ordinateur, le lecteur s’éteint automatiquement.<br />
• Si vous laissez le cordon d’alimentation branché, vous pouvez utiliser le bouton d’ouverture du tiroir OPEN pour éjecter le disque.<br />
• Pour désactiver entièrement l’appareil, vous pouvez débranchez le cordon d’alimentation.<br />
ÉLÉMENT DE PROTECTION POUR LE TRANSPORT<br />
Ouvrez le couvercle (branchez l’appareil et appuyez sur le bouton d’ouverture OPEN) et retirez la pièce <strong>de</strong> protection en plastique avant <strong>de</strong> mettre l’appareil<br />
en service.<br />
TÉMOINS LUMINEUX (DEL)<br />
Les témoins lumineux (DEL) ne s’allument que si le lecteur est raccordé à la fois à une prise <strong>de</strong> courant et à l’ordinateur.<br />
Couleur<br />
Description<br />
Vert<br />
Pas <strong>de</strong> disque<br />
Bleu<br />
Disque présent / lecture <strong>de</strong> disque<br />
Rouge<br />
Enregistrement en cours<br />
OPEN (OUVRIR)<br />
Pour ouvrir le couvercle, appuyez sur ce bouton. Le lecteur JackRabbit doit être branché. Il n’est pas nécessaire que le câble d’interface (USB) soit connecté<br />
ou que l’ordinateur soit allumé.<br />
BLUE BUTTON<br />
Ce bouton permet d’ouvrir une fenêtre d’application dédiée donnant accès à <strong>de</strong>s adresses internet utiles et à <strong>de</strong>s applications. (À condition que l’ordinateur<br />
connecté soit allumé, qu’une connexion internet soit ouverte et que l’application Blue Button soit chargée en mémoire.)<br />
Pour plus d’informations sur Blue Button, reportez-vous à la section Plus d’infos, dans le groupe <strong>de</strong> programmes <strong>Philips</strong> créé lors <strong>de</strong> l’installation.<br />
CONNEXION PAR L’INTERFACE USB (USB 2.0 et USB 1.1)<br />
Si vous utilisez une connexion USB 2.0 à haute vitesse ainsi que <strong>de</strong>s câbles et <strong>de</strong>s concentrateurs à haute vitesse compatibles, le graveur peut atteindre<br />
<strong>de</strong>s vitesses <strong>de</strong> 24 x 12 x 40 (enregistrement / réécriture / lecture).<br />
NOTE : La connexion USB 2.0 à haute vitesse nécessite un ordinateur puissant pour pouvoir atteindre ces vitesses <strong>de</strong> gravure et <strong>de</strong> lecture maximales. Si<br />
les conditions requises (voir la configuration minimale indiquée sur le coffret) ne sont pas réunies, le lecteur sera limité par les vitesses <strong>de</strong> l’USB<br />
1.1 (max. 4 x 4 x 6).<br />
FONCTIONS SPÉCIALES<br />
ORIFICE D’ÉJECTION DE SECOURS<br />
Débranchez d’abord l’appareil <strong>de</strong> la prise <strong>de</strong> courant et atten<strong>de</strong>z que le disque arrête <strong>de</strong> tourner (voir fenêtre du couvercle). Insérez ensuite une tige mince<br />
dans l’orifice situé à l’arrière/au bas <strong>de</strong> l’unité et enfoncez la tige pour dégager le couvercle.<br />
NOTE : L’orifice d’éjection ne doit être utilisé qu’en cas <strong>de</strong> nécessité absolue lorsque l’appareil est débranché. Pour ouvrir le couvercle<br />
normalement, branchez le JackRabbit sur une prise <strong>de</strong> courant et appuyez sur le bouton OPEN.<br />
MODE LECTURE<br />
Maintenez le bouton d’ouverture enfoncé pendant environ 2 secon<strong>de</strong>s pour optimaliser automatiquement les conditions <strong>de</strong> lecture du contenu<br />
audio ou vidéo.<br />
INTERRUPTION IMMÉDIATE D’UN ENREGISTREMENT (TÉMOIN ROUGE ALLUMÉ)<br />
Pour interrompre un enregistrement immédiatement, appuyez sur le bouton OPEN et maintenez-le enfoncé pendant plus <strong>de</strong> 4 secon<strong>de</strong>s.<br />
Le couvercle s’ouvrira, et le logiciel d’enregistrement indiquera une erreur d’enregistrement.<br />
NOTE : Cette action rendra le disque inutilisable.
IFU external drive_man_new.qxd 05-04-2002 12:15 Pagina 2<br />
I<br />
6<br />
NL<br />
7<br />
E<br />
8<br />
ISTRUZIONI PER L’USO (vedi illustrazione a pagina 2)<br />
AVVERTENZE<br />
• PRIMA DI APRIRE IL COPERCHIO CON LA FUNZIONE DI ESPULSIONE DI EMERGENZA, DISCONNETTERE L'ALIMENTATORE E ATTENDERE FINO A QUAN-<br />
DO SI È CERTI CHE IL DISCO NON STIA PIÙ GIRANDO (FARE RIFERIMENTO ALLA FINESTRINA SUL COPERCHIO).<br />
• EVITARE ASSOLUTAMENTE DI TOCCARE LE LENTI<br />
OFF/ON<br />
Questo prodotto non è dotato di interruttore ON/OFF.<br />
• Quando si stacca la connessione di interfaccia (USB) o il cavo di alimentazione o quando si spegne il computer, l'unità si spegne automaticamente.<br />
• Se si mantiene l'alimentatore inserito, per espellere il disco si potrà usare il pulsante APRI.<br />
• Se si <strong>de</strong>si<strong>de</strong>ra disattivare completamente il drive, scollegare l’alimentatore.<br />
INSERTO DI PROTEZIONE DURANTE IL TRASPORTO<br />
Aprire il coperchio (collegare l’alimentatore al drive e premere il pulsante APRI ) e rimuovere l’inserto di protezione in plastica per il trasporto prima di<br />
iniziare ad usare per la prima volta il drive.<br />
LED<br />
I LED si accen<strong>de</strong>ranno esclusivamente se l'alimentatore ed il computer sono connessi.<br />
Colore <strong>de</strong>l LED<br />
Descrizione<br />
Ver<strong>de</strong><br />
Disco assente<br />
Blu<br />
Disco presente / lettura disco<br />
Rosso<br />
Registrazione in corso<br />
APRI<br />
Premere questo pulsante per aprire il coperchio. Questo funzionerà esclusivamente con il JackRabbit collegato all’alimentatore. Per aprire il coperchio, non<br />
è necessario che il cavo di interfaccia (USB) sia collegato o attivo.<br />
BLUE BUTTON<br />
Premere questo pulsante per aprire una finestra di applicazione per questo drive con indirizzi e applicazioni internet idonei. (A condizione che il computer<br />
connesso sia acceso, abbia una connessione ad internet funzionante ed abbia l'applicazione Blue Button resi<strong>de</strong>nte in memoria.)<br />
Per ulteriori informazioni sul Pulsante Blu fare riferimento al capitolo “Ulteriori Informazioni” nel gruppo programmi <strong>Philips</strong>, dopo l’installazione.<br />
CONNESSIONE INTERFACCIA USB (USB 2.0 e USB 1.1)<br />
Se si usa una connessione Hi-Speed USB 2.0 con cavi e periferiche ad alta velocità compatibili, l'unità potrà andare a velocità fino<br />
24x12x40 (velocità di registrazione/riscrittura/lettura).<br />
NOTA: Una connessione Hi-Speed USB 2.0 richie<strong>de</strong> un computer potente che sia capace di raggiungere le massime velocità di (ri)scrittura/lettura.<br />
Se questi requisiti (fare riferimento ai requisiti di sistema minimi sulla confezione d'imballo) non sono rispettati, le prestazioni <strong>de</strong>ll'unità saranno<br />
limitate alle velocità <strong>de</strong>ll' USB 1.1 (max.: 4x4x6)<br />
FUNZIONI SPECIALI<br />
FORO DI ESPULSIONE DI EMERGENZA<br />
Per prima cosa disconnettere l'alimentatore dall'unità e controllare che il disco non stia più girando (fare riferimento alla finestrina sul coperchio). Quindi inserire<br />
un oggetto corto e appuntito dietro il perno all’interno dl foro sul fondo <strong>de</strong>l drive e tirare il perno in avanti per liberare il coperchio.<br />
NOTA: il foro di espulsione serve solo in caso di emergenza con il drive scollegato dall’alimentatore. Per un’apertura normale <strong>de</strong>l coperchio collegare<br />
l’alimentatore al JackRabbit e premere il pulsante APRI.<br />
MODALITÀ RIPRODUZIONE<br />
Tenendo premuto il pulsante Open per 2 secondi, verranno automaticamente ottimizzate le condizioni per la riproduzione di contenuto audio e vi<strong>de</strong>o.<br />
INTERRUZIONE IMMEDIATA DEL PROCESSO DI REGISTRAZIONE (LED ROSSO ACCESO)<br />
Tenendo il pulsante APRI premuto per più di 4 secondi, la registrazione verrà interrotta immediatamente. Il coperchio si apre ed il software di registrazione<br />
riporterà un errore nel processo di registrazione.<br />
NOTA: ciò ren<strong>de</strong>rà il disco inutilizzabile.<br />
GEBRUIKSAANWIJZING (zie <strong>de</strong> tekening op pagina 2)<br />
WAARSCHUWINGEN<br />
• TREK VOOR GEBRUIK VAN DE NOODBEDIENING VAN HET DEKSEL EERST DE NETSTEKKER UIT HET STOPCONTACT, EN WACHT TOT U<br />
ZEKER WEET DAT HET SCHIJFJE NIET MEER DRAAIT (ZIE HET VENSTER IN HET DEKSEL)<br />
• RAAK NOOIT DE LENS AAN<br />
AAN/UIT<br />
Er zit geen aan/uit-knop op dit apparaat.<br />
• Het station schakelt automatisch uit wanneer u <strong>de</strong> aansluitkabel (USB) of <strong>de</strong> netvoedingskabel lostrekt of als u <strong>de</strong> computer uitschakelt.<br />
• Als u <strong>de</strong> voeding aangesloten laat zitten, kunt u altijd met <strong>de</strong> OPEN-knop het <strong>de</strong>ksel openen.<br />
• Trek <strong>de</strong> netstekker uit het stopcontact als u het station volledig wilt uitschakelen.<br />
TRANSPORTBEVEILIGING<br />
Maak het <strong>de</strong>ksel open (sluit <strong>de</strong> voeding aan en druk op OPEN) en verwij<strong>de</strong>r voor gebruik van het station eerst <strong>de</strong> plastic transportbeveiliging.<br />
CONTROLELAMPJES<br />
Deze lampjes lichten alleen op als zowel <strong>de</strong> netvoeding als <strong>de</strong> computer is aangesloten.<br />
Lampkleur<br />
Omschrijving<br />
Groen<br />
Geen schijfje geplaatst<br />
Blauw<br />
Schijfje geplaatst / schijfje wordt gelezen<br />
Rood<br />
Bezig met bran<strong>de</strong>n<br />
OPEN<br />
Druk op OPEN om het <strong>de</strong>ksel te openen. Dit werkt alleen als <strong>de</strong> JackRabbit op <strong>de</strong> netspanning is aangesloten. De aansluitkabel (USB) hoeft niet te zijn<br />
aangesloten of actief te zijn om het <strong>de</strong>ksel te kunnen openen.<br />
BLUE BUTTON<br />
Een druk op <strong>de</strong>ze knop opent op uw computer een venster met handige verwijzingen naar websites en toepassingsprogramma’s.<br />
(Mits <strong>de</strong> aangesloten computer is ingeschakeld, over een werken<strong>de</strong> internetverbinding beschikt en het Blue Button-programma in het geheugen<br />
is gela<strong>de</strong>n.)<br />
Wilt u meer weten over Blue Button: klik dan na het installeren op ‘Meer informatie’ in <strong>de</strong> <strong>Philips</strong>-programmagroep.<br />
USB-AANSLUITING (USB 2.0 en USB 1.1)<br />
Gebruikt u een Hi-Speed USB 2.0-aansluiting in combinatie met Hi-Speed compatibele kabels en hubs, dan bedraagt <strong>de</strong> maximale snelheid van het station<br />
24x12x40 (schrijven / herschrijven / lezen).<br />
LET OP: Een Hi-Speed USB 2.0-aansluiting vereist een zeer krachtige computer om <strong>de</strong> maximale (her)schrijfsnelheid te kunnen halen.<br />
Wordt aan <strong>de</strong>ze eisen niet voldaan (zie <strong>de</strong> minimale systeemeisen die op <strong>de</strong> verpakking staan), dan kan het station slechts op<br />
USB 1.1-snelheid (max 4x4x6) wor<strong>de</strong>n gebruikt.<br />
SPECIALE FUNCTIES<br />
NOODBEDIENING DEKSEL<br />
Trek eerst <strong>de</strong> voedingsstekker uit het station en wacht tot u zeker weet dat het schijfje niet meer draait (zie het venster in het <strong>de</strong>ksel). Steek daarna een korte,<br />
smalle pin achter het nokje in het gat aan <strong>de</strong> on<strong>de</strong>rkant van het apparaat, en trek het nokje naar voren om het <strong>de</strong>ksel te ontgren<strong>de</strong>len.<br />
LET OP: Het gebruik van dit nokje is alleen bedoeld voor noodgevallen, en trek dan altijd eerst <strong>de</strong> voedingsstekker uit het station. Normaliter maakt u het<br />
<strong>de</strong>ksel open door eerst <strong>de</strong> voeding aan te sluiten op het apparaat en daarna op <strong>de</strong> OPEN-knop te drukken.<br />
WEERGEVEN<br />
Optimaliseer <strong>de</strong> audio- en vi<strong>de</strong>oweergave door <strong>de</strong> Open-knop circa 2 secon<strong>de</strong>n lang ingedrukt te hou<strong>de</strong>n.<br />
DIRECT ONDERBREKEN VAN HET BRANDEN (TERWIJL HET RODE LAMPJE OPLICHT).<br />
Houd <strong>de</strong> knop OPEN langer dan 4 secon<strong>de</strong>n ingedrukt, dan zal het bran<strong>de</strong>n direct wor<strong>de</strong>n on<strong>de</strong>rbroken. Het <strong>de</strong>ksel gaat open en <strong>de</strong> bran<strong>de</strong>rsoftware zal<br />
een foutmelding geven.<br />
LET OP: Dit maakt het schijfje onbruikbaar.<br />
INSTRUCCIONES DE USO (vea la ilustración en la página 2)<br />
ADVERTENCIAS:<br />
• ANTES DE ABRIR LA TAPA CON EL BOTÓN DE EXPULSIÓN DE EMERGENCIA, POR FAVOR DESCONECTE LA FUENTE DE ALIMENTACIÓN Y<br />
ESPERE HASTA ESTAR SEGURO DE QUE EL DISCO YA NO GIRA (MIRE A TRAVÉS DE LA VENTANILLA DE LA TAPA)<br />
• ES MUY IMPORTANTE NO TOCAR LA LENTE<br />
APAGADO / ENCENDIDO<br />
Este producto no tiene interruptor <strong>de</strong> encendido / apagado.<br />
• Cuando <strong>de</strong>sconecte la interfaz USB o el cable <strong>de</strong> la fuente <strong>de</strong> alimentación, o cuando apague el or<strong>de</strong>nador, la unidad se apagará automáticamente.<br />
• Si mantiene conectada la fuente <strong>de</strong> alimentación, podrá utilizar el botón OPEN (ABRIR) para quitar el disco.<br />
• Desconecte la fuente <strong>de</strong> alimentación si <strong>de</strong>sea <strong>de</strong>sactivar la unidad totalmente.<br />
PROTECCIÓN PARA EL TRANSPORTE<br />
Por favor abra la tapa (conecte la fuente <strong>de</strong> alimentación a la unidad y pulse el botón OPEN) y quite la protección <strong>de</strong> plástico para el transporte antes <strong>de</strong><br />
empezar a utilizar la unidad por primera vez.<br />
INDICADORES LED<br />
Los indicadores LED sólo se iluminan si la fuente <strong>de</strong> alimentación y el or<strong>de</strong>nador están ambos conectados.<br />
Color <strong>de</strong>l LED<br />
Descripción<br />
Ver<strong>de</strong><br />
No hay disco<br />
Azul<br />
Hay un disco / leyendo disco<br />
Rojo<br />
Grabación en curso<br />
ABRIR<br />
Pulse este botón para abrir la tapa. Esto sólo funcionará cuando la unidad JackRabbit esté conectada a la fuente <strong>de</strong> alimentación. El cable <strong>de</strong> interfaz<br />
(USB) no necesita estar conectado o activo para abrir la tapa.<br />
BLUE BUTTON<br />
Pulse este botón para abrir una ventana <strong>de</strong> aplicación para esta unidad con direcciones <strong>de</strong> Internet y aplicaciones útiles. (A condición <strong>de</strong> que el or<strong>de</strong>nador<br />
que hay conectado esté encendido y tenga una conexión con Internet activa y la aplicación Blue Button resi<strong>de</strong>nte en memoria).<br />
Para obtener más <strong>de</strong>talles sobre el Botón Azul: consulte la sección “Más información” <strong>de</strong>l grupo <strong>de</strong> programa <strong>Philips</strong> <strong>de</strong>spués <strong>de</strong> la instalación.<br />
CONEXIÓN DE INTERFAZ USB (USB 2.0 y USB 1.1)<br />
Si utiliza una conexión <strong>de</strong> alta velocidad USB 2.0 con cables y hubs compatibles <strong>de</strong> alta velocidad, la unidad alcanza velocida<strong>de</strong>s <strong>de</strong> hasta 24x12x40<br />
(grabación/regrabación/lectura).<br />
NOTA: Una conexión <strong>de</strong> alta velocidad USB 2.0 requiere un or<strong>de</strong>nador potente para po<strong>de</strong>r alcanzar las velocida<strong>de</strong>s máximas <strong>de</strong> (re)grabación y lectura.<br />
Si no se cumplen estos requisitos (vea los requisitos mínimos <strong>de</strong>l sistema en el embalaje <strong>de</strong> la unidad), el equipo estará limitado a las velocida<strong>de</strong>s<br />
<strong>de</strong> USB 1.1 (máx. 4x4x6).<br />
FUNCIONES ESPECIALES<br />
ORIFICIO DE EXPULSIÓN DE EMERGENCIA<br />
Desconecte la fuente <strong>de</strong> alimentación <strong>de</strong> la unidad primero, y asegúrese <strong>de</strong> que el disco ya no gira (mire a través <strong>de</strong> la ventanilla <strong>de</strong> la tapa).<br />
A continuación introduzca algún objeto <strong>de</strong>lgado y corto por el orificio que hay en la parte inferior <strong>de</strong> la unidad <strong>de</strong>trás <strong>de</strong>l botón y tire <strong>de</strong>l botón hacia<br />
<strong>de</strong>lante para abrir la tapa.<br />
NOTA: El orificio <strong>de</strong> expulsión es sólo para casos <strong>de</strong> emergencia y sólo <strong>de</strong>be utilizarse con la unidad <strong>de</strong>sconectada <strong>de</strong> la fuente <strong>de</strong> alimentación.<br />
Para la apertura normal <strong>de</strong> la tapa, conecte la fuente <strong>de</strong> alimentación a la unidad JackRabbit y pulse el botón ABRIR.<br />
MODO REPRODUCCIÓN<br />
Manteniendo pulsado el botón Abrir (Open) durante 2 segundos se optimizarán automáticamente las condiciones <strong>de</strong> reproducción <strong>de</strong> audio y ví<strong>de</strong>o.<br />
INTERRUPCIÓN INMEDIATA DEL PROCESO DE GRABACIÓN (INDICADOR LED ROJO ILUMINADO).<br />
Manteniendo el botón ABRIR pulsado durante más <strong>de</strong> 4 segundos se interrumpe la grabación <strong>de</strong> inmediato. Se abrirá la tapa y el software <strong>de</strong> grabación<br />
indicará un error durante el proceso <strong>de</strong> grabación.<br />
NOTA: Esto hará que el disco que<strong>de</strong> inutilizable.<br />
3104 125 24481<br />
CD-R/RW<br />
External drive<br />
JackRabbit<br />
• Instructions For Use<br />
• Bedienungsanweisung<br />
• Mo<strong>de</strong> d'emploi<br />
JR24CDRW<br />
• Istruzioni per l'<strong>uso</strong><br />
• Gebruiksaanwijzing<br />
• Instrucciones <strong>de</strong> <strong>uso</strong>