ED16DVDS - Philips StorageUpdates
ED16DVDS - Philips StorageUpdates
ED16DVDS - Philips StorageUpdates

Create successful ePaper yourself
Turn your PDF publications into a flip-book with our unique Google optimized e-Paper software.
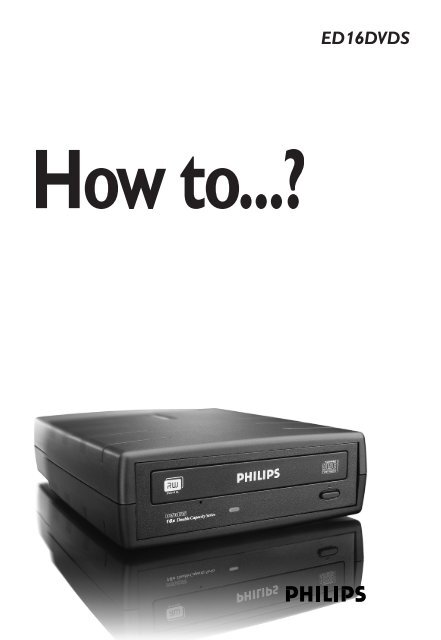
<strong>ED16DVDS</strong>
Contents - Inhalt - Table des matières<br />
UK<br />
How to connect the <strong>ED16DVDS</strong> to my computer? 5<br />
How to disconnect the <strong>ED16DVDS</strong> without shutting down the computer? 23<br />
How to capture video from a digital DV-camcorder? 27<br />
How to make a video disc? 37<br />
How to watch video? 45<br />
How to copy a disc? 51<br />
How to make a Data disc? 57<br />
How to make an Audio disc? 65<br />
How to find warranty information? 73<br />
FAQ, Frequently Asked Questions 77<br />
Specifications 91<br />
Safety Precautions 98<br />
D<br />
Wie verbindet man den <strong>ED16DVDS</strong> mit einen Computer? 5<br />
Wie kann man die Verbindung zum <strong>ED16DVDS</strong> trennen,<br />
ohne den Computer herunterzufahren? 23<br />
Videos von einem digitalen DV-Camcorder aufnehmen 27<br />
Wie erstellt man eine Video Disk? 37<br />
Wie kann man sich Videos ansehen? 45<br />
Eine Disk kopieren 51<br />
Eine Daten-Disk erstellen 57<br />
Erstellen einer Audio-Disk 65<br />
Wie findet man Garantie-Informationen? 73<br />
FAQ, Häufig gestellte Fragen 80<br />
Technische Daten 93<br />
Safety Precautions 98<br />
F<br />
Raccordement du <strong>ED16DVDS</strong> à mon ordinateur 5<br />
Comment débrancher l’<strong>ED16DVDS</strong> sans arrêter l’ordinateur? 23<br />
Comment acquérir les images vidéo d’une caméra numérique DV ? 27<br />
Comment créer un disque vidéo? 37<br />
Comment regarder des vidéos ? 45<br />
Comment copier un disque? 51<br />
Comment créer un disque de données? 57<br />
Comment créer un disque audio? 65<br />
Comment trouver les informations relatives à la garantie? 73<br />
FAQ, Questions fréquentes 82<br />
Caractéristiques techniques 94<br />
Safety Precautions 98<br />
2
Indice - Inhoud - Índice<br />
I<br />
Come collegare il <strong>ED16DVDS</strong> al computer? 5<br />
Come si disconnette l'<strong>ED16DVDS</strong> senza spegnere il computer? 23<br />
Come registrare un video da una DV-camcorder digitale? 27<br />
Come creare un video dischi? 37<br />
Come si possono guardare i video? 45<br />
Come copiare un dischi? 51<br />
Come creare un dischi di dati? 57<br />
Come creare un dischi Audio? 65<br />
Come si accede alle informazioni sulla garanzia memorizzate? 73<br />
FAQ, Domande frequenti 84<br />
Specifiche 95<br />
Safety Precautions 98<br />
NL<br />
Hoe sluit ik de <strong>ED16DVDS</strong> op mijn computer aan? 5<br />
Hoe ontkoppel ik de <strong>ED16DVDS</strong> zonder de computer uit te zetten? 23<br />
Hoe kopieer ik de opnames van een digitale DV-camcorder<br />
naar mijn computer? 27<br />
Hoe maak ik een videodisc? 37<br />
Hoe kan ik video bekijken? 45<br />
Hoe kopieer ik een disc? 51<br />
Hoe maak ik zelf een data-disc? 57<br />
Hoe maak ik zelf een muziek-disc? 65<br />
Waar vind ik informatie over de garantie? 73<br />
FAQ:Vaak gestelde vragen 86<br />
Specificaties 96<br />
Safety Precautions 98<br />
E<br />
¿Cómo conectar <strong>ED16DVDS</strong> al ordenador? 5<br />
¿Cómo desconectar <strong>ED16DVDS</strong> sin apagar el ordenador? 23<br />
¿Cómo capturar secuencias de vídeo de una videocámara digital DV? 27<br />
¿Cómo crear un disco de vídeo? 37<br />
¿Cómo ver vídeo? 45<br />
¿Cómo copiar un disco? 51<br />
¿Cómo crear un disco de datos? 57<br />
¿Cómo crear un disco de audio? 65<br />
¿Cómo encontrar información sobre la garantía? 73<br />
FAQ: Preguntas frecuentes 88<br />
Especificaciones 97<br />
Safety Precautions 98<br />
3
How to connect the<br />
<strong>ED16DVDS</strong> to my<br />
computer?<br />
Wie verbindet man den <strong>ED16DVDS</strong><br />
mit einen Computer?<br />
Raccordement du <strong>ED16DVDS</strong> à mon ordinateur<br />
Come collegare il <strong>ED16DVDS</strong> al computer?<br />
Hoe sluit ik de <strong>ED16DVDS</strong> op mijn computer aan?<br />
¿Cómo conectar <strong>ED16DVDS</strong> al ordenador?<br />
UK<br />
D<br />
F<br />
I<br />
NL<br />
E<br />
The next pages show how to connect your new <strong>ED16DVDS</strong> to a computer. Since there are many brands and types of<br />
computers available, the next photographs show only examples on how your <strong>ED16DVDS</strong> could be installed.<br />
For specific information on your computer, please refer to your computer manual or contact your local dealer.<br />
Auf den nächsten Seiten wird erläutert, wie Sie Ihren neuen <strong>ED16DVDS</strong> mit einem Computer verbinden können.<br />
Da Computer von vielen Herstellern in verschiedenen Ausführungen und Typen angeboten werden, zeigen die nachstehenden<br />
Fotos nur Beispiele für eine mögliche Installation Ihres <strong>ED16DVDS</strong>. Für spezielle Informationen zu Ihrem Computer schlagen Sie<br />
in Ihrem Computer-Handbuch nach oder erkundigen Sie sich bei Ihrem Fachhändler vor Ort.<br />
Les pages qui suivent décrivent le raccordement de votre nouveau <strong>ED16DVDS</strong> à un ordinateur. Du fait de la diversité des<br />
marques et des types d’ordinateur, les photographies suivantes ne montrent que quelques exemples d’installation de votre<br />
<strong>ED16DVDS</strong>. Pour plus de détails sur votre ordinateur, consultez le manuel qui l’accompagne ou contactez votre revendeur.<br />
Nelle seguenti pagine viene spiegato come collegare il vostro nuovo <strong>ED16DVDS</strong> ad un computer.<br />
Data l'ampia gamma di marche e modelli di computer disponibile sul mercato, le seguenti fotografie vanno considerate come<br />
un esempio di possibile installazione del <strong>ED16DVDS</strong>. Per ottenere informazioni specifiche per il tipo di computer utilizzato,<br />
consultate la guida utente del sistema o contattate il vostro rivenditore.<br />
De volgende pagina's geven aan hoe u uw nieuwe <strong>ED16DVDS</strong> op een computer aansluit.<br />
Er zijn zo veel typen computers dat de foto's alleen voorbeelden kunnen aangeven van het monteren van uw <strong>ED16DVDS</strong>.<br />
Raadpleeg de handleiding van uw computer of neem contact op met uw leverancier voor meer informatie over uw computer.<br />
En las páginas siguientes se muestra cómo conectar la nueva <strong>ED16DVDS</strong> a un ordenador.<br />
Debido a que hay muchas marcas y tipos de ordenadores en el mercado, las fotografías siguientes muestran únicamente<br />
algunos ejemplos de instalación de <strong>ED16DVDS</strong>. Para obtener información específica acerca de su ordenador,<br />
consulte el manual del ordenador o póngase en contacto con su distribuidor local.<br />
5
1<br />
UK<br />
D<br />
F<br />
I<br />
NL<br />
E<br />
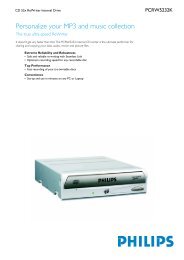
You will find a <strong>ED16DVDS</strong> device and following cables in the retail box<br />
A: <strong>ED16DVDS</strong> device.<br />
B: Power supply (2 parts).<br />
C: HiSpeed USB Cable.<br />
Der Verpackungskarton enthält die folgenden Teile:<br />
A: <strong>ED16DVDS</strong> Laufwerk.<br />
B: Netzteil (2 Teile).<br />
C: HiSpeed USB-Kabel.<br />
L’emballage contient un périphérique <strong>ED16DVDS</strong> et les câbles suivants :<br />
A : Périphérique <strong>ED16DVDS</strong><br />
B : Alimentation (2 éléments)<br />
C : Câble USB haut débit<br />
La confezione include una periferica <strong>ED16DVDS</strong> ed i seguenti cavi<br />
A: Periferica <strong>ED16DVDS</strong>.<br />
B: Alimentatore (2 componenti).<br />
C: Cavo USB ad alta velocità.<br />
De retailverpakking van de <strong>ED16DVDS</strong> bevat de volgende onderdelen:<br />
A: <strong>ED16DVDS</strong>-eenheid.<br />
B: Voedingseenheid (2 onderdelen)<br />
C: HiSpeed USB-kabel.<br />
En la caja encontrará un dispositivo <strong>ED16DVDS</strong> y los siguientes cables<br />
A: Dispositivo <strong>ED16DVDS</strong>.<br />
B: Fuente de alimentación (2 piezas).<br />
C: Cable HiSpeed USB.<br />
6
2<br />
UK<br />
D<br />
F<br />
I<br />
NL<br />
E<br />
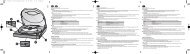
At the back side, you will find the plugs you need for connecting your <strong>ED16DVDS</strong> to your<br />
computer.<br />
A: Power.<br />
B: HiSpeed USB.<br />
C: Audio connector.<br />
Auf der Rückseite finden Sie die Anschlüsse, die Sie zum Anschließen Ihres <strong>ED16DVDS</strong> an<br />
Ihren Computer benötigen.<br />
A: Stromversorgung.<br />
B: HiSpeed USB.<br />
C: Audio-Steckverbinder.<br />
Au dos se trouvent les connecteurs requis pour brancher votre <strong>ED16DVDS</strong> à l’ordinateur.<br />
A : Alimentation<br />
B : Port USB haut débit<br />
C : Connecteur audio<br />
Sul retro, si trovano le connessioni per collegare l'<strong>ED16DVDS</strong> al vostro computer.<br />
A: Alimentazione.<br />
B: USB ad alta velocità.<br />
C: Connettore audio.<br />
Achter op de <strong>ED16DVDS</strong> vindt u de connectors waarmee u het apparaat op uw computer<br />
kunt aansluiten.<br />
A: Voeding.<br />
B: HiSpeed USB.<br />
C: Audioconnector.<br />
En la parte posterior encontrará las conexiones que necesita para conectar <strong>ED16DVDS</strong> al<br />
ordenador.<br />
A: Alimentación.<br />
B: HiSpeed USB.<br />
C: Conector de audio.<br />
7
3<br />
UK<br />
D<br />
F<br />
I<br />
NL<br />
E<br />
Connect the power cables together and connect them to the <strong>ED16DVDS</strong> and a power outlet.<br />
Verbinden Sie die Stromversorgungskabel miteinander und mit dem <strong>ED16DVDS</strong> und einer<br />
Steckdose.<br />
Raccordez les câbles d’alimentation l’un à l’autre puis branchez-les à l’<strong>ED16DVDS</strong> et à une<br />
prise secteur.<br />
Collegate i cavi di alimentazione tra loro e collegateli tra l'<strong>ED16DVDS</strong> ed una presa elettrica.<br />
Verbind de voedingskabels met elkaar en sluit ze daarna op de <strong>ED16DVDS</strong> en op een<br />
stopcontact.<br />
Conecte los cables de alimentación entre sí y conéctelos a <strong>ED16DVDS</strong> y a una toma eléctrica.<br />
4<br />
UK<br />
D<br />
F<br />
I<br />
NL<br />
E<br />
Plug the USB cable in the <strong>ED16DVDS</strong>.<br />
Do not connect the cable to the computer at this moment.<br />
Verbinden Sie das USB-Kabel mit dem <strong>ED16DVDS</strong>.Verbinden Sie das Kabel zu diesem<br />
Zeitpunkt nicht mit dem Computer.<br />
Branchez le câble USB à l’<strong>ED16DVDS</strong>. Ne branchez pas le câble à l’ordinateur pour le<br />
moment.<br />
Collegate il cavo USB all'<strong>ED16DVDS</strong>. Non collegate ancora il cavo al computer.<br />
Sluit de USB-kabel op de <strong>ED16DVDS</strong> aan. Sluit dit kabeltje nog niet op uw computer aan.<br />
Conecte el cable USB a <strong>ED16DVDS</strong>. No conecte el cable al ordenador todavía.<br />
8
5<br />
UK<br />
D<br />
F<br />
I<br />
NL<br />
E<br />
Search for the HiSpeed USB connector on your PC.<br />
A: Logo for the preferred HiSpeed USB or connector.<br />
B: Logo for the alternative LowSpeed USB connector.<br />
When connected to LowSpeed USB (or USB 1.x), speeds are limited (4x writing and 6x<br />
reading on CD, 0,7x reading on DVD) and it is not possible to write on DVD or to watch<br />
video.<br />
Suchen Sie den HiSpeed USB-Anschluss an Ihrem PC.<br />
A: Logo für den bevorzugten HiSpeed USB-Anschluss.<br />
B: Logo für den alternativen LowSpeed USB-Anschluss.<br />
Wenn eine Verbindung mit dem LowSpeed USB-Anschluss (oder USB 1.x) hergestellt wird,<br />
sind die Geschwindigkeiten begrenzt (4 fach Schreiben und 6fach Lesen von CD, 0,7 fach Lesen<br />
von DVD) und ist es nicht möglich, auf DVD zu schreiben oder Videos zu sehen.<br />
Repérez le connecteur USB haut débit de votre PC.<br />
A : Logo représentant le port USB haut débit ou le connecteur principal<br />
B : Logo représentant le connecteur USB 1.x<br />
Lorsque le câble est connecté au port USB bas débit (USB 1.x), la vitesse est limitée (4x en<br />
écriture et 6x en lecture pour les CD, 0,7x en lecture pour les DVD), et il n’est pas possible<br />
d’enregistrer des DVD ni de regarder des vidéos.<br />
Individuate il connettore USB ad alta velocità sul PC.<br />
A: Logo connettore USB ad alta velocità (preferibile).<br />
B: Logo connettore USB a bassa velocità (in alternativa).<br />
Utilizzando una connessione USB a bassa velocità (o USB 1.x), le velocità sono limitate (4x in<br />
scrittura e 6x in lettura su CD, 0,7x in lettura su DVD) e non è possibile scrivere su DVD né<br />
guardare video.<br />
Zoek op uw computer naar de HiSpeed USB-connector.<br />
A: Symbool voor snelle HiSpeed USB-connector.<br />
B: Symbool voor tragere LowSpeed USB-connector.<br />
Bij een LowSpeed USB-verbinding (versie USB 1.x) zijn de snelheden beperkt (4x schrijven en<br />
6x lezen bij CD, 0,7x lezen van DVD) en kunt u niet op een DVD schrijven of video afspelen.<br />
Busque el conector HiSpeed USB en el PC.<br />
A: Logotipo del conector HiSpeed USB preferente.<br />
B: Logotipo del conector LowSpeed USB alternativo.<br />
Con la conexión a LowSpeed USB (o USB 1.x), las velocidades están limitadas (escritura a 4x y<br />
lectura a 6x en CD, lectura a 0,7x en DVD) y no es posible grabar en DVD ni ver vídeo.<br />
9
6<br />
UK<br />
D<br />
F<br />
I<br />
NL<br />
E<br />
Identify your Operating System by right clicking on “My Computer” and choosing “Properties”.<br />
When you are using Windows 98 Second Edition, please go to step 11, otherwise continue<br />
with step 7.<br />
Identifizieren Sie Ihr Betriebssystem, indem Sie mit der rechten Maustaste auf “Arbeitsplatz”<br />
klicken und “Eigenschaften” wählen.<br />
Wenn Sie mit Windows 98 Second Edition arbeiten, fahren Sie bitte mit Schritt 11 fort,<br />
andernfalls mit Schritt 7.<br />
Identifiez votre système d’exploitation en cliquant avec le bouton droit sur « Poste de travail »<br />
puis en sélectionnant « Propriétés ».<br />
Si vous utilisez Windows 98 Deuxième Édition, passez directement à l’étape 11 ; sinon, passez à<br />
l’étape 7.<br />
Identificate il sistema operativo facendo clic su “Risorse del computer” e selezionando<br />
“Proprietà”.<br />
Se utilizzate Windows 98 Second Edition, passate al punto 11, altrimenti procedete al punto 7.<br />
Klik met rechts op “Deze computer” en klik op “Eigenschappen” om na te gaan welk<br />
besturingssysteem u gebruikt.<br />
Gebruikt u Windows 98 Tweede Edition, ga dan naar stap 11. In andere gevallen gaat u naar<br />
stap 7.<br />
Para identificar su sistema operativo, haga clic con el botón derecho en “Mi PC” y seleccione<br />
“Propiedades”.<br />
Si utiliza Windows 98 Second Edition, vaya al paso 11; en caso contrario, vaya al paso 7.<br />
10
7<br />
UK<br />
D<br />
F<br />
I<br />
NL<br />
E<br />
Connect the USB cable to the computer.<br />
Schließen Sie das USB-Kabel an den Computer an.<br />
Branchez le câble USB à l’ordinateur.<br />
Collegate il cavo USB al computer.<br />
Sluit de USB-kabel op de computer aan.<br />
Conecte el cable USB al ordenador.<br />
11
8<br />
UK<br />
D<br />
F<br />
I<br />
NL<br />
E<br />
Windows XP will warn you when you connect the <strong>ED16DVDS</strong> to a slow USB 1 connection.<br />
Check step 5 again.<br />
This is valid for Windows XP only.<br />
Windows XP warnt Sie, wenn Sie das <strong>ED16DVDS</strong> mit einem langsamen USB 1-Anschluss<br />
verbinden.<br />
Kontrollieren Sie erneut Schritt 5.<br />
Dies gilt nur für Windows XP.<br />
Windows XP affiche un message d'avertissement si vous avez branché l'<strong>ED16DVDS</strong> à un<br />
connecteur USB 1 (bas débit).<br />
Vérifiez l’étape 5.<br />
Cela ne vaut que pour Windows XP.<br />
Windows XP emetterà un avviso alla connessione dell'<strong>ED16DVDS</strong> ad una connessione USB 1<br />
lenta.<br />
Verificate nuovamente il punto 5.<br />
Questa procedura è valida solo per Windows XP.<br />
Windows XP waarschuwt als u de <strong>ED16DVDS</strong> op een trage USB 1-connector aansluit.<br />
Controleer via stap 5 of u de juiste connector gebruikt.<br />
Dit geldt alleen voor Windows XP.<br />
Windows XP le avisará cuando conecte <strong>ED16DVDS</strong> a una conexión USB 1 lenta.<br />
Revise de nuevo el paso 5.<br />
Esto es válido sólo para Windows XP.<br />
12
9<br />
UK<br />
D<br />
F<br />
I<br />
NL<br />
E<br />
The drivers will be installed automatically.<br />
This may take some seconds.<br />
The popups shown are operating system dependent.<br />
Die Treiber werden automatisch installiert.<br />
Dies kann einige Sekunden dauern.<br />
Welche Anzeigen auf dem Bildschirm erscheinen, hängt vom Betriebssystem ab.<br />
Les pilotes sont installés automatiquement.<br />
Cette opération peut prendre quelques secondes.<br />
Les messages affichés varient selon le système d’exploitation.<br />
I driver verranno installati automaticamente.<br />
Il completamento dell'operazione potrebbe richiedere alcuni secondi.<br />
I messaggi visualizzati dipendono al sistema operativo utilizzato.<br />
De stuurprogramma's worden automatisch geïnstalleerd.<br />
Dit kan enkele seconden duren.<br />
De getoonde vensters verschillen per besturingssysteem.<br />
Los controladores se instalarán automáticamente.<br />
Esto puede tardar unos segundos.<br />
Las ventanas emergentes que aparecen dependerán del sistema operativo.<br />
13
10<br />
UK<br />
D<br />
F<br />
I<br />
NL<br />
E<br />
Insert the Nero Disc in the <strong>ED16DVDS</strong>.<br />
Go to step 15!<br />
Legen Sie die Nero-CD in das <strong>ED16DVDS</strong>-Laufwerk ein.<br />
Fahren Sie mit Schritt 15 fort!<br />
Insérez le disque Nero dans l’<strong>ED16DVDS</strong>.<br />
Passez à l'étape 15.<br />
Inserite il disco di Nero nell'<strong>ED16DVDS</strong>.<br />
Procedete al punto 15!<br />
Leg de Nero-CD in de <strong>ED16DVDS</strong>.<br />
Ga naar stap 15!<br />
Inserte el disco de Nero en <strong>ED16DVDS</strong>.<br />
Vaya al paso 15.<br />
14
11<br />
UK<br />
D<br />
F<br />
I<br />
NL<br />
E<br />
Windows 98 Second Edition only!<br />
Insert the Nero disc in the CDROM device of your computer, not in the <strong>ED16DVDS</strong>.<br />
If you do not have a CD-ROM on your computer, please refer to the Frequently Asked<br />
Questions.<br />
Nur Windows 98 Second Edition!<br />
Legen Sie die Nero-CD in das CDROM-Laufwerk Ihres Computers ein, nicht in das<br />
<strong>ED16DVDS</strong>.<br />
Wenn Sie kein CDROM-Laufwerk in Ihrem Computer haben, sehen Sie bitte bei den häufig<br />
gestellten Fragen nach.<br />
Windows 98 Deuxième Édition uniquement !<br />
Insérez le disque Nero dans le lecteur de CD-ROM de votre ordinateur, et non dans<br />
l’<strong>ED16DVDS</strong>.<br />
Si votre ordinateur n’est pas équipé d’un lecteur de CD-ROM, consultez la section des<br />
Questions fréquentes.<br />
Solo per Windows 98 Second Edition!<br />
Inserite il disco Nero nell'unità CDROM del computer, non nell'<strong>ED16DVDS</strong>.<br />
Se nel computer non è installata un'unità CD-ROM, consultate le Domonde frequenti.<br />
Alleen voor Windows 98 Tweede Edition!<br />
Leg de Nero-disc in het CD-ROM-station van uw computer, niet in de <strong>ED16DVDS</strong>.<br />
Heeft uw computer geen CD-ROM-station, kijk dan bij “Vaak gestelde vragen”.<br />
Sólo para Windows 98 Second Edition<br />
Inserte el disco de Nero en la unidad de CDROM del ordenador, no en <strong>ED16DVDS</strong>.<br />
Si el ordenador no tiene CD-ROM, consulte la sección Preguntas frecuentes.<br />
15
12<br />
UK<br />
D<br />
F<br />
I<br />
NL<br />
E<br />
Windows 98 Second Edition only! Wait until this screen pops up.<br />
Nur Windows 98 Second Edition! Warten Sie, bis diese Anzeige erscheint.<br />
Windows 98 Deuxième Édition uniquement ! Attendez que cet écran apparaisse.<br />
Solo per Windows 98 Second Edition! Attendete la comparsa di questa finestra.<br />
Alleen voor Windows 98 Tweede Edition! Wacht tot het volgende scherm verschijnt.<br />
Sólo para Windows 98 Second Edition Espere a que aparezca esta pantalla.<br />
13<br />
UK<br />
D<br />
F<br />
I<br />
NL<br />
E<br />
Windows 98 Second Edition only! Connect the USB cable to the computer.<br />
Nur Windows 98 Second Edition! Schließen Sie das USB-Kabel an den Computer an.<br />
Windows 98 Deuxième Édition uniquement ! Branchez le câble USB à l’ordinateur.<br />
Solo per Windows 98 Second Edition! Collegate il cavo USB al computer.<br />
Alleen voor Windows 98 Tweede Edition! Sluit de USB-kabel op de computer aan.<br />
Sólo para Windows 98 Second Edition Conecte el cable USB al ordenador.<br />
16
14<br />
UK<br />
D<br />
F<br />
Windows 98 Second Edition only!<br />
The “Add New Hardware Wizard” will pop up. Follow these steps:<br />
A. Click “Next” in “The wizard searches for new drivers…:”.<br />
B. Choose “Search for the best drivers…”<br />
C. Choose “Specify a location”.<br />
D. Browse to the directory “<strong>Philips</strong> drivers” on the Nero disc and click Next.<br />
E. The drivers will be installed.<br />
F. Continue with step 15.<br />
Nur Windows 98 Second Edition!<br />
Der Assistent zum Hinzufügen neuer Hardware (“Add New Hardware Wizard”) erscheint.<br />
Führen Sie die folgenden Schritte durch:<br />
A. Klicken Sie bei “Der Assistent sucht nach neuen Treibern…:” auf “Weiter” .<br />
B. Wählen Sie “Suche nach den besten Treibern…”<br />
C. Wählen Sie “Einen Ort spezifizieren”.<br />
D. Durchsuchen Sie das Verzeichnis “<strong>Philips</strong> drivers” auf der Nero-CD und klicken Sie auf<br />
“Weiter”.<br />
E. Die Treiber werden installiert.<br />
F. Fahren Sie mit Schritt 15 fort.<br />
Windows 98 Deuxième Édition uniquement !<br />
L’Assistant Ajout de nouveau matériel apparaît. Procédez comme suit :<br />
A. Cliquez sur « Suivant » lorsque le message « L’Assistant recherche de nouveaux pilotes… »<br />
apparaît.<br />
B. Choisissez « Rechercher le meilleur pilote pour votre périphérique… ».<br />
C. Choisissez « Emplacement spécifique ».<br />
D. Accédez au répertoire « <strong>Philips</strong> drivers » sur le disque Nero puis cliquez sur Suivant.<br />
E. Les pilotes sont alors installés.<br />
F. Passez à l’étape 15.<br />
17
14<br />
I<br />
NL<br />
E<br />
Solo per Windows 98 Second Edition!<br />
Compare la finestra “Installazione guidata nuovo hardware”. Svolgete i seguenti passaggi:<br />
A. Fate clic su “Avanti” in “Saranno cercati i nuovi driver…:”.<br />
B. Selezionate “Ricercare un driver migliore…”<br />
C. Selezionate “Specificare un percorso”.<br />
D. Selezionate la cartella dei driver "<strong>Philips</strong> drivers" sul disco Nero e fate clic su Avanti.<br />
E. I driver verranno installati.<br />
F. Procedete al punto 15.<br />
Alleen voor Windows 98 Tweede Edition!<br />
De “Wizard Nieuwe hardware toevoegen” verschijnt.Voer de volgende stappen uit:<br />
A. Klik bij “De wizard zoekt nieuwe stuurprogramma's...” op “Volgende”.<br />
B. Selecteer “Naar het beste stuurprogramma zoeken…”<br />
C. Selecteer “Een locatie opgeven”.<br />
D. Ga op de Nero-CD naar de map “<strong>Philips</strong> drivers” en klik daar op “Volgende”.<br />
E. De stuurprogramma's worden geïnstalleerd.<br />
F. Ga door met stap 15.<br />
Sólo para Windows 98 Second Edition<br />
Aparece el “Asistente para agregar nuevo hardware”. Siga estos pasos:<br />
A. Haga clic en “Siguiente” en “El asistente buscará nuevos controladores…:”.<br />
B. Seleccione “Buscar los mejores controladores…”<br />
C. Seleccione “Especificar una ubicación”.<br />
D. Busque el directorio “<strong>Philips</strong> drivers” en el disco de Nero y haga clic en Siguiente.<br />
E. Los controladores se instalarán.<br />
F. Continúe con el paso 15.<br />
18
15<br />
UK<br />
D<br />
F<br />
I<br />
NL<br />
E<br />
Click on “Install Suite” to install the main software.<br />
The software will ask to reboot the PC at the end of the installation process.<br />
Klicken Sie auf “Suite installieren”, um die Haupt-Software zu installieren.<br />
Die Software fordert Sie am Ende des Installationsvorgangs auf, den PC neu zu booten.<br />
Cliquez sur « Install Suite » (installer la suite) pour installer le programme principal.<br />
À la fin de l’installation, vous êtes invité à redémarrer le PC.<br />
Fate clic su "Installa Suite" per installare il software principale.<br />
Il software richiederà di riavviare il PC al termine del processo d'installazione.<br />
Klik op “Install Suite” om het hoofdprogramma te installeren.<br />
Na het installeren vraagt het programma u de computer opnieuw op te starten.<br />
Haga clic en “Install Suite” para instalar el software principal.<br />
El programa le pedirá que reinicie el PC al final del proceso de instalación.<br />
19
16<br />
UK<br />
D<br />
F<br />
I<br />
NL<br />
E<br />
Remember the typenumber of your <strong>ED16DVDS</strong>, which is located on the sticker on the<br />
bottom of the device.<br />
This model number will allow you to find easily information and updates on the <strong>Philips</strong> website:<br />
www.philips.com/support<br />
Merken Sie sich die Modellnummer Ihres <strong>ED16DVDS</strong> – sie befindet sich auf dem Aufkleber am<br />
Boden des Geräts.<br />
Mit Hilfe dieser Modellnummer können Sie auf einfache Weise Informationen und Updates auf<br />
der <strong>Philips</strong> Website finden: www.philips.com/support<br />
N’oubliez pas la référence du modèle de votre <strong>ED16DVDS</strong> ; elle est indiquée sur l’autocollant<br />
situé en dessous du périphérique.<br />
Ce numéro vous permettra de retrouver facilement des informations et des mises à jour sur le<br />
site web de <strong>Philips</strong> : www.philips.com/support<br />
Annotate il numero di modello dell'<strong>ED16DVDS</strong>, situato sull'etichetta applicata sul fondo della<br />
periferica.<br />
Questo numero è utile per rintracciare agevolmente informazioni ed aggiornamenti sul sito<br />
Web <strong>Philips</strong>: www.philips.com/support<br />
Onthoud het typenummer van uw <strong>ED16DVDS</strong>. U vindt dit nummer op een sticker onder op<br />
het product.<br />
Met dit nummer kunt u gemakkelijk extra informatie en updates vinden op de site van <strong>Philips</strong>:<br />
www.philips.com/support<br />
Recuerde el número de tipo de <strong>ED16DVDS</strong>, que figura en la etiqueta de la parte inferior del<br />
dispositivo.<br />
Este número de modelo le permite buscar información y actualizaciones fácilmente en el sitio<br />
web de <strong>Philips</strong>: www.philips.com/support<br />
20
17<br />
After installing the software, you should reboot your computer.<br />
Congratulations.Your <strong>Philips</strong> device is now ready for use.<br />
How to use it and what software applications you need to perform your tasks, is described in the<br />
next chapters of this How To Manual.<br />
Nach der Installation der Software sollten Sie Ihren Computer neu starten.<br />
Herzlichen Glückwunsch. Ihr <strong>Philips</strong> Gerät ist jetzt einsatzbereit.<br />
Wie Sie es benutzen und welche Software-Anwendungen Sie benötigen, um bestimmte Aufgaben<br />
auszuführen, wird in den nächsten Kapiteln dieses Handbuchs beschrieben.<br />
Après avoir installé le logiciel, vous devez redémarrer votre ordinateur.<br />
Félicitations! Votre périphérique <strong>Philips</strong> est maintenant prêt.<br />
Son mode d’emploi et les applications logicielles requises sont décrits dans les chapitres suivants de<br />
ce manuel d'utilisation.<br />
Terminata l'installazione del software, è necessario riavviare il computer.<br />
Congratulazioni. La periferica <strong>Philips</strong> è ora pronta per l'uso.<br />
I seguenti capitoli di questa guida contengono informazioni sull'uso della periferica e sul software<br />
necessario per le varie attività<br />
Na het installeren van de software moet u de computer opnieuw opstarten.<br />
Gefeliciteerd! Uw <strong>Philips</strong>-product is nu startklaar.<br />
De volgende hoofdstukken van deze handleiding beschrijven het gebruik en de software die u nodig<br />
hebt.<br />
Una vez instalado el software, debe reiniciar el ordenador.<br />
Enhorabuena.Ahora podrá utilizar el dispositivo <strong>Philips</strong>.<br />
En los capítulos siguientes de este manual se describe cómo utilizar el dispositivo y las aplicaciones de<br />
software que necesita para realizar cada tarea.<br />
21
How to disconnect the<br />
<strong>ED16DVDS</strong> without shutting<br />
down the computer?<br />
Wie kann man die Verbindung zum <strong>ED16DVDS</strong> trennen,<br />
ohne den Computer herunterzufahren?<br />
Comment débrancher l’<strong>ED16DVDS</strong> sans arrêter l’ordinateur?<br />
Come si disconnette l'<strong>ED16DVDS</strong> senza<br />
spegnere il computer?<br />
Hoe ontkoppel ik de <strong>ED16DVDS</strong> zonder de<br />
computer uit te zetten?<br />
¿Cómo desconectar <strong>ED16DVDS</strong> sin apagar el ordenador?<br />
UK<br />
D<br />
F<br />
I<br />
NL<br />
E<br />
The next pages show how to disconnect your new <strong>ED16DVDS</strong> to a computer.<br />
The screenshots are representing the Microsoft Windows XP operating system.<br />
Other operating systems may show different popups.<br />
Auf den nächsten Seiten wird erläutert, wie Sie Ihr neues <strong>ED16DVDS</strong>-Laufwerk von einem Computer trennen können.<br />
Die dargestellten Bildschirmanzeigen beziehen sich auf das Betriebssystem Microsoft Windows XP.<br />
Bei anderen Betriebssystemen können andere Anzeigen erscheinen.<br />
Les pages qui suivent montrent comment déconnecter votre nouvel <strong>ED16DVDS</strong> d’un ordinateur.<br />
Les copies d’écran ont été réalisées sous le système d’exploitation Microsoft Windows XP.<br />
Les messages affichés peuvent varier selon les systèmes d’exploitation.<br />
Nelle seguenti pagine viene spiegato come scollegare il vostro nuovo <strong>ED16DVDS</strong> dal computer.<br />
Le finestre sono state catturate in ambiente Microsoft Windows XP.<br />
Per gli altri sistemi operativi, le finestre di dialogo risultare differenti.<br />
De volgende pagina's beschrijven hoe u uw nieuwe <strong>ED16DVDS</strong> van uw computer ontkoppelt.<br />
De voorbeeldschermen zijn ontleend aan het besturingssysteem Microsoft Windows XP.<br />
Bij andere besturingssystemen kunnen deze schermen anders zijn.<br />
En las páginas siguientes se explica cómo desconectar su nueva <strong>ED16DVDS</strong> de un ordenador.<br />
Las ilustraciones representan el sistema operativo Microsoft Windows XP.<br />
En otros sistemas operativos pueden aparecer pantallas diferentes.<br />
23
1<br />
UK<br />
D<br />
F<br />
I<br />
NL<br />
E<br />
2<br />
To disconnect the <strong>ED16DVDS</strong> without shutting down your computer, click on this symbol.<br />
Um die Verbindung zum <strong>ED16DVDS</strong> zu trennen, ohne den Computer herunterzufahren,<br />
klicken Sie auf dieses Symbol.<br />
Pour déconnecter l’<strong>ED16DVDS</strong> sans arrêter l’ordinateur, cliquez sur cette icône.<br />
Per disconnettere l'<strong>ED16DVDS</strong> senza spegnere il computer, fate clic su questo simbolo.<br />
Klik op dit pictogram als u de <strong>ED16DVDS</strong> wilt ontkoppelen zonder uw computer uit te zetten.<br />
Para desconectar <strong>ED16DVDS</strong> sin apagar el ordenador, haga clic en este símbolo.<br />
UK<br />
D<br />
F<br />
I<br />
NL<br />
E<br />
Click on “Safely remove USB…”.<br />
Klicken Sie auf “USB auf sichere Weise entfernen…”.<br />
Cliquez sur « Safely remove USB » (Retirer un périphérique USB en toute sécurité…).<br />
Fate clic su “Rimozione sicura USB…”.<br />
Klik op “USB veilig verwijderen…”.<br />
Haga clic en “Quitar hardware con seguridad…”.<br />
24
3<br />
UK<br />
D<br />
F<br />
I<br />
NL<br />
E<br />
When this popup appears, you may disconnect the <strong>ED16DVDS</strong><br />
Wenn diese Anzeige erscheint, können Sie die Verbindung zum <strong>ED16DVDS</strong> trennen.<br />
Lorsque ce message apparaît, vous pouvez déconnecter l’<strong>ED16DVDS</strong>.<br />
Quando compare questo messaggio potete scollegare l'<strong>ED16DVDS</strong><br />
Als dit venster verschijnt, kunt u de <strong>ED16DVDS</strong> ontkoppelen.<br />
Cuando aparezca esta pantalla, puede desconectar <strong>ED16DVDS</strong><br />
25
How to capture video from<br />
a digital DV-camcorder?<br />
Videos von einem digitalen DV-Camcorder aufnehmen<br />
Comment acquérir les images vidéo<br />
d’une caméra numérique DV ?<br />
Come registrare un video da una DV-camcorder digitale?<br />
Hoe kopieer ik de opnames van<br />
een digitale DV-camcorder naar mijn computer?<br />
¿Cómo capturar secuencias de vídeo<br />
de una videocámara digital DV?<br />
UK<br />
D<br />
F<br />
I<br />
NL<br />
E<br />
This manual shows an example on how to capture video from a digital DV-camcorder which is connected via FireWire<br />
(IEEE1394) to the computer.This product is for personal use only.<br />
Unauthorized duplication and distribution of copyrighted materials is a violation of copyright law.<br />
In diesem Handbuch wird an einem Beispiel gezeigt, wie ein Video von einem digitalen DV-Camcorder aufgenommen wird, der über<br />
FireWire (IEEE1394) an den Computer angeschlossen ist. Dieses Produkt ist nur für den persönlichen Gebrauch. Die ungenehmigte<br />
Vervielfältigung und der Vertrieb von urheberrechtlich geschützten Materialien stellt eine Verletzung des Urheberrechts dar.<br />
Ce manuel illustre la procédure d’acquisition d’images vidéo à partir d’une caméra numérique DV connectée à l’ordinateur par<br />
le biais d’un port FireWire (IEEE1394).Ce produit est à usage personnel exclusivement.<br />
Toute duplication et diffusion non autorisée de matières soumises au droit d’auteur et de copie (copyright) constituent une<br />
violation de la loi sur les droits d’auteur et de copie (copyright).<br />
Questo manuale mostra un esempio di come registrare un video da una DV-camcorder digitale connessa al computer via<br />
FireWire (IEEE1394). Questo prodotto è destinato ad un uso esclusivamente personale.<br />
La duplicazione e la distribuzione di materiali protetti dal diritto d'autore rappresentano una violazione della legge sul copyright.<br />
Deze handleiding beschrijft het kopiëren van opnames gemaakt met een digitale DV-camcorder naar de computer via een<br />
FireWire-aansluiting (IEEE1394). Dit product is alleen bedoeld voor eigen gebruik.<br />
Het zonder toestemming vermenigvuldigen en verspreiden van auteursrechtelijk beschermd materiaal is wettelijk verboden.<br />
Este manual muestra un ejemplo que explica cómo capturar una secuencia de vídeo de una videocámara digital DV conectada<br />
al ordenador mediante el puerto FireWire (IEEE1394). Este producto es para uso personal exclusivamente.<br />
La duplicación y distribución no autorizada de materiales con copyright es una violación de las leyes del copyright.<br />
The application software used here is:<br />
Nero Vision Express from Ahead Software<br />
27
1<br />
UK<br />
D<br />
F<br />
I<br />
NL<br />
E<br />
Start "Nero SmartStart" from the desktop.<br />
Starten Sie "Nero SmartStart" von Ihrer Oberfläche aus.<br />
Lancez "Nero SmartStart" depuis le bureau.<br />
Aprire "Nero SmartStart" dal desktop.<br />
Start "Nero SmartStart" vanaf het bureaublad.<br />
Inicie "Nero SmartStart" desde el escritorio.<br />
2<br />
UK<br />
D<br />
F<br />
I<br />
NL<br />
E<br />
Connect your camera to the computer and switch it on.<br />
Verbinden Sie Ihre Kamera mit dem Computer und schalten Sie sie ein.<br />
Connectez votre caméra à l’ordinateur et allumez-la.<br />
Collegare la camera al computer ed accendere.<br />
Sluit uw camera op de computer aan en schakel hem in.<br />
Conecte la cámara al ordenador y enciéndala.<br />
28
3<br />
UK<br />
D<br />
F<br />
I<br />
NL<br />
E<br />
Choose "DVD".<br />
Wählen Sie "DVD".<br />
Choisissez "DVD".<br />
Selezionare "DVD".<br />
Kies "DVD".<br />
Seleccione "DVD".<br />
4<br />
UK<br />
D<br />
F<br />
I<br />
NL<br />
E<br />
Choose "Photo and video" and click "Capture video".<br />
Wählen Sie "Photo und Video" und klicken Sie auf "Video aufnehmen".<br />
Choisissez "Photo et vidéo" puis cliquez sur "Capturer une vidéo".<br />
Selezionare "Foto e video" e fare clic su "Cattura video".<br />
Kies "Foto en video" en klik op "Video vastleggen"<br />
Seleccione "Foto y vídeo" y haga clic en "Capturar vídeo".<br />
29
5<br />
UK<br />
D<br />
F<br />
I<br />
NL<br />
E<br />
6<br />
You can use these buttons to control your DV-camera.<br />
Press the "record" button to record video.<br />
Diese Tasten können Sie benutzen, um Ihre DV-Kamera zu steuern.<br />
Drücken Sie die Taste "Aufnehmen", um Video-informationen aufzunehmen.<br />
Ces boutons vous permettent de commander votre caméra DV.<br />
Appuyez sur le bouton "Enregistrer" pour enregistrer la vidéo.<br />
E' possibile utilizzare questi pulsanti per controllare la camera-DV.<br />
Premere il pulsante "Registra" per registrare il video.<br />
U kunt deze knoppen gebruiken voor het bedienen van uw DV-camera.<br />
Druk op de knop "Opnemen" om video op te nemen.<br />
Estos botones permiten controlar la cámara DV.<br />
Pulse el botón "Grabar" para grabar vídeo.<br />
30<br />
UK<br />
D<br />
F<br />
I<br />
NL<br />
E<br />
During capturing, you will see the progress here.<br />
Während der Aufnahme sehen Sie hier den Fortschritt.<br />
La progression de l’acquisition est affichée ici.<br />
Durante la cattura qui viene visualizzata la sua progressione.<br />
Tijdens het opnemen ziet u hier de voortgang.<br />
Durante la captura, verá el progreso de la misma aquí.
7<br />
UK<br />
D<br />
F<br />
I<br />
NL<br />
E<br />
When all video sequences are captured, click "Next".<br />
Wenn alle Videosequenzen aufgenommen sind, klicken Sie auf "Weiter".<br />
Une fois l’acquisition de toutes les séquences vidéo terminée, cliquez sur "Suivant".<br />
Dopo aver catturato tutte le sequenze video, fare clic su "Avanti".<br />
Na het opnemen van alle videofragmenten klikt u op "Volgende".<br />
Una vez capturadas las secuencias de vídeo, haga clic en "Siguiente"."Volgende".<br />
8<br />
UK<br />
D<br />
F<br />
I<br />
NL<br />
E<br />
Choose "Make DVD with captured video" and "DVD-Video".<br />
Wählen Sie "DVD mit aufgenommenen Videodaten erstellen" und "DVD-Video".<br />
Choisissez "Créer un DVD avec la vidéo capturée" et "DVD-Vidéo".<br />
Selezionare "Crea DVD con video acquisito" e "DVD-Video".<br />
Kies "DVD met vastgelegde video maken" en dan "DVD-Video".<br />
Seleccione "Crear DVD con vídeo capturado" y "DVD-Vídeo".<br />
31
9<br />
UK<br />
D<br />
F<br />
I<br />
NL<br />
The captured movies are shown here.You can edit them by choosing "Edit Movie".<br />
Hier werden die aufgenommenen Filme gezeigt. Sie können sie editieren, indem Sie "Edit<br />
Movie" wählen.<br />
Les séquences disponibles sont répertoriées ici.Vous pouvez les monter en choisissant "Edit<br />
Movie".<br />
Qui sono visualizzati i filmati catturati. E' possibile modificarli selezionando "Edit Movie".<br />
Hier ziet u de vastgelegde films. U kunt die bewerken door "Edit Movie" te kiezen.<br />
Los vídeos capturados se muestran aquí. Puede editarlos seleccionando "Edit Movie".<br />
E<br />
10<br />
32<br />
UK<br />
D<br />
F<br />
I<br />
NL<br />
E<br />
In the Edit Movie screen, you can add transitions, texts, … and you can trim the recorded<br />
video.When done, click "Next".<br />
Auf der Anzeige Edit Movie können Sie Übergänge,Texte, … hinzufügen und die aufgezeichneten<br />
Videoinformationen schneiden.Wenn Sie fertig sind, klicken Sie auf "Weiter".<br />
L’écran Edit Movie vous permet d'ajouter des transitions, du texte, etc., ainsi que de couper les<br />
enregistrements effectués. Lorsque vous avez terminé, cliquez sur "Suivant".<br />
Nello schermo Edit Movie, è possibile aggiungere transizioni, testi ... ed anche tagliare il video<br />
registrato.Al termine, fare clic su "Avanti".<br />
In het scherm "Edit Movie" kunt u overgangen, tekst enz. toevoegen en de opgenomen video<br />
verfraaien. Klik op "Volgende" zodra u tevreden bent.<br />
En la pantalla Edit Movie puede añadir transiciones, textos, etc., así como recortar el vídeo<br />
grabado. Cuando termine, haga clic en "Siguiente".
11<br />
UK<br />
D<br />
F<br />
I<br />
NL<br />
E<br />
12<br />
After editing all files, click "Next".<br />
Nach dem Editieren aller Dateien klicken Sie auf "Weiter".<br />
Une fois tous les fichiers modifiés, cliquez sur "Suivant".<br />
Dopo aver modificato tutti i file, fare clic su "Avanti".<br />
Na het bewerken van alle bestanden klikt u op "Volgende".<br />
Cuando haya editado todos los archivos, haga clic en "Siguiente".<br />
UK<br />
D<br />
F<br />
I<br />
NL<br />
E<br />
You can change the layout, the background, add titles,… here.<br />
When done, click "Next".<br />
Hier können Sie das Layout und den Hintergrund ändern,Titel hinzufügen, usw.<br />
Wenn Sie fertig sind, klicken Sie auf "Weiter".<br />
Cet écran vous permet de modifier la disposition, l'arrière-plan, d'ajouter des titres, etc.<br />
Lorsque vous avez terminé, cliquez sur "Suivant".<br />
Qui è possibile modificare la disposizione, lo sfondo, aggiungere titoli....Al termine,<br />
fare clic su "Avanti".<br />
Hier kunt u de layout en achtergrond aanpassen, titels toevoegen ... enz.<br />
Klik op "Volgende" zodra u tevreden bent.<br />
Aquí puede cambiar la presentación, el fondo, añadir títulos, etc.<br />
Cuando termine, haga clic en "Siguiente".<br />
33
13<br />
UK<br />
D<br />
F<br />
I<br />
NL<br />
E<br />
You can preview the finished movie by pressing on the thumbnails.<br />
When done, click "Next".<br />
Wenn Sie auf die Thumbnail-Symbole klicken, sehen Sie eine Vorschau des fertigen Films.<br />
Wenn Sie fertig sind, klicken Sie auf "Weiter".<br />
Vous pouvez afficher un aperçu du film en appuyant sur les miniatures.Lorsque vous avez<br />
terminé, cliquez sur "Suivant".<br />
Selezionando le miniature è possibile visualizzare un'anteprima del filmato realizzato.Al<br />
termine, fare clic su "Avanti".<br />
Klik op een miniatuur als u een afgeronde film wilt beoordelen.<br />
Klik op "Volgende" zodra u tevreden bent.<br />
Puede obtener una vista preliminar del vídeo pulsando sobre las imágenes en miniatura.<br />
Cuando termine, haga clic en "Siguiente".<br />
14<br />
34<br />
UK<br />
D<br />
F<br />
I<br />
NL<br />
E<br />
Choose "Burn to", choose your recorder and click "Burn".<br />
Wählen Sie "Brennen auf", wählen Sie Ihren Recorder und klicken Sie auf "Brennen".<br />
Choisissez "Graver vers" puis le périphérique d’enregistrement et cliquez sur "Graver".<br />
Selezionare "Masterizza Su", specificare il recorder e fare clic su "Scrivi".<br />
Kies "Branden naar", kies de recorder en klik op "Branden".<br />
Seleccione "Grabar en", elija su grabadora y haga clic en "Grabar".
15<br />
UK<br />
D<br />
F<br />
I<br />
NL<br />
E<br />
16<br />
NeroVision Express is transcoding and burning your disc.<br />
NeroVision Express transcodiert und brennt Ihre Disk.<br />
NeroVision Express procède au transcodage et à la gravure de votre disque.<br />
NeroVision Express è in fase di trascodifica e scrittura del disco.<br />
NeroVision Express zet de informatie om en brandt die op de disc.<br />
NeroVision Express está transcodificando y grabando el disco.<br />
UK<br />
D<br />
F<br />
I<br />
NL<br />
E<br />
Congratulations, your disc has been written successfully. Click "OK".<br />
You may exit the application now.<br />
Herzlichen Glückwunsch – Ihre Disk wurde erfolgreich erstellt. Klicken Sie auf "OK".<br />
Sie können jetzt die Anwendung verlassen.<br />
Félicitations, votre disque est prêt. Cliquez sur "OK".<br />
Vous pouvez maintenant fermer l’application.<br />
Congratulazioni, il disco è stato scritto correttamente. Fare clic su "OK".<br />
Ora è possibile chiudere l'applicazione.<br />
Gefeliciteerd! Uw disc is met succes gebrand. Klik op "OK".<br />
U kunt het programma nu afsluiten.<br />
Enhorabuena, su disco se ha grabado correctamente. Haga clic en "Aceptar".<br />
Ahora puede cerrar la aplicación.<br />
35
How to make a video disc?<br />
Wie erstellt man eine Video Disk?<br />
Comment créer un disque vidéo?<br />
Come creare un video dischi?<br />
Hoe maak ik een videodisc?<br />
¿Cómo crear un disco de vídeo?<br />
UK<br />
D<br />
F<br />
I<br />
NL<br />
E<br />
This manual will show you how to make a DVD-Video from source files which are stored on your hard disc or on one or more<br />
discs and that can be played in most DVD-players.A DVD Video is a DVD disc with video files in a special format, which you can<br />
play on a DVD Video Player or on a DVD-ROM.This product is for personal use only. Unauthorized duplication and distribution of<br />
copyrighted materials is a violation of copyright law.<br />
In dieser Anleitung wird beschrieben, wie man eine DVD-Video Disk von Quelldateien erstellen kann, die auf der Festplatte oder auf<br />
einer oder mehreren Disks gespeichert sind und die mit den meisten DVD-Spielern wiedergegeben werden kann. Eine DVD Video ist<br />
eine DVD Disk mit Video-Dateien in einem speziellen Format, die mit einem DVD Video Player oder einem DVD-ROM Laufwerk<br />
wiedergegeben werden kann. Dieses Produkt ist nur für den privaten Gebrauch vorgesehen. Die unberechtigte Vervielfältigung und<br />
Verteilung von urheberrechtlich geschütztem Material stellt eine Verletzung des Urheberrechts dar.<br />
Ce manuel vous enseigne comment créer un DVD vidéo lisible sur la plupart des lecteurs de DVD à partir de fichiers source<br />
présents sur votre disque dur ou sur un ou plusieurs disques. Un DVD vidéo est un DVD contenant des fichiers vidéo dans un<br />
format spécial que vous pouvez lire sur un lecteur de DVD vidéo ou de DVD-ROM. Ce produit est réservé à un usage personnel.<br />
Toute duplication et distribution sans autorisation des documents protégés par copyright constitue une violation de la législation<br />
sur les droits d’auteur.<br />
Este manual le muestra cómo crear un DVD-Vídeo a partir de archivos de origen almacenados en el disco duro o en uno o más<br />
discos que pueda ser reproducido en la mayoría de los lectores de DVD. Un DVD-Vídeo es un disco DVD con archivos de vídeo<br />
en un formato especial, que se puede reproducir en un lector de DVD Vídeo o en un DVD-ROM. Este producto es para uso<br />
personal exclusivo. La duplicación y distribución sin autorización de materiales con derechos de propiedad intelectual infringen<br />
las leyes de propiedad intelectual.<br />
Deze handleiding geeft aan hoe bestanden die nu op uw harde schijf of op een of meer andere discs staan op een DVD-Video-disc<br />
brandt die u in de meeste DVD-spelers kunt afspelen. Een DVD-Video is een DVD-disc met videobestanden in een format dat u<br />
kunt afspelen in een DVD-videospeler of een DVD-ROM. Dit product is alleen bestemd voor persoonlijk gebruik. Onder het<br />
geldende copyright is het verboden zonder voorafgaande toestemming materiaal waarop copyright rust te kopiëren of distribueren.<br />
Este manual le muestra cómo crear un DVD-Vídeo a partir de archivos de origen almacenados en el disco duro o en uno o más<br />
discos que pueda ser reproducido en la mayoría de los lectores de DVD. Un DVD-Vídeo es un disco DVD con archivos de vídeo<br />
en un formato especial, que se puede reproducir en un lector de DVD Vídeo o en un DVD-ROM. Este producto es para uso<br />
personal exclusivo. La duplicación y distribución sin autorización de materiales con derechos de propiedad intelectual infringen<br />
las leyes de propiedad intelectual.<br />
The application software used here is:<br />
Nero Vision Express from Ahead Software 37
1<br />
UK<br />
D<br />
F<br />
I<br />
NL<br />
E<br />
Start "Nero SmartStart" from the desktop.<br />
Starten Sie "Nero SmartStart" von Ihrer Oberfläche aus.<br />
Lancez "Nero SmartStart" depuis le bureau.<br />
Aprire "Nero SmartStart" dal desktop.<br />
Start "Nero SmartStart" vanaf het bureaublad.<br />
Inicie "Nero SmartStart" desde el escritorio.<br />
2<br />
UK<br />
D<br />
F<br />
I<br />
NL<br />
E<br />
Choose "DVD".<br />
Wählen Sie "DVD".<br />
Choisissez "DVD".<br />
Selezionare "DVD".<br />
Kies "DVD".<br />
Seleccione "DVD".<br />
38
3<br />
UK<br />
D<br />
F<br />
I<br />
NL<br />
E<br />
Choose "Photo and video" and "Make DVD-Video".<br />
Wählen Sie "Photo und Video" und "DVD-Video erstellen".<br />
Choisissez "Photo et vidéo" puis cliquez sur "Créer un DVD vidéo".<br />
Selezionare "Foto e video" e "Crea DVD-Video".<br />
Kies "Foto en video" en dan "DVD-Video maken".<br />
Seleccione "Foto y vídeo" y haga clic en "Crear DVD-Vídeo".<br />
4<br />
UK<br />
D<br />
F<br />
I<br />
NL<br />
E<br />
Choose "Add Video files".<br />
Wählen Sie "Video-Dateien hinzufügen".<br />
Choisissez "Ajouter des fichiers vidéo".<br />
Selezionare "Aggiungi file video".<br />
Kies "Videobestanden toevoegen".<br />
Seleccione "Añadir archivos de vídeo".<br />
39
5<br />
UK<br />
D<br />
F<br />
I<br />
NL<br />
E<br />
6<br />
Choose the files you want to add and click "Open".<br />
Wählen Sie die hinzuzufügenden Dateien und klicken Sie auf "Öffnen".<br />
Sélectionnez les fichiers à ajouter puis cliquez sur "Ouvrir".<br />
Selezionare i file da aggiungere e fare clic su "Apri".<br />
Kies de bestanden die u wilt toevoegen en klik op "Openen".<br />
Seleccione los archivos que desea añadir y haga clic en "Abrir".<br />
40<br />
UK<br />
D<br />
F<br />
I<br />
NL<br />
E<br />
The movies you loaded are shown here.You can edit them by choosing "Edit Movie".<br />
Hier werden die geladenen Filme gezeigt. Sie können sie editieren, indem Sie "Edit Movie"<br />
wählen.<br />
Les films que vous venez de charger sont répertoriés ici.<br />
Vous pouvez les monter en choisissant "Edit Movie".<br />
Qui sono visualizzati i filmati caricati. E' possibile modificarli selezionando "Edit Movie".<br />
Hier ziet u welke bestanden u hebt toegevoegd.<br />
U kunt die bewerken door "Edit Movie" te kiezen.<br />
Los vídeos que ha cargado se muestran aquí. Puede editarlos seleccionando "Edit Movie".
7<br />
UK<br />
D<br />
F<br />
I<br />
NL<br />
E<br />
8<br />
In the Edit Movie screen, you can add video effects, text effects and transitions.<br />
Auf der Anzeige Edit Movie können Sie Videoeffekte,Texteffekte und Übergänge hinzufügen.<br />
L’écran Edit Movie vous permet d’ajouter des effets vidéo et textuels, ainsi que des transitions.<br />
Nello schermo Edit Movie, è possibile aggiungere effetti video, effetti testo e transizioni.<br />
In het scherm "Edit Movie" kunt u video- en teksteffecten en overgangen toevoegen.<br />
En la pantalla Edit Movie puede añadir efectos de vídeo, de texto y transiciones.<br />
UK<br />
D<br />
F<br />
I<br />
NL<br />
E<br />
You can also trim the recorded video.<br />
When done, choose "Next".<br />
Sie können das aufgezeichnete Videomaterial auch schneiden.Wenn Sie fertig sind,<br />
wählen Sie "Weiter".<br />
Vous pouvez également couper la vidéo enregistrée. Lorsque vous avez terminé,<br />
choisissez "Suivant".<br />
E' anche possibile tagliare il video registrato.<br />
Al termine, fare clic su "Avanti".<br />
Ook kunt u de opgenomen video inkorten. Klik op "Volgende" zodra u tevreden bent.<br />
También puede recortar el vídeo grabado. Cuando termine, haga clic en "Siguiente".<br />
41
9<br />
UK<br />
D<br />
F<br />
I<br />
NL<br />
E<br />
10<br />
After editing all files, choose "Next".<br />
Nach dem Editieren aller Dateien wählen Sie "Weiter".<br />
Une fois tous les fichiers modifiés, choisissez "Suivant".<br />
Dopo aver modificato tutti i file, fare clic su "Avanti".<br />
Na het bewerken van alle bestanden klikt u op "Volgende".<br />
Cuando haya editado todos los archivos, haga clic en "Siguiente".<br />
42<br />
UK<br />
D<br />
F<br />
I<br />
NL<br />
E<br />
You can change the layout, the background, add titles, … here.<br />
When done, choose "Next".<br />
Hier können Sie das Layout und den Hintergrund ändern,Titel hinzufügen, usw.<br />
Wenn Sie fertig sind, wählen Sie "Weiter".<br />
Cet écran vous permet de modifier la disposition, l'arrière-plan, d'ajouter des titres, etc.<br />
Lorsque vous avez terminé, choisissez "Suivant".<br />
Qui è possibile modificare la disposizione, lo sfondo, aggiungere titoli....Al termine, fare clic su<br />
"Avanti".<br />
Hier kunt u de layout en achtergrond aanpassen, titels toevoegen ... enz.<br />
Klik op "Volgende" zodra u tevreden bent.<br />
Aquí puede cambiar la presentación, el fondo, añadir títulos, etc.<br />
Cuando termine, haga clic en "Siguiente".
11<br />
UK<br />
D<br />
F<br />
I<br />
NL<br />
E<br />
You can preview the finished movie by pressing on the thumbnails.<br />
When done, choose "Next".<br />
Wenn Sie auf die Thumbnail-Symbole klicken, sehen Sie eine Vorschau des fertiggestellten Films.<br />
Wenn Sie fertig sind, wählen Sie "Weiter".<br />
Vous pouvez afficher un aperçu du film en appuyant sur les miniatures. Lorsque vous avez<br />
terminé, choisissez "Suivant".<br />
Selezionando le miniature è possibile visualizzare un'anteprima del filmato realizzato.Al<br />
termine, fare clic su "Avanti".<br />
Klik op een miniatuur als u een afgeronde film wilt beoordelen.<br />
Klik op "Volgende" zodra u tevreden bent.<br />
Puede obtener una vista preliminar del vídeo pulsando sobre las imágenes en miniatura.<br />
Cuando termine, haga clic en "Siguiente".<br />
12<br />
UK<br />
D<br />
F<br />
I<br />
NL<br />
E<br />
Choose "Burn to", choose your recorder and choose "Burn".<br />
Wählen Sie "Brennen auf", wählen Sie Ihren Recorder und klicken Sie auf "Brennen".<br />
Choisissez "Graver sur" puis le périphérique d’enregistrement et choisissez "Graver".<br />
Selezionare "Masterizza Su", specificare il recorder e fare clic su "Scrivi".<br />
Kies "Branden naar", kies de recorder en klik op "Branden".<br />
Seleccione "Grabar en", elija su grabadora y haga clic en "Grabar".<br />
43
13<br />
UK<br />
D<br />
F<br />
I<br />
NL<br />
E<br />
14<br />
NeroVision Express is transcoding and burning your disc.<br />
NeroVision Express transcodiert und brennt Ihre Disk.<br />
NeroVision Express procède au transcodage et à la gravure de votre disque.<br />
NeroVision Express è in fase di trascodifica e scrittura del disco.<br />
NeroVision Express zet de informatie om en brandt die op de disc.<br />
NeroVision Express está transcodificando y grabando el disco.<br />
44<br />
UK<br />
D<br />
F<br />
I<br />
NL<br />
E<br />
Congratulations, your disc has been written successfully.<br />
Click "OK".You may exit the application now.<br />
Herzlichen Glückwunsch – Ihre Disk wurde erfolgreich erstellt.<br />
Klicken Sie auf "OK". Sie können jetzt die Anwendung verlassen.<br />
Félicitations, votre disque est prêt. Cliquez sur "OK".<br />
Vous pouvez maintenant fermer l’application.<br />
Congratulazioni, il disco è stato scritto correttamente. Fare clic su "OK".<br />
Ora è possibile chiudere l'applicazione.<br />
Gefeliciteerd! Uw disc is met succes gebrand. Klik op "OK".<br />
U kunt het programma nu afsluiten.<br />
Enhorabuena, su disco se ha grabado correctamente. Haga clic en "Aceptar".<br />
Ahora puede cerrar la aplicación.
How to watch video?<br />
Wie kann man sich Videos ansehen?<br />
Comment regarder des vidéos ?<br />
Come si possono guardare i video?<br />
Hoe kan ik video bekijken?<br />
¿Cómo ver vídeo?<br />
UK<br />
The next pages show how to watch video from your new <strong>ED16DVDS</strong>.<br />
D<br />
Auf den nächsten Seiten wird beschrieben, wie Sie sich mit Ihrem neuen <strong>ED16DVDS</strong> Videos ansehen können.<br />
F<br />
Les pages suivantes montrent comment regarder des vidéos sur votre nouvel <strong>ED16DVDS</strong>.<br />
I<br />
Nelle seguenti pagine viene spiegato come guardare i video con il vostro nuovo <strong>ED16DVDS</strong>.<br />
NL<br />
De volgende pagina's beschrijven hoe u met uw nieuwe <strong>ED16DVDS</strong> video kunt bekijken.<br />
E<br />
En las páginas siguientes se muestra cómo ver vídeo en su nueva <strong>ED16DVDS</strong>.<br />
45
1<br />
UK<br />
D<br />
F<br />
I<br />
NL<br />
E<br />
Start “Nero SmartStart” from the desktop.<br />
Starten Sie “Nero SmartStart” von Ihrer Oberfläche aus.<br />
Lancez « Nero SmartStart » depuis le bureau.<br />
Aprite “Nero SmartStart” dal desktop.<br />
Start vanaf het bureaublad het programma “Nero SmartStart”.<br />
Inicie “Nero SmartStart” en el escritorio.<br />
2<br />
UK<br />
D<br />
F<br />
I<br />
NL<br />
E<br />
Choose “Photo and video” and “Play video” and insert a DVD-Video in your <strong>ED16DVDS</strong>.<br />
Wählen Sie “Photo und Video” und “Video abspielen” und legen Sie eine DVD-Video in Ihr<br />
<strong>ED16DVDS</strong>-Laufwerk ein.<br />
Choisissez « Photo et vidéo » puis « Lire une vidéo »; enfin, insérez un DVD vidéo dans votre<br />
<strong>ED16DVDS</strong>.<br />
Selezionate “Foto e Video” e “Play Video” ed inserite un DVD-Video nel vostro <strong>ED16DVDS</strong>.<br />
Selecteer “Foto en Video” en “Video afspelen” en leg een DVD-Videodisc in uw <strong>ED16DVDS</strong>.<br />
Seleccione “Foto y vídeo” y “Reproducir vídeo” e inserte un DVD de vídeo en <strong>ED16DVDS</strong>.<br />
46
3<br />
UK<br />
D<br />
F<br />
I<br />
NL<br />
E<br />
The first time you put a DVD-Video in your drive, you may have to choose a region.<br />
Please choose your region correctly (see also step 4).<br />
After setting the region, you can change it 4 more times.<br />
The last setting will remain permanent.<br />
Wenn Sie zum ersten Mal eine DVD-Video in Ihr Laufwerk einlegen, müssen Sie eventuell eine<br />
Region wählen. Bitte wählen Sie Ihre Region auf korrekte Weise (siehe auch Schritt 4).<br />
Nach dem Einstellen der Region können Sie den Regionalcode vier weitere Male ändern.<br />
Die letzte Einstellung wird permanent sein.<br />
La première fois que vous insérez un DVD vidéo dans votre lecteur, il peut être nécessaire de<br />
sélectionner une zone. Choisissez-la correctement (reportez-vous également à l’étape 4).<br />
Une fois la zone sélectionnée, vous pouvez en changer encore 4 fois.<br />
Le dernier réglage reste permanent.<br />
La prima volta che inserite un DVD-Video nell'unità, potrebbe essere necessario selezionare<br />
una zona (codice regionale). Configurate correttamente questa impostazione (vedi anche<br />
punto 4).<br />
Successivamente, potrete cambiare regione per altre 4 volte.<br />
La quinta impostazione scelta sarà definitiva e permanente.<br />
De eerste keer dat u een DVD-Videodisc plaatst, moet u misschien een regio kiezen. Selecteer<br />
de correcte regio (zie ook stap 4).<br />
Na het kiezen van een regio kunt u die instelling 4 keer aanpassen.<br />
De laatste van die 4 keuzes blijft permanent ingesteld.<br />
La primera vez que inserte un DVD de vídeo en la unidad, tendrá que seleccionar una región.<br />
Seleccione su región correctamente (consulte también el paso 4).<br />
Una vez establecida la región, puede cambiarla 4 veces más.<br />
La última selección no se podrá cambiar.<br />
47
4<br />
UK<br />
D<br />
F<br />
I<br />
NL<br />
E<br />
This map shows the different regions.<br />
For Europe, the region is 2.<br />
Diese Karte zeigt die verschiedenen Regionen.<br />
Für Europa lautet die Ziffer für die Region 2.<br />
Cette carte montre les différentes zones.<br />
L’Europe est la zone 2.<br />
Questa mappa evidenzia la suddivisione in regioni.<br />
L'Europa è abbinata alla regione 2.<br />
Het volgende overzicht toont de verschillende regio's.<br />
Voor Europa is de regiocode 2.<br />
Este mapa muestra las regiones.<br />
Para Europa, la región es 2.<br />
48
5<br />
UK<br />
D<br />
F<br />
I<br />
NL<br />
E<br />
These are the main controls of ShowTime:<br />
A: Play, forward, backward, stop and pause.<br />
B: Open other files.<br />
C: Switch to full screen (or use the “z” on the keyboard)<br />
D: Volume control.<br />
Dies sind die wichtigsten Bedienelemente für ShowTime:<br />
A: Wiedergabe,Vorwärts, Rückwärts, Stopp und Pause.<br />
B: Andere Dateien öffnen.<br />
C: Umschalten auf Vollbild (oder mit der “z”-Taste auf der Tastatur).<br />
D: Lautstärkeregelung.<br />
Voici les principales commandes de ShowTime :<br />
A : Lecture, avance rapide, rembobinage, arrêt et pause.<br />
B : Ouvrez d’autres fichiers.<br />
C : Passez en mode plein écran (ou tapez « z » sur le clavier).<br />
D : Réglage de volume.<br />
Ecco i principali controlli di ShowTime:<br />
A: Play, avanti, indietro, stop e pausa.<br />
B: Apre altri file.<br />
C: Passa a schermo intero (in alternativa utilizzate il tasto “z” della tastiera)<br />
D: Controllo di volume.<br />
De belangrijkste bedieningsorganen van ShowTime zijn:<br />
A: Afspelen, vooruit, terug, stop en pauze.<br />
B: Andere bestanden openen.<br />
C: Schermvullende weergave (of gebruik “z” op het toetsenbord).<br />
D: Volumeregelaar.<br />
Estos son los controles principales de ShowTime:<br />
A: Reproducir, adelante, atrás, detener y pausa.<br />
B: Abrir otros archivos.<br />
C: Cambio a pantalla completa (o use la tecla “z” del teclado)<br />
D: Control de volumen.<br />
49
How to copy a disc?<br />
Eine Disk kopieren<br />
Comment copier un disque?<br />
Come copiare un dischi?<br />
Hoe kopieer ik een disc?<br />
¿Cómo copiar un disco?<br />
UK<br />
D<br />
F<br />
This manual shows an example of how to copy a disc.<br />
This product is for personal use only.<br />
Unauthorized duplication and distribution of copyrighted materials is a violation of copyright law.<br />
In diesem Handbuch wird an einem Beispiel gezeigt, wie eine Disk kopiert wird.<br />
Dieses Produkt ist nur für den persönlichen Gebrauch. Die ungenehmigte Vervielfältigung und der Vertrieb von urheberrechtlich<br />
geschützten Materialien stellt eine Verletzung des Urheberrechts dar.<br />
Ce manuel illustre la procédure de copie d’un disque. Ce produit est à usage personnel exclusivement.<br />
Toute duplication et diffusion non autorisée de matières soumises au droit d’auteur et de copie (copyright) constituent une<br />
violation de la loi sur les droits d’auteur et de copie (copyright).<br />
I<br />
NL<br />
Questo manuale contiene informazioni su come copiare un dischi.<br />
Questo prodotto è destinato ad un uso esclusivamente personale.<br />
La duplicazione e la distribuzione di materiali protetti dal diritto d'autore rappresentano una violazione della legge sul copyright.<br />
Deze handleiding beschrijft het kopiëren van een disc.<br />
Dit product is alleen bedoeld voor eigen gebruik.<br />
Het zonder toestemming vermenigvuldigen en verspreiden van auteursrechtelijk beschermd materiaal is wettelijk verboden.<br />
E<br />
Este manual muestra un ejemplo de cómo copiar un disco.<br />
Este producto es para uso personal exclusivamente.<br />
La duplicación y distribución no autorizada de materiales con copyright es una violación de las leyes del copyright.<br />
The application software used here is:<br />
Nero - Burning Rom from Ahead Software<br />
51
1<br />
UK<br />
D<br />
F<br />
I<br />
NL<br />
Start "Nero SmartStart" from the desktop.<br />
Starten Sie "Nero SmartStart" von Ihrer Oberfläche aus.<br />
Lancez "Nero SmartStart" depuis le bureau.<br />
Aprire "Nero SmartStart" dal desktop.<br />
Start "Nero SmartStart" vanaf het bureaublad.<br />
Inicie "Nero SmartStart" desde el escritorio.<br />
2<br />
UK<br />
D<br />
F<br />
I<br />
NL<br />
E<br />
Choose "CD" or "DVD".<br />
Wählen Sie "CD" oder "DVD".<br />
Choisissez "CD" ou "DVD".<br />
Selezionare "CD" o "DVD".<br />
Kies "CD" of "DVD".<br />
Seleccione "CD" o "DVD".<br />
52
3<br />
UK<br />
D<br />
F<br />
I<br />
NL<br />
E<br />
Choose "Copy and Backup" and click "Copy Disc".<br />
Wählen Sie "Kopieren und Sichern" und klicken Sie auf "Disk kopieren".<br />
Choisissez "Copier et sauvegarder" puis cliquez sur "Copier un disque".<br />
Selezionare "Copia e Backup" e fare clic su "Copia disco".<br />
Kies "Kopiëren en backup" en klik op "Schijf kopiëren".<br />
Seleccione "Copiar y copia seg." y haga clic en "Copiar disco".<br />
4<br />
UK<br />
D<br />
F<br />
I<br />
NL<br />
E<br />
Choose the source drive and insert the source disc in this drive.<br />
Wählen Sie das Quelllaufwerk und legen Sie die Quell-Disk in dieses Laufwerk ein.<br />
Choisissez le disque source puis insérez-le dans le lecteur source.<br />
Selezionare lettore sorgente ed inserire il disco di origini in questa unità.<br />
Kies het bronstation en leg de bronschijf in dat station.<br />
Seleccione la unidad origen y coloque el disco de origen en esta unidad.<br />
53
5<br />
UK<br />
D<br />
F<br />
I<br />
NL<br />
E<br />
6<br />
Choose the destination drive.<br />
Wählen Sie das Ziellaufwerk.<br />
Choisissez l’unité de destination.<br />
Selezionare drive di destinazione.<br />
Kies het doelstation.<br />
Seleccione la unidad de destino.<br />
54<br />
UK<br />
D<br />
F<br />
I<br />
NL<br />
E<br />
If possible, you may mark the checkbox "quick copy" if your source drive is fast enough.<br />
Otherwise, unmark the checkbox. Click "Burn".<br />
Wenn Ihr Quelllaufwerk schnell genug ist, können Sie bei Bedarf das Kästchen "Schnellkopie"<br />
ankreuzen.Andernfalls löschen Sie das Kreuz oder Häkchen in dem Kästchen. `<br />
Klicken Sie auf "Brennen".<br />
Si votre lecteur source est suffisamment rapide, vous pouvez cocher l’option "Copie rapide".<br />
Sinon, décochez cette case. Cliquez sur "Graver".<br />
Se possibile, selezionare la casella "Copia rapida" se l'unità sorgente è sufficientemente veloce.<br />
Altrimenti, deselezionare la casella. Fare clic su "Scrivi".<br />
Indien mogelijk kunt u het vakje "Snel kopiëren" aanvinken, maar alleen als uw bronstation snel<br />
genoeg is. Is dat niet zo, verwijder dan het vinkje. Klik op "Branden".<br />
Si la velocidad de la unidad de origen lo permite, marque la casilla "Copia rápida".<br />
En caso contrario, deje la casilla sin marcar. Haga clic en "Grabar".
7<br />
UK<br />
D<br />
F<br />
I<br />
NL<br />
E<br />
8<br />
Insert an empty disc in your destination drive.<br />
Legen Sie eine leere Disk in Ihr Ziellaufwerk ein.<br />
Insérez un disque vierge dans votre lecteur de destination.<br />
Inserire un disco vuoto nell'unità di destinazione.<br />
Leg een lege disc in het doelstation.<br />
Coloque un disco vacío en la unidad de destino.<br />
UK<br />
D<br />
F<br />
I<br />
NL<br />
E<br />
"Nero" will now burn your disc.<br />
"Nero" wird jetzt Ihre Disk brennen.<br />
"Nero" grave alors votre disque.<br />
"Nero" inizierà a scrivere sul disco.<br />
"Nero" zal nu uw disc branden.<br />
"Nero" grabará ahora el disco.<br />
55
9<br />
UK<br />
D<br />
F<br />
I<br />
NL<br />
E<br />
Congratulations, your disc has been written successfully.<br />
Click "OK".<br />
You may exit the application now.<br />
Herzlichen Glückwunsch – Ihre Disk wurde erfolgreich erstellt.<br />
Klicken Sie auf "OK".<br />
Sie können jetzt die Anwendung verlassen.<br />
Félicitations, votre disque est prêt.<br />
Cliquez sur "OK".<br />
Vous pouvez maintenant fermer l’application.<br />
Congratulazioni, il disco è stato scritto correttamente.<br />
Fare clic su "OK".<br />
Ora è possibile chiudere l'applicazione.<br />
Gefeliciteerd! Uw disc is met succes gebrand.<br />
Klik op "OK".<br />
U kunt het programma nu afsluiten.<br />
Enhorabuena, su disco se ha grabado correctamente.<br />
Haga clic en "Aceptar".<br />
Ahora puede cerrar la aplicación.<br />
56
How to make a Data disc?<br />
Eine Daten-Disk erstellen<br />
Comment créer un disque de données?<br />
Come creare un dischi di dati?<br />
Hoe maak ik zelf een data-disc?<br />
¿Cómo crear un disco de datos?<br />
UK<br />
This manual shows you an example of how to make a Data disc.<br />
This product is for personal use only.<br />
Unauthorized duplication and distribution of copyrighted materials is a violation of copyright law.<br />
D<br />
In diesem Handbuch wird an einem Beispiel gezeigt, wie eine Daten-Disk erstellt wird.<br />
Dieses Produkt ist nur für den persönlichen Gebrauch. Die ungenehmigte Vervielfältigung und der Vertrieb von urheberrechtlich<br />
geschützten Materialien stellt eine Verletzung des Urheberrechts dar.<br />
F<br />
Ce manuel illustre la procédure de création d’un disque de données.<br />
Ce produit est à usage personnel exclusivement.Toute duplication et diffusion non autorisée de matières soumises au droit<br />
d’auteur et de copie (copyright) constituent une violation de la loi sur les droits d’auteur et de copie (copyright).<br />
I<br />
NL<br />
E<br />
Questo manuale contiene informazioni su come creare un dischi di dati.<br />
Questo prodotto è destinato ad un uso esclusivamente personale.<br />
La duplicazione e la distribuzione di materiali protetti dal diritto d'autore rappresentano una violazione della legge sul copyright.<br />
De volgende pagina's beschrijven het installeren van de nieuwe DVD-ReWriter in uw PC. Omdat er vele soorten en merken<br />
computers zijn, zullen de hierna volgende afbeeldingen hoogstwaarschijnlijk niet exact overeenkomen met uw eigen situatie.<br />
Ze dienen slechts ter illustratie van het installeren. Raadpleeg voor specifieke informatie over uw eigen computer de handleiding<br />
van uw PC, of neem contact op met uw leverancier.<br />
Este manual muestra un ejemplo de cómo crear un disco de datos.<br />
Este producto es para uso personal exclusivamente.<br />
La duplicación y distribución no autorizada de materiales con copyright es una violación de las leyes del copyright.<br />
The application software used here is:<br />
Nero - Burning Rom from Ahead Software<br />
57
1<br />
UK<br />
D<br />
F<br />
I<br />
NL<br />
E<br />
Start "Nero SmartStart" from the desktop.<br />
Starten Sie "Nero SmartStart" von Ihrer Oberfläche aus.<br />
Lancez "Nero SmartStart" depuis le bureau.<br />
Aprire "Nero SmartStart" dal desktop.<br />
Start "Nero SmartStart" vanaf het bureaublad.<br />
Inicie "Nero SmartStart" desde el escritorio.<br />
2<br />
UK<br />
D<br />
F<br />
I<br />
NL<br />
E<br />
Choose "CD" or "DVD".<br />
Wählen Sie "CD" oder "DVD".<br />
Choisissez "CD" ou "DVD".<br />
Selezionare "CD" o "DVD".<br />
Kies "CD" of "DVD".<br />
Seleccione "CD" o "DVD".<br />
58
3<br />
UK<br />
D<br />
F<br />
I<br />
NL<br />
E<br />
Choose "Data" and click "Make a data disc".<br />
Wählen Sie "Daten" und klicken Sie auf "Daten Disk erstellen".<br />
Choisissez "Données" puis cliquez sur "Enregistrer un disque de données".<br />
Selezionare "Dati" e fare clic su "Crea disco dati".<br />
Kies "Data" en klik op "Data-cd maken".<br />
Seleccione "Datos" y haga clic en "Crear un disco de datos".<br />
4<br />
UK<br />
D<br />
F<br />
I<br />
NL<br />
E<br />
Click "Add".<br />
Klicken Sie auf "Hinzufügen".<br />
Cliquez sur "Ajouter".<br />
Fare clic su "Aggiungi".<br />
Klik op "Toevoegen".<br />
Haga clic en "Añadir".<br />
59
5<br />
UK<br />
D<br />
F<br />
I<br />
NL<br />
E<br />
Choose the files to burn and click "Add".<br />
Wählen Sie die zu brennenden Dateien und klicken Sie auf "Hinzufügen".<br />
Choisissez les fichiers à graver puis cliquez sur "Ajouter".<br />
Selezionare i file da scrivere e fare clic su "Aggiungi".<br />
Selecteer de bestanden die u op de disc wilt branden en klik op "Toevoegen".<br />
Seleccione los archivos que desee grabar y haga clic en "Añadir".<br />
6<br />
UK<br />
D<br />
F<br />
I<br />
NL<br />
E<br />
When all files are added, click "Finish".<br />
Wenn alle Dateien hinzugefügt sind, klicken Sie auf "Fertig".<br />
Une fois tous les fichiers ajoutés, cliquez sur "Terminer".<br />
Dopo aver aggiunto tutti i file, fare clic su "Fini".<br />
Klik op "Voltooien" als alle bestanden zijn toegevoegd.<br />
Una vez añadidos todos los archivos, haga clic en "Finalizar".<br />
60
7<br />
UK<br />
D<br />
F<br />
I<br />
NL<br />
E<br />
Click "Next".<br />
Klicken Sie auf "Weiter".<br />
Cliquez sur "Suivant".<br />
Fare clic su "Avanti".<br />
Klik op "Volgende".<br />
Haga clic en "Siguiente".<br />
8<br />
UK<br />
D<br />
F<br />
I<br />
NL<br />
E<br />
Choose the drive you use for burning and click "Burn".<br />
Wählen Sie das Laufwerk zum Brennen der Disk und klicken Sie auf "Brennen".<br />
Choisissez le lecteur à utiliser pour la gravure puis cliquez sur "Graver".<br />
Selezionare l'unità da utilizzare per la scrittura e fare clic su "Scrivi".<br />
Kies de recorder waarmee u de disc wilt branden en klik op "Branden".<br />
Seleccione la unidad para la grabación y haga clic en "Grabar".<br />
61
9<br />
UK<br />
D<br />
F<br />
I<br />
NL<br />
E<br />
Insert an empty disc.<br />
Legen Sie eine leere Disk ein.<br />
Insérez un disque vierge.<br />
Inserire un disco vuoto.<br />
Plaats een lege disc in uw recorder.<br />
Ponga un disco vacío.<br />
10<br />
UK<br />
D<br />
F<br />
I<br />
NL<br />
E<br />
"Nero" will now burn your disc.<br />
"Nero" wird jetzt Ihre Disk brennen.<br />
"Nero" grave alors votre disque.<br />
"Nero" inizierà a scrivere sul disco.<br />
"Nero" zal nu uw disc branden.<br />
"Nero" grabará ahora el disco.<br />
62
11<br />
UK<br />
D<br />
F<br />
I<br />
NL<br />
E<br />
Congratulations, your disc has been written successfully.<br />
Click "OK".<br />
You may exit the application now.<br />
Herzlichen Glückwunsch – Ihre Disk wurde erfolgreich erstellt.<br />
Klicken Sie auf "OK".<br />
Sie können jetzt die Anwendung verlassen.<br />
Félicitations, votre disque est prêt.<br />
Cliquez sur "OK".<br />
Vous pouvez maintenant fermer l’application.<br />
Congratulazioni, il disco è stato scritto correttamente.<br />
Fare clic su "OK".<br />
Ora è possibile chiudere l'applicazione.<br />
Gefeliciteerd! Uw disc is met succes gebrand.<br />
Klik op "OK".<br />
U kunt het programma nu afsluiten.<br />
Enhorabuena, su disco se ha grabado correctamente.<br />
Haga clic en "Aceptar".<br />
Ahora puede cerrar la aplicación.<br />
63
How to make an<br />
Audio disc?<br />
Erstellen einer Audio-Disk<br />
Comment créer un disque audio?<br />
Come creare un dischi Audio?<br />
Hoe maak ik zelf een muziek-disc?<br />
¿Cómo crear un disco de audio?<br />
UK<br />
D<br />
F<br />
I<br />
NL<br />
E<br />
This manual shows you an example of how to make an Audio disc which can be played in any CD-Player<br />
This product is for personal use only.<br />
Unauthorized duplication and distribution of copyrighted materials is a violation of copyright law.<br />
In diesem Handbuch wird beschrieben, wie eine Audio-Disk erstellt wird, die von jedem CD-Player abgespielt werden kann.<br />
Dieses Produkt ist nur für den persönlichen Gebrauch. Die ungenehmigte Vervielfältigung und der Vertrieb von urheberrechtlich<br />
geschützten Materialien stellt eine Verletzung des Urheberrechts dar.<br />
Ce manuel illustre la procédure de création d’un disque audio qui pourra être lu sur n’importe lecteur de CD.<br />
Ce produit est à usage personnel exclusivement.Toute duplication et diffusion non autorisée de matières soumises au droit<br />
d’auteur et de copie (copyright) constituent une violation de la loi sur les droits d’auteur et de copie (copyright).<br />
Questo manuale contiene informazioni su come creare un dischi Audio che potrà essere letto da un CD-Player.<br />
Questo prodotto è destinato ad un uso esclusivamente personale.<br />
La duplicazione e la distribuzione di materiali protetti dal diritto d'autore rappresentano una violazione della legge sul copyright.<br />
Deze handleiding beschrijft het maken van een muziek-disc om in een normale cd-speler af te spelen.<br />
Dit product is alleen bedoeld voor eigen gebruik.<br />
Het zonder toestemming vermenigvuldigen en verspreiden van auteursrechtelijk beschermd materiaal is wettelijk verboden.<br />
Este manual muestra un ejemplo de cómo crear un disco de audio que se puede reproducir en cualquier lector de compact<br />
disc. Este producto es para uso personal exclusivamente.<br />
La duplicación y distribución no autorizada de materiales con copyright es una violación de las leyes del copyright.<br />
The application software used here is:<br />
Nero - Burning Rom from Ahead Software<br />
65
1<br />
UK<br />
D<br />
F<br />
I<br />
NL<br />
E<br />
Start "Nero SmartStart" from the desktop.<br />
Starten Sie "Nero SmartStart" von Ihrer Oberfläche aus.<br />
Lancez "Nero SmartStart" depuis le bureau.<br />
Aprire "Nero SmartStart" dal desktop.<br />
Start "Nero SmartStart" vanaf het bureaublad.<br />
Inicie "Nero SmartStart" desde el escritorio.<br />
2<br />
UK<br />
D<br />
F<br />
I<br />
NL<br />
E<br />
Choose "CD".<br />
Wählen Sie "CD".<br />
Choisissez "CD".<br />
Selezionare "CD".<br />
Kies "CD".<br />
Seleccione "CD".<br />
66
3<br />
UK<br />
D<br />
F<br />
I<br />
NL<br />
E<br />
Choose "Audio" and "Make Audio CD".<br />
Wählen Sie "Audio" oder "Audio CD erstellen".<br />
Choisissez "Audio" puis "Créer un CD audio".<br />
Selezionare "Audio" e fare clic su "Crea CD audio".<br />
Kies "Audio" en dan "Audio-cd maken".<br />
Seleccione "Audio" y "Crear CD de audio".<br />
4<br />
UK<br />
D<br />
F<br />
I<br />
NL<br />
E<br />
Click "Add".<br />
Klicken Sie auf "Hinzufügen".<br />
Cliquez sur "Ajouter".<br />
Fare clic su "Aggiungi".<br />
Klik op "Toevoegen".<br />
Haga clic en "Añadir".<br />
67
5<br />
UK<br />
D<br />
F<br />
I<br />
NL<br />
E<br />
6<br />
Go to the location where your audio files are located.<br />
Wechseln Sie zu dem Verzeichnis, in dem sich Ihre Audio-Dateien befinden.<br />
Accédez à l’emplacement de vos fichiers audio.<br />
Accedere alla posizione in cui sono presenti i file audio.<br />
Ga naar de map waar uw audiobestanden zijn opgeslagen.<br />
Acceda a la ubicación donde se encuentran los archivos de audio.<br />
68<br />
UK<br />
D<br />
F<br />
I<br />
NL<br />
E<br />
Select the audio files (*.wav) you want to have on your new audio disc and click "Add".<br />
Wählen Sie die Audio-Dateien (*.wav), die Sie auf Ihrer neuen Audio-Disk wünschen, und<br />
klicken Sie auf "Hinzufügen".<br />
Sélectionnez les fichiers audio (*.wav) que vous souhaitez placer sur le nouveau disque puis<br />
cliquez sur "Ajouter".<br />
Selezionare i file audio (*.wav) da includere nel nuovo disco audio e fare clic su "Aggiungi".<br />
Selecteer de audiobestanden (*.wav) die u op de nieuwe disc wilt branden en klik op<br />
"Toevoegen".<br />
Seleccione los archivos de audio (*.wav) que desea incluir en su nuevo disco de audio y haga<br />
clic en "Añadir".
7<br />
UK<br />
D<br />
F<br />
I<br />
NL<br />
E<br />
8<br />
When all files are added, click "Finished".<br />
Wenn alle Dateien hinzugefügt sind, klicken Sie auf "Fertig".<br />
Une fois tous les fichiers ajoutés, cliquez sur "Terminé".<br />
Dopo aver aggiunto tutti i file, fare clic su "Finito".<br />
Klik op "Voltooid" als alle bestanden zijn toegevoegd.<br />
Una vez añadidos todos los archivos, haga clic en "Finalizado".<br />
UK<br />
D<br />
F<br />
I<br />
NL<br />
E<br />
Click "Next".<br />
Klicken Sie auf "Weiter".<br />
Cliquez sur "Suivant".<br />
Fare clic su "Avanti".<br />
Klik op "Volgende".<br />
Haga clic en "Siguiente".<br />
69
9<br />
UK<br />
D<br />
F<br />
I<br />
NL<br />
E<br />
10<br />
Choose your recorder and click "Burn".<br />
Wählen Sie Ihren Recorder und klicken Sie auf "Brennen".<br />
Choisissez le périphérique d'enregistrement puis cliquez sur "Graver".<br />
Selezionare il recorder e fare clic su "Scrivi".<br />
Kies uw recorder en klik op "Branden".<br />
Seleccione su grabadora y haga clic en "Grabar".<br />
UK<br />
D<br />
F<br />
I<br />
NL<br />
E<br />
Insert an empty disc.<br />
Legen Sie eine leere Disk ein.<br />
Insérez un disque vierge.<br />
Inserire un disco vuoto.<br />
Plaats een lege disc in uw recorder.<br />
Ponga un disco vacío.<br />
70
11<br />
UK<br />
D<br />
F<br />
I<br />
NL<br />
"Nero" will now burn your disc.<br />
"Nero" wird jetzt Ihre Disk brennen.<br />
"Nero" grave alors votre disque.<br />
"Nero" inizierà a scrivere sul disco.<br />
"Nero" zal nu uw disc branden.<br />
E<br />
12<br />
"Nero" grabará ahora el disco.<br />
UK<br />
D<br />
F<br />
I<br />
NL<br />
E<br />
Congratulations, your disc has been written successfully. Click "OK".<br />
You may exit the application now.<br />
Herzlichen Glückwunsch – Ihre Disk wurde erfolgreich erstellt. Klicken Sie auf "OK".<br />
Sie können jetzt die Anwendung verlassen.<br />
Félicitations, votre disque est prêt. Cliquez sur "OK".<br />
Vous pouvez maintenant fermer l’application.<br />
Congratulazioni, il disco è stato scritto correttamente. Fare clic su "OK".<br />
Ora è possibile chiudere l'applicazione.<br />
Gefeliciteerd! Uw disc is met succes gebrand. Klik op "OK".<br />
U kunt het programma nu afsluiten.<br />
Enhorabuena, su disco se ha grabado correctamente. Haga clic en "Aceptar".<br />
Ahora puede cerrar la aplicación.<br />
71
How to find warranty<br />
information?<br />
Wie findet man Garantie-Informationen?<br />
Comment trouver les informations relatives<br />
à la garantie?<br />
Come si accede alle informazioni<br />
sulla garanzia memorizzate?<br />
Waar vind ik informatie over de garantie?<br />
¿Cómo encontrar información sobre la garantía?<br />
73
1<br />
UK<br />
D<br />
F<br />
I<br />
NL<br />
E<br />
2<br />
Insert the Nero disc again, and click "exit".<br />
Legen Sie die Nero Disk wieder ein und klicken Sie auf "Exit".<br />
Réinsérez le disque Nero et cliquez sur "Quitter".<br />
Inserire nuovamente il disco Nero e fare clic su "esci".<br />
Leg de Nero-CD weer in de lade en klik op "Sluiten".<br />
Vuelva a colocar el disco de Nero y haga clic en "salir".<br />
74<br />
UK<br />
D<br />
F<br />
I<br />
NL<br />
E<br />
Click on the "My Computer" icon on your desktop (A) or click "Start", "My Computer" (B).<br />
Klicken Sie auf das Symbol<br />
"My Computer" auf Ihrer Oberfläche (A) oder klicken Sie auf "Start", "My Computer" (B).<br />
Cliquez sur l’icône<br />
'Poste de travail' de votre bureau (A) ou cliquez sur 'Démarrer' puis 'Poste de travail' (B).<br />
Fare clic sull'icona "Risorse del computer" nel desktop (A) oppure fare clic su "Start", "Risorse<br />
del computer" (B)<br />
Klik op het bureaublad op het pictogram "Deze computer" (A) of klik op "Start" en dan op<br />
"Deze computer" (B).<br />
Haga clic en el icono "Mi PC" del escritorio (A) o bien haga clic en "Inicio" y "Mi PC" (B).
3<br />
UK<br />
D<br />
F<br />
I<br />
NL<br />
E<br />
4<br />
UK<br />
D<br />
F<br />
I<br />
NL<br />
E<br />
Click with the right mouse button on the "Nero" icon (A) and choose "Explore" (B).<br />
Klicken Sie mit der rechten Maustaste auf das Symbol "Nero" (A) und wählen Sie "Explore" (B).<br />
Cliquez avec le bouton droit sur l’icône "Nero" (A) et choisissez "Explorer" (B).<br />
Fare un clic destro sull'icona "Nero" (A) e selezionare "Esplora" (B).<br />
Klik met de rechtermuisknop op het pictogram "Nero" (A) en daarna op "Verkennen" (B).<br />
Haga clic con el botón derecho del ratón en el icono "Nero" (A) y elija "Explorar" (B).<br />
Choose the "<strong>Philips</strong> Warranty"<br />
folder and you will find the<br />
warranty documents.<br />
If you have no Adobe Acrobat<br />
Reader, please download this for<br />
free on http://www.adobe.com<br />
Wählen Sie den Ordner "<strong>Philips</strong><br />
Warranty"; hier finden Sie die<br />
Garantiedokumente.<br />
Wenn Sie nicht über den Adobe<br />
Acrobat Reader verfügen, können<br />
Sie sich diese Software kostenlos<br />
bei http://www.adobe.com<br />
herunterladen.<br />
Choisissez le dossier "<strong>Philips</strong> Warranty": vous y trouverez les documents relatifs à la garantie.<br />
Si vous ne disposez pas d’Adobe Acrobat Reader, vous pouvez le télécharger gratuitement<br />
depuis le site http://www.adobe.com<br />
Selezionare la cartella "<strong>Philips</strong> Warranty" che contiene i documenti relativi alla garanzia.<br />
Se sul computer non è installato Acrobat Reader, è possibile scaricarlo gratuitamente dal sito<br />
http://www.adobe.com<br />
Ga naar de map "<strong>Philips</strong> Warranty". Daar vindt u documentatie over de garantie.<br />
Als u Adobe Acrobat Reader niet hebt, download dit programma dan gratis vanaf de site<br />
http://www.adobe.com<br />
Seleccione la carpeta "<strong>Philips</strong> Warranty", en la que encontrará los documentos de la garantía.<br />
Si no dispone de Adobe Acrobat Reader, descárguelo gratuitamente desde<br />
http://www.adobe.com<br />
75
FAQ<br />
Frequently Asked<br />
Questions<br />
FAQ<br />
Häufig gestellte Fragen<br />
FAQ<br />
Questions fréquentes<br />
FAQ<br />
Domande frequenti<br />
FAQ<br />
Vaak gestelde vragen<br />
FAQ<br />
Preguntas frecuentes<br />
77
UK<br />
Question 1: I have a windows 98 Second Edition PC and there is no CDROM in<br />
the computer but I have another PC. How do I install the drivers?<br />
1. Start another computer.<br />
2. Insert the Nero disc for the <strong>ED16DVDS</strong> into the CDROM.<br />
3. Click "Exit" when the Nero Installation screen appears.<br />
4. Click on “My Computer”.<br />
5. Click on the “Nero”-logo.<br />
6. Click on the right mouse button and choose “Explore”.<br />
7. Go to the directory “<strong>Philips</strong> Drivers”<br />
8. Copy the contents of this directory on a floppy disc.<br />
9. Attach your <strong>ED16DVDS</strong> to your Windows 98SE computer.<br />
10. When Windows asks for the drivers, insert the floppy from step 8 and point windows to<br />
this floppy.<br />
11. The drivers will be installed.You can now use your <strong>ED16DVDS</strong> to install the software by<br />
inserting the Install disc.<br />
Question 2: I have a windows 98 Second Edition PC and there is no CDROM in<br />
the computer but I have access to the internet. How do I install the drivers?<br />
1. Start the computer.<br />
2. Start Internet Explorer (or another web browser)<br />
3. Go to the <strong>Philips</strong> PCStuff website: http://www.philips.com/support<br />
4. Choose "Drivers and manuals"<br />
5. Search for the <strong>ED16DVDS</strong><br />
6. Download the Windows 98SE drivers<br />
7. Unzip the drivers and remember where you saved the unzipped drivers<br />
8. Plug in the <strong>ED16DVDS</strong><br />
9. When Windows asks for drivers, refer to the location where you saved the drivers in<br />
step 7.<br />
10. Your <strong>ED16DVDS</strong> will work now.<br />
Question 3: How do I keep my <strong>ED16DVDS</strong> in good shape?<br />
1. Do not expose to moisture, rain, sand or heat.<br />
2. Place it on a firm, flat surface.<br />
3. Keep away from domestic heat and direct sunlight.<br />
4. Give the <strong>ED16DVDS</strong> enough place: approx. 2,5cm (1 inch) to all sides is required.<br />
5. Do not place anything on the <strong>ED16DVDS</strong>.<br />
Question 4: I have connected the <strong>ED16DVDS</strong> to an USB connector but<br />
Windows does not react and the <strong>ED16DVDS</strong> is not recognized.<br />
1. Make sure the <strong>ED16DVDS</strong> is connected properly to a power outlet.<br />
2. Make sure the USB connectors are switched on (also in the PC Bios, consult your PC<br />
manual).<br />
3. Check if all drivers are installed (run windows update, check your PC manual and download<br />
if required drivers for the PC from the manufacturer’s website).<br />
Question 5: Burning or reading takes far too long. How does this come?<br />
1. You have connected the <strong>ED16DVDS</strong> to a low speed USB connector, which has a very<br />
limited throughput. Connect the drive to a highspeed USB adapter.<br />
2. You may have to install drivers for your USB-adapter. Consult the manual and or download<br />
drivers from the manufacturer’s website.<br />
78
Question 6: I inserted a disc and it is not played.<br />
1. Ensure the disc label is facing up.<br />
2. Clean the disc.<br />
3. Check whether the disc has the same region code as the player.<br />
4. Check if the disc is defective by trying another disc.<br />
5. Check to see if the disc is defective, badly scratched or warped (not flat)<br />
Question 7: Player does not respond to some operating commands during<br />
playback.<br />
Check whether a PC connection is active. Unplug the USB cable to de-activate the PC<br />
connection.The operations may not be permitted by the disc. Refer to the instructions of the<br />
disc.<br />
Question 8: I tried to burn a disc and this failed.What happened?<br />
1. Check to ensure that there are no scratches or finger marks on the disk.<br />
2. Use a new disk and retry the writing sequence.<br />
3. Use a different (<strong>Philips</strong>) branded disk to check that your drive is working correctly.<br />
Question 9: I can not read from a disc.<br />
1. Check to ensure that there are no scratches or finger marks on the disk.<br />
2. Use another disk and retry to see if your drive can read a other disc.<br />
Question 10: How can I clean a dirty disc?<br />
Some problems may occur because the disc inside the player is dirty.To avoid these problems<br />
clean your discs regularly, in the following way:<br />
When a disc becomes dirty, clean it with a cleaning cloth.Wipe the disc from the center out, in<br />
a straight line.<br />
Question 11: May I use chemicals to clean a disc?<br />
No, do not use solvents such as benzene, thinner, commercially available cleaners, or anti-static<br />
spray intended for analogue discs.<br />
Question 12: May I use cleaning discs to clean the lens of the <strong>ED16DVDS</strong>?<br />
No, do not use commercially available cleaning discs to clean the lens, as these discs may<br />
damage the optical unit.<br />
79
D<br />
Frage 1: Ich habe einen PC mit Windows 98 Second Edition und es befindet sich<br />
kein CDROM-Laufwerk im Computer, aber ich habe noch einen anderen PC.<br />
Wie kann ich die Treiber installieren?<br />
1. Starten Sie den anderen Computer.<br />
2. Legen Sie die Nero-CD für das <strong>ED16DVDS</strong> in das CDROM-Laufwerk ein.<br />
3. Klicken Sie auf "Beenden", wenn die Anzeige für die Nero Installation erscheint.<br />
4. Klicken Sie auf "Arbeitsplatz".<br />
5. Klicken Sie auf das „Nero“-Logo.<br />
6. Klicken Sie mit der rechten Maustaste und wählen Sie “Explore”.<br />
7. Gehen Sie zum Verzeichnis “<strong>Philips</strong> Drivers”.<br />
8. Kopieren Sie den Inhalt dieses Verzeichnisses auf eine Diskette.<br />
9. Verbinden Sie Ihr <strong>ED16DVDS</strong> mit Ihrem Windows 98SE Computer.<br />
10.Wenn Windows Sie nach den Treibern fragt, legen Sie die Diskette aus Schritt 8 ein und<br />
weisen Sie Windows diese Diskette an.<br />
11. Die Treiber werden installiert. Sie können jetzt Ihr <strong>ED16DVDS</strong> benutzen, um die Software<br />
zu installieren, indem Sie die Install-CD einlegen.<br />
Frage 2: Ich habe einen PC mit Windows 98 Second Edition und es befindet sich<br />
kein CDROM-Laufwerk im Computer, aber ich habe Zugang zum Internet.Wie<br />
kann ich die Treiber installieren?<br />
1. Starten Sie den Computer.<br />
2. Starten Sie den Internet Explorer (oder einen anderen Web-Browser).<br />
3. Gehen Sie zur <strong>Philips</strong> PCStuff Website: http://www.philips.com/support<br />
4. Wählen Sie “Drivers and manuals”.<br />
5. Suchen Sie nach <strong>ED16DVDS</strong>.<br />
6. Laden Sie die Windows 98SE Treiber herunter.<br />
7. Entzippen Sie die Treiber und merken Sie sich, wo Sie die entzippten Treiber speichern.<br />
8. Stecken Sie das <strong>ED16DVDS</strong> ein.<br />
9. Wenn Windows Sie nach Treibern fragt, verweisen Sie auf das Verzeichnis, in dem Sie die<br />
Treiber bei Schritt 7 gespeichert haben.<br />
10. Ihr <strong>ED16DVDS</strong> wird jetzt funktionieren.<br />
Frage 3:Wie halte ich mein <strong>ED16DVDS</strong> in guter Verfassung?<br />
1. Setzen Sie das System nicht Feuchtigkeit, Regen, Sand oder Wärmequellen aus.<br />
2. Stellen Sie es auf eine stabile und ebene Unterlage.<br />
3. Halten Sie es von Heizkörpern und anderen Wärmequellen fern und schützen Sie es vor<br />
direkter Sonneneinstrahlung.<br />
4. Sorgen Sie dafür, dass um das <strong>ED16DVDS</strong> herum genügend freier Raum ist: ca. 2,5 cm<br />
(1 Zoll) auf allen Seiten.<br />
6. Legen Sie keine Gegenstände auf das <strong>ED16DVDS</strong>.<br />
Frage 4: Ich habe das <strong>ED16DVDS</strong> mit einem USB-Anschluss verbunden, aber<br />
Windows reagiert nicht und das <strong>ED16DVDS</strong> wird nicht erkannt.<br />
1. Vergewissern Sie sich, dass das <strong>ED16DVDS</strong> korrekt mit einer Steckdose verbunden ist.<br />
2. Vergewissern Sie sich, dass die USB-Anschlüsse eingeschaltet sind (auch im PC BIOS; sehen<br />
Sie in Ihrem PC-Handbuch nach).<br />
3. Prüfen Sie, ob alle Treiber installiert sind (führen Sie das Windows Update aus, lesen Sie in<br />
Ihrem PC-Handbuch nach und laden Sie bei Bedarf Treiber für Ihren PC von der Website<br />
des Herstellers herunter).<br />
Frage 5: Das Brennen oder Lesen dauert viel zu lange.Woran liegt das?<br />
1. Sie haben das <strong>ED16DVDS</strong> mit einem langsamen USB-Anschluss verbunden, der einen sehr<br />
begrenzten Durchsatz hat.Verbinden Sie das Laufwerk mit einem Highspeed-USB-Adapter.<br />
2. Eventuell müssen Sie Treiber für Ihren USB-Adapter installieren. Sehen Sie im Handbuch<br />
nach oder laden Sie die Treiber von der Website des Herstellers herunter.<br />
80
Frage 6: Ich habe eine CD eingelegt und es wird nichts wiedergegeben.<br />
1. Kontrollieren, ob die CD mit der bedruckten Seite nach oben eingelegt wurde.<br />
2. Reinigen Sie die CD.<br />
3. Prüfen Sie, ob die CD den gleichen Regionalcode hat wie der Spieler.<br />
4. Kontrollieren Sie, ob die CD defekt ist. Probieren Sie zu diesem Zweck eine andere CD aus.<br />
5. Prüfen Sie, ob die CD defekt, stark verkratzt oder verzogen (nicht flach) ist.<br />
Frage 7: Der Spieler reagiert während der Wiedergabe nicht auf alle Befehle.<br />
Prüfen Sie, ob die PC-Verbindung aktiv ist. Ziehen Sie das USB-Kabel heraus, um die PC-<br />
Verbindung zu deaktivieren. Die CD lässt bestimmte Bedienungsfunktionen eventuell nicht zu.<br />
Beachten Sie das Begleitheft der CD.<br />
Frage 8: Ich habe versucht, eine CD zu brennen, aber das hat nicht funktioniert.<br />
Was ist geschehen?<br />
1. Vergewissern Sie sich, dass sich keine Kratzer oder Fingerabdrücke auf der CD befinden.<br />
2. Legen Sie eine neue CD ein und wiederholen Sie die Schreibsequenz.<br />
3. Legen Sie eine andere Marken-CD (<strong>Philips</strong>) ein, um zu prüfen, ob das Laufwerk korrekt<br />
funktioniert.<br />
Frage 9: Ich kann nicht von einer CD lesen.<br />
1. Vergewissern Sie sich, dass sich keine Kratzer oder Fingerabdrücke auf der CD befinden.<br />
2. Legen Sie eine andere CD ein und wiederholen Sie den Vorgang, um zu prüfen, ob Ihr<br />
Laufwerk eine andere CD lesen kann.<br />
Frage 10:Wie kann ich eine verschmutzte CD reinigen?<br />
Manche Fehlfunktionen können auf Verunreinigungen der eingelegten CD zurückzuführen sein.<br />
Damit solche Probleme gar nicht erst auftreten, sollten Sie Ihre CDs regelmäßig reinigen.<br />
Gehen Sie dabei folgendermaßen vor:<br />
Wenn eine CD verschmutzt ist, reinigen Sie sie mit einem weichen Tuch.Wischen Sie dabei<br />
geradlinig von der Mitte zum Rand.<br />
Frage 11: Darf ich Chemikalien zum Reinigen einer CD verwenden?<br />
Nein, verwenden Sie weder Lösungsmittel wie Waschbenzin,Verdünner und im Handel<br />
erhältliche Reinigungsmittel noch Antistatik-Sprays für herkömmliche Schallplatten.<br />
Frage 12: Darf ich Reinigungs-CDs verwenden, um die Linse des <strong>ED16DVDS</strong> zu<br />
reinigen?<br />
Nein, verwenden Sie keine im Handel erhältlichen Reinigungs-CDs zum Reinigen der Linse, da<br />
diese CDs die optische Einheit beschädigen können.<br />
81
F<br />
Question 1 : Je possède un PC fonctionnant sous Windows 98 Deuxième Édition<br />
sans lecteur de CD-ROM, mais je possède aussi un autre PC. Comment installer<br />
les pilotes ?<br />
1. Démarrez un autre ordinateur.<br />
2. Insérez le disque Nero de l’<strong>ED16DVDS</strong> dans le lecteur de CD-ROM.<br />
3. Cliquez sur « Exit » lorsque la fenêtre Nero Installation apparaît.<br />
4. Cliquez sur « Poste de travail ».<br />
5. Cliquez sur le logo « Nero ».<br />
6. Cliquez avec le bouton droit de la souris et choisissez « Explorer ».<br />
7. Accédez au répertoire « <strong>Philips</strong> Drivers ».<br />
8. Copiez le contenu de ce répertoire sur une disquette.<br />
9. Connectez votre <strong>ED16DVDS</strong> à votre ordinateur fonctionnant sous Windows 98SE.<br />
10. Lorsque Windows vous demande les pilotes, insérez la disquette créée à l’étape 8 et<br />
indiquez à Windows qu’il doit les rechercher sur celle-ci.<br />
11. Les pilotes sont alors installés.Vous pouvez désormais utiliser votre <strong>ED16DVDS</strong> pour<br />
installer le logiciel en insérant le disque Install.<br />
Question 2 : Je possède un PC fonctionnant sous Windows 98 Deuxième Édition<br />
sans lecteur de CD-ROM, mais je dispose d’un accès Internet. Comment<br />
installer les pilotes ?<br />
1. Démarrez l’ordinateur.<br />
2. Lancez Internet Explorer (ou un autre navigateur web).<br />
3. Accédez au site <strong>Philips</strong> PCStuff : http://www.philips.com/support<br />
4. Choisissez « Drivers and manuals » (Pilotes et manuels).<br />
5. Recherchez le <strong>ED16DVDS</strong>.<br />
6. Téléchargez les pilotes pour Windows 98SE.<br />
7. Décompressez les pilotes en notant l’emplacement des fichiers décompressés.<br />
8. Branchez l’<strong>ED16DVDS</strong>.<br />
9. Lorsque Windows vous demande les pilotes, indiquez l’emplacement où vous les avez<br />
décompressés à l’étape 7.<br />
10.Votre <strong>ED16DVDS</strong> est alors prêt à être utilisé.<br />
Question 3 : Comment assurer l’entretien de mon <strong>ED16DVDS</strong> ?<br />
1. Ne l’exposez pas à l’humidité, à la pluie, à la poussière ou à la chaleur.<br />
2. I nstallez-le sur une surface plane et stable.<br />
3. Tenez-le à l’écart de tout appareil de chauffage et de la lumière directe du soleil.<br />
4. Laissez suffisamment d’espace autour de votre <strong>ED16DVDS</strong> : approximativement 2,5 cm au<br />
minimum.<br />
5. Ne placez aucun objet sur l'<strong>ED16DVDS</strong>.<br />
Question 4 : J’ai branché l’<strong>ED16DVDS</strong> à un connecteur USB mais Windows ne le<br />
reconnaît pas.<br />
1. Assurez-vous que l'<strong>ED16DVDS</strong> est bien branché à une prise secteur.<br />
2. Assurez-vous que les connecteurs USB sont activés (également dans le BIOS du PC ;<br />
consultez le manuel de celui-ci).<br />
3. Vérifiez si tous les pilotes sont installés (exécutez Windows Update, consultez le manuel de<br />
votre PC et, le cas échéant, téléchargez les pilotes requis depuis le site web du<br />
constructeur).<br />
Question 5 : La gravure ou la lecture est anormalement lente. Quelle en est la<br />
raison ?<br />
1. Vous avez branché l’<strong>ED16DVDS</strong> à un connecteur USB bas débit. Branchez le lecteur à un<br />
connecteur USB haut débit.<br />
2. Il peut être nécessaire d’installer les pilotes de votre adaptateur USB. Consultez le manuel<br />
ou téléchargez les pilotes depuis le site web du constructeur.<br />
82
Question 6 : J’ai inséré un disque, mais la lecture est inopérante.<br />
1. Assurez-vous que l’étiquette du disque est sur le dessus.<br />
2. Nettoyez le disque.<br />
3. Vérifiez que le disque a le même code de zone que le lecteur.<br />
4. Vérifiez si le disque n’est pas défectueux en insérant un autre disque.<br />
5. Vérifiez si le disque n’est pas défectueux, rayé ou gondolé.<br />
Question 7 : Le lecteur ne répond pas à certaines commandes pendant la<br />
lecture.<br />
Vérifiez si la connexion avec le PC est active. Débranchez le câble USB pour désactiver la<br />
connexion avec le PC. Ces commandes ne sont peut-être pas autorisées avec ce disque.<br />
Consultez les instructions concernant celui-ci.<br />
Question 8 : J’ai tenté de graver un disque, mais l’opération a échoué. Que s’estil<br />
passé ?<br />
1. Assurez-vous que le disque n’est pas rayé ou ne porte pas de traces de doigts.<br />
2. Utilisez un nouveau disque et relancez la gravure.<br />
3. Utilisez un disque de marque différente (<strong>Philips</strong>) pour vous assurer que votre lecteur<br />
fonctionne correctement.<br />
Question 9 : Je ne parviens pas à lire un disque.<br />
1. Assurez-vous que le disque n’est pas rayé ou ne porte pas de traces de doigts.<br />
2. Utilisez un autre disque et réessayez pour vous assurer que votre lecteur peut le lire.<br />
Question 10 : Comment nettoyer un disque encrassé ?<br />
Certains problèmes peuvent être dus à l’encrassement du disque inséré dans le lecteur. Pour<br />
éviter ce genre de problème, nettoyez vos disques régulièrement en procédant comme suit:<br />
Lorsqu'un disque est sale, utilisez un chiffon pour le nettoyer. Essuyez-le en partant du centre<br />
vers les bords et en ligne droite.<br />
Question 11 : Puis-je utiliser des produits chimiques pour nettoyer un disque ?<br />
Non ; évitez les solvants tels que le benzène, le diluant pour peinture, les détergents du<br />
commerce ou les aérosols antistatiques conçus pour les disques analogiques.<br />
Question 12 : Puis utiliser des disques de nettoyage avec la lentille de<br />
l’<strong>ED16DVDS</strong>?<br />
Non.Vous ne devez en aucun cas utiliser des disques de nettoyage du commerce, car ils<br />
risquent d'endommager l'unité optique.<br />
83
I<br />
Domanda 1: Utilizzo un PC con Windows 98 Second Edition in cui non è<br />
installata un'unità CDROM, ma posseggo un altro PC. Come devo procedere<br />
per installare i driver?<br />
1. Avviate l'altro computer.<br />
2. Inserite il disco di Nero per l'<strong>ED16DVDS</strong> nell'unità CDROM.<br />
3. Fate clic su "Exit" (Esci) alla comparsa dello schermo d'installazione di Nero.<br />
4. Fate clic su "Risorse del computer".<br />
5. Fate clic sul logo "Nero".<br />
6. Fate un clic destro e selezionate "Esplora".<br />
7. Accedete alla cartella dei driver “<strong>Philips</strong> Drivers”<br />
8. Copiate il contenuto di questa cartella su un dischetto.<br />
9. Collegate l'<strong>ED16DVDS</strong> al vostro computer Windows 98SE.<br />
10. Quando Windows richiede i driver, inserite il floppy prodotto al punto 8 e confermate a<br />
Windows l'uso di questo dischetto.<br />
11. I driver verranno installati. Ora è possibile utilizzare il vostro <strong>ED16DVDS</strong> per installare il<br />
software tramite il disco d'installazione Install.<br />
Domanda 2: Utilizzo un PC con Windows 98 Second Edition in cui non è<br />
installata un'unità CDROM, ma ho possibilità di accedere ad Internet. Come<br />
devo procedere per installare i driver?<br />
1. Avviate il computer.<br />
2. Aprite Internet Explorer (od un altro browser Web)<br />
3. Accedete al sito Web PCStuff di <strong>Philips</strong>: http://www.philips.com/support<br />
4. Selezionate "Drivers and manuals" (Driver e manuali)<br />
5. Ricercate <strong>ED16DVDS</strong><br />
6. Scaricate i driver per Windows 98SE<br />
7. Scompattate il file zip dei driver ed annotate la posizione dove avete salvato i file<br />
8. Collegate l'<strong>ED16DVDS</strong><br />
9. Quando Windows richiede i driver, specificate la posizione in cui avete salvato i driver al<br />
punto 7.<br />
10. L'<strong>ED16DVDS</strong> ora funziona correttamente.<br />
Domanda 3: Come mantengo l'<strong>ED16DVDS</strong> in ottima forma?<br />
1. Non esponetelo all'umidità, pioggia od eccessivo calore.<br />
2. Collocatelo su una superficie stabile e piana.<br />
3. Tenetelo lontano da caloriferi e luce solare diretta.<br />
4. Lasciate dello spazio libero attorno all'<strong>ED16DVDS</strong>: circa 2,5cm per lato.<br />
5. Non poggiate alcun oggetto sopra all'<strong>ED16DVDS</strong>.<br />
Domanda 4: Ho collegato l'<strong>ED16DVDS</strong> ad un connettore USB ma Windows non<br />
reagisce il alcun modo e l'<strong>ED16DVDS</strong> non viene riconosciuto.<br />
1. Assicuratevi di aver collegato correttamente l'<strong>ED16DVDS</strong> ad una presa elettrica.<br />
2. Assicuratevi che i connettori USB siano abilitati (anche nel BIOS del PC, a questo proposito,<br />
consultate la Guida del PC).<br />
3. Verificate di aver installato tutti i driver (accedete a Windows Update, controllate la guida<br />
del PC e scaricate, se necessari, i driver per il PC dal sito Web del produttore).<br />
Domanda 5: La scrittura o lettura richiedono un tempo eccessivamente lungo.<br />
Qual è il motivo?<br />
1. Avete collegato <strong>ED16DVDS</strong> ad un connettore USB a bassa velocità, che presenta un<br />
throughput molto limitato. Collegate l'unità ad un adattatore USB ad alta velocità.<br />
2. Potrebbe essere necessario installare i driver per l'adattatore USB. Consultate la guida o<br />
scaricate i driver dal sito Web del produttore.<br />
84
Domanda 6: Ho inserito un disco, ma non viene riprodotto.<br />
1. Verificate che l'etichetta del disco sia rivolta verso l'alto.<br />
2. Pulite il disco.<br />
3. Controllate se il disco è codificato per lo stesso codice regionale impostato nel lettore.<br />
4. Controllate se il disco è difettoso, provandone un altro.<br />
5. Verificate la superficie del disco per rilevare difetti, graffi o deformazioni (disco non piano)<br />
Domanda 7: Il lettore non risponde ad alcuni comandi operativi, durante la<br />
riproduzione.<br />
Verificate se è attiva una connessione al PC. Scollegate il cavo USB per disattivare la<br />
connessione al PC. I comandi potrebbero essere non previsti a livello di disco. Consultate le<br />
istruzioni a corredo del disco.<br />
Domanda 8: Ho tentato di scrivere un disco, ma l'operazione non è andata a<br />
buon fine. Casa è accaduto?<br />
1. Verificate che sulla superficie del disco non siano presenti graffi od impronte.<br />
2. Utilizzate un altro disco e ripetete la sequenza di scrittura.<br />
3. Utilizzate un disco di marca differente (<strong>Philips</strong>) per verificare se l'unità funziona<br />
correttamente.<br />
Domanda 9: Non riesco a leggere il disco.<br />
1. Verificate che sulla superficie del disco non siano presenti graffi od impronte.<br />
2. Utilizzate un altro disco e riprovate per verificare se l'unità è in grado di leggere.<br />
Domanda 10: Come si pulisce un disco sporco?<br />
Alcuni problemi potrebbero insorgere perché il disco inserito nel lettore è sporco. Per evitare<br />
questi inconvenienti, pulite regolarmente i dischi, procedendo come segue:<br />
Quando un disco è sporco, pulitelo con un panno di pulizia, con passate radiali, dal centro del<br />
disco verso l'esterno.<br />
Domanda 11: E' possibile utilizzare agenti chimici per pulire i dischi?<br />
No, non utilizzate solventi, quali benzina, solventi, detergenti domestici o spray antistatici<br />
destinati a dischi analogici.<br />
Domanda 12: E' possibile utilizzare dischi di pulizia per pulire l'ottica<br />
dell'<strong>ED16DVDS</strong>?<br />
No, non utilizzate i dischi di pulizia in commercio per pulire l'ottica, poiché questi tipi di disco<br />
potrebbero danneggiare l'unità ottica.<br />
85
NL<br />
Vraag 1: Mijn computer met Windows 98 Tweede Edition heeft geen CD-ROMstation,<br />
maar ik heb een andere PC. Hoe kan de stuurprogramma's installeren?<br />
1. Start de andere computer op.<br />
2. Leg de Nero-CD voor de <strong>ED16DVDS</strong> in het CD-ROM-station.<br />
3. Klik op "Verlaten" zodra het Nero-installatiescherm verschijnt.<br />
4. Klik op "Deze computer".<br />
5. Klik op het "Nero"-logo.<br />
6. Klik met de rechtermuisknop en kies "Verkennen".<br />
7. Ga naar de map "<strong>Philips</strong> drivers".<br />
8. Kopieer de inhoud van deze map naar een diskette.<br />
9. Sluit de <strong>ED16DVDS</strong> aan op uw computer met Windows 98SE.<br />
10.Als Windows om stuurprogramma's vraagt, plaats dan de diskette (zie stap 8) en kies die in<br />
Windows.<br />
11. De stuurprogramma's worden geïnstalleerd. U kunt uw <strong>ED16DVDS</strong> nu gebruiken om de<br />
software met behulp van de installatie-CD te installeren.<br />
Vraag 2: Mijn computer met Windows 98 Tweede Edition heeft geen CD-ROMstation,<br />
maar ik heb wel een Internet-verbinding. Hoe kan de stuurprogramma's<br />
installeren?<br />
1. Start de computer op.<br />
2. Start Internet Explorer (of een andere web browser).<br />
3. Ga naar de website met <strong>Philips</strong> PCStuff: http://www.philips.com/support<br />
4. Kies daar "Drivers and manuals".<br />
5. Zoek naar de <strong>ED16DVDS</strong>.<br />
6. Download de stuurprogramma's voor Windows 98SE.<br />
7. Pak de stuurprogramma's uit (Unzip) en onthoud waar u de uitgepakte stuurprogramma's<br />
opslaat.<br />
8. Sluit de <strong>ED16DVDS</strong> aan.<br />
9. Als Windows om stuurprogramma's vraagt, geef dan de locatie aan die in stap 7 is gebruikt.<br />
10. Nu werkt uw <strong>ED16DVDS</strong>.<br />
Vraag 3: Hoe houd ik mijn <strong>ED16DVDS</strong> optimaal in vorm?<br />
1. Stel het product niet bloot aan vocht, regen, zand of hitte.<br />
2. Zet het product op een stevig en egaal oppervlak.<br />
3. Houd het product uit de buurt van warmtebronnen en rechtstreeks zonlicht.<br />
4. Zorg voor voldoende ruimte rond uw <strong>ED16DVDS</strong>: rondom moet aan elke kant ongeveer<br />
2,5 cm vrije ruimte blijven.<br />
5. Zet nooit voorwerpen op de <strong>ED16DVDS</strong>.<br />
Vraag 4: Ik heb de <strong>ED16DVDS</strong> op een USB-connector aangesloten, maar<br />
Windows herkent het product niet en reageert er niet op.<br />
1. Controleer of de <strong>ED16DVDS</strong> correct op een stopcontact is aangesloten.<br />
2. Zorg dat de USB-connectors zijn geactiveerd. (Ook in het BIOS van uw PC. Kijk in de<br />
handleiding van uw PC.)<br />
3. Controleer of alle stuurprogramma's zijn geïnstalleerd. (Installeer een update van Windows,<br />
kijk in uw PC-handleiding en download indien nodig stuurprogramma's voor de PC vanaf<br />
de site van de fabrikant.)<br />
Vraag 5: Branden of lezen van een disc duurt veel te lang.Wat is de oorzaak?<br />
1. U hebt de <strong>ED16DVDS</strong> op de trage USB-connector aangesloten. Dit beperkt de<br />
datasnelheid aanzienlijk. Sluit het product op de snelle USB-connector aan.<br />
2. Misschien moet u stuurprogramma's voor uw USB-interface installeren. Kijk in de<br />
handleiding en download indien nodig stuurprogramma's vanaf de site van de fabrikant<br />
86
Vraag 6: Ik heb een disc geplaatst, maar die wordt niet afgespeeld.<br />
1. Controleer of de disc met de bedrukte zijde naar boven is geplaatst.<br />
2. Maak de disc schoon.<br />
3. Controleer of de disc en de speler dezelfde regiocode hebben.<br />
4. Plaats een andere disc om na te gaan of de eerste defect is.<br />
5. Controleer of de disc defect, sterk bekrast of verbogen is.<br />
Vraag 7:Tijdens het afspelen reageert de speler niet op sommige<br />
bedieningshandelingen.<br />
Controleer of de verbinding met de PC correct is aangesloten. Maak de USB-kabel los om de<br />
verbinding met de PC op te heffen. Sommige opdrachten werken niet bij bepaalde typen discs.<br />
Raadpleeg de instructies bij de disc.<br />
Vraag 8: Het branden van een disc is mislukt.Wat is de oorzaak?<br />
1. Controleer of de disc geen krassen of vingerafdrukken bevat.<br />
2. Probeer het branden nog een keer met een nieuwe disc.<br />
3. Gebruik een ander merk disc (<strong>Philips</strong>) om na te gaan of uw brander goed werkt.<br />
Vraag 9: Een disc wordt niet gelezen.<br />
1. Controleer of de disc geen krassen of vingerafdrukken bevat.<br />
2. Probeer of het lezen van een andere disc wel correct werkt.<br />
Vraag 10: Hoe kan een vuile disc schoonmaken?<br />
Sommige problemen kunnen een gevolg zijn van vuil op een disc.Voorkom fouten door discs<br />
als volgt regelmatig schoon te maken:<br />
Verwijder vuil van ene disc met een schoon doekje.Wrijf alleen in een rechte lijn vanuit het<br />
midden naar de randen van de disc.<br />
Vraag 11: Mag ik een disc met schoonmaakmiddelen reinigen?<br />
Nee. Gebruik nooit oplosmiddelen als benzine, thinner, huishoudreinigers of antistatische<br />
sprays voor analoge media.<br />
Vraag 12: Mag ik de lens in de <strong>ED16DVDS</strong> schoonmaken met reinigings-CD's?<br />
Nee. Gebruik geen reinigings-CD's om de lens schoon te maken, want zulke discs kunnen de<br />
optische onderdelen beschadigen.<br />
87
E<br />
Pregunta 1:Tengo un PC con Windows 98 Second Edition que no tiene CDROM,<br />
pero tengo otro PC. ¿Cómo instalo los controladores?<br />
1. Inicie el otro ordenador.<br />
2. Inserte el disco de Nero para <strong>ED16DVDS</strong> en el CDROM.<br />
3. Haga clic en "Exit" (Salir) cuando aparezca la pantalla de instalación de Nero.<br />
4. Haga clic en “Mi PC”.<br />
5. Haga clic en el logotipo de “Nero”.<br />
6. Haga clic con el botón derecho del ratón y elija “Explore” (Explorar).<br />
7. Vaya al directorio “<strong>Philips</strong> Drivers”<br />
8. Copie el contenido de este directorio en un disquete.<br />
9. Conecte la unidad <strong>ED16DVDS</strong> al ordenador con Windows 98SE instalado.<br />
10. Cuando Windows pida los controladores, inserte el disquete del paso 8 e indique esta ruta.<br />
11. Los controladores se instalarán.Ahora puede usar <strong>ED16DVDS</strong> para instalar el software con<br />
el disco de instalación.<br />
Pregunta 2:Tengo un PC con Windows 98 Second Edition que no tiene CDROM,<br />
pero tengo acceso a Internet. ¿Cómo instalo los controladores?<br />
1. Inicie el ordenador.<br />
2. Ejecute Internet Explorer (u otro explorador web)<br />
3. Acceda al sitio web PCStuff de <strong>Philips</strong>: http://www.philips.com/support<br />
4. Seleccione "Drivers and manuals"<br />
5. Busque <strong>ED16DVDS</strong><br />
6. Descargue los controladores para Windows 98SE<br />
7. Descomprima los controladores y recuerde dónde los guarda<br />
8. Conecte la unidad <strong>ED16DVDS</strong><br />
9. Cuando Windows pida los controladores, indique la ubicación en la que guardó los<br />
controladores en el paso 7.<br />
10. La unidad <strong>ED16DVDS</strong> ya funcionará.<br />
Pregunta 3: ¿Cómo mantengo mi <strong>ED16DVDS</strong> en buen estado?<br />
1. No lo exponga a la humedad, lluvia, arena ni calor.<br />
2. Colocar sobre una superficie estable y plana.<br />
3. Mantener alejado de la calefacción y la luz solar directa.<br />
4. Deje espacio suficiente para <strong>ED16DVDS</strong>: aprox. 2,5 cm por todos los lados.<br />
5. No coloque nada sobre <strong>ED16DVDS</strong>.<br />
Pregunta 4: He conectado <strong>ED16DVDS</strong> a un conector USB pero Windows no<br />
reacciona y <strong>ED16DVDS</strong> no se reconoce.<br />
1. Asegúrese de que <strong>ED16DVDS</strong> está conectado correctamente a una toma eléctrica.<br />
2. Asegúrese de que los conectores USB están activados (también en la BIOS del PC,<br />
consulte el manual del PC).<br />
3. Compruebe que todos los controladores están instalados (ejecute Windows Update,<br />
consulte el manual del PC y descargue los controladores necesarios del sitio web del<br />
fabricante).<br />
Pregunta 5: Se tarda mucho en grabar o leer. ¿Por qué ocurre esto?<br />
1. Ha conectado <strong>ED16DVDS</strong> a un conector USB de baja velocidad, que ofrece un<br />
rendimiento muy limitado. Conecte la unidad a un adaptador USB highspeed.<br />
2. Puede ser necesario instalar controladores para el adaptador USB. Consulte el manual y/o<br />
descargue los controladores del sitio web del fabricante.<br />
88
Pregunta 6: He insertado un disco pero no se reproduce.<br />
1. Asegúrese de que la etiqueta del disco está hacia arriba.<br />
2. Limpie el disco.<br />
3. Compruebe si el disco tiene el mismo código de región que el reproductor.<br />
4. Compruebe si el disco está defectuoso probando con otro disco.<br />
5. Compruebe si el disco está defectuoso, muy arañado o deformado (no es plano).<br />
Pregunta 7: El reproductor no responde a algunos comandos durante la<br />
reproducción.<br />
Compruebe si una conexión de PC está activa. Desconecte el cable USB para desactivar la<br />
conexión. Puede que el disco no permita las operaciones. Consulte las instrucciones del disco.<br />
Pregunta 8: He intentado grabar un disco y ha fallado. ¿Qué ocurrió?<br />
1. Compruebe que el disco no presenta arañazos o huellas de dedos.<br />
2. Use un nuevo disco y reintente la secuencia de escritura.<br />
3. Use otro disco de marca (<strong>Philips</strong>) para comprobar que la unidad funciona correctamente.<br />
Pregunta 9: No puedo leer un disco.<br />
1. Compruebe que el disco no presenta arañazos o huellas de dedos.<br />
2. Use otro disco e intente de nuevo para ver si la unidad puede leerlo.<br />
Pregunta 10: ¿Cómo limpio un disco sucio?<br />
Algunos problemas se deben a que el disco insertado en el reproductor está sucio. Para evitar<br />
estos problemas, limpie los discos regularmente como se indica:<br />
Cuando un disco se ensucie, límpielo con un paño. Limpie el disco del centro afuera, en línea<br />
recta.<br />
Pregunta 11: ¿Puedo usar productos químicos para limpiar un disco?<br />
No, no utilice disolventes como el benceno, diluyentes, productos de limpieza comerciales o<br />
sprays antiestáticos para discos de vinilo.<br />
Pregunta 12: ¿Puedo usar discos limpiadores para limpiar la lente de<br />
<strong>ED16DVDS</strong>?<br />
No, no utilice discos de limpieza comerciales para limpiar la lente, ya que estos discos pueden<br />
dañar la unidad óptica.<br />
89
Specifications<br />
Technische Daten<br />
Caractéristiques techniques<br />
Specifiche<br />
Specificaties<br />
Especificaciones<br />
91
UK<br />
Maximum write speeds:<br />
48x on CD-Recordable<br />
24x on UltraSpeed CD-ReWritable<br />
16x on DVD+R<br />
4x on DVD+R Double Layer<br />
8x on DVD+RW<br />
16x on DVD-R<br />
6x on DVD-RW<br />
The actual write speed may be lower as this is disc dependent.<br />
Maximum read speeds:<br />
48x on CD<br />
16x on DVD-ROM<br />
8x on Recorded DVD’s<br />
The <strong>ED16DVDS</strong> reads following discs:<br />
CD / CD-R / CD-RW formats both 8cm & 12cm discs (up to 99 min).<br />
DVD Disc Format: DVD-ROM, DVD-Video, DVD+R, DVD+R Double layer, DVD+RW,<br />
DVD-R, DVD-RW formats both 8cm & 12cm discs.<br />
Interface: HiSpeed USB (USB 2.0)<br />
Typical access time: 160ms<br />
Buffer Size: 2 MB<br />
Temperature:<br />
Operating temperature should be between +5ºC and +40ºC (41ºF and 104ºF)<br />
Storage temperature should be between -20ºC and +60ºC (-4ºF and 140ºF)<br />
MTBF: 75.000 hours at 20% duty cycle.<br />
92
D<br />
Maximale Schreibgeschwindigkeit:<br />
48fach auf CD-Recordable<br />
24fach auf UltraSpeed CD-ReWritable<br />
16fach auf DVD+R<br />
4fach auf DVD+R Double Layer<br />
8fach auf DVD+RW<br />
16fach auf DVD-R<br />
6fach auf DVD-RW<br />
Die tatsächliche Schreibgeschwindigkeit kann geringer sein, weil sie von der Disk abhängt.<br />
Maximale Lesegeschwindigkeit:<br />
48fach von CD<br />
16fach von DVD-ROM<br />
8fach von Recorded DVDs<br />
Das <strong>ED16DVDS</strong>-Laufwerk eignet sich zum Lesen der folgenden CDs:<br />
CD / CD-R / CD-RW Formate auf 8 cm & 12 cm CDs (bis zu 99 min).<br />
DVD Disk Format: DVD-ROM, DVD-Video, DVD+R, DVD+R Double Layer, DVD+RW,<br />
DVD-R, DVD-RW Formate auf 8 cm & 12 cm CDs.<br />
Interface: HiSpeed USB (USB 2.0)<br />
Typische Zugriffszeit: 160 ms<br />
Größe des Zwischenspeichers: 2 MB<br />
Temperatur:<br />
Die Temperatur sollte bei Betrieb zwischen +5 ºC und +40 ºC liegen.<br />
Die Temperatur sollte bei der Lagerung zwischen -20 ºC und +60 ºC liegen.<br />
Mittlerer Ausfallabstand 75.000 Std. bei 20% Einschaltdauer<br />
93
F<br />
Vitesses maximales en écriture :<br />
48x sur CD inscriptible<br />
24x sur CD réinscriptible ultrarapide<br />
16x sur DVD+R<br />
4x sur DVD+R Double couche<br />
8x sur DVD+RW<br />
16x sur DVD-R<br />
6x sur DVD-RW<br />
La vitesse d’écriture réelle peut être inférieure selon le type de disque.<br />
Vitesses maximales en lecture :<br />
48x sur CD<br />
16x sur DVD-ROM<br />
8x sur DVD enregistrés<br />
L’<strong>ED16DVDS</strong> lit les disques suivants :<br />
CD / CD-R / CD-RW 8 cm et 12 cm (jusqu'à 99 minutes).<br />
DVD : DVD-ROM, DVD-Video, DVD+R, DVD+R double couche, DVD+RW, DVD-R,<br />
DVD-RW 8 cm et 12 cm.<br />
Interface : USB haut débit (USB 2.0)<br />
Temps d’accès moyen : 160 ms<br />
Capacité du tampon : 2 Mo<br />
Températures :<br />
La température en fonctionnement doit être comprise entre +5° C et +40° C.<br />
La température d’entreposage doit être comprise entre -20° C et +60° C.<br />
MTBF de 75.000 heures à 20% d'utilisation<br />
94
I<br />
Velocità in scrittura max:<br />
48x su CD-R<br />
24x su CD-RW ultraveloci<br />
16x su DVD+R<br />
4x su DVD+R Doppio layer<br />
8x su DVD+RW<br />
16x su DVD-R<br />
6x su DVD-RW<br />
La velocità in scrittura effettiva può risultare inferiore poiché legata alla natura del disco.<br />
Velocità in lettura max:<br />
48x su CD<br />
16x su DVD-ROM<br />
8x su DVD registrati<br />
<strong>ED16DVDS</strong> è in grado di leggere i seguenti dischi:<br />
Dischi CD / CD-R / CD-RW in formato 8 cm e 12 cm (fino a 99 min).<br />
Dischi DVD: DVD-ROM, DVD-Video, DVD+R, DVD+R doppio layer, DVD+RW, DVD-R,<br />
DVD-RW in formato 8 cm e 12 cm.<br />
Interfaccia: USB ad alta velocità (USB 2.0)<br />
Tempo di accesso tipico: 160 ms<br />
Dimensione buffer: 2 MB<br />
Temperatura:<br />
La temperatura operativa deve essere compresa tra +5ºC e +40ºC<br />
La temperatura in stoccaggio deve essere compresa tra -20ºC e +60ºC<br />
MTBF 75000 con 20% di utilizzo<br />
95
NL<br />
Maximale schrijfsnelheid:<br />
48x op CD-Recordable<br />
24x op UltraSpeed CD-ReWritable<br />
16x op DVD+R<br />
4x op DVD+R Dubbellaags<br />
8x op DVD+RW<br />
16x op DVD-R<br />
6x op DVD-RW<br />
De daadwerkelijke schrijfsnelheid kan lager zijn, omdat die van de disc afhankelijk is.<br />
Maximale leessnelheid:<br />
48x vanaf CD<br />
16x vanaf DVD-ROM<br />
8x vanaf opgenomen DVD’s<br />
De <strong>ED16DVDS</strong> leest de volgende typen discs:<br />
CD / CD-R / CD-RW, zowel discs van 8 cm als 12 cm (tot 99 min.)<br />
DVD-typen: DVD-ROM, DVD-Video, DVD+R, DVD+R dubbellaags, DVD+RW, DVD-R,<br />
DVD-RW, zowel discs van 8 cm als 12 cm<br />
Interface: HiSpeed USB (USB 2.0)<br />
Nominale toegangstijd: 160 ms<br />
Buffergeheugen: 2 MB<br />
Temperatuur:<br />
Tijdens gebruik moet de temperatuur tussen +5ºC en +40ºC zijn.<br />
Buiten gebruik moet de temperatuur tussen -20ºC en +60ºC zijn.<br />
MTBF 75.000 uur bij 20% inschakeltijd<br />
96
E<br />
Velocidades de escritura máximas:<br />
48x en CD grabable<br />
24x en CD regrabable UltraSpeed<br />
16x en DVD+R<br />
4x en DVD+R Doble capa<br />
8x en DVD+RW<br />
16x en DVD-R<br />
6x en DVD-RW<br />
La velocidad de escritura real puede ser más lenta en función del disco.<br />
Velocidades de lectura máximas:<br />
48x en CD<br />
16x en DVD-ROM<br />
8x en DVD grabados<br />
<strong>ED16DVDS</strong> lee los siguientes discos:<br />
CD / CD-R / CD-RW de 8 cm y 12 cm (hasta 99 min).<br />
Formato de disco DVD: DVD-ROM, DVD-Video, DVD+R, DVD+R doble capa, DVD+RW,<br />
DVD-R, DVD-RW de 8 cm y 12 cm.<br />
Interfaz: HiSpeed USB (USB 2.0)<br />
Tiempo de acceso normal: 160 ms<br />
Tamaño de búfer: 2 MB<br />
Temperatura:<br />
La temperatura de funcionamiento debe estar entre +5 ºC y +40 ºC<br />
La temperatura de almacenamiento debe estar entre -20 ºC y +60 ºC<br />
MTBF 75.000 horas al 20% del ciclo de servicio<br />
97
UK<br />
D<br />
F<br />
I<br />
NL<br />
E<br />
Safety Precautions<br />
WARNING<br />
Plastic bags can be dangerous.<br />
To avoid danger of suffocation, keep this bag away from babies and small children.<br />
ATTENTION<br />
Pour eviter danger d’etouffement tenir ce sachet loin de la portee des enfants.<br />
ACHTUNG<br />
Um Erstickungsgefahr zu vermeiden bitte diesen Beutel von Kindern fernhalten.<br />
ATENCION<br />
Para evitar el peligro de asfixia no dejar este saco al alcance de los niños.<br />
LET OP<br />
Om gevaar van verstikking te voorkomen houdt de zak buiten bereik van kleine kinderen.<br />
ATTENZIONE<br />
Per evitare pericoli di soffocamento non lasciare questo saccheto alla portata dei bambini.<br />
98
Safety Precautions<br />
USA/Canada:This player is for use only with IBM compatible UL listed Personal<br />
Computers or Macintosh UL listed workstations, weighing less than 18 kg.<br />
LASER SAFETY<br />
This unit employs a laser. Do not remove the cover or attempt to service this device when<br />
connected due to the possibility of eye damage.<br />
LASER-SICHERHEIT<br />
In das Gerät ist ein Laser eingebaut. Nehmen Sie die Abdeckung nicht ab und versuchen Sie nicht, das<br />
Gerät zu reparieren, solange es angeschlossen ist. Es besteht die Gefahr einer Augenverletzung.<br />
CAUTION<br />
USE OF CONTROLS OR ADJUSTMENTS OR PERFORMANCE OF PROCEDURES OTHER<br />
THAN THOSE SPECIFIED HEREIN MAY RESULT IN HAZARDOUS LASER RADIATION<br />
EXPOSURE.<br />
WARNUNG<br />
DIE VORNAHME VON REGELUNGEN ODER EINSTELLUNGEN ODER DIE DURCHFÜHRUNG<br />
VON VERFAHREN, DIE NICHT IN DIESEM DOKUMENT (DIESER BESCHREIBUNG; IM<br />
NACHSTEHENDEN TEXT) ANGEGEBEN SIND, KANN EINE GEFÄHRLICHE EINWIRKUNG<br />
VON LASERSTRAHLUNG ZUR FOLGE HABEN.<br />
CAUTION<br />
VARO!<br />
VARNING<br />
ADVERSEL<br />
DANGER<br />
VORSICHT<br />
INVISIBLE LASER RADIATION.WHEN OPEN AVOID EXPOSURE TO BEAM<br />
AVATTAESSA OLET ALTTIINA NÄKYVÄLLE JA NÄKYMÄTTÖMÄLLE LASER<br />
SÄTEILYLLE. ÄLÄ KATSO SÄTEESEEN<br />
OSYNLIG LASERSTRÅLNING NÄR DENNA DEL ÄR ÖPPNAD BETRAKTA<br />
EJ STRÅLEN<br />
USYNLIG LASERSTRÅLING NÅR DEKSEL ÅPNES UNNGÅ EKSPONERING<br />
FOR STRÅLEN<br />
INVISIBLE LASER RADIATION.WHEN OPEN AVOID DIRECT EXPOSURE<br />
TO BEAM<br />
UNSICHTBARE LASERSTRAHLUNG WENN ABDECKUNG GEÖFFNET<br />
NICHT DEM STRAHL AUSSETZEN<br />
LASER<br />
Type ........................................................................................................Semiconductor laser GaAIAs<br />
Wave length ................................................................................783 nm (CD) – 658 nm (DVD)<br />
Output power ..................................................................(measured above the objective lens)<br />
...................................................................................................................................................Read: 0,7 mW<br />
.............................................................................................Write: 30 mW (CD) – 75 mW (DVD)<br />
Beam divergence ......................................................................................................................60 degree<br />
KLASS 1<br />
LASERAPPARAT<br />
CLASS 1<br />
LASER PRODUCT<br />
LUOKAN 1<br />
LASERLAITE<br />
KLASSE 1<br />
LASER-PRODUCT<br />
99
Additional information available at our website:<br />
www.philips.com/support<br />
Specifications subject to change without notice.<br />
All dimensions shown are approximate.<br />
© 2005 Koninklijke <strong>Philips</strong> Electronics N.V.<br />
All rights reserved.<br />
Reproduction, copying, usage, modifying, hiring, renting, public performance,<br />
transmission and/or broadcasting in whole or part is prohibited without the<br />
written consent of <strong>Philips</strong> Electronics N.V.<br />
3104 125 2002.2