Untitled - Visiter le site web de l'utilisateur
Untitled - Visiter le site web de l'utilisateur
Untitled - Visiter le site web de l'utilisateur

You also want an ePaper? Increase the reach of your titles
YUMPU automatically turns print PDFs into web optimized ePapers that Google loves.
C<br />
A<br />
B
FOURCHES A SUSPENSION MANITOU<br />
TOUTES NOS FELICITATIONS POUR AVOIR CHOISI UNE FOURCHE MANITOU<br />
2004, LE DERNIER CRI EN MATIERE DE TECHNOLOGIE DES FOURCHES A SUS-<br />
PENSION. Cette fourche est entièrement assemblée, prête à être montée sur votre<br />
bicyc<strong>le</strong>tte. El<strong>le</strong> est équipée d’un tube pivot <strong>de</strong> 28,5 mm (1 1 /8 po) non fi<strong>le</strong>té et peut<br />
être aussi disponib<strong>le</strong> en version frein à disque uniquement. Pour un usage sur<br />
route, un réf<strong>le</strong>cteur doit être fixé au cintre ; il n’est pas fourni avec la fourche.<br />
GAMME DES FOURCHES MANITOU SKAREB 2004<br />
SKAREB COMP..........DEBATTEMENT DE 80 OU 100 MM / RESSORT PNEUMA-<br />
TIQUE / AMORTISSEMENT HYDRAULIQUE (REGLAGE DE LA<br />
DETENTE) / TETE PLEINE /<br />
ARCEAU INVERSE<br />
SKAREB ELITE ..........DEBATTEMENT DE 80 OU 100 MM / RESSORT PNEUMA-<br />
TIQUE / AMORTISSEMENT HYDRAULIQUE (REGLAGE DE LA<br />
DETENTE) / TETE CREUSE / ARCEAU INVERSE<br />
SKAREB SUPER ........DEBATTEMENT DE 80 OU 100 MM / RESSORT PNEUMA-<br />
TIQUE / VERROUILLAGE TPC /<br />
TETE CREUSE / ARCEAU INVERSE<br />
SKAREB PLATINUM ..DEBATTEMENT DE 80 OU 100 MM / RESSORT PNEUMA-<br />
TIQUE / REGLAGE DU VOLUME D’AIR / VERROUILLAGE<br />
TPC / TETE CREUSE /<br />
ARCEAU INVERSE<br />
Vous pouvez éga<strong>le</strong>ment vous procurer ce manuel sur <strong>le</strong> <strong>site</strong> www.answerproducts.com.<br />
FAIRE DE LA BICYCLETTE EST UNE ACTIVITE<br />
QUI PEUT ETRE DANGEREUSE ET QUI NECES-<br />
SITE DE GARDER A TOUT MOMENT LE CONTROLE DE LA BICYCLETTE. LA LECTURE<br />
COMPLETE DE CE MANUEL ET L’ENTRETIEN REGULIER ET ADEQUAT DE LA BICY-<br />
CLETTE ET DE SA FOURCHE A SUSPENSION REDUISENT LES RISQUES DE<br />
BLESSURE OU MEME D’ACCIDENT MORTEL. AVANT D’ENFOURCHER VOTRE BICY-<br />
CLETTE, VOUS DEVEZ EN INSPECTER LA FOURCHE A SUSPENSION POUR VOUS<br />
ASSURER QUE CELLE-CI N’A PAS ETE ENDOMMAGEE LORS D’UNE UTILISATION OU<br />
D’UN MONTAGE PRECEDENTS. N’UTILISEZ PAS VOTRE BICYCLETTE SI LA<br />
FOURCHE PRESENTE DES SIGNES DE TORSION, DE FISSURATION OU DE FUITE, SI<br />
ELLE GRINCE OU SI UNE PIECE D’ORIGINE MANQUE. TOUTE CHUTE PEUT<br />
ENTRAINER DES BLESSURES GRAVES VOIRE MORTELLES. LE RESPECT DE CES<br />
INSTRUCTIONS PEUT VOUS AIDER A REDUIRE LE RISQUE D’ACCIDENT. SI VOUS<br />
ETES UN PRATIQUANT ASSIDU OU UN UTILISATEUR AGRESSIF EN TOUT TERRAIN,<br />
OU SI VOUS UTILISEZ VOTRE BICYCLETTE<br />
AU MOINS 3 FOIS PAR SEMAINE SUR UN TERRAIN ACCIDENTE, NOUS VOUS<br />
RECOMMANDONS, EN PLUS DE L’ENTRETIEN REGULIER, DE RETOURNER VOTRE<br />
FOURCHE TOUS LES DEUX ANS POUR UNE INSPECTION ET UNE REVISION COM-<br />
PLETE. RETOURNEZ VOTRE FOURCHE A VOTRE DETAILLANT MANITOU QUI LA<br />
FERA SUIVRE A ANSWER PRODUCTS OU CONTACTEZ ANSWER AU (661) 257-44 11<br />
POUR RETOURNER VOTRE FOURCHE DIRECTEMENT.<br />
IMPORTANT : La Manitou est une fourche tout terrain et en tant que tel<strong>le</strong><br />
n’est pas équipée <strong>de</strong> réf<strong>le</strong>cteurs pour un usage sur route. Deman<strong>de</strong>z à votre<br />
reven<strong>de</strong>ur ou à son mécanicien <strong>de</strong> vous instal<strong>le</strong>r <strong>le</strong>s réf<strong>le</strong>cteurs conformes à la<br />
rég<strong>le</strong>mentation en vigueur si vous prévoyez d’utiliser votre bicyc<strong>le</strong>tte sur <strong>de</strong>s<br />
voies publiques. Si vous avez <strong>de</strong>s questions concernant la rég<strong>le</strong>mentation, contactez<br />
votre reven<strong>de</strong>ur.<br />
INSTRUCTIONS DE SECURITE POUR<br />
LE CONSOMMATEUR<br />
Ne démontez jamais ou ne faites pas démonter <strong>le</strong> tube pivot ou <strong>le</strong>s jambages <strong>de</strong> la<br />
tête <strong>de</strong> fourche. Le tube pivot et <strong>le</strong>s jambages sont ajustés à la presse à l’usine.<br />
Les ajuster <strong>de</strong> force permet une meil<strong>le</strong>ure tenue que <strong>de</strong>s jambages rivetés mais on<br />
ne peut <strong>le</strong>s retirer. Les retirer <strong>de</strong> force endommagerait <strong>de</strong> façon permanente la tête<br />
<strong>de</strong> fourche, rendant dangereuse son utilisation prolongée. N’essayez pas <strong>de</strong> fi<strong>le</strong>ter<br />
un tube pivot sans fi<strong>le</strong>tage. L’usinage du fi<strong>le</strong>t fragiliserait <strong>le</strong> tube pivot et <strong>le</strong> rendrait<br />
dangereux à utiliser. Le seul moyen sûr est <strong>de</strong> vous procurer <strong>le</strong> bon pivot et la<br />
bonne tête <strong>de</strong> fourche auprès d’un reven<strong>de</strong>ur ou <strong>de</strong> contacter <strong>le</strong> service consommateur<br />
d’Answer au (661) 257-44 11. Toute autre modification ou changement<br />
apporté à votre fourche doit être considéré comme dangereux. Contactez<br />
<strong>le</strong> service consommateur d’Answer avant toute modification pour vous renseigner<br />
sur <strong>le</strong>s consignes <strong>de</strong> sécurité.<br />
N’utilisez pas la fourche si une pièce est cassée, tordue, fissurée ou, à votre avis,<br />
est peut-être endommagée. Contactez votre reven<strong>de</strong>ur ou <strong>le</strong> service consommateur<br />
<strong>de</strong> Answer Products au (661) 257-44 11 si vous avez <strong>de</strong>s questions sur l’intégrité<br />
ou l’état <strong>de</strong> votre fourche.<br />
Answer Products vous recomman<strong>de</strong> d’inspecter périodiquement votre fourche<br />
pour rechercher <strong>le</strong>s signes d’usure ou <strong>de</strong> dommage. Inspectez la tête, <strong>le</strong>s jambages<br />
internes, <strong>le</strong>s jambages externes, <strong>le</strong>s pattes et l’arceau <strong>de</strong> frein afin d’y déce<strong>le</strong>r<br />
d’éventuel<strong>le</strong>s fissures ou cassures.<br />
RENSEIGNEMENTS AYANT TRAIT A<br />
LA GARANTIE<br />
Toute fourche Answer Products qui selon <strong>le</strong> fabricant présente <strong>de</strong>s vices<br />
<strong>de</strong> matériaux et <strong>de</strong> fabrication pendant une pério<strong>de</strong> d’un an à compter <strong>de</strong> la date<br />
d’achat (ou 2 ans dans la Communauté européenne), sera réparée ou remplacée,<br />
au gré du fabricant, sans frais, lors <strong>de</strong> la réception <strong>de</strong> la fourche à l’usine en port<br />
payé. Cette garantie ne couvre pas la casse, la déformation ou <strong>le</strong>s dommages à la<br />
fourche pouvant résulter <strong>de</strong> collisions ou <strong>de</strong> chutes. Cette garantie ne couvre<br />
aucune fourche ayant subi un usage abusif ou dont <strong>le</strong> numéro <strong>de</strong> série a été modifié,<br />
oblitéré ou en<strong>le</strong>vé. Cette garantie ne couvre pas <strong>le</strong>s dégâts causés à la peinture.<br />
Toute modification effectuée par l’utilisateur rend la garantie nul<strong>le</strong> et non<br />
avenue. Cette garantie est expressément offerte à la place <strong>de</strong> toute autre garantie et<br />
la durée <strong>de</strong> la garantie tacite est limitée à cel<strong>le</strong> <strong>de</strong> la garantie expresse ci-incluse.<br />
Answer Products décline toute responsabilité quant aux dommages indirects ou<br />
fortuits.<br />
Si une intervention sous garantie est nécessaire, quel<strong>le</strong> qu’en soit la raison,<br />
retournez la fourche au lieu d’achat, avec <strong>le</strong> reçu d’achat initial. A ce moment, vous<br />
seront données toutes instructions concernant la réparation, <strong>le</strong> retour ou l’échange<br />
<strong>de</strong> la fourche. Les clients résidant hors <strong>de</strong>s Etats-Unis sont priés <strong>de</strong> s’adresser à<br />
<strong>le</strong>ur reven<strong>de</strong>ur ou au distributeur <strong>de</strong> <strong>le</strong>ur région.<br />
DIRECTIVES DE POSE<br />
Il se peut que l’on ait à couper <strong>le</strong> tube pivot à la longueur <strong>de</strong> votre tube<br />
<strong>de</strong> direction. Si cette opération ne vous est pas familière ou si vous ne possé<strong>de</strong>z<br />
pas <strong>le</strong>s outils nécessaires, il est recommandé <strong>de</strong> faire instal<strong>le</strong>r votre fourche par<br />
un reven<strong>de</strong>ur disposant d’un mécanicien qualifié.<br />
LE TUBE PIVOT ET LES JAMBAGES SONT<br />
EMMANCHES DE FORCE A LA PRESSE A L’U-<br />
SINE EN UNE SEULE OPERATION ET NE PEUVENT ETRE DEMONTES DE LA TETE DE<br />
FOURCHE. LE REMPLACEMENT DE L’ENSEMBLE TETE DE FOURCHE/TUBE PIVOT<br />
EST NECESSAIRE POUR AUGMENTER LA LONGUEUR DU TUBE PIVOT OU CHANGER<br />
SON DIAMETRE. LE DEMONTAGE OU LE REMPLACEMENT DU TUBE PIVOT OU DES<br />
JAMBAGES SONT DANGEREUX ET SONT DONC INTERDITS.<br />
RODAGE<br />
Une fourche neuve se ro<strong>de</strong> au cours <strong>de</strong>s premières randonnées (environ 20 heures<br />
au total). Avant <strong>le</strong> rodage, on peut noter que la fourche coince légèrement et<br />
qu’el<strong>le</strong> semb<strong>le</strong> avoir <strong>de</strong>s crans. Après la pério<strong>de</strong> <strong>de</strong> rodage, el<strong>le</strong> fonctionne plus<br />
soup<strong>le</strong>ment et absorbe beaucoup mieux <strong>le</strong>s cahots. Après 20 heures, il est bon <strong>de</strong><br />
vérifier <strong>le</strong>s réglages (<strong>le</strong> cas échéant) pour mettre la fourche parfaitement au point.<br />
INSTALLATION DE LA FOURCHE<br />
1. Démontez l’ancienne fourche <strong>de</strong> votre bicyc<strong>le</strong>tte.<br />
2. Mesurez et coupez <strong>le</strong> tube pivot pour qu’il s’ajuste au tube <strong>de</strong> direction <strong>de</strong> la<br />
bicyc<strong>le</strong>tte. (Voir l’AVERTISSEMENT ci-<strong>de</strong>ssus). Vous pouvez utiliser votre<br />
vieil<strong>le</strong> fourche comme modè<strong>le</strong> pour couper <strong>le</strong> tube pivot à la bonne longueur.<br />
3. En<strong>le</strong>vez <strong>le</strong> cône <strong>de</strong> direction <strong>de</strong> l’ancienne fourche.<br />
4. Instal<strong>le</strong>z <strong>le</strong> jeu <strong>de</strong> direction et la fourche et rég<strong>le</strong>z-<strong>le</strong>s selon <strong>le</strong>s instructions du<br />
fabricant.<br />
5. Instal<strong>le</strong>z <strong>le</strong> cintre et la potence selon <strong>le</strong>s instructions du fabricant.<br />
6. Instal<strong>le</strong>z <strong>le</strong>s freins selon <strong>le</strong>s instructions du fabricant.<br />
7. Pour instal<strong>le</strong>r la roue avant, ajustez <strong>le</strong> blocage rapi<strong>de</strong> <strong>de</strong> la roue avant pour<br />
qu’il passe par <strong>le</strong>s pattes anti-détachement secondaires. Fixez la roue selon<br />
<strong>le</strong>s instructions du fabricant du blocage rapi<strong>de</strong>.<br />
8. Instal<strong>le</strong>z <strong>le</strong> câb<strong>le</strong> <strong>de</strong> frein selon <strong>le</strong>s instructions du fabricant. Assurez-vous<br />
que <strong>le</strong> câb<strong>le</strong> du frein avant est à sa place. Assurez-vous que la gaine <strong>de</strong> frein<br />
n’est pas vrillée et qu’el<strong>le</strong> ne touche pas au pneu lors du déplacement <strong>de</strong> la<br />
fourche.<br />
LORSQUE VOUS MONTEZ LA ROUE AVEC UN<br />
PNEU CORRECTEMENT GONFLE, ASSUREZ-<br />
VOUS QU’IL Y A UN JEU MINIMUM ENTRE LA FOURCHE ET LE PNEU.<br />
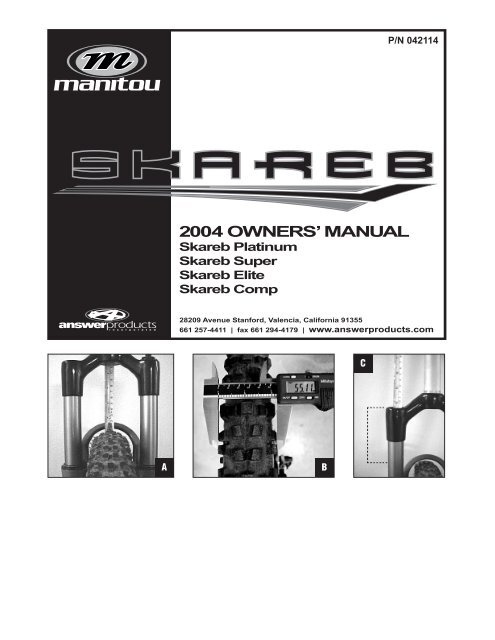
1. MESUREZ L’ECART ENTRE LE POINT LE PLUS HAUT DU PNEU ET LA PARTIE<br />
INFERIEURE DE L’ARCEAU DE FREIN (VOIR FIGURE A). VOIR LE TABLEAU 1<br />
POUR LE JEU MINIMUM PAR RAPPORT A L’ARCEAU<br />
DE FREIN.<br />
2. MESUREZ LE PNEU A L’ENDROIT OU SA LARGEUR EST MAXIMUM (VOIR FIG-<br />
URE B). VOIR LE TABLEAU 1 POUR LA LARGEUR MAXIMUM DU PNEU.<br />
TABLEAU 1 : JEU DE LA ROUE<br />
JEU MINIMUM PAR RAPPORT A LARGEUR MAXIMUM<br />
L’ARCEAU DE FREIN<br />
DU PNEU<br />
(Voir Figure A)<br />
(Voir Figure B)<br />
5 mm 55 mm
IMPORTANT : Si vous ne placez pas correctement <strong>le</strong> câb<strong>le</strong> <strong>de</strong> frein avant et<br />
<strong>de</strong> <strong>le</strong> fixer soli<strong>de</strong>ment à la fourche, vous vous exposez à <strong>de</strong>s b<strong>le</strong>ssures graves<br />
voire mortel<strong>le</strong>s. La fourche ne doit pas être utilisée<br />
si l’une <strong>de</strong> ses pièces semb<strong>le</strong> ou est endommagée. Contactez votre reven<strong>de</strong>ur<br />
ou Answer Products pour <strong>de</strong>s pièces <strong>de</strong> rechange.<br />
REGLAGE INITIAL<br />
MESURE DU DEBATTEMENT<br />
Pour savoir quel est <strong>le</strong> débattement <strong>de</strong> votre fourche, il suffit <strong>de</strong> mesurer l’écart<br />
entre la partie supérieure du joint <strong>de</strong>s fourreaux inférieurs (ou la partie inférieure<br />
du souff<strong>le</strong>t protecteur <strong>de</strong> fourche) et la partie inférieure <strong>de</strong> la tête. Voir <strong>le</strong> tab<strong>le</strong>au 2<br />
pour déterminer <strong>le</strong> débattement.<br />
TABLEAU 2 : MESURE DU DEBATTEMENT<br />
DEBATTEMENT<br />
DISTANCE ENTRE LE SOUFFLET<br />
ET LA TETE DE LA FOURCHE<br />
80 mm Environ 96 mm<br />
100 mm Environ 116 mm<br />
MESURE DE LA COMPRESSION STATIQUE<br />
Pour mesurer la compression statique, il vous faut disposer d’un ruban gradué,<br />
d’un crayon, d’un morceau <strong>de</strong> papier et d’ai<strong>de</strong>.<br />
1. Mesurez l’écart entre l’axe <strong>de</strong> l’essieu avant et la partie inférieure <strong>de</strong> la tête<br />
lorsque personne n’est en sel<strong>le</strong>, et consignez cet écart. (Rappe<strong>le</strong>z-vous l’emplacement<br />
exact <strong>de</strong>s <strong>de</strong>ux points car vous <strong>de</strong>vrez <strong>le</strong>s réutiliser ultérieurement.)<br />
2. Deman<strong>de</strong>z au cycliste <strong>de</strong> s’asseoir sur la sel<strong>le</strong> et mesurez l’écart entre <strong>le</strong>s<br />
<strong>de</strong>ux points indiqués à l’étape 1. Il est important que <strong>le</strong> cycliste soit en position<br />
norma<strong>le</strong> (poids centré) et pieds sur <strong>le</strong>s péda<strong>le</strong>s.<br />
3. Soustrayez la secon<strong>de</strong> mesure <strong>de</strong> la première. Vous obtenez ainsi la compression<br />
statique (voir tab<strong>le</strong>au 3).<br />
4. Sur toutes <strong>le</strong>s fourches SKAREB, déposez <strong>le</strong> bouchon d’air situé à la partie<br />
supérieure du fourreau gauche et, à l’ai<strong>de</strong> d’un pompe pour amortisseurs<br />
(Manitou nº réf. : 85-4069), mettez la fourche à la pression voulue (éga<strong>le</strong> à 75<br />
% du poids du cycliste pour <strong>le</strong>s fourches à débattement <strong>de</strong> 80 mm, ou éga<strong>le</strong><br />
à 50 % du poids du cycliste pour <strong>le</strong>s fourches à débattement <strong>de</strong> 100 mm).<br />
Sachez qu’un peu <strong>de</strong> pression s’échappe parfois <strong>de</strong>s circuits pneumatiques<br />
lorsque vous déposez la pompe ; pour savoir exactement combien <strong>de</strong> pression<br />
s’est échappée, reposez la pompe après avoir réglé et vérifié la pression.<br />
5. Si <strong>le</strong> réglage <strong>de</strong> la précontrainte ou <strong>de</strong> la pression d’air ne permet pas<br />
d’obtenir la compression voulue, il faut poser <strong>de</strong> nouveaux ressorts.<br />
Consultez <strong>le</strong> tab<strong>le</strong>au <strong>de</strong>s kits, ci-<strong>de</strong>ssous.<br />
TABLEAU 3 : MESURE DE LA COMPRESSION STATIQUE<br />
DEBATTEMENT<br />
COMPRESSION STATIQUE<br />
80 mm 12 à 16 mm<br />
100 mm 18 à 24 mm<br />
REGLAGE DE L’AMORTISSEMENT DE LA DETENTE<br />
Les dispositifs <strong>de</strong> réglage <strong>de</strong> la détente <strong>de</strong>s fourches Manitou se trouvent<br />
à la partie inférieure du fourreau droit. En tournant <strong>le</strong> bouton dans <strong>le</strong> sens horaire<br />
(vue à partir du bas), vous augmentez l’amortissement <strong>de</strong> la<br />
détente ; en tournant <strong>le</strong> bouton dans <strong>le</strong> sens antihoraire, vous réduisez l’amortissement<br />
<strong>de</strong> la détente.<br />
REGLAGE DE L’AMORTISSEMENT DE LA COMPRESSION – VER-<br />
ROUILLAGE TPC<br />
Pour <strong>le</strong>s fourches à TPC avec verrouillage, il suffit <strong>de</strong> tourner <strong>le</strong> bouton situé à la<br />
partie supérieure du jambage droit pour augmenter l’amortissement <strong>de</strong> la compression<br />
et activer <strong>le</strong> verrouillage. En tournant <strong>le</strong> bouton dans <strong>le</strong> sens horaire<br />
(lorsque vous regar<strong>de</strong>z la fourche en étant assis sur<br />
la sel<strong>le</strong>), vous augmentez l’amortissement <strong>de</strong> la compression et activez <strong>le</strong> verrouillage<br />
; en tournant <strong>le</strong> bouton dans <strong>le</strong> sens antihoraire, vous réduisez l’amortissement<br />
<strong>de</strong> la compression et désactivez <strong>le</strong> verrouillage. Le <strong>de</strong>rnier <strong>de</strong>mi-tour <strong>de</strong> la<br />
rotation du bouton active <strong>le</strong> verrouillage, tandis que la première partie <strong>de</strong> sa rotation<br />
augmente ou réduit l’amortissement <strong>de</strong><br />
la compression.<br />
REGLAGE DE L’AMORTISSEMENT SPV<br />
Avec l’amortissement SPV, vous pouvez rég<strong>le</strong>r <strong>le</strong>s caractéristiques d’amortissement<br />
<strong>de</strong> la compression et la sensibilité à la position <strong>de</strong> votre suspension à l’ai<strong>de</strong><br />
d’une pompe SPV (Manitou nº réf. : 85-4161). Pour que votre système d’amortissement<br />
SPV fonctionne correctement, procé<strong>de</strong>z comme suit.<br />
1. Commencez par déposer <strong>le</strong> bouchon d’air rouge qui se trouve à la partie<br />
supérieure du fourreau droit (lorsque vous regar<strong>de</strong>z la fourche en étant assis<br />
sur la sel<strong>le</strong>) et, à l’ai<strong>de</strong> d’une pompe SVP spécia<strong>le</strong> (Manitou nº réf. : 85-4161),<br />
mettez la fourche à une pression <strong>de</strong> 3,4 bar (50 psi).<br />
2. Vérifiez <strong>le</strong> fléchissement en appliquant la métho<strong>de</strong> énoncée ci-<strong>de</strong>ssus.<br />
3. Rég<strong>le</strong>z la pression SPV. Une pression plus é<strong>le</strong>vée augmente l’amortissement<br />
<strong>de</strong> la compression, maintient <strong>le</strong> vélo plus haut et accroît l’efficacité du<br />
pédalage. Une pression moins é<strong>le</strong>vée réduit l’amortissement <strong>de</strong> la compression,<br />
permet plus <strong>de</strong> fléchissement, et assure <strong>de</strong>s réactions plus nerveuses et<br />
plus soup<strong>le</strong>s. Ne rég<strong>le</strong>z pas la pression SPV à moins <strong>de</strong> 2 bar (30 psi) ou à<br />
plus <strong>de</strong> 6,8 bar (100 psi).<br />
4. Rég<strong>le</strong>z <strong>le</strong> volume SPV. Avec une clé à douil<strong>le</strong> <strong>de</strong> 16 mm ou <strong>de</strong> la douil<strong>le</strong> <strong>de</strong><br />
réglage du volume SVP <strong>de</strong> 16 mm (nº réf. : 85-3007), vous pouvez rég<strong>le</strong>r <strong>le</strong><br />
volume d’air <strong>de</strong> votre suspension SPV. L’écrou hexagonal <strong>de</strong> réglage du volume<br />
est rouge et situé à la partie supérieure du fourreau gauche. En tournant<br />
<strong>le</strong> dispositif <strong>de</strong> réglage du volume dans <strong>le</strong> sens horaire, vous ren<strong>de</strong>z l’amortissement<br />
plus progressif et la suspension plus ferme du milieu à la fin <strong>de</strong> la<br />
course <strong>de</strong> compression. En tournant <strong>le</strong> dispositif <strong>de</strong> réglage du volume dans<br />
<strong>le</strong> sens antihoraire, vous ren<strong>de</strong>z plus linéaire la suspension pendant l’amortissement<br />
<strong>de</strong> la compression, et plus doux en fin <strong>de</strong> course.<br />
Veuil<strong>le</strong>z consulter <strong>le</strong> <strong>site</strong> Web <strong>de</strong> Answer Products à l’adresse www.answerproducts.com<br />
pour plus amp<strong>le</strong> information sur <strong>le</strong> réglage <strong>de</strong> votre suspension SPV.<br />
MAINTENANCE<br />
Votre fourche néces<strong>site</strong> <strong>de</strong>s interventions d’entretien, <strong>de</strong>s nettoyages et <strong>de</strong>s contrô<strong>le</strong>s<br />
périodiques. En effet, se peut que <strong>de</strong>s matières étrangères et <strong>de</strong> l’humidité<br />
s’accumu<strong>le</strong>nt à l’intérieur <strong>de</strong> la fourche en fonction <strong>de</strong> la rigueur <strong>de</strong>s conditions<br />
rencontrées pendant <strong>le</strong>s randonnées. Pour maintenir <strong>le</strong> ren<strong>de</strong>ment optimal <strong>de</strong> la<br />
fourche, il est recommandé <strong>de</strong> la démonter périodiquement, <strong>de</strong> la nettoyer, <strong>de</strong> la<br />
sécher et <strong>de</strong> la graisser. Vous pouvez télécharger <strong>le</strong>s instructions d’entretien et <strong>de</strong><br />
mise au point à l’adresse www.answerproducts.com.<br />
FREQUENCE D’ENTRETIEN DES FOURCHES SKAREB<br />
Conditions<br />
norma<strong>le</strong>s<br />
Conditions<br />
extrêmes<br />
Usage bref et sporadique<br />
Démontez la fourche selon<br />
<strong>le</strong> manuel d’entretien, nettoyez<br />
l’arceau inversé et<br />
remplacez tous <strong>le</strong>s 6 mois<br />
l’hui<strong>le</strong> qui se trouve au fond<br />
du fourreau. Entretenez <strong>le</strong><br />
système d’amortissement<br />
FFD, TPC ou SPV en<br />
changeant l’hui<strong>le</strong> <strong>de</strong> l’amortisseur<br />
tous <strong>le</strong>s ans.<br />
Graissez <strong>le</strong>s ressorts, si<br />
nécessaire. Sur <strong>le</strong>s modè<strong>le</strong>s<br />
à fourche pneumatique,<br />
vérifiez <strong>le</strong> niveau d’hui<strong>le</strong> au<strong>de</strong>ssus<br />
du piston tous <strong>le</strong>s<br />
2 mois conformément aux<br />
directives énoncées dans <strong>le</strong><br />
<strong>site</strong> Web.<br />
Démontez la fourche selon<br />
<strong>le</strong> manuel d’entretien, nettoyez<br />
l’arceau inversé et<br />
remplacez tous <strong>le</strong>s 4 mois<br />
l’hui<strong>le</strong> qui se trouve au fond<br />
du fourreau. Entretenez <strong>le</strong><br />
système d’amortissement<br />
FFD, TPC ou SPV en<br />
changeant l’hui<strong>le</strong> <strong>de</strong> l’amortisseur<br />
tous <strong>le</strong>s ans.<br />
Graissez <strong>le</strong>s ressorts, si<br />
nécessaire. Sur <strong>le</strong>s modè<strong>le</strong>s<br />
à fourche pneumatique,<br />
vérifiez <strong>le</strong> niveau d’hui<strong>le</strong> au<strong>de</strong>ssus<br />
du piston toutes <strong>le</strong>s<br />
6 semaines conformément<br />
aux directives énoncées<br />
dans <strong>le</strong> <strong>site</strong> Web.<br />
Usage fréquent et intensif<br />
Démontez la fourche selon<br />
<strong>le</strong> manuel d’entretien, nettoyez<br />
l’arceau inversé et<br />
remplacez tous <strong>le</strong>s 4 mois<br />
l’hui<strong>le</strong> qui se trouve au fond<br />
du fourreau. Entretenez <strong>le</strong><br />
système d’amortissement<br />
FFD, TPC ou SPV en<br />
changeant l’hui<strong>le</strong> <strong>de</strong> l’amortisseur<br />
tous <strong>le</strong>s ans.<br />
Graissez <strong>le</strong>s ressorts, si<br />
nécessaire. Sur <strong>le</strong>s modè<strong>le</strong>s<br />
à fourche pneumatique,<br />
vérifiez <strong>le</strong> niveau d’hui<strong>le</strong> au<strong>de</strong>ssus<br />
du piston toutes <strong>le</strong>s<br />
6 semaines conformément<br />
aux directives énoncées<br />
dans <strong>le</strong> <strong>site</strong> Web.<br />
Démontez la fourche selon<br />
<strong>le</strong> manuel d’entretien, nettoyez<br />
l’arceau inversé et<br />
remplacez tous <strong>le</strong>s 3 mois<br />
l’hui<strong>le</strong> qui se trouve au fond<br />
du fourreau. Entretenez <strong>le</strong><br />
système d’amortissement<br />
FFD, TPC ou SPV en<br />
changeant l’hui<strong>le</strong> <strong>de</strong> l’amortisseur<br />
tous <strong>le</strong>s ans.<br />
Graissez <strong>le</strong>s ressorts, si<br />
nécessaire. Sur <strong>le</strong>s modè<strong>le</strong>s<br />
à fourche pneumatique,<br />
vérifiez <strong>le</strong> niveau d’hui<strong>le</strong> au<strong>de</strong>ssus<br />
du piston toutes <strong>le</strong>s<br />
4 semaines conformément<br />
aux directives énoncées<br />
dans <strong>le</strong> <strong>site</strong> Web.<br />
IMPORTANT : Avant d’enfourcher votre bicyc<strong>le</strong>tte, vous <strong>de</strong>vez :<br />
1. Vous assurer que <strong>le</strong> blocage <strong>de</strong> la roue est correctement serré et ajusté<br />
selon <strong>le</strong>s instructions du fabricant.<br />
REMARQUE : Les fourches à pattes anti-détachement standard sont équipées<br />
<strong>de</strong> pattes anti-détachement secondaires pour maintenir la roue dans la<br />
fourche en cas <strong>de</strong> <strong>de</strong>sserrage du blocage rapi<strong>de</strong>.<br />
2. Essuyer <strong>le</strong>s jambages internes et nettoyer la fourche complète pour détecter<br />
d’éventuels dommages. N’utilisez pas la fourche si une pièce est cassée,<br />
tordue, fissurée ou, à votre avis, est peut-être endommagée.
3. Vous assurer que <strong>le</strong> jeu <strong>de</strong> direction est correctement ajusté selon <strong>le</strong>s<br />
instructions du fabricant.<br />
4. Vous assurer que <strong>le</strong> câb<strong>le</strong> du frein avant est à sa place et vérifier <strong>le</strong> réglage<br />
<strong>de</strong>s freins.<br />
NIVEAU D’HUILE<br />
IMPORTANT : Il est primordial <strong>de</strong> maintenir au niveau adéquat l’hui<strong>le</strong> <strong>de</strong><br />
votre fourche à suspension. Le système d’amortissement se trouve dans <strong>le</strong><br />
jambage droit <strong>de</strong> la fourche. Une quantité insuffisante d’hui<strong>le</strong> provoque du<br />
moussage et nuit au ren<strong>de</strong>ment. Une quantité excessive d’hui<strong>le</strong> limite <strong>le</strong> débattement<br />
et peut endommager <strong>le</strong> système et nuire à la sécurité du rou<strong>le</strong>ment.<br />
Lire complètement la présente section avant <strong>de</strong> changer <strong>le</strong> niveau d’hui<strong>le</strong>.<br />
Pour vérifier <strong>le</strong> niveau d’hui<strong>le</strong>, déposer <strong>le</strong> dispositif <strong>de</strong> compression situé à la partie<br />
supérieure du jambage droit (lorsque vous regar<strong>de</strong>z la fourche en étant assis<br />
sur la sel<strong>le</strong>). Laissez <strong>le</strong> ressort gauche en place pour maintenir la fourche complètement<br />
déployée. Avec un ruban gradué ou une jauge d’hui<strong>le</strong>, mesurez l’écart<br />
entre la partie supérieure <strong>de</strong> la tête <strong>de</strong> la fourche et <strong>le</strong> niveau supérieur <strong>de</strong> l’hui<strong>le</strong><br />
(Figure C). Pour <strong>le</strong> niveau d’hui<strong>le</strong> adéquat, voir <strong>le</strong> tab<strong>le</strong>au 4.<br />
TABLEAU 4 : NIVEAU D’HUILE<br />
MODELE DE FOURCHE<br />
SKAREB<br />
NIVEAU D’HUILE<br />
110 à 120 mm<br />
REMARQUE : N’utilisez que <strong>de</strong> l’hui<strong>le</strong> pour fourches à suspension SAE 5WT.<br />
Pour toute question concernant votre fourche Manitou 2004, aux<br />
Etats-Unis, veuil<strong>le</strong>z contacter <strong>le</strong> service consommateur d’Answer au<br />
(661) 257-44 11. Pour plus amp<strong>le</strong> information, <strong>le</strong>s clients résidant hors<br />
<strong>de</strong>s Etats-Unis sont priés <strong>de</strong> s’adresser à <strong>le</strong>ur reven<strong>de</strong>ur Manitou ou au distributeur<br />
<strong>de</strong> <strong>le</strong>ur région.<br />
Vous pouvez aussi vi<strong>site</strong>r <strong>le</strong> <strong>site</strong> www.answerproducts.com et télécharger ce<br />
manuel ou prendre connaissance d’informations détaillées sur l’entretien <strong>de</strong> votre<br />
fourche à suspension.<br />
JEUX DE PIECES DE RECHANGE POUR FOURCHES SKAREB 2004<br />
Blocs d’amortissement SKAREB 2004<br />
85-5558<br />
85-5559<br />
85-4876<br />
85-5308<br />
Bloc d’amortissement <strong>de</strong> la compression SKAREB Comp/Elite<br />
Bloc d’amortissement <strong>de</strong> la compression SKAREB Super/<br />
Platinum<br />
Bloc d’amortissement <strong>de</strong> la détente <strong>de</strong> 80 mm SKAREB<br />
Comp/Elite/Super/Platinum<br />
Bloc d’amortissement <strong>de</strong> la détente <strong>de</strong> 100 mm SKAREB<br />
Comp/Elite/Super/Platinum<br />
Bouchons d’air SKAREB 2004<br />
85-5271<br />
85-5588<br />
Bouchon d’air SKAREB Comp/Elite/Super<br />
Bouchon d’air SKAREB Platinum<br />
Ensemb<strong>le</strong>s tête <strong>de</strong> fourche et tube pivot SKAREB 2004<br />
85-5560 Ensemb<strong>le</strong> tête <strong>de</strong> fourche/tube pivot SKAREB 66 cm (26 po),<br />
acier, à débattement <strong>de</strong> 80 mm<br />
85-5561 Ensemb<strong>le</strong> tête <strong>de</strong> fourche/tube pivot SKAREB 66 cm (26 po),<br />
acier, à débattement <strong>de</strong> 100 mm<br />
85-5562 Ensemb<strong>le</strong> tête <strong>de</strong> fourche/tube pivot SKAREB 66 cm (26 po),<br />
alliage, noir, à débattement <strong>de</strong> 80 mm<br />
85-5563 Ensemb<strong>le</strong> tête <strong>de</strong> fourche/tube pivot SKAREB 66 cm (26 po),<br />
alliage, noir, à débattement <strong>de</strong> 100 mm<br />
85-4449 Ensemb<strong>le</strong> tête <strong>de</strong> fourche/tube pivot SKAREB 66 cm (26 po),<br />
alliage, noir, à débattement <strong>de</strong> 80 mm - SPV<br />
85-4455 Ensemb<strong>le</strong> tête <strong>de</strong> fourche/tube pivot SKAREB 66 cm (26 po),<br />
alliage, noir, à débattement <strong>de</strong> 100 mm - SPV<br />
Ensemb<strong>le</strong>s <strong>de</strong> fourreau extérieur SKAREB 2004<br />
85-5101 Ensemb<strong>le</strong> <strong>de</strong> fourreau extérieur SKAREB 66 cm (26 po),<br />
argent<br />
85-5108 Ensemb<strong>le</strong> <strong>de</strong> fourreau extérieur SKAREB 66 cm (26 po),<br />
b<strong>le</strong>u glacé<br />
85-5107 Ensemb<strong>le</strong> <strong>de</strong> fourreau extérieur SKAREB 66 cm (26 po),<br />
rouge glacé<br />
85-5564 Ensemb<strong>le</strong> <strong>de</strong> fourreau extérieur SKAREB 66 cm (26 po),<br />
b<strong>le</strong>u soie<br />
85-5112 Ensemb<strong>le</strong> <strong>de</strong> fourreau extérieur SKAREB 66 cm (26 po),<br />
argent, sans bossage<br />
85-5119 Ensemb<strong>le</strong> <strong>de</strong> fourreau extérieur SKAREB 66 cm (26 po),<br />
b<strong>le</strong>u glacé, sans bossage<br />
85-5118 Ensemb<strong>le</strong> <strong>de</strong> fourreau extérieur SKAREB 66 cm (26 po),<br />
rouge glacé, sans bossage<br />
85-5567 Ensemb<strong>le</strong> <strong>de</strong> fourreau extérieur SKAREB 66 cm (26 po),<br />
b<strong>le</strong>u soie, sans bossage<br />
Ensemb<strong>le</strong>s autocollants/boutons/joints/amortisseurs/pistons à air/<br />
joints toriques SKAREB 2004<br />
85-5544<br />
85-5545<br />
85-4420<br />
85-5392<br />
85-4436<br />
85-4435<br />
85-4438<br />
85-4437<br />
85-5584<br />
85-5585<br />
85-5265<br />
85-5266<br />
85-5267<br />
85-5268<br />
85-5320<br />
85-5887<br />
Jeu d’autocollants SKAREB Comp, argent<br />
Jeu d’autocollants SKAREB Comp, noir<br />
Jeu d’autocollants SKAREB Elite, argent<br />
Jeu d’autocollants SKAREB Elite, noir<br />
Jeu d’autocollants SKAREB Super, argent<br />
Jeu d’autocollants SKAREB Super, noir<br />
Jeu d’autocollants SKAREB Platinum, argent<br />
Jeu d’autocollants SKAREB Platinum, noir<br />
Nécessaire <strong>de</strong> boutons SKAREB<br />
Nécessaire <strong>de</strong> boutons SKAREB Platinum<br />
Nécessaire <strong>de</strong> joints SKAREB<br />
Nécessaire <strong>de</strong> piston à air<br />
Nécessaire d’amortisseurs SKAREB<br />
Nécessaire <strong>de</strong> joints toriques SKAREB<br />
Bouchon <strong>de</strong> protection – Fourreau gauche<br />
Ensemb<strong>le</strong> SPV SKAREB<br />
Jeux <strong>de</strong> ressorts SKAREB 2004<br />
85-5573<br />
85-5575<br />
85-5577<br />
85-5579<br />
85-5581<br />
Jeu <strong>de</strong> ressorts SKAREB à rai<strong>de</strong>ur extra faib<strong>le</strong><br />
Jeu <strong>de</strong> ressorts SKAREB à rai<strong>de</strong>ur faib<strong>le</strong><br />
Jeu <strong>de</strong> ressorts SKAREB à rai<strong>de</strong>ur moyenne<br />
Jeu <strong>de</strong> ressorts SKAREB à rai<strong>de</strong>ur forte<br />
Jeu <strong>de</strong> ressorts SKAREB à rai<strong>de</strong>ur extra forte<br />
Tiges <strong>de</strong> compression SKAREB 2004<br />
85-5264<br />
85-5583<br />
85-4439<br />
Poids du cycliste<br />
Bloc tige <strong>de</strong> compression SKAREB, 80 mm<br />
Bloc tige <strong>de</strong> compression SKAREB, 100 mm<br />
Ensemb<strong>le</strong> <strong>de</strong> poussoir pneumatique, 80 ou 100 mm<br />
45 à 57 kg<br />
57 à 68 kg<br />
68 à 86 kg<br />
86 à 98 kg<br />
98 à 107 kg