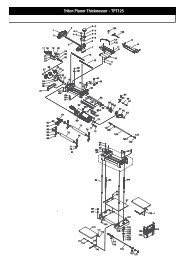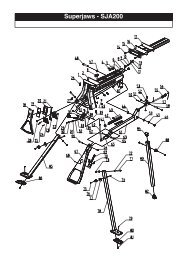
Bedienungsanleitung - Triton Tools
Bedienungsanleitung - Triton Tools
Bedienungsanleitung - Triton Tools

You also want an ePaper? Increase the reach of your titles
YUMPU automatically turns print PDFs into web optimized ePapers that Google loves.
GB<br />
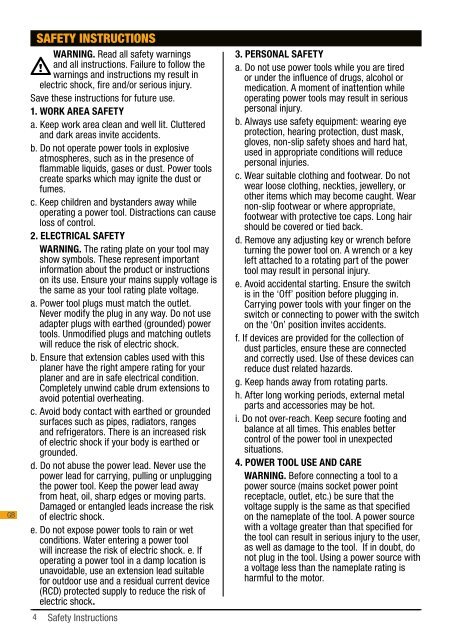
SAFETY INSTRUCTIONS<br />
WARNING. Read all safety warnings<br />
and all instructions. Failure to follow the<br />
warnings and instructions my result in<br />
electric shock, fire and/or serious injury.<br />
Save these instructions for future use.<br />
1. WORK AREA SAFETY<br />
a. Keep work area clean and well lit. Cluttered<br />
and dark areas invite accidents.<br />
b. Do not operate power tools in explosive<br />
atmospheres, such as in the presence of<br />
flammable liquids, gases or dust. Power tools<br />
create sparks which may ignite the dust or<br />
fumes.<br />
c. Keep children and bystanders away while<br />
operating a power tool. Distractions can cause<br />
loss of control.<br />
2. ELECTRICAL SAFETY<br />
WARNING. The rating plate on your tool may<br />
show symbols. These represent important<br />
information about the product or instructions<br />
on its use. Ensure your mains supply voltage is<br />
the same as your tool rating plate voltage.<br />
a. Power tool plugs must match the outlet.<br />
Never modify the plug in any way. Do not use<br />
adapter plugs with earthed (grounded) power<br />
tools. Unmodified plugs and matching outlets<br />
will reduce the risk of electric shock.<br />
b. Ensure that extension cables used with this<br />
planer have the right ampere rating for your<br />
planer and are in safe electrical condition.<br />
Completely unwind cable drum extensions to<br />
avoid potential overheating.<br />
c. Avoid body contact with earthed or grounded<br />
surfaces such as pipes, radiators, ranges<br />
and refrigerators. There is an increased risk<br />
of electric shock if your body is earthed or<br />
grounded.<br />
d. Do not abuse the power lead. Never use the<br />
power lead for carrying, pulling or unplugging<br />
the power tool. Keep the power lead away<br />
from heat, oil, sharp edges or moving parts.<br />
Damaged or entangled leads increase the risk<br />
of electric shock.<br />
e. Do not expose power tools to rain or wet<br />
conditions. Water entering a power tool<br />
will increase the risk of electric shock. e. If<br />
operating a power tool in a damp location is<br />
unavoidable, use an extension lead suitable<br />
for outdoor use and a residual current device<br />
(RCD) protected supply to reduce the risk of<br />
electric shock.<br />
3. PERSONAL SAFETY<br />
a. Do not use power tools while you are tired<br />
or under the influence of drugs, alcohol or<br />
medication. A moment of inattention while<br />
operating power tools may result in serious<br />
personal injury.<br />
b. Always use safety equipment: wearing eye<br />
protection, hearing protection, dust mask,<br />
gloves, non-slip safety shoes and hard hat,<br />
used in appropriate conditions will reduce<br />
personal injuries.<br />
c. Wear suitable clothing and footwear. Do not<br />
wear loose clothing, neckties, jewellery, or<br />
other items which may become caught. Wear<br />
non-slip footwear or where appropriate,<br />
footwear with protective toe caps. Long hair<br />
should be covered or tied back.<br />
d. Remove any adjusting key or wrench before<br />
turning the power tool on. A wrench or a key<br />
left attached to a rotating part of the power<br />
tool may result in personal injury.<br />
e. Avoid accidental starting. Ensure the switch<br />
is in the ‘Off’ position before plugging in.<br />
Carrying power tools with your finger on the<br />
switch or connecting to power with the switch<br />
on the ‘On’ position invites accidents.<br />
f. If devices are provided for the collection of<br />
dust particles, ensure these are connected<br />
and correctly used. Use of these devices can<br />
reduce dust related hazards.<br />
g. Keep hands away from rotating parts.<br />
h. After long working periods, external metal<br />
parts and accessories may be hot.<br />
i. Do not over-reach. Keep secure footing and<br />
balance at all times. This enables better<br />
control of the power tool in unexpected<br />
situations.<br />
4. POWER TOOL USE AND CARE<br />
WARNING. Before connecting a tool to a<br />
power source (mains socket power point<br />
receptacle, outlet, etc.) be sure that the<br />
voltage supply is the same as that specified<br />
on the nameplate of the tool. A power source<br />
with a voltage greater than that specified for<br />
the tool can result in serious injury to the user,<br />
as well as damage to the tool. If in doubt, do<br />
not plug in the tool. Using a power source with<br />
a voltage less than the nameplate rating is<br />
harmful to the motor.<br />
a. Using the correct power tool for your<br />
application will be safer and produce better<br />
results at the rate for which it was designed.<br />
b. Do not use the power tool if the ‘On/Off’<br />
switch is not working correctly. Power tools<br />
that cannot be controlled by the switch are<br />
dangerous and must be repaired prior to use.<br />
c. Disconnect the plug from the power source<br />
before making any adjustments, changing<br />
accessories or storing power tools. Such<br />
preventive safety measures reduce the risk of<br />
starting the power tool accidentally.<br />
d. Do not force the tool, or use it for a purpose<br />
for which it was not designed, let it work at<br />
a reasonable speed. Overloading will occur if<br />
too much pressure is applied, and the motor<br />
slows, resulting in a poor quality result and<br />
possible damage to the motor.<br />
e. Power tools are dangerous in the hands of<br />
untrained users. Store power tools out of<br />
reach of children, and do not allow persons<br />
who are unfamiliar with the product or these<br />
instructions to operate the power tool.<br />
SETTING UP<br />
Fitting your router<br />
The Alignment Disc (B) provides easy and<br />
accurate positioning of the router on the<br />
Mounting Plate (A).<br />
First fit a straight cutter to your router. The<br />
alignment disc fits onto a 1 ⁄2" shank cutter, but<br />
if you are fitting a 1 ⁄4" or a 5 ⁄16" shank cutter, use<br />
the appropriate Adaptor Ring (C or D), located in<br />
the sides of the disc. The adaptor ring fits into<br />
the centre of the alignment disc. It should be<br />
fitted to the cutter shank before fitting the cutter<br />
to the router.<br />
Fit the mounting plate into the bearing channels<br />
of the workcentre.<br />
Set the router height so that the cutter shank<br />
protrudes through the hole in the mounting plate.<br />
Push the alignment disc onto the shank of the<br />
cutter and lock it into the centred position.<br />
Manoeuvre the router until you are able to clip<br />
the disc into the hole in the mounting plate. The<br />
router is now exactly centred over the hole in the<br />
plate.<br />
f. Maintain power tools. Check for misalignment,<br />
binding or breakage of moving parts, and any<br />
other condition that may affect the operation<br />
of the power tool. If damaged, have the power<br />
tool repaired before use. Accidents are caused<br />
by poorly maintained power tools.<br />
g. Keep cutting tools sharp and clean. Correctly<br />
maintained cutting tools with sharp cutting<br />
edges are less likely to bind and are easier to<br />
control.<br />
h. Use the power tool, accessories and tool<br />
bits in accordance with these instructions<br />
and in the manner intended for the particular<br />
type of power tool, taking into account the<br />
working conditions and the work to be carried<br />
out. Failure to use the tool for its intended<br />
purposes could result in a hazardous situation<br />
and may invalidate the warranty.<br />
5. SERVICE<br />
a. Have your power tool serviced by a qualified<br />
repair technician, using only identical<br />
replacement parts. This will ensure that the<br />
safety of the power tool is maintained.<br />
Fit the four Router Locators (E) to the longer<br />
slots in the plate, using the four Coach Bolts (F),<br />
Spring Washers (G) and Hex Nuts (H), as shown<br />
in Fig.1. Note that the lower lip of each locator<br />
should fit hard up against the side of the router<br />
base. Do not completely tighten the hex nuts yet.<br />
If the router has a round base you should now<br />
be able to rotate the router until there are four<br />
clear positions on the top edge of the base for<br />
fitting the top clamps. The router handles may<br />
overhand the edges of the plate, try to keep this<br />
overhang to a minimum.<br />
4 Safety Instructions<br />
Safety Instructions / Setting Up 5<br />
Fig.1.<br />
GB