Engineers Jaws - Triton Tools
Engineers Jaws - Triton Tools
Engineers Jaws - Triton Tools

You also want an ePaper? Increase the reach of your titles
YUMPU automatically turns print PDFs into web optimized ePapers that Google loves.
Thank you for purchasing this <strong>Triton</strong> tool. Please read this manual: it contains information necessary for safe<br />
and effective use of this tool, and will enable you to get the full benefit of the tool’s unique design. Keep this<br />
manual close at hand and ensure all users of this tool have read and fully understand the instructions.<br />
CONTENTS<br />
Symbols 2<br />
Warranty 2<br />
Parts List 3<br />
Assembly 3<br />
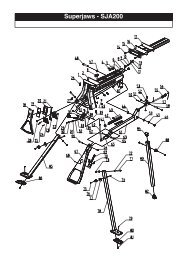
PARTS LIST<br />
1. Front Jaw (1)<br />
2. Rear Jaw (1)<br />
3. Coach Bolts (4)<br />
4. Mounting Knobs (4)<br />
SYMBOLS<br />
Always wear ear, eye and respiratory<br />
protection.<br />
Instruction warning.<br />
Do not use before viewing<br />
and fully understanding the<br />
operating instructions<br />
ASSEMBLY<br />
GB<br />
WARRANTY<br />
To register your guarantee visit our web site at<br />
www.tritontools.com* and enter your details.<br />
Your details will be included on our mailing list<br />
(unless indicated otherwise) for information on<br />
future releases. Details provided will not<br />
be made available to any third party.<br />
PURCHASE RECORD<br />
Date of Purchase:<br />
Model: SJA470<br />
___ / ___ / ____<br />
Retain your receipt as proof of purchase<br />
<strong>Triton</strong> Precision Power <strong>Tools</strong> guarantees to<br />
the purchaser of this product that if any part<br />
proves to be defective due to faulty materials<br />
or workmanship within 12 MONTHS from the<br />
date of original purchase, <strong>Triton</strong> will repair, or<br />
at its discretion replace, the faulty part free of<br />
charge.<br />
This guarantee does not apply to commercial<br />
use nor does it extend to normal wear and<br />
tear or damage as a result of accident, abuse<br />
or misuse.<br />
* Register online within 30 days.<br />
Terms & conditions apply.<br />
This does not affect your statutory rights<br />
REMOVING THE URETHANE JAW FACINGS<br />
Step 1<br />
Remove the fixed jaw facing: use a<br />
screwdriver or similar to pry the facing off the<br />
fixed jaw.<br />
Step 2<br />
Remove the moving jaw facing: Push the<br />
backing face to the right (when viewed from<br />
the front of the Superjaws) to disengage the<br />
connection pins. You can then remove first the<br />
backing face and then the font face.<br />
FITTING THE ENGINEERS JAWS<br />
See Diagram, page 3<br />
Step 1<br />
Position the Front Jaw (1) onto the fixed jaw<br />
so that the flanged edge is located on top of<br />
the fixed jaw.<br />
Step 2<br />
Thread the Coach Bolts (3) through the aligned<br />
fixing holes in the <strong>Engineers</strong> <strong>Jaws</strong> and the<br />
fixed jaw, so that the bolt heads locate in the<br />
fixing positions in the front of the <strong>Engineers</strong><br />
jaws.<br />
Step 3<br />
Fit the Mounting Knobs (4) onto the bolts and<br />
tighten to secure the Front Jaw (1) in position.<br />
Step 4<br />
Position the Rear Jaw (2) onto the moving jaw<br />
so that the flanges locate over the top and<br />
bottom of the moving jaw<br />
Step 5<br />
Secure the Rear Jaw (2) using the remaining<br />
Coach Bolts (3) and Mounting Knobs (4)<br />
GB<br />
2 Contents / Symbols / Warranty<br />
Parts List / Assembly 3