DPC6410, DPC6411 DPC7310, DPC7311 DPC8111, DPC8112 ...
DPC6410, DPC6411 DPC7310, DPC7311 DPC8111, DPC8112 ...
DPC6410, DPC6411 DPC7310, DPC7311 DPC8111, DPC8112 ...

You also want an ePaper? Increase the reach of your titles
YUMPU automatically turns print PDFs into web optimized ePapers that Google loves.
MAINTENANCE<br />
CAUTION:<br />
Before doing any work on the Power Cut turn off the engine,<br />
remove the cutting disc, pull the plug cap off the spark plug<br />
and wear protective gloves!<br />
CAUTION:<br />
Start the Power Cut only after complete assembly and<br />
inspection.<br />
IMPORTANT:<br />
Because many of the parts and assemblies not mentioned<br />
in this Instruction Manual are vital to the safety of the unit,<br />
and because all parts are subject to a certain amount of<br />
wear and tear, it is important for your own safety that you<br />
have the unit checked and maintained regularly by a MAKITA<br />
service center.<br />
SERVICE<br />
IMPORTANT:<br />
If the cutting wheel breaks during cutting, the<br />
Power Cut must be repaired by a MAKITA service<br />
centre before being used again!<br />
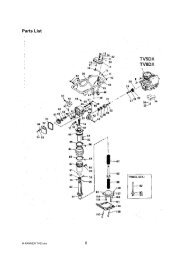
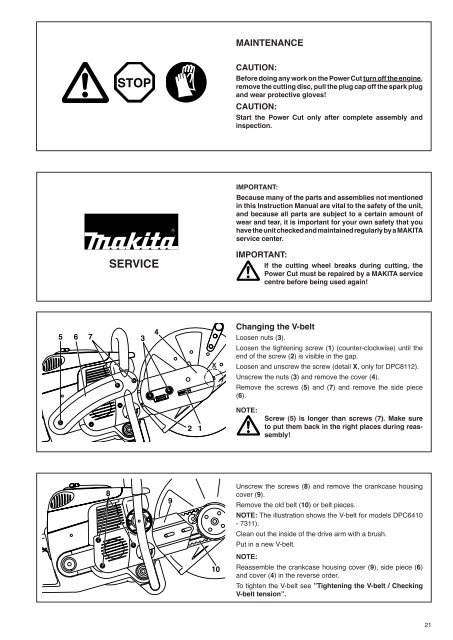
Changing the V-belt<br />
Loosen nuts (3).<br />
Loosen the tightening screw (1) (counter-clockwise) until the<br />
end of the screw (2) is visible in the gap.<br />
Loosen and unscrew the screw (detail X, only for <strong>DPC8112</strong>).<br />
Unscrew the nuts (3) and remove the cover (4).<br />
Remove the screws (5) and (7) and remove the side piece<br />
(6).<br />
NOTE:<br />
Screw (5) is longer than screws (7). Make sure<br />
to put them back in the right places during reassembly!<br />
Unscrew the screws (8) and remove the crankcase housing<br />
cover (9).<br />
Remove the old belt (10) or belt pieces.<br />
NOTE: The illustration shows the V-belt for models <strong>DPC6410</strong><br />
- 7311).<br />
Clean out the inside of the drive arm with a brush.<br />
Put in a new V-belt.<br />
NOTE:<br />
Reassemble the crankcase housing cover (9), side piece (6)<br />
and cover (4) in the reverse order.<br />
To tighten the V-belt see ”Tightening the V-belt / Checking<br />
V-belt tension”.<br />
21