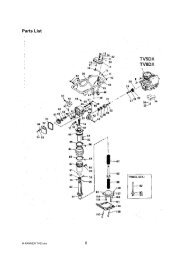
DPC6410, DPC6411 DPC7310, DPC7311 DPC8111, DPC8112 ...
DPC6410, DPC6411 DPC7310, DPC7311 DPC8111, DPC8112 ...
DPC6410, DPC6411 DPC7310, DPC7311 DPC8111, DPC8112 ...

You also want an ePaper? Increase the reach of your titles
YUMPU automatically turns print PDFs into web optimized ePapers that Google loves.
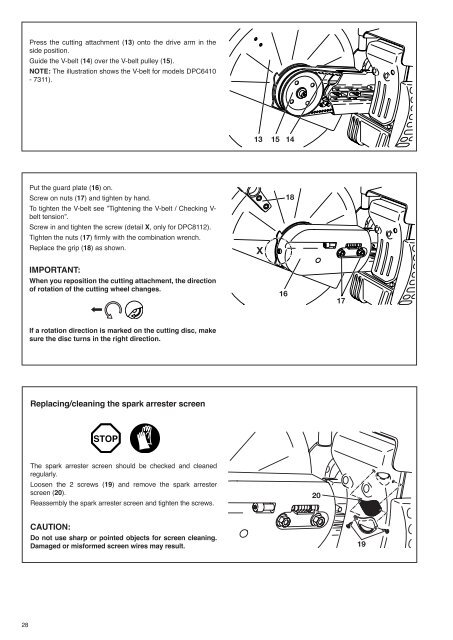
Press the cutting attachment (13) onto the drive arm in the<br />
side position.<br />
Guide the V-belt (14) over the V-belt pulley (15).<br />
NOTE: The illustration shows the V-belt for models <strong>DPC6410</strong><br />
- 7311).<br />
13 15 14<br />
Put the guard plate (16) on.<br />
Screw on nuts (17) and tighten by hand.<br />
To tighten the V-belt see ”Tightening the V-belt / Checking V-<br />
belt tension”.<br />
Screw in and tighten the screw (detail X, only for <strong>DPC8112</strong>).<br />
Tighten the nuts (17) firmly with the combination wrench.<br />
Replace the grip (18) as shown.<br />
18<br />
IMPORTANT:<br />
When you reposition the cutting attachment, the direction<br />
of rotation of the cutting wheel changes.<br />
16<br />
17<br />
If a rotation direction is marked on the cutting disc, make<br />
sure the disc turns in the right direction.<br />
Replacing/cleaning the spark arrester screen<br />
The spark arrester screen should be checked and cleaned<br />
regularly.<br />
Loosen the 2 screws (19) and remove the spark arrester<br />
screen (20).<br />
Reassembly the spark arrester screen and tighten the screws.<br />
20<br />
CAUTION:<br />
Do not use sharp or pointed objects for screen cleaning.<br />
Damaged or misformed screen wires may result.<br />
19<br />
28