
Create successful ePaper yourself
Turn your PDF publications into a flip-book with our unique Google optimized e-Paper software.
We thank you for choosing a <strong>Riobel</strong> product. It’s a top quality product, made to last and keep its original look for a<br />
very long time. Before starting with the installation, please take a few minutes to read the instructions in this booklet.<br />
We suggest that you keep the booklet for future referral or in case of any problem.<br />
Warranty<br />
Before proceeding to the installation, it is very important to ensure that the interior of the water pipes is clean. Look<br />
for calcareous residue, sand, solder or any other particles.<br />
This <strong>Riobel</strong> product includes a Limited lifetime warranty on the finish and all working parts and is guaranteed from<br />
the initial purchase date against all manufacturing defects. The warranty offered on our products will be honored<br />
only if the installation is made by a certified master plumber. The warranty does not cover:<br />
• installation or removal charges;<br />
• normal wear of the components;<br />
• units that have not been installed according to the manufacturer’s instructions and in conformity with the rules,<br />
codes and laws currently governing plumbing installation;<br />
• all problems resulting of improper care or use of inappropriate cleaning products. Do not use acid detergents,<br />
abrasive sponges, metallic pads, alcohol-based detergents, disinfectants or other solvents;<br />
• damage caused by hard water, calcareous deposits or sediments.<br />
Installation guide for bath faucet<br />
<strong>Gui</strong>de d’installation pour robinet de bain<br />
In case of any problem, the defective parts must be returned correctly packaged with the original proof of purchase<br />
to your original retailer. Only <strong>Riobel</strong> inc. can authorize the replacement of a defective product; or if not<br />
available, the replacement by a similar part or product. This warranty is applicable to the original buyer as long as<br />
he owns the property, with proof of purchase and it is not transferable. This warranty does not cover any labor<br />
costs and/or any damages caused during the installation, the repair or the replacement, nor accidental or collateral<br />
damages. <strong>Riobel</strong> inc. does not offer warranty on their products as for merchant value specific warranty of any<br />
particular use, explicit or implicit statutory or tacit other than foreseen above.<br />
Technical information is subject to change without notice.<br />
Nous vous remercions d’avoir choisi un produit <strong>Riobel</strong>. Il s’agit d’un produit de haute qualité, conçu pour durer et<br />
garder son aspect original. Nous vous invitons, avant de procéder à l’installation, à lire attentivement ce guide.<br />
Nous vous suggérons aussi de le conserver comme référence pour un besoin futur ou dans le cas d’éventuelles<br />
réclamations.<br />
Garantie<br />
Avant de procéder au montage, il est indispensable de s'assurer de la propreté de l'intérieur des tubes d'arrivée<br />
d'eau et de l'absence de calcaire, de sable ou autres particules.<br />
La robinetterie <strong>Riobel</strong> que vous venez d’acquérir possède une garantie à VIE limitée sur les pièces et la finition à<br />
partir de la date d’achat contre tout vice de fabrication. La garantie offerte sur nos produits ne sera honorée que si<br />
l’installation est effectuée par un maître plombier certifié. La garantie ne couvre pas :<br />
• les frais d’installation ou de désinstallation ;<br />
• l’usure normale des composantes ;<br />
• l’unité qui n’a pas été installée selon les instructions du manufacturier et qui ne respecte pas les codes et les lois<br />
en vigueur régissant un tel travail ;<br />
• les problèmes résultant d’un mauvais entretien ou de l’utilisation de produits d’entretien inadéquats. Ne pas<br />
utiliser les détergents acides, les éponges abrasives, les tampons métalliques, les détersifs à base d'alcool, les<br />
désinfectants ou autres solvants ;<br />
• les dommages causés par des eaux dures, des dépôts de calcaires ou de sédiments.<br />
TORONTO<br />
11, Cidermill ave. Unit 5<br />
Concord (Ontario)<br />
L4K 4B6<br />
Tel.: 905‐760‐9009<br />
1‐888‐287‐5354<br />
Fax: 905‐760‐<strong>12</strong>92<br />
info@riobel.ca<br />
UNITED STATES<br />
Tel.: 1‐866‐473‐8442<br />
Fax: 1‐866‐909‐8442<br />
MONTRÉAL<br />
820, rue Nobel<br />
St‐Jérôme (Québec)<br />
J7Z 7A3<br />
Tél. : 450‐432‐0442<br />
1‐866‐473‐8442<br />
Télec. : 450‐432‐1095<br />
www.riobel.ca<br />
En cas de problèmes, il est impératif de retourner la pièce correctement emballée ainsi que la preuve d’achat à<br />
votre détaillant initial. Seul <strong>Riobel</strong> inc. est habilité à décider du remplacement des pièces reconnues défectueuses<br />
par un produit identique ou comparable, si non disponible. La garantie s’applique à l’acheteur original,<br />
avec preuve d’achat, aussi longtemps qu’il sera propriétaire de la maison et n’est pas transférable. Cette garantie<br />
ne couvre pas les frais de main-d’œuvre engagés et/ou les dommages survenus lors de l’installation, la réparation<br />
ou le remplacement, ni les dommages accidentels ou indirects. <strong>Riobel</strong> inc. n’accorde, pour ses produits, aucune<br />
garantie de valeur marchande, aucune garantie spécifique pour un usage particulier, ni aucune garantie expresse<br />
ou implicite, tacite ou statuaire autre que celle prévue ci-dessus.<br />
Sous réserve de modifications techniques sans préavis.<br />
2
Rough installation for 4 pieces deck mount faucet.<br />
Installation du brute pour robinet de bain 4 morceaux<br />
C. Screw nut (2) and lightly hand tight.<br />
D. Position the diverter (1) so the connections are offset (example #1) they should not<br />
be facing each other (example #2) Complete the installation by tightening the nut<br />
(2).<br />
Diverter Installation:<br />
A. Screw all the way down the diverter (1) the nut (2) and insert a metallic washer (3)<br />
and a gasket (4). From underneath the deck insert the diverter (1) into the hole.<br />
B. Above the deck, insert a gasket (5), a metallic washer (6) and screw on the top nut<br />
completely to a stop(7).<br />
Installation du déviateur;<br />
C. Visser la noix (2) et serrer légèrement à la main.<br />
D. Positionner le déviateur (1) de façon à ce que les connections soit décaler (exemple<br />
#1) elle ne doivent pas se retrouve pas face à face (exemple #2) Serrer l’écrou (2)<br />
pour finaliser l’assemblage.<br />
C<br />
A. Visser jusqu’au bout l’écrou (2) sur le déviateur (1) et insérer une anneau métallique<br />
(3) ainsi qu’un joint d'étanchéité (4). Insérer le déviateur (1) dans le trous.<br />
B. Par-dessus le plan de travail, insérer un joint d’étanchéité (5), une rondelle métallique<br />
(6) et visser l’écrou supérieur (7) jusqu’au bout.<br />
A<br />
B<br />
D<br />
(exemple #1) (exemple #2)<br />
<strong>Gui</strong>-<strong>12</strong>-<strong>SA</strong> rev 00 05/2011<br />
3<br />
<strong>Gui</strong>-<strong>12</strong>-<strong>SA</strong> rev 00 05/2011<br />
4
Spindle Installation:<br />
A. Screw the nut (9) all the way onto the spindle (10) then insert the retainer (8).<br />
B. From underneath the deck insert the assembly (11) into the hole then on top insert<br />
the gasket (13) and screw the nut (<strong>12</strong>) all the way down.<br />
C. Position the spindle (10) so the connections are offset (example #1) they should not<br />
be facing each other (example # 2).<br />
D. Tight the nut (9) maintaining the spindle in position.<br />
Installation des pivots:<br />
A. Visser la noix (9) sur le pivot (10) jusqu’au bout et insérer l’adaptateur (8).<br />
B. Insérer l’assemblage (11) dans le trou et par-dessus le plan de travail, insérer le<br />
joint d’étanchéité (13) et visser la noix (<strong>12</strong>) jusqu’au bout.<br />
C. Positionner le pivot (10) de façon à ce que sa connexion soit décaler (exemple #1)<br />
elles ne doivent pas être face a face (exemple # 2).<br />
D. Serrer la noix (9) en maintenant la position du pivot.<br />
A<br />
B<br />
D<br />
Spindles Installation—cartridges alignment:<br />
E. The cartridges should be aligned in a way that the flat side of the rods are facing<br />
rear.<br />
F. Adjust the position of the rod (15) using an adjustable wrench (16). Use the flat side<br />
(14) to grip and rotate the cartridge.<br />
G. Verify that the cartridge is moving back to forth.<br />
H. Fix the cartridge in place by tightening the lock nut (17) using an adjustable wrench<br />
(16).<br />
Installation des pivots—alignement des cartouches:<br />
E. Les cartouches doivent être aligner de façon à ce que les plat sur les tiges regarde<br />
vers l’arrière du robinet.<br />
F. Ajuster la position de la cartouche (15) en utilisant une clé ajustable (16). Utiliser les<br />
parties plates (14) comme prise pour faire pivoter la cartouche.<br />
G. Vérifier que le mouvement de la cartouche est bien de l'avant vers l’arrière<br />
H. Fixer la position de la cartouche en serrant la noix de blocage (17) à l'aide d’une clé<br />
ajustable (16).<br />
E<br />
The flat side of the rod<br />
should be facing towards<br />
the rear.<br />
Le plat sur la tige de la<br />
cartouche doit regarder<br />
vers l’arrière.<br />
C<br />
(exemple #1) (exemple #2)<br />
<strong>Gui</strong>-<strong>12</strong>-<strong>SA</strong> rev 00 05/2011<br />
5<br />
<strong>Gui</strong>-<strong>12</strong>-<strong>SA</strong> rev 00 05/2011<br />
6
F<br />
H<br />
Trim installation / Installation de la finition<br />
Spout installation:<br />
A. Insert the spout (1) onto the top nut of the diverter (3) making sure to slide the diverter<br />
rod (2) into the provided hole on the spout.<br />
B. Align the spout and set it in place using the set screw (4). Insert the screw cap (5) et<br />
screw the lever (6) onto the rod.<br />
G<br />
Installation du bec:<br />
A. Insérer le bec (1) sur l’écrou supérieur du déviateur (3) en prenant soin de glisser la<br />
tige (2) dans le trou du bec prévu à cet effet.<br />
B. Aligner le bec et serrer celui-ci en place à l’aide de la vis de serrage (4). Inséré le<br />
cache vis (5) et visser le levier (6) sur la tige.<br />
A<br />
B<br />
Hand shower base installation:<br />
I. Insert the o’ring (19) into the base of the hand shower decorative flange (18) and<br />
slide the assembly into the hole.<br />
J. Onto the threaded rod of the hand shower base (18), screw the deck flange nut (20)<br />
to fix the assembly to the desired position<br />
Installation de la base de douchette:<br />
I. insérer sur la base décorative de la douchette (18) le joint torique (19) et glisser<br />
l’assemblage dans le trou.<br />
J. Sur le tube fileter de la base de douchette (18), visser la noix (20) pour fixer<br />
l’assemblage à la position désirée.<br />
I<br />
J<br />
<strong>Gui</strong>-<strong>12</strong>-<strong>SA</strong> rev 00 05/2011<br />
7<br />
<strong>Gui</strong>-<strong>12</strong>-<strong>SA</strong> rev 00 05/2011<br />
8
Handles Installation:<br />
A. Insert the handle (9) over the cartridge rod (8).<br />
B. Insert the handle base (10) over the handle (9) and screw all the way onto the nut<br />
(6) (apply a slight pressure on the handle to help the rotating process of the handle<br />
base) and adjusts the handle base (10) to the required position by tightening or untightening<br />
it.<br />
Installation des poignées:<br />
C. Insérer la poignée (9) sur la tige de la cartouche (8).<br />
D. Insérer la base de poignée (10) sur la poignée (9) et visser celle-ci sur la noix (6)<br />
jusqu’au bout (appliquer une légère pression sur la poignée pour faciliter le vissage<br />
de la base de poignée) et ajuster la base de poignée (10) à la position désirée en<br />
vissant ou dévissant celle-ci.<br />
Hand shower installation:<br />
G. In the hand shower connection (13), insert a gasket (<strong>12</strong>) and screw on the hose<br />
(11).<br />
H. On the hose (11), insert the decorative sleeve (14) and screw this one onto the hand<br />
shower (13).<br />
I. Slide the hand shower assembly (15) into the base (16).<br />
Installation de la douchette:<br />
G. Dans la connexion de la douchette (13), insérer le joint d’étanchéité (<strong>12</strong>) et visser le<br />
boyau (11).<br />
H. Sur le boyau (11), insérer la bague décorative (14) puis visser celle-ci sur la douchette<br />
(13).<br />
I. Glisser l’assemblage de la douchette (15) dans la base (16).<br />
C<br />
D<br />
G H I<br />
<strong>Gui</strong>-<strong>12</strong>-<strong>SA</strong> rev 00 05/2011<br />
9<br />
<strong>Gui</strong>-<strong>12</strong>-<strong>SA</strong> rev 00 05/2011<br />
10
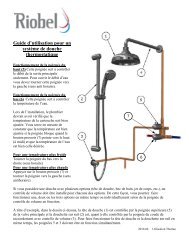
Water supply hook up<br />
FEATURES AND BENEFITS | CARACTÉRISTIQUES ET AVANTAGES<br />
1) Hook up the spindles (10) to the diverter (1) using the provided flexible hoses.<br />
2) Hook up the flexible hose (20) to the diverter (1).<br />
3) Insert the gasket (21) into the flexible hose (20) then screw on the hand shower<br />
hose (11).<br />
4) Hook up the water supply to the spindles (10).<br />
5) Perform a leak check on all connections.<br />
Branchement des alimentations d’eau<br />
1) Effectuer le branchement des pivot (10) au déviateur (1) en utilisant les tuyaux<br />
flexible fournis.<br />
2) Brancher le tuyau flexible (20) au déviateur (1).<br />
3) Insérer un joint d’étanchéité (21) dans le tuyau flexible (20) et y visser le boyau de<br />
la douchette (11).<br />
4) Brancher les alimentations d’eau sur les pivots (10).<br />
5) Faire une vérification des jonctions pour détecter toute fuite.<br />
INTERTEK approvals for the standards; C<strong>SA</strong> B<strong>12</strong>5, ASME and<br />
NSF 61. Certified; CMR248<br />
Approbation INTERTEK selon les normes; C<strong>SA</strong> B<strong>12</strong>5, ASME et<br />
NSF 61. Certifié; CMR248<br />
Pressure balance and thermostatic valves handles match lavatory and tub<br />
faucets (handles); this ensures a perfectly harmonious bathroom.<br />
Les poignées des valves à pression équilibrée et thermostatique sont combinées<br />
à celle du robinet de lavabo et de la baignoire; ce qui assure une salle de<br />
bain parfaitement agencée.<br />
Chrome, Brushed Nickel (PVD), Polished Nickel (PVD), Night Brushed (PVD)<br />
and Gold (PVD); covered by our lifetime warranty.<br />
Chrome, Nickel Brossé (PVS), Nickel Poli (PVS), Nuit Brossée (PVS) et Or<br />
(PVS); Tous garantis à vie.<br />
German ceramic cartridge; offers smooth handling and lifetime warranty.<br />
Cartouches céramique allemandes; sans friction et garanties à vie.<br />
Designed, engineered and inspected by / Conçu, développé et inspecté par<br />
Water supply /<br />
Alimentation d’eau<br />
Water supply /<br />
Alimentation d’eau<br />
ST-JÉRÔME (QUÉBEC) CANADA<br />
TORONTO<br />
11, Cidermill ave. Unit 5<br />
Concord, Ontario<br />
L4K 4B6<br />
Tel. : 905-760-9009<br />
1-888-287-5354<br />
Fax : 905-760-<strong>12</strong>92<br />
UNITED STATES<br />
Tel.: 1-866-473-8442<br />
Fax: 1-866-909-8442<br />
www.riobel.ca<br />
MONTRÉAL<br />
820, rue Nobel<br />
St-Jérôme, Québec<br />
J7Z 7A3<br />
Tél. : 450-432-0442<br />
1-866-473-8442<br />
Téléc. : 450-432-1095<br />
Info@riobel.ca www.riobel.ca<br />
<strong>Gui</strong>-<strong>12</strong>-<strong>SA</strong> rev 00 05/2011<br />
11<br />
<strong>Gui</strong>-<strong>12</strong>-<strong>SA</strong> rev 00 05/2011<br />
<strong>12</strong>