
You also want an ePaper? Increase the reach of your titles
YUMPU automatically turns print PDFs into web optimized ePapers that Google loves.
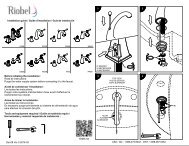
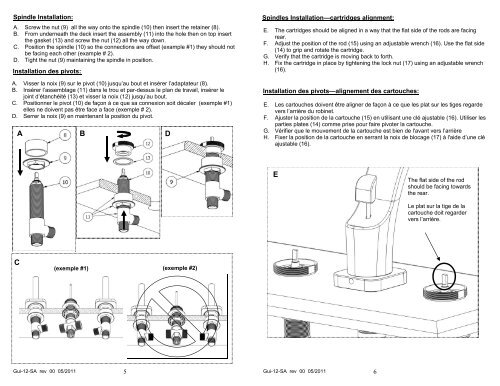
Spindle Installation:<br />
A. Screw the nut (9) all the way onto the spindle (10) then insert the retainer (8).<br />
B. From underneath the deck insert the assembly (11) into the hole then on top insert<br />
the gasket (13) and screw the nut (<strong>12</strong>) all the way down.<br />
C. Position the spindle (10) so the connections are offset (example #1) they should not<br />
be facing each other (example # 2).<br />
D. Tight the nut (9) maintaining the spindle in position.<br />
Installation des pivots:<br />
A. Visser la noix (9) sur le pivot (10) jusqu’au bout et insérer l’adaptateur (8).<br />
B. Insérer l’assemblage (11) dans le trou et par-dessus le plan de travail, insérer le<br />
joint d’étanchéité (13) et visser la noix (<strong>12</strong>) jusqu’au bout.<br />
C. Positionner le pivot (10) de façon à ce que sa connexion soit décaler (exemple #1)<br />
elles ne doivent pas être face a face (exemple # 2).<br />
D. Serrer la noix (9) en maintenant la position du pivot.<br />
A<br />
B<br />
D<br />
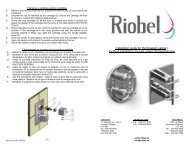
Spindles Installation—cartridges alignment:<br />
E. The cartridges should be aligned in a way that the flat side of the rods are facing<br />
rear.<br />
F. Adjust the position of the rod (15) using an adjustable wrench (16). Use the flat side<br />
(14) to grip and rotate the cartridge.<br />
G. Verify that the cartridge is moving back to forth.<br />
H. Fix the cartridge in place by tightening the lock nut (17) using an adjustable wrench<br />
(16).<br />
Installation des pivots—alignement des cartouches:<br />
E. Les cartouches doivent être aligner de façon à ce que les plat sur les tiges regarde<br />
vers l’arrière du robinet.<br />
F. Ajuster la position de la cartouche (15) en utilisant une clé ajustable (16). Utiliser les<br />
parties plates (14) comme prise pour faire pivoter la cartouche.<br />
G. Vérifier que le mouvement de la cartouche est bien de l'avant vers l’arrière<br />
H. Fixer la position de la cartouche en serrant la noix de blocage (17) à l'aide d’une clé<br />
ajustable (16).<br />
E<br />
The flat side of the rod<br />
should be facing towards<br />
the rear.<br />
Le plat sur la tige de la<br />
cartouche doit regarder<br />
vers l’arrière.<br />
C<br />
(exemple #1) (exemple #2)<br />
<strong>Gui</strong>-<strong>12</strong>-<strong>SA</strong> rev 00 05/2011<br />
5<br />
<strong>Gui</strong>-<strong>12</strong>-<strong>SA</strong> rev 00 05/2011<br />
6