Chronomètre Mémoire 1 ligne - Oregon Scientific
Chronomètre Mémoire 1 ligne - Oregon Scientific
Chronomètre Mémoire 1 ligne - Oregon Scientific

You also want an ePaper? Increase the reach of your titles
YUMPU automatically turns print PDFs into web optimized ePapers that Google loves.
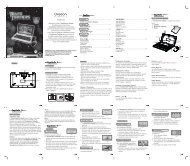
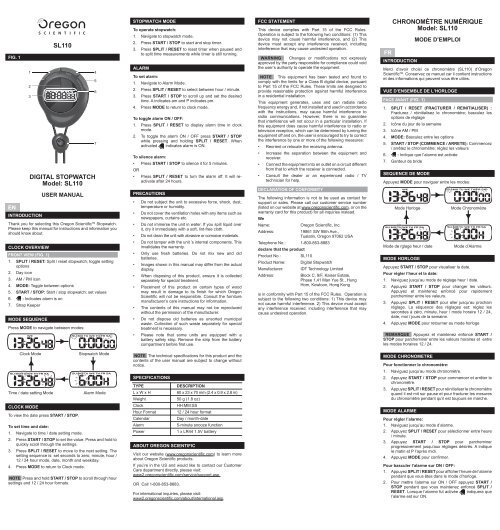
FIG. 1<br />
EN<br />
INTRODUCTION<br />
SL110<br />
DIGITAL STOPWATCH<br />
Model: SL110<br />
USER MANUAL<br />
Thank you for selecting this <strong>Oregon</strong> <strong>Scientific</strong> TM Stopwatch.<br />
Please keep this manual for instructions and information you<br />
should know about.<br />
CLOCK OVERVIEW<br />
FRONT VIEW (FIG. 1)<br />
1. SPLIT / RESET: Split / reset stopwatch; toggle setting<br />
options<br />
2. Day icon<br />
3. AM / PM icon<br />
4. MODE: Toggle between options<br />
5. START / STOP: Start / stop stopwatch; set values<br />
6. : Indicates alarm is on<br />
7. Strap Keeper<br />
MODE SEQUENCE<br />
1 4<br />
2<br />
3<br />
Press MODE to navigate between modes:<br />
5<br />
6<br />
7<br />
STOPWATCH MODE<br />
To operate stopwatch:<br />
1. Navigate to stopwatch mode.<br />
2. Press START / STOP to start and stop timer.<br />
3. Press SPLIT / RESET to reset timer when paused and<br />
to split time measurements while timer is still running.<br />
ALARM<br />
To set alarm:<br />
1. Navigate to Alarm Mode.<br />
2. Press SPLIT / RESET to select between hour / minute.<br />
3. Press START / STOP to scroll up and set the desired<br />
time. A indicates am and P indicates pm.<br />
4. Press MODE to return to clock mode.<br />
To toggle alarm ON / OFF:<br />
1. Press SPLIT / RESET to display alarm time in clock<br />
mode.<br />
2. To toggle the alarm ON / OFF press START / STOP<br />
while pressing and holding SPLIT / RESET. When<br />
activated indicates alarm is ON.<br />
To silence alarm:<br />
• Press START / STOP to silence it for 5 minutes.<br />
OR<br />
• Press SPLIT / RESET to turn the alarm off. It will reactivate<br />
after 24 hours.<br />
PRECAUTIONS<br />
• Do not subject the unit to excessive force, shock, dust,<br />
temperature or humidity.<br />
• Do not cover the ventilation holes with any items such as<br />
newspapers, curtains etc.<br />
• Do not immerse the unit in water. If you spill liquid over<br />
it, dry it immediately with a soft, lint-free cloth.<br />
• Do not clean the unit with abrasive or corrosive materials.<br />
• Do not tamper with the unit ’s internal components. This<br />
invalidates the warranty.<br />
• Only use fresh batteries. Do not mix new and old<br />
batteries.<br />
• Images shown in this manual may differ from the actual<br />
display.<br />
• When disposing of this product, ensure it is collected<br />
separately for special treatment.<br />
• Placement of this product on certain types of wood<br />
may result in damage to its finish for which <strong>Oregon</strong><br />
<strong>Scientific</strong> will not be responsible. Consult the furniture<br />
manufacturer’s care instructions for information.<br />
• The contents of this manual may not be reproduced<br />
without the permission of the manufacturer.<br />
• Do not dispose old batteries as unsorted municipal<br />
waste. Collection of such waste separately for special<br />
treatment is necessary.<br />
• Please note that some units are equipped with a<br />
battery safety strip. Remove the strip from the battery<br />
compartment before first use.<br />
FCC STATEMENT<br />
This device complies with Part 15 of the FCC Rules.<br />
Operation is subject to the following two conditions: (1) This<br />
device may not cause harmful interference, and (2) This<br />
device must accept any interference received, including<br />
interference that may cause undesired operation.<br />
WARNING Changes or modifications not expressly<br />
approved by the party responsible for compliance could void<br />
the user’s authority to operate the equipment.<br />
NOTE This equipment has been tested and found to<br />
comply with the limits for a Class B digital device, pursuant<br />
to Part 15 of the FCC Rules. These limits are designed to<br />
provide reasonable protection against harmful interference<br />
in a residential installation.<br />
This equipment generates, uses and can radiate radio<br />
frequency energy and, if not installed and used in accordance<br />
with the instructions, may cause harmful interference to<br />
radio communications. However, there is no guarantee<br />
that interference will not occur in a particular installation. If<br />
this equipment does cause harmful interference to radio or<br />
television reception, which can be determined by turning the<br />
equipment off and on, the user is encouraged to try to correct<br />
the interference by one or more of the following measures:<br />
• Reorient or relocate the receiving antenna.<br />
• Increase the separation between the equipment and<br />
receiver.<br />
• Connect the equipment into an outlet on a circuit different<br />
from that to which the receiver is connected.<br />
• Consult the dealer or an experienced radio / TV<br />
technician for help.<br />
DECLARATION OF CONFORMITY<br />
The following information is not to be used as contact for<br />
support or sales. Please call our customer service number<br />
(listed on our website at www.oregonscientific.com, or on the<br />
warranty card for this product) for all inquiries instead.<br />
We<br />
Name:<br />
<strong>Oregon</strong> <strong>Scientific</strong>, Inc.<br />
Address:<br />
19861 SW 95th Ave.,<br />
Tualatin, <strong>Oregon</strong> 97062 USA<br />
Telephone No.: 1-800-853-8883<br />
declare that the product<br />
Product No.: SL110<br />
Product Name: Digital Stopwatch<br />
Manufacturer: IDT Technology Limited<br />
Address:<br />
Block C, 9/F, Kaiser Estate,<br />
Phase 1,41 Man Yue St., Hung<br />
Hom, Kowloon, Hong Kong<br />
is in conformity with Part 15 of the FCC Rules. Operation is<br />
subject to the following two conditions: 1) This device may<br />
not cause harmful interference. 2) This device must accept<br />
any interference received, including interference that may<br />
cause undesired operation.<br />
FR<br />
CHRONOMÈTRE NUMÉRIQUE<br />
Model: SL110<br />
INTRODUCTION<br />
MODE D’EMPLOI<br />
Merci d’avoir choisi ce chronomètre (SL110) d’<strong>Oregon</strong><br />
<strong>Scientific</strong> TM . Conservez ce manuel car il contient instructions<br />
et des informations qui peuvent vous être utiles.<br />
VUE D’ENSEMBLE DE L’HORLOGE<br />
FACE AVANT (FIG. 1)<br />
1. SPLIT / RESET (FRACTURER / REINITIALISER) :<br />
Fracturez / réinitialisez le chronomètre; basculez les<br />
options de réglage<br />
2. Icône du jour de la semaine<br />
3. Icône AM / PM<br />
4. MODE: Basculez entre les options<br />
5. START / STOP (COMMENCE / ARRETE): Commencez<br />
/ arrêtez le chronomètre; réglez les valeurs<br />
6. : Indique que l’alarme est activée<br />
7. Gardeur de bride<br />
SEQUENCE DE MODE<br />
Appuyez MODE pour naviguer entre les modes:<br />
Mode Horloge<br />
Mode de rglage heur / date<br />
MODE HORLOGE<br />
Mode <strong>Chronomètre</strong><br />
Mode d’Alarme<br />
Appuyez START / STOP pour visualiser la date.<br />
Pour régler l’heur et la date:<br />
1. Naviguez jusqu’au mode de réglage heur / date.<br />
2. Appuyez START / STOP pour changer les valeurs.<br />
Appuyez et maintenez enfoncé pour rapidement<br />
parcheminer entre les valeurs.<br />
3. Appuyez SPLIT / RESET pour aller jusqu’au prochain<br />
réglage. La séquence des réglages est: réglez les<br />
secondes à zéro, minute, heur / mode horaire 12 / 24,<br />
date, moi / jours de la semaine.<br />
4. Appuyez MODE pour retourner au mode horloge<br />
REMARQUE Appuyez et maintenez enfoncé START /<br />
STOP pour parcheminer entre les valeurs horaires et entre<br />
les modes horaires 12 / 24.<br />
Clock Mode<br />
Time / date setting Mode<br />
CLOCK MODE<br />
To view the date press START / STOP.<br />
Stopwatch Mode<br />
Alarm Mode<br />
To set time and date:<br />
1. Navigate to time / date setting mode.<br />
2. Press START / STOP to set the value. Press and hold to<br />
quickly scroll through the settings.<br />
3. Press SPLIT / RESET to move to the next setting. The<br />
setting sequence is: set seconds to zero, minute, hour /<br />
12 / 24 hour mode, date, month and weekday.<br />
4. Press MODE to return to Clock mode.<br />
NOTE Press and hold START / STOP to scroll through hour<br />
settings and 12 / 24 hour formats.<br />
NOTE The technical specifications for this product and the<br />
contents of the user manual are subject to change without<br />
notice.<br />
SPECIFICATIONS<br />
TYPE<br />
L x W x H<br />
Weight<br />
Clock<br />
Hour Format<br />
Calendar<br />
Alarm<br />
Power<br />
ABOUT OREGON SCIENTIFIC<br />
DESCRIPTION<br />
60 x 23 x 70 mm (2.4 x 0.9 x 2.8 in)<br />
50 g (1.8 oz)<br />
HH:MM:SS<br />
12 / 24 hour format<br />
Day / month-date<br />
5-minute snooze function<br />
1 x LR44 1.5V battery<br />
Visit our website (www.oregonscientific.com) to learn more<br />
about <strong>Oregon</strong> <strong>Scientific</strong> products.<br />
If you’re in the US and would like to contact our Customer<br />
Care department directly, please visit:<br />
www2.oregonscientific.com/service/support.asp<br />
OR Call 1-800-853-8883.<br />
For international inquiries, please visit:<br />
www2.oregonscientific.com/about/international.asp.<br />
MODE CHRONOMETRE<br />
Pour fonctionner le chronomètre:<br />
1. Naviguez jusqu’au mode chronomètre.<br />
2. Appuyez START / STOP pour commencer et arrêter le<br />
chronomètre.<br />
3. Appuyez SPLIT / RESET pour réinitialiser le chronomètre<br />
quand il est mit sur pause et pour fracturer les mesures<br />
du chronomètre pendant qu’il est toujours en marche.<br />
MODE ALARME<br />
Pour régler l’alarme:<br />
1. Naviguez jusqu’au mode d’alarme.<br />
2. Appuyez SPLIT / RESET pour sélectionner entre heure<br />
/ minute.<br />
3. Appuyez START / STOP pour parcheminer<br />
progressivement jusqu’aux réglages désirés. A indique<br />
le matin et P l’après midi.<br />
4. Appuyez MODE pour confirmer.<br />
Pour basculer l’alarme sur ON / OFF:<br />
1. Appuyez SPLIT / RESET pour afficher l’heure de l’alarme<br />
pendant que vous êtes dans le mode d’horloge.<br />
2. Pour mettre l’alarme sur ON / OFF appuyez START /<br />
STOP pendant que vous maintenez enfoncé SPLIT /<br />
RESET. Lorsque l’alarme fut activée indiquera que<br />
l’alarme est sur ON.<br />
SL110_M_USA_OP.indd 1<br />
5/8/07 10:12:12 AM
Pour couper le son de l’alarme :<br />
• Appuyez START / STOP pour couper la sonnerie<br />
pendant 5 minutes.<br />
OU<br />
• Appuyez SPLIT / RESET pour éteindre la sonnerie. Elle<br />
se réactivera après 24 heures.<br />
PRECAUTIONS<br />
• Ne pas soumettre le produit à une force excessive, au<br />
choc, à la poussière, aux changements de température<br />
ou à l’humidité.<br />
• Ne pas couvrir les trous de ventilation avec des journaux,<br />
rideaux etc…<br />
• Ne pas immerger le produit dans l’eau. Si vous renversez<br />
du liquide sur l’appareil, séchez-le immédiatement avec<br />
un tissu doux.<br />
• Ne pas nettoyer l’appareil avec des matériaux corrosifs<br />
ou abrasifs.<br />
• Ne pas trafiquer les composants internes. Cela invalidera<br />
votre garantie.<br />
• N’utilisez que des piles neuves. Ne pas mélanger des<br />
piles neuves et usagées.<br />
• Les images de ce manuel peuvent différer de l’aspect<br />
réel du produit.<br />
• Lorsque vous désirez vous débarrasser de ce produit,<br />
assurez-vous qu’il soit collecté séparément pour un<br />
traitement adapté.<br />
• Le poser sur certaines surfaces en bois peut endommager<br />
la finition du meuble, et <strong>Oregon</strong> <strong>Scientific</strong> ne peut en<br />
être tenu responsable. Consultez les mises en garde du<br />
fabricant du meuble pour de plus amples informations.<br />
• Le contenu du présent manuel ne peut pas être reproduit<br />
sans la permission du fabriquant.<br />
• Ne pas jeter les piles usagées dans les containers<br />
municipaux non adaptés Veuillez effectuer le tri de ces<br />
ordures pour un traitement adapté si nécessaire.<br />
• Veuillez remarquer que certains appareils sont<br />
équipés d’une bande de sécurité. Retirez la bande du<br />
compartiment des piles avant la première utilisation.<br />
REMARQUE Les caractéristiques techniques de ce produit<br />
et le contenu de ce manuel peut être soumis à modifications<br />
sans préavis.<br />
CHARATERISTIQUES TECHNIQUES<br />
TYPE<br />
SYGNIFICATION<br />
L x E x H<br />
60 x 23 x 70 mm<br />
(2.4 x 0.9 x 2.8 pouces)<br />
Poids<br />
50 g (1.8 onces)<br />
Horloge<br />
HH:MM:SS<br />
Format horaire Format horaire 12 / 24<br />
Calendrier<br />
Jour / moi-date<br />
Alarme<br />
5 minutes fonction répétition<br />
Alimentation<br />
1 x LR44 1.5V pile<br />
A PROPOS D’OREGON SCIENTIFIC<br />
Pour plus d‘informations sur les produits <strong>Oregon</strong> <strong>Scientific</strong><br />
France, rendez-vous sur notre site www.oregonscientific.fr.<br />
Si vous êtes aux Etats-Unis, vous pouvez contacter notre<br />
support consommateur directement : sur le site<br />
www2.oregonscientific.com/service/support.asp<br />
OU<br />
par téléphone au: 1-800-853-8883<br />
Pour des renseignements internationaux, rendez vous sur le<br />
site: www2.oregonscientific.com/about/international.asp.<br />
EUROPE - DÉCLARATION DE CONFORMITÉ<br />
Par la présente, <strong>Oregon</strong> <strong>Scientific</strong> déclare que <strong>Chronomètre</strong><br />
Model: SL110 est conforme à la directive européenne<br />
89/336/CE. Une copie signée et datée de la déclaration<br />
de conformité est disponible sur demande auprès de notre<br />
Service Client.<br />
ES<br />
INTRODUCCIÓN<br />
CRONÓMETRO Digital<br />
Modelo: SL110<br />
MANUAL DE USUARIO<br />
Gracias por elegir el cronómetro de <strong>Oregon</strong> <strong>Scientific</strong> TM<br />
Sírvase guardar este manual para disponer de las<br />
instrucciones y la información que debería conocer.<br />
RESUMEN RELOJ<br />
VISTA FRONTAL (FIG. 1)<br />
1. SPLIT / RESET: Distribuir / reiniciar cronómetro; alternar<br />
opciones de ajuste<br />
2. Icono del día<br />
3. Icono AM / PM<br />
4. MODE: Alternar entre funciones<br />
5. START / STOP: Iniciar / detener cronómetro; ajustar<br />
valores<br />
6. Indica que la alarma está activada.<br />
7. Orificio para la correa<br />
SECUENCIA DE MODO<br />
Pulse MODE para pasar de un modo a otro:<br />
Modo reloj<br />
Modo de ajuste de hora<br />
/ fecha<br />
MODO RELOJ<br />
Pulse START / STOP para ver la fecha.<br />
Modo de cronómetro<br />
Modo Alarma<br />
Para ajustar fecha y hora:<br />
1. Acceder al modo de ajuste de hora / fecha.<br />
2. Pulse START / STOP para ajustar el valor. Pulse y<br />
manténgalos pulsados para desplazarse rápidamente<br />
por los ajustes.<br />
3. Pulse SPLIT / RESET para pasar al siguiente ajuste. La<br />
secuencia de configuración es: ajustar segundos a cero,<br />
minuto, hora, modo de hora 12 / 24h, fecha, mes y día<br />
de la semana.<br />
4. Pulse MODE para volver al Modo Reloj.<br />
NOTA Pulse START / STOP y manténgalo pulsado para<br />
desplazarse por los ajustes de hora y formato 12 / 24h.<br />
MODO CRONÓMETRO<br />
Para manejar el cronómetro:<br />
1. Acceda al modo cronómetro.<br />
2. Pulse START / STOP para poner en marcha el<br />
cronómetro y detenerlo.<br />
3. Pulse SPLIT / RESET para reiniciar el cronómetro<br />
cuando está en pausa, y para distribuir las mediciones<br />
de tiempo mientras el cronómetro funcione.<br />
ALARMA<br />
Para configurar la alarma:<br />
1. Acceda al Modo Alarma.<br />
2. Pulse SPLIT / RESET para elegir hora o minuto.<br />
3. Pulse START / STOP para subir y configurar la hora<br />
deseada. La A indica AM y la P indica PM.<br />
4. Pulse MODE para volver al Modo Reloj.<br />
Para apagar la alarma:<br />
• Pulse START / STOP para silenciarla durante 5 minutos.<br />
O bien<br />
• Pulse SPLIT / RESET to para apagar la alarma. Se<br />
reactivará al cabo de 24 horas.<br />
PRECAUCIÓN<br />
• No exponga el producto a fuerza extrema, descargas,<br />
polvo, fluctuaciones de temperatura o humedad.<br />
• No cubra los orificios de ventilación con objetos como<br />
periódicos, cortinas, etc.<br />
• No sumerja el dispositivo en agua. Si se vertiera<br />
líquido en la unidad, límpiela con un paño suave y sin<br />
electricidad estática.<br />
• No limpie la unidad con materiales abrasivos o<br />
corrosivos.<br />
• No manipule los componentes internos. De hacerlo se<br />
invalidaría la garantía.<br />
• Use siempre pilas nuevas. No mezcle pilas viejas con<br />
pilas nuevas.<br />
• Las imágenes de esta guía para el usuario puede ser<br />
distintas al producto en sí.<br />
• Cuando elimine este producto, asegúrese de que no<br />
vaya a parar a la basura general, sino separadamente<br />
para recibir un tratamiento especial.<br />
• La colocación de este producto encima de ciertos tipos<br />
de madera puede provocar daños a sus acabados.<br />
<strong>Oregon</strong> <strong>Scientific</strong> no se responsabilizará de dichos<br />
daños. Consulte las instrucciones de cuidado del<br />
fabricante para obtener más información.<br />
• Los contenidos de este manual no pueden reproducirse<br />
sin permiso del fabricante.<br />
• No elimine las pilas gastadas con la basura normal.<br />
Es necesario desecharlo separadamente para poder<br />
tratarlo.<br />
• Tenga en cuenta que algunas unidades disponen de<br />
una cinta de seguridad para las pilas. Retire la cinta de<br />
compartimiento para pilas antes de usarlo por primera<br />
vez.<br />
NOTA La ficha técnica de este producto y los contenidos de<br />
este manual de usuario pueden cambiarse sin aviso.<br />
FICHA TÉCNICA<br />
TIPO<br />
L x A x H<br />
Peso<br />
Reloj<br />
horas Formato<br />
Calendario<br />
Alarma<br />
Alimentación<br />
SOBRE OREGON SCIENTIFIC<br />
DESCRIPCIÓN<br />
60 x 23 x 70 mm<br />
(2.4 x 0.9 x 2.8 pulgadas)<br />
50 g<br />
HH:MM:SS<br />
12/24 horas Formato<br />
Dia / mes-fecha<br />
Función snooze de 5 minutos<br />
1 x LR44 pilas<br />
Visite nuestra página web (www.oregonscientific.com) para<br />
conocer más sobre los productos de <strong>Oregon</strong> <strong>Scientific</strong>. Si<br />
está en EE.UU y quiere contactar directamente con nuestro<br />
Departamento de Atención al Cliente, por favor visite www2.<br />
oregonscientific.com/service/support.asp o llame al 1-800-<br />
853-8883.<br />
Si está en España y quiere contactar directamente con<br />
nuestro Departamento de Atención al Cliente, por favor<br />
visite www.oregonscientific.es o llame al 902 338 368<br />
Para consultas internacionales, por favor visite www2.<br />
oregonscientific.com/about/international.asp.<br />
EU - DECLARACIÓN DE CONFORMIDAD<br />
Por medio de la presente <strong>Oregon</strong> <strong>Scientific</strong> declara que<br />
el Cronómetro (Modelo: SL110) cumple con los requisitos<br />
esenciales de la directiva EMC 89/336/CE. Tiene a su<br />
disposición una copia firmada y sellada de la Declaración<br />
de Conformidad, solicítela al Departamento de Atención al<br />
Cliente de <strong>Oregon</strong> <strong>Scientific</strong>.<br />
Para activar / desactivar la alarma:<br />
1. Pulse SPLIT / RESET para mostrar la hora de la alarma<br />
en modo reloj.<br />
2. Para encender o apagar la alarma, pulse START /<br />
STOP mientras pulse SPLIT / RESET y lo mantenga<br />
pulsado. Una vez activo, indicará que la alarma está<br />
activada.<br />
© 2007 <strong>Oregon</strong> <strong>Scientific</strong>. All rights reserved.<br />
086L004826-029<br />
SL110_M_USA_OP.indd 2<br />
5/8/07 10:12:20 AM