CANICOM 200 - Num'Axes
CANICOM 200 - Num'Axes
CANICOM 200 - Num'Axes

You also want an ePaper? Increase the reach of your titles
YUMPU automatically turns print PDFs into web optimized ePapers that Google loves.
Guide d’utilisation Fr - 3<br />
User’s guide Gb - 16<br />
Manual de instrucciones Es - 28<br />
Gebrauchsanleitung D -40<br />
Manuale d’uso It - 53
DECLARATION « CE » DE CONFORMITE<br />
« EC » DECLARATION OF CONFORMITY<br />
Directive R&TTE 1999/5/CE<br />
NUM’AXES<br />
déclare que<br />
declares that<br />
les colliers de dressage<br />
training collars<br />
<strong>CANICOM</strong> <strong>200</strong><br />
satisfont à toutes les dispositions de la Directive R&TTE N° 1999/5/CE<br />
du 07/04/99 du Conseil Européen<br />
comply to all dispositions of the European Council R&TTE Directives below N° 1999/5/EC<br />
et sont conformes aux normes suivantes<br />
and comply with standards below :<br />
ETSI EN 300 220-2 V2.4.1<br />
ETSI EN 301 489-3 V1.4.1<br />
EN 60950-1 : <strong>200</strong>6<br />
EN 62479 : 2010<br />
NUM’AXES<br />
745 rue de la Bergeresse – Z.A.C. des Aulnaies – BP 30157<br />
45161 OLIVET CEDEX – FRANCE<br />
Tél. +33 2 38 63 64 40 / Fax + 33 2 38 63 31 00<br />
11/04/<strong>200</strong>5 – M. Pascal GOUACHE - Président du Directoire
Guide d’utilisation<br />
Fr - 3<br />
AVERTISSEMENT !<br />
Tout porteur d’appareil individuel d’assistance cardiaque (stimulateur cardiaque, pacemaker ou<br />
défibrillateur) est invité à prendre les précautions d’usage dans l’utilisation du <strong>CANICOM</strong> <strong>200</strong>.<br />
Cet appareil émet des champs magnétiques statiques (aimant situé dans la télécommande) ainsi<br />
que des ondes électromagnétiques hautes fréquences (fréquence = 869 Mhz, puissance Maxi<br />
d’émission = 25 mW).<br />
Cet appareil répond aux normes européennes.<br />
Nous vous remercions d’avoir choisi un appareil de la gamme NUM’AXES.<br />
Avant d’utiliser le <strong>CANICOM</strong> <strong>200</strong>, lire attentivement les explications de ce guide que vous conserverez<br />
pour toute référence ultérieure.<br />
Avant la mise en place du collier <strong>CANICOM</strong>, il est recommandé de faire examiner votre chien par un<br />
vétérinaire afin de vérifier qu’il n’y a pas de contre-indications.<br />
Vérifiez régulièrement le cou de votre chien car les frottements répétés des électrodes sur la peau<br />
peuvent parfois provoquer des irritations. Dans ce cas, retirez-lui le collier jusqu’à leur disparition<br />
complète.<br />
Ne laissez pas le collier plus de 8 heures par jour au cou de votre animal et profitez de la pose ou<br />
du retrait du collier pour vérifier qu’il n’a aucun signe d’irritation.<br />
Commencez toujours par le niveau de stimulation le plus faible et déterminez le niveau d’intensité à<br />
partir duquel votre chien réagit en augmentant progressivement.<br />
N’hésitez pas à faire appel aux conseils d’un dresseur professionnel pour un dressage adapté à votre chien.
Fr - 4<br />
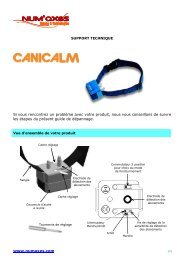
Composition du <strong>CANICOM</strong> <strong>200</strong><br />
En ouvrant l’emballage, vous trouverez :<br />
- 1 collier <strong>CANICOM</strong> équipé d’électrodes courtes<br />
- 1 pile lithium 3 Volts CR2 pour le collier<br />
- 1 télécommande <strong>CANICOM</strong> <strong>200</strong> équipée<br />
d’une pile Lithium 3 Volts CR 2430<br />
- 1 lampe néon de test<br />
- 1 jeu d’électrodes longues<br />
- 1 dragonne<br />
- 1 DVD de conseils<br />
- ce guide d’utilisation<br />
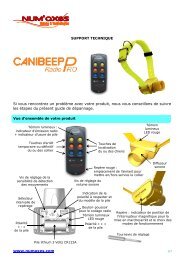
Présentation du produit<br />
TELECOMMANDE<br />
Fig. 1<br />
Stimulations<br />
continues<br />
limitées à<br />
8 secondes<br />
Stimulations<br />
flash<br />
inférieures<br />
à 1 seconde<br />
Réglage du<br />
niveau des<br />
stimulations<br />
Bip sonore<br />
Repère rouge :<br />
emplacement de<br />
l’interrupteur<br />
magnétique<br />
Bouton<br />
Marche/Arrêt<br />
Ecran<br />
LCD<br />
COLLIER RECEPTEUR<br />
Fig. 2<br />
Indicateur<br />
d’émission<br />
radio<br />
Témoin<br />
d’usure<br />
de la pile<br />
Repère rouge :<br />
emplacement de l’aimant<br />
permettant la mise en<br />
marche/arrêt du collier<br />
ECRAN LCD<br />
Fig. 3<br />
2 électrodes<br />
(courtes ou<br />
longues)<br />
Voyant<br />
Marche/Arrêt<br />
+ indicateur de<br />
réception radio<br />
+ témoin<br />
d’usure de pile<br />
Niveau de<br />
stimulation :<br />
de 1 à 9
Fr - 5<br />
Première mise en service<br />
u Mise en place de la pile dans le collier <strong>CANICOM</strong><br />
- Dévissez les 4 vis du couvercle du collier <strong>CANICOM</strong> à l’aide d’un tournevis.<br />
- Insérez la pile 3V Lithium CR2 en respectant la polarité indiquée près du logement de la pile<br />
(cf. Fig. 4).<br />
- Un bip sonore (son grave) est émis, indiquant une mise en place correcte de la pile.<br />
Si vous n’entendez aucun bip après avoir inséré la pile, ôtez-la immédiatement de son support.<br />
Vérifiez sa polarité avant une nouvelle insertion.<br />
- Avant de replacer le couvercle, contrôlez la présence du joint d’étanchéité dans sa rainure.<br />
- Revissez modérément les 4 vis.<br />
Fig. 4<br />
Polarité « - » de la pile<br />
Polarité « + » de la pile<br />
Joint d’étanchéité<br />
u Mettre en/hors service la télécommande<br />
La pile est déjà présente dans la télécommande lorsque vous achetez le produit.<br />
- Mise en service : appui prolongé de 1 seconde sur le bouton rouge Marche/Arrêt situé sur<br />
le côté de la télécommande (cf. Fig.1). Des indications apparaissent sur l’écran LCD.<br />
- Mise hors service : appui prolongé de 1 seconde sur le bouton rouge Marche/Arrêt (cf.Fig.1).<br />
L’écran LCD s’éteint.<br />
u Mettre en/hors service le collier<br />
Un aimant situé dans la télécommande permet de mettre en ou hors service le collier <strong>CANICOM</strong>.
Fr - 6<br />
- Mise en service : mettre en contact le repère rouge de la télécommande avec le repère rouge du collier<br />
pendant une durée de 1 seconde (cf. Fig. 5). Le voyant du collier s’allume puis clignote en vert : le collier<br />
<strong>CANICOM</strong> est en Marche.<br />
Fig. 5<br />
Mettre en contact ces 2 zones<br />
pendant 1 seconde<br />
TELECOMMANDE<br />
COLLIER<br />
- Mise hors service : mettre en contact le repère rouge de la télécommande avec le repère rouge du<br />
collier récepteur pendant une durée de 1 seconde (cf. Fig. 5), le voyant du collier passe de la phase<br />
clignotement vert au rouge continu, puis il s’éteint : le collier <strong>CANICOM</strong> est à l’Arrêt.<br />
Pour préserver les piles, il est recommandé de mettre hors service la télécommande et le collier dès<br />
que vous ne les utilisez plus.<br />
uCodage de la télécommande et du collier<br />
Le codage de la télécommande avec le collier permet de coupler votre télécommande avec le collier<br />
récepteur fourni.<br />
IMPORTANT : avant de débuter le codage, assurez-vous qu’aucune autre personne proche de vous<br />
n’utilise son <strong>CANICOM</strong> <strong>200</strong> ou tout autre produit de la gamme NUM’AXES : votre collier pourrait<br />
enregistrer le code de cette télécommande voisine. Si cela se produit, procédez à nouveau au<br />
codage de la télécommande avec le collier.
Fr - 7<br />
PROCEDURE DE CODAGE<br />
1. Mettre en service la télécommande : appui prolongé de 1 seconde sur le bouton Marche/Arrêt<br />
situé sur le côté de la télécommande.<br />
2. Collier récepteur en position « hors service » (voyant éteint) : mettre en contact le repère rouge<br />
de la télécommande avec le repère rouge du collier pendant 6 secondes consécutives. Le voyant du<br />
collier s’allume en vert fixe, puis passe au rouge clignotant.<br />
3. Eloigner la télécommande du collier.<br />
4. Appuyer sur la touche de la télécommande. Un bip sonore est émis, le collier est codé avec votre<br />
télécommande.<br />
u Reprogrammer un collier<br />
Vous pouvez recoder votre collier indéfiniment, soit avec la même télécommande, soit avec une<br />
nouvelle télécommande de la gamme <strong>CANICOM</strong>. Cf. § procédure de codage.<br />
Utilisation de la télécommande<br />
La télécommande du <strong>CANICOM</strong> <strong>200</strong> est conçue pour piloter 1 collier.<br />
v Touche : avertissement sonore<br />
L’appui sur la touche « Bip sonore » vous permet de commander à distance un avertissement sonore<br />
sur le collier. Il n’y a pas de limitation de temps de cette fonction : des bips sonores sont émis tant que vous<br />
appuyez sur cette touche.<br />
Il est possible d’utiliser le bip sonore de plusieurs façons en fonction de la méthode de dressage que vous<br />
utilisez. Il peut :<br />
- servir à avertir le chien de son erreur,<br />
- attirer son attention à distance, …<br />
Il est très important de l’utiliser toujours de la même façon afin de ne pas perturber votre chien.<br />
v Touche F : stimulation Flash<br />
L’appui sur le bouton « F » vous permet de mettre en garde à distance votre chien par l’envoi de<br />
stimulations délivrées de façon brève par les deux électrodes du collier, pendant une durée définie de<br />
moins d’une seconde.<br />
v Touche C : stimulation Continue<br />
L’appui sur le bouton « C » vous permet de mettre en garde à distance votre chien par l’envoi de<br />
stimulations délivrées de façon continue par les deux électrodes du collier, pendant une durée<br />
équivalente à la durée de l’appui sur ce bouton, mais limitée à 8 secondes maximum.
Fr - 8<br />
v Touches de réglage « + » et « - »<br />
Les touches +/- permettent de régler très rapidement le niveau d’intensité de la stimulation délivrée par<br />
le collier.<br />
9 niveaux sont disponibles.<br />
Niveau 1 : stimulation très faible. Niveau 9 : stimulation forte.<br />
Commencez toujours par le niveau de stimulation le plus faible.<br />
Usure/remplacement de la pile de la télécommande<br />
En cas d’usure de la pile, les performances (portée radio) de la télécommande se trouvent<br />
diminuées. Ne tardez pas à la remplacer !<br />
Pour pouvoir contrôler la pile, mettez en service votre télécommande <strong>CANICOM</strong> <strong>200</strong> et observez le<br />
témoin d’usure de la pile affiché sur l’écran LCD. Les divers symboles de cet indicateur ont les<br />
significations suivantes :<br />
La pile est en bon état.<br />
La pile est faible : prévoyez sans tarder une pile de rechange.<br />
La pile est usagée : votre <strong>CANICOM</strong> <strong>200</strong> se met en sécurité, le système « se bloque » : vous<br />
devez remplacer la pile.<br />
Remplacez la pile usagée par une nouvelle pile (3V Lithium CR 2430) en procédant de la façon suivante :<br />
- Au dos de la télécommande, ôtez la vis et la trappe à pile.<br />
- Enlevez la pile usagée.<br />
- Insérez la pile « bouton » (3V Lithium CR 2430) dans<br />
son support : le « + » inscrit sur la pile doit être<br />
visible (cf. Fig. 6).<br />
- Positionnez et fixez la trappe à pile en utilisant la vis.<br />
- Vérifiez le bon fonctionnement de votre télécommande.<br />
Fig. 6<br />
Le signe « + » de<br />
la pile est visible
Fr - 9<br />
Usure/remplacement de la pile du collier<br />
Pour contrôler l’état de la pile du collier, observez le voyant de mise en/hors service situé en façade du<br />
collier :<br />
• La pile est en bon état : clignotement lent vert.<br />
• La pile est faible : clignotement rapide rouge. Prévoyez sans trop tarder le remplacement de la pile.<br />
Remplacez la pile usagée par une pile neuve (cf. § 1ère mise en service : Mise en place de la pile dans le<br />
collier <strong>CANICOM</strong>).<br />
Vérifiez le bon fonctionnement du collier.<br />
Changement des électrodes<br />
Deux jeux d’électrodes de longueurs différentes sont livrés d’origine. La longueur des électrodes doit être<br />
suffisante pour faire un bon contact avec la peau du chien et pour que le collier fonctionne correctement.<br />
Si votre chien a des poils longs et que les électrodes courtes montées en usine ne conviennent pas,<br />
remplacez-les par les électrodes longues fournies avec les accessoires. Un serrage modéré à la main<br />
sans outil est suffisant (ne pas utiliser de clé).<br />
Vérification de votre <strong>CANICOM</strong> <strong>200</strong><br />
- Avant d’effectuer cette opération, assurez-vous que votre collier est en position « arrêt ».<br />
- Vous pouvez alors placer chaque fil de la lampe néon test sous chacune des électrodes (en les dévissant<br />
puis en les revissant de façon à pincer les fils de la lampe test sous les électrodes).<br />
- Mettez la télécommande et le collier en position « marche ».<br />
- Appuyez sur la touche « F » ou « C » et modifiez le niveau d’intensité des stimulations : la lampe test<br />
s’allume avec plus ou moins d’intensité lumineuse. Votre appareil est en parfait état de fonctionnement.<br />
Pour obtenir les meilleures performances<br />
Les consignes de dressage que vous adressez à votre chien sont transmises de la télécommande vers le<br />
collier par les ondes radio.<br />
Ces ondes radio sont sensibles et « portent » à une distance pouvant atteindre <strong>200</strong> mètres environ<br />
(distance variable selon l’environnement et le relief dans lesquels vous évoluez).<br />
Les performances de votre <strong>CANICOM</strong> <strong>200</strong> seront optimales si vous respectez les<br />
recommandations suivantes :
Fr - 10<br />
- pour obtenir une portée radio satisfaisante, tenez votre télécommande de façon à bien dégager la partie<br />
située au-dessus de l’écran LCD.<br />
- orientez toujours le collier autour du cou du chien de la façon suivante : le voyant de marche est visible,<br />
il n’est pas en contact avec le poitrail du chien.<br />
- contrôlez l’état des piles (télécommande et collier) avant d’utiliser l’appareil et remplacez-les dès que<br />
le niveau de charge est faible.<br />
- les performances des piles se dégradent sensiblement sous des températures inférieures à 0°C.<br />
Gardez si possible votre télécommande au chaud (ex. une poche intérieure) avant de l’utiliser.<br />
Ajustement du collier<br />
La sangle doit être ajustée de façon à ce que les électrodes soient bien en contact avec la peau du chien.<br />
- Si la sangle est trop lâche, le collier ne fonctionnera pas correctement. De plus, il risque de<br />
bouger et les frottements répétés peuvent irriter la peau de votre chien.<br />
- Si la sangle est trop serrée, le chien aura des difficultés à respirer.<br />
La sangle est bien réglée quand vous pouvez passer deux doigts entre la sangle et le cou de votre chien.<br />
Evitez de laisser le collier positionné au même endroit sur le cou de votre chien pendant plusieurs heures<br />
d’affilée car cela peut causer des irritations. Si votre chien doit porter le collier pendant de longues<br />
périodes, changez en régulièrement l’emplacement autour de son cou.<br />
L’initiation au collier de dressage<br />
- La période d’initiation peut commencer sur un jeune chien âgé d’au moins 6 mois et ayant reçu une<br />
éducation de base composée des rudiments de dressage : « assis », « couché » ainsi qu’un rappel<br />
minimum.<br />
- Nous vous recommandons de ne pas mettre le collier sur un chien en mauvaise santé (problèmes<br />
cardiaques, épilepsie et autres) ou ayant des troubles du comportement.<br />
- Une période d’adaptation au collier est nécessaire : au début, mettez le collier au cou de votre chien<br />
lors de vos sorties mais sans l’utiliser afin qu’il s’y habitue.<br />
- Ne brûlez pas les étapes pour un dressage positif et serein :<br />
- Choisissez un terrain familier où votre chien a l’habitude d’aller.<br />
- Déterminez le niveau de stimulation à partir duquel votre chien réagit en<br />
commençant par le niveau d’intensité le plus faible et en augmentant<br />
progressivement.<br />
- Choisissez le bon moment pour envoyer un avertissement sonore ou une stimulation :<br />
c’est-à-dire au moment précis où votre animal commet la faute et non après.<br />
- Encouragez votre chien par des caresses, des flatteries verbales : il comprendra plus<br />
rapidement et sa volonté d’obéir ne fera que s’accentuer.
Fr - 11<br />
La différence entre la stimulation « continue » et la stimulation « flash »<br />
Ces deux fonctions présentent un intérêt certain : celui de pouvoir moduler et de s’adapter à chaque sujet<br />
en fonction de chaque situation.<br />
u La stimulation « continue »<br />
Cette fonction est généralement à utiliser pour une leçon de dressage sur un terrain familier pour le<br />
chien (au départ).<br />
Du fait de sa durée « continue », l’utilisateur doit toujours utiliser la plus faible intensité quitte à jouer<br />
sur la durée, de façon à ce que le chien ait le temps d’assimiler.<br />
u La stimulation « flash »<br />
C’est le rappel à l’ordre. De faible intensité, elle sert à attirer l’attention de votre animal qui ressent un<br />
léger désagrément au moment même où il commet la faute.<br />
Précautions d’emploi<br />
− Cet appareil n’est pas prévu pour être utilisé par des personnes (y compris les enfants) dont les<br />
capacités physiques, sensorielles ou mentales sont réduites ou des personnes dénuées<br />
d’expérience ou de connaissance, sauf si elles ont pu bénéficier par l’intermédiaire d’une personne<br />
responsable de leur sécurité, d’une surveillance ou d’instructions préalables concernant l’utilisation<br />
de l’appareil.<br />
− Il convient de surveiller les enfants pour s’assurer qu’ils ne jouent pas avec l’appareil.<br />
− Cet appareil n’est en aucun cas un jouet.<br />
− Cet appareil ne doit pas être utilisé par des personnes âgées de moins de 14 ans.<br />
- Le collier <strong>CANICOM</strong> est un produit parfaitement étanche à l’immersion. Votre chien peut traverser les<br />
cours d’eau sans souci.<br />
- La télécommande est étanche au ruissellement (mais pas à l’immersion) : elle est prévue pour rester<br />
un court instant sous la pluie. Mettez-la à l’abri de l’eau dès que possible. Si votre télécommande<br />
tombe dans une flaque d’eau, celle-ci risque d’être endommagée de façon irréversible.<br />
- Nous vous déconseillons le port d’une médaille, d’un collier métallique ou de tout autre collier quand<br />
votre chien porte son collier d’éducation et d’aide au dressage <strong>CANICOM</strong> <strong>200</strong>.
Fr - 12<br />
- Evitez d’approcher la télécommande trop près d’objets sensibles aux champs magnétiques : celle-ci<br />
intègre un aimant permanent qui risquerait de les endommager de façon irréversible.<br />
- Prenez soin de ne pas stocker ou ranger l’appareil dans des endroits exposés à une température élevée.<br />
− NUM’AXES vous recommande d’utiliser des piles de même modèle et de même marque que celles<br />
qui vous ont été fournies lors de l’achat de votre produit. Des piles d’autres marques pourraient ne<br />
pas fonctionner ou ne pas être totalement compatibles avec votre produit. Vous pouvez vous procurer<br />
les piles adéquates auprès de NUM’AXES ou de votre distributeur.<br />
- Dans le cas d’une non-utilisation prolongée, supérieure à trois mois environ (exemple fin de période de<br />
chasse), il est recommandé de retirer la pile de la télécommande et du collier. La configuration du<br />
collier (codage) est conservée pendant de nombreux mois même en l’absence de pile.<br />
- Les piles doivent être changées tous les 2 ans même si l’appareil n’a pas été utilisé pendant de longues<br />
périodes.<br />
- Ne laissez jamais les piles usagées dans l’appareil (télécommande + collier) : elles peuvent fuir et<br />
endommager votre <strong>CANICOM</strong> <strong>200</strong>.<br />
Entretien<br />
- Evitez d’utiliser des liquides volatils tels que des diluants ou du benzine pour nettoyer l’appareil.<br />
Essuyez-le avec un linge doux et trempé d’une solution détergente neutre.<br />
- Afin de préserver l’étanchéité de votre collier, il est fortement recommandé d’en changer le joint<br />
chaque année.<br />
En cas de dysfonctionnement<br />
Avant d’attribuer une panne à l’appareil, prenez soin de relire ce guide et assurez-vous que le problème<br />
n’est pas dû à une pile faible ou à des erreurs d’utilisation.<br />
En cas de problème, procédez à un recodage du collier avec la télécommance (cf. procédure de codage).<br />
Procédez éventuellement à un reset du collier. Pour ce faire, ôtez la pile de son logement, puis avec un<br />
objet métallique (par ex. tournevis, ciseaux) mettez en liaison les 2 supports de la pile pendant<br />
2 secondes environ (cf. Fig. 7). Insérez à nouveau la pile : vous devez entendre un bip sonore indiquant<br />
une mise en place correcte de la pile.<br />
Remettez votre collier <strong>CANICOM</strong> en service à l’aide de la télécommande.
Fr - 13<br />
Fig. 7<br />
Reset : relier les 2<br />
supports de pile<br />
Si le problème persiste, appelez le Service Après-Vente NUM’AXES au 02 38 63 64 40.<br />
Avec l’aide de nos techniciens, de nombreux problèmes peuvent être résolus par téléphone. Selon<br />
l’ampleur du dysfonctionnement, vous devrez peut-être retourner votre produit au Service Après-Vente<br />
NUM’AXES afin qu’il soit réparé et testé.<br />
NE RETOURNEZ PAS VOTRE PRODUIT À VOTRE DISTRIBUTEUR.<br />
Retournez-le à l’adresse suivante : NUM’AXES<br />
ZAC des Aulnaies – 745 rue de la Bergeresse<br />
BP 30157 - 45161 OLIVET Cedex - FRANCE<br />
Pour toutes réparations, le service après-vente a impérativement besoin :<br />
- de votre produit complet<br />
- de la preuve d’achat (facture ou ticket de caisse)<br />
Si vous omettez l’un de ces éléments, le Service Après-Vente NUM’AXES vous facturera la réparation.<br />
Une somme forfaitaire de 25 € TTC sera facturée en cas de retour SAV non justifié (par exemple pile hors<br />
service, pile mise en place dans le mauvais sens, codage ou recodage télécommande/collier non<br />
effectué).<br />
Caractéristiques techniques<br />
Télécommande<br />
Collier récepteur<br />
Alimentation 1 pile lithium 3 V type CR2430 1 pile de 3V type CR2<br />
Autonomie En fonctionnement intensif : En veille : environ 7 mois<br />
environ 50 000 commandes En fonctionnement intensif :<br />
environ 2 mois<br />
Portée radio<br />
<strong>200</strong> m environ
Fr - 14<br />
Télécommande<br />
Collier récepteur<br />
Etanchéité Au ruissellement A l’immersion<br />
Témoin d’usure des piles Par indicateur sur écran LCD Par voyant lumineux<br />
Niveaux de stimulation 9<br />
Température d’utilisation Entre – 20°C et +40°C Entre – 20°C et +40°C<br />
Dimensions : H x l x ép. 98 mm x 45 mm x 18 mm 38 mm x 68 mm x 43 mm<br />
Poids (avec la pile) 50 g 75 g (sans la sangle)<br />
Collier réglable à l’encolure de<br />
20 à 50 cm<br />
Garantie<br />
NUM’AXES garantit le produit contre les défauts de fabrication pendant les 2 années qui suivent<br />
l’acquisition. Les frais de transport aller-retour du produit sont à la charge exclusive de l’acheteur.<br />
Conditions de garantie<br />
1. La garantie sera assurée uniquement si la preuve d’achat (facture ou ticket de caisse) est présentée<br />
sans rature à NUM’AXES.<br />
2. Cette garantie ne couvre aucun des points suivants :<br />
- le renouvellement des piles<br />
- le renouvellement de la sangle<br />
- les risques de transport directs ou indirects liés au retour du produit chez NUM’AXES<br />
- l’endommagement du produit résultant :<br />
- de la négligence ou faute de l’utilisateur (ex. : morsures, cassures, fêlures)<br />
- d’une utilisation contraire aux instructions ou non prévue<br />
- de réparations faites par des réparateurs non agréés<br />
- la perte ou le vol<br />
3. Si le produit est reconnu défectueux, NUM’AXES le réparera ou l’échangera selon son choix.<br />
4. NUM’AXES garantit le délai d’intervention de 48 heures (hors délais postaux).<br />
5. NUM’AXES ne pourra être tenu pour responsable des dommages qui pourraient résulter d’une<br />
mauvaise utilisation ou d’une panne du produit.
Fr - 15<br />
6. NUM’AXES se réserve le droit de modifier les caractéristiques de ses produits en vue d’y apporter<br />
des améliorations techniques ou de respecter de nouvelles réglementations.<br />
7. Les informations contenues dans ce guide peuvent faire l’objet de modifications sans préavis.<br />
8. Photos et dessins non contractuels.<br />
Enregistrement de votre produit<br />
Vous pouvez enregistrer votre produit sur notre site internet www.numaxes.com.<br />
Accessoires<br />
Vous pouvez vous procurer les accessoires (pile, sangle…) à tout moment auprès de NUM’AXES ou de<br />
votre distributeur.<br />
Collecte et recyclage de votre appareil en fin de vie<br />
Le pictogramme apposé sur votre produit signifie que l’équipement ne peut être mêlé aux ordures<br />
ménagères.<br />
Il doit être remis à un point de collecte approprié pour le traitement, la valorisation et le recyclage des<br />
déchets électroniques ou rapporté chez votre distributeur.<br />
En adoptant cette démarche, vous faites un geste pour l’environnement, vous contribuez à la préservation<br />
des ressources naturelles et à la protection de la santé humaine.<br />
Pour plus d’informations sur les lieux de collecte des équipements usagés, vous pouvez contacter votre<br />
mairie, le service des traitements de déchets ménagers ou nous retourner le produit.<br />
745 rue de la Bergeresse – Z.A.C. des Aulnaies – B.P. 30157<br />
45161 OLIVET CEDEX - FRANCE<br />
Tél. + 33 (0)2 38 63 64 40 / Fax +33 (0)2 38 63 31 00<br />
France : info@numaxes.com / Export : export@numaxes.com<br />
www.numaxes.com
User’s guide<br />
Gb - 16<br />
WARNING<br />
Any person with individual device for cardiac assistance (pacemaker, defibrillator) must take<br />
precautions when they use <strong>CANICOM</strong> <strong>200</strong>.<br />
This device emits some static magnetic fields (a magnet is located in the remote control).<br />
Frequency = 869 Mhz, at = 25 mW.<br />
The device complies with the European Standards.<br />
Thank you for choosing a NUM’AXES product. Before using your <strong>CANICOM</strong> <strong>200</strong>, please read the<br />
instructions in this guide carefully and keep it for future reference.<br />
Before using <strong>CANICOM</strong> <strong>200</strong>, we advise you to have your dog checked by your vet to ensure it is fit to<br />
wear a collar.<br />
Check your dog’s neck regularly, the repeated rubbing of the contact points against the animal’s skin<br />
may cause irritation. If this happens, remove the collar until all signs of skin irritation have<br />
disappeared. Do not leave the collar more than 8 hours per day on your dog.<br />
Start with the lowest level of stimulation and define the level from which your dog reacts by<br />
increasing gradually.<br />
Do not hesitate to contact a professional trainer for any further advice.
Gb - 17<br />
Contents of the product <strong>CANICOM</strong> <strong>200</strong><br />
Inside the packaging you will find:<br />
- 1 <strong>CANICOM</strong> receiver collar fitted with short contact points<br />
- 1 <strong>CANICOM</strong> <strong>200</strong> remote control<br />
fitted with 1 lithium 3 Volts CR2430 battery<br />
- 1 lithium 3 Volts CR2 battery for the collar<br />
- 1 neon test lamp<br />
- 1 pair of long contact points<br />
- 1 carry strap<br />
- 1 DVD<br />
- This user’s guide<br />
Description of the product<br />
REMOTE CONTROL<br />
Diagram 1<br />
Continuous<br />
stimulations<br />
limited to<br />
8 seconds<br />
Flash<br />
stimulations<br />
shorter than<br />
1 second<br />
Adjustment<br />
of the level<br />
of the<br />
stimulations<br />
Beeper<br />
button<br />
On/Off switch<br />
LCD<br />
screen<br />
Red indicator: Area<br />
where the On/Off<br />
switch magnet is<br />
located<br />
Red indicator: area<br />
where the magnet<br />
is located to switch<br />
On/Off the collar<br />
RECEIVER COLLAR<br />
Diagram 2<br />
Indicator of<br />
radio<br />
transmission<br />
Battery<br />
level<br />
indicator<br />
LCD SCREEN<br />
Diagram 3<br />
2 contact points<br />
(short or long)<br />
On/Off indicator<br />
+ indicator of<br />
radio reception<br />
+ battery level<br />
indicator<br />
Stimulation<br />
level indicator<br />
from 1 to 9
Gb - 18<br />
First use from new<br />
u Fitting the battery in the receiver collar<br />
- Unscrew the 4 screws of the top of <strong>CANICOM</strong> using a screwdriver.<br />
- Insert the battery (3V Lithium CR2) paying attention to follow polarity indicated on the battery<br />
housing (ref. Diagram 4).<br />
- A beep sound (low pitch) is emitted, indicating the correct installation of the battery.<br />
If you do not hear any beep after having inserted the battery, remove it immediately from its housing.<br />
Check the polarity before trying again<br />
- Before putting the lid back in place, check that the rubber seal is in its groove.<br />
- Screw up the 4 screws with care (do not overtighten them).<br />
Diagram 4<br />
Polarity « - » of the battery<br />
Polarity « + » of the battery<br />
Seal<br />
u Activate/deactivate the remote control<br />
Remote control is supplied with battery fitted.<br />
- Activate: press for 1 second the On/Off red button located on the side of the remote control (ref.<br />
Diagram.1). Indications appear on the LCD screen.<br />
- Deactivate: press for 1 second the On/Off red button of the remote control (ref. Diagram.1). The<br />
LCD screen is off.<br />
To increase the battery life of the remote control, we recommend you to deactivate the unit if you are not<br />
using your <strong>CANICOM</strong> <strong>200</strong> for a long period.
Gb - 19<br />
u Activate/deactivate the receiver collar<br />
A magnet located in the remote control is used to either switch on/off the receiver collar.<br />
- Activate: approach the red area where the magnet is located inside the remote control until coming in<br />
contact on red indicator located on the receiver collar, hold for 1 second (ref. Diagram 5), the indicator<br />
light will flash in green indicating that <strong>CANICOM</strong> is on.<br />
Diagram 5<br />
Approach until coming in contact those 2 areas<br />
during 1 second<br />
REMOTE CONTROL<br />
COLLAR<br />
- Deactivate: approach the red area where the magnet is located inside the remote control until coming<br />
in contact on red indicator located on the receiver collar, hold for 1 second (ref. Diagram 5), the indicator<br />
light will flash from green to red and then off: the collar is off.<br />
To increase the battery life of the receiver collar, we recommend you deactivate the unit if you are no<br />
longer using your <strong>CANICOM</strong> <strong>200</strong> for a long period.<br />
u Coding of the remote control and receiver collar<br />
Each remote control has its individual radio operator code. The coding of the remote control with the<br />
receiver collar enables the two units to work together.<br />
IMPORTANT: before beginning the coding, make sure no other person is using his <strong>CANICOM</strong> <strong>200</strong><br />
or other products from the NUM'AXES range close by: your receiver collar could accidentally<br />
record the code of his remote control. If that occurs, re-code the remote control with the receiver<br />
collar.
Gb - 20<br />
CODING PROCEDURE<br />
1. Activate the remote control: press for 1 second the On/Off red button located on the side of the<br />
remote control.<br />
2. Receiver collar in position « deactivated » (indicator off): approach the red indicator located on the<br />
remote control until coming in contact on red indicator located on the receiver collar, hold<br />
for 6 seconds. The indicator lights in fixed green, then flashes in red.<br />
3. Move the remote control away from the receiver collar.<br />
4. Press the button of the remote control. A beep sound is emitted, the collar is then synchronized<br />
with your remote control.<br />
u Reprogram a receiver collar<br />
Collar can be re-coded indefinitely, either with the same remote control, or with a new <strong>CANICOM</strong><br />
remote control. Ref. § coding procedure.<br />
How to use the remote control<br />
The <strong>CANICOM</strong> <strong>200</strong> remote control is designed to operate with 1 receiver collar.<br />
v button: beeper<br />
If you press the « Beeper » button the receiver collar will emit sound signals. There is no time limit for<br />
this function: the beeper will continue to sound for as long as the button is pressed.<br />
It’s up to you to use the beeper depending on the way you want to train your dog. With the beeper button<br />
you can:<br />
- send a sound to your dog when it is disobedient,<br />
- draw its attention,…<br />
It’s very important to always use the beeper button in the same way in order not to disturb<br />
your dog.<br />
v F button: Flash stimulation<br />
Press the «F» button to send a warning to your dog using stimulations transmitted by the two contact<br />
points located on the receiver collar for a defined length of time of less than one second.<br />
v C button: Continuous stimulation<br />
Press the «C» button to send a warning to your dog using stimulations transmitted by the two contact<br />
points located on the receiver collar, this will last for as long as the button is pressed but limited to<br />
8 seconds maximum.
Gb - 21<br />
v « + » and « - » : stimulation level control buttons<br />
Use the “+”/”-“ buttons for rapid adjustment of the stimulation level of the receiver collar.<br />
9 levels are available.<br />
Level 1: very weak stimulation. Level 9: strong stimulation.<br />
Always start with the lowest level of stimulation.<br />
Checking/replacing battery of remote control<br />
Performance (radio range) of the remote control may deteriorate as battery becomes weak. Be<br />
prepared to replace the battery.<br />
To check the condition of the battery, turn on the remote control and look at the battery level indicator on<br />
the LCD screen. The symbols which appear indicate the following:<br />
Battery fully charged.<br />
Weak battery: prepare to replace the battery.<br />
Dead battery: your <strong>CANICOM</strong> <strong>200</strong> functions in safety mode and the system locks up. The<br />
battery must be replaced.<br />
Replace the old battery with a new one as follows:<br />
- On the back of the remote control, unscrew the screw and remove the battery cover.<br />
- Remove the old battery.<br />
- Insert the new battery (3-V lithium CR 2430) making<br />
sure the polarity “+” noted on the battery is<br />
visible (ref. Diagram 6).<br />
- Put the battery cover back in place.<br />
- Retighten the screw.<br />
- Check the remote control operates correctly.<br />
Diagram 6<br />
« + » of the battery<br />
must be visible
Gb - 22<br />
Checking/Replacing battery of receiver collar<br />
To check the condition of the receiver collar battery, observe the On/Off indicator located on the front of<br />
the receiver collar:<br />
• Battery fully charged: flashes slowly green.<br />
• Weak battery: flashes quickly red. Replace it with a new battery (See § Fitting the battery in the receiver collar).<br />
Check the receiver collar operates correctly.<br />
Changing the contact points<br />
Two different series of contact points are supplied. The length of the contact points must be sufficient to<br />
have proper contact with the dog’s skin, enabling the device to operate correctly.<br />
If you have a long-haired dog and the short contact points fitted to the collar in the factory are inadequate,<br />
remove and replace them with the long ones supplied with the kit. Carefully tighten them manually (do<br />
not use a key).<br />
How to check that your <strong>CANICOM</strong> <strong>200</strong> is functioning properly<br />
You can check that your <strong>CANICOM</strong> <strong>200</strong> is operating correctly at any time.<br />
- Before doing so, make sure that the receiver collar is turned « off ».<br />
- Place the neon test lamp in contact with each of the contact points (by unscrewing them then by<br />
screwing them up in order to grip wires of the lamp under the contact points).<br />
- Turn « on » the remote control and receiver collar.<br />
- Press the « F » or « C » button and modify the level of intensity of the stimulations: the test lamp will<br />
come on with more or less intensity.<br />
Getting the best results<br />
The training instructions you send to your dog are sent from the remote control to the receiver collar by<br />
radio waves. These radio waves are sensitive and the range reaches approximately <strong>200</strong> meters<br />
(depending on geography and environment).<br />
The performances of your <strong>CANICOM</strong> <strong>200</strong> will be optimal if you respect the following<br />
recommendations:
Gb - 23<br />
- To obtain a good radio range, do not cover the part located above the LCD screen when you hold the<br />
remote control in your hand.<br />
- The position of the receiver collar around the neck of the dog should be in the following way: the<br />
“On/Off” indicator is visible and is not in contact with the breast of the dog.<br />
- Check the batteries (remote control and receiver collar) before using the unit and replace them as soon<br />
as the level of load is weak.<br />
- The performances of the batteries decrease slightly under temperatures lower than 0°C. If possible<br />
keep the remote control warm (e.g. in the pocket) before using it.<br />
Fitting the collar<br />
The strap must be adjusted so that the contact points are in contact with the skin of the dog.<br />
- If the strap is too loose, the collar is likely to move and repeated friction can irritate the skin of<br />
your dog. Furthermore, it will not function correctly.<br />
- If the collar is too tight, the dog will have breathing difficulties.<br />
The strap is properly adjusted when you can insert two fingers between the strap and your dog’s<br />
neck.<br />
Do not leave the collar positioned at the same place for long periods (i.e. over 3 hours) because this can<br />
cause irritations. If your dog must carry the collar for long periods, change regularly the position around<br />
the neck of your dog.<br />
Starting out with the training collar<br />
- You can start using the collar with 6 month-old puppies that have already received some basic training:<br />
« stay », « sit », or at least « no ».<br />
- Do not use the collar with dogs that are not in good physical shape (i.e. cardiac problems, epilepsy) or<br />
have behavioural problems.<br />
- Your dog will need to get used to the collar; for a few days let the dog wear the collar but do not use it.<br />
- Positive and effective training takes time. Do not rush:<br />
- Choose a familiar area, a place your dog is used to.<br />
- Define the level of stimulation from which your dog reacts by starting with the level<br />
of the lowest intensity and increasing gradually.<br />
- Choose the right moment to press the button: at the exact time your dog does<br />
something wrong.<br />
- Give your dog plenty of encouragement: it will learn faster and its desire to respond will<br />
only increase.
Gb - 24<br />
The difference between « continuous » and « flash » stimulation<br />
Both functions are extremely interesting and useful, since they can be adapted to any dog and any<br />
situation.<br />
u « continuous » stimulation<br />
Should be typically used for training at a location that is familiar to the dog (at the beginning). Because<br />
the stimulation is continuous, use the lowest intensity and take advantage of the length of the stimulation<br />
rather than of the intensity, so your dog has time to understand.<br />
u « flash » stimulation<br />
Use this function to correct your dog.<br />
The low stimulation will attract its attention, it will feel something unpleasant at the precise moment it<br />
is behaving badly.<br />
Cautions for use<br />
− This appliance is not intended for use by persons (including children) with reduced physical, sensory<br />
or mental capabilities, or lack of experience and knowledge, unless they have been given supervision<br />
or instruction concerning use of the appliance by a person responsible for their safety.<br />
− Children should be supervised to ensure that they do not play with the appliance.<br />
− This device is not a toy.<br />
− This device must not be used by people under 14 years old.<br />
- The <strong>CANICOM</strong> collar is totally waterproof. Your dog can swim in water.<br />
- The remote control is showerproof only : it is only designed to remain a short time in the rain. Put it<br />
in a dry place as soon as possible. If the remote control falls into the water, it could be damaged in an<br />
irreversible way.<br />
- The dog should not wear a medal, metallic collar, or any other kind of collar together with the training<br />
collar <strong>CANICOM</strong> <strong>200</strong>.<br />
- Avoid placing the remote control close to objects sensitive to magnetic fields, which could be<br />
irreversibly damaged.<br />
- Do not place or keep the unit in places exposed to high temperatures.<br />
− NUM’AXES advises to use the same type and same brand of batteries as those supplied in you new<br />
purchased product. Other brands of batteries may not operate, or may not be completely compatible<br />
with your product. You can purchase the suitable batteries from NUM’AXES or from your distributor.<br />
- Remove the battery from the receiver collar and the remote control if you are not using the appliance<br />
for 3 months or more.<br />
- It is necessary to replace the batteries every two years, even if the unit has not been used for long<br />
periods.<br />
- Never leave a discharged batteries in the unit (remote control and collar): leakage could damage your<br />
<strong>CANICOM</strong> <strong>200</strong>.
Gb - 25<br />
Maintenance<br />
- Avoid cleaning the unit with volatile liquids such as solvents or cleaning fluids. Use a soft cloth and<br />
neutral detergent.<br />
- In order to maintain water tightness, we recommend the replacement of the seal located in the receiver<br />
collar every year.<br />
Troubleshooting<br />
Should your <strong>CANICOM</strong> <strong>200</strong> stop working or develop a fault, first read this user’s guide over, then check<br />
the batteries and replace them if necessary and retry. Also check that you are using the product correctly.<br />
If you encounter any problem, re-code the collar with the remote control (ref. coding procedure).<br />
Re-initialise the system by removing the battery from its housing, then with a metallic tool (e.g.<br />
screwdriver, scissors) touch each of the 2 battery contacts for 2 seconds approximately (ref. Diagram 7).<br />
Insert the battery again: One beep is emitted, indicating the battery is in correct position.<br />
Restart your <strong>CANICOM</strong> using the remote control.<br />
Diagram 7<br />
Reset: connect<br />
the 2 supports of<br />
the battery<br />
If the problem persists, contact your distributor or check out on www.numaxes.com.<br />
You can also contact NUM’AXES at +33.2.38.69.96.27 or by Email export@numaxes.com.<br />
Depending on the extent of the malfunction, you may have to return your product for service and repair.<br />
For all repairs, please supply the following:<br />
- the complete product<br />
- the proof of purchase (invoice or sales receipt)<br />
If you omit one of these items, the After Sales Service will have to invoice you for any repair costs<br />
incurred.
Gb - 26<br />
Technical specifications<br />
Remote control<br />
Receiver collar<br />
Power 1 3-V lithium battery CR2430 1 3-V battery CR2<br />
Battery life Continuous use: In stand by: approximately<br />
approximately 50 000 triggers 7 months<br />
Continuous use: approximately<br />
2 months<br />
Range<br />
approximately <strong>200</strong> m<br />
Hermetic seal Showerproof Waterproof<br />
Indicator of wear of the batteries Indicator on LCD screen Indicator light<br />
Levels of stimulations 9<br />
Use temperature between – 20°C and +40°C between – 20°C and +40°C<br />
Dimensions : H x L x D. 98 mm x 45 mm x 18 mm 38 mm x 68 mm x 43 mm<br />
Weight (with the battery) 50 g 75 g (without strap)<br />
Collar adjustable to neck sizes<br />
from 20 to 50 cm<br />
Guarantee<br />
NUM’AXES guarantees the products against all production defects for two years after purchase.<br />
All postage and packing charges will be the purchaser’s sole responsibility.<br />
Guarantee conditions<br />
1. The guarantee will be valid only if the proof of purchase (invoice or sales receipt), without cancellation,<br />
is submitted to the distributor or to NUM’AXES. The guarantee is limited to the original purchaser.<br />
2. This guarantee does not cover the following:<br />
- Changing the batteries<br />
- Changing the strap<br />
- Direct or indirect risks incurred when sending the article back to the distributor or NUM’AXES<br />
- Damage to the article caused by:<br />
- negligence or incorrect use (ex: bites, breakage, cracking)<br />
- use contrary to the instructions or not envisioned therein<br />
- repairs performed by unauthorized persons<br />
- Loss or theft
Gb - 27<br />
3. If the product is found to be defective, NUM’AXES will either decide to repair or to replace it.<br />
4. No claim may be advanced against NUM’AXES, particularly in relation to incorrect use or breakdown.<br />
5. NUM’AXES reserves the right to modify the characteristics of its products with a view to making<br />
technical improvements or to comply with new regulations.<br />
6. The information contained in this guide may be subject to amendment without prior notice.<br />
7. Photos and drawings are not contractual.<br />
Register your product<br />
Your product can be registered on our website at www.numaxes.com.<br />
Spare parts<br />
You can purchase spare parts (batteries, straps, collar…) from your supplier at any time.<br />
Collection and recycling of your device at the end of its life<br />
The pictogram which appears on your product means that this one can not be thrown with<br />
household refuse.<br />
You have to bring the device to a collection location suitable for treatment, development, recycling, of<br />
electronic wastes or bring it back to your distributor.<br />
Adopting this process, you do something for the environment, you contribute to the preservation of<br />
natural resources and to the protection of human health.<br />
www.numaxes.com<br />
export@numaxes.com
Manual de instrucciones<br />
Es - 28<br />
NOTA PREVIA<br />
Se recomienda a todo portador de un aparato individual de asistencia cardio vascular (estimulador<br />
cardíaco, marcapasos, desfibrilador) tomar precauciones en la utilización del <strong>CANICOM</strong> <strong>200</strong>.<br />
Este aparato emite campos magnéticos estáticos (imán situado en el mando a distancia) así como<br />
ondas electromagnéticas de alta frecuencía (frecuencía = 869Mhz, una potencia de emisíon<br />
máxima = 25 mW).<br />
Este aparato se ajusta a las normativas europeas.<br />
Todo nuestro agradecimiento por haber elegido un aparato de la gama NUM’AXES. Para obtener de él un<br />
rendimiento máximo, lea atentamente, antes de usar al <strong>CANICOM</strong> <strong>200</strong>, las instrucciones del manual, que<br />
conservará para cualquiera consulta posterior.<br />
Antes de colocar a su perro el <strong>CANICOM</strong>, se recomienda que sea examinado por un veterinario con<br />
el fin de cerciorarse de que el animal esté en condiciones de llevar el collar.<br />
Verificar regularmente el cuello de su perro, porque los frotamientos repetidos de los electrodos<br />
sobre la piel pueden provocar a veces irritaciones. En este caso, retirarle el collar hasta que<br />
desaparezcan las irritaciones. No dejar nunca el collar más de 8 horas por día sobre el cuello de su<br />
perro. Cada vez que le quite o le ponga su collar, verificar que no hay ningún signo de irritaciones.<br />
Empiece siempre con el nivel de estímulo más bajo, determine el nivel de intensidad desde el cual<br />
su perro reacciona y aumente paulatinamente.<br />
Le aconsejamos buscar la ayuda de adiestradores profesionales para un adiestramiento adaptado a<br />
su perro.
Es - 29<br />
Composición del <strong>CANICOM</strong> <strong>200</strong><br />
Al abrir el embalaje, encontrará:<br />
- 1 collar <strong>CANICOM</strong> equipado con electrodos cortos<br />
- 1 mando <strong>CANICOM</strong> <strong>200</strong> equipado con una pila de litio 3 Volts CR2430<br />
- 1 pila de litio 3 Volts CR2 para el collar<br />
- 1 lámpara de prueba<br />
- 1 juego de electrodos largos<br />
- 1 correa de seguridad<br />
- 1 DVD<br />
- este manual de instrucciones<br />
Presentación del <strong>CANICOM</strong> <strong>200</strong><br />
MANDO A DISTANCIA<br />
Fig. 1<br />
Estímulos<br />
continuos<br />
limitados a<br />
8 segundos<br />
Estímulos<br />
flash<br />
inferiores a<br />
1 segundo<br />
Ajuste del<br />
nivel de<br />
los estímulos<br />
Aviso sonoro<br />
Indicador rojo :<br />
Zona en la cual se<br />
sitúa el interruptor<br />
magnético<br />
Botón<br />
Encendido/Apagado<br />
Pantalla<br />
de control<br />
LCD<br />
COLLAR RECEPTOR<br />
Fig. 2<br />
Indicador<br />
de emisión<br />
radio<br />
Indicador<br />
de carga<br />
de la pila<br />
Indicador rojo :<br />
indicador de posición del<br />
imán para poner En/Fuera<br />
de servicio el collar<br />
PANTALLA LCD<br />
Fig. 3<br />
2 electrodos<br />
(cortos o<br />
largos)<br />
Luz luminosa<br />
Encendido/<br />
Apagado<br />
+ indicador de<br />
recepción radio<br />
+ indicador de<br />
desgaste de<br />
la pila<br />
Indicador de<br />
nivel de<br />
estímulo :<br />
de 1 hasta 9
Es - 30<br />
Primera puesta en servicio<br />
uColocar la pila en el collar<br />
- Desenrosque los 4 tornillos de la tapa del collar <strong>CANICOM</strong> usando un destornillador.<br />
- Introduzca la pila (3 volts de litio CR2) respetando la orientación indicada cerca del alojamiento<br />
de la pila (cf. Fig. 4).<br />
Se emite una señal sonora que indica la colocación correcta de la pila.<br />
Si no huviera ningúna señal despues de insertar la pila, sacarla y colocarla correctamente, teniendo<br />
cuidado de la polaridad de la pila.<br />
- Antes de colocar la tapa, compruebe que la junta tórica se encuentra bien colocada en la ranura de la<br />
trampilla.<br />
- Apriete ligeramente los 4 tornillos.<br />
Polaridad « - » de la pila<br />
Polaridad « + » de la pila<br />
Fig. 4<br />
Junta tórica<br />
uPuesta en/fuera de servicio del mando a distancia<br />
La pila se encuentra ya en el mando cuando adquiere el producto.<br />
- Puesta en servicio : presionar continuamente durante 1 segundo el botón rojo Encendido/Apagado<br />
situado en el lado del mando a distancia (cf.fig.1). Aparecen las indicaciones sobre la pantalla LCD.<br />
- Puesta fuera de servicio : presionar continuamente durante 1 segundo el botón rojo<br />
Encendido/Apagado del mando a distancia. Se apagan las indicaciones sobre la pantalla LCD.<br />
Si no utiliza el <strong>CANICOM</strong> <strong>200</strong> durante un cierto tiempo, es conveniente ponerlo fuera de servicio para<br />
preservar la duración de la pila.
Es - 31<br />
uPuesta en/fuera de servicio del collar receptor<br />
Un imán situado en el mando a distancia permite poner en servicio o fuera de servicio el collar receptor<br />
<strong>CANICOM</strong>.<br />
- Puesta en servicio : acercar el indicador rojo del mando hasta tocar el indicador rojo del collar<br />
receptor durante 1 segundo (cf. Fig. 5). La luz indicadora parpadea en verde : el collar receptor<br />
<strong>CANICOM</strong> está en servicio.<br />
- Puesta fuera de servicio : acercar el indicador rojo del mando hasta tocar el indicador rojo del collar<br />
receptor durante 1 segundo (cf.Fig. 5). La luz indicadora cambia de verde parpadeante a rojo continuo<br />
y después se apaga : el collar receptor está apagado.<br />
Fig. 5<br />
Poner en contacto estas 2 zonas<br />
durante 1 segundo<br />
MANDO A DISTANCIA<br />
COLLAR RECEPTOR<br />
Si no utiliza el <strong>CANICOM</strong> <strong>200</strong> durante un cierto tiempo, es conveniente ponerlo fuera de servicio para<br />
preservar la duración de la pila.<br />
u Sincronización del mando a distancia y del collar receptor<br />
La sincronización permite acoplar su collar con el mando a distancia suministrado.
Es - 32<br />
IMPORTANTE : Antes de empezar con la codificación se debe tener en cuenta que ninguna otra<br />
persona cercana esté utilizando un <strong>CANICOM</strong> <strong>200</strong> o cualquier otro producto de la gama NUM’AXES,<br />
su collar receptor podría registrar el código de ese mando a distancia vecino. Reprogramar de<br />
nuevo el mando con el collar si occure esta situación.<br />
PROCEDIMIENTO PARA LA CODIFICACIÓN<br />
1. Poner en servicio el mando a distancia : presionar continuamente durante 1 segundo el botón rojo<br />
Encendido/Apagado situado en el lado del mando.<br />
2. Collar en posición “fuera de servicio” (apagado, luz apagada) : acercar el indicador rojo del mando<br />
hasta tocar el indicador rojo del collar receptor durante 6 segundos. La luz se enciende en verde fijo,<br />
y después en rojo parpadeante.<br />
3. Alejar el mando a distancia del collar receptor.<br />
4. Apoyar sobre la tecla “aviso sonoro” del mando a distancia. Se emite un aviso sonoro. El collar<br />
receptor está sincronizado con su mando a distancia.<br />
u Reprogramar un collar receptor<br />
Se puede reprogramar su collar receptor indefinidamente, bien sea con el mismo mando a distancia o<br />
con otro nuevo mando de la gama <strong>CANICOM</strong>. Cf. Procedimiento para la codificación.<br />
Utilización del mando a distancia<br />
El mando a distancia del <strong>CANICOM</strong> <strong>200</strong> ha sido estudiado para controlar 1 collar receptor.<br />
v Tecla : Aviso sonoro<br />
La presión sobre el pulsador “aviso sonoro” permite emitir a distancia un aviso previo sonoro al collar.<br />
No hay limitación de tiempo en esta función : las señales sonoras están emitidas mientras que mantega<br />
pulsado el botón.<br />
Es posible utilizar el aviso sonoro de varias maneras según el tipo de adiestramiento que esté realizando.<br />
Puede :<br />
- avisar el perro de su error,<br />
- llamar su atención a distancia, ...<br />
Es muy importante utilizar siempre la misma forma de adiestrar con el fin de no molestar a su<br />
perro.
Es - 33<br />
v Tecla F : estímulo flash<br />
Presionando el botón “F” puede poner en guardia a distancia a su perro, gracias al envío de estímulos<br />
breves, transmitidos por los dos electrodos del collar receptor, de una duración de menos de<br />
1 segundo.<br />
v Tecla C : estímulo continuo<br />
Presionando el botón “C” puede poner en guardia a distancia a su perro, gracias al envío de estímulos<br />
continuos, transmitidos por los dos electrodos del collar receptor, de una duración limitada a<br />
8 segundos máximo.<br />
v Botones de regulación “+” y “-“<br />
Los botones de regulación +/ - permiten regular rápidamente el nivel de los estímulos.<br />
Dispone de 9 niveles.<br />
Nivel 1 : indica el más suave. Nivel 9 : indica el más fuerte<br />
Empiece siempre con el nivel de estímulo más bajo.<br />
Desgaste/sustitución de la pila del mando a distancia<br />
En caso de desgaste de la pila, las prestaciones (alcance radio) del mando disminuirán. ¡Sustituir la pila!<br />
Para comprobar la pila, poner en servicio su mando a distancia <strong>CANICOM</strong> <strong>200</strong> y controlar el indicador de<br />
nivel de carga de la pila sobre la pantalla LCD. Los diferentes símbolos en dicho indicador tienen las<br />
siguientes significados :<br />
Pila en buen estado.<br />
Pila débil : pensar en sustituir la pila.<br />
Pila gastada : su <strong>CANICOM</strong> <strong>200</strong> está en modalidad de seguridad, el sistema se “bloquea”; se<br />
debe sustituir la pila.<br />
Sustituir la pila gastada por una pila nueva (3V CR 2430) procediendo de la siguiente manera :<br />
- Sacar el tornillo y la tapa de la pila situados en la parte posterior del mando.<br />
- Sacar la pila gastada.<br />
- Insertar la pila nueva (3V de Litio CR 2430) en su alojamiento : el “+” escrito sobre la pila deve estar<br />
visible (cf. Fig. 6).<br />
- Apretar el tornillo sujetador para fijar la tapa del alojamiento de la pila.<br />
- Comprobar el buen funcionamento de su mando.
Es - 34<br />
Fig. 6<br />
El siglo « + » de<br />
la pila está visible<br />
Desgaste/sustitución de la pila del collar receptor<br />
Para comprobar el estado de la pila sobre el collar receptor, visualizar la luz luminosa situada en frente<br />
de la caja receptora.<br />
• Pila en buen estado : la luz verde parpadea lentamente.<br />
• Pila débil : la luz roja parpadea rápidamente. Prever la sustitución de la pila cuanto antes, por una<br />
nueva (3V de Litio CR2) (Veáse § Colocar la pila en el collar). Comprobar el estado de funcionamento<br />
del collar.<br />
Cambio de los electrodos<br />
Con el equipo se entregan dos juegos de electrodos de longitudes distintas. La longitud de los electrodos<br />
ha de ser suficiente para hacer un buen contacto con la piel del perro y para que el aparato funcione<br />
correctamente.<br />
Si su perro tiene pelo largo y los electrodos cortos montados de fábrica no son adecuados,<br />
desenrósquelos y cámbielos por los electrodos largos que se suministran con los accesorios. Es<br />
suficiente un ajuste manual y moderado (no usar herramienta).<br />
Verificación de su <strong>CANICOM</strong> <strong>200</strong><br />
- Antes de empezar esta operación, asegurarse de que el collar receptor esté fuera de servicio<br />
“apagado”.<br />
- Entonces, puede poner en contacto la lámpara de prueba con cada uno de los electrodos. Desenrosque<br />
y despues enrosque de manera que se sujeten los hilos de la lámpara de prueba bajo los electrodos.<br />
- Poner en servicio “encendido” el mando y el collar receptor.
Es - 35<br />
- Apoyar sobre el botón “F” o “C” modificando el nivel de intensidad de los estímulos : la lámpara de<br />
prueba se enciende con una cierta luminosidad.<br />
Para obtener los mejores resultados<br />
Las órdenes de adiestramiento que envién a su perro son transmitidas del mando a distancia al collar<br />
receptor por ondas radio.<br />
Estas ondas radio son sensibles y “alcazan” una distancia de <strong>200</strong> metros (esta distancia puede variar<br />
según el entorno y la configuración del terreno donde se encuentre).<br />
Las prestaciones de su <strong>CANICOM</strong> <strong>200</strong> serán óptimas si respetan las siguientes recomendaciones :<br />
- Para un alcance correcto de las ondas, debe sostener su mando de manera que la pantalla LCD esté al<br />
descubierto.<br />
- Siempre fijar el collar receptor alrededor del cuello del perro de manera que la luz de puesta en<br />
servicio esté visible y no contra el pecho del perro.<br />
- Comprobar el estado de la pila del mando tanto como del collar receptor antes de utilizar el aparato y<br />
cambiarla cuando el nivel de carga esté débil.<br />
- Cuando la temperatura es inferior a 0°C, la pila es menos eficaz que a temperatura ambiente. Guardar<br />
el mando al abrigo (ej. un bolsillo de chaqueta) antes de utilizarlo.<br />
Ajuste del collar<br />
Debe asegurarse que los electrodos estén en contacto con la piel del perro.<br />
- Si la correa está demasiado suelta, el collar se moverá y los frotamientos repetidos de los<br />
electrodos sobre la piel del perro podrían provocar irritaciones y no funcionaría correctamente.<br />
- Si el collar está demasiado apretado, su perro tendrá dificultades para respirar.<br />
La correa está bien ajustada cuando pueden pasar dos dedos entre la correa y el cuello del perro.<br />
Si su perro tiene que llevar el collar durante un cierto tiempo, cámbiarlo de posición regularmente<br />
alrededor de su cuello para que no le provoque irritaciones. También, se recomienda no dejar puesto el<br />
collar varias horas consecutivas.<br />
Iniciación al collar de adiestramiento<br />
- El período de iniciación puede empezar con cachorros de 6 meses, que ya hayan recibido una educación<br />
básica con los rudimentos del adiestramiento : “sentado”, “quieto” o por lo menos, algún rapapolvo.....<br />
- No ponga el collar a un perro con mala salud (con problemas cardíacos, epilepsia, u otros) o que tenga<br />
trastornos de comportamiento.<br />
- Es necesario un cierto tiempo para que se acostumbre al collar : póngale el collar sin utilizarlo.<br />
- No salte etapas para efectuar un adiestramiento positivo y tranquilo :<br />
- Escoja un terreno que su perro esté acostumbrado a frecuentar.
Es - 36<br />
- Determine el nivel de estímulo desde el cual su perro reacciona empezando por el nivel<br />
de intensidad más bajo y aumente paulatinamente.<br />
- Es preciso elegir el momento propicio para presionar el botón : exactamente cuando el<br />
perro hace algo incorrecto.<br />
- Anímelo con caricias: entenderá más rápidamente y aumentará su voluntad de obedecer.<br />
La diferencia entre estímulos « continuo » y « flash »<br />
Estas dos funciones son muy interesantes porque se pueden modular y adaptar a cualquier sujeto según<br />
las situaciones específicas.<br />
u Estímulo « continuo »<br />
En general se debe utilizar para una lección de adiestramiento en un terreno familiar para el perro<br />
(cuando se empieza).<br />
Dado su duración “continua”, el usuario tiene siempre que usar la intensidad más débil y controlar bien<br />
su duración, de manera que el perro tenga tiempo de entender.<br />
u Estímulo « flash »<br />
Es para llamar a la orden.<br />
Sirve para llamar la atención del perro cuando comete un error. Durante la caza se recomienda emplear<br />
al estímulo “flash”, ya que dura poco y evita molestar al perro en acción.<br />
Precauciones de uso<br />
− Este aparato no está diseñado para que lo utilicen personas (niños incluidos) con capacidades físicas,<br />
sensoriales o mentales reducidas, o falta de experiencia y de conocimientos, salvo que estén<br />
supervisadas o hayan recibido instrucciones para la utilización del aparato por una persona<br />
responsable de su seguridad.<br />
− Los niños deben ser vigilados para asegurarse que no jueguen con el aparato.<br />
− Este aparato no es un juguete.<br />
− Este aparato no debe ser utilizado por personas menores de 14 años.<br />
- El collar receptor <strong>CANICOM</strong> es un producto perfectamente estanco a la inmersión. Su perro puede<br />
bañarse en los rios sin perjudicar el collar receptor <strong>CANICOM</strong>.<br />
- El mando es estanco al agua (no sumergible) : en lo posible protegerlo del agua. Puede causar daños<br />
irreversibles en caso de que el mando se sumerja en el agua.<br />
- No es conveniente utilizar una medalla metálica u otro collar cuando su perro lleve su collar de<br />
adiestramiento <strong>CANICOM</strong> <strong>200</strong>.<br />
- Alejar el mando de objetos sensibles a los campos magnéticos : dicho mando integra un imán<br />
permanente que causaría daños irreparables.<br />
- Procurar no guardar ni dejar nunca el aparato expuesto a altas temperaturas.<br />
− NUM’AXES recomienda la utilización de pilas de modelo y marca idénticos a las que están
Es - 37<br />
proporcionadas con su equipo de educación canina. Pilas de otras marcas podrían no funcionar o no<br />
ser compatibles con sus productos. Pueden conseguirse las pilas adecuadas directamente en<br />
NUM’AXES o en su distribuidor.<br />
- Si se prevé no usar el <strong>CANICOM</strong> <strong>200</strong> durante un período prolongado del orden de 3 meses (fin de<br />
temporada de caza), se recomienda retirar la pila del mando a distancia y del collar receptor. La<br />
codificación del collar se conserva durante numerosos meses incluso in ausencia de la pila.<br />
- No dejar nunca pilas agotadas dentro del aparato (mando y collar) : pueden perjudicar su<br />
<strong>CANICOM</strong> <strong>200</strong>.<br />
- Cada 2 años es preciso cambiar las pilas también cuando el aparato haya sido poco usado.<br />
Mantenimiento<br />
- Evitar el uso de líquidos volátiles como disolventes o la gasolina para limpiar el aparato. Secarlo con un<br />
paño suave empapado de solución de detergente neutra.<br />
- Para preservar su estanqueidad, se recomienda cambiar la junta del collar cada año.<br />
En caso de malfuncionamiento<br />
Antes de atribuir un fallo al aparato es preciso consultar este manual para comprobar que el problema<br />
no sea debido a una pila agotada o a errores de uso.<br />
En caso de inconvenientes, se aconseja repetir la codificación del collar receptor con el mando a distancia<br />
(cf. Procedimiento para la codificación).<br />
Proceder a un « reset » del collar receptor sacando la pila de su alojamiento, con una pieza metálica (por<br />
ej. destornillador, tijeras) poner en contacto durante 2 segundos los dos ganchos que sujetan la pila<br />
(Fig. 7). Insertar de nuevo la pila : se emite un aviso sonoro indicando la colocación correcta de la pila.<br />
Puesta en servicio su <strong>CANICOM</strong> ayudandose del mando.<br />
Fig. 7<br />
Reset : Poner en contacto<br />
los dos ganchos de la pila<br />
Si el inconveniente persiste, póngase en contacto con su DISTRIBUIDOR o con NUM’AXES<br />
(+33.2.38.69.96.27 o export@numaxes.com).<br />
Según la magnitud de su problema, puede que tenga que hacernos llegar su producto para ser reparado<br />
y testado en nuestra fábrica.
Es - 38<br />
Para cualquier reparación, el Servicio Post Venta necesita obligatoriamente:<br />
- el aparato completo<br />
- la prueba de compra (factura o ticket de compra)<br />
Si olvida usted uno de estos elementos, el Servicio Post Venta le facturará el arreglo.<br />
Características técnicas Mando a distancia<br />
Collar receptor<br />
Alimentación 1 pila de Litio 3V tipo CR2430 1 pila de Litio 3V tipo CR2<br />
Autonomía En funcionamiento intensivo : En « stand by » : cerca de<br />
Cerca de 50 000 presiones 7 meses<br />
En funcionamiento intensivo :<br />
cerca de 2 meses<br />
Alcance radio<br />
Cerca de <strong>200</strong> m<br />
Estanqueidad Al chorreo Al inmersión<br />
Indicador de carga de la pila Por indicador sobre pantalla LCD Por indicador luminoso<br />
Niveles de estímulos 9<br />
Temperatura de utilización Entre – 20°C y +40°C Entre – 20°C y +40°C<br />
Dimensiones : A x L x P. 98 mm x 45 mm x 18 mm 38 mm x 68 mm x 43 mm<br />
Peso (con la pila) 50 g 75 g (sin la correa)<br />
Collar ajustable al cuello de 20 a<br />
50 cm<br />
Garantía<br />
NUM’AXES garantiza el producto contra los defectos de fabricación durante los 2 años consecutivos<br />
a su adquisición. Los gastos del transporte ida/vuelta del producto corren exclusivamente a cargo<br />
del comprador.<br />
Condiciones de la garantía<br />
1. La garantía solamente será válida presentando a NUM’AXES la prueba de compra (factura o ticket de<br />
compra) sin tachaduras.<br />
2. Dicha garantía no cubre ninguno de los siguientes puntos:<br />
- la renovación de las pilas<br />
- el cambio de la correa<br />
- los riesgos de transporte, directos o indirectos, derivados de la devolución del producto a su<br />
DISTRIBUIDOR o a NUM’AXES<br />
- el deterioro del producto resultante de:<br />
- la negligencia o error del usuario (por ejemplo: mordeduras, roturas, fisuras, etc.)<br />
- una utilización contraria a las instrucciones o no prevista<br />
- las reparaciones realizadas por personas no habilitadas<br />
- la pérdida o el robo
Es - 39<br />
3. Si se reconoce que el producto es defectuoso, NUM’AXES lo reparará o lo cambiará, según decida.<br />
4. No se podrá recurrir contra el fabricante NUM’AXES en caso de daños resultados de una mala<br />
utilización del producto o de una avería.<br />
5. NUM’AXES se reserva el derecho de modificar las características de sus productos para realizar<br />
mejoras técnicas o respetar nuevas normativas.<br />
6. La información de esta guía puede ser objeto de modificaciones sin previo aviso.<br />
7. Fotos y dibujos no contractuales.<br />
Inscriba su producto<br />
Puede inscribir su producto en nuestro sitio web www.numaxes.com.<br />
Accesorios<br />
Puede encargar a su distribuidor, en cualquier momento, los accesorios (pila, correa, collar, junta de<br />
collar receptor…).<br />
Reciclaje de aparatos electrónicos al final de su vida<br />
El pictograma que aparece en su producto, significa que el equipo no puede mezclarse con basuras<br />
domésticas. Debe ser entregado en un punto de recogida adecuado para el tratamiento, la valorización y<br />
el reciclaje de las basuras electrónicas o bien devolverlo a su distribuidor.<br />
Adoptando este comportamiento, hará un gesto con el medio ambiente, contribuyendo así a la<br />
preservación de los recursos naturales y a la protección de la salud humana.<br />
www.numaxes.com – export@numaxes.com
Gebrauchsanleitung<br />
D - 40<br />
VORSICHT<br />
Träger von Herzschrittmachern müssen die üblichen Vorsichtsmaßnahmen treffen bei der<br />
Bedienung Ihres <strong>CANICOM</strong> <strong>200</strong>.<br />
Dieses Gerät strahlt statische Magnetfelder sowie elektromagnetische Hochfrequenzenwellen ab<br />
(ein Magnet befindet sich im Handsender) (Frequenz = 869 Mhz, maximale Sendeleistung =<br />
25 mW).<br />
Dieses Gerät entspricht der europäischen Normen.<br />
Wir danken Ihnen, dass Sie sich für ein Gerät aus der NUM’AXES Produktreihe entschieden haben. Sie<br />
sollten vor dem Gebrauch von <strong>CANICOM</strong> <strong>200</strong> die Anweisungen dieser Anleitung sorgfältig durchlesen und<br />
diese zur Konsultation bei später auftretenden Fragen aufbewahren.<br />
Wir empfehlen Ihnen, vor dem Einsatz eines Canicom-Trainers einen Tierarzt aufzusuchen, der<br />
Ihren Hund auf gesundheitliche Einschränkungen untersucht.<br />
Die wiederholte Reibung der Kontakte auf der Haut kann zu Hautirritationen führen. Überprüfen Sie<br />
den Hals Ihres Hundes bitte regelmäßig auf wunde Stellen oder Reizungen. Sollten Hautirritationen<br />
auftreten, unterbrechen Sie die Anwendung des Gerätes, bis die Reizungen abgeklungen sind.<br />
Lassen Sie das Halsband nicht mehr als 8 Stunden lang pro Tag am Hals Ihres Hundes und prüfen<br />
Sie regelmäßig dass, es keine Irritation gibt.<br />
Verwenden Sie bei Ihrer Ausbildung immer den geringst möglichen Impuls. Beobachten Sie die<br />
Reaktionen Ihres Hundes genau.<br />
Bei Fragen und Problemen empfehlen wir Ihnen, sich an einen Hundeausbilder zu wenden.
D - 41<br />
Lieferumfang<br />
Beim Öffnen der Verpackung finden Sie:<br />
- Das Canicom-Halsband (der Funk-Empfänger), der wasserfest ist mit Kurzen Elektroden<br />
- Eine 3V Lithium - Batterie CR2 für das Canicom-Halsband<br />
- Einen Handsender <strong>CANICOM</strong> <strong>200</strong> (der Funk-Sender), der wasserfest ist und mit einer 3V Lithium<br />
Batterie CR2430<br />
- 1 Testlampe<br />
- 1 Paar langer Kontakte<br />
- 1 Tragriemen<br />
- 1 DVD<br />
- Dieses Buch zur Gebrauchsanleitung<br />
Das Empfänger-Halsband<br />
Abb. 2<br />
2 Kontakte<br />
(kurze oder<br />
lange)<br />
Vorstellung des Gerätes<br />
Der Sender<br />
Abb. 1<br />
Dauerimpuls<br />
- auf 8<br />
Sekunden<br />
beschränkt<br />
Position des<br />
Magnetschalters<br />
Ein-/<br />
Ausschaltentaste<br />
LCD-Bildschirm<br />
Abb. 3<br />
Leuchtzeichen für<br />
Ein-/ Ausschalten<br />
+ Anzeiger des<br />
Funkempfängers<br />
+ Kontroll-Lampe des<br />
Batteriezustandes<br />
Kurzimpuls<br />
als 1<br />
Sekunde<br />
Sendeanzeige<br />
LCD-Bildschirm<br />
Einstellung<br />
der Stufen<br />
Batteriestands<br />
anzeige<br />
Ton-Signal<br />
Position des<br />
Magnetschalters<br />
Impulsstufe :<br />
von 1 bis 9
D - 42<br />
Erste Inbetriebnahme<br />
u Legen Sie die Batterie in das <strong>CANICOM</strong> Empfänger-Halsband ein.<br />
So gehen Sie vor:<br />
- Lösen Sie die vier Schrauben des <strong>CANICOM</strong>-Deckels mittels eines Schraubenziehers.<br />
- Legen Sie die Batterie (Typ 3V-Lithium CR2) gemäß der neben dem Batteriefach aufgezeigten<br />
Polarität ein. (siehe Abb. 4).<br />
- Es ertönt ein (tiefer) Piepton, der auf die richtige Installation der Batterie hinweist.<br />
Sollten Sie nach dem Einlegen der Batterie keinen Piepton hören, entnehmen Sie bitte sofort<br />
wieder die Batterie. Prüfen Sie die Polarität, bevor Sie die Batterie neu einlegen.<br />
- Bevor Sie den Deckel wieder aufsetzen, achten Sie darauf, dass die Dichtung sorgfältig in der<br />
hierfür vorgesehenen Nut liegt. Drehen Sie die vier Schrauben fest.<br />
Polarität « - » der Batterie<br />
Polarität « + » der Batterie<br />
Abb. 4<br />
Dichtung<br />
u Ein- und Ausschalten des Handsenders<br />
Beim Kauf des Gerätes befindet sich die Batterie bereits im <strong>CANICOM</strong> <strong>200</strong> Handsender.<br />
- Zum Einschalten: Drücken Sie eine Sekunde lang auf die auf der Seite des Handsenders<br />
liegenden rote Ein- / Ausschaltens-Taste (siehe Abb.1). Auf dem LCD-Bildschirm erscheinen<br />
die Symbole.<br />
- Zum Ausschalten: Drücken Sie eine Sekunde lang auf die Ein- / Ausschaltens-Taste . Der<br />
LCD-Bildschirm erlischt.<br />
Wir empfehlen Ihnen bei längerem Nicht-Gebrauch die Batterie im Handsender zu entfernen.<br />
u Ein- und Ausschalten des Empfänger-Halsbandes<br />
Dank dem im Handsender befindlichen Magnet können Sie das <strong>CANICOM</strong> ein- und ausschalten.
D - 43<br />
- Zum Einschalten: Halten Sie die rote Markierung des Handsenders eine Sekunde lang an die rote<br />
Markierung des Halsbandes. Die LED am Halsband beginnt grün zu blinken. Das Gerät ist nun<br />
eingeschaltet.<br />
- Zum Ausschalten: Halten Sie die rote Markierung des Handsenders eine Sekunde lang an die rote<br />
Markierung des Halsbandes. Die LED am Halsband leuchtet rot auf. Das Gerät ist nun ausgeschaltet.<br />
Wir empfehlen Ihnen, bei längerem Nicht-Gebrauch die Batterie im Halsband zu entfernen.<br />
Abb. 5<br />
Zum Ein- und Ausschalten halten Sie die beiden<br />
zonen an den roten Markierungen eine<br />
Sekunde lang aneinander<br />
Der Sender<br />
Das Empfänger-Halsband<br />
u Frequenzabstimmung von Handsender und Empfänger<br />
Jeder Sender hat seine eigene, einzigartige Funk-Kodierung (Adresse). Dank der Frequenzabstimmung<br />
des Handsenders mit dem Empfänger-Halsband arbeitet Ihr Handsender mit dem gelieferten<br />
Empfänger-Halsband.<br />
WICHTIG: Bitte vergewissern Sie sich vor der Frequenzabstimmung, dass sich kein anderes<br />
NUM’AXES Gerät in Ihrer Umgebung in Betrieb befindet. Es könnte ansonsten zu<br />
Falschprogrammierungen durch die Kodierung der fremden Komponente kommen. In diesem<br />
Fall wären Sie dann gezwungen, den Sender mit dem Empfänger-Halsband neu zu<br />
programmieren.
D - 44<br />
VERFAHREN ZUR FREQUENZABSTIMMUNG:<br />
1. Schalten Sie den Handsender ein: Drücken Sie eine Sekunde lang auf die auf der Seite des<br />
Handsenders liegenden rote Ein- / Ausschaltens-Taste .<br />
2. Das Empfänger-Halsband ist außer Betrieb (ausgeschaltet, die LED ist aus): Halten Sie die rote<br />
Markierung des Handsenders 6 Sek. lang an die rote Markierung des Empfänger-Halsbandes. Die<br />
LED am Empfänger-Halsband leuchtet erst grün, dann blinkt sie schnell rot.<br />
3. Entfernen Sie den Handsender vom Empfänger-Halsband.<br />
4. Drücken Sie auf die -Taste des Handsenders. Ein Ton-Signal ist zu hören : das Empfänger-Halsband<br />
hat jetzt die Kodierung des Handsenders kennen gelernt und reagiert auf diesen Handsender.<br />
Das Empfänger-Halsband arbeitet nun mit Ihrem Handsender zusammen.<br />
u Neue Programmierung eines Empfänger-Halsbandes<br />
Sie können Ihr Empfänger-Halsband ohne Beschränkung neu programmieren. Diese neue<br />
Programmierung können Sie entweder mit demselben Handsender oder mit einem neuen Handsender<br />
des <strong>CANICOM</strong> – Sortiments durchführen. (siehe Verfahren zur Frequenzabstimmung)<br />
Bedienung des Handsenders<br />
Mit dem Canicom <strong>200</strong>-Handsender können Sie einen Hund arbeiten.<br />
v - Taste : Ton-Signal<br />
Drücken Sie auf die «Ton-Taste » , um ein Ton-Signal am Hundehalsband auszulösen. Bei dieser<br />
Funktion gibt es keine Zeitbeschränkung: Pieptöne werden solange abgegeben, wie Sie auf die Ton-Taste<br />
drücken.<br />
Das Tonsignal hat mehrere Benutzungsmöglichkeiten. Es kommt auf die Dressurmethoden an, die Sie<br />
benutzen. Es dient dazu:<br />
- den Hund auf einen Fehler hinzuweisen.<br />
- die Aufmerksamkeit des Hundes aus einer gewissen Entfernung zu wecken.<br />
- den herkömmlichen Warnpfiff zur Ermahnung zu ersetzen.<br />
- den Hund zu belohnen.<br />
Entscheiden Sie sich, in welcher Weise Sie das Tonsignal einsetzen wollen. Bleiben Sie bei dieser<br />
Entscheidung, um den Hund nicht zu verwirren!<br />
v F-Taste: Kurz-Impuls (Flash)<br />
Durch Drücken der F-Taste wird ein ca. 1/8 Sekunde kurzer Stromimpuls am Halsband abgegeben. Es<br />
wird dabei ein Impuls der auf dem Bildschirm angezeigten Stärke abgegeben (1-9).
D - 45<br />
v C-Taste : Dauer-Impuls (Continous)<br />
Durch Drücken der C-Taste wird ein andauernder Stromimpuls am Halsband abgegeben. Dieser Impuls<br />
wird solange abgegeben, wie Sie die C-Taste drücken – maximal jedoch 8 Sekunden. Es wird dabei ein<br />
Impuls der im Bildschirm angezeigten Stärke abgegeben (1-9).<br />
v Einstellen der Stufen mit « + » und « - »<br />
Mit den +/- -Tasten können Sie die Impulsstärke des Empfänger-Halsbandes sehr schnell regulieren.<br />
Sie verfügen über 9 Stufen.<br />
Bei der ersten Stufe ist die Stärke sehr schwach.<br />
Die 9. Stufe entspricht der stärksten Impulsstärke.<br />
Wir empfehlen Ihnen, immer mit der geringsten Impulsstärke anzufangen.<br />
v Aufteilung der Ströme<br />
Das <strong>CANICOM</strong> <strong>200</strong> verfügt über 9 Stromstufen, die Sie über die +/- Tasten wählen können. Die Aufteilung<br />
der Ströme ist nicht linear sondern logarythmisch. Die Stufe 1-6 steigen nur sehr langsam an. Ab der<br />
Stufe 7 steigen die Stufen deutlich stärker an. Die Idee dahinter: Im nicht trieblichen Bereich haben Sie<br />
die Möglichkeit, sehr fein dosiert auf Ihren Hund einzuwirken, ihm „auf die Schulter zu tippen“. Die<br />
Dosierbarkeit der Stromstärke im Notfall ist hingegen nicht mehr so entscheidend. Hier soll der Hund<br />
ein deutlich spürbares „Stop“-Zeichen bekommen.<br />
Wundern Sie sich also nicht, wenn Ihr Hund beispielsweise bei einer Stufe 6 noch nicht stark reagiert. Es<br />
handelt sich immer noch um eine sehr feine Einwirkung. Natürlich gilt dennoch: Nutzen Sie immer den<br />
geringstmöglichen Impuls. Geben Sie Ihrem Hund die Chance, auf eine Stufe 1 oder 2 zu regieren.<br />
Beobachten Sie, wie Ihr Hund auf diese geringen Stufen reagiert. Erst wenn Sie sichergestellt haben,<br />
dass der Kontakt zur Haut vorhanden und das Gerät betriebsbereit ist erhöhen Sie die Stromstufe!<br />
Auswechseln der Batterie des Handsenders<br />
Mit einer schwachen Batterie vermindert sich die Leistung (die Funkreichweite) des Handsenders.<br />
Ersetzen Sie die Batterie daher frühzeitig.<br />
Sie können den Batteriezustand kontrollieren, indem Sie Ihren <strong>CANICOM</strong> <strong>200</strong> – Handsender einschalten.<br />
Das Ladezustands-Symbol der Batterie erscheint auf dem LCD-Bildschirm. Die verschiedenen Symbole<br />
dieses Zeichen bedeuten wie folgt:<br />
Die Batterie ist im guten Zustand.<br />
Die Batterieleistung ist schwach: Sorgen Sie für eine Ersatzbatterie.<br />
Die Batterie ist leer: Ihr <strong>CANICOM</strong> <strong>200</strong> blockiert. Es ist keine Signalabgabe mehr möglich.<br />
Wechseln Sie die Batterie aus.<br />
Ersetzen Sie die leere Batterie mit einer neuen Batterie. So gehen Sie vor:<br />
- Lösen Sie die Schraube auf der Rückseite des Handsenders und nehmen Sie den Batteriedeckel ab.
D - 46<br />
- Entfernen Sie die leere Batterie.<br />
- Legen Sie die neue Batterie (3V Lithium CR 2430) ein, dass der Plus-Pol nach außen zeigt.<br />
- Legen Sie den Batteriedeckel zurück.<br />
- Ziehen Sie die Schraube fest.<br />
- Kontrollieren Sie das einwandfreie Funktionieren Ihres Handsenders.<br />
Abb. 6<br />
Das « + » Zeichen der<br />
Batterie ist sichtbar<br />
Auswechseln der Batterie des Empfänger-Halsbandes<br />
Den Ladezustand der im Halsband befindlichen Batterie zeigt die auf der Vorderseite des Gehäuses des<br />
Empfänger-Halsbandes liegende LED an:<br />
- Die Batterie ist in gutem Zustand: Langsames grünes Blinken.<br />
- Die Batteriestärke ist schwach: Schnelles rotes Blinken. Ersetzen Sie die Batterie mit einer neuen<br />
Batterie gleicher Art: 3V Lithium CR2. Prüfen Sie das einwandfreie Funktionieren des Empfänger-<br />
Halsbandes. (Siehe §Erste Inbetriebnahme : Legen Sie die Batterie in das <strong>CANICOM</strong> Empfänger-<br />
Halsband ein).<br />
Auswechseln der Kontakte<br />
Es werden 2 Sätze Kontakte unterschiedlicher Länge mit dem Gerät geliefert. Achten Sie bitte darauf,<br />
dass die Länge der Kontakte ausreichend ist, damit sie in Kontakt mit der Haut des Hundes sind. Nur so<br />
funktioniert das Gerät perfekt.<br />
Falls die vormontierten kurzen Kontakte wegen der Felldichte Ihres Hundes nicht ausreichen, ersetzen<br />
Sie diese mit den als Zubehöre mitgelieferten langen Kontakten. Ziehen Sie die Kontakte nur handfest<br />
an, da Sie sonst die Aufnahme auf der Platine beschädigen könnten.
D - 47<br />
Prüfung Ihres <strong>CANICOM</strong> <strong>200</strong><br />
So können Sie die Funktion Ihres Canicom <strong>200</strong> Trainingssystemes überprüfen:<br />
- Versichern Sie sich, dass das Empfänger-Halsband «ausgeschaltet» ist.<br />
- Sie können dann je einen Draht der Kontroll-Lampe unter jeder Kontakte klemmen (schrauben Sie<br />
beide ab und zurück, so dass die Drahte der Kontroll-Lampe unter den Kontakten geklemmt werden).<br />
- Schalten Sie den Handsender und das Empfänger-Halsband ein.<br />
- Drücken Sie auf die « F » oder « C »-Taste, und dann ändern Sie die Stufe der Impulsstärke: die<br />
Kontroll-Lampe leuchtet mit mehr oder weniger Leuchtstärke. Ihr Gerät funktioniert einwandfrei.<br />
So erzielen Sie die besten Ergebnisse<br />
Die Signale zwischen Handsender und Halsband werden über Funkwellen übertragen. Die maximale<br />
Reichweite beträgt je nach Gelände bis zu <strong>200</strong> Metern.<br />
Achten Sie bitte auf folgende Hinweise, um die besten Leistungen Ihres <strong>CANICOM</strong> <strong>200</strong> zu erzielen:<br />
- Im oberen Bereich des Handsenders befindet sich im Gehäuseinneren die Antenne. Halten Sie den<br />
Handsender, so dass der obere Teil des LCD-Bildschirmes aus Ihrer Hand herausragt und die Antenne<br />
so nicht innerhalb Ihrer Handfläche liegt.<br />
- Legen Sie das Empfänger-Halsband so an, dass die LED-Leuchte nicht zum Hundekörper sondern in<br />
Richtung Schnauze zeigt.<br />
- Kontrollieren Sie den Batteriezustand (das Empfänger-Halsband und der Handsender), bevor Sie das<br />
Gerät benutzen, und ersetzen Sie die Batterie, sobald das Ladungsniveau schwach wird.<br />
- Die Batteriestärke vermindert sich leicht, wenn die Temperaturen unter 0°C fallen. Wir empfehlen<br />
Ihnen, bei Kälte den Handsender in der Tasche anzuwärmen.<br />
Justierung des Halsbandes<br />
Das Halsband muss so stramm am Hundehals sitzen, dass jederzeit gewährleistet ist, dass beide<br />
Kontakte die Haut des Hundes berühren.<br />
Die Justierung des Halsbandes ist sehr wichtig:<br />
• Wenn das Halsband zu locker ist, funktioniert das Gerät nicht korrekt. Außerdem kann sich das<br />
Halsband bewegen und die wiederholten Reibungen der Kontakten auf der Haut des Tiers können<br />
Reizungen verursachen.<br />
• Wenn das Halsband zu fest sitzt, wird der Hund gewürgt.<br />
Vermeiden Sie das Halsband über längere Zeit hinweg am Hals des Hundes zu lassen, weil es Irritationen<br />
verursachen kann.<br />
Es sollten maximal zwei Finger zwischen Hundehals und Halsband passen. Natürlich sollte das
D - 48<br />
Halsband den Hund jedoch nicht würgen. Das Halsband sollte nicht zum Anbringen einer Leine<br />
verwendet werden.<br />
Durch Zug an der Leine Könnten die Kontakte über die Haut des Hundes gezogen werden.<br />
Die Gewöhnung an das Halsband zur Hundeerziehung<br />
- Bereits ab einem Alter von 6 Monaten kann ein junger Hund langsam an das Halsband gewöhnt werden.<br />
Er sollte eine Grunderziehung erhalten haben und auf einfache Befehle wie "Sitz!", "Platz!" oder andere<br />
Ermahnungen reagieren.<br />
- Arbeiten Sie nicht mit diesem Halsband, wenn Ihr Tier krank (Herzprobleme, Epilepsie usw. ...) oder<br />
aber stark verhaltensgestört ist.<br />
- Eine gewisse Gewöhnung an das Hundehalsband ist immer erforderlich: Legen Sie Ihrem Hund das<br />
Halsband zunächst einige Zeit an, ohne von seinen Funktionen Gebrauch zu machen. Noch besser:<br />
Lernen Sie Ihrem Hund, dass das Halsband etwas Schönes ist. Er trägt es, wenn Sie mit Ihm Gassi<br />
gehen, er was zu fressen bekommt, oder Sie mit Ihm spielen. So lernt der Hund sehr schnell, das<br />
Halsband nicht als Strafmittel sondern als etwas Angenehmes kennen.<br />
- Überspringen Sie keine Lernstufe: Nur so erziehen Sie Ihren Hund positiv und wirkungsvoll:<br />
- Wählen Sie anfangs eine vertraute Umgebung, in der sich Ihr Hund auskennt.<br />
- Beginnen Sie immer mit dem geringstmöglichen Stromimpuls und achten Sie auf die<br />
Reaktion Ihres Hundes.<br />
- Wählen Sie beim Betätigen der Funktionstaste stets den richtigen Zeitpunkt. Lösen Sie die<br />
Sanktion genau in dem Moment aus, in dem Ihr Hund sich falsch verhält, nicht erst später.<br />
- Ermutigen Sie ihn durch Streicheln: Das trägt zum besseren Verständnis bei und wird den<br />
Willen zum Gehorsam bei Ihrem Hund verstärken.<br />
Der Unterschied zwischen "Dauer-" und "Kurzimpuls"<br />
Diese beiden interessanten Funktionen sind von großer Bedeutung und bieten Ihnen die Möglichkeit,<br />
situationsgemäß mit Ihrem Hund zu handeln.<br />
Der Dauerimpuls<br />
Dieser Impuls kann beispielsweise angewandt werden, um ein Kommando, das der Hund bereits kennt,<br />
zu unterstützten. Der Hund lernt, dass er das unangenehme Gefühl (den Impuls) abstellen kann, in dem<br />
er das Kommando des Führers befolgt.<br />
Der Kurzimpuls<br />
Kann wie ein „Tippen auf die Schulter“ als Ermahnung oder Erinnerung eingesetzt werden.
D - 49<br />
Vorsichtsmaßnahmen<br />
- Das System darf von Leuten mit physisch oder sensoriellen verminderten Fähigkeiten (inkl. Kinder)<br />
nicht benutzt werden oder Leute, die über ungenügend Erfahrung und Wissen verfügen so lange sie<br />
nicht unter Beobachtung einer verantwortlichen Person stehen oder bis sie ausgebildet sind, um das<br />
System richtig zu benutzen.<br />
− Versichern Sie sich, dass Kinder nicht mit dem System spielen.<br />
− Der Artikel ist kein Spielzeug.<br />
− Das Produkt ist nicht geeignet für die Benutzung durch Kinder unter 14 Jahren.<br />
- Das <strong>CANICOM</strong> Empfänger-Halsband ist wasserfest. Ihr Hund kann daher ohne Probleme auch mal in<br />
einen See springen.<br />
- Der Handsender ist spritzwassergeschützt. Ein leichter Regenguss kann ihm nichts anhaben.<br />
Stärkere Wasserreinwirkung könnte ihn jedoch irreparabel zerstören!<br />
- Die NUM’AXES-Halsbänder <strong>CANICOM</strong> dürfen nicht zusammen mit einem anderen magnetisierenden<br />
Halsbändern getragen werden.<br />
- Bringen Sie den Magnetschalter auf keinen Fall in die Nähe von Gegenständen, die empfindlich auf<br />
Magnetfelder reagieren, um dadurch möglicherweise irreparabel Schäden zu vermeiden.<br />
- Achten Sie darauf, dass das Gerät nicht an Orten gelagert wird, die hohen Temperaturen ausgesetzt sind.<br />
− NUM’AXES empfehlt Ihnen Batterie gleicher Marke und gleicher Art wie die Batterie, die beim Kauf<br />
des Gerätes mitgeliefert wurden, zu benützen. Ihr Gerät könnte mit Batterien anderer Marken<br />
schlecht funktionieren oder nicht vollkompatibel sein. Entsprechende Batterie erwerben Sie bei<br />
NUM’AXES oder Ihrem Fachhändler.<br />
- Die Batterie muss alle zwei Jahre ausgewechselt werden, auch wenn das Gerät über längere Zeit<br />
hinweg nicht benutzt wurde.<br />
- Im Falle einer verlängerte Nicht-Benutzung des Gerätes ( z.B mehr als drei Monate am Ende der<br />
Jagdsaison) empfehlen wir Ihnen die Batterie aus dem Halsband und dem Handsender zu nehmen. Die<br />
kodierung des Halsbandes (Frequenzabstimmung) wird beibehalten auch ohne eingelegte Batterie.<br />
- Lassen Sie niemals eine leere Batterie im Handsender oder im Halsband, sie könnte auslaufen und Ihr<br />
<strong>CANICOM</strong> <strong>200</strong> beschädigen.<br />
Pflege<br />
- Benutzen Sie zur Reinigung keine Lösungsmittel oder Benzin. Waschen Sie das Halsband regelmäßig<br />
mit klarem Wasser ab und reiben Sie es mit einem weichen Tuch trocken.<br />
- Wir empfehlen Ihnen, die Dichtung einmal pro Jahr zu wechseln, damit die Abdichtung des Empfänger-<br />
Halsbandes behaltet wird.
D - 50<br />
Beim Nicht-Funktionieren Ihres Geräts<br />
Wenn Ihr Gerät einmal nicht ordnungsgemäß funktioniert, sollten Sie dieses Handbuch nochmals<br />
aufmerksam durchlesen und sicherstellen, dass das Problem nicht auf der unzureichenden<br />
Batteriekapazität oder einem Anwendungsfehler beruht.<br />
Haben Sie den Ladungszustand der Batterien überprüft, führen Sie eine neue Kodierung des Halsbandes<br />
durch (s. Verfahren zur Frequenzabstimmung).<br />
Es besteht auch die Möglichkeit, das Empfänger-Halsband auf Werkseinstellung zurückzusetzen. Öffnen<br />
Sie dazu das Empfänger-Halsband und entnehmen Sie die Batterie. Verursachen Sie mit einem<br />
metallischen Gegenstand einen Kurzschluss zwischen den beiden Batteriepolen (mindestens 2<br />
Sekunden). Wenn Sie anschließend wieder die Batterie einlegen, sollte der oben beschriebene Batterie-<br />
Piepton zu hören sein. Das Gerät ist auf Werkseinstellung zurückgesetzt.<br />
Schalten Sie das Empfänger Halsband mit dem Handsender ein.<br />
Abb. 7<br />
Reset : Verbinden Sie die<br />
beiden Batteriepole mit einem<br />
metallischen Gegenstand<br />
Sollte das Gerät auch weiterhin nicht einwandfrei arbeiten wenden Sie sich bitte mit Ihrem Fachhändler<br />
oder mit NUM’AXES (+33.3.38.69.96.27 oder export@numaxes.com).<br />
Je nach der Fehlfunktion werden Sie beratet, das Produkt zurückzuschicken, so das es repariert und<br />
getestet wird.<br />
Der Kundendienst braucht unbedingt für alle Reparaturen:<br />
- das komplette Produkt<br />
- der Kaufbeweis (Rechnung oder Kassenbeleg)<br />
Der Kundendienst wird Ihnen die Reparatur berechnen, wenn alle Beweise nicht vorliegen.
D - 51<br />
Technische Merkmale<br />
Sender<br />
Empfänger<br />
Spannungsversorgung 1 Batterie Lithium 3 V CR2430 1 Batterie Lithium 3V CR2<br />
Durchschnittliche Ca. 50 000 Sende-Signale Im Standbyzustand : ca. 7 Monate<br />
Batterieleistung Bei durchschnittlicher Nutzung :<br />
ca. 2 Monate<br />
Reichweite<br />
Ca. <strong>200</strong> M<br />
Verhalten im Wasser Spritzwassergeschützt Wasserdicht<br />
Batterieanzeige Anzeige auf dem Bildschirm Anzeigelampe<br />
Impulsstufen 9<br />
Betriebstemperatur zwischen – 20°C und + 40°C Zwischen – 20°C und + 40°C<br />
Abmessungen H x L x B 98 mm x 45 mm x 18 mm 38 mm x 68 mm x 43 mm<br />
Gewicht (mit der Batterie) 50 g 75 g (ohne dem Gurt)<br />
Verstellbare Halsweite des<br />
Halsbandes von 20 bis 50 cm<br />
Garantie<br />
NUM’AXES garantiert das Produkt gegen Fabrikationsfehler für eine Zeit von 2 Jahren ab Kaufdatum. Die<br />
Frachtkosten für Hin- und Rücksendung des Produkts trägt ausschließlich der Käufer.<br />
Der Hersteller übernimmt keine Verantwortung für Schäden, die durch unsachgemäßen Gebrauch des<br />
Gerätes entstanden sind.<br />
Garantiebedingungen<br />
1. Die Garantie kann nur dann gewährt werden, wenn der Kaufbeweis (Rechnung oder Kassenbeleg) dem<br />
Händler oder der Firma NUM’AXES vorliegt.<br />
2. Die Garantie erstreckt sich nicht auf folgende Bereiche:<br />
- Erneuerung der Batterie oder des Nylon-Bands.<br />
- Transportrisiken direkter oder indirekter Art, die durch Rücksendung des Produkts an NUM’AXES<br />
entstehen.<br />
- Beschädigungen des Produkts, die durch Fahrlässigkeit oder Bedienungsfehler bedingt sind<br />
(unsachgemäße Bedienung, Nichtbeachtung der Betriebsanleitung, oder ungewollte Schäden z.B.<br />
Bruch oder Risse, Wassereinbruch, Reparaturen, die von nicht autorisierten Stellen durchgeführt<br />
werden).<br />
- Der Verlust oder Diebstahl.<br />
3. Wird das Produkt als Fehlerhaft anerkannt, kann NUM’AXES es ersetzen oder reparieren.<br />
4. Rechtsmittel gegen NUM’AXES, insbesondere bei unsachgemäßem Gebrauch oder technischem
D - 52<br />
Defekt des Gerätes, können in keiner Form geltend gemacht werden.<br />
5. NUM’AXES behält sich das Recht vor, die Eigenschaften seiner Produkte zur technischen<br />
Verbesserung bzw. zur Einhaltung von neuen Vorschriften zu verändern.<br />
6. Die in dieser Gebrauchsanleitung angegebenen Informationen können ohne Voranmeldung geändert<br />
werden.<br />
7. Die Photos und Zeichnungen können von den Produkten abweichen.<br />
Registrieren Ihres Produktes<br />
Ihr Produkt kann auf unserer Website unter www.numaxes.com registriert werden.<br />
Zubehöre<br />
Sie können jederzeit die Zubehöre (Batterie, Gurt…) bei Ihrem Vertreiber erwerben.<br />
Sammeln und Recycling der Geräte am Ende ihres Lebens<br />
Dieses Gerät entspricht der EU-Richtlinie <strong>200</strong>2/96/EC. Die durchgestrichene Abfalltonne , die auf<br />
diesem Gerät abgebildet ist, bedeutet, dass dieses Produkt nach dem Ende seiner Betriebszeit getrennt<br />
von den Haushaltsabfällen zu entsorgen ist. Entweder sollte es an einer Sammelstelle für elektrische<br />
und elektronische Altgeräte abgegeben werden oder, bei Kauf eines neuen Geräts, dem Verkäufer<br />
zurückgegeben werden. Der Verbraucher ist in jedem Falle verantwortlich für die Ordnungsgemäße<br />
Entsorgung des Geräts nach Ende der Betriebszeit. Nur bei Abgabe des Geräts an einer geeigneten<br />
Sammelstelle ist es möglich das Produkt so zu verarbeiten, zu recyceln und umweltgerecht zu<br />
entsorgen, dass einerseits Werkstoffe und Materialien wieder verwendet werden können und<br />
andererseits negative Folgen für Umwelt und Gesundheit ausgeschlossen werden. Nähere Auskunft<br />
bekommen Sie bei Ihrem örtlichen Amt für Abfallentsorgung oder in der Verkaufstelle dieses Geräts.<br />
www.numaxes.com – export@numaxes.com
Manuale d’uso<br />
It - 53<br />
AVVERTIMENTO DESTINATO AI PORTATORI DI APPARECCHI CARDIACI<br />
Tutti i portatori di apparecchi cardiaci (stimolatori cardiaci, pacemaker o defibrillatori) sono<br />
invitati a prendere le dovute precauzioni per utilizzare <strong>CANICOM</strong> <strong>200</strong>.<br />
Questo apparecchio emette campi magnetici statici (il magnete è situato all’ interno del<br />
telecomando) e onde elettromagnetiche ad alta frequenza (frequenza 869 MHz, massima potenza<br />
d’emissione 25 mW).<br />
<strong>CANICOM</strong> <strong>200</strong> è conforme alle normative Europee.<br />
Grazie per avere scelto un prodotto della gamma NUM’AXES.<br />
Si consiglia di leggere attentamente le istruzioni di questo manuale per conoscere tutte le prestazioni ed<br />
ottenere i migliori risultati.<br />
Consigliamo di far sottoporre il cane ad una visita veterinaria preventiva prima di utilizzare il collare<br />
per l’addestramento.<br />
Lo sfregamento degli elettrodi sempre nella stessa zona del collo del vostro cane potrebbe causare<br />
eventuali irritazioni. Nel caso in cui compaiono irritazioni al collo del cane, sospendete l’utilizzo del<br />
collare fino alla completa scomparsa. Non lasciare il collare per più di otto ore al giorno al vostro<br />
cane.<br />
E’ buona regola cominciare al utilizzare la stimolazione sempre dal livello più basso e, se necessario,<br />
aumentare progressivamente.<br />
Non esitate a chiedere al vostro veterinario o ad un addestratore professionista consigli adatti al<br />
vostro cane.
It - 54<br />
Composizione del prodotto<br />
La confezione del <strong>CANICOM</strong> <strong>200</strong> comprende:<br />
- Collare <strong>CANICOM</strong><br />
- Pila lithium CR2 da 3V per il collare<br />
- Telecomando <strong>CANICOM</strong> <strong>200</strong> equipaggiato<br />
di una pila lithium CR2430 da 3V<br />
- Lampadina test<br />
- Coppia elettrodi lunghi<br />
- Collarino porta telecomando<br />
- DVD<br />
- Manuale d’uso<br />
Presentazione del prodotto<br />
TELECOMANDO<br />
Fig. 1<br />
Stimolazione<br />
continua<br />
(max 8<br />
secondi)<br />
Stimolazione<br />
flash<br />
(inferiore a 1<br />
secondo)<br />
Regolazione<br />
livello<br />
stimolazione<br />
da 1 a 9<br />
Avvertimento<br />
sonoro<br />
Indicatore<br />
rosso:<br />
interruttore<br />
magnetico<br />
Pulsante rosso<br />
On/Off<br />
(accensione/<br />
spegnimento)<br />
Schermo<br />
LCD<br />
COLLARE RICEVITORE<br />
Fig. 2<br />
Indicatore<br />
emissione<br />
radio<br />
Indicatore<br />
carica<br />
della pila<br />
Indicatore rosso:<br />
magnete<br />
accensione/spegnimento<br />
collare<br />
DISPLAY<br />
Fig. 3<br />
Elettrodi<br />
Led collare:<br />
acceso/spento<br />
+<br />
ricezione radio<br />
+<br />
usura della pila<br />
Visualizzazione<br />
livello di<br />
stimolazione<br />
selezionato
It - 55<br />
Primo utilizzo<br />
u Preparazione del collare <strong>CANICOM</strong><br />
- Con un cacciavite a croce svitare le 4 viti del coperchio collare <strong>CANICOM</strong>.<br />
- Inserire la pila al litio da 3V tipo CR2 rispettando la polarità indicata nel vano pila (Fig. 4).<br />
- Un bip sonoro di tonalità grave indicherà che la pila è stata inserita correttamente.<br />
Nel caso in cui non udite alcun bip sonoro dopo avere inserito la pila, toglietela immediatamente e<br />
verificare la polarità corretta prima di inserirla di nuovo.<br />
- Richiudete il coperchio, assicurandovi che la guarnizione di tenuta stagna sia pulita e in posizione<br />
corretta.<br />
- Riavvitate moderatamente le 4 viti.<br />
Fig. 4<br />
Polarità - della pila<br />
Polarità + della pila<br />
COLLARE<br />
Guarnizione a tenuta stagna<br />
u Accensione/spegnimento del telecomando e del collare<br />
N.B.: Al momento dell’acquisto la pila è già inserita nel telecomando.<br />
Il magnete situato nel telecomando permette di accendere e spegnere il collare <strong>CANICOM</strong>.<br />
- Per accendere il telecomando: premere per 1 secondo il pulsante rosso situato in alto sul lato<br />
destro (Fig. 1).<br />
- Per spegnere il telecomando: premere per 1 secondo il pulsante rosso .<br />
- Per accendere il collare: portare a contatto l’indicatore rosso del telecomando con l’indicatore rosso<br />
del collare per circa 1 secondo (Fig. 5); il led del collare si illumina di colore verde e comincia a<br />
lampeggiare. Il collare è acceso.<br />
- Per spegnere il collare: portare a contatto l’indicatore rosso del telecomando con l’indicatore rosso<br />
del collare per circa 1 secondo (Fig. 5); il led diventa rosso ed il collare si spegne.
It - 56<br />
Fig. 5<br />
Per accendere o spegnere il collare mettere a contatto<br />
gli interruttori magnetici per circa un secondo.<br />
TELECOMANDO<br />
COLLARE<br />
Codifica telecomando/collare<br />
Ciascun telecomando ha un codice radio.<br />
La codifica del telecomando con il collare può essere effetuata sia alla prima attivazione del vostro<br />
<strong>CANICOM</strong> <strong>200</strong>, sia nel caso in cui dobbiate sostituire uno dei due componenti.<br />
Con questa operazione il collare potrà funzionare solo con il vostro telecomando.<br />
IMPORTANTE: prima di effettuare la procedura di codifica telecomando/collare, assicuratevi che<br />
nessuno vicino a voi stia utilizzando un <strong>CANICOM</strong> <strong>200</strong> o qualsiasi altro prodotto radiocomandato della<br />
gamma NUM’AXES perché il vostro collare potrebbe registrare il codice dell’altro telecomando.<br />
Se ciò dovesse accadere, rifate di nuovo l’operazione di codifica del telecomando con il vostro collare.<br />
PROCEDURA DI CODIFICA TELECOMANDO/COLLARE<br />
1 . Accendere il telecomando: premere per un secondo il pulsante rosso situato sul lato destro del<br />
telecomando.<br />
2 . Portare a contatto l’indicatore rosso del telecomando con l’indicatore rosso del collare (il led del<br />
collare diventa verde). Mantenere il contatto per circa 6 secondi fino a quando il led si colora di rosso<br />
e lampeggia.<br />
3 . Allontanare il telecomando dal collare.<br />
4 . Premere il tasto del telecomando. Il collare emetterà un suono e sarà sincronizzato con il<br />
telecomando.
It - 57<br />
Codificare nuovamente un collare:<br />
Non c´è alcun limite alla codifica del prodotto, sia con lo stesso telecomando, sia con nuovo<br />
telecomando della gamma <strong>CANICOM</strong>.<br />
Utilizzo del telecomando<br />
Il telecomando <strong>CANICOM</strong> <strong>200</strong> è predisposto per gestire un collare.<br />
v Tasto : avvertimento sonoro<br />
Premendo il tasto “bip sonoro” potrete inviare a distanza un avvertimento sonoro sul collare. I bip<br />
sonori sono emessi ogni volta che viene premuto questo tasto. La durata del suono è in funzione del<br />
tempo che viene mantenuto premuto il tasto.<br />
È molto importante durante l’addestramento l’utilizzo del “bip sonoro” per comunicare con il vostro<br />
ausiliare. Potete segnalargli un errore commesso, attirarre la sua attenzione, preavvisare un comando...<br />
È buona regola utilizzare il bip sonoro sempre allo stesso modo, per non creare confusione al<br />
vostro cane.<br />
v Tasto “F”: stimolazione flash<br />
Premendo il tasto “F”del telecomando potrete attivare a distanza una stimolazione flash attraverso gli<br />
elettrodi del collare. La stimolazione flash ha una durata di circa 2 decimi di secondo ogni volta che<br />
premete il tasto “F”.<br />
v Tasto “C”: stimolazione continua<br />
Premendo il tasto “C” potrete attivare a distanza una stimolazione continua attraverso i due elettrodi del<br />
collare. La durata equivale al tempo che viene mantenuto premuto il pulsante, per un massimo di 8<br />
secondi (dispositivo di sicurezza anti-shock).<br />
v Tasti di regolazione del livello di stimolazione “+” e ”-“<br />
I tasti “+”/”-“ permettono di regolare rapidamente il livello di stimolazione del collare, secondo necessità:<br />
sono disponibili 9 livelli per adeguarsi correttamente alla sensibilità del cane.<br />
Livello 1 stimolazione appena percettibile - Livello 9 massima stimolazione.<br />
I primi quattro livelli permettono stimolazioni molto sobrie, mentre i livelli dal 5 al 9 vengono<br />
normalmente utilizzati su cani di stazza importante o comunque molto tolleranti alle stimolazioni.
It - 58<br />
L’utilizzo del collare per l’addestramento ha lo scopo di educare il cane, comunicandogli la vostra<br />
approvazione o per rimarcare l’errore che ha commesso, rispettandone il carattere e la<br />
sensibilità, permettendo di mantenere uno stretto contatto in tutte le situazioni di lavoro.<br />
Si consiglia pertanto di utilizzare con molta discrezione i livelli di stimolazione in funzione del<br />
carattere e della sensibilità del vostro cane.<br />
Verifica pila telecomando<br />
L’usura della pila comporta una diminuzione delle prestazioni del telecomando, soprattutto in termini di<br />
portata. Controllate sempre lo stato della pila indicato sul display del telecomando.<br />
Pila carica.<br />
Pila debole: prevedete di sostituirla.<br />
Pila scarica: il <strong>CANICOM</strong> <strong>200</strong> si blocca ed è necessario sostituire subito la pila.<br />
Sostituzione pila telecomando<br />
- Svitare il coperchio sul retro del telecomando ed estrarre la pila.<br />
- Inserire la nuova pila rispettando la polarità indicata.<br />
- Riposizionare il tappo.<br />
- Riavvitare la vite del coperchio.<br />
Fig. 6<br />
Verifica/sostituzione pila collare<br />
Per verificare lo stato della pila, osservate il<br />
led con il collare acceso:<br />
• Con la pila in buono stato, il led verde<br />
lampeggia ogni secondo.<br />
• Con la pila quasi scarica, il led si colora di<br />
rosso e lampeggia rapidamente. Dovete<br />
quindi sostituire la pila litio tipo CR2 3V (cf. §<br />
Preparazione del collare <strong>CANICOM</strong>).<br />
Il segno + della pila<br />
deve essere visibile<br />
Sostituzione elettrodi<br />
Se il vostro cane è a pelo lungo, si consiglia di sostituire gli elettrodi corti con quelli più lunghi in<br />
dotazione, per ottenere un corretto posizionamento del collare.<br />
Raccomandiamo di stringerli con cautela, per evitare la rottura dell’involucro di plastica.
It - 59<br />
Verifica del corretto funzionamento <strong>CANICOM</strong> <strong>200</strong><br />
- Spegnete il collare<br />
- Svitate leggermente gli elettrodi del collare e fissate i due terminali della lampadina test in dotazione<br />
riavvitando gli elettrodi.<br />
- Accendete il collare e il telecomando.<br />
- Premete il tasto stimolazioni “F” o “C” del telecomando: la lampadina test si deve illuminare, indicando<br />
che il collare emette stimolazioni e quindi funziona correttamente.<br />
Per ottenere le migliori prestazioni<br />
Il telecomando <strong>CANICOM</strong> <strong>200</strong> ha una portata di circa <strong>200</strong> metri. Le distanze possono subire lievi variazioni<br />
secondo la conformazione del terreno in cui si opera.<br />
Di seguito elenchiamo alcuni consigli per ottenere le migliori prestazioni:<br />
- Le prestazioni del vostro <strong>CANICOM</strong> <strong>200</strong> saranno ottimali se terrete il telecomando leggermente in alto<br />
e in modo da non coprire la parte superiore dello schermo LCD, perché è il punto in cui vengono<br />
trasmesse le onde radio.<br />
- Ricordiamo inoltre che una temperatura molto rigida inferiore a 0°C può diminuire sensibilmente le<br />
prestazioni del prodotto. Si consiglia pertanto di conservare il telecomando in ambienti idonei.<br />
- E’ buona regola, prima di utilizzare il prodotto, controllare lo stato delle batterie.<br />
Posizionamento del collare<br />
- Gli elettrodi del collare devono essere posizionati sotto il collo del cane.<br />
- La cinghia deve essere stretta in modo da assicurare il contatto degli elettrodi con la pelle del cane.<br />
- La corretta posizione del collare indossato dal cane, è con la spia luminosa rivolta verso il muso.<br />
Il collare correttamente regolato permette di passare due dita tra la cinghia e il collo del cane.<br />
Se avete la necessità di utilizzare il collare per molte ore, preoccupatevi ogni tanto di riposizionarlo al<br />
collo del vostro cane. Lo sfregamento degli elettrodi sempre nella stessa zona del collo, potrebbe causare<br />
eventuali irritazioni.<br />
Regole di base per l’utilizzo del <strong>CANICOM</strong> <strong>200</strong><br />
- Il cane deve avere almeno 6/8 mesi ad aver appreso i comandi base, come «seduto» o «terra».<br />
- Deve essere in buona salute, non avere problemi cardiaci, epilessia o disturbi comportamentali.<br />
- Si consiglia un breve periodo di adattamento, facendo indossare al cane il collare spento per qualche<br />
giorno.<br />
- Per l’addestramento è fondamentale adottare alcuni importanti accorgimenti:
It - 60<br />
- Scegliete un terreno che gli è familiare, mettendolo a suo agio.<br />
- Successivamente determinate il livello di stimolazione a partire dal quale il vostro cane<br />
risponde. E’ buona regola cominciare al utilizzare la stimolazione sempre dal livello più<br />
basso e, se necessario, aumentare progressivamente.<br />
- Utilizzate la correzione al momento giusto facendogli capire l’errore commesso, per<br />
permettergli di associare la correzione al comportamento scorretto.<br />
- Incoraggiate il vostro cane con delle carezze, comprenderà più rapidamente.<br />
Precauzioni per l’uso<br />
− Questo dispositivo non è destinato ad essere utilizzato da persone (compresi i bambini) con ridotte<br />
capacità fisiche, sensoriali o mentali o persone prive di esperienza e conoscenza, a meno che non siano<br />
aiutati da una persona responsabile della loro sicurezza, che li sorveglia ed istruisce per l'uso del<br />
dispositivo.<br />
− Assicurarsi che i bambini non giochino con l'apparecchio.<br />
− Questo prodotto non è un giocattolo.<br />
− Questo prodotto non deve essere utilizzato da personne di età inferiore a 14 anni.<br />
- Il collare ricevitore <strong>CANICOM</strong> è impermeabile all’immersione. Il vostro cane può attraversare i corsi<br />
d'acqua senza alcuna preoccupazione.<br />
- Il telecomando è impermeabile allo scorrimento dell’acqua: è previsto l’utilizzo anche sotto la pioggia<br />
senza tuttavia sottoporlo ad eccessiva esposizione. Attenzione : se il telecomando cade in acqua,<br />
l’immersione totale potrebbe causare danni irreversibili non coperti in garanzia.<br />
- Evitate di avvicinare il telecomando a oggetti sensibili ai campi magnetici, rischiate di danneggiarli in modo<br />
irreversibile.<br />
- Abbiate cura di tenere sempre l’apparecchio in un luogo idoneo. Non lasciatelo vicino a fonti di calore,<br />
esposto al sole o a temperature troppo fredde per un periodo di tempo prolungato.<br />
− Si raccomanda di utilizzare pile dello stesso modello e della stessa marca, come quella che trovate<br />
installata nel prodotto. Pile di altre marche possono essere non compatibili e causare<br />
malfunzionamenti. Potete procurarvi le pile adeguate al vostro prodotto presso il vostro rivenditore di<br />
fiducia o direttamente da NUM’AXES.<br />
- Nel caso in cui l’apparecchio rimanga inutilizzato per un periodo superiore ai 3 mesi (ad esempio fine di<br />
periodo di caccia), si consiglia di togliere le pile sia dal collare che dal telecomando. La codifica<br />
telecomando/collare viene mantenuta per molti mesi anche in assenza delle pile.<br />
- Raccomandiamo di sostituire le batterie almeno ogni 2 anni anche se l’apparecchio è stato utilizzato poco.<br />
- Non lasciate mai le pile scariche all’interno dell’apparecchio (telecomando e collare), perché possono<br />
danneggiarlo.<br />
- Quando utilizzate il collare <strong>CANICOM</strong>, togliete dal collo del cane qualsiasi altro collare di metallo,<br />
catenelle o medaglie che possono provocare malfunzionamenti del prodotto.
It - 61<br />
Manutenzione<br />
- Per la pulizia del vostro apparecchio utilizzate solo un panno morbido e una soluzione detergente<br />
neutra, evitando assolutamente l’uso di diluenti o benzina.<br />
- Per preservare l’impermeabilità del collare, raccomandiamo di sostituire la guarnizione ogni anno.<br />
In caso di malfunzionamento<br />
Prima di affermare che il collare “non funziona”, assicuratevi che il problema riscontrato non sia dovuto<br />
ad errori di utilizzo o semplicemente alla batteria scarica.<br />
Nel caso in cui riscontrate problemi di trasmissione radio, provate a fare la procedura di codifica del<br />
collare seguendo le istruzioni riportate nel paragrafo specifico.<br />
Procedete, se necessario, ad effettuare un reset della memoria dell’apparecchio in questo modo:<br />
Togliete la batteria e poi, con l’aiuto di un oggetto metallico, (un cacciavite, per esempio) cortocircuitate<br />
per un paio di secondi i 2 supporti della pila (Fig. 7). Inserite nuovamente la batteria rispettando la<br />
polarità. Se udite un bip sonoro significa che la batteria è stata inserita correttamente.<br />
Riaccendete il vostro <strong>CANICOM</strong> con l’aiuto del telecomando.<br />
Fig. 7<br />
RESET : cortocircuitare i 2 supporti della pila<br />
Se il problema persiste contattate il vostro rivenditore di fiducia o NUM’AXES (+33.2.38.69.96.27 o<br />
export@numaxes.com) prima di inviare il prodotto in riparazione.<br />
Nel caso in cui sia necessario inviare il prodotto al servizio assistenza clienti, documentate con una chiara<br />
descrizione il difetto riscontrato. Il servizio assistenza clienti provvederà a riparare e/o sostituire il<br />
prodotto.<br />
Caratteristiche tecniche<br />
Telecomando<br />
Collare<br />
Alimentazione 1 pila litio 3V tipo CR2430 1 pila litio 3V tipo CR2<br />
Autonomia Utilizzo intensivo: circa 50.000 comandi Utilizzo intensivo: circa 2 mesi<br />
In funzione stand-by: circa 7 mesi<br />
Portata radio<br />
Circa <strong>200</strong> m<br />
Tenuta stagna Allo scorrimento dell’acqua Ermetico all’immersione
Telecomando<br />
Collare<br />
Indicatore stato della pila Indicatore schermo LCD Led luminoso<br />
Livelli stimolazione 9<br />
Temperatura d' utilizzo Tra – 20°C / + 40°C Tra – 20°C / + 40°C<br />
Dimensioni: H x L x P 98 mm x 45 mm x 18 mm 38 mm x 68 mm x 43 mm<br />
Peso (batteria inclusa) 50 g 75 g<br />
Cinghia regolabile da 20 a 50 cm<br />
Garanzia<br />
NUM’AXES garantisce il prodotto contro difetti di fabbricazione per 24 mesi dalla data di acquisto.<br />
Le spese di trasporto, andata e ritorno, per l’invio del prodotto a NUM’AXES, sono a carico<br />
dell’utilizzatore.<br />
Condizioni di garanzia<br />
1. La garanzia è riconosciuta solo se il prodotto inviato in riparazione è corredato di prova di acquisto<br />
(fattura o biglietto di cassa) senza alcuna manomissione.<br />
2. La garanzia non coprende:<br />
- La sostituzione delle pile<br />
- La sostituzione della cinghia<br />
- I rischi di trasporto, lo smarrimento o il furto connessi con l’invio del prodotto a/da NUM’AXES,<br />
- I danni causati da:<br />
- Negligenza o colpa dell’utilizzatore (ad esempio: morsi, rotture, fessure, manomissione…)<br />
- Utilizzo non conforme alle istruzioni o non previsto<br />
- Riparazioni o modifiche effettuate da personale non autorizzato<br />
3. Se il prodotto è riconosciuto difettoso, NUM’AXES lo riparerà o lo sostituirà suo insindacabile<br />
giudizio.<br />
4. Contro NUM’AXES non è ammesso alcun ricorso, in particolare, in caso di cattivo uso, manomissione<br />
o uso non conforme del prodotto.<br />
5. Il produttore NUM’AXES si riserva il diritto di modificare le caratteristiche dei prodotti, al fine di<br />
apportare miglioramenti tecnici o adeguarli a nuove regolamentazioni.<br />
6. Le informazioni del presente manuale possono essere oggetto di modifica senza preavviso.<br />
7. Fotografie e disegni non contrattuali.<br />
Registrazione del prodotto<br />
It - 62<br />
Il prodotto può essere registrato sul nostro sito web www.numaxes.com.
It - 63<br />
Accessori<br />
Sono disponibili presso il vostro rivenditore di fiducia accessori e parti di ricambio (coppia di elettrodi corti<br />
o lunghi, cinghia collare, pile, collare <strong>CANICOM</strong>…).<br />
Raccolta e riciclaggio del vostro vecchio apparecchio<br />
L’immagine apposta sul prodotto significa che l’apparecchio non può essere smaltito con i rifiuti.<br />
In caso di rottamazione, il prodotto deve essere consegnato presso un punto di raccolta adeguato per il<br />
trattamento, la valorizzazione e il riciclaggio degli scarti elettronici o riconsegnato al vostro rivenditore.<br />
In questo modo contribuite alla conservazione delle risorse naturali e alla protezione della salute umana.<br />
www.numaxes.com – export@numaxes.com
www.numaxes.com<br />
Indice H