Manuel d'utilisation de la télécommande IRC/URC - Shaw Direct
Manuel d'utilisation de la télécommande IRC/URC - Shaw Direct
Manuel d'utilisation de la télécommande IRC/URC - Shaw Direct

You also want an ePaper? Increase the reach of your titles
YUMPU automatically turns print PDFs into web optimized ePapers that Google loves.
OVERVIEW<br />
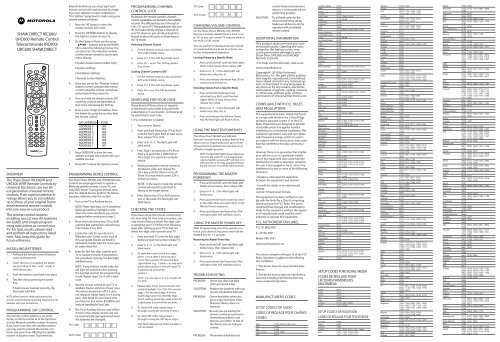
SHAW DIRECT <strong>IRC</strong>600/<br />
<strong>URC</strong>600 Remote Control<br />
Télécomman<strong>de</strong> <strong>IRC</strong>600/<br />
<strong>URC</strong>600 SHAW DIRECT<br />
The <strong>Shaw</strong> <strong>Direct</strong> <strong>IRC</strong>600 IR and<br />
<strong>URC</strong>600 IR/RF Remote Controls by<br />
Universal Electronics are our <strong>la</strong>test<br />
generation universal remote<br />
controls. Their sophisticated technology<br />
allows you to consolidate<br />
up to three of your original home<br />
entertainment remote controls<br />
into one easy-to-use product.<br />
The remote control requires<br />
installing two (2) new AA batteries<br />
(inclu<strong>de</strong>d) and simple programming<br />
instructions to control your<br />
TV. For best results, please read<br />
and perform all instructions listed<br />
here. Also, keep this gui<strong>de</strong> for<br />
future reference.<br />
INSTALLING BATTERIES<br />
1. Pull back the remote control’s battery<br />
cover and remove it.<br />
2. Insert the two (2) supplied AA batteries<br />
according to the + and - marks in<br />
the battery case.<br />
3. Push the battery cover back into p<strong>la</strong>ce.<br />
4. Test the unit by pressing the power<br />
key.<br />
If batteries are inserted correctly, the<br />
Red Light will blink.<br />
NOTE: When batteries need rep<strong>la</strong>cement, the<br />
remote control will stop operating. Rep<strong>la</strong>ce the old<br />
batteries with new AA batteries.<br />
PROGRAMMING SAT CONTROL<br />
Your remote control address is set at the<br />
factory to 000 to control all of the functions<br />
on your Motoro<strong>la</strong> satellite receiver. However,<br />
if you have more than one satellite receiver,<br />
you may want to prevent the remote control<br />
in one room from affecting the satellite<br />
receiver in another room. To prevent this<br />
kind of interference, you must “pair” each<br />
remote control with each receiver by assigning<br />
a new “address” to each combination.<br />
This “address” assignment is ma<strong>de</strong> using your<br />
remote control as follows:<br />
1. Press the SAT button to select the<br />
remote control's SAT mo<strong>de</strong>.<br />
2. Press the OPTIONS button to disp<strong>la</strong>y<br />
the Options screen on your TV.<br />
3. On the Options Menu use the arrow<br />
buttons and press ENTER/<br />
OK to open the following menus. You<br />
can also press the indicated number<br />
on the remote control to access each<br />
menu directly.<br />
6 System Setup (select mo<strong>de</strong>ls only)<br />
4 System Settings<br />
3 Instal<strong>la</strong>tion Settings<br />
2 Remote Control Address.<br />
4. Once you are on the "Remote Control<br />
Address screen" program the remote<br />
control using the remote control keypad<br />
programming sequence.<br />
5. Press and hold the remote controls SAT<br />
mo<strong>de</strong> key until the red lights f<strong>la</strong>sh at<br />
least twice and release the SAT key.<br />
6. Enter a new 3 Digit SAT address from<br />
the below list using the number keys<br />
the remote control.<br />
7. Press ENTER/OK to save the new<br />
address and pair the remote with your<br />
satellite receiver.<br />
8. Press EXIT to leave the Options menu.<br />
PROGRAMMING DEVICE CONTROL<br />
The <strong>Shaw</strong> <strong>Direct</strong> <strong>IRC</strong>600 and <strong>URC</strong>600 Remote<br />
Controls are preprogrammed to operate a<br />
Motoro<strong>la</strong> satellite receiver, a Sony TV, and<br />
Sony DVD p<strong>la</strong>yer. To program <strong>de</strong>vices other<br />
than the <strong>de</strong>fault brands, perform the following<br />
steps; otherwise skip this section.<br />
1. Turn on the TV or Auxiliary <strong>de</strong>vice.<br />
NOTE: Please read steps 2 to 4 completely<br />
before proceeding. Highlight or write<br />
down the co<strong>de</strong>s and <strong>de</strong>vice you wish to<br />
program before moving on to step 2.<br />
2. Press and hold Device key (TV or AUX)<br />
until the Red Lights f<strong>la</strong>sh at least twice,<br />
then release TV or AUX.<br />
3. Locate the co<strong>de</strong> for your <strong>de</strong>vice in<br />
Manufacturer’s Co<strong>de</strong>s on the back of<br />
this user gui<strong>de</strong>. Brands are listed in<br />
alphabetical or<strong>de</strong>r with the most popu<strong>la</strong>r<br />
co<strong>de</strong>s listed first.<br />
4. Enter the first five-digit co<strong>de</strong> for your<br />
TV or Auxiliary Device. If you perform<br />
this procedure correctly, the Red Light<br />
will blink twice.<br />
NOTE: If you enter an invalid co<strong>de</strong>, the<br />
red light will not blink when entering<br />
the <strong>la</strong>st digit and exit the programming<br />
mo<strong>de</strong>. Repeat steps 2 to 4 with a valid<br />
co<strong>de</strong>.<br />
5. Aim the remote control at your TV or<br />
Auxiliary Device and press Power once.<br />
The <strong>de</strong>vice should turn off. If it does<br />
not respond, repeat steps 2 to 4, trying<br />
each co<strong>de</strong> listed for your brand until<br />
you find one that works. If it still does not<br />
work, try Searching For Your Co<strong>de</strong>.<br />
6. The TV or Auxiliary Device co<strong>de</strong> will be<br />
stored in the remote control and will<br />
be automatically reprogrammed when<br />
the batteries are changed.<br />
TV Co<strong>de</strong>:<br />
AUX Co<strong>de</strong>:<br />
PROGRAMMING CHANNEL<br />
CONTROL LOCK<br />
By <strong>de</strong>fault, the remote control’s channelcontrol<br />
capabilities are locked to the satellite<br />
receiver. The affected keys are 0 through 9,<br />
CH+, CH- and LAST. This guarantees that you<br />
do not inadvertently change a channel on<br />
your TV. However, you can <strong>de</strong>-activate this<br />
feature to allow full access to these keys in<br />
the TV mo<strong>de</strong>.<br />
Unlocking Channel Control<br />
1. On the remote control, press and hold<br />
SAT until it blinks twice.<br />
2. Enter 9-7-3. The SAT key blinks twice.<br />
3. Press CH – once. The SAT key blinks<br />
four times.<br />
Locking Channel Control to SAT<br />
1. On the remote control, press and hold<br />
SAT until it blinks twice.<br />
2. Enter 9-7-3. The SAT key blinks twice.<br />
3. Press CH+ one. The SAT key blinks<br />
twice.<br />
SEARCHING FOR YOUR CODE<br />
If your brand of Device does not respond<br />
to the remote control after trying all of the<br />
co<strong>de</strong>s listed, or if your brand is not listed at all,<br />
try searching for your co<strong>de</strong>.<br />
1=TV, 2=DVD/VCR, 3=AUDIO<br />
1. Turn on your Device.<br />
2. Press and hold Device key (TV or AUX)<br />
until the Red Lights f<strong>la</strong>sh at least twice,<br />
then release TV or AUX.<br />
3. Enter in 9 - 9 - 1. The Red Light will<br />
blink twice.<br />
4. Press Digit 1 to search for a TV, Press<br />
Digit 2 to search for a DVD/VCR or<br />
Press Digit 3 to search for an Audio<br />
<strong>de</strong>vice.<br />
5. While pointing the remote control at<br />
the Device, press and release the<br />
CH + key until the Device turns off.<br />
(Note: You may need to press [CH+]<br />
numerous times).<br />
NOTE: In the search mo<strong>de</strong>, the remote<br />
control will send IR co<strong>de</strong>s from its<br />
library to the target <strong>de</strong>vice.<br />
6. Press Device key (TV or AUX) once to<br />
lock in the co<strong>de</strong>. The Red Light will<br />
blink twice.<br />
CHECKING THE CODES<br />
If you have set up the remote control using<br />
the Searching For Your Co<strong>de</strong> procedure, you<br />
may need to find out which five-digit co<strong>de</strong><br />
is operating your TV. Perform the following<br />
steps after setting up your TV to find out<br />
which five-digit co<strong>de</strong> operates your TV.<br />
1. Press and hold TV until the Red Light<br />
f<strong>la</strong>shes at least twice, then release TV.<br />
2. Enter in 9 - 9 - 0. The Red Light will<br />
blink twice.<br />
3. To view the co<strong>de</strong> for the first digit,<br />
press 1 once. Wait 3 seconds and<br />
count the number of times the Red<br />
Light blinks (e.g., 3 blinks =3) and write<br />
down the number in the left most TV<br />
Co<strong>de</strong> box (at end of this<br />
section).<br />
NOTE: If a co<strong>de</strong> digit is “0”, the red light will<br />
not blink.<br />
4. Repeat step 3 four more times for the<br />
remaining digits. Use 2 for the second<br />
digit, 3 for the third digit, 4 for the<br />
fourth digit and 5 for the fifth digit.<br />
Finish writing down the co<strong>de</strong> in the TV<br />
Co<strong>de</strong> boxes (at end of this section).<br />
5. To check AUX co<strong>de</strong>, repeat steps 1<br />
through 4 using the AUX key in step 1.<br />
6. To check SAT co<strong>de</strong>, repeat steps 1<br />
through 4 using the SAT key in step 1.<br />
Note: When verifying the SAT Address only digits 1, 2<br />
and 3 are required.<br />
TV Co<strong>de</strong>:<br />
AUX Co<strong>de</strong>:<br />
CHANGING VOLUME CONTROL<br />
On the <strong>Shaw</strong> <strong>Direct</strong> <strong>IRC</strong>600 and <strong>URC</strong>600<br />
Remote Controls, Global Volume Lock is set<br />
to TV, so you can control TV volume while in<br />
the AUX, or SAT mo<strong>de</strong>.<br />
You can perform Individual Volume Unlock<br />
on a selected <strong>de</strong>vice to set its volume control<br />
for in<strong>de</strong>pen<strong>de</strong>nt operation.<br />
Locking Volume to a Specific Mo<strong>de</strong>.<br />
1. Press and hold SAT until the Red Lights<br />
blink at least twice, then release SAT.<br />
2. Enter in 9 - 9 - 3 (The Red Light will<br />
blink twice after the 3).<br />
3. Press and release the Mo<strong>de</strong> Key (TV or<br />
AUX) to lock Volume to.<br />
Unlocking Volume from a Specific Mo<strong>de</strong>.<br />
1. Press and hold mo<strong>de</strong> key to be<br />
unlocked (e.g. AUX) until the Red<br />
Lights blinks at least twice, then<br />
release the mo<strong>de</strong>.<br />
2. Enter in 9 - 9 - 3 (The Red Light will<br />
blink twice after the 3).<br />
3. Press and release the Volume Down<br />
Key the Red light will f<strong>la</strong>sh 4 times.<br />
USING THE MASTER POWER KEY<br />
The <strong>Shaw</strong> <strong>Direct</strong> <strong>IRC</strong>600 and <strong>URC</strong>600<br />
Remote Controls have a unique feature that<br />
allows you to sequentially turn up to three<br />
of your home entertainment <strong>de</strong>vices on or<br />
off with a single key press.<br />
NOTE: The MASTER POWER (Power) <strong>de</strong>fault setting<br />
is the SAT mo<strong>de</strong>. If it is not programmed,<br />
only the Satellite receiver and TV will turn on or<br />
off. In the AUX or TV mo<strong>de</strong>, pressing the Power<br />
key will only turn on or off the selected <strong>de</strong>vice.<br />
PROGRAMMING THE MASTER<br />
POWER KEY<br />
1. Press and hold SAT until the Red Light<br />
blinks at least twice, then release SAT.<br />
2. Enter in 9 - 9 - 5 The Red Light will<br />
blink twice.<br />
3. Press and release each mo<strong>de</strong> key once<br />
in the or<strong>de</strong>r that you want them in the<br />
Master Power sequence.<br />
4. Press and release the Power key (The<br />
red light un<strong>de</strong>r SAT will f<strong>la</strong>sh twice).<br />
USING THE MASTER POWER KEY<br />
After Programming, point the remote control<br />
at your <strong>de</strong>vices and press and hold the<br />
POWER key for 1.5 seconds<br />
Removing the Master Power Key<br />
1. Press and hold SAT until the Red Light<br />
blinks twice, then release SAT.<br />
2. Enter in 9 - 9 - 5 The Red Light will<br />
blink twice.<br />
3. Press and release the Power key (The<br />
red light un<strong>de</strong>r SAT will f<strong>la</strong>sh twice).<br />
TROUBLESHOOTING<br />
PROBLEM: Device key does not blink<br />
when you press a key.<br />
SOLUTION: Rep<strong>la</strong>ce the batteries with two<br />
(2) new AA alkaline batteries<br />
PROBLEM: Device key blinks when you<br />
press a key, but home entertainment<br />
<strong>de</strong>vice does not<br />
respond.<br />
SOLUTION: Be sure you are aiming the<br />
remote control at your home<br />
entertainment <strong>de</strong>vice and<br />
that you are within 15 feet of<br />
the <strong>de</strong>vice you are trying to<br />
control.<br />
PROBLEM: The remote control does not<br />
control home entertainment<br />
<strong>de</strong>vices or commands are not<br />
performing properly.<br />
SOLUTION: Try all listed co<strong>de</strong>s for the<br />
<strong>de</strong>vice brand being set up.<br />
Make sure all <strong>de</strong>vices can be<br />
operated with an infrared<br />
remote control.<br />
ADDITIONAL INFORMATION<br />
This product does not have any userserviceable<br />
parts. Opening the case,<br />
except for the battery cover, may<br />
cause permanent damage to your<br />
<strong>Shaw</strong> <strong>Direct</strong> <strong>IRC</strong>600 and <strong>URC</strong>600<br />
Remote Controls.<br />
• For help via the Internet, visit us at:<br />
www.shawdirect.ca<br />
Copyright© 2010 by Universal<br />
Electronics Inc. No part of this publication<br />
may be reproduced, transmitted,<br />
transcribed, stored in any retrieval system,<br />
or trans<strong>la</strong>ted to any <strong>la</strong>nguage, in<br />
any form or by any means, electronic,<br />
mechanical, magnetic, optical, manual,<br />
or otherwise, without prior written<br />
permission of Universal Electronics Inc.<br />
COMPLIANCE WITH FCC RULES<br />
AND REGULATIONS<br />
This equipment has been tested and found<br />
to comply with the limits for a C<strong>la</strong>ss B digital<br />
<strong>de</strong>vice, pursuant to part 15 of the FCC<br />
Rules. These limits are <strong>de</strong>signed to provi<strong>de</strong><br />
reasonable protection against harmful<br />
interference in a resi<strong>de</strong>ntial instal<strong>la</strong>tion. This<br />
equipment generates, uses and can radiate<br />
radio frequency energy and if not used in<br />
accordance with the instructions, may cause<br />
harmful interference to radio communications.<br />
However, there is no guarantee that interference<br />
will not occur in a particu<strong>la</strong>r instal<strong>la</strong>tion.<br />
If this equipment does cause harmful<br />
interference to radio or television reception,<br />
the user is encouraged or try to correct the<br />
interference by one or more of the following<br />
measures:<br />
• Increase or <strong>de</strong>crease the separation<br />
between the equipment and receiver.<br />
• Consult the <strong>de</strong>aler or an experienced<br />
remote<br />
control/ TV technician for help.<br />
This equipment has been verified to comply<br />
with the limits for a C<strong>la</strong>ss B computing<br />
<strong>de</strong>vice, pursuant to FCC Rules. The user is<br />
cautioned that changes and modifications<br />
ma<strong>de</strong> to the equipment without the approval<br />
of manufacturer could void the user's<br />
authority to operate this equipment.<br />
FCC AUTHORIZATION LABEL<br />
FCC ID: MG33051<br />
IC: 2575A-3051<br />
Mo<strong>de</strong>l <strong>URC</strong>-3051<br />
Universal Electronics Inc<br />
This <strong>de</strong>vice complies with part 15 of the FCC<br />
Rules. Operation is subject to the following<br />
two conditions:<br />
1. This <strong>de</strong>vice may not cause harmful interference.<br />
2. This <strong>de</strong>vice must accept any interference<br />
received, including interference that may<br />
cause un<strong>de</strong>sired operation.<br />
MANUFACTURER'S CODES<br />
SETUP CODES FOR AUDIO<br />
CODES DE RÉGLAGE POUR CHAÎNES<br />
STÉRÉO<br />
Aiwa 31405, 30189, 31388, 31641<br />
Akai 31512<br />
Alco 31390<br />
Altec Lansing 32595, 32596<br />
AMC 31077<br />
Amphion Media 31563<br />
AMW 31563<br />
Anam 31609<br />
Anthem 32220<br />
Apex Digital 31257, 31430, 31774<br />
Arcam 31189, 30189<br />
Audiotronic 31189<br />
Audiovox 31390<br />
B & K 30820<br />
Bose 31229, 30639, 31629, 31841, 31933<br />
Boston Acoustics 32162<br />
Cambridge Sound 31370<br />
Carver 31189, 30189<br />
Cary Audio Design 31879<br />
Coby 31389<br />
Curtis 31389<br />
Daewoo 31250<br />
Denon 32134, 31360, 32279, 32857<br />
E<strong>la</strong>n 30647<br />
Fisher 31801<br />
Flextronics 31879<br />
Gateway 31517<br />
Halcro 31934<br />
Harman/Kardon 30892, 30189, 31304, 31306, 32241,<br />
32443<br />
Hitachi 31273, 31801<br />
iHome 32435<br />
iLive 32013<br />
Insignia 31030, 31077, 31751, 31893, 32126,<br />
32169, 32175, 32472, 32474<br />
Integra 31298, 31320, 31805<br />
iSymphony 32018, 32258, 32442<br />
JBL 31306<br />
JVC 31374, 31495, 32040, 32161, 32239,<br />
32331<br />
Kenwood 31313, 31570, 31569<br />
KLH 31390, 31428<br />
Koss 31366, 31497<br />
Krell 31837, 32463<br />
Left Coast 30892<br />
Lexicon 31802<br />
LG 31293, 32197, 32284<br />
Linn 30189<br />
Liquid Vi<strong>de</strong>o 31497<br />
Marantz 30892, 31892, 32138, 31189, 31269,<br />
30189, 31289,32114<br />
Magnavox 31189, 31269, 30189, 31514<br />
Mark Levinson 32405<br />
McIntosh 31289<br />
Micromega 31189<br />
Mitsubishi 31393<br />
Myryad 31189<br />
Nakamichi 31313<br />
NexxTech 31751<br />
Norcent 31389, 31751<br />
Nova 31389<br />
Onkyo 30842, 31298, 31320, 31531, 31805,<br />
32451<br />
Optimus 30823, 31023<br />
Oritron 31366, 31497<br />
Panasonic 31308, 31518, 31275, 31288, 31316,<br />
31548, 31633, 31763, 31764, 32221,<br />
32452, 32967<br />
Parasound 31934<br />
Philco 31838<br />
Philips 30892, 31189, 31269, 30189, 31266,<br />
32311, 32459<br />
Pioneer 30823, 31023, 31384, 31935<br />
Po<strong>la</strong>roid 31508<br />
Polk Audio 30892, 32242, 30189, 31289, 32244,<br />
32270<br />
Primare 31851<br />
Proscan 31254<br />
RCA 30823, 31023, 31609, 31254, 31390,<br />
31511, 32041<br />
Rio 31869<br />
Samsung 31295, 31304, 31500, 31868<br />
Sansui 30189<br />
Sanyo 31469, 31801<br />
Sherwood 31077, 31517, 31653, 31905, 32169<br />
Sherwood New 32169<br />
Sonic Blue 31869<br />
Sony 31759, 31058, 31441, 31258, 31622,<br />
31558, 31658, 31758, 31822, 31858,<br />
32172, 32216, 32320, 32475, 32522<br />
Stereophonics 31023<br />
Sunfire 31313<br />
Teac 31390, 31528<br />
Technics 31308, 31518, 31633<br />
Thorens 31189<br />
Thule Audio 31851<br />
Toshiba 31788<br />
Venturer 31390<br />
Vizio 31517<br />
Wards 30189<br />
Yamaha 30176, 30376, 31176, 31276, 31331,<br />
31375, 31376, 31476, 31815, 32061,<br />
32455, 32467, 32471<br />
Zenith 31293<br />
SETUP CODES FOR DIGITAL MEDIA<br />
CODES DE RÉGLAGE POUR<br />
LECTEURS NUMÉRIQUES<br />
MULTIMÉDIA<br />
Apple 31115<br />
B & W 32441<br />
Denon 32502<br />
HTI 32439<br />
Vizio 32454<br />
Yamaha 31797, 32021, 32458<br />
ZVOX 32332, 32334<br />
SETUP CODES FOR TELEVISION<br />
CODES DE RÉGLAGE POUR TÉLÉVISEURS<br />
Accurian 11803<br />
Action 10873<br />
Admiral 10463<br />
Advent 10761, 10783, 10815, 10817, 10842<br />
Akai 10812, 11675, 10702, 10030,<br />
10672, 11676, 11935, 12232<br />
Albatron 10700, 10843<br />
Ampro 10751<br />
AOC 10030, 11365, 11589, 11590,<br />
12014, 12087, 12402, 12479<br />
Aomni 11623<br />
Apex Digital 10748, 10879, 10765, 10767,<br />
10890, 11217, 12397<br />
Astar 11531, 11738<br />
Audiovox 10451, 10623, 10802, 10846,<br />
10875, 11937, 11951, 11952<br />
Aventura 10171<br />
Axion 11937<br />
Bell & Howell 10154<br />
BenQ 11032, 11212, 11315<br />
Boxlight 10893<br />
Broksonic 10463, 11905, 11929, 11935, 11938<br />
Byd:sign 11309<br />
C & M 10700<br />
Candle 10030<br />
Carnivale 10030<br />
Carver 10054<br />
CCE 10623<br />
Celebrity 10000<br />
Celera 10765<br />
Changhong 10765<br />
Citizen 10060, 10030, 11669, 11671,<br />
11672, 11928, 11935<br />
Coby 11634, 12306, 12314, 12315, 12326,<br />
12338, 12340, 12343, 12344, 12345,<br />
12347, 12348, 12350, 12351, 12560<br />
Commercial Solutio 11447, 10047<br />
Crosley 10000, 10054<br />
CTX 10700<br />
Curtis 11326, 12352, 12466<br />
Cytron 11326<br />
Daewoo 10154, 10451, 11661,10623,<br />
10661, 10672, 11928<br />
Dell 11264, 11080, 11178, 11403, 11863<br />
Denon 10145<br />
Diamond Vision 11996<br />
Digital Lifestyles 11765<br />
Digital Projection 11750<br />
DirecTV 11501<br />
Disney 11665, 12152<br />
Dream Vision 11164<br />
Dumont 10017<br />
Durabrand 10463, 10178, 10171, 11034, 11665<br />
Dwin 10720, 10774<br />
Dynex 11463, 11780, 11785, 11810, 12049,<br />
12184<br />
Electroband 10000<br />
Electrograph 11755, 11623<br />
Electrohome 10463, 11670, 11672<br />
Element 11687, 12183<br />
Emerson 11864, 10154, 10451, 10463, 10178,<br />
10171, 11661, 10623, 11394, 11665,<br />
11905, 11928, 11929, 11944, 11963<br />
Emprex 11422, 11765<br />
Envision 10030, 10813, 11365, 11589, 12014,<br />
12087<br />
Epson 10833, 10840, 11290<br />
ESA 10812, 10171, 11944, 11963<br />
Fisher 10154<br />
Fujitsu 10809, 10683, 10853<br />
Funai 10000, 10171, 11271, 11904, 11963,<br />
11979<br />
Gateway 11755, 11756<br />
GE 11447, 10047, 10051, 10451,<br />
10178, 11347, 11922, 12359<br />
GFM 10171, 11665, 11963, 12167<br />
Gibralter 10017, 10030<br />
Go Vi<strong>de</strong>o 10886, 11823<br />
GoldStar 10178, 10030, 11926<br />
Grundig 10683<br />
Haier 11034, 11749, 12309<br />
Hallmark 10178<br />
Hanns.G 11783<br />
Hannspree 11348, 11351, 11745, 11783<br />
Harley Davidson 11904<br />
Harman/Kardon 10054<br />
Helios 10865<br />
Hello Kitty 10451<br />
Hewlett Packard 11494<br />
Hisense 10748, 11314, 11660, 12098, 12355,<br />
12419<br />
Hitachi 11643, 11145, 10145, 11345, 11904<br />
HP 11494<br />
Humax 11501<br />
Hyundai 10849, 11219, 11294<br />
iLo 11286, 11603, 11665, 11684, 11990<br />
Infinity 10054<br />
InFocus 11164, 12199<br />
Insignia 11423, 11564, 10171, 12432, 12417,<br />
12088, 12049, 12002, 11963, 11892,<br />
11780, 11710, 11660, 11641, 11517,<br />
11326, 11204<br />
Inteq 10017<br />
iRIS 12189<br />
JBL 10054<br />
JCB 10000<br />
JCM 12189, 12256<br />
Jensen 10761, 10815, 10817, 11326<br />
JVC 10463, 10053, 10650, 10731, 11253,<br />
11601, 11774, 11923, 12271<br />
KDS 11498, 11687<br />
Kenwood 10030<br />
KLH 10765, 10767<br />
KMDS 12278<br />
KTV 10030<br />
LG 11423, 10017, 11265, 10178, 10700,<br />
10856, 11178, 11768, 11934, 11993,<br />
12358, 12424<br />
Lloyd's 11904<br />
LXI 10047, 10054, 10154, 10156, 10178<br />
MAG 11498, 11687<br />
Magnasonic 11928<br />
Magnavox 11454, 11866, 10054, 10051, 10030,<br />
10706, 10802, 11198, 11254, 11365,<br />
11525, 11904, 11931, 11944, 11963,<br />
11990, 12372<br />
Marantz 11454, 10054, 10030, 10704,<br />
10855, 11154, 11398, 12447<br />
Matsushita 10250, 10650<br />
Maxent 11755, 10762, 11211, 11714, 11757<br />
Megapower 10700<br />
Megatron 10178, 10145<br />
Memorex 10154, 10463, 10150, 10178, 11665,<br />
11670, 11892, 11924, 11926, 11927<br />
MGA 10150, 10178, 10030<br />
Mid<strong>la</strong>nd 10047, 10017, 10051<br />
Mintek 11603, 11990<br />
Mitsubishi 11250, 10150, 10178, 10836, 10868,<br />
11392<br />
Monivision 10700, 10843<br />
MTC 10060, 10030<br />
NAD 10156, 10178, 10866, 11156<br />
NEC 10030, 10704, 10882, 11398, 11704,<br />
11797<br />
NetTV 11755, 10762<br />
Nexus Electronics 12183<br />
Nikko 10178, 10030<br />
Norcent 10748, 10824, 11365, 11589,<br />
11590, 12110<br />
Norwood Micro 11286<br />
NuVision 11657, 12158<br />
Olevia 11610, 11144, 11240, 11331<br />
Optimus 10250, 10154, 10650, 11924, 11927<br />
Optoma 11348<br />
Orion 10463, 11463, 11905, 11929<br />
Panasonic 10250, 11480, 11457, 10051, 10650,<br />
11271, 11290, 11291, 11310, 11410,<br />
11924, 11927, 11941, 11946, 11947,<br />
12080<br />
PARK 12104<br />
Petters 11523<br />
Philco 10054, 10030, 10171, 11271, 11394,<br />
11665, 11963<br />
Philips 11454, 11866, 10054, 10690, 11154,<br />
11394, 11744, 11806, 11867, 12372,<br />
12374<br />
Pilot 10030<br />
Pioneer 11457, 10679, 10866, 11260, 11398<br />
P<strong>la</strong>nar 11496<br />
Po<strong>la</strong>roid 11523, 10765, 12425, 12120, 12117,<br />
12063, 12002, 11992, 11769, 11767,<br />
11766, 11763, 11762, 11687, 11498,<br />
11341, 11328, 11326, 11314, 11286,<br />
11276, 10865<br />
Port<strong>la</strong>nd 10451, 11661<br />
Prima 10761, 10783, 10815, 10817, 11785<br />
Princeton 10700, 10717<br />
Prism 10051<br />
Projection<strong>de</strong>sign 11750, 11752<br />
Proscan 11447, 10047, 10030, 11347, 11922,<br />
12147, 12256<br />
Proton 10178<br />
Proview 11498, 11687<br />
Pulsar 10017<br />
Quasar 10250, 10051, 10650, 11924<br />
RadioShack 10047, 10154, 10178, 10030, 11904<br />
RCA 11547, 11447, 10047, 10051, 12434,<br />
12247, 12187, 12002, 11958, 11953,<br />
11922, 11781, 11347, 11247, 11147,<br />
11047, 10774, 10679, 10090<br />
Realistic 10154, 10178, 10030<br />
RevolutionHD 11623<br />
Runco 10017, 10030, 10603, 11292, 11398,<br />
11629<br />
Sampo 11755, 10030, 10762<br />
Samsung 10812, 10060, 10702, 10178, 10030,<br />
10650, 10766, 10814, 11060, 11575,<br />
11959, 12051<br />
Sansui 10463, 10171, 11409, 11670, 11892,<br />
11904, 11929, 11935<br />
Sanyo 10054, 10154, 10088, 10799, 10893,<br />
11142, 12448, 12452<br />
Sceptre 10878, 11217, 11360, 11599, 12506<br />
Scotch 10178<br />
Scott 10178, 11711<br />
Sears 10047, 10054, 10154, 10156, 10178,<br />
10171, 11904, 11926<br />
Seleco 11351<br />
Sharp 10818, 10688, 10689, 10851, 11602<br />
Sherwood 11399<br />
Signature 10054<br />
Sole 11623, 12075, 12076<br />
Sony 10000, 10810, 10834, 11685, 11786,<br />
11904, 11925<br />
Soun<strong>de</strong>sign 10178<br />
Sova 11952<br />
Soyo 11520, 11826<br />
Spectroniq 11498, 11687<br />
Squareview 10171<br />
Studio Experience 10843<br />
SunBrite 11420, 12337<br />
Superscan 10864, 11944<br />
Supreme 10000<br />
SVA 10748, 10865, 10870, 10871, 10872,<br />
11963<br />
Sylvania 11864, 10054, 10030, 10171, 11271,<br />
11314, 11394, 11665, 11886, 11931,<br />
11944, 11963<br />
Symphonic 10171, 11394, 11904, 11944<br />
Syntax 11610, 11144, 11240, 11331<br />
Tatung 11286, 11756<br />
Technics 10250, 10051<br />
Techview 10847, 12004<br />
Techwood 10051<br />
Teco 11040<br />
Teknika 10054, 10150, 10060<br />
Telefunken 10702<br />
Thomas 11904<br />
TMK 10178<br />
TNCi 10017<br />
Toshiba 11524, 10154, 10156, 11256, 11265,<br />
10060, 10832, 10854, 11156, 11164,<br />
10822, 10650, 11356, 11656, 11704,<br />
11935, 11936, 11945, 12006<br />
TruTech 11665, 11723, 12066<br />
TVS 10463<br />
US Logic 11286<br />
Vector Research 10030<br />
Venturer 11865<br />
Victor 10053<br />
Vidikron 10054, 11292, 11398, 11629<br />
Vidtech 10178<br />
Viewsonic 11755, 10857, 10864, 10885, 11330,<br />
11578, 11627, 11640, 11742, 12014,<br />
12087, 12277<br />
Viore 11684, 11811, 12104, 12352<br />
Vistron 12142<br />
Vizio 11758, 10864, 10885, 11756<br />
Waycon 10156<br />
Westinghouse 11712, 10451, 10885, 10889, 10890,<br />
11282, 11300, 11577, 12293<br />
White Westing. 10463, 11661, 10623<br />
Wyse 11365<br />
Yamaha 10030, 10769, 10833, 10839, 11526<br />
Zenith 10000, 11423, 10047, 10017, 10463,<br />
11265, 10178, 10030, 11145, 10145,<br />
11661, 11904, 11929
SETUP CODES FOR DVD PLAYERS<br />
CODES DE RÉGLAGE POUR LECTEURS DVD<br />
Accurian 20675, 21416<br />
Aiwa 20641<br />
Akai 20695, 20770, 21089<br />
Alco 20790<br />
Allegro 20869<br />
Amphion Media 20872<br />
AMW 20872<br />
Apex Digital 20672, 20755, 20794, 20796, 20797,<br />
21004, 21020, 21056, 21061, 21100,<br />
22619<br />
Arrgo 21023<br />
Aspire Digital 21168, 21407<br />
Astar 21489<br />
Audio Authority 22555<br />
Audiovox 20790<br />
B & K 20655, 20662<br />
BBK 21224<br />
Bel Canto Design 21571<br />
Blue Para<strong>de</strong> 20571<br />
Bose 21895<br />
Broksonic 20695, 20868<br />
California Audio 20490<br />
Cinea 20831<br />
CineVision 20876, 20833, 20869<br />
Citizen 20695, 21277, 22116<br />
Coby 20778, 21086, 21107, 21177, 21628<br />
Craig 20831<br />
Curtis Mathes 21087<br />
CyberHome 20816, 20874, 21023, 21024, 21117,<br />
21129, 21502, 21537<br />
Daewoo 20784, 20705, 20833, 20869, 21169,<br />
21172, 21234, 21242<br />
Daytek 20872<br />
Denon 20490, 20634, 21634, 22258<br />
Desay 21407<br />
DigitalMax 21738<br />
Disney 20675, 21270<br />
Dual 21068, 21085<br />
Durabrand 21023, 21127<br />
DVD2000 20521<br />
Dynex 22255<br />
Electrohome 22116<br />
Emerson 20591, 20675, 20821, 21268<br />
Enterprise 20591<br />
ESA 20821, 21268<br />
Fisher 20670<br />
Funai 20675, 21268, 21334<br />
Gateway 21073, 21077, 21158<br />
GE 20522, 20815<br />
GFM 20675, 21268<br />
Go Vi<strong>de</strong>o 20744, 20715, 20741, 20783, 20833,<br />
20869, 21044, 21075, 21099, 21158,<br />
21304, 21730<br />
GoldStar 20741, 20869<br />
Gradiente 20651<br />
Grundig 20539, 20705<br />
Harman/Kardon 20582, 20702, 21229<br />
Helios 22080, 22192<br />
Hello Kitty 20831<br />
Hitachi 20573, 20664<br />
Hiteker 20672<br />
Humax 21500, 21588<br />
iLo 21348<br />
Insignia 20675, 21268, 22095, 22255, 22428,<br />
22596<br />
Integra 20571, 20627, 21634, 21769, 22147<br />
Irradio 20646<br />
JBL 20702<br />
JVC 20558, 20623, 20867, 21164, 21275,<br />
21550, 21602, 22365, 22472<br />
Kawasaki 20790<br />
Kenwood 20490, 20534<br />
KLH 20790, 21020, 21149<br />
Koss 20651<br />
Lasonic 20798<br />
Lenoxx 21127<br />
LG 20591, 20741, 20869, 21602, 22135<br />
LiteOn 21058, 21158, 21416, 21440, 21656,<br />
21738<br />
Loewe 20511<br />
Logitech 22639<br />
Magnavox 20503, 20539, 20646, 20675, 20821,<br />
21177, 21268, 21354, 21506, 22229<br />
Marantz 20539, 22414<br />
McIntosh 21533, 21273<br />
Memorex 20695, 20831, 21270, 22213<br />
Microsoft 20522, 22083<br />
Mintek 20839<br />
Mitsubishi 21521, 20521<br />
NAD 20741, 22572<br />
NEC 20785<br />
NexxTech 21402<br />
Norcent 21003, 20872, 21107, 21265<br />
Nyko 22340<br />
Olevia 22331<br />
Onkyo 20503, 20627, 21612, 21769,<br />
22147, 22215<br />
Oppo 20575, 21224, 22185, 22545<br />
Oritron 20651<br />
Panasonic 20490, 20503, 20632, 20703,<br />
21579, 21641, 21762<br />
Philco 20675<br />
Philips 20503, 20539, 22056, 20646, 20675,<br />
20854, 21158, 21260, 21267, 21340,<br />
21354, 21506, 22084, 22434<br />
PianoDisc 21024<br />
Pioneer 20525, 20571, 20142, 20631, 20632,<br />
21460, 21512, 21571, 22442<br />
Po<strong>la</strong>roid 21020, 21061, 21086<br />
Polk Audio 20539<br />
Port<strong>la</strong>nd 20770<br />
Presidian 20675, 21738<br />
Proceed 20672<br />
Proscan 20522<br />
ProVision 20778<br />
Qwestar 20651<br />
RCA 20522, 20571, 20790, 20822, 21022,<br />
21132, 21769, 22213, 22392<br />
RE-BL 22555<br />
Rio 20869<br />
Rotel 20623, 21178<br />
Rowa 20823<br />
Sampo 20698, 20752<br />
Samsung 20490, 20573, 20199, 20820, 21044,<br />
21075, 21470, 22069, 22329, 22369,<br />
22489, 22556<br />
Sansui 20695<br />
Sanyo 20670, 20695, 20873<br />
Schnei<strong>de</strong>r 20646<br />
Sensory Science 21158<br />
Sharp 20630, 20675, 20752, 21256,<br />
22250, 22561<br />
Sharper Image 21117<br />
Sherwood 20770, 21043, 21077<br />
Sherwood New 21077<br />
Shinsonic 20533, 20839<br />
Sonic Blue 20869, 21099<br />
Sony 20533, 21533, 20864, 20772, 21033,<br />
21070, 21431, 21516, 21536, 21633<br />
Superscan 20821<br />
Sylvania 20675, 20821, 21268, 22194<br />
Symphonic 20675, 20821<br />
Teac 20790<br />
Technics 20490, 20703<br />
Terapin 21031<br />
Theta Digital 20571<br />
Tivo 21503, 21512<br />
Toshiba 20503, 20695, 21154, 21503, 21510,<br />
21588, 21608, 21769,22006, 22277,<br />
22705<br />
Urban Concepts 20503<br />
US Logic 20839<br />
Venturer 20790<br />
Viore 22553<br />
Vizio 21064, 21226, 22563<br />
WB Electronics 22555<br />
Xbox 20522, 22083<br />
Yamaha 20490, 20539, 20646, 20545, 20497,<br />
20817, 21416, 22298, 22558<br />
YBA 20872<br />
Zektor 21730<br />
Zenith 20503, 20591, 20741, 20869<br />
Zoece 21265<br />
SETUP CODES FOR BLU-RAY DVD PLAYERS<br />
CODES DE RÉGLAGE POUR<br />
LECTEURS DVD BLUE-RAY<br />
Denon 22258<br />
Insignia 20675, 22428, 22596<br />
Integra 21769, 22147<br />
JVC 22365<br />
LG 20741, 21602<br />
Magnavox 20675<br />
Marantz 22414<br />
Microsoft 22083<br />
NAD 22572<br />
Olevia 22331<br />
Onkyo 21612, 21769, 22147<br />
Oppo 22545<br />
Panasonic 21641<br />
Philips 22084, 22434<br />
Pioneer 20142, 22442<br />
RCA 21769<br />
Samsung 20199<br />
Sharp 22250, 22561<br />
Sony 21516<br />
Sylvania 20675, 22194<br />
Toshiba 21769, 22705<br />
Viore 22553<br />
Vizio 22563<br />
Xbox 22083<br />
Yamaha 22298<br />
SETUP CODES FOR VCR<br />
CODES DE RÉGLAGE POUR<br />
MAGNÉTOSCOPES<br />
ABS 21972<br />
Accurian 20000<br />
Admiral 20048, 20209, 20479<br />
Adventura 20000<br />
Aiwa 20037, 20000<br />
Alienware 21972<br />
Allegro 20039, 21137<br />
American High 20035<br />
Audiovox 20037<br />
Bell ExpressVu 21944<br />
Bright House 22763<br />
Broksonic 20184, 20121, 20209, 20479, 21479<br />
Cable One 22763<br />
Cablevision 22763<br />
Calix 20037<br />
Canon 20035<br />
Carver 20081<br />
Charter 22763<br />
CineVision 21137<br />
Citizen 20037, 21278<br />
Comcast 22448, 22763<br />
Cox 22763<br />
Craig 20037<br />
Crosley 20081, 20000<br />
CyberPower 21972<br />
Daewoo 20045, 21137, 21278<br />
Dell 21972<br />
Denon 20042<br />
DirecTV 20739, 22033<br />
Dish Network 21944<br />
Dishpro 21944<br />
Durabrand 20039, 20038<br />
Dynatech 20000<br />
Echostar 21944<br />
Electrohome 20037, 20043<br />
Electrophonic 20037<br />
Emerex 20032<br />
Emerson 20037, 20184, 20000, 20121, 20043,<br />
20209, 20479, 2059, 21278, 21479,<br />
21593<br />
ESA 21137<br />
Expressvu 21944<br />
Fuji 20035, 20033<br />
Funai 20000, 20593, 21593<br />
Garrard 20000<br />
Gateway 21972<br />
GE 20060, 20035, 20807, 21035, 21060<br />
GFM 21593<br />
Go Vi<strong>de</strong>o 20614, 21137<br />
GOI 21944<br />
GoldStar 20037, 20038, 21137, 21237<br />
Gradiente 20000<br />
Harley Davidson 20000<br />
Harman/Kardon 20081, 20038<br />
Headquarter 20046<br />
Hewlett Packard 21972<br />
Hitachi 20000, 20042, 20089, 20593<br />
Howard Computers 21972<br />
HP 21972<br />
HTS 21944<br />
Hughes Network 20042<br />
Humax 20739<br />
Hush 21972<br />
iBUYPOWER 21972<br />
Insight 22763<br />
Instant Rep<strong>la</strong>y 20035<br />
JVC 20067, 21944<br />
KEC 20037<br />
Kenwood 20067, 20038<br />
Kodak 20035, 20037<br />
LG 21037, 21137<br />
Linksys 21972<br />
Lloyd's 20000<br />
LXI 20037<br />
Magnasonic 20593, 21278<br />
Magnavox 20035, 20039, 20081, 20000, 20149,<br />
20563, 20593, 21593,21781<br />
Marantz 20035, 20081<br />
Marta 20037<br />
Matsushita 20035, 20162, 21162<br />
Media Center PC 21972<br />
Mediacom 22763<br />
MEI 20035<br />
Memorex 20035, 20162, 20037, 20048, 20039,<br />
20000, 20209, 20046, 20479, 21037,<br />
21162, 21237, 21262<br />
MGA 20043<br />
Microsoft 21972<br />
Mind 21972<br />
Minolta 20042<br />
Mitsubishi 20067, 20043, 20807<br />
Motoro<strong>la</strong> 20035, 20048, 22763<br />
MTC 20000<br />
Multitech 20000<br />
NEC 20067, 20038<br />
Nikko 20037<br />
Niveus Media 21972<br />
Northgate 21972<br />
Olympus 20035<br />
Orion 20184, 20209, 20479, 21479<br />
Pace 22763<br />
Panasonic 21062, 20035, 20162, 20225, 20614,<br />
20616, 21035, 21162,21262<br />
Pentax 20042<br />
Philco 20035<br />
Philips 20739, 20035, 20081, 20618,<br />
21081, 21181<br />
Pilot 20037<br />
Pioneer 20067<br />
Polk Audio 20081<br />
Presidian 21593<br />
Proscan 20060, 21060<br />
Pulsar 20039<br />
Quarter 20046<br />
Quartz 20046<br />
Quasar 20035, 20162, 21035, 21162<br />
RadioShack 20000, 21037<br />
Radix 20037<br />
Ran<strong>de</strong>x 20037<br />
RCA 20060, 20035, 20042, 20149,<br />
20807, 20880, 21035, 21060<br />
Realistic 20035, 20037, 20048, 20000, 20046<br />
Rep<strong>la</strong>yTV 20614, 20616<br />
Ricavision 21972<br />
Rio 21137<br />
Runco 20039<br />
Samsung 20045, 21014<br />
Sanky 20048, 20039<br />
Sansui 20000, 20067, 20209, 20479, 21479<br />
Sanyo 20046<br />
Scott 20184, 20045, 20121, 20043, 20210<br />
Sears 20035, 20037, 20000, 20042, 20046,<br />
21237<br />
Sharp 20048, 20807, 20848<br />
<strong>Shaw</strong> 22763<br />
Signature 20035<br />
Sonic Blue 20614, 20616, 21137<br />
Sony 21232, 20032, 20035, 20033,<br />
20000, 20636, 21032, 21972<br />
Stack 9 21972<br />
STS 20042<br />
Sud<strong>de</strong>nlink 22763<br />
Sylvania 20035, 20081, 20000, 20043,<br />
20593, 21593, 21781<br />
Symphonic 20000, 20593, 21593<br />
Systemax 21972<br />
Tagar Systems 21972<br />
Tashiko 20037<br />
Teac 20000<br />
Technics 20035, 20162<br />
Teknika 20035, 20037, 20000<br />
Thomas 20000<br />
Time Warner 22763<br />
Tivo 20739, 20618, 20636, 21996, 22448<br />
Toshiba 20045, 20043, 20209, 20210, 20845,<br />
21008, 21145, 21972, 21996<br />
Totevision 20037<br />
Touch 21972<br />
Vector 20045<br />
Vector Research 20038<br />
Vi<strong>de</strong>o Concepts 20045<br />
Vi<strong>de</strong>omagic 20037<br />
Viewsonic 21972<br />
Vil<strong>la</strong>in 20000<br />
Voodoo 21972<br />
White West. 20209<br />
XR-1000 20035, 20000<br />
Yamaha 20038<br />
Zenith 20037, 20039, 20033, 20000,<br />
20209, 20479, 21137, 21479<br />
ZT Group 21972<br />
APERÇU<br />
Les télécomman<strong>de</strong>s <strong>Shaw</strong> <strong>Direct</strong> <strong>IRC</strong>600 IR<br />
et <strong>URC</strong>600 IR/RF fabriquées par Universal<br />
Electronics sont nos télécomman<strong>de</strong>s universelles<br />
<strong>de</strong> <strong>la</strong> toute <strong>de</strong>rnière génération. Leur<br />
technologie sophistiquée vous permet <strong>de</strong><br />
regrouper les fonctions <strong>de</strong> trois <strong>de</strong> vos télécomman<strong>de</strong>s<br />
d’appareils <strong>de</strong> divertissement<br />
maison en un seul produit facile à utiliser.<br />
La télécomman<strong>de</strong> requiert l’instal<strong>la</strong>tion <strong>de</strong><br />
<strong>de</strong>ux (2) piles AA neuves (comprises) et une<br />
programmation simple afin <strong>de</strong> faire fonctionner<br />
votre téléviseur. Pour obtenir les meilleurs<br />
résultats, veuillez lire et exécuter toutes<br />
les instructions décrites ici. Conservez ce<br />
gui<strong>de</strong> pour référence ultérieure.<br />
INSTALLATION DES PILES<br />
1. Soulevez le couvercle du compartiment<br />
<strong>de</strong>s piles et retirez-le.<br />
2. Insérez les <strong>de</strong>ux (2) piles AA qui sont<br />
fournies selon les marques « + » et « – »<br />
à l’intérieur du compartiment <strong>de</strong>s piles.<br />
3. Remettez en p<strong>la</strong>ce le couvercle du<br />
compartiment <strong>de</strong>s piles.<br />
4. Effectuez une vérification en appuyant<br />
sur <strong>la</strong> touche d’alimentation.<br />
Si les piles sont insérées correctement,<br />
le voyant rouge clignotera.<br />
NOTA : Lorsque les piles doivent être remp<strong>la</strong>cées, <strong>la</strong><br />
télécomman<strong>de</strong> cesse <strong>de</strong> fonctionner. Remp<strong>la</strong>cez les<br />
piles par <strong>de</strong>s piles AA neuves.<br />
PROGRAMMATION DE LA<br />
COMMANDE SAT<br />
L’adresse <strong>de</strong> votre télécomman<strong>de</strong> est préréglée<br />
par le fabricant à 000 pour comman<strong>de</strong>r<br />
toutes les fonctions <strong>de</strong> votre récepteur<br />
<strong>de</strong> signaux <strong>de</strong> satellite Motoro<strong>la</strong>. Toutefois,<br />
si vous avez plus d’un récepteur <strong>de</strong> signaux<br />
<strong>de</strong> satellite, vous voudrez peut-être<br />
empêcher <strong>la</strong> télécomman<strong>de</strong> qui se trouve<br />
dans une pièce d’affecter le récepteur qui<br />
se trouve dans une autre pièce. Afin d’éviter<br />
ce type d’interférence, vous <strong>de</strong>vez assigner<br />
chaque télécomman<strong>de</strong> à un récepteur en<br />
attribuant une nouvelle adresse à chaque<br />
combinaison. Vous pouvez attribuer une<br />
adresse à l’ai<strong>de</strong> <strong>de</strong> votre télécomman<strong>de</strong> <strong>de</strong><br />
<strong>la</strong> façon suivante :<br />
1. Appuyez sur <strong>la</strong> touche SAT pour sélectionner<br />
le mo<strong>de</strong> SAT <strong>de</strong> <strong>la</strong> télécomman<strong>de</strong>.<br />
2. Appuyez sur <strong>la</strong> touche OPTIONS pour<br />
afficher l’écran Options sur votre téléviseur.<br />
3. Dans le Menu Options, utilisez les<br />
flèches <strong>de</strong> défilement et appuyez sur <strong>la</strong><br />
touche ENTER/OK pour ouvrir<br />
les menus suivants. Vous pouvez également<br />
appuyer sur le numéro indiqué<br />
sur <strong>la</strong> télécomman<strong>de</strong> pour avoir un<br />
accès direct à chaque menu.<br />
6 Configuration du système (certains<br />
modèles seulement).<br />
4 Rég<strong>la</strong>ges du système.<br />
3 Rég<strong>la</strong>ges <strong>de</strong> l’instal<strong>la</strong>tion.<br />
2 Adresse <strong>de</strong> <strong>la</strong> télécomman<strong>de</strong>.<br />
4. Lorsque vous arrivez à l’écran « Adresse<br />
<strong>de</strong> <strong>la</strong> télécomman<strong>de</strong> », vous pouvez programmer<br />
<strong>la</strong> télécomman<strong>de</strong> à l’ai<strong>de</strong> <strong>de</strong> <strong>la</strong><br />
séquence <strong>de</strong> programmation du c<strong>la</strong>vier<br />
<strong>de</strong> <strong>la</strong> télécomman<strong>de</strong>.<br />
5. Appuyez et maintenez appuyée <strong>la</strong><br />
touche SAT <strong>de</strong> <strong>la</strong> télécomman<strong>de</strong><br />
jusqu’à ce que les voyants rouges<br />
clignotent au moins <strong>de</strong>ux fois, puis<br />
relâchez <strong>la</strong> touche SAT.<br />
6. Entrez une nouvelle adresse SAT à 3<br />
chiffres tirée <strong>de</strong> <strong>la</strong> liste ci-<strong>de</strong>ssous à<br />
l’ai<strong>de</strong> <strong>de</strong>s touches numériques <strong>de</strong> <strong>la</strong><br />
télécomman<strong>de</strong>.<br />
7. Appuyez sur <strong>la</strong> touche ENTER/OK<br />
pour enregistrer <strong>la</strong> nouvelle adresse<br />
et assigner <strong>la</strong> télécomman<strong>de</strong> à votre<br />
récepteur <strong>de</strong> signaux <strong>de</strong> satellite.<br />
8. Appuyez sur <strong>la</strong> touche EXIT pour quitter<br />
le menu Options.<br />
PROGRAMMATION DE LA<br />
COMMANDE D’UN APPAREIL<br />
Les télécomman<strong>de</strong>s <strong>Shaw</strong> <strong>Direct</strong> <strong>IRC</strong>600 et<br />
<strong>URC</strong>600 sont préprogrammées pour faire<br />
fonctionner un récepteur <strong>de</strong> signaux <strong>de</strong> satellite,<br />
un téléviseur Sony et un lecteur <strong>de</strong> DVD<br />
Sony. Pour programmer <strong>la</strong> comman<strong>de</strong> d’un<br />
appareil autre que les appareils par défaut,<br />
effectuez les étapes suivantes. Si ce n’est pas<br />
ce que vous souhaitez, ignorez cette section<br />
et passez à <strong>la</strong> suivante.<br />
1. Allumez le téléviseur ou l’appareil auxiliaire.<br />
NOTA : Veuillez lire entièrement les étapes<br />
2 à 4 avant <strong>de</strong> procé<strong>de</strong>r. Surlignez ou<br />
inscrivez les co<strong>de</strong>s et l’appareil que vous<br />
souhaitez programmer avant <strong>de</strong> passer à<br />
l’étape 2.<br />
2. Appuyez et maintenez appuyée <strong>la</strong> touche<br />
pour sélectionner l’appareil (TV ou<br />
AUX) jusqu’à ce que les voyants rouges<br />
clignotent au moins <strong>de</strong>ux fois, puis relâchez<br />
<strong>la</strong> touche TV ou AUX.<br />
3. Localisez le co<strong>de</strong> <strong>de</strong> votre appareil dans<br />
<strong>la</strong> liste <strong>de</strong>s co<strong>de</strong>s <strong>de</strong>s fabricants au verso<br />
<strong>de</strong> ce gui<strong>de</strong> d’utilisation. Les marques<br />
sont inscrites par ordre alphabétique<br />
et les co<strong>de</strong>s les plus popu<strong>la</strong>ires sont<br />
inscrits en premier.<br />
4. Entrez le premier co<strong>de</strong> à cinq chiffres<br />
pour votre téléviseur ou appareil auxiliaire.<br />
Si vous le faites correctement, le<br />
voyant rouge clignotera <strong>de</strong>ux fois.<br />
NOTA : Si vous entrez un co<strong>de</strong> invali<strong>de</strong>,<br />
le voyant rouge ne clignotera pas<br />
lorsque vous entrerez le <strong>de</strong>rnier chiffre<br />
et que vous quitterez le mo<strong>de</strong> <strong>de</strong> programmation.<br />
Répétez les étapes 2 à 4<br />
avec un co<strong>de</strong> vali<strong>de</strong>.<br />
5. Pointez <strong>la</strong> télécomman<strong>de</strong> vers le téléviseur<br />
ou l’appareil auxiliaire et appuyez<br />
sur <strong>la</strong> touche d’alimentation une fois.<br />
L’appareil <strong>de</strong>vrait s’éteindre. S’il ne<br />
répond pas, répétez les étapes 2 à 4<br />
en essayant chacun <strong>de</strong>s co<strong>de</strong>s inscrits<br />
pour votre marque jusqu’à ce que vous<br />
en trouviez un qui fonctionne. Si ce<strong>la</strong><br />
ne fonctionne toujours pas, essayez <strong>de</strong><br />
faire une Recherche <strong>de</strong> votre co<strong>de</strong>.<br />
6. Le co<strong>de</strong> du téléviseur ou <strong>de</strong> l’appareil<br />
auxiliaire sera stocké dans <strong>la</strong> télécomman<strong>de</strong><br />
et il sera automatiquement<br />
reprogrammé lorsque les piles seront<br />
remp<strong>la</strong>cées.<br />
Co<strong>de</strong> du téléviseur :<br />
Co<strong>de</strong> <strong>de</strong> l’appareil auxiliaire :<br />
RÉGLAGE DU VERROUILLAGE DU<br />
CONTRÔLE DES CANAUX<br />
Par défaut, les paramètres <strong>de</strong> contrôle <strong>de</strong>s<br />
canaux <strong>de</strong> <strong>la</strong> télécomman<strong>de</strong> ne sont pas<br />
verrouillés en fonction du récepteur satellite.<br />
Les touches concernées vont <strong>de</strong> 0 à 9, et comprennent<br />
également CH+, CH-, et LAST. Ainsi,<br />
vous ne risquez pas <strong>de</strong> modifier par acci<strong>de</strong>ntellement<br />
un canal associé à votre téléviseur,<br />
vous pouvez désactiver cette fonction pour<br />
disposer d'un accès complet à ces fonctions<br />
en mo<strong>de</strong> TV.<br />
Pour désactiver le verrouil<strong>la</strong>ge du contrôle <strong>de</strong>s<br />
canaux<br />
1. Sur <strong>la</strong> télécomman<strong>de</strong>, appuyez sur <strong>la</strong><br />
touché SAT et maintenez-<strong>la</strong> enfoncée<br />
jusqu'à ce que le voyant lumineux<br />
clignote <strong>de</strong>ux fois.<br />
2. Entrez le numéro 9 7 3 : <strong>la</strong> touche SAT<br />
clignotera <strong>de</strong>ux fois.<br />
3. Appuyez une fois sur <strong>la</strong> touche CH- : <strong>la</strong><br />
touché SAT clignotera quatre fois<br />
Pour activer le verrouil<strong>la</strong>ge du contrôle <strong>de</strong>s<br />
canaux<br />
1. Sur <strong>la</strong> télécomman<strong>de</strong>, appuyez sur <strong>la</strong><br />
touché SAT et maintenez-<strong>la</strong> enfoncée<br />
jusqu'à ce que le voyant lumineux<br />
clignote <strong>de</strong>ux fois.<br />
2. Entrez le numéro 9 7 3 : <strong>la</strong> touche SAT<br />
clignotera <strong>de</strong>ux fois.<br />
3. Appuyez une fois sur <strong>la</strong> touche CH+ : <strong>la</strong><br />
touché SAT clignotera <strong>de</strong>ux fois.<br />
RECHERCHE DE VOTRE CODE<br />
Si votre appareil ne répond pas à <strong>la</strong> télécomman<strong>de</strong><br />
après avoir essayé tous les co<strong>de</strong>s<br />
inscrits ou si <strong>la</strong> marque <strong>de</strong> votre appareil n’est<br />
pas inscrite, essayez d’effectuer une Recherche<br />
<strong>de</strong> votre co<strong>de</strong>.<br />
1=Télé, 2=DVD/magnétoscope, 3=AUDIO<br />
1. Allumez votre appareil.<br />
2. Appuyez et maintenez appuyée <strong>la</strong> touche<br />
pour sélectionner l’appareil (TV ou<br />
AUX) jusqu’à ce que les voyants rouges<br />
clignotent au moins <strong>de</strong>ux fois, puis relâchez<br />
<strong>la</strong> touche TV ou AUX.<br />
3. Entrez 9 - 9 - 1. Le voyant rouge<br />
clignotera <strong>de</strong>ux fois.<br />
4. Appuyez sur le 1 pour rechercher<br />
un téléviseur, appuyez sur le 2 pour<br />
rechercher un DVD/magnétoscope ou<br />
appuyez sur le 3 pour rechercher un<br />
appareil audio.<br />
5. Tout en pointant <strong>la</strong> télécomman<strong>de</strong><br />
vers l’appareil, appuyez et relâchez <strong>la</strong><br />
touche CH + jusqu’à ce que l’appareil<br />
se ferme. Nota : vous <strong>de</strong>vrez peut-être<br />
appuyer sur <strong>la</strong> touche [CH+] plusieurs<br />
fois.<br />
NOTA : En mo<strong>de</strong> Recherche, <strong>la</strong> télécomman<strong>de</strong><br />
enverra <strong>de</strong>s co<strong>de</strong>s IR <strong>de</strong> sa bibliothèque<br />
vers l’appareil cible.<br />
6. Appuyez sur <strong>la</strong> touche <strong>de</strong> sélection <strong>de</strong>s<br />
appareils (TV ou AUX) une fois pour<br />
verrouiller le co<strong>de</strong>. Le voyant rouge<br />
clignotera <strong>de</strong>ux fois.<br />
VÉRIFICATION DES CODES<br />
Si vous avez configuré <strong>la</strong> télécomman<strong>de</strong> en<br />
utilisant <strong>la</strong> procédure <strong>de</strong> recherche <strong>de</strong> votre<br />
co<strong>de</strong>, vous pouvez vouloir connaître le co<strong>de</strong><br />
à cinq chiffres qui fait fonctionner votre<br />
téléviseur. Exécutez les étapes suivantes<br />
après avoir configuré votre téléviseur afin <strong>de</strong><br />
connaître ce co<strong>de</strong> à cinq chiffres qui fait fonctionner<br />
votre téléviseur.<br />
1. Appuyez et maintenez appuyée <strong>la</strong><br />
touche TV jusqu’à ce que les voyants<br />
rouges clignotent au moins <strong>de</strong>ux fois,<br />
puis relâchez-<strong>la</strong>.<br />
2. Entrez 9 - 9 - 0. Le voyant rouge<br />
clignotera <strong>de</strong>ux fois.<br />
3. Pour connaître le co<strong>de</strong> : pour le premier<br />
chiffre, appuyez sur 1 une fois et atten<strong>de</strong>z<br />
3 secon<strong>de</strong>s. Ensuite, comptez le<br />
nombre <strong>de</strong> fois que les voyants rouges<br />
ont clignoté (p. ex. : 3 clignotements =<br />
3) et inscrivez le numéro dans <strong>la</strong> case à<br />
l’extrême gauche (Co<strong>de</strong> TV) à <strong>la</strong> fin <strong>de</strong><br />
cette section.<br />
NOTA : Si le chiffre du co<strong>de</strong> est 0, le voyant<br />
rouge ne clignote pas.<br />
4. Répétez l’étape 3 quatre fois <strong>de</strong> plus<br />
pour obtenir les chiffres restants. Utilisez<br />
2 pour le <strong>de</strong>uxième chiffre, 3 pour le<br />
troisième chiffre, 4 pour le quatrième<br />
chiffre et 5 pour le cinquième. Terminez<br />
l’inscription du co<strong>de</strong> dans les cases<br />
(Co<strong>de</strong> TV) à <strong>la</strong> fin <strong>de</strong> cette section.<br />
5. Pour vérifier le co<strong>de</strong> AUX, répétez les<br />
étapes 1 à 4 en utilisant <strong>la</strong> touche AUX à<br />
l’étape 1.<br />
6. Pour vérifier le co<strong>de</strong> SAT, répétez les<br />
étapes 1 à 4 en utilisant <strong>la</strong> touche SAT à<br />
l’étape 1.<br />
Nota : Lors <strong>de</strong> <strong>la</strong> vérification <strong>de</strong> l’adresse<br />
SAT, seuls les chiffres 1, 2 et 3 sont requis.<br />
Co<strong>de</strong> du téléviseur :<br />
Co<strong>de</strong> <strong>de</strong> l’appareil auxiliaire :<br />
MODIFICATION DE LA<br />
COMMANDE DU VOLUME<br />
Sur les télécomman<strong>de</strong>s <strong>Shaw</strong> <strong>Direct</strong> <strong>IRC</strong>600 et<br />
<strong>URC</strong>600, le verrouil<strong>la</strong>ge du volume est contrôlé<br />
par le téléviseur <strong>de</strong> façon à ce que vous puissiez<br />
contrôler le volume en mo<strong>de</strong> AUX ou SAT.<br />
Vous pouvez effectuer un déverrouil<strong>la</strong>ge<br />
individuel du volume sur un appareil sélectionné<br />
afin <strong>de</strong> régler <strong>la</strong> comman<strong>de</strong> du volume<br />
pour un fonctionnement indépendant.<br />
Verrouil<strong>la</strong>ge du volume dans un mo<strong>de</strong> spécifique.<br />
1. Appuyez et maintenez appuyée <strong>la</strong><br />
touche SAT jusqu’à ce que les voyants<br />
rouges clignotent au moins <strong>de</strong>ux fois,<br />
puis relâchez-<strong>la</strong>.<br />
2. Entrez 9 - 9 - 3. Le voyant rouge<br />
clignotera <strong>de</strong>ux fois après le 3.<br />
3. Appuyez sur <strong>la</strong> touche <strong>de</strong> mo<strong>de</strong> (TV ou<br />
AUX) et relâchez-<strong>la</strong> pour verrouiller le<br />
volume.<br />
Déverrouil<strong>la</strong>ge du volume dans un mo<strong>de</strong> spécifique.<br />
1. Appuyez et maintenez appuyée <strong>la</strong><br />
touche du mo<strong>de</strong> à déverrouiller (ex.,<br />
AUX) jusqu’à ce que les voyants rouges<br />
clignotent au moins <strong>de</strong>ux fois, puis<br />
relâchez-<strong>la</strong>.<br />
2. Entrez 9 - 9 - 3. Le voyant rouge<br />
clignotera <strong>de</strong>ux fois après le 3.<br />
3. Appuyez sur <strong>la</strong> touche VOL vers le<br />
bas et relâchez-<strong>la</strong>, le voyant rouge<br />
clignotera quatre fois.<br />
UTILISATION DE LA TOUCHE<br />
D’ALIMENTATION GÉNÉRALE<br />
Les télécomman<strong>de</strong>s <strong>Shaw</strong> <strong>Direct</strong> <strong>IRC</strong>600<br />
et <strong>URC</strong>600 sont dotées d’une caractéristique<br />
unique leur permettant d’allumer ou<br />
d’éteindre jusqu’à trois <strong>de</strong> vos appareils <strong>de</strong><br />
divertissement maison en appuyant sur une<br />
seule touche.<br />
NOTA : Le rég<strong>la</strong>ge par défaut <strong>de</strong> <strong>la</strong> TOUCHE<br />
D’ALIMENTATION GÉNÉRALE (Alimentation) est<br />
en mo<strong>de</strong> SAT. Si <strong>la</strong> touche n’est pas programmée,<br />
seuls le récepteur <strong>de</strong> signaux <strong>de</strong> satellite<br />
et le téléviseur pourront être allumés ou éteints.<br />
En mo<strong>de</strong> AUX ou TV, si vous appuyez sur <strong>la</strong> touche<br />
d’alimentation, seul l’appareil sélectionné<br />
pourra être allumé ou éteint.<br />
PROGRAMMATION DE LA TOUCHE<br />
D’ALIMENTATION GÉNÉRALE<br />
1. Appuyez et maintenez appuyée <strong>la</strong><br />
touche SAT jusqu’à ce que les voyants<br />
rouges clignotent au moins <strong>de</strong>ux fois,<br />
puis relâchez-<strong>la</strong>.<br />
2. Entrez 9 - 9 - 5. Le voyant rouge<br />
clignotera <strong>de</strong>ux fois.<br />
3. Appuyez et maintenez appuyée chacune<br />
<strong>de</strong>s touches <strong>de</strong> mo<strong>de</strong> dans l’ordre<br />
désiré dans <strong>la</strong> séquence d’alimentation<br />
générale.<br />
4. Appuyez sur <strong>la</strong> touche Alimentation et<br />
relâchez-<strong>la</strong>, le voyant rouge sous SAT<br />
clignotera <strong>de</strong>ux fois.<br />
UTILISATION DE LA TOUCHE<br />
D’ALIMENTATION GÉNÉRALE<br />
Après l’avoir programmée, pointez <strong>la</strong> télécomman<strong>de</strong><br />
vers vos appareils et appuyez sur <strong>la</strong><br />
touche Alimentation et maintenez-<strong>la</strong> appuyée<br />
pendant 1,5 secon<strong>de</strong>.<br />
Suppression <strong>de</strong> <strong>la</strong> touche d’alimentation<br />
générale:<br />
1. Appuyez et maintenez appuyée <strong>la</strong><br />
touche SAT jusqu’à ce que les voyants<br />
rouges clignotent au moins <strong>de</strong>ux fois,<br />
puis relâchez-<strong>la</strong>.<br />
2. Entrez 9 - 9 - 5. Le voyant rouge<br />
clignotera <strong>de</strong>ux fois.<br />
3. Appuyez sur <strong>la</strong> touche Alimentation et<br />
relâchez-<strong>la</strong>, le voyant rouge sous SAT<br />
clignotera <strong>de</strong>ux fois.<br />
DÉPANNAGE<br />
PROBLÈME : La touche <strong>de</strong> l’appareil ne<br />
clignote pas lorsque vous<br />
appuyez sur une touche.<br />
SOLUTION : Remp<strong>la</strong>cez les piles par <strong>de</strong>ux<br />
(2) piles alcalines AA neuves.<br />
PROBLÈME : La touche <strong>de</strong> l’appareil<br />
clignote lorsque vous appuyez<br />
sur une touche, mais l’appareil<br />
<strong>de</strong> divertissement ne répond<br />
pas.<br />
SOLUTION : Assurez-vous <strong>de</strong> bien<br />
pointer <strong>la</strong> télécomman<strong>de</strong> vers<br />
l’appareil et d’être à moins <strong>de</strong><br />
4,5 m <strong>de</strong> l’appareil que vous<br />
tentez <strong>de</strong> faire fonctionner.<br />
PROBLÈME : La télécomman<strong>de</strong> ne peut pas<br />
comman<strong>de</strong>r les appareils ou<br />
les comman<strong>de</strong>s ne fonctionnent<br />
pas correctement.<br />
SOLUTION : Essayez tous les co<strong>de</strong>s inscrits<br />
pour <strong>la</strong> marque d’appareil<br />
que vous voulez programmer.<br />
Assurez-vous que tous les<br />
appareils puissent fonctionner<br />
à l’ai<strong>de</strong> d’une télécomman<strong>de</strong> à<br />
infrarouge.<br />
INFORMATIONS<br />
SUPPLÉMENTAIRES<br />
Ce produit ne présente aucune pièce pouvant<br />
être réparée par l’utilisateur. L’ouverture<br />
du boîtier, sauf le compartiment pour les<br />
piles, peut causer <strong>de</strong>s dommages permanents<br />
à vos télécomman<strong>de</strong>s <strong>Shaw</strong> <strong>Direct</strong><br />
<strong>IRC</strong>600 et <strong>URC</strong>600.<br />
• Pour une assistance en ligne, ren<strong>de</strong>z-vous sur le site :<br />
www.shawdirect.ca<br />
Copyright © Universal Electronics inc., 2010.<br />
Tous droits réservés. Aucune partie <strong>de</strong> cette<br />
publication ne peut être reproduite, transmise,<br />
transcrite, enregistrée sur un système<br />
<strong>de</strong> stockage ou traduite dans toute autre<br />
<strong>la</strong>ngue, sous quelque forme et par quelque<br />
moyen que ce soit, électronique, mécanique,<br />
optique, manuel ou autre, sans l’autorisation<br />
écrite préa<strong>la</strong>ble <strong>de</strong> Universal Electronics Inc.<br />
CONFORMITÉ AUX RÈGLEMENTS<br />
DE LA FCC<br />
Cet appareil a subi <strong>de</strong>s essais et il a été<br />
démontré qu’il est conforme aux restrictions<br />
pour un appareil numérique <strong>de</strong> c<strong>la</strong>sse B,<br />
en vertu <strong>de</strong> <strong>la</strong> Partie 15 <strong>de</strong>s règlements <strong>de</strong><br />
<strong>la</strong> FCC. Ces restrictions sont établies pour<br />
procurer une protection raisonnable contre<br />
le brouil<strong>la</strong>ge nuisible dans une instal<strong>la</strong>tion<br />
rési<strong>de</strong>ntielle. Cet appareil génère, utilise et<br />
peut transmettre par rayonnement une énergie<br />
radiofréquence. Par conséquent, s’il n’est<br />
pas utilisé conformément aux directives, cet<br />
appareil peut causer un brouil<strong>la</strong>ge nuisible<br />
aux communications radio.<br />
Toutefois, il n’existe aucune garantie que le<br />
brouil<strong>la</strong>ge ne se produira pas dans une instal<strong>la</strong>tion<br />
particulière. Si cet appareil cause du<br />
brouil<strong>la</strong>ge nuisible à <strong>la</strong> réception radio ou <strong>de</strong><br />
télévision, l’utilisateur est encouragé à tenter<br />
<strong>de</strong> mettre fin au brouil<strong>la</strong>ge en utilisant l’une<br />
ou plusieurs <strong>de</strong>s mesures suivantes :<br />
• augmenter ou réduire <strong>la</strong> distance entre<br />
l’appareil et le récepteur.<br />
• consulter le détail<strong>la</strong>nt ou un technicien<br />
expérimenté en télécomman<strong>de</strong>s ou en<br />
téléviseurs pour obtenir <strong>de</strong> l’ai<strong>de</strong>.<br />
Cet appareil a subi <strong>de</strong>s essais et il a été<br />
démontré qu’il est conforme aux restrictions<br />
pour un appareil numérique <strong>de</strong> c<strong>la</strong>sse B en<br />
vertu <strong>de</strong>s règlements <strong>de</strong> <strong>la</strong> FCC. L’utilisateur<br />
est avisé que les changements ou modifications<br />
qui ne seraient pas expressément<br />
approuvés par le fabricant peuvent annuler<br />
le droit <strong>de</strong> l’utilisateur à utiliser l’appareil.<br />
FCC AUTHORIZATION LABEL<br />
FCC ID: MG33051<br />
IC: 2575A-3051<br />
Mo<strong>de</strong>l <strong>URC</strong>-3051<br />
Universal Electronics Inc<br />
Cet appareil est conforme aux restrictions<br />
établies dans <strong>la</strong> Partie 15 <strong>de</strong>s règlements <strong>de</strong><br />
<strong>la</strong> FCC. Son fonctionnement est assujetti aux<br />
<strong>de</strong>ux conditions suivantes :<br />
1. Cet appareil ne peut pas causer d’interférence<br />
nuisible.<br />
2. Cet appareil doit accepter toute interférence<br />
reçue, y compris les interférences<br />
causant un fonctionnement non désiré.<br />
M<strong>IRC</strong>600 03/11