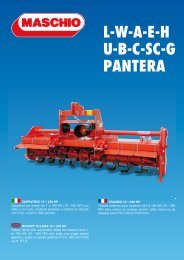
G G - COBRA G - CONDOR - JS Woodhouse
G G - COBRA G - CONDOR - JS Woodhouse
G G - COBRA G - CONDOR - JS Woodhouse
- No tags were found...

You also want an ePaper? Increase the reach of your titles
YUMPU automatically turns print PDFs into web optimized ePapers that Google loves.
ITALIANO ENGLISH DEUTSCH FRANÇAIS<br />
ESPAÑOL<br />
3.12 IN LAVORO<br />
Iniziare il lavoro con la presa di forza a<br />
regime, affondando gradualmente la<br />
macchina nel terreno.<br />
Evitare di premere sconsideratamente il<br />
pedale dell’acceleratore con la presa di<br />
forza inserita.<br />
Questo può essere molto dannoso per<br />
la macchina oltreché per il trattore stesso.<br />
Per scegliere lo sminuzzamento più idoneo<br />
del terreno, è necessario tenere in<br />
considerazione alcuni fattori e precisamente:<br />
- natura del suolo (medio impasto - sabbioso<br />
- argilloso - ecc.);<br />
- profondità di lavoro;<br />
- velocità di avanzamento del trattore;<br />
- regolazione ottimale della macchina.<br />
Uno sminuzzamento del terreno si ottiene<br />
con una velocità bassa di avanzamento<br />
del trattore, con la lamiera livellatrice<br />
abbassata ed una rotazione del rotore<br />
portazappe intorno ai 200 giri/min.<br />
La lamiera livellatrice, oltre a contenere<br />
le zolle già lavorate dalle zappe, consente<br />
di avere una superficie ben livellata ed<br />
omogenea dopo la lavorazione del terreno.<br />
Se la lamiera livellatrice viene alzata, le<br />
zolle non vengono più frantumate ed il<br />
terreno non si presenta più livellato.<br />
3.13 COME SI LAVORA<br />
Si regola la lamiera livellatrice in funzione<br />
dello sminuzzamento voluto, si regolano<br />
le due slitte di profondità ai lati della<br />
macchina, si innesta la P.d.F. e si inizia<br />
ad avanzare con il trattore, abbassando<br />
progressivamente la macchina.<br />
Si percorre un breve tratto e si controlla<br />
poi se la profondità di lavoro, lo sminuzzamento<br />
ed il livellamento del terreno<br />
sono quelli desiderati.<br />
Nelle macchine provviste di rullo posteriore,<br />
la profondità di lavoro è determinata<br />
dalla regolazione del rullo stesso mediante<br />
martinetto centrale o martinetti laterali<br />
(meccanici o idraulici).<br />
34<br />
3.12 IN WORK<br />
Start work with the pto at running rate,<br />
gradually lowering the machine into the<br />
soil. Never excessively press down on the<br />
accelerator pedal when the pto is engaged.<br />
This could be very harmful for both the<br />
machine and the tractor itself.<br />
When choosing how much to break up<br />
the soil which is to be rotary hoed the<br />
following points must be considered:<br />
- the type of soil (mixed, sandy, clay<br />
etc.);<br />
- how deep to hoe;<br />
- the forward moving speed of the tractor;<br />
- the optimal position of the machine.<br />
The earth is best broken up and machine<br />
with a slow forward moving speed of the<br />
tractor, with the levelling blade lowered<br />
and a blade-carrying rotor rotation speed<br />
of about 200 rpm.<br />
As well as holding the earth that has already<br />
been hoed by the hoe blades the<br />
levelling blade helps to produce a well<br />
levelled and smooth surface after hoeing.<br />
If the levelling blade is raised the sods<br />
are no longer broken up and there will<br />
not be a smooth, level finish.<br />
3.13 HOW IT WORKS<br />
Position the levelling blade according to<br />
how finely broken up the soil should be.<br />
Position the depth of the two skids which<br />
are on the sides of the machine<br />
Engage the P.d.F. and start to move the<br />
tractor forward gradually lowering the<br />
mahine.<br />
After a short distance check to see<br />
whether the earth is being hoed to the<br />
depth required, broken up finely enough<br />
and leveled enough.<br />
For the machines fitted with posterior rollers<br />
the hoeing depth is determined by<br />
the positioning of the roller itself using the<br />
mechanical or hydraulical central jack or<br />
the lateral jacks.<br />
3.12 BEI DER ARBEIT<br />
Die Arbeit beginnen, wenn die Zapfwelle<br />
ihre Drehzahl erreicht hat, und den Maschine<br />
dann allmählich in den Boden einsenken<br />
lassen.<br />
Vermeiden, zu stark Gas zu geben, wenn<br />
die Zapfwelle eingeschaltet ist. Das kann<br />
zu größeren Schäden an der Maschine<br />
und auch am Schlepper führen.<br />
Um den richtigen Zerkrümelungsgrad für<br />
den Boden einzustellen, sind einige Faktoren<br />
zu berücksichtigen, und zwar:<br />
- Bodenbeschaffenheit (normal - sandig<br />
-lehmig etc.);<br />
- Arbeitstiefe;<br />
- Fahrgeschwindigkeit des Schleppers;<br />
- optimale Einstellung der Maschine.<br />
Eine gute Zerkleinerung des Bodens erhält<br />
man bei langsamer Fahrgeschwindigkeit<br />
des Schleppers, bei gesenktem<br />
Planierschild und einer Rotation des<br />
Messerrotors bei 200 U/min.<br />
Das Planierschild hält nicht nur die bereits<br />
von den Hacken zerkleinerten Schollen<br />
zurück, sondern es sorgt auch dafür,<br />
daß der Boden hinter der Maschine gut<br />
nivelliert und homogen ist.<br />
Wenn man das Planierschild hebt, werden<br />
die Erdschollen nicht mehr zerkleinert<br />
und der Boden wird nicht mehr nivelliert.<br />
3.13 WIE MAN ARBEITET<br />
Man stellt die Höhe des Planierschilds je<br />
nach dem gewünschten Zerkleinerungsgrad<br />
ein, regelt die beiden Tiefenregelkufen<br />
an den Seiten der Maschine, schaltet<br />
die Zapfwelle ein und fährt mit dem<br />
Schlepper worwärts, wobei man die Maschine<br />
allmählich senkt. Man fährt eine<br />
kurze Strecke und prüft dann, ob die<br />
Arbeitstiefe, die Zekleinerung und die<br />
Nivellierung des Bodens so sind wie<br />
gewünscht. Bei den Hackfräsen mit Rolle<br />
auf der Rückseite wird die Arbeitstiefe,<br />
die Zerkleinerung und die Nivellierung<br />
des Bodens so sind wie gewünscht.<br />
Bei den Maschine mit Rolle auf der Rückseite<br />
wird die Arbeitstiefe durch die Einstellung<br />
der Rolle bedingt, und zwar mittels<br />
einer zentralen oder seitlicher Winden<br />
(mechanisch oder hydraulisch).<br />
3.12 EXECUTION DU<br />
TRAVAIL<br />
Commencez le travail avec la prise de<br />
force au régime et enfouissez graduellement<br />
la machine dans le sol.<br />
Evitez d’appuyer trop fort sur la pédale<br />
d’accélérateur quand la prise de force est<br />
en marche.<br />
Ce qui serait très dangereux pour l’appareil<br />
et le tracteur.<br />
Pour choisir le fractionnement le plus<br />
approprié au terrain, il faut tenir compte<br />
d’un certain nombres de facteurs:<br />
- nature du sol (proportions moyennes -<br />
sableux - argileux etc.);<br />
- profondeur de binage;<br />
- vitesse d’avancement du tracteur;<br />
- réglage optimale de la machine.<br />
On obtient un bon fractionnement du sol<br />
avec une vitesse d’avancement du tracteur<br />
peu élevée, la niveleuse abaissée<br />
et une rotation du rotor supporttant les<br />
disques de l’ordre de 200 t/mn.<br />
La niveleuse contient les mottes déjà binées<br />
par les houes et permet d’obtenir<br />
une surface bine nivelée et homogène<br />
après la binage du terrain.<br />
Si la niveleuse est soulevée, les mottes<br />
ne sont plus brisées et le terrain n’est plus<br />
nivelé.<br />
3.13 FONCTIONNEMENT<br />
Réglez la niveleuse en fonction du fractionnement<br />
voulu. Réglez les deux<br />
coulisseaux de profondeur sur les côtés<br />
de la machine. Enclenchez la prisé de<br />
force et commencer à avancer avec le<br />
tracteur, en abaissant progressivement<br />
la machine.<br />
Après un bref parcours, assurez-vous<br />
que la profondeur de binage, le fractionnement<br />
et le nivellement du terrrain sont<br />
bien tels que vous les souhaitez.<br />
Sur les machine dotées de rouleau arrière,<br />
la profondeur de binage est déterminée<br />
par le réglage de ce même rouleua<br />
au moyen du vérin central au des vérins<br />
latéraux (mécaniques au hydrauliques).<br />
3.12 EN FUNCIONAMIENTO<br />
Empezar a trabajar con la toma de fuerza<br />
a régimen, enterrando gradualmente<br />
la máquina en el terreno.<br />
Evitar apretar excesivamente el pedal del<br />
acelerador con la toma de fuerza activada.<br />
Esto es perjudicial para la máquina y<br />
para el tractor mismo.<br />
Para elegir la trituración más idónea del<br />
terrreno, es necessario tomar en cuenta<br />
algunos factores:<br />
- tipo de terreno (consistencio media -<br />
arenos - arcilloso etc.);<br />
- profundidad de avance del tractor;<br />
- regulación optimal de la máquina.<br />
Una trituración del terreno se abtiene con<br />
una velocidad baja de avance del tractor,<br />
con la hoja niveladora baja y una rotación<br />
del rotor porta-azadasalrededor<br />
200 R.P.M.<br />
La hoja niveladora, además de contener<br />
los aterrones ya eleborados con las azadas,<br />
peemite la obtención de una superficie<br />
bien nivelada y homogénea luego<br />
del trabajo sobre el terreno.<br />
Si alzamos la hoja niveladora, no se<br />
deshcen los terrones y el terreno no se<br />
presenta nivelado.<br />
3.13 COMO TRABAJAR<br />
Debemos regular la hoja niveladora en<br />
función de la trituración deseada, regular<br />
las dos correderas de profundidad en<br />
los lados de la máquina, acoplamos la<br />
T.d.F. y comenzamos a avanzar con el<br />
tractor, bajando progresivamente la máquina.<br />
Luego de recorrer un breve tramo controlamos<br />
si la profundidan de trabajo, la<br />
trituración y el nivelado son los deseados.<br />
En las máquina que poseen cilindro posterior,<br />
la profundidad de trabajo está determinada<br />
por la regulación del rodillo<br />
mismo mediante gato central o gatos laterales<br />
(mecánicos o hidráulicos).