fitting & adjusting your winch installation & justering av ... - Pyacht.com
fitting & adjusting your winch installation & justering av ... - Pyacht.com
fitting & adjusting your winch installation & justering av ... - Pyacht.com
- No tags were found...

Create successful ePaper yourself
Turn your PDF publications into a flip-book with our unique Google optimized e-Paper software.
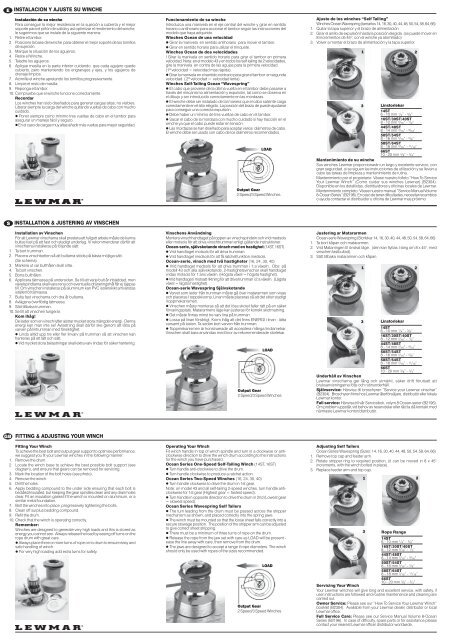
INSTALACION Y AJUSTE SU WINCHE<br />
Instalación de su <strong>winch</strong>e<br />
Para conseguir la mejor resistencia en la sujeción a cubierta y el mejor<br />
soporte para el piñón de salida y así optimizar el rendimiento del <strong>winch</strong>e,<br />
le sugerimos que se instale de la siguiente manera:<br />
1. Retire el tambor.<br />
2. Posicione la base del <strong>winch</strong>e para obtener el mejor soporte de los tornillos<br />
de sujeción.<br />
3. Marque la situación de los agujeros.<br />
4. Retire el Winche.<br />
5. Taladre los agujeros.<br />
6. Aplique masilla en la parte inferior cuidando que cada agujero quede<br />
cubierto, pero manteniendo los engranajes y ejes, y los agujeros de<br />
drenaje limpios.<br />
7. Atornille el <strong>winch</strong>e apretando los tornillos progresivamente.<br />
8. Limpie el resto de masilla.<br />
9. Reponga el tambor.<br />
10. Compruebe que el <strong>winch</strong>e funcione correctamente.<br />
Recordar<br />
Los <strong>winch</strong>es han sido diseñados para generar cargas altas, no visibles.<br />
Liberar siempre la carga del <strong>winch</strong>e quitando vueltas de cabo con mucho<br />
cuidado.<br />
! Poner siempre <strong>com</strong>o mínimo tres vueltas de cabo en el tambor para<br />
asegurar un manejo fácil y seguro.<br />
! En el caso de cargas muy altas añadir más vueltas para mayor seguridad.<br />
Funcionamiento de su <strong>winch</strong>e<br />
Introduzca una manivela en el eje central del <strong>winch</strong>e y girar en sentido<br />
horario o antihorario para accionar el tambor según las instrucciones del<br />
modelo que haya adquirido.<br />
Winches Ocean de una velocidad<br />
! Girar la manivela en sentido antihorario para mover el tambor.<br />
! Girar en sentido horario para utilizar el trinquete.<br />
Winches Ocean de dos velocidades<br />
l Girar la manivela en sentido horario para girar el tambor en primera<br />
velocidad. Nota: en el modelo 43 y en todos los self tailing de 2 velocidades,<br />
gire la manivela en contra de las agujas para la primera velocidad.<br />
(1ª velocidad = velocidad mas rápida).<br />
! Girar la manivela en el sentido contrario para girar el tambor en segunda<br />
velocidad. ( 2ª velocidad = velocidad lenta).<br />
Winches Self-Tailing Ocean “W<strong>av</strong>espring”<br />
! El cabo que proviene de la última vuelta en el tambor debe pasarse a<br />
tr<strong>av</strong>és del mecanismo alimentación y expulsión, tal <strong>com</strong>o se observa en<br />
el dibujo y ser introducido correctamente en las mordazas.<br />
! El <strong>winch</strong>e debe ser instalado de tal manera que el cabo saliente caiga<br />
correctamente en el sitio elegido. La posición del brazo de puede ajustarse<br />
para conseguir una correcta expulsión.<br />
! Debe haber un mínimo de tres vueltas de cabo en el tambor.<br />
! Sacar el cabo de la mordaza con mucho cuidado si hay tracción en el<br />
<strong>winch</strong>e ya que el cabo puede estar en tensión.<br />
! Las mordazas se han diseñado para aceptar varios diámetros de cabo.<br />
El <strong>winch</strong>e debe ser usado con cabo de los diámetros re<strong>com</strong>endados.<br />
LOAD<br />
Output Gear<br />
2 Speed/3 Speed Winches<br />
Ajuste de los <strong>winch</strong>es “Self Tailing”<br />
Winches Ocean W<strong>av</strong>espring (tamaños 14, 16, 30, 40, 44, 48, 50, 54, 58, 64, 66)<br />
1. Quitar la tapa superior y el brazo de alimentación<br />
2. Girar el anillo de expulsión hasta la posición elegida. (se puede mover en<br />
8 incrementos de 45º, con el <strong>winch</strong>e ya atornillado)<br />
3. Volver a montar el brazo de alimentación y la tapa superior.<br />
1 2<br />
3 Linstorlekar<br />
14ST<br />
6 - 10 mm 1 / 4” - 3 / 8”<br />
16ST/30ST/40ST<br />
8 - 12 mm 5 / 16” - 1 / 2”<br />
44ST/48ST<br />
8 - 14 mm 5 / 16” - 9 / 16”<br />
50ST/54ST<br />
8 - 16 mm 5 / 16” - 5 / 8”<br />
58ST/64ST<br />
8 - 18 mm 5 / 16” - 11 / 16”<br />
66ST<br />
10 - 20 mm 3 / 8” - 3 / 4”<br />
Mantenimiento de su <strong>winch</strong>e<br />
Sus <strong>winch</strong>es Lewmar proporcionarán un largo y excelente servicio, con<br />
gran seguridad, si se siguen las instrucciones de utilización y se llevan a<br />
cabo las tareas de limpieza y mantenimiento de rutina.<br />
Mantenimiento por el propietario: Véase nuestro folleto “How To Service<br />
Your Lewmar Winch” (Como cuidar sus <strong>winch</strong>es Lewmar) (B2304).<br />
Disponible en los detallistas, distribuidores y oficinas locales de Lewmar.<br />
Mantenimiento <strong>com</strong>pleto: Véase nuestro manual “Service Manual Volume<br />
8-Ocean Series” (B2196). En caso de tener dificultades, necesitar recambios<br />
o ayuda contactar el distribuidor u oficina de Lewmar mas próximo<br />
INSTALLATION & JUSTERING AV VINSCHEN<br />
Installation <strong>av</strong> Vinschen<br />
För att Lewmar vinscharna skall prestera ett fullgott arbete måste de kunna<br />
bultas fast på ett fast och stadigt underlag. Vi rekommenderar därför att<br />
vinscharna installeras på följande sätt:<br />
1. Ta bort trumman.<br />
2. Placera vinschbotten så att bultarna stöds på bästa möjliga sätt.<br />
(Se schema)<br />
3. Markera ut var bulthålen skall sitta.<br />
4. Ta bort vinschen.<br />
5. Borra bulthålen.<br />
6. Applicera tätmassa på undersidan. Se till att varje bult år inbäddad, men<br />
växelspindlarna skall vara rena och eventuella dräneringshål får ej täppas<br />
till. Om vinschen installeras på aluminium kan PVC isolerskikt arnvändas<br />
istället föt tätmassa.<br />
7. Bulta fast vinscharna och dra åt bultarna.<br />
8. Avlägsna överflödig tätmassa.<br />
9. Sätt tillbaka trumman.<br />
10. Se till att vinschen fungerar.<br />
Kom ihåg!<br />
De laster som en vinsch lyfter alstrar mycket stora mängder energi. Denna<br />
energi kan man inte se! Avlastning skall därför ske genom att lätta på<br />
varven på lintrumman med försiktighet.<br />
! Linda alltid upp tre eller fler linvarv på trumman så att vinschen kan<br />
hanteras på ett lätt och sätt.<br />
! Vid mycket stora belastningar skall extra varv lindas för säker hantering.<br />
Vinschens Användning<br />
Montera vinschhandtaget på toppen <strong>av</strong> vinschspindeln och vrid medsols<br />
eller motsois för att driva vinschtrumman enligt gällande instruktioner.<br />
Ocean-serie, självskotande vinsch med en hastighet (14ST, 16ST)<br />
! Vrid handtaget motsols för att driva trumman.<br />
! Vrid handtaget medsols för att få ratchetfunktion medsols.<br />
Ocean-serie, vinsch med två hastigheter (16, 24, 30, 40)<br />
! Vrid handtaget medsols för att driva trumman i 1:a växeln. Obs: på<br />
modell 43 och alla självskotande, 2-hastighetsvinschar skall handtaget<br />
vridas motsols för 1:ans växeln. (Högsta växel = högsta hastighet).<br />
! Vrid handtaget i motsatt riktning för att driva trumman i 2:a växeln. (Lägsta<br />
växel = lägsta hastighet).<br />
Ocean-serie W<strong>av</strong>espring Självskotande<br />
! Varvet som leder från trumman måste gå över matararmen som visas<br />
och placeras I toppskivorna. Linan måste placeras så att det sitter stadigt<br />
i toppmekanismen.<br />
! Vinschen måste monteras så att det lösa skotet faller rätt på en säker<br />
förvaringsplats. Matararmens läge kan justeras för korrekt skotmatning.<br />
! Det måste finnas minst tre varv lina på trumman.<br />
! Lossa på linan försiktigt. Korm ihåg att det finns ENERGI i linan - lätta<br />
varsamt på lasten. Ta sedan bort varven från trumman.<br />
! Toppmekanismen är konstruerade att acceptera många lindiametrar.<br />
Vinschen skall bara användas med linor <strong>av</strong> rekommenderade storlekar.<br />
LOAD<br />
Output Gear<br />
2 Speed/3 Speed Winches<br />
Justering ar Matararmen<br />
Ocean-serie W<strong>av</strong>espring (Storlekar 14, 16, 30, 40, 44, 48, 50, 54, 58, 64, 66)<br />
1. Ta bort kåpan och matararmen.<br />
2. Vrid Matarringen til önskat läge. (den kan flyttas I steg om 8 x 45°, med<br />
vinschen fastbultad).<br />
3. Sätt tillbaka matararmen och kåpan.<br />
1 2<br />
3<br />
Linstorlekar<br />
14ST<br />
6 - 10 mm 1 / 4” - 3 / 8”<br />
16ST/30ST/40ST<br />
8 - 12 mm 5 / 16” - 1 / 2”<br />
44ST/48ST<br />
8 - 14 mm 5 / 16” - 9 / 16”<br />
50ST/54ST<br />
8 - 16 mm 5 / 16” - 5 / 8”<br />
58ST/64ST<br />
8 - 18 mm 5 / 16” - 11 / 16”<br />
66ST<br />
10 - 20 mm 3 / 8” - 3 / 4”<br />
Underhâll <strong>av</strong> Vinschen<br />
Lewmar vinscharna ger lång och utmärkt, säker drift förutsatt att<br />
bruksanvisningarna följs och rutinunderháll.<br />
Självservice: Hänvisa till broschyren “Service <strong>your</strong> Lewmar vinschar”<br />
(B2304). Broschyren finns hos Lewmar återförsäljare, distributör eller lokala<br />
Lewmar kontor.<br />
Full service: Hänvisa till vår Servicebok, volym 8 Ocean-serier (B2196).<br />
Om problem uppstår, vid behov <strong>av</strong> reservdelar eller råd ta då kontakt med<br />
närmaste Lewmar kontor/distributör.<br />
FITTING & ADJUSTING YOUR WINCH<br />
Fitting Your Winch<br />
To achieve the best bolt and output gear support to optimise performance,<br />
we suggest you fit <strong>your</strong> Lewmar <strong>winch</strong>es in the following manner:<br />
1. Remove the drum.<br />
2. Locate the <strong>winch</strong> base to achieve the best possible bolt support (see<br />
diagram), and ensure that gears can be removed for servicing.<br />
3. Mark the location of the bolt holes (see photo).<br />
4. Remove the <strong>winch</strong>.<br />
5. Drill the holes.<br />
6. Apply bedding <strong>com</strong>pound to the under side ensuring that each bolt is<br />
bedded/insulated, but keeping the gear spindles clean and any drain holes<br />
clear. Fit an insulation gasket if the <strong>winch</strong> is mounted on aluminium, or a<br />
similar metal foundation.<br />
7. Bolt the <strong>winch</strong>es into place, progressively tightening the bolts.<br />
8. Clean off surplus bedding <strong>com</strong>pound.<br />
9. Refit the drum.<br />
10. Check that the <strong>winch</strong> is operating correctly.<br />
Remember:<br />
Winches are designed to generate very high loads and this is stored as<br />
energy you cannot see. Always release the load by easing off turns on the<br />
rope drum with great care.<br />
! Always place three or more turns of rope on to drum to ensure easy and<br />
safe handling of <strong>winch</strong>.<br />
! For very high loading add extra turns for safety.<br />
Operating Your Winch<br />
Fit <strong>winch</strong> handle in top of <strong>winch</strong> spindle and turn in a clockwise or anticlockwise<br />
direction to drive the <strong>winch</strong> drum according to the instructions<br />
for the <strong>winch</strong> you h<strong>av</strong>e purchased.<br />
Ocean Series One-Speed Self-Tailing Winch (14ST, 16ST)<br />
! Turn handle anti-clockwise to drive the drum.<br />
! Turn handle clockwise to produce a ratchet action.<br />
Ocean Series Two-Speed Winches (16, 24, 30, 40)<br />
! Turn handle clockwise to drive the drum in 1st gear.<br />
Note: on model 43 and all self-tailing 2-speed <strong>winch</strong>es, turn handle anticlockwise<br />
for 1st gear (Highest gear = fastest speed).<br />
! Turn handle in opposite direction to drive the drum in 2nd (Lowest gear<br />
= slowest speed).<br />
Ocean Series W<strong>av</strong>espring Self Tailers<br />
! The turn leading from the drum must be passed across the stripper<br />
mechanism as shown, and placed correctly into the spring jaws.<br />
! The <strong>winch</strong> must be mounted so that the loose sheet falls correctly into a<br />
secure stowage position. The position of the stripper arm can be adjusted<br />
to give correct sheet stripping.<br />
! There must be a minimum of three turns of rope on the drum.<br />
! Release the rope from the jaw set with care as LOAD will be present -<br />
ease the line away with care, then remove from the drum.<br />
! The jaws are designed to accept a range if rope diameters. The <strong>winch</strong><br />
should only be used with ropes of the sizes re<strong>com</strong>mended.<br />
LOAD<br />
Output Gear<br />
2 Speed/3 Speed Winches<br />
Adjusting Self Tailers<br />
Ocean Series W<strong>av</strong>espring (Sizes: 14, 16, 30, 40, 44, 48, 50, 54, 58, 64, 66)<br />
1. Remove top cap and feeder arm.<br />
2. Rotate stripper ring to required position, (it can be moved in 8 x 45°<br />
increments, with the <strong>winch</strong> bolted in place).<br />
3. Replace feeder arm and top cap.<br />
1 2<br />
3<br />
Rope Range<br />
14ST<br />
6 - 10 mm 1 /4” - 3 /8”<br />
16ST/30ST/40ST<br />
8 - 12 mm 5 /16” - 1 /2”<br />
44ST/48ST<br />
8 - 14 mm 5 /16” - 9 /16”<br />
50ST/54ST<br />
8 - 16 mm 5 /16” - 5 /8”<br />
58ST/64ST<br />
8 - 18 mm 5 /16” - 11 /16”<br />
66ST<br />
10 - 20 mm 3 /8” - 3 /4”<br />
Servicing Your Winch<br />
Your Lewmar <strong>winch</strong>es will give long and excellent service, with safety, if<br />
user instructions are followed and routine maintenance and cleaning are<br />
carried out.<br />
Owner Service: Please see our “How To Service Your Lewmar Winch”<br />
booklet (B2304). Available from <strong>your</strong> Lewmar dealer, distributor or local<br />
Lewmar office.<br />
Full Service Care: Please see our Service Manual Volume 8-Ocean<br />
Series (B2196). In case of difficulty, spare parts or for assistance please<br />
contact <strong>your</strong> nearest Lewmar office/ distributor worldwide.
WINDEN INSTALLATION UND WARTUNG<br />
Winden-Installation<br />
Um optimale Plazierung und Zuverlässigen und fehlerfreien Betrieb lhrer<br />
Winde zu errcichen empfehlen wir, wie folgt vorzugehen:<br />
1. Entfernen Sie die Windentrommel.<br />
2. Plazieren Sie die Windenbasis so, daß die Befestigungsbolzen die Winde<br />
optimal halten werden, (siehe Zeichnung).<br />
3. Markieren Sie die zu bohrenden Löcher.<br />
4. Entfernen Sie die Windenbasis wieder.<br />
5. Bohren Sie die angezeichneten Löcher.<br />
6. Bringen Sie Dichtungsmaterial auf der Unterseite der Windenbasis auf<br />
und achten Sie darauf, daß jeder Bolzen gut elngebettet ist. Beachten Sie<br />
jedoch, daß die Achsen und die Abflußlöcher frei bleiben.<br />
7. Montieren Sie die Windenbasis, und ziehen Sie die Bolzen gleichmäßig fest.<br />
8. Entfernen Sie überschüssige Dichtungsmasse.<br />
9. Montieren Sie die Windentrommel.<br />
10. Überprüfen Sie die einwandfreie Funktion der Winde.<br />
Vorsicht<br />
! Winden sind dazu konstruiert, hohe Lasten zu bewältgen. Diese wirken<br />
in Form großer Kraft auf die Winde, ohne daß Sie dieses bemerken.<br />
Enlasten Sie die Winde daher stets durch vorsichtiges Abnehmen einzeiner<br />
Windungen von der Trommel.<br />
! Lassen Sie immer mindestens drei Windungen Tau auf der Trommel,<br />
um sicheres Arbeiten der Winde zu garantieren.<br />
! Im Falle sehr großer Lasten erthöhen Sie die Anzahl der Tau-Windungen.<br />
Winden-Betrieb<br />
Stecken Sie die Windenkurbel in die Aufnahme oben in der Windenachse,<br />
und drehen Sie mit oder gegen den Uhrzeigersinn - der Anweisung lhrer<br />
speziellen Winde entsprechend.<br />
Lewmar Ocean Eingang-Selftailling-Winde (14ST , 16ST)<br />
! Drehen Sie die Kurbel gegen den Uhrzeigersinn zum Antrieb der Winde.<br />
! Drehen Sie die Kurbel im Uhrzeigersinn für Kurbelfreilauf.<br />
Lewmar Ocean Zweigang-Winden:<br />
! Drehen Sie die Kurbel im Uhrzeigersinn zum Antrieb der Winde im ersten<br />
Gang, Achtung: Bei Modell 43 und allen Selftailing-Winden gegen den<br />
Uhrzeigersinn für den ersten Gang (1. Gang = Schneller Gang).<br />
! Kurbel entgegengesetzt drehen zum Betrieb im zweiten Gang (2. Gang<br />
= langsamer Gang).<br />
Lewmar Ocean W<strong>av</strong>espring Selftailer<br />
! Hierzu ist es notwendig, daß es von der Trommel über Führungsarm in<br />
den Selftailer-Ring läuft. Bitte plazieren Sie das Tau richtig im Selftailer.<br />
! Die Winde soll so montiert sein, daß das Tau vom Selftailer-Mechanismus<br />
direkt in eine sichere Position an Deck befördert wird. Hierzu kann der<br />
Führungsarm des Selftailers so gedreht werden, daß das Tau direkt in die<br />
gewünschte Richtung von der Winde abläuft.<br />
! Es müssen mindestens drei Umdrehungen Tau auf der Windentrommel sein.<br />
! Nehmen Sie das Tau mit Vorsicht aus dem Selftaileres liegt LAST auf<br />
dem Tauwerk Geben Sie zunächst vorsichtig lose - und entfermen Sie erst<br />
dann die Umdrehungen von der Trommel.<br />
! Der Selftailer-Mechanismus ist für Tauwerk eines bestimmten<br />
Durchmesser-Bereiches konstruiert. Die Winde sollte nur mit den<br />
empfohlenen Tau-Durchmessern betrieben werden.<br />
LOAD<br />
Output Gear<br />
2 Speed/3 Speed Winches<br />
Einstellen des W<strong>av</strong>espring Selftailers<br />
Große (14, 16, 30, 40, 44, 48, 50, 54, 58, 64, 66)<br />
1. Entfemen Sie die Winderkappe und den Führungsarm.<br />
2. Drehen Sie den Führungsring in die gewünschte Position (er kann bei<br />
montierter Winde in 8 Positionen arretiert werden, je 45 Grad verdreht).<br />
3. Montieren Sie den Führungsarm und die Windenkappe wieder.<br />
1 2<br />
3 Tauwerkdurchmesser<br />
14ST<br />
6 - 10 mm 1 /4” - 3 /8”<br />
16ST/30ST/40ST<br />
8 - 12 mm 5 /16” - 1 /2”<br />
44ST/48ST<br />
8 - 14 mm 5 /16” - 9 /16”<br />
50ST/54ST<br />
8 - 16 mm 5 /16” - 5 /8”<br />
58ST/64ST<br />
8 - 18 mm 5 /16” - 11 /16”<br />
66ST<br />
10 - 20 mm 3 /8” - 3 /4”<br />
Winden-Wartung<br />
Ihre Lewmar-Winden werden lhnen larige Zeit und sehr zuverlässig<br />
ausgezeichnete Diénste leisten, wenn die Bedienungsanleitung befolgt<br />
und regeimäßige Wartung und Säuberung durchgeführt werden.<br />
Wartung durch den Besltzer: Bitte lesen Sie die Broshüre “Die Wartung<br />
ihrer Lewmar Winde” (B2304), die ihr Lewmar Händler, der zuständige<br />
Lewmar Generalvertreter oder das nächste Lewmar Büro für Sie bereithalten.<br />
Umfassende Service-Information: Bitte ziehen Sie das “Lewmar-<br />
Service-Handbuch Band 8, Ocean-Serie” (B2196) zu Rate. Im falle von<br />
Fragen oder bei Bedarf von Ersatzteilen sprechen Sie bitte den zuständigen<br />
Lewmar Generalvertreter oder das nächste Lewmar Büro.<br />
INSTALLATION ET REGLAGE VOTRE WINCH<br />
Installation du Winch<br />
Pour obtenir le meilleur boulonnage et ancrage du mécanisme, nous vous<br />
conseillons d’installer les <strong>winch</strong>es Lewmar de la façon suivante afin d’en<br />
optimiser la performance:<br />
1. Retirer la poupée<br />
2. Positionner la base du <strong>winch</strong> pour obtenir le meilleur support possible du<br />
boulonnage. (voir schéma)<br />
3. Marquer la position des trous des boulons.<br />
4. Retirer le <strong>winch</strong>.<br />
5. Percer les trous des boulons.<br />
6. Etaler du mastic sur la face inférieure de la base en s’assurant que chaque<br />
boulon soit enduit mais que les engrenages et les trous d’évacuation d’eau<br />
soient propres. Si le <strong>winch</strong> est monté sur une base en aluminium, on peut<br />
éventuellement utiliser du PVC pour assurer l’isolation.<br />
7. Positionner les <strong>winch</strong>es et les boulonner en serrant progressivement.<br />
8. Nettoyer l’excés de mastic.<br />
9. Remonter la poupée.<br />
10. Vérifier que le <strong>winch</strong> fonctionne correctement.<br />
Rappel Important!<br />
Les <strong>winch</strong>es sont conçus pour engendrer des charges très élevées qui<br />
sont conservées sous forme d’énergie non apparente. Il faut donc toujours,<br />
pour libérer la charge choquer les tours de cordage sur la poupée en<br />
faisant très attention.<br />
! Il faut toujours <strong>av</strong>oir 3 tours ou plus sur la poupée du <strong>winch</strong> pour assurer<br />
un maniement facile en toute sécurité.<br />
! Dans le cas de charges très élevées, il faut ajouter des tours pour plus<br />
de sécurité.<br />
Utilisation de Votre Winch<br />
Introduire la manivelle de <strong>winch</strong> dans son logement sur le haut de l’axe du<br />
<strong>winch</strong> et pour entraîner la poupée tourner dans le sens des aiguilles d’une<br />
montre ou dans le sens contraire des aiguilles d’une montre selon les<br />
instructions du <strong>winch</strong> que vous <strong>av</strong>ez acheté.<br />
Winch Self-Tailling 1 vitesse série Ocean (14ST, 16ST)<br />
! Tourner dans le sens contraire des aiguilles d’une montre pour<br />
entraîner la poupée.<br />
! Tourner dans le sens des aiguilles d’une montre pour utiliser le cliquet.<br />
Winches 2 vitesses série Ocean (16, 24, 30, 40)<br />
! Tourner dans le sens des aiguilles d’une montre pour entraîner la poupée<br />
en lère vitesse. Remarque: sur le modèle 43 et tous les <strong>winch</strong>s self-tailing<br />
à 2 vitesses. Tourner dans le sens contraire des aiguilles d’une montre<br />
pour la lère vitesse (Vitesse plus grande = Enroulement plus rapide).<br />
! Tourner la manivelle dans le sens contraire pour entraîner la poupée en<br />
2ème vitesse (Vitesse plus petite=Enroulement moins rapide):<br />
Self-Tailers W<strong>av</strong>espring de la Série Ocean<br />
! Le tour venant de la poupée doit passer sur le guide <strong>com</strong>me sur le<br />
schéma et fermement introduit placé tendu les mâchoires à ressort.<br />
Le cordage doit être pris correctement dans les mâchoires.<br />
! Le <strong>winch</strong> doit être installé de façon à ce que le pendant du cordage<br />
tombe correctement dans son rangement à l’endroit choisi. La position du<br />
guide peut être réglée de façcon à ce que l’écoute tombe en position correcte.<br />
! Il doit y <strong>av</strong>oir un minimum de 3 tours de cordages sur le tambour.<br />
! Retirer le cordage des mâchoires <strong>av</strong>ec précaution car il est EN CHARGE<br />
- choquer en faisant attention puis retirer les tours sur la poupée.<br />
! Les mâchoires sont conçues pour accepter plusieurs diamètres de cordages.<br />
Le <strong>winch</strong> ne doit être utilisé qu’<strong>av</strong>ec des cordages de tailles re<strong>com</strong>mendées.<br />
LOAD<br />
Output Gear<br />
2 Speed/3 Speed Winches<br />
Régalge du Guide D’enroulement<br />
W<strong>av</strong>espring de la Série Ocean (Tailles: 14, 16, 30, 40, 44, 48, 50, 54, 58, 64, 66)<br />
1. Retirer le chapeau et le guide d’enroulement.<br />
2. Tourner la bague d’enroulement dans la position requise, (elle peut prendre<br />
8 positions à intervalles de 45°, le <strong>winch</strong> étant boulonné en place).<br />
3. Remonter le guide d’enroulement et le chapeau.<br />
1 2<br />
Gamme de Cordages<br />
3<br />
14ST<br />
6 - 10 mm 1 / 4” - 3 / 8”<br />
16ST/30ST/40ST<br />
8 - 12 mm 5 / 16” - 1 / 2”<br />
44ST/48ST<br />
8 - 14 mm 5 / 16” - 9 / 16”<br />
50ST/54ST<br />
8 - 16 mm 5 / 16” - 5 / 8”<br />
58ST/64ST<br />
8 - 18 mm 5 / 16” - 11 / 16”<br />
66ST<br />
10 - 20 mm 3 / 8” - 3 / 4”<br />
Entretien des Winchs<br />
Les <strong>winch</strong>es Lewmar vous assureront un service excellent et durable, en<br />
toute sécurité, si les instructions d’utilisation sont respectées et si l’entretien<br />
et le nettoyage sont effectués régulièrement.<br />
Entretien par l’Utilisateur: Se reporter à notre notice “How to service<br />
<strong>your</strong> Lewmar Winch” ( Comment entretenir votre <strong>winch</strong> Lewmar B2304).<br />
Disponible chez votre concessionnaire, distributeur ou bureau local Lewmar.<br />
Révision Complète: Se reporter à notre “Service Manual Volume 8-<br />
Ocean Series” (Manuel d’Entretien No 8 Serie Ocean B2196). En cas de<br />
difficultés, pièces de rechange ou demande d’assistance, contacter votre<br />
bureau, distributeur Lewmar le plus proche n’importe où dans le monde.<br />
SALES OFFICES<br />
Lewmar UK/ROW<br />
Southmoor Lane, H<strong>av</strong>ant, Hampshire, PO9 1JJ, UK<br />
tel (+44) 23 92 485700 fax (+44) 23 92 485710<br />
e-mail info@uk.lewmar.<strong>com</strong><br />
Lewmar USA<br />
New Whitfield Street, Guilford, CT 06437, USA<br />
tel (+1) 203 458 6200 fax (+1) 203 453 5669<br />
e-mail info@usa.lewmar.<strong>com</strong><br />
Lewmar Mid Europe<br />
Branderweg 19, 8042 PD Zwolle, The Netherlands<br />
tel (+31) 38 427 34 90 fax (+31) 38 421 56 42<br />
e-mail info@holland.lewmar.<strong>com</strong><br />
Lewmar France<br />
Place Bernard Moitessier, 17000 La Rochelle, France<br />
tel (+33) 5 46 50 50 46 fax (+33) 5 46 50 59 04<br />
e-mail info@france.lewmar.<strong>com</strong><br />
Lewmar France (Cannes)<br />
Allée Charles Nungesser, Parc D'Activitiés de la Siagne<br />
06210 Mandelieu, France<br />
tel (+33) 4 93 48 80 48 fax (+33) 4 93 48 37 50<br />
e-mail info@france.lewmar.<strong>com</strong><br />
Lewmar Spain<br />
Joan de Borbó 92, 08039 Barcelona, Spain<br />
tel (+34) 93 221 94 37 fax (+34) 93 225 19 49<br />
e-mail info@spain.lewmar.<strong>com</strong><br />
Lewmar Northern Europe<br />
Hälleflundregatan 24, S-426 58, Västra Frölunda, Sweden<br />
tel (+46) 31 769 7700 fax (+46) 31 769 7710<br />
e-mail info@sweden.lewmar.<strong>com</strong><br />
Lewmar Finland<br />
Laaksotie 10 A-B, 02700 Kauniainen, Finland<br />
tel (+358) 9 5489 5110 fax (+358) 9 5489 5111<br />
e-mail info@finland.lewmar.<strong>com</strong><br />
HEAD OFFICE<br />
LEWMAR MARINE LIMITED<br />
Southmoor Lane, H<strong>av</strong>ant, Hampshire, PO9 1JJ, England<br />
tel (+44) 23 92 471841 fax (+44) 23 92 485720<br />
e-mail info@lewmar.<strong>com</strong><br />
website www.lewmar.<strong>com</strong><br />
© Copyright 2001 Lewmar Ltd. All rights reserved.<br />
B2189<br />
FITTING & ADJUSTING YOUR NEW WINCH<br />
WINDEN INSTALLATION UND WARTUNG<br />
INSTALLATION ET REGLAGE VOTRE WINCH<br />
INSTALACION Y AJUSTE SU WINCHE<br />
INSTALLATION & JUSTERING AV VINSCHEN<br />
Issue 4